
203 Plus - Talkie Walkie MIDLAND - Free user manual and instructions
Find the device manual for free 203 Plus MIDLAND in PDF.
| Product type | Multistandard CB transceiver (walkie-talkie) |
| Brand | Midland |
| Model | 203 Plus |
| Dimensions (L x H x P) | 124 x 38 x 190 mm |
| Weight | 1.2 kg |
| Power supply | 12.6 V DC ±10% (via cigarette lighter cord) |
| Power consumption | FM: 1.3 A; AM: 1.8 A |
| Frequency range | 26.565 - 27.99125 MHz (depending on band) |
| Output power | 4 W max (AM/FM) |
| Modulation | AM and FM |
| Number of channels | Up to 80 channels depending on selected band |
| Main features | Channel selector, squelch control, AM/FM switch, EN/EC switch (English/European band), priority channels 9/19, microphone with PTT button, external speaker, RX/TX LED indicator |
| Band selection | 8 bands: IT, EU, PL, D3, D4, UK (EN/EC), EC, I2 |
| Antenna type | PL connector, 50 ohm impedance, recommended: quarter-wave antenna 2.5 m |
| Squelch | Adjustable from 1.2 μV to 1 mV, automatic compensation for random variations |
| Receiver sensitivity | Better than 1 μV for 20 dB SINAD |
| Selectivity | 60 dB at 10 kHz; 70 dB at 20 kHz |
| Maintenance and cleaning | Clean with a soft, dry cloth. Avoid solvents. Periodically check antenna cable and SWR. |
| Safety | Never transmit without an antenna connected. Turn off the device before any manipulation. Use a suitable antenna and good grounding. |
| Spare parts and repairability | Contact Midland after-sales service or an authorized dealer. Visit www.midlandradio.eu for warranty information. |
| General information | Compliant with directive 1999/5/EC. Usage restrictions in Italy: in AM modulation, use an antenna with gain ≤ -6 dB. Manual available in multiple languages. |
Frequently Asked Questions - 203 Plus MIDLAND
User questions about 203 Plus MIDLAND
0 question about this device. Answer the ones you know or ask your own.
Ask a new question about this device
Download the instructions for your Talkie Walkie in PDF format for free! Find your manual 203 Plus - MIDLAND and take your electronic device back in hand. On this page are published all the documents necessary for the use of your device. 203 Plus by MIDLAND.
USER MANUAL 203 Plus MIDLAND
It t i 102 - note 49G, the standard in AM modulation needs a radiating system with a gain not higher than -6dB, such as, for example, with the antenna PC8" with original cable.
D4 (d4): 80CH. CH1 - CH40 26.965MHz - 27.405 MHz 4W AM/ FM
CH41-CH8026.565MHz-26.955MHz4WFM
UK (UH): 40CH 27.60125MHz - 27.99125MHz (EN) FM 4W
40CH 26.965MHz - 27.405MHz (EC) FM 4W
EC (EC): 40CH 26.965MHz - 27.405MHz FM 4W
12 (i2): 34CH 26.875MHz - 27.205MHz AM/FM 4W
Procedimento:
Midland 203 Plus is the brand new Multi Standard CB transceiver, essential in its functionalities but with advanced performances:
Phase Locked Loop circuitry gives precise frequency control and stability over all channels (pinpoint channel tuning accuracy with separate scan up and down controls); the ceramic filters give superior selectivity and freedom from adjacent channel interference.
Midland 203 Plus is supplied with a microphone, mounting bracket and power supply cable.
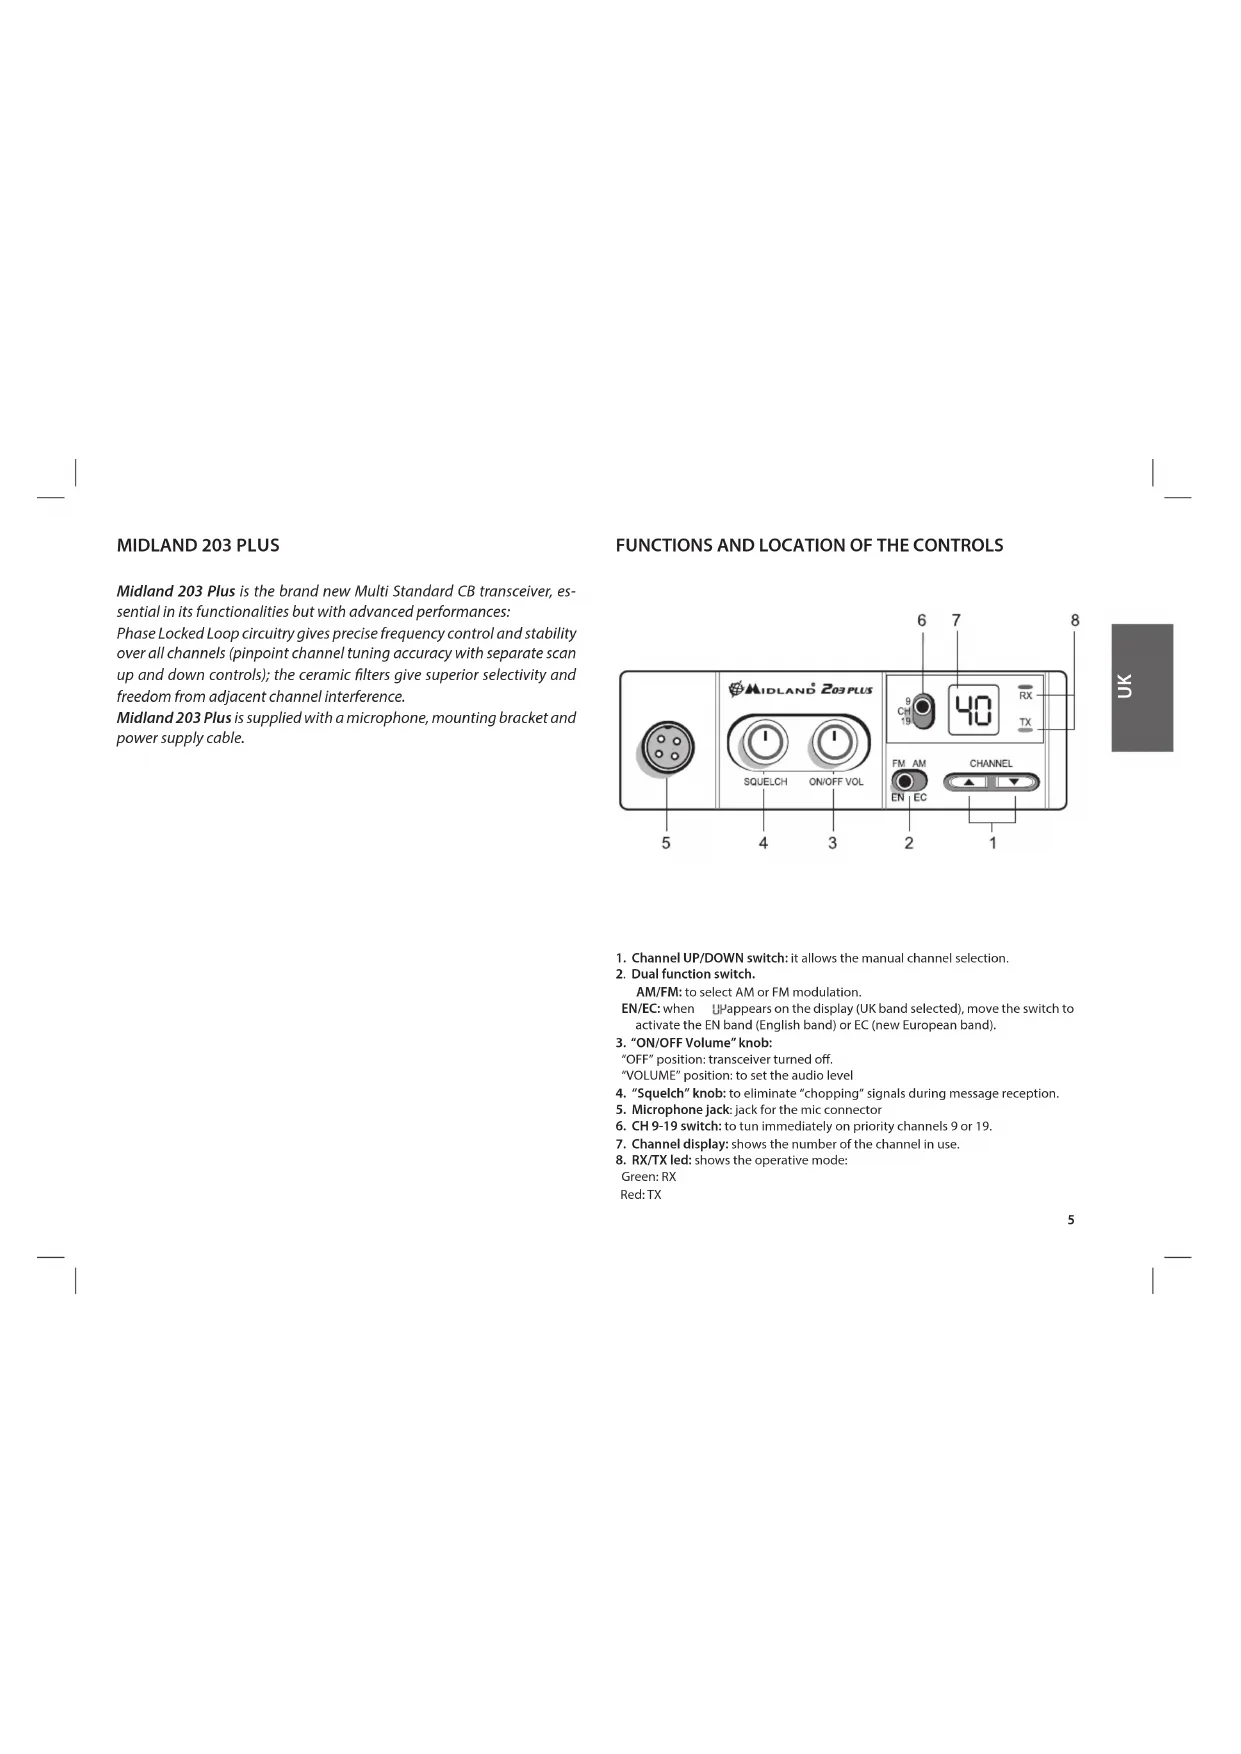
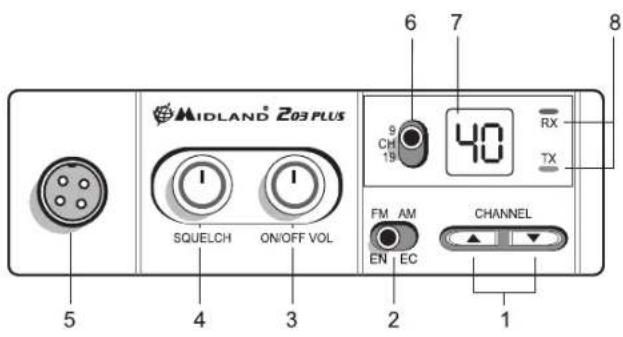
FUNCTIONS AND LOCATION OF THE CONTROLS
-
Channel UP/DOWN switch: it allows the manual channel selection.
-
Dual function switch.
AM/FM: to select AM or FM modulation.
EN/EC: when U appears on the display (UK band selected), move the switch to activate the EN band (English band) or EC (new European band).
- "ON/OFF Volume" knob:
"OFF" position: transceiver turned off.
"VOLUME" position: to set the audio level - "Squelch" knob: to eliminate "chopping" signals during message reception.
- Microphone jack: jack for the mic connector
- CH 9-19 switch: to tun immediately on priority channels 9 or 19.
- Channel display: shows the number of the channel in use.
- RX/TX led: shows the operative mode
Green: BX
Red: TX
REAR PANEL
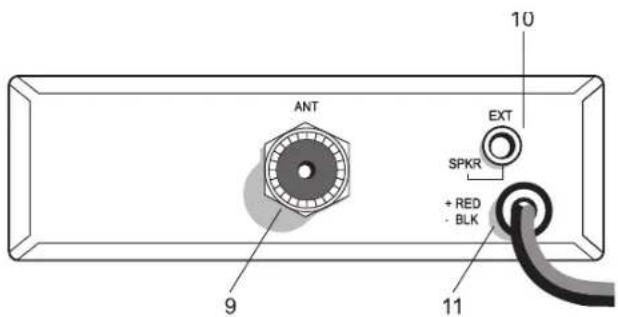
- Antenna connector: PL connector type
- EXT SPKR Jack: external loudspeaker jack.(the internal loudspeaker will be excluded)
- Power supply cable: power 12,6V DC
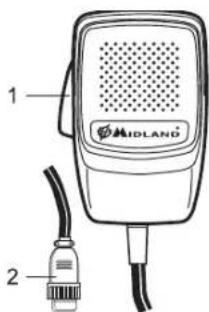
MICROPHONE
- PTT: transmission button
- 4 pin microphone connector
INSTALLATION
An extremely important requirement is the ease of installation and removal for those occasions when you might want to remove the unit for service and maintenance.
The most common mounting position for a transceiver is under the dashboard directly over the drive shaft hump. Do not mount the transceiver in the path of the heater or air conditioning.
Take your time and plan your installation carefully. When you have determined the best location for mounting, use the mounting bracket as a template to mark mounting holes. Take care when you drill the holes that you do not drill into wiring, trim or other accessories.
Mount in position with bolts, lock washers and nuts or self-threading screws. Insert the power cable with lighter plug into the vehicle's cigarette lighter cord. Before operating, you must install and connect your antenna system. The lead from the antenna you've installed should be connected to the antenna coaxial connector. If you are using an external speaker, connect it to the EXT-SPKR jack.
INSTALLING AN ANTENNA
A mobile antenna system is not limited to the antenna only. The transmission line, as well as the vehicle, are important factors in the total antenna system. Therefore, you must use the correct type of transmission line and mount the antenna securely in a position that will give you optimal results.
Use coaxial cable with an impedance of 50 Ohms. Generally speaking, you should keep the length of the transmission line to a minimum.
The above discussion is as important for reception as it is for the transmission. If a mismatch exists between the antenna and the receiver, the excellent sensitivity and signal-to-noise radio of the receiver circuit will be defeated.
Useful information
- Place the antenna as high as possible
- The longer the antenna is, the better will be the performance
- Mount the antenna and keep antenna cable away from noise sources, such as the ignition switch, gauges, etc.
- Make sure you have a solid metal-to-metal ground connection.
- Prevent cable damage during antenna installation.
There are many types of mobile CB antennas: a full quarter-wave length whip, a center loaded whip, top loaded whip and the base loaded type. For a greater efficiency it is recommended 2.5m long, full quarter-wave whip. Antenna length is directly related to efficiency.
A vertically polarized whip antenna is best suited for mobile service. It is omni-directional. Roof mount is the best ever as in this position the antenna radiates equally in all directions.
WARNING: To avoid damage, never operate your CB radio without connecting a proper antenna. A periodical control of the cable and of the S.W.R. is recommended.
HOW TO OPERATE YOUR MIDLAND 203 PLUS
After have installed and cabled your CB transceiver, follow these steps to operate with your device:
- Screw the microphone plug into the microphone jack and check that the unit is properly connected
- Make sure your antenna is connected to the antenna connector.
- Make sure the SQUELCH control is turned fully counter clockwise.
- Select AM or FM mode. The EN/EC switch operates depending on the frequency band selected. In case you selected UH, you can switch from 40CH EN to 40CH EC. In case you selected EC or I2, this switch is not operative.
- Turn on the unit and select the frequency band to use
- Adjust the volume to a suitable listening level
- Select your desired channel.
- Adjust Squelch to cut out annoying background noise when no signal is being received.
- To transmit, press the PTT button and speak in a normal tone of voice.
- To receive, release the PTT button.
The frequency bands must be chosen according to the country where you are going to operate.
Your Midland 203 Plus can be set on 8 different frequency bands:
IT(it): 40CH 26.965 MHz - 27.405 MHz 4W AM/FM
EU(EU): 40CH 26.965 MHz - 27.405 MHz 1W AM/4W FM
PL(PL): 40CH 26,960 MHz - 27,400 MHz 4W AM/EM
D3(d3): 80CH from CH1 to CH40 26.965MHz - 27.405 MHz 1W AM/4W FM from CH41 to CH80 26.565MHz - 26.955 MHz 4W FM
D4 (d4): 80CH. CH1 - CH40 26.965MHz - 27.405 MHz 4W AM/ FM
CH41-CH8026.565MHz-26.955MHz4WFM
UK (U): 40CH 27.60125MHz - 27.99125MHz (EN) FM 4W
40CH 26.965MHz - 27.405MHz (EC) FM 4W
EC (EC): 40CH 26.965MHz - 27.405MHz FM 4W
12 (i2): 34CH 26.875MHz - 27.205MHz AM/FM 4W
Procedure:
- Switch off the unit.
- Turn the device on and contemporary keep pressed the UP/DOWN buttons.
- Select the desired frequency band by pushing the UP/DOWN buttons
- To confirm the selection, press the PTT button or wait for 5 seconds.
Note: Once have set the frequency band, every time you turn on the radio, the display will show for 1 second the frequency band in use. To change the frequency band, follow the steps upon described.
SQUELCH
The Squelch function cuts out annoying background noise when no signal is being received.
To do this, set the Channel Selector to a channel where no signals are present or wait until signals cease on your channel. Then, rotate the Squelch control in a clockwise direction to the point where the background noise just stops. Now, when a signal is present, you will hear it, but will not be disturbed by noise on the channel between signals.
When properly set, the Squelch keeps the receiver "dead" until a signal comes in on that channel. However, do not set the Squelch too high, otherwise weak signals will not be able to open the Squelch circuit. To receive very weak signals, it is better to leave Squelch set to the minimum position by rotating the control maximum counterclockwise.
EMERGENCY CHANNELS (CH 9-19)
Midland 203 Plus is equipped with a switch that allows to be immediately set on the Priority cannels 9 and 19.
CH 9 is for Emergency communications, while CH 19 is used for asking road condition information.
The centre position of the switch is for tuning on the latest selected channel.
A 4 Ohm speaker, rated at 3-10 watts, should be used for this function. Plug the speaker into the EXT SPKR jack at the rear of the transceiver. When the external speaker is plugged in, the internal speaker is disconnected.
TECHNICAL SPECIFICATIONS
RECEIVER
Frequency coverage" from 26.565 to 27.99125 MHz
Sensitivity... better than 1.0 V for 20 dB SINAD
Adjacent Channel Rejection .. .60 dB at 10 kHz; 70 dB for 20 KHz
Intermediate Frequency .. .1st IF=10.7 MHz; 2nd IF=455 KHz
Audio Output power.. .4 watts max
Frequency Response (-6dB) .. .6 dB; 450-2500 Hz
Squelch ... adjustable from 1.2 μV to 1mV
TRASMITTER
Frequency coverage...from 26.565 to 27.99125 MHz
Duty cycle...5/5/90
Output Power...1/4 W
Type of modulation...AM/FM
Max Deviation...2.0 KHz FM; 80% AM
Spurious Radiation...62 dB or better
Frequency Tolerance...0.002%
Power supply...12,6 Vdc ±10%
Current Drain...FM: 1.3 A; AM: 1.8 A
Dimensions...124x38x190 mm
Weight...1.2 kg
All specifications are subject to change without notice.
- (covering all approved EU frequency bands)
A readily accessible disconnect device shall be incorporated in the installation wiring. The disconnect device shall disconnect both poles simultaneously.
Hereby, CTE International declares that this Midland 203 Plus is in compliance with the essential requirements and other relevant provisions of Directive 1999/5/EC.
MIDLAND 203 PLUS
40CH 26.965MHz - 27.405MHz (EC) FM 4W
EC(EC):40CH26.965MHz-27.405MHz FM 4W
12 (i2): 34CH 26.875MHz - 27.205MHz AM/FM 4W
Procedimento:
EU(EU):40CH 26,965 MHz -27,405 MHz 1W AM/4 W FM
PL(PL): 40CH 26.960 MHz - 27.400 MHz 4W AM/FM
D3(d3): 80CH do CH1 para CH40:
26.965MHz - 27.405 MHz 1W AM/4W FM
do CH41 para CH80 26.565MHz - 26.955 MHz 4W FM
D4(d4):80CH.CH1-CH4026.965MHz-27.405MHz4WAM/ FM
CH41-CH8026.565MHz-26.955MHz4W FM
UK (UH): 40CH 27.60125MHz - 27.99125MHz (EN) FM 4W
40CH 26.965MHz - 27.405MHz (EC) FM 4W
EC (EC): 40CH 26.965MHz - 27.405MHz FM 4W
12 (i2): 34CH 26.875MHz - 27.205MHz AM/FM 4W
Procedimento:
CANAIS DA EMERGÊNCIA (CH 9-19)
26.965MHz - 27.405 MHz 1W AM/4W FM
an6CH41EwCCH80:26.565MHz-26.955MHz4W FM
D4 (d4): 80CH. CH1 - CH40 26.965MHz - 27.405 MHz 4W AM/ FM
CH41-CH8026.565MHz-26.955MHz4WFM
UK (UH) 40CH 27,60125MHz - 27,99125MHz (EN) FM 4W
40CH 26,965MHz - 27,405MHz (EC) FM 4W
EC (EC): 40CH 26.965MHz - 27.405MHz FM 4W
12 (i2): 34CH 26.875MHz - 27.205MHz AM/FM 4W
Aiaδikασια:
- KlaeioTe Tn OoKEuJ.
- Everpyonoiote Tn ouakeun kai ouyxpovuc kpatnoe natnueva ta nktpa IANQ/KATΩ.
- EmIeTe TnV emOuntn mnuTAt ouxvotntac Pe Ta nnKtpa NANQ/KATQ
- Ia eipbetaalwo, nioe to nAiktpo PTT n npieveTe 5 eutepeenta
Jnueiwo; Mlc Bcete Tnu mavra uovvtntac, kae qopa nou 0e evpytoie Te oukeun, 0a tneikovictaie 1a deutepoItno n ouvvtnta OE xon. Ia aalayn tnc ouvovrtacakaoolnothe npanaidw bijmuata.
SQUELCH
HlambdaoupyiaSquelch anokontiou,0pouoc unoepou otav lauavetai orma.
Tia va to evpyoioe, 0eTo vEniloaya Kavaiou ae kavai Onou dev npaxouov onjata n peiueve To nauouv ta onata oTo kavai aac. Enerita, nepiotpey To nktpo Tou Squelch deIoOtropa OTo anelooOnou oOpucoc uObaopou otaata. Tupa, atav napouoiCetai onja, 0a To aokuoote, aAldev Btaiatapaootai anoBpOBo meTuOnatow.
'otavteeiawota, to Squelch kpataei tov nojnoidektnvekoepo'expi va eupaviote ona oto kavala. OTOdoo, un Detete to Squelch noloo uynla, e6dllwoc auvua onata dev 8o ma npouov avoloov to Squelch. Ia va laupaivee aduvua onata, evia kalutepo via apyveteto Squelch otny mikpotepn thontpevovtac to NALKTOPE TEELUC apioteopootopa.
KANAA EKTAKTHANAPKHCH9-19
To Midland 203 Plus eliv eonaiqevo me diaokntn nou emtpenei tvy aoeon metaon ota kavalia npotepaiaotac 9 kal 19.
To CH 9 elvai yia eikioivwiec ektaKTnc avayknc, evw to CH 19 xpnaiomoiitrai yia evnepwn tnc odkcn kataoana.
H kevtpiKt ean tou diakottn iiva ia to ouvtoviao twy teevataiw emileyeouvuv kavaiw.
THAEIXI2MOSEMAQNOY
Tia auth tIaetoupyla, a npenei va xpaiaoionei meyapawvo 4 Ohm, ota 3-10 watts. Uuvseot e to meyapawto otnu odooyxn EXT SPKR OTN iio wepia tou nonnoekntMolAc to tonoBteetae, to eouetepko myapawvo anooovseetal.
TEXNIKA XAPAKTHPISTIKA
EKTH
Euieia ouvotntac* ano 26.565 ec 27.99125 MHz
Euaogia . kaotepn ano 1.0 uvi a 20 dB SINAD
Anoppu knavaiv.. 60 dB ota 10 kHz; 70 dB yia 20 KHz
Eviaeouxuvotna .. 1n IF=10.7 MHz; 2n IF=455 KHz
Aakoutikoiuc eio8ou. 4 watts max
Anokpion ouvotntac (-dB) .. .6 dB: 450-2500 Hz
Squelch . pvOuiOcOevo ano 1.2 uV ec 1mV
NOMNOS
UK (UH): 40CH 27.60125MHz - 27.99125MHz (EN) FM 4W
40CH 26.965MHz - 27.405MHz (EC) FM 4W
EC (EC): 40CH 26.965MHz - 27.405MHz FM 4W
12 (i2): 34CH 26.875MHz - 27.205MHz AM/FM 4W
Procedure:
UK 40CH 27.60125MHz - 27.99125MHz (EN) FM 4W
40CH 26.965MHz - 27.405MHz (EC) FM 4W
EC (EC): 40CH 26.965MHz - 27.405MHz FM 4W
12 (i2): 34CH 26.875MHz - 27.205MHz AM/FM 4W
Procedura wyboru
He MoHTpye TaiaOCTaHcU B 30He npMOrO DeIcTBnKoHdIaHOpe pnn 6ObrpeBaTeTaN
Korda Bbl onpepeinte ONTINMANSHoe MeTO JN yCTAHOBKN paADIOCTAHUN, INCNOB3yTe cKOBY BA KCAETE TPAAPeTA JN PAaMeTKN MOHTAXHBXb OTBepCTN. BBydtbe BHIMATELbHpi npoCpeBPVAHAN OTBepCTN, YDOCTOBEPTECB TOM, 4TO BHI e 3aDeBaete 3JNEKTPOPiPBOOky ABTOMOBH.N. PocpIcTBOM MOHTAkhBXb BINTOB, WIA6 N Camope3OB 3aKpenITE pAOCTAHUIO B bIBOPAHYIO NO3uHIO. POCoEOHNITe NTNIAtouHn pOBOD paADIOCTAHUN K AKKymJIrTOpy INI pInkpyPABATEHIO ABTOMOBH.
Peped hahanomcnnohobarHnpaHIOCTAHmne HEO6XoNDMO yctAHOBNTb aHTEHNO CTcEMy. Kaebn aHTEHbIeHO6XoNDMO nOdkNIOHTb K PAIOCTAHmN uepe3 COOTBCTBYoum pa3bEM.
EcnBbXOTNENCNOb3ObaT BHeuHmDnHaMnK, NOaKnIOHTe erO K paAnocTaHmUpeezpa3bemEXTSPKR
AHTEHHAR CNTCTEMA
Icnonb3yTe aHTeHbToIbKO dHaN3oHa 27 Mf. ABytOMobnBHaAHTEHAA CNTEMA He ORpaHmHea TOnbKO cAmOi aHTehHOJ. JINHHnepeDau (Ka6enb) HApdy C CamM ABTOMOBnEM RnIOTC He MeHee BaxHBIM CoCTABHBM qactAMn aHTehHOB CTCTEB.
Длг польчений нальчero pe3ynbTa Ta Bы дожньи habжно установп вантугув ВОТПМАНБОМ Мосте Ha ABTOMOUNE.ИСонызг КОАКСАнБИй Kавел c coportnoBIMeHMe 50On.ЕрКOMeHnye TmN kавena -RG58/U.CnEDyET OБсeнeвTN Mннмалыну HNYKABeJI, HOcE nAHTHNeY YKOMPNeTkoTBAH uTATbHbIM Ka6eIem TO HeDOnTyCTMHO N3MeHryTb erO DInHy.
POMHNTe,TOaHTeHHbI npakTneckn Bcex MoJeNe IMeIoN Tpe6yIOt HAcTPOky!!!
YCTAHOBKA ABTOMOJIbHOI AHTEHHBI
HeckoIbKO npOCTbIX npaBnI, KOtOpBIE NOMOTy BAM yCTaHOBnTb ABTOMO6uNbHyIO aHTeHHy npaBnIbHo:
1.He yctaHaBnBaIte aHTeHHy Ha kpaIO KpOpyCa ABTomo6nla!
2.Bo BpempaobtbaAHTeHa DoxHb 6bItb DOCTaOHTHO XeCTKO C TEM,TO6bI coXpaHbBepTnKaJIbHOE NIOJKeHHe BO BpEM DaNKeHn ABTOMO6uHn.
3.YCTAHOBNTe aHTEHNY KAK MOXHO daJIbIe OT NCTOCHKO BOMEX (CCTema 3aKINrAHHN T.D.) IN POKJIaDbIaBIIte Ka6eB BDAJIOT NTMX NCTOCHKOIB.
4.ДиаHTHbI,BMOTNPOBAnHOBIN B KOPnyc,Tr6yETcH NaTeJxHmKoHTaKT C KOPnyCOM ABTOMObUNy.Y6eDntecb,yTo paNDocTAnuTnA TaKke IMeET KOHTaKT C KOPNYCOM.
Cyuetsbyet Heckolbko TINOB ATOMO6IbnbHix CB aHTENH. Han6Oonee NoxdoJhreA bYrTeCnTbIpeBa aHTENHa BepTNaKbH oNIOJIpR3aUIn, KOtopa HMeET KPYTOBYO DNarPAMMy HAnpaBJIHNHOCTOn.
UK (U): 40CH 27.60125 MfU - 27.99125 MfU (EN) FM 4W
40CH 26.965 MΓu - 27.405 MΓu (EC) FM 4W
EC (EC): 40CH 26.965 MfU - 27.405 MfU FM 4W
12 (12): 34CH 26.875 Mfμ - 27.205 Mfμ AM/FM 4W
JYCTAHOBKN Dnana3OHa YACTOT:
- BbIKIOHTpe paNIOCTAHUIO;
2.При ВКЮЧЕНИМ радиоctанцIM OДнOBРЕмEH NOHAЖМITE KHNKII «UP» I DOWN?
3.CnmoouKHOIOKUPNINDOWNBb6epHTeHeo6xOIMMbINnana3OH qactOT;
4.ДЯЗавершенипpoцурblнжмite KhoIGNKу «PTT» ninn noDoxnTe 5 cekyHd.
PnB BkUoyehnn PdAmoCTaHmnn Ha DmCInnee Ha 1 CekyHy OTo6paTcTa BB6pAnbHH duana3oh nactOT. Ia CmEnb DmAna3OHa cactOT cnedyIte BBweOeONcAHHO npoeDye.
IPNOPUTETHbIEKAHAJIbl
Padnoctaunin Midland 203 Plus Ocaunea nepekehnaeJeHem, noBIOuHcuaom onepanBaHTOnb padnoctaunin Ha npnpoNTte HauKahJI 9D and 19D:
9 KaHaI - aBapuHbI KaHaI;
19 kaHaH- HhOpMaunr O DopOxHbIX ycNoBnX;
N03MIIIE NPEKNIPOATAEI CH)-PEKIM PA6OHTI PAIAOCTAHNI,PIN KOTOPOM B03MOKEN Bb6Op IIOBOF KOHANA YCTAOHBNNHORO DuaaONaOH aACTOT.
YCTAHOBKA BHEUHEI OINHAMNKA
B KaueCTBe BHeUHrero DnHAMmKa MoKeT 6bIt NcNoIb3ObaH dINHAMNK, MEmIoUmN conpoTnBHeHne 4 Om n pacCHTaHHn Ha moUHOct b Do 10 BaTT.
BCTaBBTe ⅢTKepe DNHaMMKa B pa3beM «EXT SPKR» Ha 3aHHei NaHEni padnoctaHm.
BHHMAHNE!Pn PNOKIOUeHIN BHeuHero DnHAMMKA BHTyPTEHNI DnHAMMK OTKIOAeTCA.TenePB b6yTepeNpocJyWnBaTB BcBXOJaueNC CnHAnbIpe3 BHEUIN DnHAMK.
TEXHNUECKNEXAPAKTEPNUCTNKU
OBUHNE:
Yactotbl .26.565do 27.99125M
Pabouuun (1 5ac) TX 5%, RX 5%, stand-by 90%
Питанne... 12,6Впocт.ТOKа +/- 10%
T6apntb1 124x38x190 MM
Bec. 1.2 Kr
ПИЕМΗΝΚ:
CByBCTBnTeIbHOCtB. nyuue yem 1,0 mKb npn 20 dB SINAD
Iopabnne no6oohk KaHaoB 60
Ppomexytohhe yactotbl. 1N4:10,7MgI IIT455K
BbIXoHna ayDnMoUHocTb .MaKc 4BT
NEPEDATUK:
BbIXoHnHa MoUHocTb. 1Btnn4BT
(B 3aBnCmOCTN OT BbI6paHHORO dHaNa3oHa qACTOT)
Modynua AM/FM
Makc.deBnaucn 1.8Kf FM;95%AM
ypoBHeNo60HbIX N3nyueHn He xyx6 6D
DonyctHMoe OTKIOHeHne YAcToT. 0.002%
IIOTepeJIeHHe ToKa FM (4Bt): 1.3 A; AM: 1.8A
TexHueckn XapaKTeepntkMOrTy N3MeHrTbCn IpOn3BOnTeNem 6e3
npedapntbHoro ybeDomneHn.
PpOa3BeDcHo uHmMnOpTupoBaHO:
CTE INTEpHneHN c.p.n. -yn.P.Cebapn7-42124 MaHKacanb,PeKno 3MmNna,ITann
MmnpTepePocnn-3AOAAnh-CBra3b
VHTepHcT caT:www.midland.ru
Adec:MockBa,105187,OpTyHaTOBcka31A,ctp.2
Hacmoaum CTE International zazaem, ymo daanbu npodym cooemaemy mepebouhun Bupekmeu EC 1999/5/EC.

Produced or imported by:
CTE INTERNATIONAL s.r.l.
Via.R.Sevardi 7 42124 Mancasale Reggio Emilia Italy
Importado por:
ALAN COMMUNICATIONS, SA
Unit 1 Fitzerbert Spur Farlington Portsmouth Hants. PO6 1TT
United Kingdom
www.nevada.co.uk
The use of this transceiver can be subject to national restrictions.
Read the instructions carefully before installation and use.
Vertrieb durch:
ALAN ELECTRONICS GmbH
VHTEPHER CAIT:www.midland.ru
NcnoB0aHHe daHHo paHOCTaHUM MOxET 6b1b 06beKToH aHMOHaIbHbX OrpaHueHH.
BHHMaTeJIbHO npOHTaTE pykoBOcTBo NOnb3oBaTeI, npEckde HcH NOnb3oBaTbcR
PdAnOCTAHUNH.
For information about the warranty please visit www.midlandradio.eu
-
Für allen Informationen über die Garantie der Antikel, besuchen sieitte unsere www.mldlandradio.eu
-
Para mayor información sobre la garantía, visite la web www.mldland.es

- Procedimento:
- FUNCTIONS AND LOCATION OF THE CONTROLS
- REAR PANEL
- MICROPHONE
- INSTALLATION
- INSTALLING AN ANTENNA
- Useful information
- HOW TO OPERATE YOUR MIDLAND 203 PLUS
- Procedure:
- SQUELCH
- EMERGENCY CHANNELS (CH 9-19)
- TECHNICAL SPECIFICATIONS
- RECEIVER
- TRASMITTER
- MIDLAND 203 PLUS
- CANAIS DA EMERGÊNCIA (CH 9-19)
- Aiaδikασια:
- KANAA EKTAKTHANAPKHCH9-19
- THAEIXI2MOSEMAQNOY
- TEXNIKA XAPAKTHPISTIKA
- EKTH
- NOMNOS
- AHTEHHAR CNTCTEMA
- YCTAHOBKA ABTOMOJIbHOI AHTEHHBI
- IPNOPUTETHbIEKAHAJIbl
- YCTAHOBKA BHEUHEI OINHAMNKA
- TEXHNUECKNEXAPAKTEPNUCTNKU
- OBUHNE:
- ПИЕМΗΝΚ:
- NEPEDATUK:
Brand : MIDLAND
Model : 203 Plus
Category : Talkie Walkie