35020063 - Smart Home Niko - Free user manual and instructions
Find the device manual for free 35020063 Niko in PDF.
| Product type | 360° presence detector with 1-10 V control |
| Brand | Niko |
| Model | 35020063 |
| Category | Smart home |
| Dimensions (H x W) | 59 x 127 mm |
| Power supply | 230 Vac ±10%, 50 Hz |
| Standby power consumption | 0.2 W (without lighting ballasts) |
| Relay contact | NO (max. 10 A), sensitive to light and movement |
| Control output | 1-10 V / max. 10 mA |
| Light sensitivity range | 50 - 1500 lux |
| Disconnection delay | 1 - 60 min |
| Orientation light level | 5 - 100% |
| Mounting height | 2.5 - 4 m |
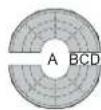
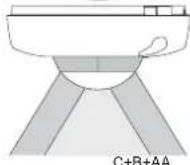
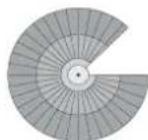
| Detection range | Circular, 3 - 20 m |
| Detection technology | Passive infrared (PIR) |
| Settings | By potentiometers or IR remote control (not supplied) |
| Protection | IP20 |
| Protection class | Class I |
| Ambient temperature | -5 to +50 °C |
| Maintenance | Clean the lens with a damp cloth and mild detergent, without pressure |
| Safety | Installation by qualified installer, with power off, in compliance with applicable standards |
| Accessories | IR remote control (350-20064, optional) |
| Warranty | 4 years from delivery date |
| Technical support | Belgium: +32 3 778 90 80, France: +33 820 20 66 25 |
Frequently Asked Questions - 35020063 Niko
User questions about 35020063 Niko
0 question about this device. Answer the ones you know or ask your own.
Ask a new question about this device
Download the instructions for your Smart Home in PDF format for free! Find your manual 35020063 - Niko and take your electronic device back in hand. On this page are published all the documents necessary for the use of your device. 35020063 by Niko.
USER MANUAL 35020063 Niko
10. WAARSCHUWINGEN VOOR INSTALLATIE
Read the complete manual before carrying out the installation and activating the system. Keep the manual for future reference.
1.DESCRIPTION
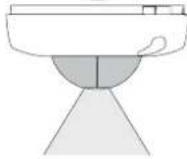
The 360^ presence detector (1 - 10V) consists of an integral unit with control of one 1 - 10V output, a motion sensor (PIR or passive infrared technology), a light sensor and an integrated IR receiver. All external units, such as push buttons and lighting fixtures, are directly connected to the presence detector, which is mounted directly on the ceiling.
The presence detector can be installed and operated on the basis of the factory settings. For optimal lighting control, it is recommended to adjust the factory settings to the environmental conditions and to the specific lighting requirements. The settings can be adjusted using the IR remote control (not included) (350-20064).
2. INSTALLATION
2.1. Connection
Danger: Disconnect all power before installing the presence detector. Do not connect the device to the mains voltage until installation has been completed.
Refer to the wiring diagram (fig. 1) and the basic circuit diagram (fig. 2).
2.2. Mounting
Tip: Do not install the presence detector in direct sunlight or in the vicinity of heat sources (radiators) or air currents (ventilation or air conditioning) (fig. 3). This can activate the sensor unnecessarily.
- a. For direct mounting on the ceiling (fig. 4A), use the holes with a centre distance of 105mm . The cable inlet must be rotated 45^ with respect to the mounting holes.
b. For mounting in a flush-mounting box (fig. 4B), use the holes provided with a centre distance of 60mm with which you push open the protection cap. Carefully install the cable following the instructions for a permanent installation.
- Push the sensor onto the terminal strip on the base and tighten the screw (fig. 5).
- Set the presence detector (fig. 6) and test the device (see sections 4.1, and 4.2).
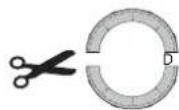
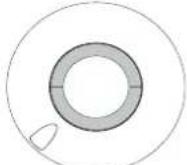
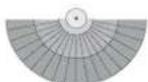
- Reduce the detection area, if necessary (fig. 7).
- Install the protection cap (fig. 5).
3. SETTINGS
3.1. Factory settings
At delivery the parameters of the presence detector are set as follows:
| Parameter Factory setting | |
| application manual | |
| light sensitivity 300 lux | |
| hysteresis on light sensitivity 20% | |
| light level of the orientation lighting 5% | |
| switch-off delay 10 min | |
| switch-off delay of the orientation lighting 1 min | |
| lux value and switch-off delay setting via IR remote control | |
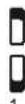
3.2. DIP switches
Figure 6 shows how to set the DIP switches according to their application.
| DIP switch | Application |
| 1 | You select this to set the lux value (LUX) and the switch-off delay (TIME) via the potentiometers or the IR remote control. |
| 2 | Not applicable. |
| 3 and 4 | You set the sensitivity of the motion sensor: minimum, low, high or maximum. |
3.3. Indication LEDs
| Mode of operation | Meaning |
| The red indication LED is flashing. | The presence detector detects presence in test mode. |
| The green indication LED is flashing. The push button | or the IR remote control is activated. When you press a button on the IR remote control while the sensor is not locked, and the green indication LED is not flashing, it means the sensor has already reached its minimum or maximum settings. |
| The blue indication LED is illuminated. | The test mode has been selected. |
| The blue indication LED is flashing. While you are setting the light sensitivity, this indicates overlighting. | |
4. IR REMOTE CONTROL
With the IR remote control (fig. 8), you can switch on or off and dim the lighting, select another application,
perform a test or enter other parameters.
4.1. Function buttons
| Button | Function |
| On | You switch the lighting on. The lighting remains switched on as long as there is activity and the switch-off delay is activated. |
| Off | You switch the lighting off. The lighting remains switched off as long as there is activity and the switch-off delay is activated. |
| Open | Press this button to brighten the lighting. If you press this button again, dimming will stop. The lighting remains switched on as long as there is activity and the switch-off delay is activated. |
| Close | Press this button to dim the lighting. If you press this button again, dimming will stop. The lighting remains switched off as long as there is activity and the switch-off delay is activated. |
| Automatic | You switch over to daylight-dependent lighting. The lighting remains switched on as long as there is activity and the switch-off delay and orientation lighting delay are activated. |
| Test | The detection area is tested by activating the integrated motion sensor for the walking test - The lighting is switched on for five seconds and the red indication LED is flashing each time the sensor detects activity. - The blue indication LED is illuminated as long as the sensor is in the test mode. - After five minutes, the device automatically returns to the control mode if you forget to close the test mode. The light sensor does not work during the walking test. |
| Auto Auto | - Press symbol to select the automatic application. You deactivate the manual application. - Press to select the manual application. You deactivate the automatic application. After you made your selection, the sensor begins with a soft start for correct initialisation. |
| Auto | You switch the indication LED on or off. |
4.2. Set' buttons
| Button | Function |
| Set 1 = 1 = 2 = 3 = 4 = 5 = 6 = 7 = 8 = 9 = 10 = 11 = 12 = 13 = 14 = 15 = 16 = 17 = 18 = 19 = 20 = 21 = 22 = 23 = 24 = 25 = 26 = 27 = 28 = 29 = 30 = 31 = 32 = 33 = 34 = 35 = 36 = 37 = 38 = 39 = 40 = 41 = 42 = 43 = 44 = 45 = 46 = 47 = 48 = 49 = 50 = 51 = 52 = 53 = 54 = 55 = 56 = 57 = 58 = 59 = 60 = 61 = 62 = 63 = 64 = 65 = 66 = 67 = 68 = 69 = 70 = 71 = 72 = 73 = 74 = 75 = 76 = 77 = 78 = 79 = 80 = 81 = 82 = 83 = 84 = 85 = 86 = 87 = 88 = 89 = 90 = 91 = 92 = 93 = 94 = 95 = 96 = 97 = 98 = 99 = 100 | - You use the red buttons only during start-up to set the reference points. - With these red buttons, you set the desired light level (50 - 1500 lux) at table height. - Each time you press the button, the light level increases or decreases. - When setting, the lighting is switched on for demonstrating the light level chosen. |
| Time 1 = 1 = 2 = 3 = 4 = 5 = 6 = 7 = 8 = 9 = 10 = 11 = 12 = 13 = 14 = 15 = 16 = 17 = 18 = 19 = 20 = 21 - With these blue buttons, you set the switch-off delay (1 - 60 min). - Each time you press the button, the switch-off delay increases or decreases by 1 minute or 10 minutes. | |
| Time 2 = 1 = 2 = 3 = 4 = 5 = 6 = 7 = 8 = 9 = 10 = 11 = 12 = 13 = 14 = 15 = 16 = 17 = 18 = 19 = 20 = 21 - With those blue buttons, you set the switch-off delay (1 - 60 min) for the orientation lighting. - Each time you press the button, the switch-off delay increases or decreases by 1 minute or 10 minutes. | |
| Level 1 = Level 1 = Level 2 = Level 3 = Level 4 = Level 5 = Level 6 = Level 7 = Level 8 = Level 9 = Level 10 = Level 11 = Level 12 = Level 13 = Level 14 = Level 15 = Level 16 = Level 17 = Level 18 = Level 19 = Level 20 = Level 21 = Level 22 = Level 23 = Level 24 = Level 25 = Level 26 = Level 27 = Level 28 = Level 29 = Level 30 = Level 31 = Level 32 = Level 33 = Level 34 = Level 35 = Level 36 = Level 37 = Level 38 = Level 39 = Level 40 = Level 41 = Level 42 = Level 43 = Level 44 = Level 45 = Level 46 = Level 47 = Level 48 = Level 49 = Level 50 = Level 51 = Level 52 = Level 53 = Level 54 = Level 55 = Level 56 = Level 57 = Level 58 = Level 59 = Level 60 = Level 61 = Level 62 = Level 63 = Level 64 = Level 65 = Level 66 = Level 67 = Level 68 = Level 69 = Level 70 = Level 71 = Level 72 = Level 73 = Level 74 = Level 75 = Level 76 = Level 77 = Level 78 = Level 79 = Level 80 = Level 81 = Level 82 = Level 83 = Level 84 = Level 85 = Level 86 = Level 87 = Level 88 = Level 89 = Level 90 = Level 91 = Level 92 = Level 93 = Level 94 = Level 95 = Level 96 = Level 97 = Level 98 = Level 99 = Level 100 = Level 101 = Level 102 = Level 103 = Level 104 = Level 105 = Level 106 = Level 107 = Level 108 = Level 109 = Level 110 = Level 111 = Level 112 = Level 113 = Level 114 = Level 115 = Level 116 = Level 117 = Level 118 = Level 119 = Level 120 = Level 121 = Level 122 = Level 123 = Level 124 = Level 125 = Level 126 = Level 127 = Level 128 = Level 129 = Level 130 = Level 131 = Level 132 = Level 133 = Level 134 = Level 135 = Level 136 = Level 137 = Level 138 = Level 139 = Level 140 = Level 141 = Level 142 = Level 143 = Level 144 = Level 145 = Level 146 = Level 147 = Level 148 = Level 149 = Level 150 = Level 151 = Level 152 = Level 153 = Level 154 = Level 155 = Level 156 = Level 157 = Level 158 = Level 159 = Level 160 = Level 161 = Level 162 = Level 163 = Level 164 = Level 165 = Level 166 = Level 167 = Level 168 = Level 169 = Level 170 = Level 171 = Level 172 = Level 173 = Level 174 = Level 175 = Level 176 = Level 177 = Level 178 = Level 179 = Level 180 = Level 181 = Level 182 = Level 183 = Level 184 = Level 185 = Level 186 = Level 187 = Level 188 = Level 189 = Level 190 = Level 191 = Level 192 = Level 193 = Level 194 = Level 195 = Level 196 = Level 197 = Level 198 = Level 199 = Level 200 = Level 201 = Level 202 = Level 203 = Level 204 = Level 205 = Level 206 = Level 207 = Level 208 = Level 209 = Level 210 = Level 211 = Level 212 = Level 213 = Level 214 = Level 215 = Level 216 = Level 217 = Level 218 = Level 219 = Level 220 = Level 221 = Level 222 = Level 223 = Level 224 = Level 225 = Level 226 = Level 227 = Level 228 = Level 229 = Level 230 = Level 231 = Level 232 = Level 233 = Level 234 = Level 235 = Level 236 = Level 237 = Level 238 = Level 239 = Level 240 = Level 241 = Level 242 = Level 243 = Level 244 = Level 245 = Level 246 = Level 247 = Level 248 = Level 249 = Level 250 = Level 251 = Level 252 = Level 253 = Level 254 = Level 255 = Level 256 = Level 257 = Level 258 = Level 259 = Level 260 = Level 261 = Level 262 = Level 263 = Level 264 = Level 265 = Level 266 = Level 267 = Level 268 = Level 269 = Level 270 = Level 271 = Level 272 = Level 273 = Level 274 = Level 275 = Level 276 = Level 277 = Level 278 = Level 279 = Level 280 = Level 281 = Level 282 = Level 283 = Level 284 = Level 285 = Level 286 = Level 287 = Level 288 = Level 289 = Level 290 = Level 291 = Level 292 = Level 293 = Level 294 = Level 295 = Level 296 = Level 297 = Level 298 = Level 299 = Level 300 = Level 301 = Level 302 = Level 303 = Level 304 = Level 305 = Level 306 = Level 307 = Level 308 = Level 309 = Level 310 = Level 311 = Level 312 = Level 313 = Level 314 = Level 315 = Level 316 = Level 317 = Level 318 = Level 319 = Level 320 = Level 321 = Level 322 = Level 323 = Level 324 = Level 325 = Level 326 = Level 327 = Level 328 = Level 329 = Level 330 = Level 331 = Level 332 = Level 333 = Level 334 = Level 335 = Level 336 = Level 337 = Level 338 = Level 339 = Level 340 = Level 341 = Level 342 = Level 343 = Level 344 = Level 345 = Level 346 = Level 347 = Level 348 = Level 349 = Level 350 = Level 351 = Level 352 = Level 353 = Level 354 = Level 355 = Level 356 = Level 357 = Level 358 = Level 359 = Level 360 = Level 361 = Level 362 = Level 363 = Level 364 = Level 365 = Level 366 = Level 367 = Level 368 = Level 369 = Level 370 = Level 371 = Level 372 = Level 373 = Level 374 = Level 375 = Level 376 = Level 377 = Level 378 = Level 379 = Level 380 = Level 381 = Level 382 = Level 383 = Level 384 = Level 385 = Level 386 = Level 387 = Level 388 = Level 389 = Level 390 = Level 391 = Level 392 = Level 393 = Level 394 = Level 395 = Level 396 = Level 397 = Level 398 = Level 399 = Level 400 = Level 401 = Level 402 = Level 403 = Level 404 = Level 405 = Level 406 = Level 407 = Level 408 = Level 409 = Level 410 = Level 411 = Level 412 = Level 413 = Level 414 = Level 415 = Level 416 = Level 417 = Level 418 = Level 419 = Level 420 = Level 421 = Level 422 = Level 423 = Level 424 = Level 425 = Level 426 = Level 427 = Level 428 = Level 429 = Level 430 = Level 431 = Level 432 = Level 433 = Level 434 = Level 435 = Level 436 = Level 437 = Level 438 = Level 439 = Level 440 = Level 441 = Level 442 = Level 443 = Level 444 = Level 445 = Level 446 = Level 447 = Level 448 = Level 449 = Level 450 = Level 451 = Level 452 = Level 453 = Level 454 = Level 455 = Level 456 = Level 457 = Level 458 = Level 459 = Level 460 = Level 461 = Level 462 = Level 463 = Level 464 = Level 465 = Level 466 = Level 467 = Level 468 = Level 469 = Level 470 = Level 471 = Level 472 = Level 473 = Level 474 = Level 475 = Level 476 = Level 477 = Level 478 = Level 479 = Level 480 = Level 481 = Level 482 = Level 483 = Level 484 = Level 485 = Level 486 = Level 487 = Level 488 = Level 489 = Level 490 = Level 491 = Level 492 = Level 493 = Level 494 = Level 495 = Level 496 = Level 497 = Level 498 = Level 499 = Level 500 = Level 501 = Level 502 = Level 503 = Level 504 = Level 505 = Level 506 = Level 507 = Level 508 = Level 509 = Level 510 = Level 511 = Level 512 = Level 513 = Level 514 = Level 515 = Level 516 = Level 517 = Level 518 = Level 519 = Level 520 = Level 521 = Level 522 = Level 523 = Level 524 = Level 525 = Level 526 = Level 527 = Level 528 = Level 529 = Level 530 = Level 531 = Level 532 = Level 533 = Level 534 = Level 535 = Level 536 = Level 537 = Level 538 = Level 539 = Level 540 = Level 541 = Level 542 = Level 543 = Level 544 = Level 545 = Level 546 = Level 547 = Level 548 = Level 549 = Level 550 = Level 551 = Level 552 = Level 553 = Level 554 = Level 555 = Level 556 = Level 557 = Level 558 = Level 559 = Level 560 = Level 561 = Level 562 = Level 563 = Level 564 = Level 565 = Level 566 = Level 567 = Level 568 = Level 569 = Level 570 = Level 571 = Level 572 = Level 573 = Level 574 = Level 575 = Level 576 = Level 577 = Level 578 = Level 579 = Level 580 = Level 581 = Level 582 = Level 583 = Level 584 = Level 585 = Level 586 = Level 587 = Level 588 = Level 589 = Level 590 = Level 591 = Level 592 = Level 593 = Level 594 = Level 595 = Level 596 = Level 597 = Level 598 = Level 599 = Level 600 = Level 601 = Level 602 = Level 603 = Level 604 = Level 605 = Level 606 = Level 607 = Level 608 = Level 609 = Level 610 = Level 611 = Level 612 = Level 613 = Level 614 = Level 615 = Level 616 = Level 617 = Level 618 = Level 619 = Level 620 = Level 621 = Level 622 = Level 623 = Level 624 = Level 625 = Level 626 = Level 627 = Level 628 = Level 629 = Level 630 = Level 631 = Level 632 = Level 633 = Level 634 = Level 635 = Level 636 = Level 637 = Level 638 = Level 639 = Level 640 = Level 641 = Level 642 = Level 643 = Level 644 = Level 645 = Level 646 = Level 647 = Level 648 = Level 649 = Level 650 = Level 651 = Level 652 = Level 653 = Level 654 = Level 655 = Level 656 = Level 657 = Level 658 = Level 659 = Level 660 = Level 661 = Level 662 = Level 663 = Level 664 = Level 665 = Level 666 = Level 667 = Level 668 = Level 669 = Level 670 = Level 671 = Level 672 = Level 673 = Level 674 = Level 675 = Level 676 = Level 677 = Level 678 = Level 679 = Level 680 = Level 681 = Level 682 = Level 683 = Level 684 = Level 685 = Level 686 = Level 687 = Level 688 = Level 689 = Level 690 = Level 691 = Level 692 = Level 693 = Level 694 = Level 695 = Level 696 = Level 697 = Level 698 = Level 699 = Level 700 = Level 701 = Level 702 = Level 703 = Level 704 = Level 705 = Level 706 = Level 707 = Level 708 = Level 709 = Level 710 = Level 711 = Level 712 = Level 713 = Level 714 = Level 715 = Level 716 = Level 717 = Level 718 = Level 719 = Level 720 = Level 721 = Level 722 = Level 723 = Level 724 = Level 725 = Level 726 = Level 727 = Level 728 = Level 729 = Level 730 = Level 731 = Level 732 = Level 733 = Level 734 = Level 735 = Level 736 = Level 737 = Level 738 = Level 739 = Level 740 = Level 741 = Level 742 = Level 743 = Level 744 = Level 745 = Level 746 = Level 747 = Level 748 = Level 749 = Level 750 = Level 751 = Level 752 = Level 753 = Level 754 = Level 755 = Level 756 = Level 757 = Level 758 = Level 759 = Level 760 = Level 761 = Level 762 = Level 763 = Level 764 = Level 765 = Level 766 = Level 767 = Level 768 = Level 769 = Level 770 = Level 771 = Level 772 = Level 773 = Level 774 = Level 775 = Level 776 = Level 777 = Level 778 = Level 779 = Level 780 = Level 781 = Level 782 = Level 783 = Level 784 = Level 785 = Level 786 = Level 787 = Level 788 = Level 789 = Level 790 = Level 791 = Level 792 = Level 793 = Level 794 = Level 795 = Level 796 = Level 797 = Level 798 = Level 799 = Level 800 = Level 801 = Level 802 = Level 803 = Level 804 = Level 805 = Level 806 |
5. ACTIVATING THE PRESENCE DETECTOR
5.1. Manual activation via the LUX potentiometer
Step Action Result
| 1. Set DIP switch 1 to ON. You can now set the lux value manually. | |
| 2. Turn the LUX potentiometer all the way to the left (minimum setting). | The blue indication LED starts flashing. |
| 3. Turn the LUX potentiometer all the way to the right (maximum setting). | The blue indication LED starts flashing after a few seconds. |
| 4. Turn the LUX potentiometer all the way to the left again (minimum setting). | a. The green indication LED is flashing once. b. The sensor switches on the lighting, after which the maximum light level is reached. c. The lighting is dimmed and then switched off. d. The lighting is switched on again at the minimum light level. |
| 5. Set the lux value of your choice using the LUX potentiometer. | The sensor records this lux value after 30 seconds. |
5.2. Activation via the IR remote control with factory settings
| Step Action Result | ||
| 1. Set DIP switch 1 to OFF (factory setting). You can now set the lux value using the IR remote control. | ||
| 2. | Press three times. | The sensor is unlocked and the green indication LED is flashing once. |
| 3. | Press | a. The sensor switches on the lighting, after which the maximum light level is reached. b. The lighting is dimmed and then switched off. |
| 4. | Press | The sensor is locked again and returns to the control mode. The device will now use the new settings. |
5.3. Activation via the IR remote control with calibration (sweep)
To set the presence detector in line with specific lighting requirements in certain rooms, you have to use the IR remote control. You will also need a separate lux meter for this. Using the lux meter, you send the reference values to the sensor, which ensures that the effect of switching on the lighting on the light level is accurately measured and set. Follow the steps below to correctly set the sensor.
Setting the light level Step Action Result
| 1. Set DIP switch 1 to OFF (factory setting). You can now set the device using the IR remote control. | |
| 2. Press three times. | The sensor is unlocked and the green indication LED is flashing once. |
| 3. Press. | a. The sensor switches on the lighting. After two minutes (fluorescent lamps heating up), the maximum light level is reached. The green indication LED is flashing during this process. b. If the green indication LED goes out, the calibration will start (sweep): the lighting is gradually dimmed and then switched off. c. As soon as the calibration is completed, the red indication LED lights up. |
| 4. Place a lux meter at table height (approximately 85 cm from the ground) underneath the sensor. | |
| 5. Press or | You set the first reference point to the lowest light level possible (e.g. 150 lux). The lighting is dimmed. Note: The light level must be as close as possible to the fixed values on the IR remote control. |
| 6. Press the button with the value closest to the first reference point (e.g. ). | The red indication LED goes out and the blue indication LED lights up. The lux value is set. |
| 7. Press or | You set the second reference point. For an optimum result, the setting of this reference point is preferably identical to the desired light level (e.g. 320 lux). Note: The light level must be as close as possible to the fixed values on the IR remote control. |
| 8. Press the button with the value closest to the second reference point (e.g. ). | The blue indication LED goes out and the green indication LED lights up. The lux value is set. |
| 9. Press the button with the value closest to the lux value of your choice (e.g. for 320 lux). | You set the lux value of your choice at table height. The green indication LED goes out. The lux value is set. |
| 10. Press once. | The sensor is locked again and returns to the control mode. The device will now use the new settings. |
5.4. Activation via the IR remote control without calibration (changing the desired lux value)
Setting the light level
| Step Action Result | ||
| 1. | Press three times. | The sensor is unlocked and the green indication LED is flashing once. |
| 2. | Press. | The red indication LED lights up. |
| 3. Place a lux meter at table height (approximately 85 cm from the ground) underneath the sensor. | ||
| 4. | Press or | You set the first reference point to the lowest light level possible (e.g. 150 lux). The lighting is dimmed. Note: The light level must be as close as possible to the fixed values on the IR remote control. |
| 5. Press the button with the value closest to the first reference point (e.g. ). | The red indication LED goes out and the blue indication LED lights up. The lux value is set. | |
| 6. | Press or | You set the second reference point. For an optimum result, the setting of this reference point is preferably identical to the desired light level (e.g. 320 lux). Note: The light level must be as close as possible to the fixed values on the IR remote control. |
| 7. Press the button with the value closest to the second reference point (e.g. ). | The blue indication LED goes out and the green indication LED lights up. The lux value is set. | |
| 8. Press the button with the value closest to the lux value of your choice (e.g. for 320 lux). | You set the lux value of your choice at table height. The green indication LED goes out. The lux value is set. | |
| 9. | Press once. | The sensor is locked again and returns to the control mode. The device will now use the new settings. |
6. OPERATION AND USE
6.1. General operation
The integrated light sensor continuously measures the daylight level in the detection area and compares this level to the preset lux value. Thanks to the light sensor, the light switches on automatically only if the detector detects motion within the detection range and if the daylight level falls below the preset lux value:
The lighting remains switched on as long as motion is detected.
- After the last motion is detected, the lighting remains switched on for the duration of the preset switch-off delay (1 to 60 minutes). As soon as the switch-off delay has elapsed, the lighting switches to orientation lighting. As soon as the switch-off delay of the orientation lighting has elapsed, the lighting switches off.
- As the daylight level increases, the lighting in the room is dimmed until the preset minimum level is reached.
The lighting switches off automatically as soon as the daylight level is sufficiently high.
6.2. Applications
There are two applications possible on this presence detector:
- manual application: manual on/off via push button, automatic off via presence detector, or dependent on the light level.
- automatic application (can only be selected with the IR remote control): automatic on/off via presence detector, dependent on the light level.
| Mode Application Mode of operation | ||
| Ceiling lighting | manual | Switching of daylight control via a push button. If necessary, you can switch on the lighting according to the preset parameters. As long as the device detects presence, the lighting is adjusted according to the preset parameters. |
| automatic | Automatic switching of daylight control via a presence detector. | |
| manual and automatic | Press the push button briefly to switch the lighting off. After approximately ten seconds the presence detector is once again ready to switch the lighting on automatically. | |
| Dimming lights | manual and automatic | Press and hold the push button to dim or brighten the lighting. You can also dim/brighten the lighting using the IR remote control. When the dim function is activated, you must switch off the lighting so that it can once again be switched on and can function according to the daylight measurements (via the integrated light sensor). |
You can also carry out these applications with the IR remote control as described in section 4.1.
- TROUBLESHOOTING
| Problem Cause Solution | ||
| The calibration was not successful: the red indication LED keeps flashing. | - Insufficient daylight (or not enough daylight is registered by the sensor).- Too much daylight, which means the sensor is saturated.- There are not enough variations in the artificial light level (or the variations are not adequately registered by the sensor).- The daylight level was varying too much during calibration. | - Press and repeat the calibration.- Press once. The sensor is locked and returns to the factory settings. |
| An error occurred while setting the first reference point: the red indication LED is flashing briefly and then stays lit. | - Insufficient daylight (or not enough daylight is registered by the sensor).- The daylight level was varying too much while setting. | - Press or to reset the reference point.- Press once. The sensor is locked and returns to the factory settings. |
| An error occurred while setting the second reference point: the red indication LED is flashing briefly and the blue indication LED then stays lit. | - Insufficient daylight (or not enough daylight is registered by the sensor).- The two reference points are identical.- The difference between the artificial light level in both reference points is too small.- The daylight level was varying too much while setting. | - Press or to reset the reference point.- Press once. The sensor is locked and returns to the factory settings. |
8. MAINTENANCE
Dirt may prevent the presence detector from functioning properly. Therefore, always keep the lens clean and dry. Use a damp cloth and water with some detergent to clean the lens. Never exert pressure to wipe the lens clean. If the lens or other parts of the presence detector are defective, please contact an authorised installer.
- TECHNICAL DATA
| dimensions 59 x 127 mm (HxW) | |
| power supply voltage 230 Vac ± 10%, 50 Hz | |
| stand-by consumption 0.2 W (without lighting fixtures) | |
| relay contact NO (max. 10 A), light- and motion-sensitive | |
| maximum load | incandescent lamps (2300 W) |
| 230 V halogen lamps (2300 W) | |
| all low-voltage halogen lamps (500 VA) | |
| fluorescent lamps (non-compensated) (1200 VA) | |
| economy lamps (CFLI) (1200 VA) | |
| maximum switching capacity 140 μF | |
| maximum inrush current 165 A/20 ms | |
| channel 1 1 - 10 V/max. 10 mA | |
| light sensitivity 50 - 1500 lux | |
| switch-off delay 1 - 60 min | |
| light level of the orientation lighting | 5 - 100% |
| duration of the orientation lighting | 0 - 60 min, infinite |
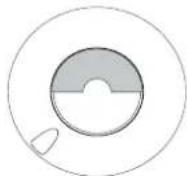
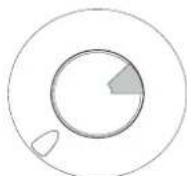
| mounting height (fig. 9) | 2.5 - 4 m |
| detection range (fig. 9) | circular, 3 - 20 m |
| protection degree | IP20 |
| protection class | class I devices |
| ambient temperature -5 - +50°C | |
| quality mark | CE marked in compliance with EN 60669-2-1 |
| accessories | IR remote control (350-20064) |
10. WARNINGS REGARDING INSTALLATION
- The installation should be carried out by a registered installer and in compliance with the statutory regulations.
- This manual should be presented to the user. It should be included in the electrical installation file, and it should be passed on to any new owners. Additional copies are available on the Niko website or via the Niko support service. The latest manual for this product is available on the Niko website at any time.
-
During installation, the following should be taken into account (non-exhaustive list): - the statutory laws, standards and regulations.
-
the technology currently available at the time of installation.
- this manual, which only states general regulations and should therefore be read within the scope of each specific installation.
- the rules of proper workmanship.

This product complies with all of the relevant European guidelines and regulations. If applicable, you can find the EC declaration of conformity regarding this product at www.niko.eu.
11. NIKO SUPPORT
In case of doubt or for the specific exchange procedure in case of a possible defect, contact the Niko support service in Belgium at +32 3 778 90 80 or your wholesaler/institaller. Contact details and more information can be found at www.niko.eu under the "Help and advice" section.
12. GUARANTEE PROVISIONS
- The period of guarantee is four years from the date of delivery. The delivery date is the invoice date of purchase of the product by the consumer. If there is no invoice, the date of production applies.
- The consumer is obliged to inform Niko in writing about the non-conformity, within two months after stating the defect.
In case of a non-conformity, the consumer only has the right to a product repair or replacement free of charge, which shall be decided by Niko. - Niko shall not be held liable for a defect or damage resulting from incorrect installation, improper or careless use, incorrect operation, transformation of the product, maintenance that does not adhere to the maintenance instructions or an external cause, such as damage due to moisture or overvoltage.
- The compulsory regulations of the national legislation concerning the sale of consumer goods and the protection of the consumer in the countries where Niko sells, directly or via sister companies, subsidiaries, chain stores, distributors, agents or permanent sales representatives, take priority over the above-mentioned rules and regulations.

UK
DF
Factory settings
m = 311
Lux + Time via potmeter
Lux - Time IR via IR remote
Min. sensitivity
5.67172964804166705
Low sensitivity
High sensitivity
m - 1 0 ;
Max. sensitivity
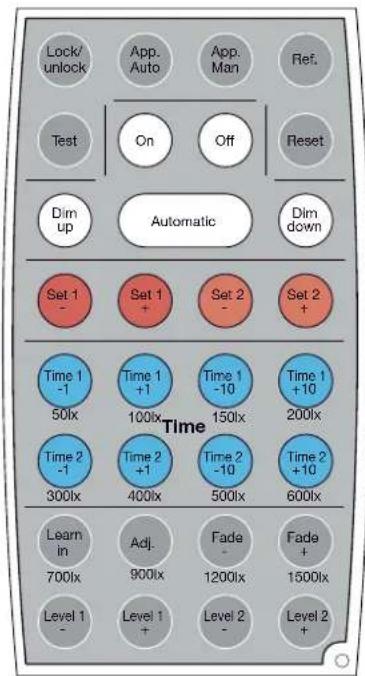
Fig./Abb./Obr. 8
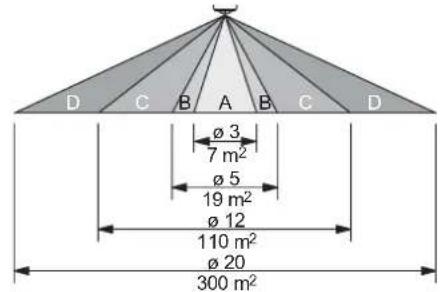
Fig./Abb./Obr. 7
513081
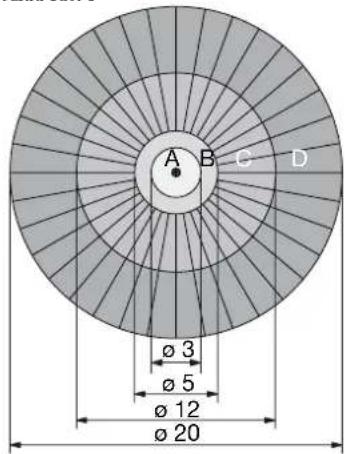
Fig./Abb./Obr. 9