
ASP 14 TS - Log splitter ATIKA - Free user manual and instructions
Find the device manual for free ASP 14 TS ATIKA in PDF.

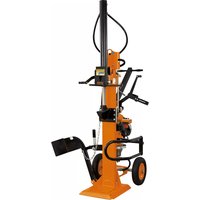
| Product type | Horizontal log splitter |
| Brand | ATIKA |
| Model | ASP 14 TS |
| Splitting force | 140 kN (14 tonnes) |
| Maximum log length | 1300 mm |
| Log diameter | 120 mm (min) to 400 mm (max) |
| Splitting stroke | ≈ 530 mm |
| Forward speed | approx. 0.034 m/s |
| Return speed | approx. 0.17 m/s |
| Oil tank capacity | approx. 10 liters |
| Hydraulic pressure | 28.6 MPa (286 bars) |
| Motor power | 4.0 kW (S6, 4 min/6 min) |
| Power supply | 400 V / 3N~+PE, 50 Hz, 16 A |
| Dimensions (L x W x H) | 580 x 920 x 1540 mm |
| Weight | approx. 150 kg |
| Control type | Two control levers (two-hand control) |
| Safety | Anti-restart device (zero-voltage release), emergency stop, splash guard |
| Stroke adjustment | Adjustable stroke height for small logs |
| Adjustable table | 3 positions (590 mm, 900 mm, 1325 mm) depending on log length |
| Recommended hydraulic oil | Shell Tellus T22, Aral Vitam Gf22, BP Energol HLP22, Mobil DTE11 or equivalent |
| Maintenance | Oil change after 50 h then every 250 h; regular lubrication of the column |
| Warranty | According to conditions provided with the device |
Frequently Asked Questions - ASP 14 TS ATIKA
User questions about ASP 14 TS ATIKA
0 question about this device. Answer the ones you know or ask your own.
Ask a new question about this device
Download the instructions for your Log splitter in PDF format for free! Find your manual ASP 14 TS - ATIKA and take your electronic device back in hand. On this page are published all the documents necessary for the use of your device. ASP 14 TS by ATIKA.
USER MANUAL ASP 14 TS ATIKA
natural_image
Industrial machine with visible wheels and a labeled base, set against a patterned background (no readable text or symbols)Brennholzspalter
Original instructions

Seite 14

Page 23
GB EC Declaration of Conformity according to Directive: 2006/42/EC
GB under our sole responsibility, that the product Brennholzspalter (Log splitter) ASP 14 TS (Serial number: 000001-020000) is conform with the above mentioned EC directive as well as with the provisions of the guideline below: 2004/108/EC.
GB Following harmonized standards have been applied:
GB Duly authorised person for the compilation of technical documents:

D Gerätebeschreibung – GB Description of device – F Description de l'appareil
GB Extend of delivery
After unpacking, check the contents of the box
▶ That it is complete
▶ Check for possible transport damage
Report any damage or missing items to your dealer, supplier or the manufacturer immediately. Complaints made at a later date will not be acknowledged.
| ▪ 1 ready mounted machine unit | ▪ 1 table plate | ▪ 1 axle | ▪ 1 control arm, left | ▪ 1 operating manual |
| ▪ 1 splitting cross | ▪ 2 wheels | ▪ 1 control arm, right | ▪ 1 bag of accessories |
F Fourniture
natural_image
Mechanical assembly diagram showing a bracket with a magnified inset of internal components (no text or symbols visible)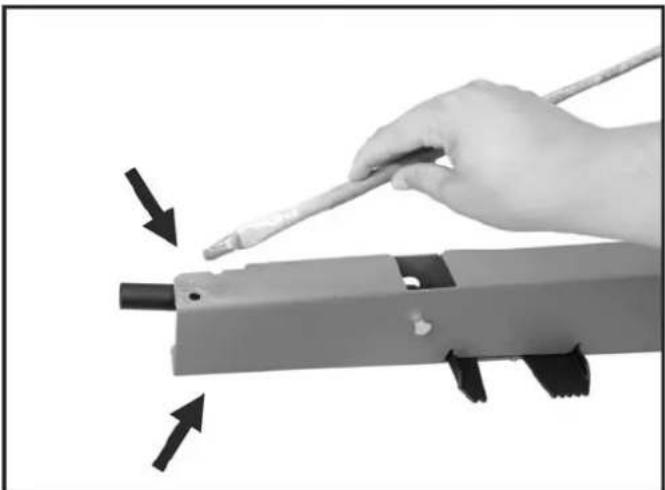
natural_image
Hand holding a tool with arrows pointing to a mechanical component (no text or symbols visible)GB Tip: grease the metal plates at top and bottom first!
Insert control arms and insert pipe in recess of cross connection.
natural_image
Close-up of a hand operating a mechanical device with a metal frame and screw base (no visible text or symbols)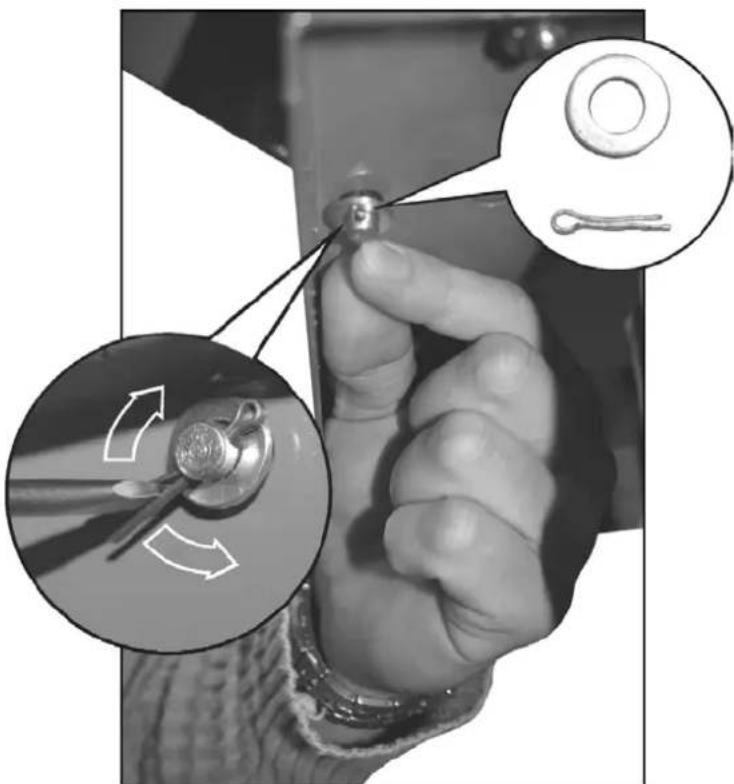
natural_image
Close-up of a hand holding a small mechanical component with circular insets showing tool manipulation (no text or symbols visible)GB Push the holding bolt through.
GB Lock the holding bolt at the bottom.
natural_image
Mechanical assembly showing tire maintenance with a hand operating a tire, and close-up of a wire being inserted into a wheel (no text or symbols visible)D Räder montieren
GB Mount wheels
F Montage des roues
D
▶ Locking bolt is available in the installation position.
▶ Fit the table into the appropriate mounting angles.
▶ Pay attention that the locking bolt is engaged.
F
FIN
D Befestigen Sie das Spaltkreuz mit der Sechskantmutter M 12 x 35 ① am Spaltmesser und sichern Sie die Kette mit der Sterngriffmutter M 12 ②
GB Fasten the splitting cross using the hexagon nut M12x35 ① on the splitting blade and secure the chain with the machine know nut M12 ②
F Fixez la croix de fendage avec l'écrou à 6 pans M 12 x 35
① sur la lame de fendage et sécurisez la chaîne avec l'écrou à poignée en étoile M 12 ②
BG Закрепете кръстовидната разцепваща приставка с шестостенната гайка М 12 x 35 ① за разцепващия нож и фиксирайте веригата със звездовидната ръкохватка с интегрирана гайка М 12 ②
CZ Připevněte štípací kříž šestihrannou maticí M12x35 na štípací nůž a zajistěte řetěz hvězdicovou maticí M12.
DK Fastgør spaltekrydset med sekskantmøtrik M 12 x 35 ① på spaltekniven og lås kæden med stjernegrebsmøtrik M 12 ②
FIN Kiinnitä halkaisuristi halkaisuterässä olevalla kuusiomutterilla M 12 x 35 ① ja varmista ketju tähtikahvamutterilla M 12 ②
H Az ① M 12 x 35 hatlapú anyával rögzítse a hasító keresztet a hasító késen, és a ② M 12 csillagfogantyús anyával biztosítsa a láncot.
HR Učvrstite križ za cijepanje šestobridnom maticom M 12 x 35 ① na nožu za cijepanje i osigurajte lanac zvjezdastom zahvatnom maticom M 12 ②
Fissare il cuneo a croce con il dado esagonale M 12 x 35
① al fenditoio e fermare la catena con il dado a stella M 12
②
NL Bevestig het splijtkruis met de zeskantmoer M 12 x 35 ① op het splijtmes en zeker de ketting met de stergreepmoer M 12 ②
PL Przymocować krzyżak za pomocą śruby sześciokątnej M 12 x 35 ① na nożu i zabezpieczyć łańcuch nakrętką z uchwytem gwiazdowym M 12 ②
RO Fixați crucea de despicat cu piuliță hexagonală M 12 x 35
① de cuțitul de despicat și asigurați lanțul cu piulița cu
mâner în formă de stea M 12 ②
S Fäst klyvkorset med sexkantmuttern M 12 x 35 ① vid klyvkniven och säkra kedjan med korsmuttern M 12 ②
SK Priskrútkujte štiepací kríž šest'hrannou maticou na štiepací nož a zaistite reťaz hviezdicovou maticou M12
SLO Pritrdite cepilni križ s šestrobno matico M 12 x 35 ① na cepilni nož in verigo pritrdite z zvezdasto ročajno matico M 12 ②

natural_image
Close-up of a mechanical component with a central square button and two metallic tabs (no visible text or symbols)Einschalten
natural_image
Close-up of a mechanical component with internal wiring and mounting holes (no visible text or symbols)i Hydraulik
natural_image
Person operating a machine with a headband, no visible text or symbolsnatural_image
Mechanical assembly with a cylindrical component mounted on a metal frame (no visible text or symbols)natural_image
Worker operating a machine with a magnified inset showing a hand holding a component (no visible text or symbols)natural_image
Person operating a mechanical testing machine with a textured cylindrical component (no visible text or symbols)natural_image
Mechanical assembly diagram showing two views of a mechanical component with arrows indicating motion direction (no text or symbols)Kanten schärfen
natural_image
Mechanical device with mounted gears and a flat base (no visible text or symbols)
natural_image
Close-up of a hand using a tool to clean or wash a metal bowl (no text or symbols visible)Do not operate machine before having read the operating instructions, understood all the notes and assembly the machine as described here.
Keep the instructions in a safe place for future use.
Contents
| EC-Declaration of Conformity 1 | |
| Spare parts / Description of device 3 | |
| Extent of delivery 6 | |
| Assembly | 9 |
| Symbols 23 | |
| Proper use 23 | |
| Residual risks 24 | |
| Safe working 24 | |
| Transport instructions 25 | |
| Positioning | 25 |
| Start-up | 25 |
| Working with the log splitter 26 | |
| Maintenance and cleaning 28 | |
| Technical data 30 | |
| Possible problems 30 | |
| Guarantee | 30 |
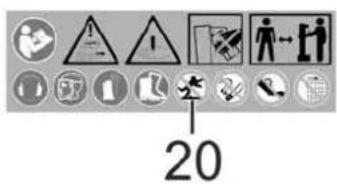
Symbols machine

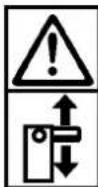
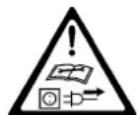
Read the operating and safety instructions thoroughly before commissioning the machine.
Caution! Before starting any repair, maintenance or cleaning work, always switch off the motor and remove the plug from the socket.
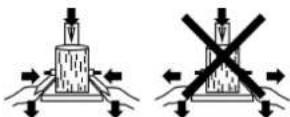
Cutting and crushing risk! Never touch dangerous areas when splitting blade is moving.

Do not remove jammed logs with your hands.
Nobody else should be in the working area of the machine other than the operator. Keep other persons or animals out of the danger area (minimum distance 5 m).

Wear hearing protection when working with the machine to protect your hearing.

Wear face mask when working with the machine to protect the eyes from chips and splinters.

Wear safety gloves when working with the machine to protect the hands from chips and splinters.

Wear safety shoes when working with the machine to protect the feet from falling logs.

Keep your work space tidy! Untidiness may result in accidents.

Oil is a fire hazard and can explode. Smoking and open fire are prohibited.

Dispose of the old oil properly (local oil disposal point). The old oil must not be poured into the ground or drainage system, or mixed with other waste.

Do not remove or modify any protection or safety devices.
Always pay full attention to the splitting blade's movement.


Hold the work piece when splitting with the clamping claw.
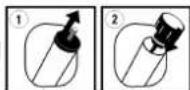
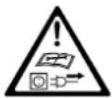
The transport closure must be replaced by the oil dipstick before start up the machine. (see "Start-up")
Make sure that the motor turns in the correct direction (see motor arrow), because operation in the wrong direction damages the oil pump. (see "Start-up")
Symbols machine / packaging

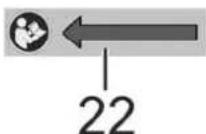
Do not dispose of electrical devices as domestic waste. Dispose of devices, accessories and packaging by means of environmentally friendly recycling.
According to the European Directive 2002/96/EC on electrical and electronic scrap, electrical devices that are no longer serviceable must be separately collected and brought to a facility for an environmentally compatible recycling.
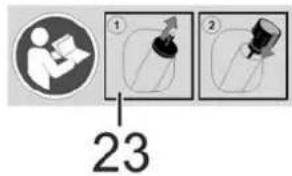
Symbols operating manual

Threatened hazard or hazardous situation. Not observing this instruction can lead to injuries or cause damage to property.

Important information on proper handling. Not observing this instruction can lead to faults.

User information. This information helps you to use all the functions optimally.

Assembly, operation and servicing. Here you are explained exactly what to do.
Proper use
■ The log splitter must only be used for splitting logs.
- Only straight-cut logs are suitable for use with the log splitter.
■ Foreign bodies (nails, wire, concrete etc.) must always be removed from the wood before it is split.
- The intended usage also includes compliance with the operating, servicing and repair conditions prescribed by the manufacturer and following the safety instructions included in the instructions.
- Any other use is deemed not to be use as prescribed. The manufacturer is not liable for any type of damage resulting from this: the user bears the sole risk.
- Unauthorised modifications on the log splitter exclude a liability of the manufacturer for damages of any kind resulting from it.
- Only persons who are familiarised with the device and informed about possible risks are allowed to prepare, operate and service this device. Repair works may only be carried out by us or by a customer service agent nominated by us.
Residual risks

Even if used properly, residual risks can exist even if the ant safety regulations are complied with due to the design mined by the intended purpose.
Residual risks can be minimised if the “Safe working” and the “Proper use” as well as the whole of the operating instructions are observed.
Observing these instructions, and taking proper care, will reduce the risk of personal injury or damage to the equipment.
- Failure to observe the safety precautions can lead to injury to the operator or damage to property.
- Carelessness, failure to comply with the safety regulations and incorrect use can result in injuries to your hands and fingers when the splitting blade is moving.
- Risk from electricity, by using non-standard electrical connections.
- Touching live parts of opened electrical components.
- Impairment of hearing when working on the machine for longer periods of time without ear protection.
In addition, in spite of all the precautionary measures taken, non-obvious residual risks can still exist.
Safe working

Before commissioning this product, read and keep to the following advice. Also observe the preventive regulations of your professional association and the safety provisions applicable in the respective country, in order to protect yourself and others from possible injury.
Pass the safety instructions on to all persons who work with the machine.
① Keep these safety instructions in a safe place.
- Be observant. Attend to what you do. Start working with rationality. Do not use the device when you are tired or under the influence of drugs, alcohol or medicaments. One moment of carelessness when using the device can result in serious injuries.
■ Make yourself familiar with the equipment before using it, by reading and understanding the operating instructions.
- Do not use the machine for unsuitable purposes (see "Proper use" and "Working with the log splitter").
-
Ensure that you have stand in a secure standing position and maintain your balance at all times.
■ Take up a working position which is close to the controls.
■ Never stand on top of the machine.
■ When working with the machine, always wear -
face mask
- safety gloves
- hearing protection
— safety shoes with steel toe-caps
■ Wear suitable work clothing:
- do not wear any loose-fitting clothing or jewellery, since these may be caught or trapped by moving parts
- Within his area of work the operator is responsible for third parties.
- The machine may not be operated by children or young people under the age of 18.
- Keep children away form machine.
- Never operate the machine if other persons are in the immediate vicinity.
■ Never leave the machine unattended. - Keep your workplace in an orderly condition! Untidiness can result in accidents.
- Do not overload the machine! You work better and safer in the given performance range.
- Only operate the machine with complete and correctly attached safety equipment and do not alter anything on the machine that could impair the safety.
- Do not modify the machine or parts of it.
- Do not spray machine with water (this is hazardous due to live components).
- Do not leave the machine standing in the rain or use when raining.
- Store the unused machine in a dry locked place away from the reach of children.
-
Switch the machine off and remove the mains plug from the socket when
-
carrying out repair works
– maintenance and cleaning work
– checking connecting lines, whether these are knotted or damaged - removing faults
- transporting
– leaving unattended (even during short interruptions)
- Check the machine for possible damage
- Before continuing to use the machine, the protective devices must be inspected to ensure that they work perfectly and with their intended function
- Check whether the movable parts function perfectly and do not stick or whether the parts are damaged. All parts must be correctly installed and fulfil all conditions to ensure perfect operation of the machine.
- Damaged guards and parts must be properly repaired or exchanged by a recognized, specialist workshop; insofar as nothing else is stated in the instructions for use.
- Damaged or illegible safety warning labels should be replaced immediately.

Electrical safety
- Electrical connections must conform to IEC 60245 (H 07 RN-F) with a cable cross-section of at least ⇒ 400 V 3\~ 5 x 1.5 mm² for a maximum cable length of up to 10 m
- Never use the machine with a power supply cable of over 10 m in length. Longer power supply cables will cause a drop in voltage. The motor will not be able to provide its maximum performance and the operation of the machine will be impaired.
- Plugs and coupler outlets on connection cables must be made of rubber, plasticised PVC or other thermoplastic material of same mechanical stability or be covered with this material.
■ The connector of the connection cable must be splash-proof. - When running the connection line observe that it does not interfere, is not squeezed, bended and the plug connection does not get wet.
■ Wind off completely the cable when using a cable drum. - Do not use the cable for purposes for which it is not meant. Protect the cable against heat, oil and sharp edges. Do not use the cable to pull the plug from the socket.
- Regularly check the extension cables and replace them if they are damaged.
- Do not use any defective connection cables.
- When working outdoors, only use extension cables especially approved and appropriately labelled for outdoor use.
- Do not set up any provisional electrical connections.
■ Never bypass protective devices or deactivate them.

The electrical connection or repairs to electrical parts of the machine must be carried out by a certified electrician or one of our customer service points. Local regulations – especially regarding protective measures – must be observed.

Repairs to other parts of the machine must be carried out by the manufacturer or one of his customer service points.

Use only original spare parts. Accidents can arise for the user through the use of other spare parts. The manufacturer is not liable for any damage or injury resulting from such action.
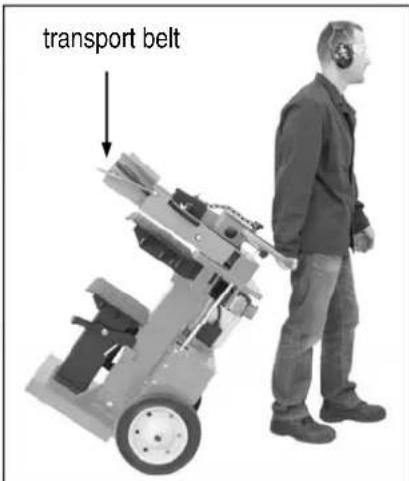
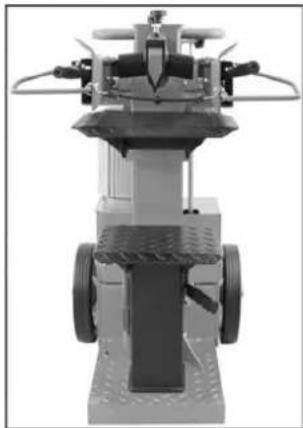
Transport Instructions

Move the splitting blade right down every time before the ne is transported.
To transport the machine, grasp the handle and tilt the log splitter slightly towards you. The log splitter can be easily transported in this position.
Make sure that the oil tank cap is securely tightened to prevent oil from leaking during transport.
Positioning
Ensure that the working area meets the following conditions:
— no danger of slipping
- level
- free of obstacles
– sufficiently well lit

Do not operate the machine in the direct vicinity of gas petrol pipes or containers, or any other easily inflammable serials.
Start-up
- Check that the machine is completely and correctly assembled.
Before using the log splitter, make sure each time that – there are no faulty connections (tears, cuts, etc.)
Do not use defective power supply cables.
– there are no damages at the machine
- all screws are tight
– check the hydraulic system for any possible leaks
- the oil level

The transport closure must be replaced by the oil start up the machine.
Transport closure
If the hydraulic system is not vented, the trapped air will damage the seals and cause permanent damage to the log splitter.

Mains connection
- Compare the voltage given on the machine model plate e.g. 230 V with the mains voltage and connect the machine to the relevant and properly earthed plug.
■ Only use connection cables with sufficient cross-sections.
■ Connect the machine via a 30 mA fault current safety switch.
i Fuse protection
400 V 3\~ → 16 A

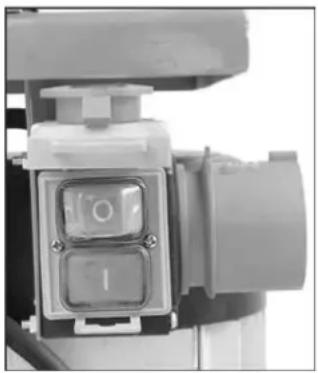
i Switching on / off
⚠️ Prior to every use, check the function of the disconnection mechanism (by switching on and off).
Do not use any device where the switch can not be switched on and off. Damaged switches must be repaired or replaced immediately by the customer service.
natural_image
Close-up of a mechanical component with two circular buttons labeled '1' and 'O', no visible text or symbols beyond the button labels.
Switching on
Press the green button.

Switching off
Press the red button.
① Lock in case of power (zero-voltage initiator)
The equipment will switch off automatically if there is a power cut. Repress the green button to switch it on again.
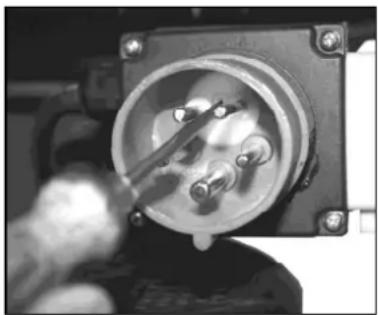
Log splitter with 400 V 3\~

Make sure that the motor turns in the
correct direction (see motor arrow), because operation in the wrong direction damages the oil pump.
➢ Switch on motor; the splitting blade automatically moves to the highest position.
If the splitting blade is already in its highest position: grip both operating handles and push them down. The splitting blade moves downwards.
If the splitting blade does not move after the motor has started, switch off the motor and change the direction of rotation.
You can change the direction by placing a screw-driver in the slot provided in the plug collar, and adjust the correct direction by moving to the left or right applying slight pressure.
natural_image
Close-up of a mechanical component with a tool inserted, showing internal components and mounting holes (no visible text or symbols)i Hydraulics
- Never operate the machine in the event of any possible danger from hydraulic fluid.
- Ensure that the machine and working area are clean and free of oil.
- Check the hydraulic reservoir regularly to ensure that it contains enough hydraulic oil (see "Care and maintenance").
Capacity: approx. 10 litres
Danger of slippage or fire!
Working with the log splitter
Additional SAFETY INSTRUCTIONS
- The log splitter may only be operated by a single person.
- The machine may only be operated by persons over the age of 18 years, and who have read and understood these operating instructions.
- Wear protective equipment (safety goggles/mask, gloves, safety shoes) to protect yourself from possible injury.
- Never try to split logs containing nails, wire or other similar objects.
- Already split wood and wood chips create a dangerous working area. The operator may stumble, slip or fall. Always keep the working area neat and tidy.
- Never place the hands on or near any moving parts of the machine when it is switched on. Maintain a safe distance from the log, the ram and the wedge in order to protect your hands from injury.
- The machine should only be used for splitting logs with a maximum length of 1300 mm.
- Check before splitting if the splitting column has been sufficiently lubricated to allow its trouble-free retraction and extension.
What type of logs can I split?
Size of logs
Length: max. 1300 mm
Diameter: min. 120 – max. 400 mm
The log diameter is a recommended guideline figure, because:
- thin logs can be difficult to split if they contain knots or if the fibres are too strong.
Do not try to split green logs. Dry logs are much easier to split, and do not cause jams as often as green (damp) wood.
⚠️ Hardwood tend to bursting: Exercise utmost caution!
Operation
Two-hand operation
⚠️ Never operate the log splitter with two people.
⚠️ Never block the control handles (clamping claws).
- Press the green switch on the electric motor. Wait a few moments until the motor has reached its operating revolutions and the required pressure has been built up in the hydraulic pump.
Check the direction of the motor in the log splitter with three-phase motor (400 V 3\~), because operation in the wrong direction damages the oil pump.
At temperatures below -5^ C, let the log splitter run for at least 15 min. in neutral to heat up the oil.
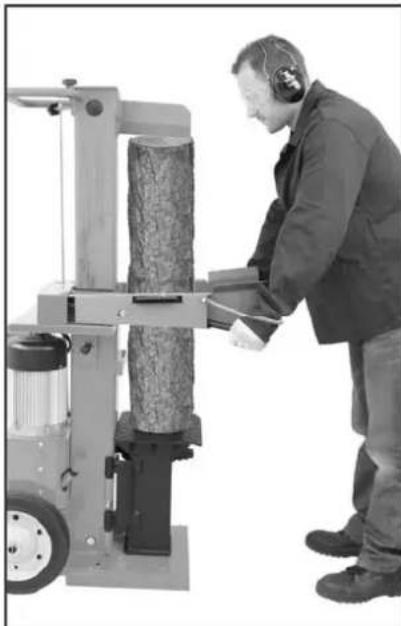
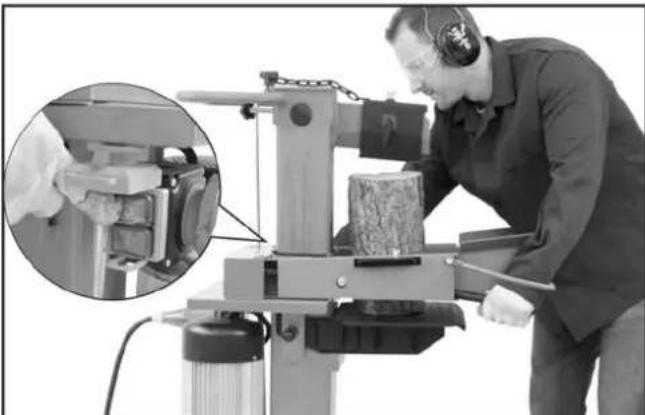
- Place the log on the log splitter table.
① Only split the logs in the direction of the wood fibres.
- Hold the log tight with the clamping claws.
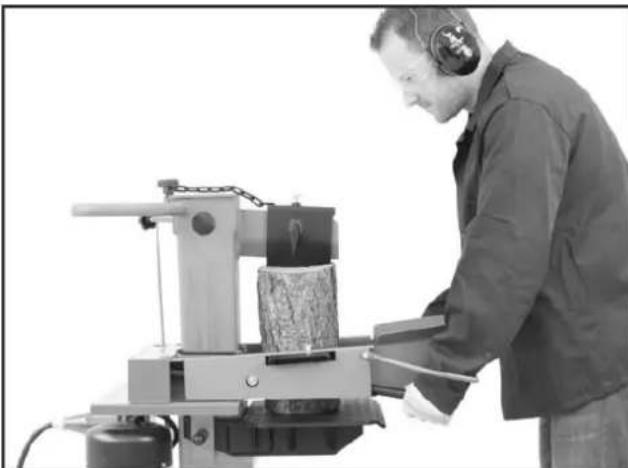
natural_image
Man operating a machine with a textured block, wearing headphones (no visible text or symbols)- Press both operating handles down simultaneously:
→ The splitting blade falls down and splits the log.
- Release the two control handles, the splitting blade returns to its initial position.
① If you only release one control handle, then the splitting blade remains where it is.
Special instructions for splitting logs:
■ Preparations:
The logs to be split should be cut to the maximum dimensions. Ensure also that the logs are cut straight and square.
Place the log properly on the log splitter, so as not to cause any risk of stumbling or falling to the operator.
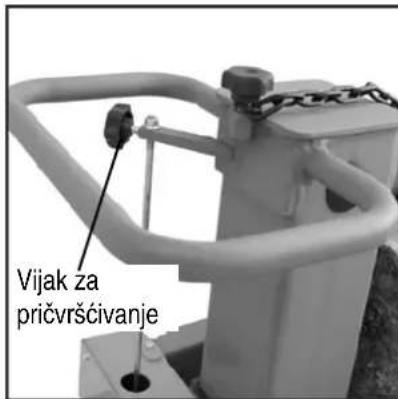
- Adjusting the stroke height
In case of shorter wood pieces the efficiency can be increased by shortening the return of the splitting cutter.
- Place the log on the splitting table and press the two control handles to bring the splitting blade down to approx. 2 cm above the log.
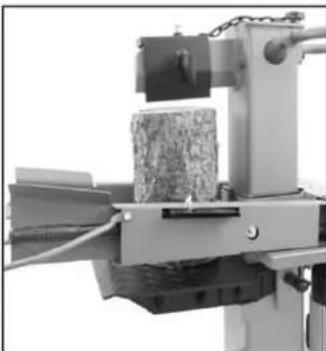
natural_image
Industrial machine with conveyor belt and mechanical components (no visible text or symbols)- Release one control handle so that the blade stays in this position.
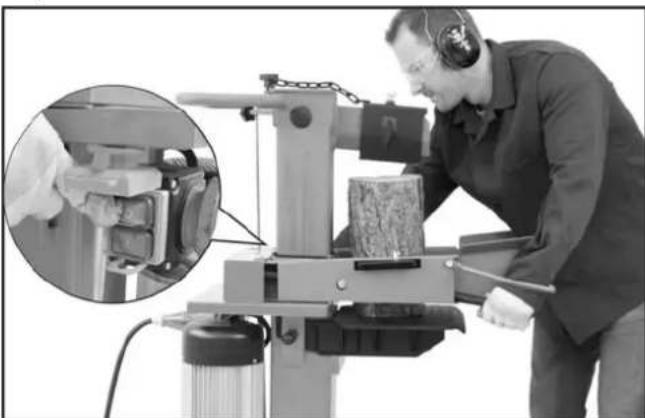
natural_image
Worker operating a machine with a close-up inset showing hand positioning and mechanical components (no visible text or symbols)-
Switch the machine off and disconnect the power.
-
Release the second control handle.
-
Shorten the return path at the rod fitted to the side by fixing the holding screw at the necessary height.

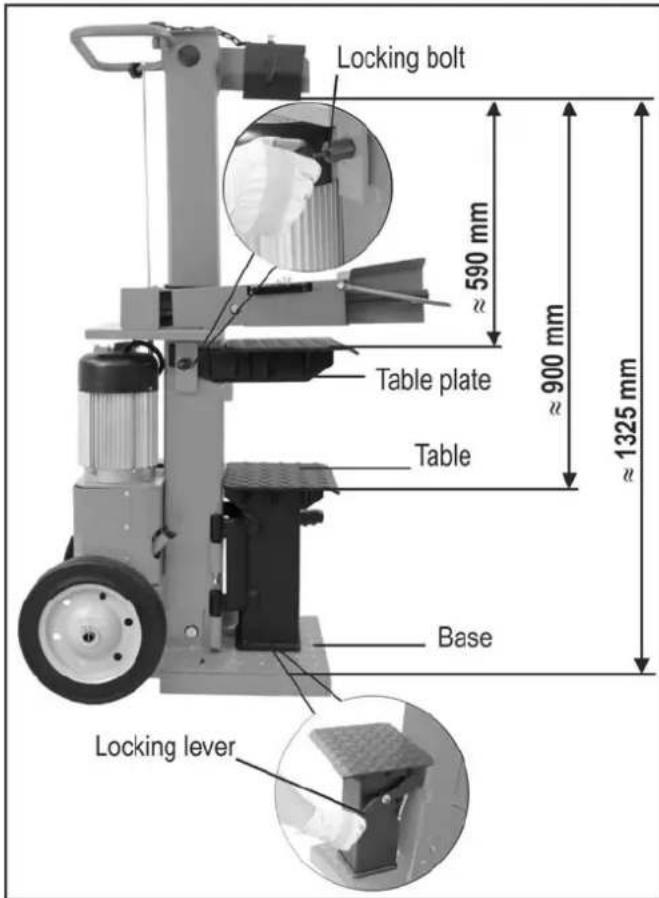
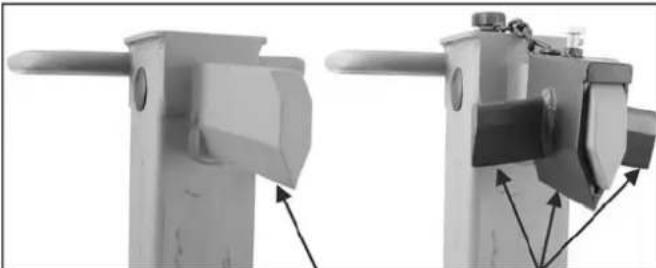
■ Adjusting the table height
Upper table plate position: 590 mm.
Middle table position: 900 mm.
Lower base position: 1325 cm.
-
Split logs up to 590 mm on the table plate. Secure the table plate using the locking bolt. (The locking bolt engages in the table plate hole.)
-
Split logs up to 900 mm on the table. Pull out the table plate.
-
Split logs up to 1300 mm on the base. Press the locking lever down and swing aside the table.
■ Adjusting the splitting cross:
-
Loosen hexagon screw.
-
Move the splitting cross to the correct position. (The hexagon screw lies above the hole in the splitting blade).
-
Tighten the hexagon screw again.
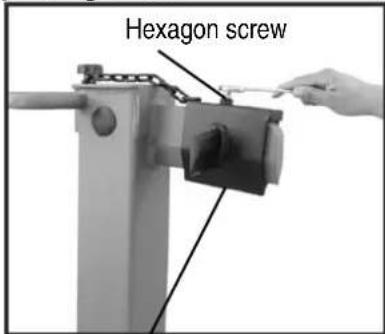
Splitting cross
- Splitting short wood:
-
Upper position of table plate.
-
Place the log on the splitter's table plate.
-
Hold the log tight with the clamping claws.
① Only split the logs in the direction of the wood fibres.
- Splitting long wood:
-
Middle position of table or low position of base.
-
Remove the splitting cross.
-
Place the log on the splitter's table or base.
natural_image
Person operating a portable industrial machine with a cylindrical component, no visible text or symbolsPossible malfunction when cleaving logs: The log to be cleaved is not cleaved right through, jams on the cleaving blade and is pulled up during the blade's return movement. In this case, proceed as follows:
-
Switch off the device.
-
Depending on the log still to be cleaved fix the table plate in the upper or the table in the middle position.
-
Switch on the device and continue the splitting operation.

Never try to split two logs at once.

Never try to remove or replace the log during the splitting process.
Never try to force the splitting of the log by maintaining the pressure for several seconds. This can lead to damage to the machine.
Position the log on the table again and repeat the splitting phase, or put the log on one side.
How to release a jammed log?
There is a risk of knotted logs getting stuck during the splitting process.
-
Switch machine off and disconnect the power.
-
Do not remove jammed logs with your hands.

- Carefully move the stuck log with a crowbar backwards and forwards to loosen it. Don't damage the splitting pillar.

Never hammer on the stuck log.

Never use a saw to cut the stuck log out of the machine.

Do not enlist the aid of a second person - this is a one-man job.
Finishing work:
➢ Bring the splitting blade to the lower position (run-in state).
Release one of the control handles.
Switch the machine off and disconnect the power.
➢ Follow the care and maintenance instructions.
Maintenance and cleaning
Before each maintenance and cleaning work:
- switch off device
- pull out main plug

Wear protective gloves in order to avoid injury to the hands.
For maintaining and cleaning, removed security devices must unconditionally be mounted properly and proved again.
Use only original parts. Other parts can result in unexpected damages and injuries.
Be sure to have removed any tools from the machine after completion of service work.
Maintenance and repair work other than those described in this chapter is only allowed to be carried out by service staff.
To guarantee a long and reliable usage of the product carry out the following maintenance works regularly.
i Observe the following in order to keep the log splitter in good working order:
- Clean the machine thoroughly after you have finished using it.
- Loose fastening elements.
■ Worn out or damaged parts.
■ Remove any resin remains on the machine. - Lubricate the splitting column regularly or oil it using environmentally friendly spray oil.
- Check hydraulic hoses and hose connections regularly for any leaks and firm fitting.
- Correct assembly and faultless covers and protective devices.
Sharpening the splitting blade
After longer operating periods, for reduced splitting performance or slight deformation of the cutting edge, grind the splitting blade or sharpen it with a fine file (remove burrs).
natural_image
Two mechanical components with directional arrows indicating movement or force, mounted on a pole (no text or symbols visible)Sharpen wedges

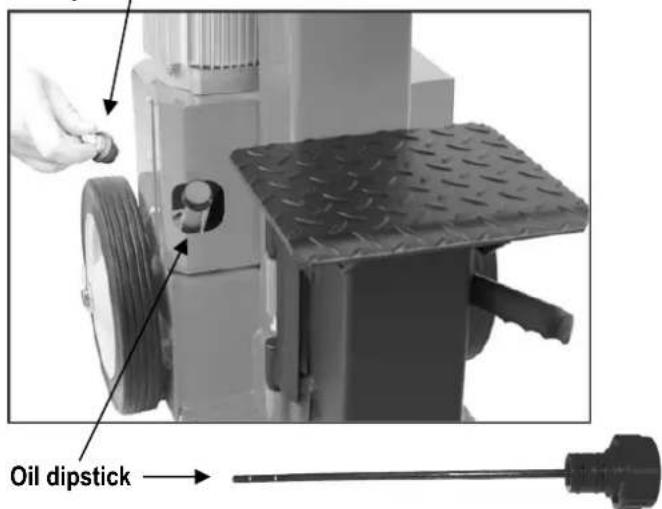
How do I check the oil level?
-
The splitting column must be in run-in state. Now remove the dipstick.
-
Clean the dipstick and the oil seal.
-
Replace the dipstick fully into the oil reservoir.
-
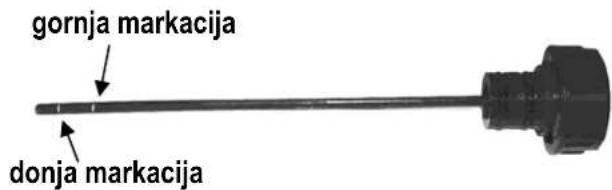
Now remove the dipstick again and read off the oil level.

natural_image
Mechanical device with mounted components and mounting base (no visible text or symbols)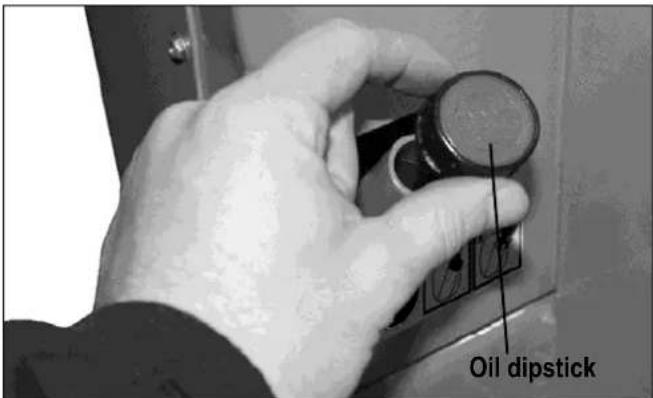
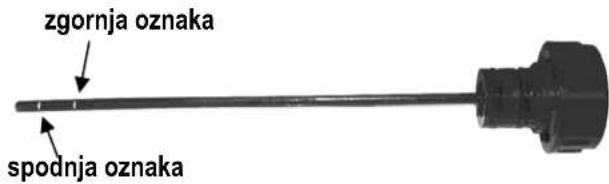
If the oil level is between the two marking on the oil dipstick, there is sufficient oil in the reservoir.
If the oil level is below the lower marking, more oil should be added with the aid of a clean funnel.

-
Check the oil seal and replace it if it is damaged in any way.
-
Replace the dipstick into the oil reservoir.

When should I change the oil?
The first oil change should be carried out after 50 operating hours, and then every 500 operating hours.

Two persons are required for this.
Changing the oil:
- The splitting column must be in run-in state.
-
Now remove the dipstick.
-
Place a container under the log splitter to catch the old oil. The container should have a capacity of at least 10 litres.
-
Place a container under the log splitter to catch the old oil. The container should have a capacity of at least 10 litres.
-
Screw off the drain plug to allow the oil to flow out.

natural_image
Close-up of a hand using a tool to clean or wash the metal bowl (no text or symbols visible)-
Insert the seal and drain plug again.
-
Pour in the new hydraulic oil (approx. 7 litres) using a clean funnel.
-
Clean the dipstick and the oil seal.
-
Check the oil seal and replace it if it is damaged in any way.
-
Replace the dipstick.
-
Insert the seal and drain plug again.
- Pour in the new hydraulic oil (approx. 7 litres) using a clean funnel.
- Clean the dipstick and the oil seal.
- Check the oil seal and replace it if it is damaged in any way.
- Replace the dipstick.
Dispose of the old oil properly (local oil disposal point). The old oil must not be poured into the ground or drainage system, or mixed with other waste.

Hydraulic oil
We recommend the following hydraulic oils for the hydraulic cylinder:
Shell Tellus T 22
Aral Vitam Gf 22
BP Energol HLP 22
Mobil DTE 11
or equivalent
Do not use any other types of oil. The use of any other type of oil will adversely affect the operation of the hydraulic cylinder.
Technical data
| Model / Type ASP 14 TS | |
| Year of construction see last page | |
| Splitting force 140 kN (14 t) | |
| Log length max. 1300 mm | |
| Log diameter min. 120 mm – max. 400 mm | |
| Stroke | ≈ 530 mm |
| Feed speed approx. 0.034 m/sek. | |
| Return speed approx. 0.17 m/sek. | |
| Hydraulic oil (max.) approx. 10 litres | |
| Hydraulic pressure 28.6 MPa (286 bar) | |
| Electric motor performance (power consumption) P | 1 4.0 kW S6 (4 min/6 min) |
| Power supply 400 V / 3N~+PE 50 Hz, 16 A | |
| Dimensions length 580 x width 920 x height 1540 mm | |
| Weight | approx. |
Possible problems
Before each fault clearance:
- switch off device
- pull out main plug
| Problem | Possible cause | Remedy |
| Logs are not being split properly(insufficient splitting performance). | ⇒ The log is not positioned correctly.⇒ The log exceeds the maximum dimensions or the wood is too hard for the performance of the machine.⇒ Splitting blade does not split log.⇒ Hydraulic pressure too low.⇒ Release rods bent (hydraulic tappet not quite pressed in).⇒ Incorrect connecting lead (longer than 10 m or too small cable cross-section). | ⇒ Reposition the log correctly.⇒ Cut the log to the required dimensions.⇒ Sharpen splitting blade, check for burrs or notches.⇒ Check the oil level and add more oil if necessary.If the problem cannot be rectified, refer to the manufacturer or other approved service centre.⇒ Arrange for manufacturer or authorised company to adjust the rods.⇒ Use the correct connecting lead. |
| Splitting column moves unsteadily or with strong vibrations. | ⇒ Air in the circuit.⇒ Splitting column not sufficiently lubricated or oiled. | ⇒ Check the oil level and add more oil if necessary.⇒ Lubricate splitting column or oil with environmentally friendly spray oil.If the problem cannot be rectified, refer to the manufacturer or other approved service centre. |
| Splitting column does not move in. | ⇒ Hydraulic pump defective. | ⇒ To correct the problem, refer to the manufacturer or other approved service centre. |
| Motor starts, but splitting column does not move in. | ⇒ Motor turns in wrong direction | ⇒ Check the motor directionThreephase: adjust the motor direction |
| Motor will not start. | ⇒ No electrical power.⇒ 2-phase mode in threephase motor.⇒ Connection cable defective.⇒ Electric motor defective. | ⇒ Check the fuse.⇒ Have fuse and lead checked by qualified electrician.⇒ Replace the connection cable or have it checked by an electrician.⇒ To correct the problem, refer to the manufacturer or other approved service centre. |
Guarantee
Please observe the enclosed terms of guarantee.

natural_image
Close-up of a mechanical component with a central square button and two circular ports (no visible text or symbols)Mise en marche
natural_image
Close-up of a mechanical component with a metallic tool inserted, showing internal components and mounting holes (no visible text or symbols)natural_image
Person operating a machine with tools and components, wearing a headset (no visible text or symbols)natural_image
Industrial machine with a textured block mounted on a platform (no visible text or symbols)natural_image
Worker operating a machine with a close-up inset showing a mechanical component (no visible text or symbols)natural_image
Worker operating a mechanical device with a cylindrical component, no visible text or symbolsnatural_image
Two mechanical components with directional arrows indicating movement or force, no visible text or symbolsAffûtage des arêtes
natural_image
Mechanical device with attached frame and wheels (no visible text or symbols)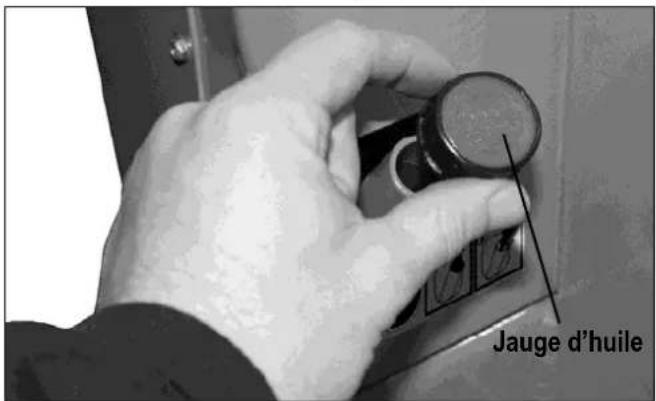
natural_image
Close-up of a hand using a tool to clean or wash the surface of a metal bowl (no text or symbols visible)natural_image
Close-up of a mechanical component with a central square button and two circular buttons, no visible text or symbols.
Включване
natural_image
Close-up of a mechanical component with internal components and a tool, no visible text or symbolsi Хидравлика
natural_image
Man operating a machine with tools, wearing headphones (no visible text or symbols)natural_image
Industrial machine with conveyor belt and mechanical components (no visible text or symbols)natural_image
Worker operating a mechanical device with a magnified inset showing a close-up of the component (no visible text or symbols)natural_image
Person operating a mechanical device with a textured cylindrical component, wearing a headset (no visible text or symbols)natural_image
Mechanical component assembly diagram showing two views of a lever mechanism (no text or symbols)наточване на ръба

natural_image
Industrial machine with dual wheels and control panel (no visible text or symbols)
natural_image
Close-up of a hand using a tool to clean or wash a metal bowl (no text or symbols visible)natural_image
Close-up of a mechanical component with a central square button and two circular ports (no visible text or symbols)
Zapnutí
natural_image
Close-up of a mechanical component with a central circular opening and internal wiring (no visible text or symbols)i Hydraulika
natural_image
Man operating a machine with a headband, no visible text or symbolsnatural_image
Mechanical assembly with a textured block mounted on a platform, no visible text or symbolsnatural_image
Worker operating a mechanical machine with a magnified inset showing hand positioning (no visible text or symbols)natural_image
Person operating a portable industrial machine with cylindrical components (no visible text or symbols)natural_image
Two mechanical components with directional arrows indicating movement or assembly (no visible text or symbols)Ostření hrany
natural_image
Industrial machine component with dual wheels and a central top (no visible text or symbols)
natural_image
Close-up of a hand using a tool to clean or wash metal in a bowl (no text or symbols visible)Symbol apparat / emballage

Opstilling
i Indkobling / Frakobling

natural_image
Close-up of a mechanical component with two transparent buttons and a handle (no visible text or symbols)
Indkobling
natural_image
Close-up of a mechanical component with a circular housing and internal wiring (no visible text or symbols)i Hydraulik
natural_image
Man operating a machine with tools, wearing headphones (no visible text or symbols)natural_image
Mechanical assembly with a textured block mounted on a metal frame (no visible text or symbols)- Slip et af betjeningshåndtagene for at standse spaltekniven i denne position.

natural_image
Worker operating a machine with a magnified inset showing a close-up of the mechanical component (no visible text or symbols)natural_image
Person operating a mechanical lift or cart with a cylindrical component, no visible text or symbolsnatural_image
Two mechanical components with directional arrows indicating movement or assembly (no text or symbols visible)skærpning af kant

natural_image
Mechanical device with mounted components and wheels (no visible text or symbols)
natural_image
Close-up of a hand using a tool to clean or wash a metal bowl, no visible text or symbolsnatural_image
Close-up of a mechanical component with a square button and two circular ports (no visible text or symbols)
Päällekytkeminen
natural_image
Close-up of a mechanical component with a tool inserted, showing internal components and mounting holes (no visible text or symbols)i Hydraulikka
natural_image
Person operating a machine tool in a workshop (no visible text or symbols)natural_image
Industrial machine with conveyor belt and mechanical components (no visible text or symbols)natural_image
Worker operating a machine with a magnified inset showing a hand holding a small object (no visible text or symbols)natural_image
Person operating a mechanical press machine with a cylindrical component (no visible text or symbols)natural_image
Two mechanical components with directional arrows indicating movement or force, mounted on a vertical support (no text or symbols visible)Reunan teroitus

natural_image
Industrial machine with dual wheels and control panel (no visible text or symbols)
natural_image
Close-up of a hand using a tool to clean or wash the surface of a metal bowl (no text or symbols visible)natural_image
Close-up of a mechanical device with a central square button and handle (no visible text or symbols)
Bekapcsolás
natural_image
Close-up of a mechanical component with a tool inserted, showing internal components and mounting holes (no visible text or symbols)i Hidraulika
natural_image
Man wearing headset operating industrial machine (no visible text or symbols)natural_image
Mechanical assembly with layered components and a textured block (no visible text or symbols)natural_image
Worker operating a mechanical device with a magnified inset showing hand positioning (no visible text or symbols)natural_image
Person operating a mechanical device with a textured cylindrical component, no visible text or symbolsnatural_image
Two mechanical components with directional arrows indicating movement or force, mounted on a vertical support (no text or symbols visible)natural_image
Mechanical device with wheels and a central top component (no visible text or symbols)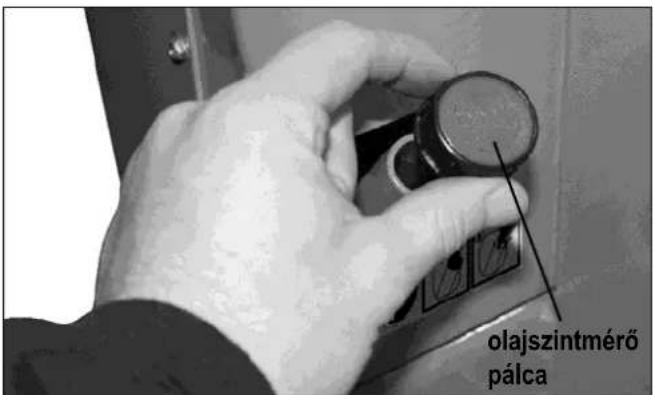
natural_image
Close-up of a hand using a tool to clean or wash metal in a bowl (no text or symbols visible)natural_image
Close-up of a mechanical component with a central button and two buttons (no visible text or symbols)Uključivanje Pritisnite zelenu tipku.
Isključivanje Pritisnite crvenu tipku.
① Osigurač od ponovnog puštanja u rad u slučaju prekida dovoda struje (nulnaponski okidač)
natural_image
Close-up of a mechanical component with a circular opening and internal components, possibly a valve or pump (no visible text or symbols)Hidraulika
- Nikada nemojte raditi sa strojem kad postoji opasnost od strane hidraulične tekućine.
- Osigurajte da su stroj i radno područje čisti i bez fleka od ulja. Opasnost od sklizanja i požara!
- Provjeravajte redovito, ima li u spremniku dovoljno hidrauličnog ulja (vidi „Održavanje i njega“)
Sadržaj: otprilike 10 litra
natural_image
Man wearing headset operating industrial machine (no visible text or symbols)natural_image
Mechanical assembly with a textured block mounted on a metal frame (no visible text or symbols)- Pustite jedan od držaka za posluživanje da bi nož za cijepanje ostao u toj poziciji, a onda isključite uređaj.
natural_image
Worker operating a machine with a magnified inset showing hand positioning and mechanical components (no visible text or symbols)-
Izvucite mrežni utikač.
-
Pustite drugi držak za posluživanje.
-
Skratite povratni hod na šipki koja je postavljena na boku, tako što ćete vijak za pričvršćivanje fiksi rati na potrebnoj visini.
natural_image
Person operating a portable industrial machine with a cylindrical component, no visible text or symbolsnatural_image
Two mechanical components with directional arrows indicating movement or force, mounted on a pole (no text or symbols visible)Oštrenje rubova

natural_image
Industrial machine with dual wheels and a central top component (no visible text or symbols)
Ako razina ulja leži između dvije markacije, onda u spremniku ima dovoljno ulja.
Ako razina ulja leži ispod donje markacije, ulje se pomoću jednog čistog lijevka mora dopuniti.
-
Provjerite brtvilo za ulje. U slučaju da je oštećeno brtvilo se mora izmijeniti.
-
Stavite opet mjernu šipku u otvor do graničnika.

natural_image
Close-up of a hand using a tool to clean or wash a metal bowl (no text or symbols visible)- Opet umetnite brtvilo i ispusni čep.
- Pomoću čistog lijevka uspite novo hidraulično ulje (otprilike 7 litara).
- Očistite šipku za mjerenje razine ulja i brtvilo za ulje.
- Provjerite brtvilo za ulje. U slučaju da je oštećeno, brtvilo se mora izmijeniti.
- Zavrnite opet šipku za mjerenje razine ulja čvrsto.
Staro ulje uklonite propisno (odlagalište starog ulja u Vašoj blizini). Zabranjeno je ispuštanje starog ulja u tlo ili miješanje s ostalim otpadom.

Hidraulično ulje
natural_image
Close-up of a mechanical device with a central button labeled 'O' and a side panel showing '1', no visible text or symbols.
Accensione
natural_image
Close-up of a mechanical component with a circular housing and internal components, possibly a valve or connector (no visible text or symbols)natural_image
Man operating a machine with a headband, no visible text or symbolsnatural_image
Industrial machine with conveyor belt and mechanical components (no visible text or symbols)natural_image
Worker operating a mechanical machine with an inset close-up showing a hand holding a small object (no visible text or symbols)natural_image
Person operating a mechanical lift or cart with a cylindrical component, no visible text or symbolsnatural_image
Two mechanical components with directional arrows indicating movement or assembly (no visible text or symbols)Affilare lo spigolo

natural_image
Mechanical device with mounted components and mounting base (no visible text or symbols)
natural_image
Close-up of a hand using a tool to clean or wash the surface of a metal bowl (no text or symbols visible)natural_image
Close-up of a mechanical component with two circular buttons and a handle (no visible text or symbols)natural_image
Close-up of a mechanical component with a tool inserted, showing internal components and mounting holes (no visible text or symbols)i Hydraulisch systeem
natural_image
Worker operating a machine tool in a workshop (no visible text or symbols)natural_image
Industrial machine with a textured block mounted on a conveyor belt (no visible text or symbols)natural_image
Man operating a machine with a close-up inset showing a hand holding a small object (no visible text or symbols)natural_image
Person operating a mechanical device with a cylindrical component, no visible text or symbolsnatural_image
Two mechanical components with directional arrows indicating movement or force, mounted on a pole (no text or symbols visible)Kant scherpen

natural_image
Top-down view of a mechanical lift or platform device with visible gears and wheels (no text or symbols)
natural_image
Close-up of a hand using a tool to clean or wash a metal bowl (no text or symbols visible)natural_image
Close-up of a mechanical device with a central square button and two buttons, no visible text or symbols.
taczenie
natural_image
Close-up of a mechanical component with internal components and mounting holes (no visible text or symbols)natural_image
Man wearing headset operating industrial machine (no visible text or symbols)natural_image
Industrial machine with a textured block mounted on a metal frame (no visible text or symbols)natural_image
Worker operating a mechanical machine with an inset close-up showing hand positioning (no visible text or symbols)natural_image
Person operating a portable industrial machine with a textured cylindrical component, no visible text or symbolsnatural_image
Two mechanical components with directional arrows indicating movement or assembly (no visible text or symbols)natural_image
Industrial machine with dual wheels and a top-mounted head (no visible text or symbols)
natural_image
Close-up of a hand using a tool to clean or wash a metal bowl (no text or symbols visible)natural_image
Close-up of a mechanical component with two square buttons and a handle (no visible text or symbols)
Conectarea
natural_image
Close-up of a mechanical component with a tool inserted, showing internal components and mounting holes (no visible text or symbols)i Sistemul hidraulic
natural_image
Man operating a machine with headsets, no visible text or symbolsnatural_image
Industrial machine with a textured block mounted on a metal frame (no visible text or symbols)natural_image
Worker operating a machine with a magnified inset showing a close-up of the mechanical component (no visible text or symbols)natural_image
Person operating a portable industrial machine with a cylindrical component, no visible text or symbolsnatural_image
Two mechanical components with directional arrows indicating movement or force, no visible text or symbolsAscuțiti muchia

natural_image
Mechanical device with mounted gears and a flat base (no visible text or symbols)
natural_image
Close-up of a hand using a tool to clean or wash the metal bowl (no text or symbols visible)natural_image
Close-up of a mechanical device with a central button and two buttons, no visible text or symbols.
Tillkoppling
natural_image
Close-up of a mechanical component with internal wiring and mounting holes (no visible text or symbols)i Hydraulik
natural_image
Person operating a machine with a headband, no visible text or symbolsnatural_image
Industrial machine with a textured block mounted on a metal frame (no visible text or symbols)natural_image
Worker operating a mechanical machine with an inset close-up showing a hand holding a component (no visible text or symbols)natural_image
Person operating a portable industrial machine with a textured cylindrical component, no visible text or symbolsnatural_image
Two mechanical components with directional arrows indicating movement or force, mounted on a pole (no text or symbols visible)Skärpa kanten

natural_image
Industrial machine with dual wheels and control panel (no visible text or symbols)
natural_image
Close-up of a hand using a tool to clean or wash a metal bowl (no text or symbols visible)natural_image
Close-up of a mechanical device with a central square button labeled 'I' and a circular symbol on top (no readable text or symbols beyond the label)
Zapnutie
natural_image
Close-up of a mechanical component with a circular opening and internal components, possibly a valve or connector (no visible text or symbols)i Hydraulika
natural_image
Person operating a machine with a headlamp, no visible text or symbolsnatural_image
Mechanical assembly with a textured block mounted on a metal frame (no visible text or symbols)natural_image
Man operating a mechanical machine with an inset close-up showing a hand holding a component (no visible text or symbols)natural_image
Person operating a portable industrial machine with a cylindrical component, no visible text or symbolsnatural_image
Two mechanical components with directional arrows indicating movement or assembly (no text or symbols visible)Ostrenie hrany

Ako skontrolovat' stav oleja?
-
Štiepací stípik musí byt' zasunutý.
-
Odmerku vytiahnite.
-
Očistite odmerku a tesnenie.
-
Čistú odmerku opät' zasuňte do otvoru až na doraz.
-
Odmerku opät vytiahnite.

natural_image
Mechanical device with mounted components and mounting base (no visible text or symbols)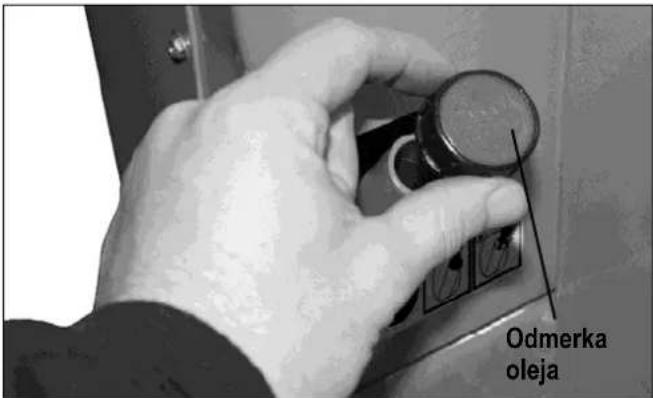
ak leží hladina oleja medzi oboma označeniami, je oleja v stroji dostatok.
ak je hladina oleja pod dolnou ryskou, je potrebné olej doplnit. Použite čistý lievik.

-
Skontrolujte tesnenie. Nesmie byt' poškodené.
-
Čistú odmerku vsuňte opät do otvoru.

natural_image
Close-up of a hand using a tool to clean or wash the surface of a metal bowl (no text or symbols visible)natural_image
Close-up of a mechanical component with a central button and flange (no visible text or symbols)
Vklop
Pritisnite zeleno tipko.

Izklop
natural_image
Close-up of a mechanical component with internal components and a tool, no visible text or symbolsi Hidravlika
natural_image
Person operating a machine tool in a workshop (no visible text or symbols)- Hkrati pritiskajte krmilno ročico navzdo.
→ Pomikalo debel potisne deblo proti cepilnemu klinu. Deblo se razcepi.
natural_image
Industrial machine with a textured block mounted on a metal frame (no visible text or symbols)- Izpustite eno krmilno ročico, da se cepilni nož v tem položaju ustavi in izključite napravo.

natural_image
Man operating a machine with a close-up inset showing a mechanical component (no visible text or symbols)natural_image
Person operating a mechanical lift or cart with a device, no visible text or symbolsnatural_image
Two mechanical components with directional arrows indicating movement or assembly (no visible text or symbols)Brušenje roba

Kako preverim stanje olja?
-
Cepilni steber mora biti v nevtralnem položaju.
-
Izvijačite merilno palico za olje.
-
Očistite merilno palico za olje in oljno tesnilo.
-
Merilno palico za olje vstavite do omejila nazaj v odprtino.
-
Znova izvlecite merilno palico za olje.
natural_image
Industrial machine component with dual wheels and a central top (no visible text or symbols)
Če je raven olja med obema oznakama, je v rezervoarju dovolj olja.
Če je raven olja pod spodnjo oznako, je treba olje doliti z uporabo čistega lijaka.
-
Preverite oljno tesnilo. Če je poškodovano, ga morate zamenjati.
-
Merilno palico za olje vstavite do omejila nazaj v odprtino.

Kdaj moram menjati olje?
natural_image
Close-up of a hand using a tool to clean or wash a metal bowl (no text or symbols visible)- Ponovno vstavite tesnilo in izpustni čep.
- Skozi lijak vljite novo hidravlično olje (pribl. 7 litra).
- Očistite merilno palico za olje in oljno tesnilo.
- Preverite oljno tesnilo. Če je poškodovano, ga morate zamenjati.
- Merilno palico za olje vstavite do omejila nazaj v odprtino.
natural_image
Close-up of sliced citrus tree roots in white, showing segmented leaves and root (no text or symbols)
- Brennholzspalter
- GB Extend of delivery
- F Fourniture
- D
- F
- FIN
- Einschalten
- i Hydraulik
- Symbols machine
- Symbols machine / packaging
- Symbols operating manual
- Proper use
- Residual risks
- Safe working
- Electrical safety
- Transport Instructions
- Positioning
- Start-up
- Mains connection
- i Switching on / off
- Switching on
- Switching off
- ① Lock in case of power (zero-voltage initiator)
- Log splitter with 400 V 3\~
- Make sure that the motor turns in the
- i Hydraulics
- Danger of slippage or fire!
- Working with the log splitter
- Additional SAFETY INSTRUCTIONS
- What type of logs can I split?
- Size of logs
- Operation
- Two-hand operation
- Special instructions for splitting logs:
- ■ Preparations:
- - Adjusting the stroke height
- ■ Adjusting the table height
- ■ Adjusting the splitting cross:
- - Splitting short wood:
- - Splitting long wood:
- How to release a jammed log?
- Finishing work:
- Maintenance and cleaning
- Sharpening the splitting blade
- How do I check the oil level?
- When should I change the oil?
- Two persons are required for this.
- Changing the oil:
- Hydraulic oil
- Possible problems
- Guarantee
- i Хидравлика
- Zapnutí
- i Hydraulika
- Symbol apparat / emballage
- Opstilling
- i Indkobling / Frakobling
- Indkobling
- Päällekytkeminen
- i Hydraulikka
- Bekapcsolás
- i Hidraulika
- ① Osigurač od ponovnog puštanja u rad u slučaju prekida dovoda struje (nulnaponski okidač)
- Hidraulika
- Hidraulično ulje
- Accensione
- i Hydraulisch systeem
- taczenie
- Conectarea
- i Sistemul hidraulic
- Tillkoppling
- Zapnutie
- Ako skontrolovat' stav oleja?
- Vklop
- Izklop
- i Hidravlika
- Kako preverim stanje olja?
- Kdaj moram menjati olje?
Brand : ATIKA
Model : ASP 14 TS
Category : Log splitter