
GWS 750115 Professional - Coffee grinder BOSCH - Free user manual and instructions
Find the device manual for free GWS 750115 Professional BOSCH in PDF.
| Product type | Professional angle grinder |
| Brand | Bosch |
| Model | GWS 750-115 Professional |
| Nominal power input | 750 W |
| Power output | 380 W |
| Rated speed | 11,000 rpm |
| Max disc diameter | 115 mm |
| Drive spindle thread | M14 |
| Weight (with standard handle) | 1.8 kg |
| Weight (with anti-vibration handle) | 1.9 kg |
| Protection class | II (double insulation) |
| Preselection of speed | No (standard model) |
| Anti-restart protection | No (standard model) |
| Starting current limitation | No (standard model) |
| Main functions | Grinding, cutting, sanding, wire brushing |
| Additional handle | Yes, adjustable (left/right) |
| Protective guard | For grinding and cutting (interchangeable) |
| Spindle lock button | Yes |
| Maintenance and cleaning | Clean ventilation slots, blow out with compressed air |
| Spare parts and repairability | Bosch after-sales service, parts available |
Frequently Asked Questions - GWS 750115 Professional BOSCH
User questions about GWS 750115 Professional BOSCH
0 question about this device. Answer the ones you know or ask your own.
Ask a new question about this device
Download the instructions for your Coffee grinder in PDF format for free! Find your manual GWS 750115 Professional - BOSCH and take your electronic device back in hand. On this page are published all the documents necessary for the use of your device. GWS 750115 Professional by BOSCH.
USER MANUAL GWS 750115 Professional BOSCH
General Power Tool SafetyWarnings
WARNING
Read all safety warnings and all instructions. Failure to follow the
warnings and instructions may result in electric shock, fire and/or serious injury.
Save all warnings and instructions for future reference.
The term "power tool" in the warnings refers to your mains-operated (corded) power tool or battery-operated (cordless) power tool.
Work area safety
- Keep work area clean and well lit. Cluttered or dark areas invite accidents.
Do not operate power tools in explosive atmospheres, such as in the presence of flammable liquids, gases or dust. Power tools create sparks which may ignite the dust or fumes. - Keep children and bystanders away while operating a power tool. Distractions can cause you to lose control.
Electrical safety
Power tool plugs must match the outlet. Never modify the plug in any way. Do not use any adapter plugs with earthed (grounded) power tools. Unmodified plugs and matching outlets will reduce risk of electric shock.
Avoid body contact with earthed or grounded surfaces, such as pipes, radiators, ranges and refrigerators. There is an increased risk of electric shock if your body is earthed or grounded.
Do not expose power tools to rain or wet conditions. Water entering a power tool will increase the risk of electric shock.
Do not abuse the cord. Never use the cord for carrying, pulling or unplugging the power tool. Keep cord away from heat, oil, sharp edges or moving parts. Damaged or entangled cords increase the risk of electric shock.
- When operating a power tool outdoors, use an extension cord suitable for outdoor use. Use of a cord suitable for outdoor use reduces the risk of electric shock..
If operating a power tool in a damp location is unavoidable, use a residual current device (RCD) protected supply. Use of an RCD reduces the risk of electric shock.
Personal safety
Stay alert, watch what you are doing and use common sense when operating a power tool. Do not use a power tool while you are tired or under the influence of drugs, alcohol or medication. A moment of inattention while operating power tools may result in serious personal injury.
Use personal protective equipment. Always wear eye protection. Protective equipment such as dust mask, non-skid safety shoes, hard hat, or hearing protection used for appropriate conditions will reduce personal injuries.
Prevent unintentional starting. Ensure the switch is in the off-position before connecting to power source and/or battery pack, picking up or carrying the tool.
Carrying power tools with your finger on the switch or energising power tools that have the switch on invites accidents.
Remove any adjusting key or wrench before turning the power tool on. A wrench or a key left attached to a rotating part of the power tool may result in personal injury.
Do not overreach. Keep proper footing and balance at all times. This enables better control of the power tool in unexpected situations.
Dress properly. Do not wear loose clothing or jewellery. Keep your hair, clothing and gloves away from moving parts. Loose clothes, jewellery or long hair can be caught in moving parts.
If devices are provided for the connection of dust extraction and collection facilities, ensure these are connected and properly used. Use of dust collection can reduce dust-related hazards.
Power tool use and care
Do not force the power tool. Use the correct power tool for your application. The correct power tool will do the job better and safer at the rate for which it was designed.
Do not use the power tool if the switch does not turn it on and off. Any power tool that cannot be controlled with the switch is dangerous and must be repaired.
- Disconnect the plug from the power source and/or the battery pack from the power tool before making any adjustments, changing accessories, or storing power tools. Such preventive safety measures reduce the risk of starting the power tool accidentally.
- Store idle power tools out of the reach of children and do not allow persons unfamiliar with the power tool or these instructions to operate the power tool. Power tools are dangerous in the hands of untrained users.
- Maintain power tools. Check for misalignment or binding of moving parts, breakage of parts and any other condition that may affect the power tool's operation. If damaged, have the power tool repaired before use. Many accidents are caused by poorly maintained power tools.
- Keep cutting tools sharp and clean. Properly maintained cutting tools with sharp cutting edges are less likely to bind and are easier to control.
Use the power tool, accessories and tool bits etc. in accordance with these instructions, taking into account the working conditions and the work to be per
formed. Use of the power tool for operations different from those intended could result in a hazardous situation.
Service
Have your power tool serviced by a qualified repair person using only identical replacement parts. This will ensure that the safety of the power tool is maintained.
Safety information for the angle grinder
SafetyWarnings common for Grinding, Sanding,Wire Brushing or Abrasive Cutting Off operations
This power tool is intended to function as a grinder, sander, wire brush or cut-off tool. Read all safety warnings, instructions, illustrations and specifications provided with this power tool. Failure to follow all instructions listed below may result in electric shock, fire and/or serious injury.
Operations such as polishing are not recommended to be performed with this power tool. Operations for which the power tool was not designed may create a hazard and cause personal injury.
- Do not use accessories which are not specifically designed and recommended by the tool manufacturer. Just because the accessory can be attached to your power tool, it does not assure safe operation.
The rated speed of the accessory must be at least equal to the maximum speed marked on the power tool. Accessories running faster than their rated speed can break and fly apart.
The outside diameter and the thickness of your accessory must be within the capacity rating of your power tool. Incorrectly sized accessories cannot be adequately guarded or controlled.
- Threaded mounting of accessories must match the grinder spindle thread. For accessories mounted by flanges, the arbour hole of the accessory must fit the locating diameter of the flange. Accessories that do not match the mounting hardware of the power tool will run out of balance, vibrate excessively and may cause loss of control.
Do not use a damaged accessory. Before each use inspect the accessory such as abrasive wheels for chips and cracks, backing pad for cracks, tear or excess wear, wire brush for loose or cracked wires. If power tool or accessory is dropped, inspect for damage or install an undamaged accessory. After inspecting and installing an accessory, position yourself and bystanders away from the plane of the rotating accessory and run the power tool at maximum no load speed for one minute. Damaged accessories will normally break apart during this test time.
Wear personal protective equipment. Depending on application, use face shield, safety goggles or safety glasses. As appropriate, wear dust mask, hearing protectors, gloves and workshop apron capable of stopping small abrasive or workpiece fragments. The eye protection must be capable of stopping flying debris gen
erated by various operations. The dust mask or respirator must be capable of filtrating particles generated by your operation. Prolonged exposure to high intensity noise may cause hearing loss.
- Keep bystanders a safe distance away from work area. Anyone entering the work area must wear personal protective equipment. Fragments of workpiece or of a broken accessory may fly away and cause injury beyond immediate area of operation.
Hold the power tool by insulated gripping surfaces only, when performing an operation where the cutting accessory may contact hidden wiring or its own cord. Cutting accessory contacting a "live" wire may make exposed metal parts of the power tool "live" and could give the operator an electric shock.
Position the cord clear of the spinning accessory. If you lose control, the cord may be cut or snagged and your hand or arm may be pulled into the spinning accessory. - Never lay the power tool down until the accessory has come to a complete stop. The spinning accessory may grab the surface and pull the power tool out of your control.
Do not run the power tool while carrying it at your side. Accidental contact with the spinning accessory could snag your clothing, pulling the accessory into your body.
Regularly clean the power tool's air vents. The motor's fan will draw the dust inside the housing and excessive accumulation of powdered metal may cause electrical hazards.
Do not operate the power tool near flammable materials. Sparks could ignite these materials. - Do not use accessories that require liquid coolants. Using water or other liquid coolants may result in electrocution or shock.
Kickback and RelatedWarnings
Kickback is a sudden reaction to a pinched or snagged rotating wheel, backing pad, brush or any other accessory. Pinching or snagging causes rapid stalling of the rotating accessory which in turn causes the uncontrolled power tool to be forced in the direction opposite of the accessory's rotation at the point of the binding.
For example, if an abrasive wheel is snagged or pinched by the workpiece, the edge of the wheel that is entering into the pinch point can dig into the surface of the material causing the wheel to climb out or kick out. The wheel may either jump toward or away from the operator, depending on direction of the wheel's movement at the point of pinching. Abrasive wheels may also break under these conditions.
Kickback is the result of power tool misuse and/or incorrect operating procedures or conditions and can be avoided by taking proper precautions as given below.
- Maintain a firm grip on the power tool and position your body and arm to allow you to resist kickback forces. Always use auxiliary handle, if provided, for maximum control over kickback or torque reaction
during start-up. The operator can control torque reactions or kickback forces, if proper precautions are taken.
Never place your hand near the rotating accessory. Accessory may kickback over your hand.
Do not position your body in the area where power tool will move if kickback occurs. Kickback will propel the tool in direction opposite to the wheel's movement at the point of snagging.
- Use special care when working corners, sharp edges etc. Avoid bouncing and snagging the accessory. Corners, sharp edges or bouncing have a tendency to snag the rotating accessory and cause loss of control or kickback.
Do not attach a saw chain woodcarving blade or toothed saw blade. Such blades create frequent kickback and loss of control.
SafetyWarnings specific for Grinding and Abrasive Cutting-Off operations
Use only wheel types that are recommended for your power tool and the specific guard designed for the selected wheel. Wheels for which the power tool was not designed cannot be adequately guarded and are unsafe.
The grinding surface of centre depressed wheels must be mounted below the plane of the guard lip. An improperly mounted wheel that projects through the plane of the guard lip cannot be adequately protected.
The guard must be securely attached to the power tool and positioned for maximum safety, so the least amount of wheel is exposed towards the operator. The guard helps to protect operator from broken wheel fragments, accidental contact with wheel and sparks that could ignite clothing.
- Wheels must be used only for recommended applications. For example: do not grind with the side of cutoff wheel. Abrasive cut-off wheels are intended for peripheral grinding, side forces applied to these wheels may cause them to shatter.
Always use undamaged wheel flanges that are of correct size and shape for your selected wheel. Proper wheel flanges support the wheel thus reducing the possibility of wheel breakage. Flanges for cut-off wheels may be different from grinding wheel flanges.
Do not use worn down wheels from larger power tools. Wheel intended for larger power tool is not suitable for the higher speed of a smaller tool and may burst.
Additional SafetyWarnings specific for Abrasive Cutting Off operations
Do not "jam" the cut-off wheel or apply excessive pressure. Do not attempt to make an excessive depth of cut. Overstressing the wheel increases the loading and susceptibility to twisting or binding of the wheel in the cut and the possibility of kickback or wheel breakage.
Do not position your body in line with and behind the rotating wheel. When the wheel, at the point of operation, is moving away from your body, the possible kick
back may propel the spinning wheel and the power tool directly at you.
- When wheel is binding or when interrupting a cut for any reason, switch off the power tool and hold the power tool motionless until the wheel comes to a complete stop. Never attempt to remove the cut-off wheel from the cut while the wheel is in motion otherwise kickback may occur. Investigate and take corrective action to eliminate the cause of wheel binding.
Do not restart the cutting operation in the workpiece. Let the wheel reach full speed and carefully re-enter the cut. The wheel may bind, walk up or kickback if the power tool is restarted in the workpiece.
Support panels or any oversized workpiece to minimize the risk of wheel pinching and kickback. Large workpieces tend to sag under their own weight. Supports must be placed under the workpiece near the line of cut and near the edge of the workpiece on both sides of the wheel.
Use extra caution when making a "pocket cut" into existing walls or other blind areas. The protruding wheel may cut gas or water pipes, electrical wiring or objects that can cause kickback.
SafetyWarnings specific for Sanding operations
Do not use excessively oversized sanding disc paper. Follow manufacturers recommendations, when selecting sanding paper. Larger sanding paper extending beyond the sanding pad presents a laceration hazard and may cause snagging, tearing of the disc, or kickback.
SafetyWarnings specific for WireBrushing operations
Be aware that wire bristles are thrown by the brush even during ordinary operation. Do not overstress the wires by applying excessive load to the brush The wire bristles can easily penetrate light clothing and/or skin.
If the use of a guard is recommended for wire brushing, do not allow any interference of the wire wheel or brush with the guard. Wire wheel or brush may expand in diameter due to work load and centrifugal forces.
Additional safety information

Wear safety goggles.
Use suitable detectors to determine if utility lines are hidden in the work area or call the local utility company for assistance. Contact with electric lines can lead to fire and electric shock. Damaging a gas line can lead to explosion. Penetrating a water line causes property damage or may cause an electric shock.
Do not touch grinding and cutting discs until they have cooled down. The discs can become very hot while working.
Release the On/Off switch and set it to the off position when the power supply is interrupted, e. g., in case of
a power failure or when the mains plug is pulled. This prevents uncontrolled restarting.
Products sold in GB only:
Your product is fitted with an BS 1363/A approved electric plug with internal fuse (ASTA approved to BS 1362).
If the plug is not suitable for your socket outlets, it should be cut off and an appropriate plug fitted in its place by an authorised customer service agent. The replacement plug should have the same fuse rating as the original plug. The severed plug must be disposed of to avoid a possible shock hazard and should never be inserted into a mains socket elsewhere.
- Secure the workpiece. A workpiece clamped with clamping devices or in a vice is held more secure than by hand.
Product Description and Specifications

Read all the safety and general instructions.
Failure to observe the safety and general instructions may result in electric shock, fire and/or serious injury.
Please observe the illustrations at the beginning of this operating manual.
Intended use
The power tool is intended for cutting, roughing and brushing metal and stone materials without the use of water.
A special protective guard for cutting must be used when cutting bonded abrasives.
Sufficient dust extraction must be provided when cutting stone.
With approved abrasive tools, the power tool can be used for sanding with sanding discs.
Product Features
The numbering of the product features refers to the diagram of the power tool on the graphics page.
(1) Spindle lock button
(2) On/off switch
(3) Speed preselection thumbwheel (GWS 750-100 S/GWS 750-115 S/GWS 750-125 S)
(4) Auxiliary handle (insulated gripping surface)
(5) Combination wrench for grinding spindle M14
(6) Combination wrench for grinding spindle M10A)
(7) Grinding spindle
(8) Protective guard for grinding
(9) Locking screw for protective guard
(10) Mounting flange with O-ring
(11) Grinding disc
(12) Clamping nut
(13) Quick-clamping nut SDS-ccic
(14) Carbide grinding head
(15) Protective guard for cutting
(16) Cutting disc
(17) Hand guard
(18) Rubber sanding pad
(19) Abrasive disc
(20) Round nutA
(21) Cup brush
(22) Handle (insulated gripping surface)
A) Accessories shown or described are not included with the product as standard. You can find the complete selection of accessories in our accessories range.
Technical Data
| Angle grinder GWS 710 GWS 750-100 GWS 750-115 GWS 750-125 | ||||
| Article number | 3601 C94 0.. 3601 C94 0.. 3601 C94 0.. 3601 C94 0.. | |||
| Rated power input W 750 750 750 750 | ||||
| Power output W 380 380 380 380 | ||||
| Rated speed rpm 11,000 11,000 11,000 11,000 | ||||
| Speed adjustment range rpm - - - - | ||||
| Max. grinding disc diameter mm 125 100 115 125 | ||||
| Grinding spindle thread M14 M10 M14 M14 | ||||
| Max. thread length of grinding spindle mm 22 22 22 22 | ||||
| Speed preselection - - - - | ||||
| Kickback stop | - - - - | |||
| Restart protection | - - - - | |||
| Starting current limitation | - - - - | |||
| Weight according to EPTA-Procedure 01:2014 | ||||
| Angle grinder GWS 710 GWS 750-100 GWS 750-115 GWS 750-125 | ||||
| - with additional low-vibration auxiliary handle | kg 1.9 1.9 1.9 1.9 | |||
| - with standard auxiliary handle | kg 1.8 1.8 1.8 1.8 | |||
| Protection class / II / II / II / II | ☐ | ☐ | ☐ | |
The specifications apply to a rated voltage [U] of 230 V. These specifications may vary at different voltages and in country-specific models.
| Angle grinder GWS 750-100 S GWS 750-115 S GWS 750-125 S GWS 750-100 I | ||||
| Article number | 3601 C94 1.. 3601 C94 1.. 3601 C94 1.. 3601 C94 2.. | |||
| Rated power input W 750 750 750 750 | ||||
| Power output W 380 380 380 410 | ||||
| Rated speed rpm 11,000 11,000 11,000 11,000 | ||||
| Speed adjustment range rpm 2800-11,000 2800-11,000 2800-11,000 | - | |||
| Max. grinding disc diameter mm 100 115 125 100 | ||||
| Grinding spindle thread | M10 | M14 | M14 | M10 |
| Max. thread length of grinding spindle mm | 22 | 22 | 22 | 22 |
| Speed preselection | ● | ● | ● | - |
| Kickback stop | - | - | - | ● |
| Restart protection | ● | ● | ● | ● |
| Starting current limitation | ● | ● | ● | ● |
| Weight according to EPTA-Procedure 01:2014 | ||||
| - with additional low-vibration auxiliary handle | kg 1.9 1.9 1.9 1.9 | |||
| - with standard auxiliary handle | kg 1.8 1.8 1.8 1.8 | |||
| Protection class / II / II / II / II | 回 | 回 | 回 | |
The specifications apply to a rated voltage [U] of 230 V. These specifications may vary at different voltages and in country-specific models.
Fitting
Fitting protective equipment
Pull the plug out of the socket before carrying out any work on the power tool.
Note: If the grinding disc breaks during operation or the holding fixtures on the protective guard/power tool become damaged, the power tool must be sent to the after-sales service immediately; see the "After-sales service and advice on using products" section for addresses.
Protective guard for grinding
Place the protective guard (8) on the spindle collar. Adjust the position of the protective guard (8) to meet the requirements of the operation. Lock the protective guard (8) by tightening the locking screw (9) using the combination wrench (5)/(6).
Adjust the protective guard (8) such that sparking in the direction of the operator is prevented.
Note: The coding cams on the protective guard (8) ensure that only a protective guard that is suitable for the power tool can be fitted.
Protective guard for cutting
Always use the protective guard for cutting (15) when cutting bonded abrasives.
Provide sufficient dust extraction when cutting stone.
The protective guard for cutting (15) is fitted in the same way as the protective guard for grinding (8).
Side handle
Do not operate your power tool without the side handle (4).
Screw the side handle (4) on the left or right of the machine head depending on how your are working.
Hand guard
Always fit the hand guard (17) when working with the rubber sanding pad (18) or with the cup brush/disc brush/flap disc.
Attach the hand guard (17) to the side handle (4).
Fitting the abrasive tools
- Pull the plug out of the socket before carrying out any work on the power tool.
Do not touch grinding and cutting discs until they have cooled down. The discs can become very hot while working.
Clean the grinding spindle (7) and all the parts to be fitted. Lock the grinding spindle with the spindle lock button (1) before clamping and releasing the abrasive tools.
Do not press the spindle lock button while the grinding spindle is moving. The power tool may become damaged if you do this.
Grinding/cutting disc
Pay attention to the dimensions of the abrasive tools. The diameter of the hole must match that of the mounting flange. Do not use an adapter or reducer.
When using diamond cutting discs, ensure that the arrow indicating the direction of rotation on the diamond cutting disc matches the direction of rotation of the power tool (see the direction of rotation arrow on the machine head).
See the graphics page for fitting instructions.
To fasten the grinding/cutting disc, screw on the clamping nut (12) and tighten it with the combination wrench(5)/(6); see the "Quick-clamping nut" section.
After fitting the abrasive tool, check that the abrasive tool is fitted correctly and can turn freely before switching on the power tool. Make sure that the abrasive tool does not brush against the protective guard or other parts.
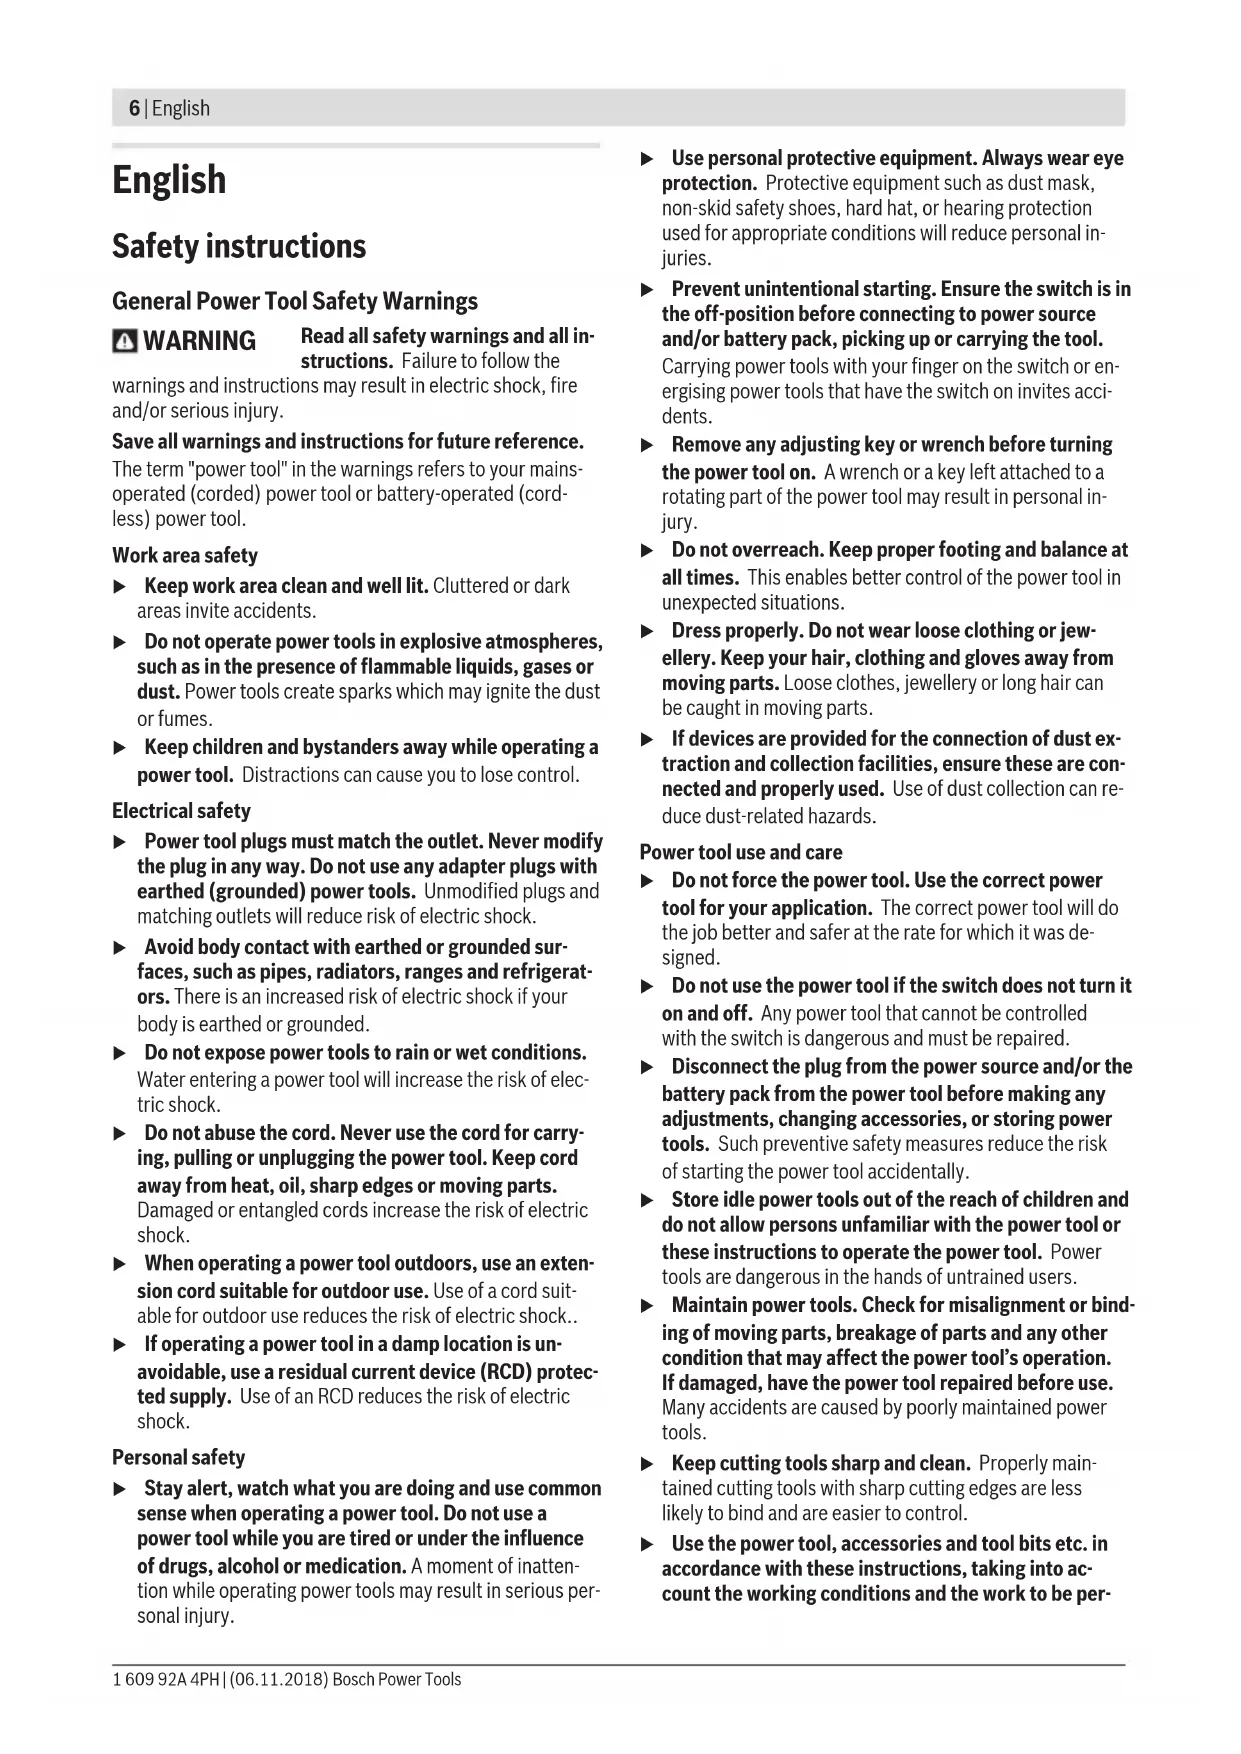
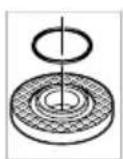
Mounting flange for grinding spindle M 14: A plastic part (O-ring) is fitted around the cent ring collar in the mounting flange (10). If the O-ring is missing or damaged, the mounting flange (10) must be replaced before operation
can resume.
Mounting flange for grinding spindle M 10: The mounting flange can be used on either side.
Flap disc
Always fit the hand guard (17) when working with the flap disc.
Rubber sanding pad
Always fit the hand guard (17) when working with the rubber sanding pad (18).
See the graphics page for fitting instructions.
Screw on the round nut (20) and tighten it with the combination wrench (5)/(6).
Cup brush/disc brush
Always fit the hand guard (17) when working with the cup brush or disc brush.
See the graphics page for fitting instructions.
The cup brush/disc brush must be screwed onto the grinding spindle until it rests firmly against the grinding spindle flange at the end of the grinding spindle thread. Tighten the cup brush/disc brush with an open-ended spanner.
Quick-clamping nutSDS-e/ie
To change the abrasive tool easily without having to use any additional tools, you can use the quick-clamping nut (13) instead of the clamping nut (12).
The quick-clamping nut (13) may be used only for grinding or cutting discs.
Only use quick-clamping nuts (13) that are in good working order and not damaged.
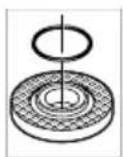
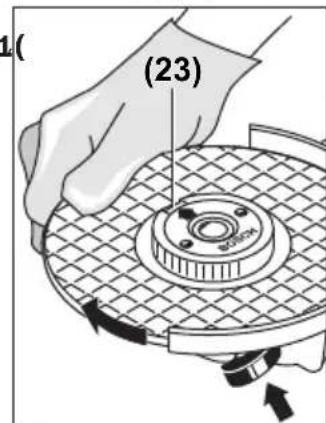
When screwing on, make sure that the printed side of the quick-clamping nut (13) is not facing the grinding disc; the arrow must be pointing towards the index mark (23).
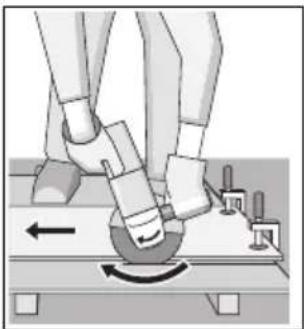
Press the spindle lock button (1) to lock the grinding spindle. To tighten the quick-clamping nut, turn the grinding disc firmly clockwise.

If the quick-clamping nut has been attached correctly and is not damaged, you can loosen it by hand by turning the knurled ring anticlockwise. Never loosen a tight quick-clamping nut with pliers. Always use the combination wrench. Insert the combination wrench as shown in the figure.
head
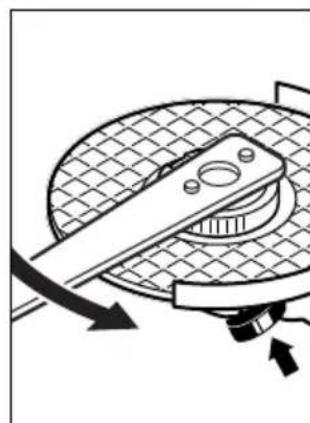
Pull the plug out of the socket before carrying out any work on the power tool.
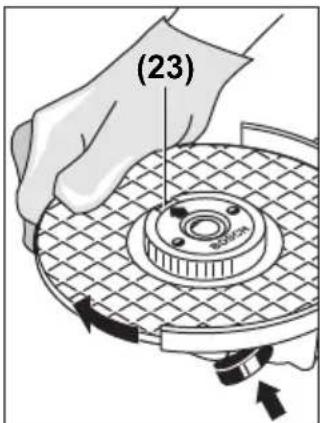
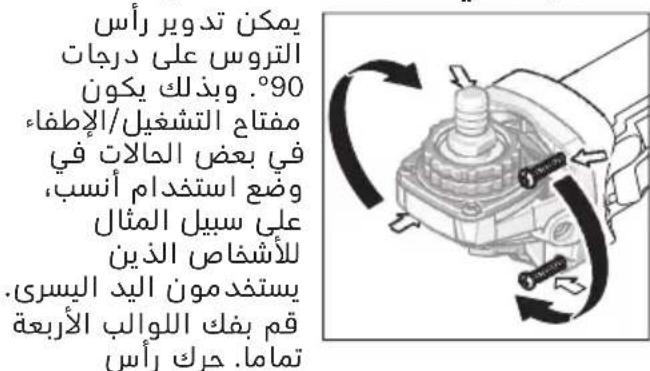
The machine head can be rotated in 90^ increments. In this way, the on/off switch can be brought into a more favourable handling position for particular applications, e.g. for left-handed tool users.
Completely unscrew the four screws. Rotate the machine head carefully,
without removing it from the housing, into the new position. Screw in and retighten the four screws.
Approved abrasive tools
You can use all the abrasive tools mentioned in these operating instructions.
The permissible speed [rpm] or the circumferential speed [m / s] of the abrasive tools used must at least match the values given in the table.
It is therefore important to observe the permissible rotational/circumferential speed on the label of the abrasive tool.
| max. [mm] [mm] | |||||
| D bd [rpm] [m/s] | |||||
| b d | 100 | 7 | 16.0 | 11,000 | 80 |
| 115 | 7 | 22.2 | 11,000 | 80 | |
| 125 | 7 | 22.2 | 11,000 | 80 | |
| D | 100 | - | - | 11,000 | 80 |
| 115 | - | - | 11,000 | 80 | |
| 125 | - | - | 11,000 | 80 | |
| b l d | 70 | 30 | M 10 | 11,000 | 45 |
| 75 | 30 | M 14 | 11,000 | 45 | |
Dust/chip extraction
The dust from materials such as lead paint, some types of wood, minerals and metal can be harmful to human health. Touching or breathing in this dust can trigger allergic reactions and/or cause respiratory illnesses in the user or in people in the near vicinity.
Certain dusts, such as oak or beech dust, are classified as carcinogenic, especially in conjunction with wood treatment additives (chromate, wood preservative). Materials containing asbestos may only be machined by specialists.
- Use a dust extraction system that is suitable for the material wherever possible.
- Provide good ventilation at the workplace.
- It is advisable to wear a P2 filter class breathing mask.
The regulations on the material being machined that apply in the country of use must be observed.
- Avoid dust accumulation at the workplace. Dust can easily ignite.
Operation
Start-up
Pay attention to the mains voltage. The voltage of the power source must match the voltage specified on the rating plate of the power tool. Power tools marked with 230V can also be operated with 220V .
Hold the tool by the insulated gripping surfaces and auxiliary handle only. The application tool could come
into contact with hidden wiring or its own cord. Contact with live wires may make metal parts of the tool live, posing a risk of electric shock.
When operating the power tool using a mobile generator that does not have sufficient reserve capacity or an adequate voltage control system with inrush current boost converter, loss of performance or atypical behaviour may occur upon switch-on.
Please check the suitability of the power generator you are using, particularly with regard to the mains voltage and frequency.
▶ Products that are only sold in AUS and NZ: Use a residual current device (RCD) with a nominal residual current of 30mA or less.
Switching on/off
To start the power tool, push the on/off switch (2) forward.
To lock the on/off switch (2) in position, push the on/off switch (2) forward and down until it clicks into place.
To switch off the power tool, release the on/off switch (2); or, if the switch is locked, briefly push the on/off switch (2) backward and down and then release it.
Always check abrasive tools before using them. The abrasive tool must be fitted properly and be able to move freely. Carry out a test run for at least one minute with no load. Do not use abrasive tools that are damaged, run untrue or vibrate during use. Damaged abrasive tools can burst apart and cause injuries.
Kickback stop (GWS 750-100 I)

If there is a sudden drop in the speed of the power tool, e.g. jamming in a separating cut, the power supply to the motor will be interrupted electronically.
To restart the tool, set the on/off switch (2) to the "off" position and then switch the power tool on again.
Restart protection (GWS 750-100 S/GWS 750-115 S/ GWS 750-125 S/GWS 750-100 I)
The restart protection prevents an uncontrolled start-up of the power tool after an interruption in the power supply.
To restart the tool, set the on/off switch (2) to the "off" position and then switch the power tool on again.
Starting current limitation (GWS 750-100 S/ GWS 750-115 S/GWS 750-125 S/GWS 750-100 I)
The electronic starting current limitation restricts the power consumption when the power tool is switched on and enables operation with a 16 A fuse.
Speed preselection (GWS 750-100 S/GWS 750-115 S/ GWS 750-125 S)
You can preselect the required speed using the speed preselection thumbwheel (3), even during operation. The information in the table below describes the recommended values.
Material Application Application tool Thumbwheel position
Metal Removing paint Abrasive disc 2-3
Wood, metal Brushing, removing rust Cup brush, abrasive disc 3
Metal, stone Grinding Grinding disc 4-6
Metal Rough grinding Grinding disc 6
Metal Cutting Cutting disc 6
The values specified for speed levels are guide values.
The rated speed of the accessory must be at least equal to the maximum speed marked on the power tool. Accessories running faster than their rated speed can break and fly apart.
Working advice
Pull the plug out of the socket before carrying out any work on the power tool.
Exercise caution when cutting slots in structural walls; see the "Information on structures" section.
- Clamp the workpiece if it is not secure under its own weight.
Do not load the power tool so heavily that it comes to a stop.
If the power tool has been subjected to a heavy load, continue to run it at no-load for several minutes to cool down the accessory.
Do not use the power tool with a cut-off stand.
Do not touch grinding and cutting discs until they have cooled down. The discs can become very hot while working.
Rough grinding
Never use cutting discs for rough grinding.
The best rough grinding results are achieved with a set angle of 30^ to 40^ . Move the power tool back and forth with moderate pressure. This will ensure that the workpiece does not become too hot or discolour and that grooves are not formed.
Flap Disc
With the flap disc (accessory), curved surfaces and profiles can be worked. Flap discs have a considerably higher service life, lower noise levels and lower sanding temperatures than conventional sanding sheets.
Cutting Metal
Always use the protective guard for cutting (15) when cutting bonded abrasives.
When carrying out abrasive cutting, use a moderate feed that is suited to the material being machined. Do not exert pressure on the cutting disc and do not tilt or swing the power tool.
Do not attempt to reduce the speed of a cutting disc coming to a stop by applying pressure from the side.
The power tool must always work in an up-grinding motion. Otherwise, there is a risk that it will be pushed uncontrolled out of the cut. For best results when cutting profiles and rectangular tubing, start at the smallest cross section.
Cutting stone
Provide sufficient dust extraction when cutting stone.
Wear a dust mask.
The power tool may be used only for dry cutting/grinding.
For best results when cutting stone, use a diamond cutting disc.
When cutting especially hard materials such as concrete with a high pebble content, the diamond cutting disc can overheat and become damaged as a result. This is clearly indicated by circular sparking, rotating with the diamond cutting disc.
If this happens, stop cutting and allow the diamond cutting disc to cool down by running the power tool for a short time at maximum speed with no load.
Working noticeably slower and with circular sparking indicate that the diamond cutting disc that has become dull. You can resharpen the disc by briefly cutting into abrasive material (e.g. lime-sand brick).
Information on structural design
Slots in load-bearing walls are subject to DIN 1053 part 1 or country-specific regulations. These regulations must be observed under all circumstances. Seek advice from the responsible structural engineer, architect or construction supervisor before starting work.
Maintenance and Servicing
Maintenance and cleaning
Pull the plug out of the socket before carrying out any work on the power tool.
To ensure safe and efficient operation, always keep the power tool and the ventilation slots clean.
In extreme conditions, always use a dust extractor if possible. Blow out ventilation slots frequently and install a residual current device (RCD) upstream. When
machining metals, conductive dust can settle inside the power tool, which can affect its protective insulation.
Store and handle the accessories carefully.
In order to avoid safety hazards, if the power supply cord needs to be replaced, this must be done by Bosch or by a customer service centre that is authorised to repair Bosch power tools.
After-sales Service and Advice on Using Products
Our after-sales service can answer questions concerning product maintenance and repair, as well as spare parts. You can find exploded drawings and information on spare parts at: www.bosch-pt.com
The Bosch product use advice team will be happy to help you with any questions about our products and their accessories.
www.powertool-portal.de, the internet portal for tradespeople and DIY enthusiasts.
In all correspondence and spare parts orders, please always include the 10-digit article number given on the type plate of the product.
Cambodia
Robert Bosch (Cambodia) Co., Ltd
Unit 8BC, GTTower, 08th Floor, Street 169
Czechoslovakia Blvd, Sangkat Veal Vong
Khan 7 Makara, Phnom Penh
VAT TIN: 100 169 511
Tel.: +855 23 900 685
Tel.: +855 23 900 660
www.bosch.com.kh
People's Republic of China
China Mainland
Bosch Power Tool (China) Co. Ltd.
Bosch Service Center
567, Bin Kang Road
Bin Kang District
Hangzhou, Zhejiang Province
China 310052
Tel.: (0571) 8887 5566 / 5588
Fax: (0571) 8887 6688 × 5566# / 5588#
E-mail: bsc.hz@cn.bosch.com
www.bosch-pt.com.cn
HK and Macau Special Administrative Regions
Robert Bosch Co. Ltd.
21st Floor, 625 King's Road
North Point, Hong Kong
Customer Service Hotline: +852 2101 0235
Fax: +852 2590 9762
E-mail: info@hk.bosch.com
www.bosch-pt.com.hk
India
Bosch Service Center
69, Habibullah Road, (next to PSBB School), T. Nagar
Chennai-600077
Phone: (044) 64561816
Bosch Service Center Rishyamook
85A, Panchkuin Road
New Delhi-110001
Phone: (011) 43166190
Bosch Service Center 79,
Crystal Bldg., Dr. Annie Besant Road, Worli
Mumbai-400018
Phone: (022) 39569936 / (022) 39569959 /
(022) 39569967 / (022) 24952071
Indonesia
PT Robert Bosch
Palma Tower 10th Floor
Jalan RA Kartini II-S Kaveling 6
Pondok Pinang, Kebayoran Lama
Robert Bosch Middle East FZE - Pakistan Liaison Office
2nd Floor Plaza # 10, CCA Block, DHA Phase 5
Lahore, 54810
Phone: +92(303)4444311
E-mail: Faisal.Khan@bosch.com
Philippines
Robert Bosch, Inc.
28th Floor Fort Legend Towers,
3rd Avenue corner 31st Street,
Fort Bonifacio, Global City,
1634 Taguig City
Tel.: (632) 8703871
Fax: (632) 8703870
www.bosch-pt.com.ph
Singapore
Powerwell Service Centre Ptd Ltd
Bosch Authorised Service Centre (Power Tools)
4012 Ang Mo Kio Ave 10, #01-02 TECHplace
Singapore 569628
Tel.: 64521770
Fax: 64521760
E-mail: ask@powerwellsc.com
www.powerwellsc.com
www.bosch-pt.com.sg
Thailand
Robert Bosch Ltd.
Liberty Square Building
No.287,11 Floor
Silom Road, Bangrak
Bangkok 10500
Tel.: 02 6393111
Fax:022384783
Robert Bosch Ltd., P.O. Box 2054
Bangkok 10501
www.bosch.co.th
Bosch Service - Training Centre
La Salle Tower Ground Floor Unit No.2
10/11 La Salle Moo 16
Srinakharin Road
Bangkaew, Bang Plee
Samutprakarn 10540
Tel.: 027587555
Fax: 02 7587525
Vietnam
Branch of Bosch Vietnam Co., Ltd in HCMC
14th floor, Deutsches Haus, 33 Le Duan
Ben Nghe Ward, District 1, Ho Chi Minh City
Tel.: (028) 62583690
Fax: (028) 62583692 - 62583694
Hotline: (028) 6250 8555
E-mail: tuvankhachhang-pt@vn.bosch.com
www.bosch-pt.com.vn
Armenia, Azerbaijan, Georgia, Kyrgyzstan, Mongolia, Tajikistan, Turkmenistan, Uzbekistan
TOO "Robert Bosch" Power Tools, After Sales Service
RayimbekAve.,169/1
050050, Almaty, Kazakhstan
Service e-mail: service.pt.ka@bosch.com
Official website: www.bosch.com, www.bosch-pt.com
Bahrain
Hatem Al Juffali Technical Equipment Establishment.
Kingdom of Bahrain, Setra Highway, Al Aker Area
Phone: +966126971777-311
Fax: +97317704257
E-mail: h.berjas@eajb.com.sa
Egypt
Unimar
20 Markaz kadmat
El tagmoa EL Aoul - New Cairo
Phone: +20 2224 76091-95
Phone: +20 2224 78072-73
Fax: +20222478075
E-mail: adelzaki@unimaregypt.com
Iran
Robert Bosch Iran
3rd Floor, No 3, Maadiran Building
Aftab St., Khodami St., Vanak Sq.
Tehran 1994834571
Phone: +9821 86092057
Iraq
Sahba Technology Group
Al Muthana airport road
Baghdad
Phone: +9647901906953
Phone Dubai: +97143973851
E-mail: bosch@sahbatechnology.com
Jordan
Roots Arabia-Jordan
Nasser Bin Jameel street, Building 37 Al Rabiah
11194 Amman
Phone: +962 6 5545778
E-mail: bosch@rootsjordan.com
Kuwait
AI Qurain Automotive Trading Company
Shuwaikh Industrial Area, Block 1, Plot 16, Street 3rd
P.O.Box 164-Safat 13002
Phone: 24810844
Fax: 24810879
E-mail: josephkr@aaalmutawa.com
Lebanon
Tehini Hana & Co. S.A.R.L.
P.O.Box 90-449
Jdeideh
Dora-Beirut
Phone: +9611255211
E-mail: service-pt@tehini-hana.com
Libya
El Naser for Workshop Tools
Swanee Road, Alfalah Area
Tripoli
Phone: +218 214811184
Oman
Malatan Trading & Contracting LLC
P.O.Box 131
Ruwi, 112 Sultanate of Oman
Phone: +968 99886794
E-mail: malatanpowertools@malatan.net
Qatar
International Construction Solutions W L L
P.O.Box 51
Doha Phone: +974 40065458
Fax:+97444538585
E-mail: csd@icsdoha.com
Saudi Arabia
Juffali Technical Equipment Co. (JTECO)
Kilo 14, Madinah Road, Al Bawadi District
Jeddah 21431
Phone: +966 2 6672222 Ext. 1528
Fax: +966 2 6676308
E-mail:roland@eajb.com.sa
Syria
Dallal Establishment for Power Tools
P.O.Box 1030
Aleppo
Phone: +963212116083
E-mail: rita.dallal@hotmail.com
United Arab Emirates
Central Motors & Equipment LLC, P.O. Box 1984
Al-Wahda Street - Old Sana Building
Sharjah
Phone: +971 6 593 2777
Fax:+97165332269
E-mail: powertools@centralmotors.ae
Yemen
Abualrejal Trading Corporation
Sana'a Zubiery St. Front to new Parliament Building
Phone: +967-1-202010
Fax: +967-1-279029
E-mail: tech-tools@abualrejal.com
Ethiopia
Forever plc
Kebele 2,754,BP 4806
Addis Ababa
Phone: +251 111 560 600
E-mail: foreverplc@ethionet.et
Ghana
C.WOERMANN LTD.
Nsawam Road/Avenor Junction, P.O. Box 1779
Accra Phone: +233 302 225 141
Kenya
Robert Bosch East Africa Ltd
Mpaka Road P.O.Box 856
00606 Nairobi
Nigeria
Robert Bosch Nigeria Ltd.
52-54 Isaac John Street P.O. Box
GRA Ikeja - Lagos
Republic of South Africa
Customer service
Hotline: (011) 6519600
Gauteng - BSC Service Centre
35 Roper Street, New Centre
Johannesburg
Tel.: (011) 4939375
Fax: (011) 4930126
E-mail: bsctools@icon.co.za
KZN - BSC Service Centre
Unit E, Almar Centre
143 Crompton Street
Pinetown
Tel.: (031) 7012120
Fax: (031) 7012446
E-mail: bsc.dur@za.bosch.com
Western Cape - BSC Service Centre
Democracy Way, Prosperity Park
Milnerton
Tel.: (021) 5512577
Fax: (021) 5513223
E-mail: bsc@zsd.co.za
Bosch Headquarters
Midrand, Gauteng
Tel.: (011) 6519600
Fax: (011) 6519880
E-mail: rbsa-hq.pts@za.bosch.com
Tanzania
Diesel & Autoelectric Service Ltd.
117 Nyerere Rd., P.O. Box 70839
Vingunguti 12109, Dar Es Salaam
Phone: +255 222 861 793/794
Australia, New Zealand and Pacific Islands
Robert Bosch Australia Pty. Ltd.
Power Tools
Locked Bag 66
Clayton South VIC 3169
Customer Contact Center
Inside Australia:
Phone: (01300) 307044
Fax: (01300) 307045
Inside New Zealand:
Phone: (0800) 543353
Fax: (0800) 428570
Outside AU and NZ:
Phone: +61 395415555
www.bosch-pt.com.au
www.bosch-pt.co.nz
Disposal
The power tool, accessories and packaging should be recycled in an environmentally friendly manner.

Do not dispose of power tools along with household waste.
中文
安全规章
电动工具通用安全警告

警告!
警告! 阅读所有警告和所有说
明!不遵照以下警告和说明会
导致电击、着火和/或严重伤害。
保存所有警告和说明书以备查阅。
JiHJIiJiJiJiJiJiJiJiJiJiJiJiJiJiJiJiJiJiJiJiJiJiJiJiJiJiJiJiJiJiJiJiJiJiJiJiJiJiJiJiJiJiJiJiJiJiJiJiJiJiJi
写马作用
Anext(8) 8) S.
S.
Anext(8) 8)
Anxpanb (8) 1 山 A3K3A
T:Anr (8) 8
節減訣章程用在前
口 南 三山市北庄人名自在中中中中中中中中中中中中中中中中中中中中中中中中中中中中中中中中中中中中中中中中中中中中中中中中中中中中中中中中中中中中中中中中中中中中中中中中中中中中中中中中中中中中中中中中中中中中中中中中中中中中
GWS 750-100 S/ GWS 750-115 S/GWS 750-125 S/ GWS 750-100 I)
鍙鍙鍙鍙鍙鍙鍙鍙鍙鍙鍙鍙鍙鍙鍙鍙鍙鍙鍙鍙鍙鍙鍙鍙鍙鍙鍙鍙鍙鍙鍙鍙鍙鍙鍙鍙鍙鍙鍙鍙鍙鍙鍙鍙鍙鍙鍙鍙鍙鍙鍫鍚鍚鍚鍚鍚鍚鍚鍚鍚鍚鍚鍚鍚鍚鍚鍚鍚鍚鍚鍚鍚鍚鍚鍚鍚鍚鍚鍚鍚鍚鍚鍚鍚鍚鍚鍚鍚鍚鍚鍚鍚鍚鍚鍚鍚鍚鍚鍚鍚鍚鍗鍚鍚鍚鍚鍚鍚鍚鍚鍚鍚鍚鍚鍚鍚鍚鍚
AS 送T贝
nauuauuunuuuunuuuunuuu uuuuuuuuuuuuuuuuuuuuuuuuuuuuuuuuuuuuuuuuuuuuuuuuuuuuuuuuuuuuuuuuuuuuuuuuuuuuuuuuuuuuuuuuuuuuuuuuuuuuuuuuuuuuuuuuuuuuuuuuuuuuuuuuuuuuuuuuuuuuuuuuuuuuuuuuuuuuuuuuuuuuuuuuuuuuuuuuuuuuuuuUU
nnnnnnnnnnnnnnnnnnnnnnnnnnnnnnnnnnnnnnnnnnnnnnnnnnnnnnnnnnnnnnnnnnnnnnnnnnnnnnnnnnnnnnnnnnnnnnnnnnnnnnnnnnnnnnnnnnnnnnnnnnnnnnnnnnnnnnnnnnnnnnnnn
1 1
luiuunwngnnaovnwnnuuunnuuunnuu uunru nnnnneuvnuuunu uonnnnnuuunnuuunnuu uanunnunnuunnuuuu
yauuunueunuunuuunununununununununununununununununununununununununununununununununununununununununununununun
1
Jauunnnaaannnnnnaanennnnnnnnnnnnnnnnnnnnnnnnnnnnnnnnnnnnnnnnnnnnnnnnnnnnnnnnnnnnnnnnnnnnnnnnnnnnnnnnnnnnnnnnnnnnnnnnnnnnnnnnnnnnnnnnnnnnnnnnnnnnnnnnnnnnnnnnnnnnnnnnnnnnnnnnnn
aunrnnnnaeannnnnne nnnnnnnnne annnnnne nnnnnnne nnnnnnne nnnnnnne nnnnnnne nnnnnnne nnnnnnne nnnnnnne nnnnnnne nnnnnnne nnnnnnne nnnnnnne nnnnnnne nnnnnnne nnnnnnne nnnnnnne nnnnnnne nnnnnnne nnnnnnne nnnnnnne nnnnnnne nennnnnne nnnnnnne nnnnnnne nnnnnnne nnnnnnne nnnnnnne nnnnnnne nnnnnnne nnnnnnne nnnnnnne nnnnnnne nannnne nannnne nannnne nannnne nannnne nannnne nannnne nannnne nannnne nannnne nannnne nannnne nannnne nannnne nannnne nannnne nannnne nannnne nannnne nannnne nannnne nannnne nannnne
yauunuunununununununununununununununununununununununununununununununununununununununununununununununununununununununununununun
A 10000000000000000000000000000000000000000000000000000000000000000000000000000
nnaaunnaaunnaunnaunnaunnaunnaunnaunnaunnaunnaunnaunnaunnaunnaunnaunnaunnaunnaunnaunnaunnaunnaunnaunnaunnaunnaunnaunnaunnaunnaunnaunnaunnaunnaunnaunnaunnaunnaunnaunnaunnaunnaunnaunnaunnaunnaunnaunnaunnaunnaunnaunnua
ywnnnaaynnnnnaanannnnaan anananaan nnaan
Wnwnnuuunnnnnaaannnnnnaanennnnn n Wn nnnnnnnnnnnnnnnnnnnnnnnnnnnnnnnnnnnnnnnnnnnnnnnnnnnnnnnnnnnnnnnnnnnnnnnnnnnnnnnnnnnnnnnnnnnnnnnnnnnnnnnnnnnnnnnnnnnnnnnnnnnnnnnnnnnnnnnnnnnnnnn nn
ywnnwnnnnnnnnnnnnnnnnnnnnnnnnnnnnnnnnnnnnnnnnnnnnnnnnnnnnnnnnnnnnnnnnnnnnnnnnnnnnnnnnnnnnnnnnnnnnnnnnnnnnnnnnnnnnnnnnnnnnnnnnnnnnnnnnnnnnnnnnnnnnnnnnnnnnnnnnnnnnnnnnnnnnn
yuvnuuunnuunnuu uynnuuunnuu uynnuuunnuu uynnuuunnuu uynnuuunnuu uynnuuunnuu uynnuuunnuu uynnuuunnuu
yauuunnuuunnuuunnuuunnuuunnuuunnuuunnuuunnuuunnuuunnuuunnuuunnuuunnuuunnuuunnuuunnuuunnuuunnuuunnuuunnuuunnuuunnuuunnuuunnuuunnuuunnuuunnuuunnuuunnu
Hnnaaannnnnnae nnne nnnnne ne nnnnne
aunnnaeauuulwunnuulnaanuulw
yauuunnunununununununununununununununununununununununununununununununununununununununununununununununununununun
nnaaannnnnnae nnaanennnnae nnaanennnnae nnaanennnnae nnaanennnnae nnaanennnnae nnaanennnnae nnaanennnnae nnaanennnnae nnaanennnnae nnaanennnnae nnaanennnnae nnaanennnnae nnaanennnnae nnaanennnnae nnaanennnne nnaanennnnae nnaanennnnae nnaanennnnae nnaanennnnae nnaanennnnae nnaanennnnae nnaanennnnae nnaanennnnae nnaanennnnae nnaanennnnae nnaanennnnae nnaanennnnae nnaanennnnae nnaanennnnae n.
nunnuuauovnuuunnnnnaaunnuuunnuuun nnuuunnuuunnuuunnuuunnuuunnuuunnuuuuuuuuuuuuuuuuuuuuuuuuuuuuuuuuuuuuuuuuuuuuuuuuuuuuuuuuuuuuuuuuuuuuuuuuuuuuuuuuuuuuuuuuuuuuuuuuuuuuuuuuuuuuuuuuuuuuuuuuuuuuuuuuuuuuuuuuuuuuuuuuuuuuuuuuuuuuuuuuuuuuuuuuuuuuuuuuuuuuuuuuuuuuuuuuuuuuuuuuuUU
ywnnnnnaeennnnnne nnnnne nn ne nnnnne nnnnne nnnnne nnnnne nnnnne nnnnne nnnnne nnnnne nnnnne nnnnne nnnnne nnnnne nnnnne nnnnne nnnnne nnnnne nnnnne nnnnne nnnnne nnnnne nnnnne nnnnne nnnnne nnnnne nnnnne nnnnnee
H
ywnnnaunn“nnn”wauunnuunnuuul uwwuunnnnnnuu u nnnnnnnnnnuuunnuu uuuuunnuuunnuuunnuu uuuuunnuuunnuuunnuu uuuuunnuuunnuuunnuu
1 1 1 1 1 1 1 1 1 1 1 1 1 1 1 1 1 1 1 1 1 1 1 1 1 1 1 1 1 1 1 1 1 1 1 1 1
1
aunuununununununununununununununununununununununununununununununununununununununununununun
yuuunununununununununununununununununununununununununununununununununununununununununununununununununununun
1nnaaannnnnnnnnnnnnnnnnnnnnnnnnnnnnnnnnnnnnnnnnnnnnnnnnnnnnnnnnnnnnnnnnnnnnnnnnnnnnnnnnnnnnnnnnnnnnnnnnnnnnnnnnnnnnnnnnnnnnnnnnnnnnnnnnnnnnnnnnnnnnnnnnnnnnnnnnnnnnnnnnnnn
nuiuwwuuaaunnuuunnn
nwnnnnnaaunnsuunwnuuaa [U] 230 nannnnnnaananaaauuuuauuuuuuuuuuuuuuuuuuuuuuuuuuuuuuuuuuuuuuuuuuuuuuuuuuuuuuuuuuuuuuuuuuuuuuuuuuuuuuuuuuuuuuuuuuuuuuuuuuuuuuuuuuuuuuuuuuuuuuuuuuuuuuuuuuuuuuuuuuuuuuuuuuuuuuuuuuuuuuuuuuuuuuuuuuuuuuuuuuuuuuuuuuuuuuuuuuuuuuuuuUU
| GWS 750-100 S GWS 750-115 S GWS 750-125 S GWS 750-100 I | ||||
| 3601 C94 1.. 3601 C94 1.. 3601 C94 1.. 3601 C94 2.. | ||||
| nongbukwahwahwahwahwahwahwahwahwahwahwahwahwahwahwahwahwahwahwahwahwahwahwahwahwahwahwahwahwahwahwahwahwahwahwahwahwahwahwahwahwahwahwahwahwahwahwahwahwahwahwaw | 750 750 750 750 | |||
| 380 380 380 410 | ||||
| nongbukwahwahwahwahwahwahwahwahwahwahwahwahwahwahwahwahwahwahwahwahwahwahwahwahwahwahwahwahwahwahwahwahwahwahwahwahwahwahwahwahwahwahwahwahwahwahwa | 11000 11000 11000 11000 | |||
| 2800-11000 2800-11000 2800-11000 - | ||||
| mua. 100 115 125 100 | ||||
| M10 M14 M14 M10 | ||||
| (,) | 22 22 22 22 | |||
| (,) | ● ● ● - | |||
| (,) | --- ● | |||
| (,) | ● ● ● ● | |||
| (,) | ● ● ● ● | |||
| (,) | ● ● ● ● | |||
| EPTA-Procedure 01:2014 | ||||
| - (,) | 1.9 1.9 1.9 1.9 | |||
| - (,) | 1.8 1.8 1.8 1.8 | |||
| (,) | □/□/□/□/□/□/□/□/□/□/□/□/□/□/□/□/□/□/□/□/□/□/□/□/□/□/□/□/□/□/□/□/□/□/□/□/□/□/□/□/□/□/□/□/□/□/□/□/□/□/□ | □ | □ | □ |
aunnuuunnuuunnuuunnu (8) uuuuuuuuuuuuuuuuuuuuuuuuuuuuuuuuuuuuuuuuuuuuuuuuuuuuuuuuuuuuuuuuuuuuuuuuuuuuuuuuuuuuuuuuuuuuuuuuuuuuuuuuuuuuuuuuuuuuuuuuuuuuuuuuuuuuuuuuuuuuuuuuuuuuuuuuuuuuuuuuuuuuuuuuuuuuuuuuuuuuuuuuuuuuuuuuuuuuuuuuuUU (9) uUUUUUUUUUUUUUUUUUUUUUUUUUUUUUUUUUUUUUUUUUUUUUUUUUUUUUUUUUUUUUUUUUUUUUUUUUUUUUUUUUUUUUUUUUUUUUUUUUUUUUUUUUUUUUUUUUUUUUUUUUUUUUUUUUUUUUUUUUUUUUUUUUUUUUUUUUUUUUUUUUUUUUUUUUUUUUUUUUUUUUU
Junuovnuu (8) luanuaovnuu liu
1nnaa nnaaunnaa (4) 2nna 2nnaa (4) 2nnaa aaaan aaan aaan aaan aaan aaan aaan aaan aaan aaan aaan aaan aaan aaan aaan aaan aaan aaan aaan aaan aaan aaan aaan aaan aaan aaan aaan aaan aaan aaan aaan aaan aaan aaan aaan aaan aaan aaan aaan aaan aaan aaan aaan aaan aaan aaan aaan aaan aaan aaan aaan
nnaaunna
(GWS 750-100 S/GWS 750-115 S/
GWS 750-125 S/GWS 750-100 I)
nnaaannnnnnaaennnnnnnnnnnnnnnnnnnnnnnnnnnnnnnnnnnnnnnnnnnnnnnnnnnnnnnnnnnnnnnnnnnnnnnnnnnnnnnnnnnnnnnnnnnnnnnnnnnnnnnnnn
i
wnnnn nn nnnnnnnnnnnnnnnnnnnnnnnnnnnnnnnnnnnnnnnnnnnnnnnnnnnnnnnnnnnnnnnnnnnnnnnnnnnnnnnnnnnnnnnnnnnnnnnnnnnnnnnnnnnnnnn
山
n (GWS 750-100 S/
GWS 750-115 S/GWS 750-125 S)
y
2
(3)yaunanrwnanuunnunnn
nnuuunnuuunnuuunnuuunnuuuuuuuuuuuuuuuuuuuuuuuuuuuuuuuuuuuuuuuuuuuuuuuuuuuuuuuuuuuuuuuuuuuuuuuuuuuuuuuuuuuuuuuuuuuuuuuuuuuuuuuuuuuuuuuuuuuuuuuuuuuuuuuuuuuuuuuuuuuuuuuuuuuuuuuuuuuuuuuuuuuuuuuuuuuuuuuuuuuuuuuuuuuuuuuuuuuuuuuuuUUUUUUUUUUUUUUUUUUUUUUUUUUUUUUUUUUUUUUUUUUUUUUUUUUUUUUUUUUUUUUUUUUUUUUUUUUUUUUUUUUUUUUUUUUUUUUUUUUUUUUUUUUUUUUUUUUUUUUUUUUUUUUUUUUUUUUUUUUUUUUUUUUUUUUUUUUUUUUUUUUUUUUUUUUUUUUUUUUUUUUUUUUUUUUUUUUUUUUUU
y
www.powertool-portal.de 1
10
lnu
nunnnnnnnnnnnnnnnnn
wotela 1 5
2525 4
山
nannn 10110
tns: +66 2012 8888
wn: +66 2064 5800
www.bosch.co.th
y
2
wnuaan 10/11 nj 16
nuaunun
W
10540
Jusunilne
Insrwn 027587555
027587525
777
wWn nnnsuauuuaaunna
山
aovwovwovvovovovov
Bahasa Indonesia
Keselamatan personnel
Mata gerinda/cakram potong
Mur quick-clamping SDS-
Palma Tower 10th Floor
Jalan RA Kartini II-S Kaveling 6
Pondok Pinang, Kebayoran Lama
Cac Canh bao An toan Bó sung dang riêng cho cac thao tac Cat
Khong duoc lam ket dia cat hoac ty de qua luc. Khong duoc co gang cat sau qua muc. Viec tao ung suat qua muc len dia lam tang tai va de gay ra xoan hoac ket dia trong khi cat va co the tao luc phan hoi hoac lam vio dia.
Khong duoc dung song song va phia sau dia quay. Khi dia, o vi tri vanh, dang di chuyen theo huong co the ban, luc phan hoi co the day dia quay va dia quay va dung cu truc tiep ve phia ban.
Khi dia bi ket hoac khi dung cat vi ly do nao do, hyt tat nguon dung cu dien cam tay va giu co dinh thiiet bi dien toi khi dia da dung quay han. Tuyet doi khong co gang thao dia cat ra trong khi dia van dang quay neu khong luc phan hoi co the xay ra. Kiem tra va co bien phap khac phuc de loai bo nguyen nhan ket dia.
Khong duoc khoi dong lai thao tac cat khi bi ket trong phoi. De dia quay dat toc do cuc dai va can than khoi dong lai duong cat. Dia co the bi ket, nay len hoac tac dong tro lai neu khoi dong lai dung cu dien ket trong phoi.
Su dung cac tam do hoac thai kich co de giam thieu nguy co ep dia va luc phan hoi. Cac thai lon thuong vong xuong duoi trong luong rieng cua chung. Can thai dat cac tam do phia duoi thai gan duong cat va gan canh cua thai ve ca hai phia cua dia cat.
Su dung bian phap an toan khac khi cat ranh vao cac vach hi en co hoac cac khu vu chan tuong. Dia cat nh o len co the cat dut cac duong ong khi hoac nuoc, day dien hoac cac vat dung co the gay ra luc phan hoi.
Cac canh bao phu them

Chan Bao Vé Dung De Cát
Khi cat bang chat lieuu mai nén két, luon luon su dung chan bao vê dé CAT (15).
Tao du hiieu qua cho viec hut bui khi kat da.
Chan bao vê dung de cat (15) duoc lap vao giongh nu' cach lap chan bao vê dung de cha nham (8).
Taynamphu
Chi vanh may cua ban khi da gan tay nam phu (4).
Vǎn tay nám phu vào (4) ò ben phai hay trái dαu may tuy theo cach thuc thao tac.
Chán Bǎo Vě Tay
Dung cho Vietc vanh hanh voi dia cha cao su (18) hay voi ban chai kim loai/ban chai dia/dia cha gap nep, luon luon gan chan bao vê tay vao (17).
Chan bao vê tay (17) duoc bat chat cung voi tay nam phu (4).
Lap Dung Cu Mai
▶ Truoc khi tién hanh bát cu vièc gi trèn may, kéo phich cām dièn nguón ra.
Khong duoc cham vao dia mai hay dia cat truck hi cac dia nay da ngoi. Dia co the tro nen rat nong trong luc hoat dong.
Lam sach truc may mai (7) va tát ca bo phân sap duoc lap vao.
De cap chat hay thao long dung cu mai, khoa trunc may mai bang nut khoa trunc (1).
Chi cho nut khoa truc hoat dong khi truc may mai da dung yan. Neu khong, may co the bi lam hong.
Día Mai/Cat
Hày luy dén kich coa dung cu mai. Duong kich cua Iô lap dung cu phai vua khit voi bich lap dung cu ma khong co khe hó. Khong duoc su dung bo phan tu nhô hay bo phan tiep hop.
Khi su dung dia cat hat kim cuong, hyu y mui ten chi chieu quay tren dia cat kim cuong va chieu quay cua may phai cung chieu (xem phan mui ten chi chieu quay in dap tren dau may).
Xem trang hinh anh de biét cac buoc lap rap.
De vān chat dia mai/cat, vān dai oc chan vào (12)
vā siét chat lui bang chia vān kět hop(5)/(6), xem phàn „Dai oc khoa nanh".
Sau khi lap dung cu mai va truck hmi mo may, kiem tra xem dung cu mai co lap vao dung cach khong va co the quay tu do khong. Dam bao dung cu mai khong cham vao chan bao ve hay cac bo phan khac.
Māt bich tiēp nhān cua truc may mai
M 14: Trong māt bich tiēp nhān (10) chi
tiēt bang nhua (vong dem chu O) duoc
lap vao vanh dinh tam. Thieu vong
dem chu O hoac no bi hu'hai, nhāt
dinh phai thay the māt bich tiēp nhān
(10) truoc khi su dung tiep.
Chong dai nguc (GWS 750-100 I)

Khi sut giam so vong quay dot ngot cuadung cu dien,vi du ket cung trong doan cat,ngon dien toi dong co bi giandaoan.
Chong khoi dong lai (GWS 750-100 S/ GWS 750-115 S/GWS 750-125 S/GWS 750-100 I)
Su bao vê su tái khoi dong ngan ngua su khoi dong khong duoc chu dong kiem soat cua may sau khi mat dien.
De vanh lai hyu dua cong tac Bat/Tat (2) vao vi tri tat va bat lai dung cu dien.
Lam giam cuong do dong dien khi khoi dong (GWS 750-100 S/GWS 750-115 S/ GWS 750-125 S/GWS 750-100 I)
Thiet bi dien tu lam giam cuong do dong dien khoi dong han ché nang luong dien tiu thu phi bat cong tac may len va cho phep hoat dong voi cau chi 16 ampere.
Chon trucoc dq (GWS 750-100 S/ GWS 750-115 S/GWS 750-125 S)
Voi num vān de chon truoc toc do (3), ban co the chon truoc so vong quay can thiet ca khi dang vān hanh. Cac so lieu trong bang duoi day la cac tiu chuán ducg khuyen nghi.
Don nguyen 8BC, GT Tower, Tang 08,
Duong 169, Tiép Khac Blvd, Sangkat Veal Vong,
Khan 7 Makara, Phnom Penh
VAT TIN: 100 169 511
Tel.: +855 23 900 685
Tel.: +855 23 900 660
www.bosch.com.kh
Su thai bo
May, linh kien và bao bi phai duoc phan loai dé tái che theo huóng than thien voi mi o truong.

Khong duoc thai bo dung cu dien vao chung voi rac sinh hoat!
Français
Protection anti-redemarrage (GWS 750-100 S/ GWS 750-115 S/GWS 750-125 S/GWS 750-100 I)
Robert Bosch Morocco SARL
53, Rue Lieutenant Mahmoud Mohamed
20300 Casablanca
E-Mail: sav.outillage@ma.bosch.com
Tunisia
Robert Bosch Tunisia SARL
Jg .a aai Jai Jai Jai Jai Jai Jai Jai Jai Jai Jai Jai Jai Jai Jai Jai Jai Jai Jai Jai Jai Jai Jai Jai Jai Jai Jai Jai Jai Jai Jai Jai Jai Jai Jai Jai Jai Jai Jai Jai Jai Jai Jai Jai Jai Jai Jai Jai Jai Jai Jai
J 1
g j g j g j j j j j j j j j j j j j j j j j j j j j j j j j j j j j j j j j j j j j j j j j j j j j j j j j j j j j j j j j j j j j j j j j jj J
山g 1 g 1s j 1
gl 1j y .d J
.29 aJl j 1 j 1g j
Jolal. 1. Jolal. 2. Jolal. 3. Jolal. 4. Jolal. 5. Jolal. 6. Jolal. 7. Jolal. 8. Jolal. 9. Jolal. 10.
yI yJ .aW L a JyJ p q 4
Lj I yI yJ.
JyJ g JyJ
JyJ UyJg JyJ
JyJ UyJ
JyJ JyJ
JyJ
JbBbBbBbBbBbBbBbBbBbBbBbBbBbBbBbBbBbBbBbBbBbBbBbBbBbBbBbBbBbBbBbBbBbBbBbBbBbBbBbBbBbBbBbBbBbBbBbBbBbBb
Lg: aLiisJlg aJUgSJJ sssJ pIaewl
jaii jiaai jiaai jai 1
Jaii jaii aaiai iui jui 0oi iaii ioo oaiu uui Uauuui Iiauui Jg jg .dla
eLusUaJUgSJI oJI pssuW
Jy jll aI yjSll oSll .Jbeo Iqsw
Jleu Ieoo gbrb cIg osill Jso
Ldol pui uug jba jslabXlg
pSggl/g 100000000000000000000000000000000000000000000000000000000000000000000000000
#
JlXI JdJ
aJyI JdSd dale Iol
J 1 J 1 1 1 1 1 1 1 1 1 1 1 1 1 1 1 1 1
Jg 10000000000000000000000000000000000000000000000000000000000
gJU UaIuIg uLoI I Jy Jy Bai I .Jy LqI
g pssuilll (auiyjSll oess) albuysuoy aaiuall alogall auiyjSll sssll , uolxI uusuia g (auiyjSll auiuill lls abwlg) auuyjSll auiuill lIs jgs) pssuay aaiuwll auiyjSll sssll . (auiyjSll
JooI Joo
L
.
Eg9gU! 5gj g oJaaJI uJaaJI Lgig .uJgJl
g g 11 jL J 11 jL jL jL g
U
.0jXg jx
oeJlIeJieJie|Jy
.ajjJcJJ 1
jIJI Ic oJbWU IclSd
Jy
aui
.μlaJIg aJllo μlaJI
JgJoo JgO 5u uJgJI
J 1 J 1 J 1 J 1 J 1 J 1 J 1 J 1 J 1 J 1 J 1 J 1 J 1 J 1 J 1 J 1 J 1 J 1 J 1 J 1 J 1 J 1 J 1 J 1 J 1 J 1 J 1 J 1 J 1 J 1 J 1 J 1 J 1 J 1 J
aJl aJl aJl Jn Jn Jn Jn Jn Jn Jn Jn Jn Jn
gJbIaBnJyIbW JbSd
Jso nJyJIgUil |JyJusoiJ
. UJLo! uWJU
a a a a a a a a a a a a a a a a a a a a a a a a a a a a a a a a a a a a a a a a a
Lgaij
Joo aJdall JlJI I JIJI Jg Jo f Cw
Jssll 100 4o 100 00
.duJgS do
gJgJgJgJgJgJgJgJgJgJgJgJgJgJgJgJgJgJgJgJgJgJgJgJgJgJgJgJgJgJgJgJgJgJgJgJgJgJgJgJgJgJgJgJgJgJgJgJgJg
JU 1 JI Lc auiyjx Jd jx JI I JI JI JI JI JI JI JI JI JI JI JI JI JI JI JI JI JI JI JI JI JI JI JI JI JI JI JI
aui jll 1u w uo aug g uai kui .gao uu
8.1JbIJI JgIoo jc IyjBlaIaIwI 2Jol aIyIyIyI yIyIyIyI yIyIyIyI yIyIyIyI yIyIyIyI yIyIyIyI yIyIyIyI yIyIyIyI yIyIyIyI yIyIyIyI yIyIyIyI yIyIyIyI yIyIyIyI yIyI
jolqolssaiwai j!oiauJSL
.0gJgJgJawl
1 1 1 1 1 1 1 1 1 1 1 1 1 1 1 1 1 1 1 1 1 1 1 1 1 1 1 1 1
Aai i 1000000000000000000000000000000000000000000000000000000000000000000000
jlllloIgblalglglaIgblalssc
Laggi jSog JlJSw uJSSuLg aUu Laiu
4.öJag
Llgl.1aIg 10g 1Jg
aaii IlaI jaiyJl sll piai. aaii Uai I gdo yg lqk 4.aaii Aai Jj
UJg2
JuswlgnnnssiaaIbawg .baq aLoljLsIgabglaJI JLaJI JLoI Lc
a gljll JnJlOJI
gI gI I I I I I I I I I I I I I I I I I I I I I I I I I
gAaLw oIwJgI Joo oIgI aLos .gB 1sI uLoKl U
aJJI I aIgJg JgJg JgJg JgJg JgJg JgJg JgJg JgJg JgJg JgJg JgJg JgJg JgJg JgJg JgJg JgJg JgJg JgJg JgJg JgJg JgJg JgJg JgJg JgJg JgJg JgJg
Jlll Joc 1
g lalj no paao julac jd uylgJ Uuolg ojgba gda
UeS 100000000000000000000000000000000000000
aIol j. g oJ 0d aJlal
duw Jn oo d yjSJJ oJy J
.oo
e 15 e g aagaaaeggaaagaaagaaagaaagaaagaaagaaagaaagaaagaaagaaagaaagaaagaaagaaagaaagaaagaaagaaagaaagaaagaaagaaagaaagaaagaaagaaagaaagaaagaaagaaagaaagaaagaaagaaagaaagaaagaaagaa
jubg jwSui 1 jkawl lqicm no
aALL lJIJI bJIJI 1gJ U B J Lgawall IwIJI JbI gLsawg
Jlui Jyll Ie oai jj y paa 4
. aiiu Jluio jj g1 sji
. diai JjI uo g d jn
. jbss Ud qg
g 111 111 111 111 111 11
Laaa aaaaalagllg aaiyjgl kll J
laaaaall jcJ 1
plo ksw laiysnks 2 auiyjll ooll
aiol jc jzig
no abgsasall yajwll baw
aawbaw lwsl jogkns npjbjj jall
jllg wliu cJ ksw jssrll jow
jkw aiao nks 8 aqglll aoew jc
.
J 1 J 1 J 1 J 1 J 1 J 1 J 1 J 1 J 1 J 1 J 1 J 1 J 1 J 1 J 1 J 1 J 1 J 1 J 1 J 1 J 1 J 1 J 1 J 1 J 1 J 1 J 1 J 1 J 1 J 1 J 1 J 1 J 1 J 1 J
GWS 750-100 S/GWS 750-115 S/)
(GWS 750-125 S
(4)
aai jg jgai JJI 5 M14
aaiJl jgds gao JbJI lioM10
aJUJJgJg(7)
JUJU JUJU UJU UJU (8)
aLgJUbC uWuJ (9)
juii 10) (A
duol (12)
SDS-clicdJdJgol (13)
(14)
(15)
Xg joljgs lal aab
.aaJJJ aosu Joo g w
aaglcUwpjI UoJy JwAuljx
Jjll
JdIaB Jals
Jaiiaabg alldlg aolSJIaicmu
15j0o j0jogg aolcU
aJg aJd jI aoo oOg I Jc
Jaljol lai ayu yd o scl
JouWJdo
aJg jjJI JbI Jlloij oS
.aaSsJbglgqU
Jawl sliw g uJJ qjjg aui
jUjJg gbaIbA jUjJI JsWl aB
.0jol jilc jswl aabg agla
12b0>
XgUuUgUgUgUgUgUgUgUg
.2gogjIgLoaJdiKuua
gJjI JwTgo gbo 9gbai j0j Ug
gJUgJUJUJUJUJU
.aaJjJ aoo gg
aai jia jia aai jia
aJSS aJlI
.0jaiuJI alglJ JuaI siojaiuJI eI
joo jnoioll ocl j j j g
jll jai 1 g aabai
.aaJjI cLdJol jaiI gI gaiu daojg
Jlll lalaoa IooI 1
a<luuI cLjJy
Lwla
.
Jg k Jkwh jllhJl 1
oljalayssll
.1g/9 aaoJU JJI
aJyJU JgIg IJIS
gaww
g o o wjol g l ywll jal
gI gJLwJU JpJd sJy d.aJgJI
JJIggl Jaaai oal
auiSjoll
aLwJnLWJUd
.ugljIbJ-1JlLgJ

Jgai aai oai jgi pai
aJn jwglj JUJI JsLgbs
aJlglbglal aol.
(11)UJ.duuLulloosuUgUUxU
gga 15g jla bla
a.salljIjOJIKsawllbla gljial.
auiuJU UoosuU Ug
boll
.3j UJU
JUJI LJIaJIc
(A)
21(aaolw
(A
16(2bā
22((gjoo eluo yao) yao
(A)
17
A(0gJgJgUlgUJgUJlb|Jn
18(a,b)
(A)
19(
(A)
20(
auiuluiu
| GWS 710GWS 750-100GWS 750-115GWS 760-125GWS | |||||
| 3 601 C94 0..3 601 C94 0..3 601 C94 0..3 601 C94 0..3 601 C94 0..3 601 C94 0..3 601 C94 0..3 601 C94 0..3 601 C94 0..3 601 C94 0..2 601 C94 0..3 601 C94 0..3 601 C94 0..3 601 C94 0..3 601 C94 0..3 601 C94 0..3 601 C94 0..3 601 C94 0..3 601 C94 0..3 C94 0..3 C94 0..3 C94 0..3 C94 0..3 C94 0..3 C94 0..3 C94 0..3 C94 0..3 C94 0..3 C94 0..3 C94 0..3 C94 0..3 C94 0..3 C94 0..3 C | J. J. J. J. J. J. J. J. J. J. J. J. J. J. J. J. J. J. J. J. J. J. J. J. J. J. J. J. J. J. J. J. J. J. J. J. J. J. J. J. J. J. J. J. J. J. J. J. J. J. J. | J. J. J. J. J. J. J. J. J. J. J. J. J. J. J. J. J. J. J. J. J. J. J. J. J. J. J. J. J. J. J. J. J. J. J. J. J. J. J. J. J. J. J. J. J. J. J. J. J. | |||
| 750 | 750 | 750 | 750 | b1g | dd |
| 380 | 380 | 380 | 380 | b1g | d |
| 11000 | 11000 | 11000 | 11000 | d | ds |
| - | - | - | - | d | m |
| 125 | 115 | 100 | 125 | m | a |
| M14 | M14 | M10 | M14 | l | |
| 22 | 22 | 22 | 22 | m | d |
| - | - | - | - | d | |
| - | - | - | - | d | |
| - | - | - | - | d | |
| - | - | - | - | d | |
| - | - | - | - | d | |
| EPTA-Procedure 01:2014 | |||||
| 1,9 | 1,9 | 1,9 | 1,9 | k | m |
| 1,8 | 1,8 | 1,8 | 1,8 | k | m |
| II/Ⅱ | II/Ⅱ | II/Ⅱ | II/Ⅱ | d | |
Jg Jg aoluljllg 1230 gU]
| GWS 750-100 I | GWS 750-125 S | GWS 750-115 S | GWS 750-100 S | Ägåla Jullä | |
| 3601 C94 1..3 601 | C94 1..3 | 601 C94 1..3 601 | |||
| 750 | 750 | 750 | 750 | bIg | Ägåla Jullässmälty |
| 410 | 380 | 380 | 380 | bIg | Ägåla Jullä |
| 11000 | 11000 | 11000 | 11000 | -1 | Ägåla Jullässmälty |
| - | 11000-2800 | 11000-2800 | 11000-2800 | -1 | Ägåla Jullässmälty |
| 100 | 125 | 115 | 100 | mo | Ägåla Jullässmälty |
| M10 | M14 | M14 | M10 | Ägåla Jullässmälty | |
| 22 | 22 | 22 | 22 | mo | Ägåla Jullässmälty |
| - | ● | ● | ● | Ägåla Jullässmälty | |
| ● | - | - | - | Ägåla Jullässmälty | |
| ● | ● | ● | ● | Ägåla Jullässmälty | |
| ● | ● | ● | ● | Ägåla Jullässmälty | |
| EPTA-Procedure 01:2014 | |||||
| 1,9 | 1,9 | 1,9 | 1,9 | Sjög | mässen mässen mässen - |
GWS 750-100 SGWS 750-115 SGWS 756
≤1,81,81,81,8
-1
wU
□
回
回
//Ⅱ/Ⅱ/Ⅱ/Ⅱ
aLooJ a
JgKdAaIJIaIJIaIJIaIJIaIJIaIJIaIJIaIJIaIJIaIJIaIJIaIJIaIJIaIJIaIJIaIJIaIJIaIJIaIJIaIJIaIJIaIJIaIJIaIJIaIJIaIJIaIJIaIJIaIJIaIJIaIJIaIJIaIJIaIJI
g (7) aJl jI g Jgoo oobii p 1
CJJIc baiol gulg 10g 1.
loic bq jlgjg jy jbfo 4 .aJl Jc Iagg aaljlgds g k. Jfll auiuul o d jd qg
gbl/1jll
b g 1 u L. .LJSSc UwLaO cJIa dIgall boll JosuW 2. CuiI I aWJg o aioI .jglg b g
1J Lc Jd Jwllbll 1jol sii Wl Sic
Jg Jc Jgogall 1jgl oJgW gbl
Jy Jg Jd Jg 1jgl 1jgl wllgall
Jg Jc Jgogall 1jgl 1jgl pW jbl) .(uogjll
aabbsllgwwllaaagc g bckjllb jy jy y 1golo bny ggbal/gy
JUJI 1000000000000000000000000000000000000000000000000000000000000000000000000000000
14 a 10
M 10 aal joo aai 1.

j j 1000000000000000000000000000000000000000000000000
glboll
IbIaII IaII JnJos PoiSauLy JooJI Sic .(17)laI sJU IaIg uKj pO (18)
gwwjAaaw 9 wSjll Ugbaa ju .ababai
g (20) yu wai I golal bju .(6)/(5) uJAL buJI liao pI sWU
J 10
J 11 11 11 11 11 11 11 11 11 11 11 11 11 11 11 11 11 11 11 11 11 11 11 11 1
gwwJl aaaa uSjll Ugbujj J.ubabill
#
aJl j
aJyJ 1 aJU u Jn JU LJI U WJ 4 .aJyJ 0 dJ U Lc JAc JI J
aall pI aawly (17) 111 a91g Cw w. .4
1 1g
aJyLJI aSsI Jn no JyI LJI yI 1
.ayIyJxJ Ie Jc Jc JI J
gbl Jg Jb J
0JyJyJyJyJyJyJyJyJyJyJyJyJyJyJyJyJyJy
Jl jll pnnn nng uwnuug JI.
gaaaal jll scc
JgSdI JgSdI sGpI sWl EI
IaJI IJU 15 12 10 10 10 10 10 10 10 10 10 10 10 10 10 10 10 10 10 10 10 10 10 10 10 10 10 10 10 10 10 10 10 10 10 10
aJgdu gaoaoll lalI ssc Iy 1 y 1111111111111111
| [ρ] | ||||
| [ρ] | d | b | D | |
| 80 | 11000 | 16,0 | 7 | 100 |
| 80 | 11000 | 22,2 | 7 | 115 |
| 80 | 11000 | 22,2 | 7 | 125 |
| 80 | 11000 | - | - | 100 |
| 80 | 11000 | - | - | 115 |
| 80 | 11000 | - | - | 125 |
| 45 | 11000 | M 10 | 30 | 70 |
| 45 | 11000 | M 14 | 30 | 75 |
jUJUJIb
Jg jy Jg Jg Jg Jg Jg Jg Jg Jg Jg Jg Jg Jg Jg Jg Jg Jg Jg Jg Jg Jg Jg Jg Jg Jg Jg Jg Jg Jg Jg Jg Jg Jg Jg Jg Jg Jg Jg Jg Jg Jg Jg Jg Jg Jg Jg Jg Jg Jg Jg Jg J g J g J g J g J g J g J g J g J g J g J g J g J g J g J g J g J g J g J g J g J g J g J g J g J g J g J g J g J g J g J g J g J g J g J g J g J g J g J g J g J g J g
olw/aaal owljll bpo kla pnnn n nn n 1
daaogn gkuiy aaii jngg s yoo y cnnn
aqi sic aaii jngg s yoo ayuq g bi
owljll bpo kai. aaii jngg s yoo y
gl aiao plssw ly nnnn owlj/aaal
SDS- liE
sclpssuulgagwuslil0scmuu 12(aj 13.
gJgJgJgJgJgJgJgJgJgJgJgJgJgJgJgJgJgJgJgJgJgJgJgJgJgJgJgJgJgJgJgJgJgJgJgJgJgJgJgJgJgJgJgJgJgJgJgJgJgJg
aLiA aai JI Lc JALdLsic 11 11 (13) dll agol o jaoI aIc Igawu)23(
CJJJc b
UJgJg0
UJgJg00
UJgJg00
UJgJg00
UJgJg00
UJgJg00
UJgJg00
slll aagw algoa l kssaaalaaaasll 10s gdiakg y aalol jla ool ssc ojjoll 8.ugdyacawl uyac 1dawlos pddw w algaal d g 6d w ssw oosiaall .kajll bgl gldo
w g jll wjg
aJySsJ aSsJU 0o no uu Jll UwJ .aJySsJ oJdJI Lc Joc sI JrJl
J.10
jg sijg puiu Uk ufo 10 joo oJc o gSj
ooJ uuiuuiuuiuuiuui
.
jgglJskuI aobio gJ JrloI q
.bjao U
b u yu yu yu yu yu yu yu yu yu yu yu yu yu yu yu yu yu yu yu yu yu yu yu yu yu yu yu yu yu yu yu yu yu yu yu yu yu yu yu yu yu yu yu yu yu yu yu yu yu yu y
GWS 750-100 S/) juui I sIc! aIg
GWS 750-115 S/GWS 750-125 S/
(GWS 750-100 I
oJl Jjw oJc! gioj Jusuui oJlc! aagg j
jUJU JxI OgC SiL pSJJ
LJIJIJI
bduu duiy uui 1uus uo sle!
aiLg2)ablgjwll
.aaJySJI 0aJI Jxw Wsl
GWS 750-100 S/)
GWS 750-115 S/GWS 750-125 S/
(GWS 750-100 I
sic oJdall sdy gjiSjI jduo
(GWS 750-115 S/GWS 750-125 S
Lauo jlgjS SSc bdo aalc abwlg elisO)3(
.1uull.lui laa u gllal lall ssc b
Lg jjKg g
山
山
Jgssjlll 100
uU uSau.duuJgSJI gai aag
aJoojj JjLgKJJ J
230 uuao U
aJgja
Jg 1 Jaa aai jll lwl 0d 0d
Lgauai jy
Jai Jao loo jus da Jy
.ajjusaoa o suiuui uaiui jui
UJgoI dawy auljSJI oJL Jw sic Lg y jll,(UJgJI) alaiiJI aJIJI
aLw g LJ CwJ g f aJI J no aJgS cUbla
aagaaugg aaii
Ugss U
.1JzwiI sic 5uic | jc |s|g|s|x| g c
joo 100
auiuJgUd uWU d jig gauo lauolag
/
jJU
@L/1J#uill)2.(lo.
(2) /jssuul lioo u
UJUJawuUolX1 (2) 1Lx/luwul
GwL
/1sui 1i0u iuiu
g2
(
dji jawl
| gδδδδδδδδδδδδδδδδδδδδδδδδδδδδδδδδδδδδδδδδδδδδδδδδδδδδδδδδδδδδδδδδδδδδδδδδδδδδδδδδδδδδδδδδδδδδδδδδδδδδ | |
| 2-3 | ˆρσεινητηδδδδδδδδδδδδδδδδδδδδδδδδδδδδδδδδδδδδδδδδδδδδδδδδδδδδδδδδδδδδδδδδδδδδδδδδδδδδδδδδδδδδδδδδδδδδδδδδδδδ δ |
| 3 | ˆρσεινητηδδδδδδδδδδδδδδδδδδδδδδδδδδδδδδδδδδδδδδδδδδδδδδδδδδδδδδδδδδδδδδδδδδδδδδδδδδδδδδδδδδδδδδδδ |
| 4-6 | ˆρσεινητηδδδδδδδδδδδδδδδδδδδδδδδδδδδδδδδδδδδδδδδδδδδδδδδδδδδδδδδδδδδδδδδδδδδδδδδδδδδδδδδδδδ |
| 6 | ˆρσεινητηδδδδδδδδδδδδδδδδδδδδδδδδδδδδδδδδδδδδδδδδδδ |
| 6 | ˆρσεινητηδδδδδδδδδδδδδδδδδδδδδδ |
Jg gaoa j
.《aJw!UdJ!》jIJI,laLJI
wls1x1y1a6b8uulp
.lqjjg aai
JssuIgSJI oSJI Ic JusuU paa
.1g9g 1u uui jus
p8 15
Joo JaaJIgogIc gJgssosL
.
.aojolaoI JUJUaIguaaiuJI
gabai sic. gball ulso
aalaljluai
auiuuaJjwUgJlg
olsswI elue
.
aJJI I aIJI b
Aic au
.aaJJIgajg
JUJU no aLgU ELIg 1JJU p
service-pt@tehini-hana.com:gJJJ
U
p.p. · .UJ201 Ug! Ujg]
Sgjoo jolll aij.53
20300 LjI Jl
sav.outillage@ma.bosch.com:jgjJ
la
p.p. uU gIaJIg oJlaIuilo
131 ggsu ygss
laacablw112gJ
:+968 99
malatanpowertools@malatan.net:jgjj
j
p.p.uuuiUglJaggJl
51ggsu ygg
+974 40065458:ddgJl
+974 4453 8585 :μu≤Lg
csd@icsdoha.com:gjSJ
aJgawlll aJyalll aSlaalI
uolIgioj jbu bua
g bbs Jy jI yJL gj Jgj Jgj Jgj Jgj Jgj Jgj Jgj Jgj Jgj Jgj Jgj Jgj Jgj Jgj Jgj Jgj Jgj Jgj Jgj Jgj Jgj Jgj Jgj Jgj Jgj Jgj Jgj Jgj Jgj Jgj Jgj Jgj Jgj Jg
1j 5i jg jbs jooj g lbs jy
GaaJlUcJ
gJSLduuusgogsgjgsulga
JjI I JolcsJw g jg sis
JgGgUusooJgOJJsLg
gJgJSLJgJoas
S. sij jls gj ljl u, sls o laowl
jglgoo jjIjI I jS oIggi d
.duiuloljauuU 1suiu
.oui slaiw| gaoi jqj
.ajoi slaiw| jiai Sicjl oJgaw
LaiI Swo I JI OJU
gaiolS, wjai Gai
Jjw gjo Jg jEgi wliio li
. 5u u L
aaiIgali jgblgdldSduIglo
daLwgs jSjgl jI J
g sJb d Jlai jj j oKss
JjlaS Ss oLss Jn
Jaa pks dS ggs J. uu y uugolg
Jog g 2bdoS (5g) low cuiol bius
aui j u i w g J 1 oLw s g w
.1J uu 1g w u
olssgjlJllojIgosii
aJg gj
aJd JcLg, jJlJolw
.
jglgslla Js laown y
gijtabo ayldiy
ojgamIj gdsJg ojs lail sg
sis bα
auiS JiiS CJ jie ojuaio jc 5gusog
.
IgawuJdWgjI. WguaLio wU
.
jslqwblj lkwg wlu
LwU. dJgJgSolswu
jswl jSao 21 gi g sily 590 .slw
SiiS 50 Biiw uJy Jy slqio
jilwglalg jgljqdaS gJg
SjS OiiS gao aIw g jLg SjS uSo
dsugw jiaobo sly cwi osw aillj lue g
slaawl g uai cwwj jlwg jI
jue g juSo jIwgl oJlaui.
.1sio j slj luc g s j 1u J Law cugao
ijlju g jj1j1s
olkssgj jlwhjg jg j
gjIjI jSJSJg
jI jI jI. sO slawl ly wli
wJl
i! 1gss
J 1 J 1 J 1 J 1 J 1 J 1 J 1 J 1 J 1 J 1 J 1 J 1 J 1 J 1 J 1 J 1 J 1 J 1 J 1 J 1 J 1 J 1 J 1 J 1 J 1 J 1 J 1 J 1 J 1 J 1 J 1 J 1 J 1 J 1 J
JLJ 1 JUJ 1JUJ 1JUJ 1JUJ 1JUJ
JjI J 1
. 1
. 1
. 1
golai 1uoi jL Jd laoi u n jn s g law w wJl Jd jw g oSs wS (sg) wJy Jla Jow u b yjI cJl
Jg Jg 100000000000000000000000000000000000000000000000000
1gog 1sLgoguolguguoguoguoguulgauu
JUw g uJ 0laWl. Jsi JlaWl Jls
Iio gui jg uo s iu o s iu s iu
. g w S
GaiI golssj
J 1 J 1 J 1 J 1 J 1 J 1 J 1 J 1 J 1 J 1 J 1 J 1 J 1 J 1 J 1 J 1 J 1 J 1 J 1 J 1 J 1 J 1 J 1 J 1 J 1 J 1 J 1 J 1 J 1 J 1 J 1 J 1 J 1 J 1 J
aogjblabjolalawd jgjwJ
WjU bGiaIbtaaWlajl,caWlO
.1sS ggl G
Jwqjl JdsilgwsL GwWg
.1s|u|j]jjo jjg 1g jg
Gai |laiai]jLw
.

oJaiuI JgO I jjjjjIjI a glio
.
Lb cws y Ls pG a b jgS g Jy JjI y
CwI JSoa daw nJl oJaiw lg Cwni wli
. 5J S UJnWu
uUaocgogGiaIgIuaW
L (18) L
LwUw d0/2uWJ/GwL W
.1s oJIoW| (17) 1oJ uSsw jI
.4 (4) 4uJ (17) uJ
UwJjUa
jjI s9J J SJSd agSjPoljl jI u
j j1 j1 j1 JlJl aJl wgs
.
a (\dot{u}\dot{\psi} g\dot{v} u\ddot{u}\dot{u}\dot{u}\dot{u}\dot{s}\dot{s}\dot{s}\dot{s}\dot{s}\dot{s}\dot{s}\dot{s}\dot{s}\dot{s}\dot{s}\dot{s}\dot{s}\dot{s}\dot{s}\dot{s}\dot{s}\dot{s}\dot{s}\dot{s}\dot{s}\dot{s}\dot{s}\dot{s}\dot{s}\dot{s}\dot{s}\dot{s}\dot{s}\dot{s}\dot{s}\dot{s}\dot{s}\dot{s}
jLswJSLpKiooJUa.aajjwLq
.iguoo eJ
.1s jai Ij 1abg 1w g (7) oJws Jgoo
(1) jgoo jg 5 doSJJjI jJ S Jg gSoo
.
Iolksusgao cui gosis Jao daSs
olwJgoo Jols aggjJgdo b
ω
iaiI jj
jIjI s9J JgS aigS jI j
J J 10000000000000000000000000000000000000000000000000000000000000000000000000000000
3u3j#
.3Jgagg
Lw a/
g w. g. 111111111111111111111111111111111111111111111111111111111111111
<jwgj
J 10000000000000000000000000000000000000000000000000000000000000
m : x = 1 或 3x + 4y + 1 = 0
Uw Caw (sJy jj 10:
.1sJL Jg j
UuUd
IJJSLWUwdaagjg)
.
SswXwLwL
Ij18)w
.
gul daa jn lgj oui
(2) 10g g bgsL, cwi I jI J LJ I J g sI yu u o g S C wj j I .
JlI Jw IjI jI Jg
9 1 JI JI JI JI JI JI JI JI JI JI JI JI JI JI JI JI JI JI JI JI JI JI JI JI JI JI JI JI JI JI JI JI JI JI JI JI JI JI JI JI JI JI JI JI JI JI JI JI JI JI JII
JiJiJiJiJiJiJiJiJiJiJiJiJiJiJiJiJiJiJiJiJiJiJiJiJiJiJiJiJiJiJiJiJiJiJiJiJiJiJiJiJiJiJiJi
(GWS 750-100 I) aac a uo ouiS aigio
GWS 750-100 S/) GWS 750-115 S/GWS 750-125 S/ GWS 750-100 I
GWS 750-100 S/GWS 750-115 S/) (GWS 750-125 S/GWS 750-100 I
sJ110j jg jg jS O S 50
Soo 11 11 11 11 11 11 11
J 16 jg g o J o k s J S J S J S J S aia
.
GWS 750-100 S/) jI (GWS 750-115 S/GWS 750-125 S
.1Js sggg jjI glc uSgj
g ubaloo d yI oLisu g JjI [ab]
.5iS 51g5j 5g a
dswduJlaiI sUy JUsuJjUg
Lb01jXs LoojOo jolaw loa, lalso
.
U
wJ L JJJ Wg -JUg


- General Power Tool SafetyWarnings
- WARNING
- Save all warnings and instructions for future reference.
- Work area safety
- Electrical safety
- Personal safety
- Power tool use and care
- Service
- Safety information for the angle grinder
- SafetyWarnings common for Grinding, Sanding,Wire Brushing or Abrasive Cutting Off operations
- Kickback and RelatedWarnings
- SafetyWarnings specific for Grinding and Abrasive Cutting-Off operations
- Additional SafetyWarnings specific for Abrasive Cutting Off operations
- SafetyWarnings specific for Sanding operations
- SafetyWarnings specific for WireBrushing operations
- Additional safety information
- Products sold in GB only:
- Product Description and Specifications
- Read all the safety and general instructions.
- Intended use
- Product Features
- Technical Data
- Fitting
- Fitting protective equipment
- Protective guard for grinding
- Protective guard for cutting
- Side handle
- Hand guard
- Fitting the abrasive tools
- Grinding/cutting disc
- Flap disc
- Rubber sanding pad
- Cup brush/disc brush
- Quick-clamping nutSDS-e/ie
- head
- Approved abrasive tools
- Dust/chip extraction
- Operation
- Start-up
- Switching on/off
- Kickback stop (GWS 750-100 I)
- Restart protection (GWS 750-100 S/GWS 750-115 S/ GWS 750-125 S/GWS 750-100 I)
- Starting current limitation (GWS 750-100 S/ GWS 750-115 S/GWS 750-125 S/GWS 750-100 I)
- Speed preselection (GWS 750-100 S/GWS 750-115 S/ GWS 750-125 S)
- Material Application Application tool Thumbwheel position
- Working advice
- Rough grinding
- Cutting Metal
- Cutting stone
- Information on structural design
- Maintenance and Servicing
- Maintenance and cleaning
- After-sales Service and Advice on Using Products
- Cambodia
- People's Republic of China
- China Mainland
- HK and Macau Special Administrative Regions
- India
- Indonesia
- Philippines
- Singapore
- Thailand
- Vietnam
- www.bosch-pt.com.vn
- Armenia, Azerbaijan, Georgia, Kyrgyzstan, Mongolia, Tajikistan, Turkmenistan, Uzbekistan
- Bahrain
- Iran
- Iraq
- Jordan
- Kuwait
- Qatar
- Saudi Arabia
- Syria
- United Arab Emirates
- Yemen
- Ethiopia
- Ghana
- Kenya
- Nigeria
- Republic of South Africa
- Customer service
- Gauteng - BSC Service Centre
- KZN - BSC Service Centre
- Western Cape - BSC Service Centre
- Bosch Headquarters
- Tanzania
- Australia, New Zealand and Pacific Islands
- Disposal
- 中文
- 安全规章
- 电动工具通用安全警告
- 警告!
- 保存所有警告和说明书以备查阅。
- 写马作用
- 節減訣章程用在前
- GWS 750-100 S/ GWS 750-115 S/GWS 750-125 S/ GWS 750-100 I)
- AS 送T贝
- nuiuwwuuaaunnuuunnn
- Junuovnuu (8) luanuaovnuu liu
- nnaaunna
- lnu
- 777
- Bahasa Indonesia
- Keselamatan personnel
- Mata gerinda/cakram potong
- Mur quick-clamping SDS-
- Cac Canh bao An toan Bó sung dang riêng cho cac thao tac Cat
- Cac canh bao phu them
- Chan Bao Vé Dung De Cát
- Taynamphu
- Chán Bǎo Vě Tay
- Lap Dung Cu Mai
- Día Mai/Cat
- Chong dai nguc (GWS 750-100 I)
- Chong khoi dong lai (GWS 750-100 S/ GWS 750-115 S/GWS 750-125 S/GWS 750-100 I)
- Lam giam cuong do dong dien khi khoi dong (GWS 750-100 S/GWS 750-115 S/ GWS 750-125 S/GWS 750-100 I)
- Chon trucoc dq (GWS 750-100 S/ GWS 750-115 S/GWS 750-125 S)
- Su thai bo
- Français
- Protection anti-redemarrage (GWS 750-100 S/ GWS 750-115 S/GWS 750-125 S/GWS 750-100 I)
- Tunisia
- #
- JlXI JdJ
- GWS 750-100 SGWS 750-115 SGWS 756
- gbl/1jll
- aJl j
- gaaaal jll scc
- jUJUJIb
- SDS- liE
- 山
- wJl
- i! 1gss
- Lw a/
Brand : BOSCH
Model : GWS 750115 Professional
Category : Coffee grinder