
CD10 - Keyboard General Music - Free user manual and instructions
Find the device manual for free CD10 General Music in PDF.

| Product Type | Electronic keyboard with automatic accompaniment |
| Number of keys | 61 velocity-sensitive keys |
| Maximum polyphony | 32 notes |
| Multitimbral | 16 parts |
| Sound generation | 16-bit PCM |
| Sound banks | 2 banks (128+128 General MIDI compatible sounds) |
| Drum kits | 8 drum kits |
| Styles | 96 Styles + 96 Variations |
| Digital effects | 2 processors (16 reverbs + 16 modulations) |
| Sequencer | 1 multitrack song |
| Pedal controls | Volume and Damper pedals (optional) |
| MIDI | MIDI IN/OUT jacks, General MIDI compatible |
| Power supply | 1.5V batteries (type D) or optional 12V DC power adapter |
| Speakers | Built-in |
| Audio outputs | LEFT/RIGHT (1/4" jack), stereo headphone jack |
| Display | LCD screen showing Tempo, Style, Sound |
| Maintenance | Clean with a soft cloth and mild detergent; screen with glass cleaner |
| Safety | Do not expose to water; use recommended power supply; do not open the device |
| Included accessories | User manual |
Frequently Asked Questions - CD10 General Music
User questions about CD10 General Music
0 question about this device. Answer the ones you know or ask your own.
Ask a new question about this device
Download the instructions for your Keyboard in PDF format for free! Find your manual CD10 - General Music and take your electronic device back in hand. On this page are published all the documents necessary for the use of your device. CD10 by General Music.
USER MANUAL CD10 General Music
© 1995 by Generalmusic S.p.A. All rights reserved.
- Keyboard
Tastiera
Clavier
Tastatur
Toetsenbord
Klaviatur
Keyboardet
Teclado
- Control panel
Copyrights and liability. 7
Power supply, Connections and Demo, 8
POwER SUPPLY, 8
Loading the batteries, 8
Connecting the power supply to the mains, 8
AMPLIFICATION, 8
Built-in speakers, 8
External amplification, 8
Stereohedgephones,8
PEDALS,8
Damper, 8
Volume, 8
DEMO,8
The keyboard and the sections, 9
THE KEYBOARD, 9
THEINSTRUMENT SECTIONS,9
UPPER AND LOWER, 9
Programming LAYER, 9
Programming SINGLE, 9
Returning to SPLIT, 9
Changing the split point, 9
ASSIGNING SOUNDS TO THE UPPER AND LOWER SECTIONS, 10
Assigning a Sound to the Upper section, 10
Assigning a Sound to the Lower section, 10
REGULATING THE VOLUME OF THE UPPER AND LOWER SECTIONS, 10
The Styles, 10
DRUM, BASS, ACC1, ACC2, 10
REGULATING THE VOLUME OF DRUM, BASS, ACC1 AND ACC2, 10
AUTOMATIC SUSTAINOF THE LOWER SECTION, 10
Activating/deactivating Lower Memory, 10
SELECTING A STYLE, 10
CHANGING THE TEMPO, 11
CONTROLLING THE STYLE, 11
[START/STOP], 11
[TOUCH START/CONTINUE], 11
[INTRO/END], 11
[TAP TEMPO], 11
[FILL BASIC], 11
[FILL VAR], 11
[VARIATION], 11
[ARRANGE], 11
[ATOSET], 11
STOPPING THE STYLE WHEN YOU RELEASE THE KEYS, 12
BASS FOLLOW. 12
Harmony, Digital Effects, Master Tuning, 12
HARMONY, 12
Activating Harmony, 12
Using Harmony, 12
Deactivating Harmony, 12
DIGITAL EFFECTS, 13
MASTER TUNING, 13
Drums & Samples Pads, 13
Transposer, 13
Tune, 13
Sel. Sounds & Styles with the [PAGE] buttons, 13
Selecting a Sound, 13
Selecting a Style, 13
The two sound banks, 14
Selecting a sound bank, 14
The Song, 14
THE SEQUENCECBUTTONS,14
[PLAY/DEL], 14
[REC], 14
[LOWER], 14
[UPPER],14
[START/STOP], 14
[TOUCH START/CONTINUE], 14
SPECIAL SECTIONS, 14
RECORDING, 14
Preparation (before recording), 14
Recording, 15
Escaping from "record", 15
"OVERDUBBING", 15
MIDI, 15
What is Midi, 15
DELETE, 15
SONG NAME, 15
Midi Connections, 15
INSTRUMENTAL SECTIONS AND MIDI CHANNELS, 16
Common Channel, 16
Programming the Midi Channels of CD10, 16
GENERAL MIDI, 16
Sound compatibility, 16
The sixteen General Midi sections, 16
CD10 AS A SLAVE, 16
Changing the Sound, 16
Changing a Style, 17
Controlling a Style, 17
CD10 AS A MASTER, 17
Changing the Sound, 17
Changing the Style, 17
Controlling the Style, 17
SPECIAL MIDI FUNCTIONS, 18
Local ON/OFF, 18
Slave:Tracks,18
MIDI Clock, 18
Start/Stop ON/OFF, 18
MIDI Filters, 18
MIDI Dump, 19
DYNAMICS, 19
Technical specifications, 20
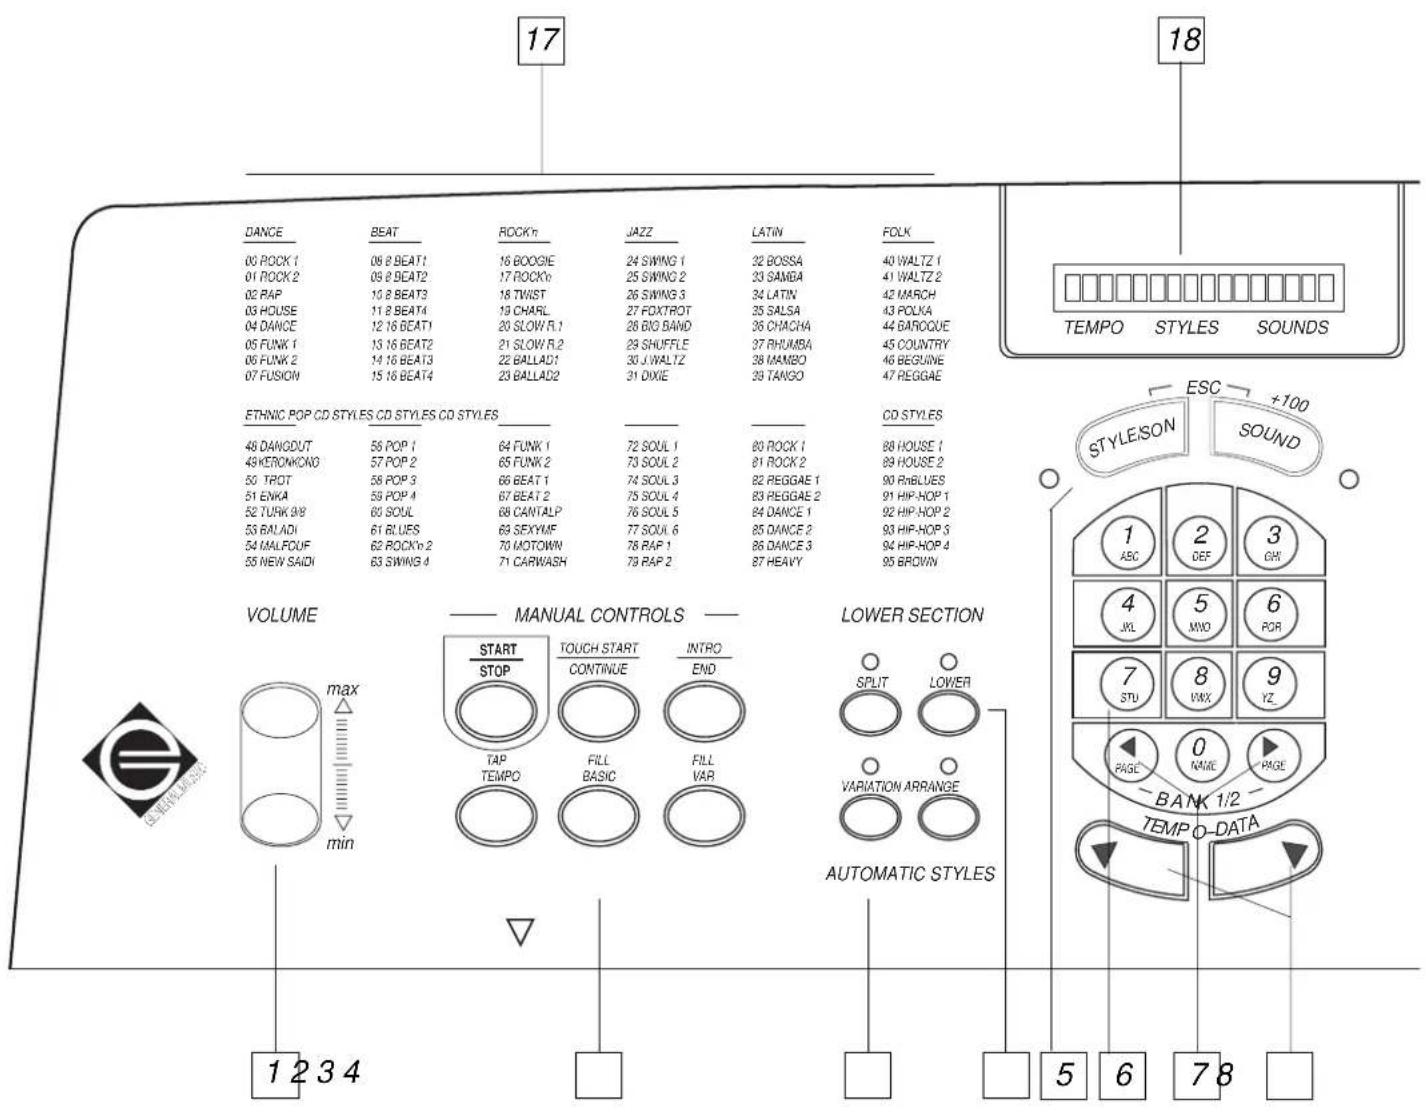
- Volume. Regulates the General Volume. The regulation is proportional to the individual volume settings of each sound section.
- Manual Controls. Groups of buttons which control the Rhythms and Automatic accompaniment. [START/STOP] starts or stops the Style (or Song). [TOUCH START/CONTINUE] starts the Style when you play a note or a chord in the Lower section (or starts the Song playback from its current position). [INTRO/END] starts and stops the Style with an introduction or an ending. [TAP TEMPO] starts the Style after beating time on the button. [FILL BASIC] triggers the Fill In and/or returns to the Basic Style. [FILL VAR] triggers the Fill variation and activates a variation of the Style.
- Automatic Styles. [VARIATION] activates/deactivates the variation of the Style. [ARRANGE] activates/deactivates the automatic arrangements.
-
Lower Section. Controls of the Lower section of the keyboard. [SPLIT] activates/deactivates the split point between the Upper and Lower sections. [LOWER] activates/deactivates the Lower section.
-
[STYLEs] and [SOUNDS] buttons. [STYLEs] predisposes the keypad for Style selection. [SOUNDS] predisposes the keypad for Sound selection. Pressed together they act as an [ESC] function that cancels certain edit situations and allows you to escape from Song "record" mode and from MIDI and DELETE programming modes.
- Keypad. Inserts numbers and letters. When the [STYLES] LED is on, the keypad selects Styles, when the [SOUNDS] LED is on, the keypad selects Sounds for the Upper section; if you press [LOWER] when this LED is on, the keypad selects Sounds for the Lower section.
- [PAGE] buttons. In MIDI mode these buttons pass to the previous edit page or the next. When the LED of the [SOUNDS] button is on, these buttons scroll through the Sound bank. When the LED on the [STYLES] button is on, these buttons scroll through the Style bank. Pressed together they select a different Sound Bank (Sound Bank 1 or 2).
- [TEMPO-DATA] buttons. These allow you to change the playing speed (Tempo) of the Styles. Press the buttons together to set the
tempo to the intermediate value of 120. In MIDI edit mode, these buttons permit the modification of the parameter values.
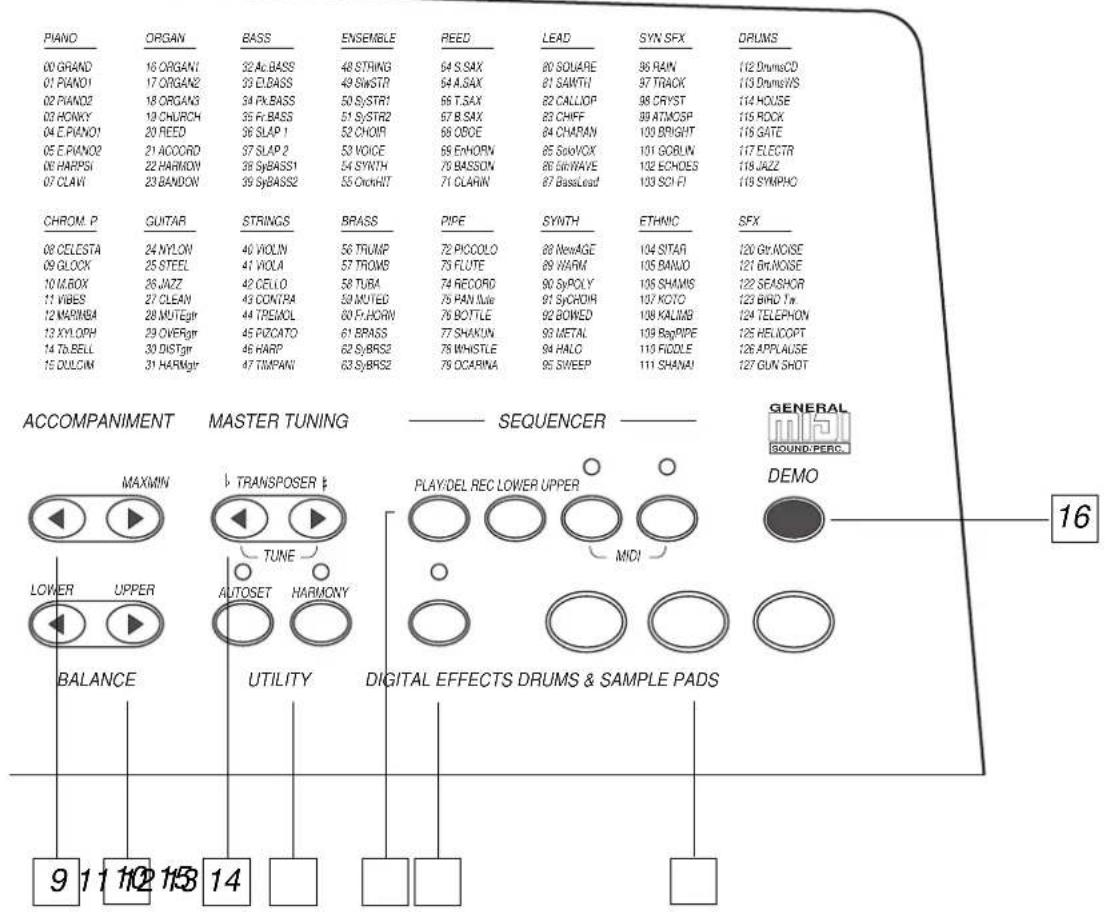
9. Accompaniment. Regulates the volumes of the automatic accompaniment sections (Drum, Bass, Acc1, Acc2).
10. Balance. Balances the volume between the Upper and Lower sections.
11. Master Tuning. Transposition and fine tuning of the instrument.
12. Utility. [AUTOSET] changes the Sound of the sections, tempo and effects when you change the Style. [HARMONY] harmonises the Upper section with the chord played on the Lower section.
13. Sequencer. Buttons which control, record and modify a Song.
14. [DIGITAL EFFECTS] button. Activates/deactivates the effects (reverb and modulations).
15. Drums & Samples Pads. Play special percussion sounds that change according to the currently selected Style.
- [DEMO] button. Starts a continuous sequence of demonstration songs. To stop the sequence, press DEMO again.
- Styles list. The Styles are listed in family groups. Each Style corresponds to a number which can be selected either on the keypad or via MIDI.
- Display. Normally displays the tempo, Style and Sound of the Upper section. Other information may appear during editing situations.
- Sounds list. Sounds are grouped in family groups according to General MIDI standard. Each Sound corresponds to a number that can be selected either on the keypad or via MIDI.
Connection panel

- MIDI IN/OUT ports. Sockets for connection to other musical instruments (or computer). [MIDI IN] allows another instrument to control CD10. [MIDI OUT] allows CD10 to control another instrument.
- Damper. Socket for the Damper (or Sustain) pedal. This pedal holds the notes of the Upper section.
- Volume. Socket for the Volume pedal. Controls the general volume of the instrument.
- OUTPUT LEFT/RIGHT sockets. Sockets for connection to an amplifier or an amplified mixer. Connect both the sockets for the stereo reproduction or only the [RIGHT/M] output for mono. Use cables with 1/4' mono jacks on one end to connect to CD10, and mono jacks suited to the inputs of the amplifier/mixer at the other end.
Use two 1/4 mono jacks to connect to an amplification system for musical instruments:

Use two RCA type mono jacks to connect to a home stereo system:

- Phones. Stereo headphones. Use an RCA-1/4' adapter for walkman or minidisc headphones.
- Power supply socket. Connect an optional power supply to this socket. If batteries are present in the battery compartment, the power supply will have priority.
Important: Do not use a power supply of a different brand that is not designed specifically for the CD10. Some power supplies may appear to be similar to the proper power supply but may damage the circuits of the instrument. Check that the adapter shows the following symbol (= internal positive pole):
- ON/OFF switch. Switches the instrument [ON] or [OFF].
Introduction
About CD10
CD10 is a keyboard with automatic accompaniments (called Styles). Styles allow you to play in live situations backed by the accompaniment of a "virtual band"; a single player can give the impression that he is playing all the instruments of the band alone, offering hours of personal enjoyment and for the pleasure of his friends.
Naturally, CD10 can also be used as a solo keyboard for performances with a real band; thanks to its realistic sounds CD10 can perform as an electronic organ, a piano or a string orchestra.
All the CD10 sounds are "sampled"; in other words they are recordings of actual instruments using a technique similar to that used for Compact Discs. Sampling provides sounds which are not only very realistic and clear but also extremely powerful.
To unleash more audio power, CD10 may be connected to an external amplification system (stereo amplifiers, amplified speakers, amplified mixers) or it can exploit the built-in speakers.
Important: remember that when you turn off your instrument, all the contents of the memory will be cancelled.
Every time you turn off the instrument, all newly programmed settings return to their original factory-set values (default situation). Split points, sounds that have been assigned to the various sections, Style selections and MIDl assignments all return to their default settings.
The Song recorded by the Sequencer is cancelled but you can store this in an external sequencer with MIDI DUMP.
Maintenance
- Clean the surface with a soft cloth dampened with a solution of light detergent and water.
- Clean the display with special lens or monitor liquid.
Safety
- Read through the chapter "Power supply and connections" before you turn on your instrument.
- Use only the type of battery indicated and the power supply provided by Generalmusic.
- Never use the instrument near water.
- Check the volume of the amplifier before you start playing. Remember that excessive volumes may cause permanent hearing loss.
- Keep the instrument away from heat sources. Do not expose your instrument to very low temperatures.
- The instrument should be positioned to allow proper ventilation at all times.
- Do not drop objects or spill liquids into the enclosure through the openings. If this should accidentally happen, turn off the instrument immediately and call your local servicing centre.
- Do not open the instrument.
- Call qualified service personnel when a ) the power supply is damaged; b ) objects fall, or liquids spill into the instrument accidentally; c ) the instrument is left out in the rain; d ) the instrument does not appear to operate normally; e ) the instrument has been dropped or the enclosure damaged.
Copyrights and liability
The information in this publication has been carefully prepared and checked. The manufacturers however decline all liability for eventual errors. All rights are reserved. This publication may not be copied, photocopied or reproduced in part or in whole without prior written consent from Generalmusic S.p.A.
Generalmusic reserves the right to apply any aesthetic, design or function modifications it considers necessary to any of its products without prior notice.
Generalmusic declines all liability for damage to property or persons resulting from improper use of the instrument.
Power supply, Connections and Demo
Power supply
CD10 runs either on batteries or from the mains (by means of the optional power supply).
Either method may be used. When the power supply is plugged to the mains, the battery supply is automatically disconnected.
Loading the batteries
Unplug the power supply from the wall socket if the plug is inserted.
Use 1,5V, "half torch" batteries. We recommend the use of alkaline batteries which have a longer life.
- Turn the instrument upside down to gain access to the battery compartment on the underside of the instrument:
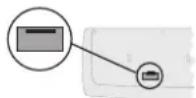
- Open the lid and slide in the batteries with the "+" and "-" signs on the batteries in correspondence with the signs marked in the battery compartment (the "-" should face the interior of the compartment).
- Replace the lid of the battery compartment and turn the instrument the right way up.
- Turn on the ON/OFF switch (ON).
Connecting the power supply to the mains
Only a Generalmusic power supply should be used; the power supply is available on request. Any other power supply, even if very similar, may damage the instrument.
- Connect the power supply jack to the "12V DC" socket at the back of the instrument.
- Insert the power supply plug to the mains socket.
- Turn on the instrument using the ON/OFF switch.
Amplification
CD10 is fitted with built-in speakers but may also be connected to an external amplification system or you can connect a set of headphones.
Use the [VOLUME] buttons to regulate the volume of the built-in amplification and the stereo headphones.
Built-in speakers
The speakers operate when no headphones are connected and they are independent from the external amplification outputs.
External amplification
Connect an external amplification system to the LEFT and RIGHT sockets for the stereo signal or only to the RIGHT/M socket for mono.
To exclude the built in speakers and just use an external amplifier all you need to do is plug headphones (or even just a normal jack plug) into the PHONES socket.
Use the [VOLUME] buttons to regulate the volume output from the CD10.
Stereo headphones
Connect a set of stereo headphones to the PHONES socket. The built-in speakers are excluded when you insert the Phones jack into this socket.
Pedals
Optional pedals supplied by Generalmusic may be connected for Damper and Volume control.
Damper
A footswitch ("switch control" pedal) must be fitted.
Press this pedal to sustain the notes of the Upper section, just like the sustain pedal of a piano.
Volume
A "continuous control" pedal must be fitted.
This pedal regulates the general volume and performs the same function as the [VOLUME] buttons.
Demo
When you have set up your CD10 for playing, press the [DEMO] button to start a short sequence of demonstration songs that are resident in the instrument's ROM and listen to how your CD10 plays them.
While the demo sequence is playing, all panel functions and controls are rendered inactive, except the [MASTER VOLUME] control which allows you to control the overall volume.
The sequence repeats continuously until the [DEMO] button is pressed again.
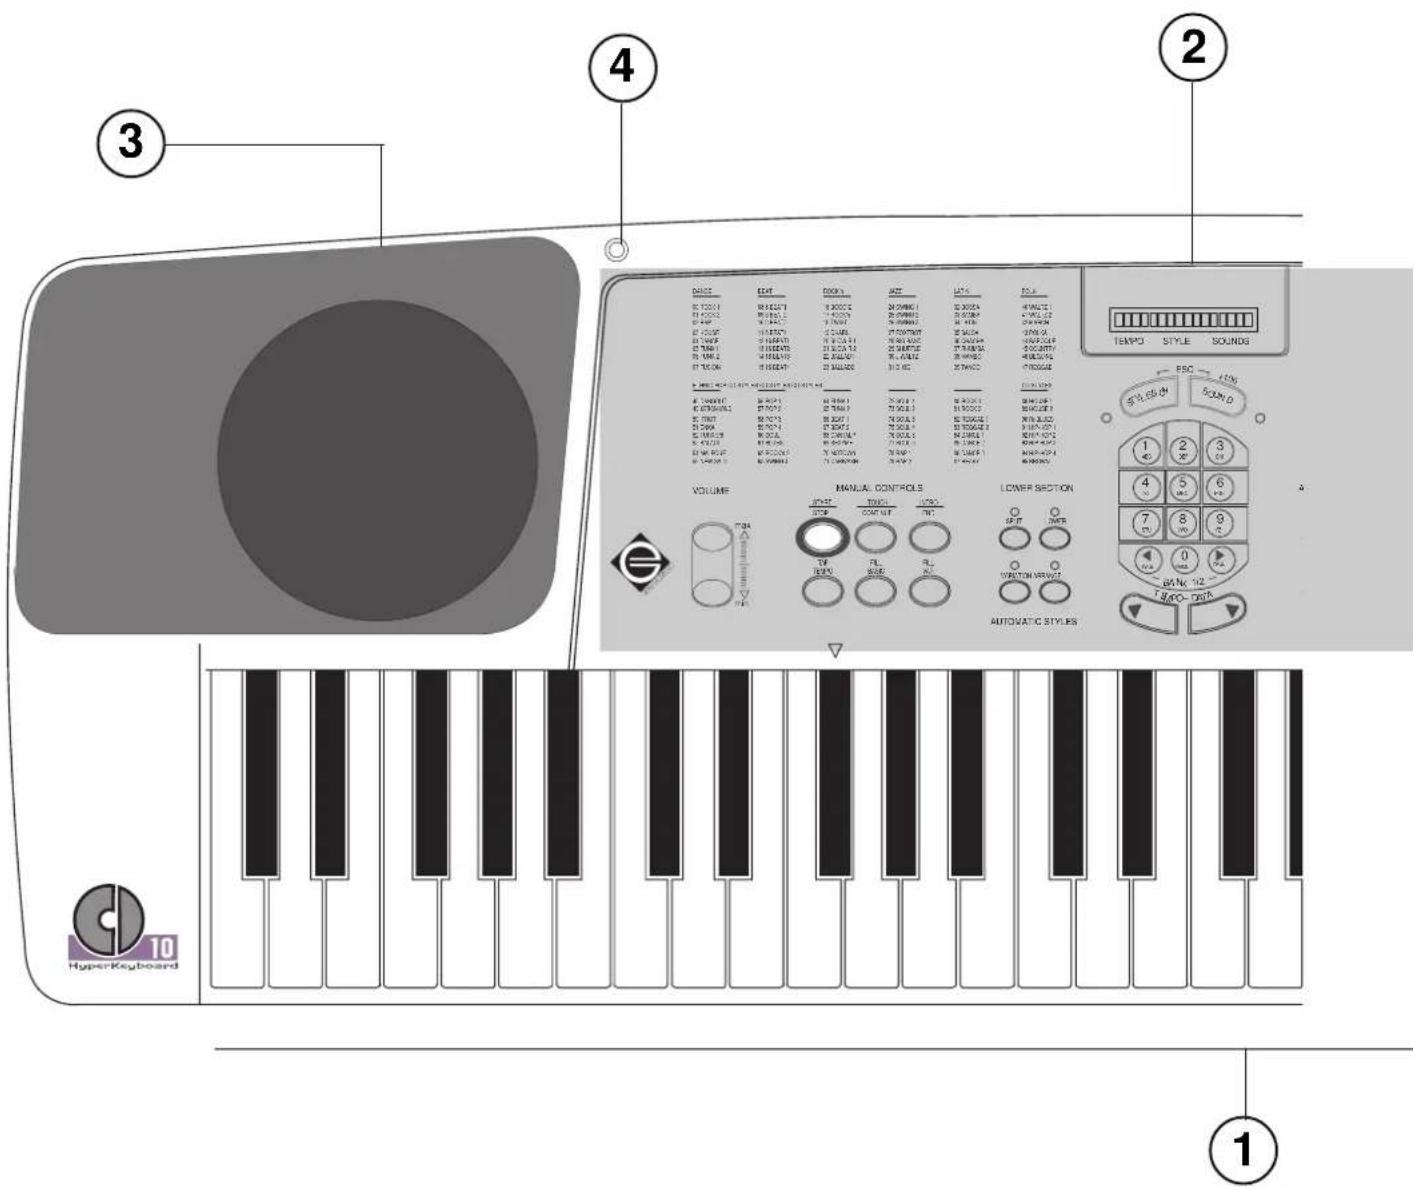
The keyboard and the sections
The keyboard
CD10 has a velocity sensitive keyboard (dynamic) which means that it reacts to how hard or softly you strike the keys. The harder you play (the higher the keystrike velocity), the louder the instrument will sound, such as occurs in a classic acoustic piano.
You can also choose to deactivate the velocity sensitivity by setting the Dynamic function (a function found in MIDI mode) to "off".
The instrument sections
CD10 can play six instrument sections, two on the keyboard (Upper and Lower) and four as automatic accompaniment (Drums, Bass, Acc1, Acc2).
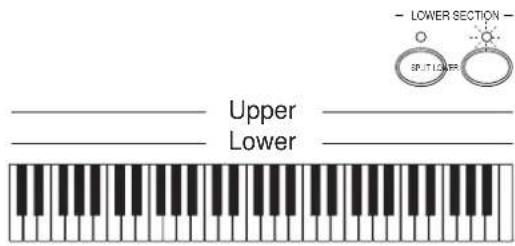
Upper and Lower
SPLIT:
When you turn on the instrument, Upper plays in the right section of the keyboard and Lower in the left section.
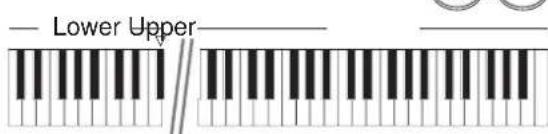
- LAYER:
Upper and Lower play together over the full keyboard extension.
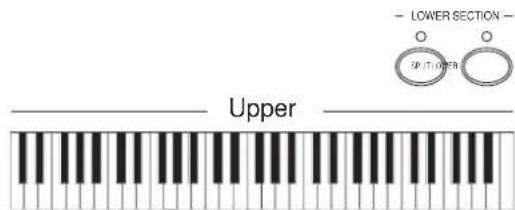
- SINGLE:
Upper plays over the full keyboard extension, while Lower does not play.
Programming LAYER
- Press the [SPLIT] button; the LED turns off.
- Upper and Lower play together over the full keyboard extension.
Programming SINGLE
- If [SPLIT] is on, press the button so that the LED turns off.
- Press the [LOWER] button to turn off its LED.
- Upper plays over the entire keyboard extension while Lower does not play.
Returning to SPLIT
- If they are off, press the [LOWER] and [SPLIT] button so that their LEDs turn on.
- Upper plays in the right section of the keyboard, and Lower plays in the left section.
The "split point" of the keyboard is indicated by the white triangle silkscreened above the keyboard.
You can change the split point by following the steps described in the next paragraph.
Changing the split point
- Press and hold the [SPLIT] button. Play the highest note limit for the Lower section.
- The split point corresponds to the note just played.
Assigning sounds to the Upper and Lower sections
The CD10 Sounds list is silkscreened on the control panel on the right of the display. You can assign the Sounds of your choice to the Upper and Lower sections.
Assigning a Sound to the Upper section
- If it is off, press the [SOUNDS] button so that its LED turns on.
- Specify the number of the Sound required by entering the corresponding number on the keypad. If the number selected is between 00 - 09, you must also specify the zero. If the number selected is between 100 - 127, press the [SOUNDS] button for the hundreds, then enter the last two numbers.
Example: To select "01 Piano1" specify [0][1]. To select "127 Gunshot" specify [SOUNDS][2][7].
- The name of the Sound selected appears on the display next to the word "Sounds".
Assigning a Sound to the Lower section
- If it is off, press the [SOUNDS] button so that its LED turns on.
- Press and hold the [LOWER] button while you select the sound.
- Select the Sound in the same way that you selected the Sound for the Upper section.
- The Sound you have selected flashes on the display next to the word "Sounds" (the display then again displays the new Sound selected on the Upper section).
Regulating the volume of the Upper and Lower sections
You can regulate the volume of the Upper and Lower sections with the BALANCE buttons. When one of these buttons is pressed, a graphical representation of the balanced volumes of the two sections is displayed for an instant.
[LOWER] increases the volume of the Lower section over that of the Upper section while [UPPER] increases the volume of Upper over that of the Lower section.
Drum, Bass, Acc1, Acc2
These instrumental sections are engaged by the Style to play automatic arrangements. They are not free to be played on the keyboard in real time.
Regulating the volume of Drum, Bass, Acc1 and Acc2
You may regulate the volume of these instrumental sections with the ACCOMPANIMENT buttons. When you press a button, a graphical representation of the volume of the sections is displayed for an instant..
[MIN] decreases the volume and [MAX] increases the volume.
Automatic sustain of the Lower section
The notes played on the Lower section can be held even when you raise your hand from the keyboard. This can be obtained by activating the function LOWER MEMORY, which is off when you turn on your instrument.
Activating/deactivating Lower Memory
- Press the two [MIDI] buttons simultaneously to enter MIDI Programming Mode.
- Scroll the "pages" forwards with [PAGE>] button until you reach LOWER MEM:
LOWER MEM. = off
- Use the [TEMPO-DATA] buttons to turn the function ON or OFF.
- Press the two [ESC] buttons together to escape from MIDI Mode.
The Styles
A Style is an automatic accompaniment that can be controlled by playing chords on the keyboard.
The buttons in the MANUAL CONTROLS and AUTOMATIC STYLES sections allow you to start or stop the accompaniment and to select the way in which the Styles are played.
The list of Styles is silkscreened on the control panel on the left of the display.
Selecting a Style
When you turn on the instrument, a Style will be ready for you to play. Follow these steps to select a different Style.
- If it is off, press the [STYLES] button to activate it (LED lights up).
- Enter the number of the required Style on the keypad. If the number selected is between 00 and 09, you must also enter the zero.
Example: To select "01 Rock2" enter [0][1].
- The name of the Style you have selected appears on the display next to the word "Styles".
Changing the tempo
You can change the metronome tempo with the [TEMPO-DATA] buttons. The currently selected tempo appears on the display next to the word "Tempo".
If the [AUTOSET] LED is ON when you change the Style, the tempo will also be changed according to the Style selected. Press the two [TEMPO-DATA] buttons together to restore the intermediate setting of 120.
Controlling the Style
In order to play all the accompaniment sections, you must play a note or a chord with your left hand (below the split point). The single note corresponds to a major chord.
[START/STOP]
Starts or stops the Style.
[TOUCH START/CONTINUE]
The TOUCH START function starts the Style when you play a note on the left section of the keyboard, without having to press [START/STOP].
- When the Style is not playing, press [TOUCH START/CONTINUE].
- Play a note or a chord on the left section of the keyboard.
- The Style starts automatically.
- To deactivate the function, press [TOUCH START/CONTINUE] again.
[INTRO/END]
An alternative to [START/STOP], this button Starts or stops the Style with an Intro(duction) or an Ending.
[TAP TEMPO]
Allows you to establish the playing speed of the Style by beating time on the button.
- When the Style is not playing, tap on the button two or more times. The established playing speed (corresponding to the metronome tempo) appears on the display next to the word "Tempo".
- Press [START/STOP]. The Style starts with the tempo you have set.
[FILL BASIC]
Triggere a Fill In (one or more "random" bars). If the Style variation pattern is playing, it introduces the Fill In and triggers the basic Style pattern.
- While the basic Style is playing, press [FILL BASIC].
- A Fill In will be triggered.
- At the end of the Fill In, the basic Style continues to play.
or
- While the Style variation pattern is playing ([VARIATION] button LED on), press [FILL BASIC].
- A Fill In will be triggered.
- At the end of the Fill In, the Style returns to the basic pattern. ([VARIATION] button LED off).
[FILLVAR]
Triggers a Fill In variation and recalls the Style variation.
- While the basic Style pattern is playing, press [FILL VAR].
- A Fill In variation will be triggered.
- At the end of the Fill In variation, the Style variation will play ([VARIATION] LED on).
[VARIATION]
Activates/deactivates the Style variation, namely a slightly different version of the basic Style pattern.
The button's LED is turned ON or OFF automatically by the [FILL VAR] and [FILL BASIC] buttons.
[ARRANGE]
Activates/deactivates the instrument sections Bass, Acc1, Acc2. If the LED is on, all the automatic accompaniment sections will play, while if the LED is off only the Drum section will play.
[AUTOSET]
Activates/deactivates (1) selection of the sounds of the Upper and Lower sections in the Style, (2) regulation of the volume of the instrumental sections recorded in the Style, (3) automatic variation of tempo and effects.
If the LED is on, these settings will also change when you change the Style. If the LED is OFF, these settings do not change when you change the Style.
Stopping the Style when you release the keys
Once you have played the note or the chord to control the Style, the automatic accompaniment sections continue to play until you press [START/STOP] or [INTRO/END].
You can however set CD10 so that the automatic accompani-ment sections stop when you raise your hand from the keyboard. To do this, simply set the AUTOSTOP function to ON.
- Press the two [MIDI] buttons simultaneously to enter MIDI Mode.
- Scroll the "pages" forward with [PAGE>] until you reach AUTOSTOP:
AUTOSTOP = off
- Use the [TEMPO-DATA] buttons to set the function to ON. If you want to deactivate the function, press the [TEMPODATA] again.
- Press both [ESC] buttons to escape from MIDI Mode.
Bass Follow
Generally, the Bass accompaniment plays the notes that you play on the keyboard. This is the case when the BASS FOLLOW function is ON. If you want the Bass section to follow only the programmed pattern of the Style, without including "additional" notes played on the keyboard, you should set BASS FOLLOW to OFF.
- Press the two [MIDI] buttons simultaneously to enter MIDI Mode.
- Scroll the "pages" forward with [PAGE>] until you reach BASS FOLLOW:
BASS FOLLOW = on
- Use the [TEMPO-DATA] buttons to set the function to OFF. To reactivate the function, press [TEMPO-DATA].
- Press both [ESC] buttons to escape from MIDI Mode.
Harmony, Digital Effects, Master Tuning
Harmony
This function allows you to harmonise the melody you play with your right hand with the chords you play with your left hand.
Activating Harmony
- Press the [HARMONY] button (LED lights up).
- The LED of the button [SPLIT] lights up automatically. The Freestyle function is set automatically to OFF.
In this way, the keyboard has been split into two sections: the Upper section for the melody and the Lower section for
the chords.
The keyboard must be split in this way, regardless of the On/Off status of the Lower section.
Using Harmony
Play a melody with your right hand and at the same time play a note or a chord with the left hand.
The chord of the left hand is united in harmony to the melody of the right hand.
Deactivating Harmony
Press [HARMONY]. (LED turns off).
Digital Effects
CD10 incorporates two digital effects processors:
- a reverb, which adds ambience to the sound (16 different types);
- a modulation effect, which adds the classical effects of chorus, delay, flanger or rotary (16 different types) to the sound. Each Style has two effects that change when you change the Style.
The button [DIGITAL EFFECTS] toggle between Effect ON and OFF. The LED lights up when the effects are activated and turns off when they are deactivated.
Master Tuning
Changes the pitch of CD10 to adapt it to the tuning of other instruments of the band. Master Tuning consists of the following two sections:
- TRANSPOSER changes the pitch in semitone steps;
- TUNE changes the pitch in steps 1/64th of a semitone (ideal for tuning to an acoustic instrument with inaccurate tuning).
Transposer
- Press [<] to transpose down by a semitone or [>] to transpose up by a semitone. The minimum value is -6 (semitones) and the maximum value is +6 (semitones).
- Whenever you press a TRANSPOSER button, the current Transpose setting in semitones appears on the display.
Tune
- Press the two buttons [<] and [>] to activate TUNE.
- Press [<] to lower the tuning by 1/64th of a semitone or [>] to raise by 1/64th of a semitone. The minimum value is -48/64 and the maximum value is +48/64.
- Whenever you press a TUNE button, the tuning value appears on the display.
- Press the two buttons [<] and [>] together to return to the TRANSPOSER function.
Drums & Samples Pads
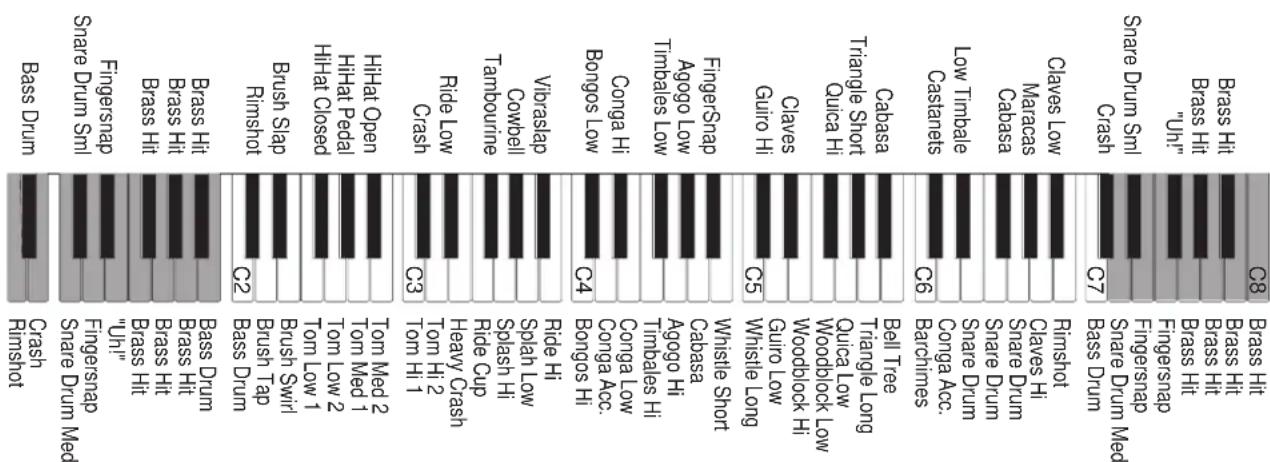
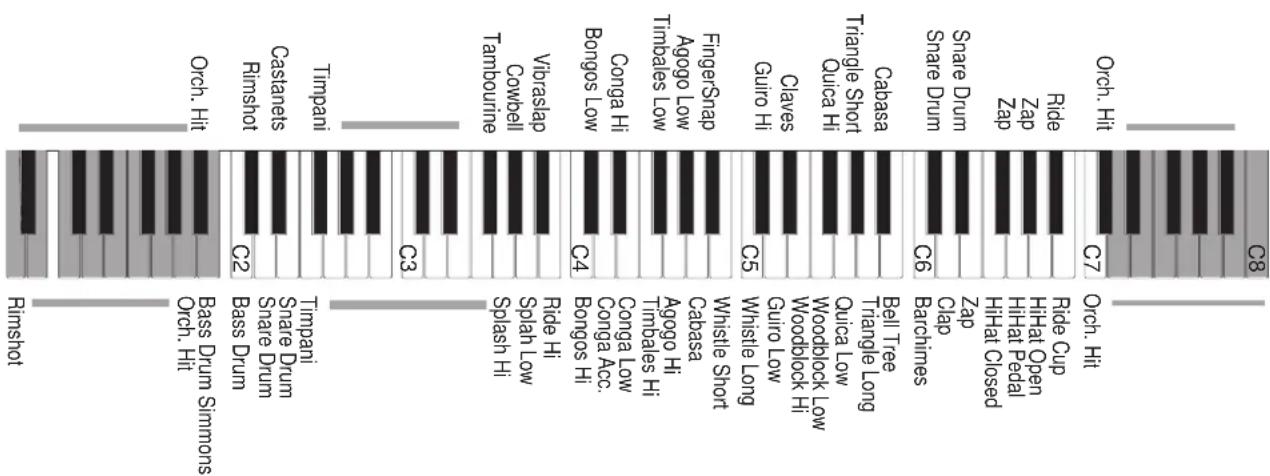
On electric keyboards, the sets of percussive sounds are known as drumkits where a different percussion instrument is assigned to each note of the keyboard. CD10 has eight drumkits and each Style recalls the drumkit most suited to play its Drum section.
In addition to the traditional percussion instruments, the CD10
drumkits also contain "special" sounds, called samples.
The three large buttons in the DRUMS & SAMPLES PADS section are pads and they play the percussion instruments or samples.
The three pads play the sounds contained in the drumkit of the instrumental Drum section, or sounds contained in the drumkits assigned as Sounds to the Upper section.
Selecting Sounds & Styles with the [PAGE] buttons
In addition to the standard selection method, Sounds and Styles can also be selected with the [PAGE<] and [PAGE>] buttons of the keypad.
Selecting a Sound
- If this is off, press the [SOUNDS] button to activate it (LED lights up).
-
If you are assigning the Sound to the Lower section, press and hold the [LOWER] button.
-
Scroll through the Sound bank with the [PAGE<] or [PAGE>] button.
Selecting a Style
- If this is off, press the [STYLES] button to activate it (LED lights up).
- Scroll through the Style Bank with [PAGE<] or [PAGE>] button.
The two sound banks
CD10 has two sound banks that can be assigned to the Upper and Lower sections. The sounds of the first bank is silkscreened on the control panel. You will find the second bank in the Appendix of this manual.
Bank 1 and Bank 2 have different versions of the same sound. For example, if sound 00 in Bank 1 is a GrandPiano, sound 00 in Bank 2 will also be a piano sound.
Bank 2 is perfectly compatible with the sounds of the General MIDI standard (see chapter on "Midi"). In Bank 1, however, the "Drums" group replaces the "Percussion" group so that the drumkits can be played on the keyboard.
Selecting a sound bank
- Press the two [BANK 1/2] buttons on the keypad.
- The name of the bank selected ("Sound Bank 1" or "Sound Bank 2") appears on the display.
Sound Bank 1
Sound BANK 2
- Once you have selected the bank, select the sound. The bank selected will be active until you select the other bank (followed by selection of a sound).
The Song
CD10 incorporates a multitrack Sequencer that can be used to record a Song played in real time or to record the data received by CD10 via MIDI IN.
The sequencer buttons
[PLAY/DEL]
(1) Recalls the Song for playback.
(2) In "record" mode, it activates the "delete" functions.
[REC]
Recalls a Song and activates it for recording.
[LOWER]
Track of the Lower section.
The status of this button can show three different situations. Led off: track empty. Led flashing: track is recording. Led on: track is recorded.
[UPPER]
Track of the Upper section.
The status of this button can show three different situations. Led off: track empty. Led flashing: track is recording. Led on: track is recorded.
[START/STOP]
Starts or stops the Song playback.
[TOUCH START/CONTINUE]
The CONTINUE function restarts the Song from the point is was stopped with [START/STOP].
Special sections
In addition to the Upper and Lower sections, the Song records the following special sections: Chord, Common Channel, Tempo, Pads. It is not necessary to press any buttons to record these sections (these are "ghost" tracks that are recorded in any case).
Special sections
| Chord: The Arrangement chords. Controls | the following sections: Drum, Bass, Acc1 and Acc2. It cannot be overdubbed. | |
| Common Channel: Style controls: Style selected, activation/deactivation of the Style control buttons. It cannot be overdubbed. | ||
| Tempo: Metronome Tempo. | It cannot be overdubbed. | |
| Pads: Notes played on the [DRUMS & SAMPLES P ADS]. It can be overdubbed. | ||
Recording
Preparation (before recording)
- Press [REC] to enter "record" mode. The [STYLES] or [SOUNDS] LED flash.
- The LED of the [LOWER] and [UPPER] buttons flashes: you can record the two tracks. If you do not want to record a track, tap the button to turn off the LED.
- You may select a Style if you wish. If not, you will record the Style selected at the moment of entering record mode.
-
If the [AUTOSET] LED is off, you can select the initial Sounds for the Upper and Lower sections, otherwise the Style selects the Sounds automatically.
-
If the [AUTOSET] LED if off, you can change the initial tempo of the Song.
- If the [AUTOSET] LED is off you can change the initial volume of the accompaniment sections or the initial balanced levels of the Upper and Lower sections.
- If the [AUTOSET] LED is off you can activate or deactivate the [DIGITAL EFFECTS] button. This initial state may be changed during recording.
Recording
- Press [START/STOP] or [INTRO/END] to start recording.
- During recording, you can change the Style, Sound, tempo, accompaniment volume and balanced level of the Upper and Lower sections, use the Style controls, activate/deactivate [DIGITAL EFFECTS].
- Stop recording with [START/STOP] or [INTRO/END].
- The leds of the [UPPER] and [LOWER] tracks should be on. If so, the Upper and Lower sections are recorded.
Escaping from "record"
Press the two buttons together [ESC].
"Over dubbing"
You can record new notes in the tracks you have recorded.
- Press [REC] to enter Song "record" mode.
- Press repeatedly the button of the track you wish to record, until the corresponding LED flashes. Both tracks can be recorded.
The special sections Chord, Common Channel, Tempo are
not recorded again. To record these again you must first
cancel them. You can however add notes to the Pads track.
- Start recording with [START/STOP].
- Add the notes to the Upper and/or Lower and/or Pads sections.
- Stop recording with [START/STOP].
- Press the two [ESC] buttons to escape from "record" mode.
Delete
- If necessary, press [REC] to enter Song "record" mode.
- Press [PLAY/DEL] to activate DELETE mode.
- Select the track to cancel with the [TEMPO-DATA] buttons.
- Press the [PLAY/DEL] button to cancel the selected track. In order to escape from DELETE mode without deleting data, press the two [ESC] buttons.
Song Name
- If necessary, press [REC] to enter Song "record" mode.
- Press [PLAY/DEL] to activate DELETE mode.
- Press [NAME] (on the keypad) to enter the name of the Song or change an existing name.
- Enter the letters on the keypad (each key corresponds to three characters that you can select in cycle, each time you tap the key).
- Press [PAGE>] to move forwards one position. Press [PAGE<] to return backwards one place.
- When you have completed entering the name, press the [ESC] buttons to escape from "record" mode and confirm the name of the Song.
MIDI
What is Midi
Midi is a system for communicating between electronic musical instruments. With Midi you can:
(a) control another musical instrument from the CD10 keyboard;
(b) control Sounds and Styles of CD10 with another device (keyboard, sequencer, computer);
(c) connect CD10 to a sequencer or a computer (which includes both (a) and (b) ) in order to programme Songs externally and store the CD10 Song by means of the MIDI DUMP function.
Midi Connections
These are the main rules to follow when making a Midi connection:
- In musical language, an instrument that controls another instrument is called a master while the instrument that is controlled by the master is known as the slave.
- Connect the MIDI OUT socket of the master to the MIDI IN socket of the slave by means of a standard Midi cable.
- In order to programme the Songs on an external sequencer or computer, connect the MIDI OUT of CD10 to the MIDI IN of the sequencer/computer and the MIDI OUT of the sequencer/computer to the MIDI IN of CD10.
- Do not connect two sockets on the same instrument to each other.
Instrumental sections and Midi channels
Each of the six sections of CD10 corresponds to a Midi channel (1-16).
The factory default settings are as follows:
| Instrumental section Midi channel |
| Drum 10 |
| Bass 2 |
| Acc1 3 |
| Acc2 6 |
| Lower 4 |
| Upper 5 |
The corresponding parts on connected Midi devices must be programmed to the same Midi channels. Here are a number of practical examples, with CD10 programmed as in the above table:
- If CD10 controls an expander with only the Upper section extended over the full keyboard extension, the expander must receive on Midi Channel 5.
- If CD10 controls a multi-timbral expander, in other words with several instrumental sections, the sections of the expander should be programmed as the sections of CD10: channel 10 on the Drum section, Channel 2 on the Bass section, and so on....
- If CD10 is controlled by another instrument, the sections of the other instrument must be programmed as the CD10 sections, or the sections of CD10 as the master instrument sections.
Common Channel
In addition to the six sections, CD10 receives and transmits Style control data on a special channel (Style number, tempo, activation/deactivation of Style control buttons).
This channel, known as the Common Channel, must also be assigned a MIDI channel, which is generally 1 or 16. By default, the CD10 MIDI Common is set to channel 16. An instrument transmitting or receiving Style control commands from CD10 must necessarily transmit or receive these data on the Common channel.
Programming the Midi Channels of CD10
- Press the two [MIDI] buttons simultaneously to enter MIDI Mode.
- The first three MIDI pages contain the parameters for the channels assigned to the sections. Each page is divided into two sections. The first page contains the Lower and Upper sections, the second page contains Drum and Bass and the third, Acc1 and Acc2. The Common Channel is on page four.
- Pass from section to section or from page to page with the [PAGE<] and [PAGE>] buttons.
- Change the MIDI channel assigned to the section using the [TEMPO-DATA] buttons.
- Press both [ESC] buttons simultaneously to escape from MIDI Mode.
General Midi
Sound compatibility
General Midi (GM) standards stipulate similar sound mappings and sound selection methods for different instruments. When CD10 is controlled by an external sequencer, the correct sounds will be selected.
CD10 has two sound banks; Bank 2 is General Midi compatible while Bank 1 is slightly different ("Drums" group instead of "Percussive" group). When the option GENERALMIDI is ON, a drumkit from the "Drums" group will always be selected on Midi Channel 10, while the sounds of the other groups (including "Percussive") may be selected on all the other channels.
The sixteen General Midi sections
Six instrument sections that can be controlled directly by CD10, but the General Midi standard requires that a multi-timbral expander is able to receive on sixteen different parts.
When the GENERALMIDI option (in MIDI edit) is set to ON, CD10 receives on sixteen sections, including the six standard CD10 sections. The following is a map of the sections and corresponding MIDI channels.
| MIDI channel Part | |
| 1 GM 01 | |
| 2 | Bass |
| 3 | Acc1 |
| 4 | Lower |
| 5 | Upper |
| 6 | Acc2 |
| 7 GM 07 | |
| 8 GM 08 | |
| 9 GM 09 | |
| 10 | Drum |
| 11 | GM 1 1 |
| 12 | GM 12 |
| 13 | GM 13 |
| 14 | GM 14 |
| 15 | GM 15 |
| 16 | GM 16 (or Common Channel) |
If you assign a different MIDI channel to an instrument section of CD10, the channel left "empty" will not be able to receive data.
CD10 as a slave
Changing the Sound
- If you need to select a Sound from Bank 2, send the following message to the CD10 section:
Control Change 0, value 01
Control Change 0 is often also called Bank Select. It is not necessary to send this message for Bank 1 Sounds.
- After sending Control Change 0, send the Program Change number corresponding to the Sound to select. For example, in order to select Sound "16 Organ 1" you must send Program Change number 16.
It is also possible that the master transmits Program Change numbers from 1 to 128 instead of from 0 to 127. In this case however, increase the Program Change number to be sent to CD10 by 1.
- The Sound selected is assigned to the section.
Changing a Style
- Send the Program Change number to CD10 corresponding to the Style to select on the Common Channel. For example, in order to select Style "07 Fusion 1" send Program Change number 7.
- The Style is selected. The Sounds of the accompaniment sections change automatically. If the LED of the [AUTOSET] button is ON, the Sounds of the Upper and Lower sections, as well as the Tempo will change.
Controlling a Style
In order to simulate the Style controls, send the Program Change numbers or Control Change numbers listed in the following tables to CD10 on the Common Channel.
These messages, however, are transmitted to another instrument (or computer) when the corresponding buttons are pressed on the C10 control panel.
Style Control ProgramChange
| Intro 121 | |
| Fill Basic 122 | |
| Fill V aryation 123 | |
| Sync Start | 124 |
| Variation On | 125 |
| Variation Of f | 126 |
| End | 127 |
The Control Change messages are always followed by the value assigned to the same.
Style Control ControlChange-Value
| Intro 112-17 | |
| Fill Basic 112-18 | |
| End | 112-19 |
| Sync Start | 112-20 |
| Fill V ar | 112-37 |
| Variation On | 112-102 |
| Variation Of f | 112-38 |
| Harmony On | 112-103 |
| Harmony Off | 112-39 |
| Memory On 112-104 |
| Memory Off 112-40 |
| Eff1 On 112-105 |
| Eff1 Off 112-41 |
| Eff2 On 112-106 |
| Eff2 Off 112-42 |
| Arrange On 112-107 |
| Arrange Off 112-43 |
| Autoset On 112-109 |
| Autoset Off 112-45 |
Tempo Increment 118-tempo variation by 2
Tempo Decrement 119-tempo variation by 2
In order to synchronise the tempo of CD10 with that of the master, set the MIDI CLOCK to EXT (see paragraph on "Special functions of Midi-Midi Clock").
CD10 as a master
Changing the Sound
When you select a Sound in CD10, the corresponding Program Change number is sent to the slaved instrument on the section corresponding to that of CD10. Even when you change a Style, the Program Changes of the sections are sent to the slave instrument.
When you select a Sound of Bank 2, CD10 transmits Control Change message 0 — with value 01 — just before the Program Change.
Changing the Style
The Styles of the slave instrument must be similar to those of CD10. If not, ignore the name of the CD10 Style and use only the number.
The slave instrument must receive the Style change data on a Midi channel. If possible, assign this channel to the Common Channel, since CD10 transmits the Style change data on the Common Channel.
Controlling the Style
The slave instrument must receive the same control messages utilised by CD10 (see tables on "Style Control" in previous paragraph).
If this is not possible, Start/Stop is the only standard Midi message that may be received by the slave instrument.
In order to synchronise the slave tempo to that of CD10, set the CD10 MIDI CLOCK to INT (see paragraph on "Special functions of the Midi—Midi Clock"). The slave's Midi Clock must be set to EXT.
Special MIDI functions
Local ON/OFF
The CD10 sections can play the sounds of a slave instrument without playing its own internal sounds. The sections that play the slave without playing the internal sounds are said to be in LOCAL OFF.
To work with an external sequencer, set (1) CD10 in Single Mode, (2) the Upper section in Local Off. In the external sequencer, activate the MIDI Thru. When you play on the CD10 keyboard, you will not hear the Upper section but the corresponding section of the external sequencer.
- Press the two [MIDI] buttons simultaneously to enter MIDI Mode.
- Scroll through the "pages" with [PAGE>] or [PAGE<] until you arrive at the first LOC page. There are three LOC pages, each with two of the six CD10 sections: page 1 shows the Lower and Upper sections, page 2 shows the Drum and Bass sections while page 3 shows Acc1 and Acc2.
- Pass from page to page with [PAGE<] and [PAGE>].
- Use the [TEMPO-DATA] buttons to toggle between ON and OFF for the selected section.
- Press the two [ESC] buttons to escape MIDI mode.
Slave:Tracks
As a slave, CD10 may receive two, six or sixteen sections via Midi. Receiving two parts provides major polyphony (in other words a greater number of voices).
When you turn on the master, the SLAVE:TRACKS function is automatically set to ON and CD10 receives on the six sections. If you prefer to work with only the Upper and Lower sections, enter MIDI Mode and set this function to OFF.
- Press the two [MIDI] buttons simultaneously to enter MIDI Mode.
- Scroll through the "pages" with [PAGE>] or [PAGE<] until you reach SLAVE:TRACKS.
- Use [TEMPO-DATA] to toggle between ON or OFF.
- Press both [ESC] buttons to escape from MIDI Mode.
MIDI Clock
The Midi Clock is the existing synchronism between the two electronic musical instruments. MIDI CLK = INT (internal) means that the instrument is synchronised with its internal tempo and can start and change the tempo to a slave. MIDI CLK = EXT (external) means that the instrument is synchronised with the tempo of a master, therefore, in order to start the Style, the appropriate command must be sent from the master.
CD10 as master
CD10 Internal clock
slave External clock
CD10 as slave
CD10 External Clock
masterInternalClock
- Press the two [MIDI] buttons simultaneously to enter MIDI Mode.
- Scroll through the "pages" with [PAGE>] or [PAGE<] to reach CLK.
- Use the [TEMPO-DATA] buttons to toggle between INT or EXT.
- Press the two [ESC] buttons to escape MIDI Mode.
Start/Stop ON/OFF
The Start/Stop message can be received or transmitted or can be prevented from doing so. If the function is set to ON, Start/ Stop is received and transmitted; if the function is set to OFF, Start/Stop is ignored.
- Press the two [MIDI] buttons simultaneously to enter MIDI Mode.
- Scroll through the "pages" with [PAGE>] or [PAGE<] to reach START/STOP.
- Use the [TEMPO-DATA] buttons to toggle between ON or OFF.
- Press both the [ESC] buttons to escape MIDI Mode.
MIDI Filters
Some messages can be "filtered" (excluded) from communications. This may help to avoid problems of compatibility between CD10 and a musical backing on sequencers programmed for other musical instruments, which might have different Program Changes or other non-compatible messages with respect to CD10.
- Press the two [MIDI] buttons simultaneously to enter MIDI Mode.
- Scroll through the "pages" with [PAGE>] or [PAGE<] to the first page of F.IN (=Filter In, filters on Midi In) or F.OUT (=Filter Out, filter on Midi Out).
- Each page shows a MIDI message filter:
| Note Note |
| P.Chg Program Change |
| C.Chg Control Change |
| Damp Damper Pedal |
| Bend Pitch Bend |
| Man.C. Manual Controls (= Style control by means of Program Change) |
| G.Mus. Generalmusic Controls (= Style and tempo controls by means of Control Change). |
Use [PAGE<] and [PAGE>] to pass from one page to another.
- Use [TEMPO-DATA] to toggle between ON and OFF for the filter.
- Press the two [ESC] buttons to escape from MIDI Mode.
MIDI Dump
The Song stored in the instrument's memory can be transmitted to an external sequencer (or computer), or to a Midi Data Filer, or to another CD model by means of System Exclusive data transmitted via DUMP-SAVE.
CD10 will then be able to receive the Song from the external sequencer, from the Midi Data Filer or from another CD by means of the DUMP-LOAD.
Saving the Song:
- Press the two [MIDI] buttons simultaneously to enter MIDI Mode.
- Scroll through the "pages" with [PAGE>] or [PAGE<] to reach the DUMP SAVE page.
- Press the two [MIDI] buttons simultaneously to start the procedure. The display shows the request to enter the name of the "file" to send to the external sequencer:
NAME:?
- Enter the letters on the keypad (each key has three letters that can be selected in cycle by tapping the button). Press [PAGE>] to move forward a space. Press [PAGE<] to move back a space. The name can consist of no more than seven letters.
- Confirm the name by pressing the [MIDI] buttons or cancel Dump with the [ESC] buttons. On the display, a question mark appears after the name of the "file", asking you to confirm the procedure.
NAME:FILE001?
- Start recording in the sequencer connected to CD10.
- Press the two [MIDI] buttons together to start transferring the Song to the external sequencer. CD10 shows the following message "Wait please".
- At the end of the recording, stop the recording in the external sequencer and save the data on a floppy disk.
Loading a Song in CD10:
This procedure cancels the Song in the memory of CD10! If another CD (models CD2, CD3, CD10, CD20, CD30) or an external sequencer transmit Midi Dump Data (System Exclusive) to CD10, the instrument automatically sets itself for reception, regardless of the currently set mode.
The procedure can also be started manually as follows:
1. Press the two [MIDI] buttons simultaneously to enter MIDI Mode.
2. Scroll the "pages" using [PAGE>] or [PAGE<], to reach the DUMP LOAD page.
3. Press the two [MIDI] buttons simultaneously in order to set CD10 on hold. The CD10 display shows the following message "Wait please"
4. Start play on the external sequencer. The Song is transferred to the memory of CD10.
- At the end, the Song is transferred to the memory of CD10. The Song previously in the memory is cancelled. If CD10 receives data from one of the above CD models, Styles 88-95 are replaced by the programmable Styles in the memory of these models. In order to receive the original CD10 Styles, switch off the instrument and the turn it on again (memory is cancelled).
Dynamics
It is possible to activate/deactivate the keyboard dynamics, the reception and transmission via Midi of Velocity messages.
- Press the two [MIDI] buttons simultaneously to enter MIDI Mode.
- Scroll through the "pages" with [PAGE>] or [PAGE<] to reach the page DYNAMIC.
- The [TEMPO-DATA] buttons toggle between OFF or ON for Dynamics.
- Press the two [ESC] buttons to escape from MIDI Mode.
Technical specifications
Keyboard: 61 keys (Velocity sensitive)
Footswitches: Volume, Damper (Sustain)
Sound generation: PCM 16 bit
Max polyphony: max 32 notes
Multisound: 16 parts
Effects: 2 processors (16 reverbs + 16 modulations)
Sounds: 128+128 General Midi compatible Sounds
Drumkit: 7 General Midi compatible drumkits + 1 GEM WS
compatibledrumkit
Styles: 96 Styles + 96 Variations
Songs: 1 multi-track song that that is erased from memory when
the instrument is powered down
Editing: Overdebbing, Delete
MIDI: IN, OUT
Synchronisation: MIDI: Clock In/Out
Audio outputs: 2 jacks (Left+Right/M)
Headphones
Built-in amplification: 5+5 Watt
Dimensions (H·W·D): 108·966·322 mm
Weight: 6 kg
CD 10
MANUALE
D'ISTRUZIONI
FERMARELO STYLE AL RILASCIO DEI TASTI (AUTOSTOP), 12
Harmony, Digital Effects, Master Tuning, 12
HARMONY, 12
Drums & Samples Pads, 13
Drum, Bass, Acc1, Acc2
[TOUCH START/CONTINUE]
Harmony, Digital Effects, Master Tuning
Harmony
Drums & Samples Pads
[TOUCH START/CONTINUE]
masterClock Internal
Controlla pedale: Volume, Damper (Sustain)
ANDERN DES TEMPOS, 11
STYLESPIELEN,11
[START/STOP], 11
[TOUCH START/CONTINUE], 11
[INTRO/END], 11
[TAP TEMPO], 11
[FILL BASIC], 11
[FILL VAR], 11
[VARIATION], 11
[ARRANGE], 11
[AUTOSET], 11
STYLEAUTOSTOP,12
BASS FOLLOW, 12
Harmony, Digital Effects, Master Tuning, 12
HARMONY, 12
Harmonyaktivieren,12
Drums & Sample Pads, 13
CHORD, CONTROLS, TEMPO, PADS, 14
A_UFNAHME 14
Drum, Bass, Acc1, Acc2
[TOUCH START/CONTINUE]
Harmony, Digital Effects, Master Tuning
Harmony
[TOUCH START/CONTINUE]
Chord, Controls, Tempo, Pads
| Drum 10 |
| Bass 2 |
| Acc1 3 |
| Acc2 6 |
| Lower 4 |
| Upper 5 |
| MIDI Channel | Gruppe |
| 1 | GM 01 |
| 2 | Bass |
| 3 | Acc1 |
| 4 | Lower |
| 5 | Upper |
| 6 | Acc2 |
| 7 | GM 07 |
| 8 | GM 08 |
| 9 | GM 09 |
| 10 | Drum |
| 11 | GM 1 1 |
| 12 | GM 12 |
| 13 | GM 13 |
| 14 | GM 14 |
| 15 | GM 15 |
| 16 | (Common Channel) |
Damp Damper Pedal (Sustain)
Bend Pitch Bend (Tonhohen-Beugung)
Man.C.Manual Controls Style Control
mittels Program Change)
G.Mus. Generalmusic Controls (= Style und
Tempo Controls mittels Control Change).
Editieren: Overhub, Delete
MIDI: IN, OUT
Synchronisation: M/DI: Clock In/Out
Alimentation, connections, demo, 8
ALIMENTATION 8
Introduction des piles, 8
DRUM, BASS, Acc1, Acc2, 10
REGLAGE DU VOLUME DE DRUM, BASS, ACC1 ET ACC2, 10
SOUTIEN (SUSTAIN) AUTOMATIQUE DELA SECTION LOWER, 10
Activer/desactiver Lower Memory, 10
CHOIX DU STYLE, 10
VARIATIONDU TEMPO, 11
CONTROLE DU STYLE, 11
[START/STOP], 11
[TOUCH START/CONTINUE], 11
[INTRO/END], 11
[TAP TEMPO], 11
[FILL BASIC], 11
[FILL VAR], 11
[VARIATION], 11
[ARRANGE], 11
[ATOSET], 11
ARRET DU STYLE LORS DU RELACHEMENT DES TOUCHES, 12
COMPORTEMENT DE LA BASSE (BASS FOLLOW), 12
Harmony, Digital Effects, Master Tuning, 12
HARMONIE (HARMONY), 12
Drums & Samples Pads, 13
Lesseize sections General Midi,16
UTILISATION DU CD10 EN TANT QU'ESCLAVE (CONTRÔLÉ PAR UN AUTRE INSTRUMENT), 17
Specifications techniques, 20
Panneau de contrôle

Alimentation, connections, demo
Alimentation
Exemple: Pour selectionner "01 Piano1", composer [0][1]. Pour selectionner "127 Gunshot", composer [SOUNDS][2][7].
Drum, Bass, Acc1, Acc2
Activer/désactiver Lower Memory
[TOUCH START/CONTINUE]
Harmony, Digital Effects, Master Tuning
Harmonie (Harmony)
Drums & Samples Pads
[TOUCH START/CONTINUE]
| Drum 10 |
| Bass 2 |
| Acc1 3 |
| Acc2 6 |
| Lower 4 |
| Upper 5 |
| Canal | MIDI | Section |
| 1 | GM 01 | |
| 2 | Bass | |
| 3 | Acc1 | |
| 4 | Lower | |
| 5 | Upper | |
| 6 | Acc2 | |
| 7 | GM 07 | |
| 8 | GM 08 | |
| 9 | GM 09 | |
| 10 | Drum | |
| 11 | GM 11 | |
| 1 | 2 GM 12 | |
| 1 | 3 GM 13 | |
| 1 | 4 GM 14 | |
| 1 | 5 GM 15 | |
| 1 | 6 GM 16 | (ou Common Channel) |
Spectifications techniques
Editing: Surimpression, Effacement
MIDI: IN, OUT
Synchronisation MIDL: Clock In/Out
Sortie audio: 2 jack mono (Left+Right)
Headphones
Amplification incorporee: 5+5 Watt
Dimensions (H·W·D): 108·966·322 mm
Poids: 6 kg
CD 10
HANDLEIDING
Inhoudsopgave
Bedieningspaneel, 4
DRUM, BASS, Acc1, Acc2, 10
HET VOLUME REGELEN VAN DRUM, BASS, ACC1, ACC2, 10
AUTOMATISCH DOORKLINKEN VAN LOWER SECTIE, 10
Harmony, Digital Effects, Master Tuning, 12
HARMONY, 12
Drums & Samples Pads, 13
DESEQUencer KNOPPEN, 14
[PLAY/DEL], 14
[REC], 14
[LOWER], 14
[UPLLER], 14
[START/STOP], 14
[TOUCH START/CONTINUE], 14
SPECIALE SECTIES, 14
OPNAME,14
Drum, Bass, Acc1, Acc2
Start of stopt de Style.
[TOUCH START/CONTINUE]
Harmony, Digital Effects, Master Tuning
Harmony
Drums & Samples Pads
[TOUCH START/CONTINUE]
| Instrumental section Midi channel |
| Drum 10 |
| Bass 2 |
| Acc1 3 |
| Acc2 6 |
| Lower 4 |
| Upper 5 |
| MIDI channel Part | |
| 1 GM 01 | |
| 2 | Bass |
| 3 | Acc1 |
| 4 | Lower |
| 5 | Upper |
| 6 | Acc2 |
| 7 GM 07 | |
| 8 GM 08 | |
| 9 GM 09 | |
| 10 | Drum |
| 11 GM 11 | |
| 1 2 | GM 12 |
| 1 3 | GM 13 |
| 1 4 | GM 14 |
| 1 5 | GM 15 |
| 1 6 | (Common Channel) |
Tempo Increment 118-tempo variation by 2
Tempo Decrement 119-tempo variation by 2
| CD10 Internal clock |
| slave External clock |
CD10 als slave
| CD10 | External | Clock |
| master | Internal | Clock |
| Man.C. Manual Controls (= Style control by means of Program Change) |
| G.Mus. | Generalmusic Controls (= Style and tempo controls by means of Con-trol Change). |
Multisound: 16 parts (multi-timbraal)
Effecten: 2 processors (16 reverbs + 16 modulatie effecten)
Drumkit: 7 General MIDI drumkits + 1 WS series drumkit
Styles: 96 Styles + 96 Varieties
Songs: 1meer-sporen song
Editing: Overdubbing, Delete
MIDI: IN, OUT
Synchronisatie: MIDI: Clock In/Out
DRUM, BASS, Acc1, Acc2, 10
REGULAR EL VOLUMEN DE DRUM, BASS, ACC1 EACC2, 10
SUSTAINAUTOMATICO DE LA PARTE LOWER, 10
Activar/desactivar Lower Memory, 10
ELEGIR EL STYLE, 10
VARIARELTIEMPO,11
CONTROLAR EL STYLE, 11
[START/STOP], 11
[TOUCH START/CONTINUE], 11
[INTRO/END], 11
[TAP TEMPO], 11
[FILL BASIC], 11
[FILLVAR],11
[VARIATION], 11
[ARRANGE], 11
[ATOSET], 11
DETENER EL STYLE AL SOLTARLAS TECLAS, 12
Harmony, Digital Effects, Master Tuning, 12
HARMONY, 12
Drums & Samples Pads, 13
Drum, Bass, Acc1, Acc2
[TOUCH START/CONTINUE]
Harmony, Digital Effects, Master Tuning
Harmony
Estamericano.
Drums & Samples Pads
[TOUCH START/CONTINUE]
Controles a pedal: Volume, Damper (Sustain)
DRUM, BASS, Acc1, Acc2, 10
ATT ANDRA VOLYM P A DRUM, BASS ACC1, OCH ACC2, 10
AUTOMATISK SUSTAIN P A LOWER SEKTIONEN, 10
Aktivera / ta bort Lower Memory, 10
ATTVALJAEN STYLE 10
ANDRING AV TEMPO, 11
KONTROLL AV STYLES, 11
{START/STOP}, 11
[TOUCH START/CONTINUE], 11
[INTRO/END], 11
[TAP TEMPO], 11
[FILL BASIC], 11
[FILL VAR], 11
[VARIATION], 11
[ARPANGE], 11
[ATOSET], 11
ATT STOPPAEN STYLE NAR TANGENTENSLAPPS, 12
BASS FOLLOW, 12
Harmony, Digitala Effekter, Master Transp, 12
HARMONY, 12
Aktivera Harmony, 12
Anvanda Harmony, 12
DELETE (TA BORT), 15
NAMN PA SONG, 15
MIDI, 16
Vad ar MIDI, 16
Midianslutingar,16
INSTRUMENTSEKTIONER OCH MIDI KANALER, 16
Common Channel (gemensam kanal), 16
AttprogrammeraMidikanalerna pa CD10,16
GENERAL MIDI, 16
Ljudkompabilitet, 16
De sexton General Midi sektionerna, 16
Drum, Bass, Acc1, Acc2
[TOUCH START/CONTINUE]
TOUCH/START Funktionen startar en angiven Style Near Dtrycker ned en tangent istället for [START/STOP] knappen.
[TOUCH START/CONTINUE]
slave External clock
CD10 som Slave
CD10 External Clock
master Internal Clock
Man.C. Manual Controls (= Style control by means of Program Change)
G.Mus. Generalmusic Controls (= Style and
tempo controls by means of Control Change).
Fotpedaler: Volym, Damper (Sustain)
Ljudgenerering: PCM 16 bit
Max polyfoni: max 32 toner
Multisound: 16 parts
Effekter: 2 processor (16 reverb + 16 modulationer)
Ljud: 128+128 General Midi kompatibla ljud
Trumpet: 7 General Midi kompatibla trumpet + 1 GEM WS
kompatibelt trumset
Styles: 96 Styles + 96 Variationer
Editoring: Overdebbing, Delete
MIDI: IN, OUT
Synkronisering: MIDI: Clock In/Out
Audio utgangar: 2 kontakter (Left+Right/M)
Hörlurar
- The following tables show the names of the Bank 1 sounds (shown in UPPER CASE letters) and Bank 2 sounds, (shown in lower case letters). When using CD10 as a slave connected to a MIDI Keyboard operating as a Master, if a split transmitting to CD10 is programmed to play above or below the recommended note ranges, a deterioration in the quality of the sound may be heard. You are advised, therefore, to keep within the recommended sample range for all the sounds listed.
If you use CD10 as a slave, to select a Second Bank sound, you must send a Bank Select message from the master (often referred to as the MDI Controller 0) with a value of "1" (corresponding to the second bank), followed by the respective Program Change. Example: to select "piano2": [Bank Select (1)] [Program Change (2)].
| Family | Program Change Sound Range Sound Range | Bank 1 Recommended | Recommended Bank 2 | Recommended |
| Piano | ||||
| 0 GRANDPIANO C2-C7 grandpiano C2-C7 | ||||
| 1 PIANO 1 C2-C7 piano 1 C2-C7 | ||||
| 2 PIANO 2 C2-C7 piano 2 C2-C7 | ||||
| 3 HONKY-TONK C2-C7 honky-tonk C2-C7 | ||||
| 4 ELECTR. PIANO 1 C2-A6 electr. piano 1 C2-A6 | ||||
| 5 ELECTR. PIANO 2 C2-A5 electr. piano 2 C2-A5 | ||||
| 6 HARPSICHORD C2-E6 | harpsichord | C2-E6 | ||
| 7 CLAVICHORD C2-C7 clavichord | C2-C7 | |||
| Chrom. Percussion | ||||
| 8 CELESTA | C2-C7 | celesta | C2-C7 | |
| 9 GLOCKENSPIEL | A2-C7 | glockenspiel | A2-C7 | |
| 10 MUSIC BOX | C2-C7 | music box | C2-C7 | |
| 11 VIBES | C2-C7 | vibes | C2-C7 | |
| 12 MARIMBA | C2-C7 | marimba | C2-C7 | |
| 13 XYLOPHONE | C2-C7 | xylophone | C2-C7 | |
| 14 TUBULAR BELLs | C2-C7 | tubular bells | C2-C7 | |
| 15 DULCIMER | C2-A6 | dulcimer | C2-A6 | |
| Organ | ||||
| 16 ORGAN 1 | C2-A6 | organ 1 | C2-A6 | |
| 17 ORGAN 2 | C2-C7 | organ 2 | C2-C7 | |
| 18 ORGAN 3 | C2-E6 | organ 3 | C2-E6 | |
| 19 CHURCH ORGAN | C2-A6 | church organ | C2-A6 | |
| 20 REED | D#2-G#5 | reed | D#2-G#5 | |
| 21 ACCORDION | C2-C7 | accordion | C2-C7 | |
| 22 HARMONICA | C2-C7 | harmonica | C2-C7 | |
| 23 BANDONEON | C2-C7 | bandoneon | C2-C7 | |
| Guitar | ||||
| 24 NYLON GUITAR | C2-C7 | nylon guitar | C2-C7 | |
| 25 STEEL GUITAR | C2-C7 | steel guitar | C2-C7 | |
| 26 JAZZ GUITAR | C2-C7 | jazz guitar | C2-C7 | |
| 27 CLEAN EL.GUITAR | C2-C7 | clean el.guitar | C2-C7 | |
| 28 MUTED EL.GUIT. | C2-C7 | muted el.guit. | C2-C7 | |
| 29 OVER. EL.GUIT. | C2-C7 | over. el.guit. | C2-C7 | |
| 30 DIST. EL.GUITAR | C2-C7 | dist. el.guitar | C2-C7 | |
| 31 HARMON. GUITAR | C2-C7 | harmon. guitar | C2-C7 | |
| Bass | ||||
| 32 ACOUSTIC BASS | C2-C7 | acoustic bass | C2-C7 | |
| 33 ELECTRIC BASS | C2-C7 | electric bass | C2-C7 | |
| 34 PICK BASS | C2-C7 | pick bass | C2-C7 | |
| 35 FRETLESS BASS | C2-C7 | fretless bass | C2-C7 | |
| 36 SLAP BASS 1 | C2-C7 | slap bass 1 | C2-C7 | |
| 37 SLAP BASS 2 | C2-C7 | slap bass 2 | C2-C7 | |
| 38 SYNTH BASS 1 | C2-A6 | synth bass 1 | C2-A6 | |
| 39 SYNTH BASS 2 | C2-A6 | synth bass 2 | C2-A6 | |
| Strings/Orch. | ||||
| 40 VIOLIN | C2-A6 | violin | C2-A6 | |
| 41 VIOLA | C2-C7 | viola | C2-C7 | |
| 42 CELLO | C2-C7 | cello | C2-C7 | |
| 43 CONTRABASS | C2-C7 | contrabass | C2-C7 | |
| 44 TREM. STRINGS | C2-A5 | trem. strings | C2-A5 | |
| 45 PIZZICATO | C2-C7 | pizzicato | C2-C7 | |
| 46 HARP | C2-C7 | harp | C2-C7 | |
| 47 TIMPANI | C2-A6 | timpani | C2-A6 |
Ensemble
| 48 STRINGS C2-A6 strings C2-A6 | ||||
| 4 9 SLOW STRINGS C2-A6 slow strings C2-A6 | ||||
| 5 0 SYNTH STRNG 1 C2-A6 synth string 1 C2-A6 | ||||
| 5 1 SYNTH STRNG 2 C2-A6 synth string 2 C2-A6 | ||||
| 52 CHOIR C2-C7 choir C2-C7 | ||||
| 53 VOICE C2-C7 voice C2-C7 | ||||
| 54 SYNTH C2-C7 synth C2-C7 | ||||
| 55 ORCHESTRA HIT C2-C6 or chestra hit C2-C6 | ||||
| Brass | ||||
| 56 TRUMPET C2-A6 trumpet C2-A6 | ||||
| 57 TROMBONE C2-A6 trombone C2-A6 | ||||
| 58 TUBA C2-A6 flicorno C2-C7 | ||||
| 59 MUTED TRUMPET C2-D#6 muted trumpet C2-D#6 | ||||
| 60 FRENCH HORN A2-C7 french horn C2-C7 | ||||
| 61 BRASS C2-C7 brass C2-C7 | ||||
| 62 SYNTH BRASS 1 C2-C7 synth brass 1 C2-C7 | ||||
| 63 SYNTH BRASS 2 C2-C7 synth brass 2 C2-C7 | ||||
| Reed | ||||
| 64 SOPRANO SAX C2-C7 soprano sax C2-C7 | ||||
| 65 ALTO SAX C2-C5 alto sax C2-C5 | ||||
| 66 TENOR SAX C2-C7 tenor sax C2-C7 | ||||
| 67 BARITONE SAX C2-B5 baritone sax C2-B5 | ||||
| 68 OBOE C2-C7 oboe C2-C7 | ||||
| 69 ENGLISH HORN C2-C6 english horn C2-C6 | ||||
| 70 BASSOON C2-C7 bassoon C2-C7 | ||||
| 71 CLARINET C2-E6 clarinet C2-E6 | ||||
| Pipe | ||||
| 72 PICCOLO C2-C7 piccolo C2-C7 | ||||
| 73 FLUTE A2-C7 flute A2-C7 | ||||
| 74 REORDER C2-C7 recorder C2-C7 | ||||
| 75 PAN FLUTE A2-C7 pan flute A2-C7 | ||||
| 76 BOTTLE A2-C7 bottle A2-C7 | ||||
| 77 SHAKUN A2-C7 shakun A2-C7 | ||||
| 78 WHISTLE C2-C7 whistle C2-C7 | ||||
| 79 OCARINA C2-C7 ocarina C2-C7 | ||||
| Synth Lead | ||||
| 80 SQUARE WAVE C2-C7 square wave C2-C7 | ||||
| 81 SAWTOOTH WV. sawtooth wv. C2-C7 | ||||
| 82 CALLIOPE calliope A2-C7 A2-C7 | ||||
| 8 3 CHIFFER C2-C7 chiffer C2-C7 | ||||
| 84 CHARANG C2-C6 charang C2-C6 | ||||
| 85 SOLO VOX solo vox C2-C7 | ||||
| 86 5TH WAVE E3-A6 5th wave E3-A6 | ||||
| 87 BASS LEAD C2-C7 bass lead C2-C7 | ||||
| Synth Pad | ||||
| 88 NEW AGE C2-E6 new age C2-E6 | ||||
| 89 WARM C2-A7 warm C2-A7 | ||||
| 90 SYNPOLY C2-C7 synpoly C2-C7 | ||||
| 91 SYNCHOIR C2-C6 synchoir C2-C6 | ||||
| 92 BOWED C2-A7 bowed C2-A7 | ||||
| 93 METAL C2-C7 metal C2-C7 | ||||
| 94 HALO C2-C7 halo C2-C7 | ||||
| 95 SWEEP C2-C7 sweep C2-C7 |
Synth SFX
| 96RAIN C2-C6 rain C2-C6 | ||||
| 97 TRACK C2-G6 track C2-G6 | ||||
| 98CRYSTAL C2-C7 crystal C2-C7 | ||||
| 99 ATMOSPHERE C2-C6 atmosphere C2-C6 | ||||
| 100 | BRIGHT | C2-E6 | bright A2_C7 | |
| 101 | GOBLINS | C2-C7 | goblins C2-C7 | |
| 102 | ECHOES | C2-C7 | echoes C2-C7 | |
| 103 | SCI-FI | C2-E6 | sci-fi C2-E6 | |
| Ethnic | ||||
| 104 | SITAR | C2-C6 | sitar C2-C6 | |
| 105 | BANJO | C2-A6 banjo | C2-A6 | |
| 106 | SHAMISEN | C2-C6 | shamisen C2-C6 | |
| 107 | KOTO | C2-A6 | koto C2-A6 | |
| 108 | KALIMBA | C2-C7 kalimba | C2-C7 | |
| 109 | BAGPIPE | C2-A5 | bagpipe C2-A5 | |
| 110 | FIDDLE | C2-A6 | fiddle C2-A6 | |
| 111 | SHANAI | C2-C6 shanai C2-C6 | ||
| Percussion | ||||
| 112 | DRUMS CD | A0-C8 | tinkle bell C2-D6 | |
| 113 | DRUMS WS | A0-C8 | agogo G2-C6 | |
| 114 | HOUSE KIT | A0-C8 | steel drums C2-C7 | |
| 115 | ROCK KIT | A0-C8 | woodblock C3-C7 | |
| 116 | GATE KIT | A0-C8 | taiko drum C2-C7 | |
| 117 | ELECTRIC KIT | A0-C8 | melodic tom C2-C7 | |
| 118 | JAZZ KIT | A0-C8 | synth drum C2-C7 | |
| 119 | SYMPHONY KIT | A0-C8 | reverse cymbal C2-C6 | |
| SFX | ||||
| 120 | GUITAR NOISE | C#6-C7 | wha wha gtr C#6-C7 | |
| 121 | BREATH NOISE | C2-A5 | breath noise C2-A5 | |
| 122 | SEASHORE | C2-C7 | seashore C2-C7 | |
| 123 | BIRD TWEET | C2-C7 | bird tweet C2-C7 | |
| 124 | TELEPHONE | C2-C7 | telephone C2-C7 | |
| 125 | HELCIOPTER | C2-C7 | helicopter C2-C7 | |
| 126 | APPLAUSE | C2-C7 | applause C2-C7 | |
| 127 | GUN SHOT | C2-C7 | gun shot C2-C7 | |
Styles
DANCE
00 Rock1
01 Rock2
02 Rap
03 House
04 Dance
05 Funk1
06 Funk2
07 Fusion
BEAT
08 8Beat1
09 8Beat2
10 8Beat3
11 8Beat4
12 16Beat1
13 16Beat2
14 16Beat3
15 16Beat4
ROCK'n
16 Boogie
17 Rock'n
18 Twist
19 Charleston
20 Slow Rock1
2 1 Slow Rock 2
22 Ballad1
23 Ballad2
JAZZ
24 Swing1
25 Swing2
26 Swing3
27 Foxtrot
28 BigBand
29 Shuffle
30 Jazz Waltz
31 Dixieland
LATIN
3 2 Bossa
33 Samba
34 Latin
35 Salsa
36 ChaCha
37 Rhumba
38 Mambo
39 Tango
FOLK
40 Waltz1
41 Waltz2
42 March
43 Polka
44 Baroque
45 Country
46 Beguine
47Reggae
ETHNIC
48 Dangdut
49 Keroncong
50 Trot
51 Enka
5 2 Turk 9/8
53 Baladi
54 Malfouf
55 New Saidi
POP
56 Pop1
57 Pop2
58 Pop3
59 Pop4
60 Soul
61 Blues
62 Rock'n
63 Swing4
CD STYLES
64 Funk1
65 Funk2
66 Beat1
67 Beat2
68 CantaLP
69 SexyMF
70 Motown
71 Carwash
CD STYLES
72 Soul1
73 Soul2
74 Soul3
75 Soul4
76 Soul5
77 Soul6
78 Rap1
79 Rap2
CD STYLES
80 Rock1
81 Rock2
8 2 Reggae1
83Reggae2
84 Dance1
85 Dance2
86 Dance3
87 Heavy
PROG
88 House1
89 House2
90 RnBlues
91 HiHop1
92 HiHop2
93 HiHop3
94 HiHop4
95 Brown
SONG
96 SONG
123
Up Quica

Drum WS
Guiro Quica

Drum CD
123
"C" "D" "One"

ROCK KIT
123 Do It! "Yo!" "Uh!"
HOUSE KIT
123 "CmOn! LScrchHScrch
ELECTRIC KIT
123
Zap

"Dance!"

"Do It!"
GATE KIT
123

"Do It!" "Four"

123

JAZZ KIT

Crash Snare Fingers
SYMPHONY KIT
123


Hit C7 Hit G7 Hit C8
MANUFACTURER:MODEL:CD10 Version:1.00
Generalmusic S.p.A. Hyperkeyboard Date: Jan 95
| FUNCTION TRANSMITTED RECOGNIZED REMARKS | ||||
| BASIC CHANNEL Default 1-16 1-16 Changed 1-16 1-16 | ||||
| MODE Default Mode 3 Mode 3 Messages XX Altered **** X | ||||
| NOTE NUMBER 36-96 21 True Voice 21-108 **** 21-108 | ||||
| VELOCITY | Note ON Note OFF | O 9nH v=1-127 X 9nH v=0 | O 9nH v=1-127 X | |
| AFTER TOUCH | Key's Ch's | XX XX | ||
| PITCH BENDER | O | O | ||
| CONTROL CHANGE | 00 01 04 07 64 112 118 119 | O O X O | O O Foot Control. | Bank Sel. Mod.Wheel Main Volume Damper Pedal (1) (1) (1) |
| O O O | O O O | (1) (1) (1) | ||
| O O O | O O O | (1) (1) | ||
| O O O | O O O | (1) (1) | ||
| PROGRAM CHANGE | True # | O (0-127) O (0-127) *** (0-127) | ||
| SYSTEM EXCLUSIVE | O | O | ||
| SYSTEM COMMON | Song Pos. Tune | XX XX | ||
| SYSTEM REAL TIME | Clock Commands | O O | O O | Start/Stop/Continue |
| O O | O O | |||
| AUXMESSAGE | Reset All Contr Local ON/OFF All Notes OFF Active Sense Reset | O O O O O O | O O O O O | |
Notes: (1) Generalmusic reserved Control Change
Mode 1: OMNI ON
Mode 3: OMNI OFF, POLY
Mode 2: OMNI ON, MONO O: Yes
Mode 4: OMNI OFF, MONO
X: No
CD10 Hyperkeyboard Copyright © Generalmusic 1995 Release: V. 1.00 (February 93)
1.1 TRANSMITTED DATA
9n kk 00 Note Off
9n kk vv Note On
Bn 00 cc Bank selection
Bn 01 cc Modulation Wheel
Bn 07 cc Main Volume
Bn 40 cc Damper Pedal
Bn 70 cc Generalmusic reserved (See par. 3.1)
Bn 76 cc Generalmusic reserved (See par. 3.1)
Bn 77 cc Generalmusic reserved (See par. 3.1)
Bn 79 OO Reset All Controllers
Bn 7A cc Local Control
Bn 7B OO All Note Off
Cnp pp Program Change
En bb bb Pitch Bend
F8 Timing Clock
FA Start
FB Continue
FC Stop
FE Active Sensing
1.2 TRANSMITTED PARAMETERS DETAILS
n = Midi Channel (01-16 programmable)
kk = Note (36-96)
vv = Key Velocity (01-127)
pp = Program for Section (00-127)
= Program for Sequencer (00-99 = Style/Song
Common MIDI Channel 121 = Intro 122 = Fill Basic
123 = Fill Var 124 = Sync
125 = Variation ON
126 = Variation OFF
127 = End
cc = Controller value (0-127 for continuos controllers,
0-63=OFF, 64-127=ON for switches)
bb = Pitch Bend value (0-127)
2.1 RECOGNIZED DATA
8n kk 00 Note Off
9n kk 00 Note Off
9n kk vv Note On
Bn 00 cc Bank selection
Bn 01 cc Modulation
Bn 04 cc Foot Control
Bn 07 cc Main Volume
Bn 40 cc Damper Pedal
Bn 70 cc Generalmusic reserved (See par. 3.1)
Bn 76 cc Generalmusic reserved (See par. 3.1)
Bn 77 cc Generalmusic reserved (See par. 3.1)
Bn 79 00 Reset All Controllers
Bn 7A cc Local Control
Bn 7B OO All Note Off
Cnp pp Program Change
En bb bb Pitch Bend
F8 Timing Clock
FA Start
FB Continue
FC Stop
FE Active Sensing
FF Reset
2.2 RECOGNIZED PARAMETERS DETAILS
n = Midi Channel (01-16 programmable)
kk = Note (21-108)
vw = Key Velocity (01-127)
pp = Program for Section (00-127)
= Program for Sequencer (00-99 = Style/Song
(Common MIDI Channel) 121 = Intro 122 = Fill Basic
123 = Fill Var 124 = Sync
125 = Variation ON
126 = Variation OFF
127 = End)
cc = Controller value (0-127 for continuos controllers
0-63=OFF, 64-127=ON for switches)
bb = Pitch Bend value (0-127)
3.1 GENERALMUSIC RESERVED CONTROL CHANGE 70, 76, 77
Bn 70 11 INTRO REQUEST
Bn 70 12 FILL BASIC REQUEST
Bn 70 13 END REQUEST
Bn 70 14 SYNC_START REQUEST
Bn 70 25 FILL VAR REQUEST
Bn 70 26-66 VARIATION Disable/Enable
Bn 70 27-67 HARMONY Disable/Enable
Bn 70 28-68 MEMORY Disable/Enable
Bn 70 29-69 EFFECT1 Disable/Enable
Bn 70 2A-6A EFFECT 2 Disable/Enable
Bn 70 2B-6B ARRANGE Disable/Enable
Bn 70 2D-6D AUTOPRESET Disable/Enable
Bn 76 vv TEMPO INIncrement (vv = inc. value)
Bn 77 vv TEMPO DECREMENT (vv = dec. value)
Federal Communications Commission
Note: This equipment has been tested and found to comply with the limits for a Class B digital device, pursuant to Part 15 of FCC Rules. These limits are designed to provide reasonable protection against harmful interference in a residential installation. This equipment generates, uses, and can radiate radio frequency energy and, if not installed and used in accordance with the instructions, may cause harmful interference to radio communications. However, there is no guarantee that interference will not occur in a particular installation. If this instrument does cause harmful interference to radio or television reception, which can be determined by turning the instrument off and on, the user is encouraged to try to correct the interference by one or more of the following measures:
- Reorient or relocate the receiving antenna.
- Increase the separation between the instrument and the receiver.
- Connect the instrument into an outlet on a circuit different from that to which the receiver is connected.
- Consult the dealer or an experienced radio/television technician for help.
GENERALMUSIC Code 271030
Specifications are subject to change without prior notice.