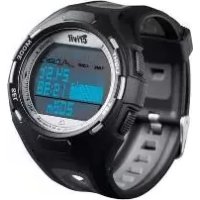
USER MANUAL IAN 275275 CRIVIT
Operation and Safety Notes
NL BE
LCD-SpOrthHOrLOGe
GB/IEOperation and Safety NotesPage 29
Intended use.. Page 30
Description of Parts.. 30
General Safety Instructions 30
Safety Instructions for Batteries.. 31
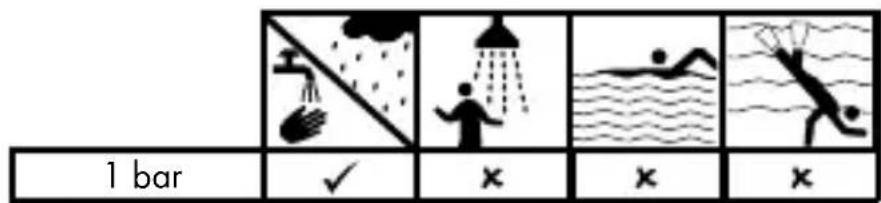
Watertightness Page 32
Preparations for use
Changing the battery.. 32
Operation
Time Mode.. 32
Alarm. Page 34
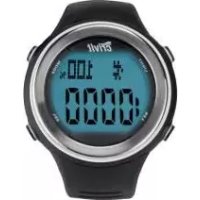
Stopwatch Mode.. 37
Compass Mode... Page 40
Altimeter Mode.. Page 44
Background contrast lighting 48
Troubleshooting... Page 49
Cleaning and Care.. 49
Disposal 49
Warranty.. 50
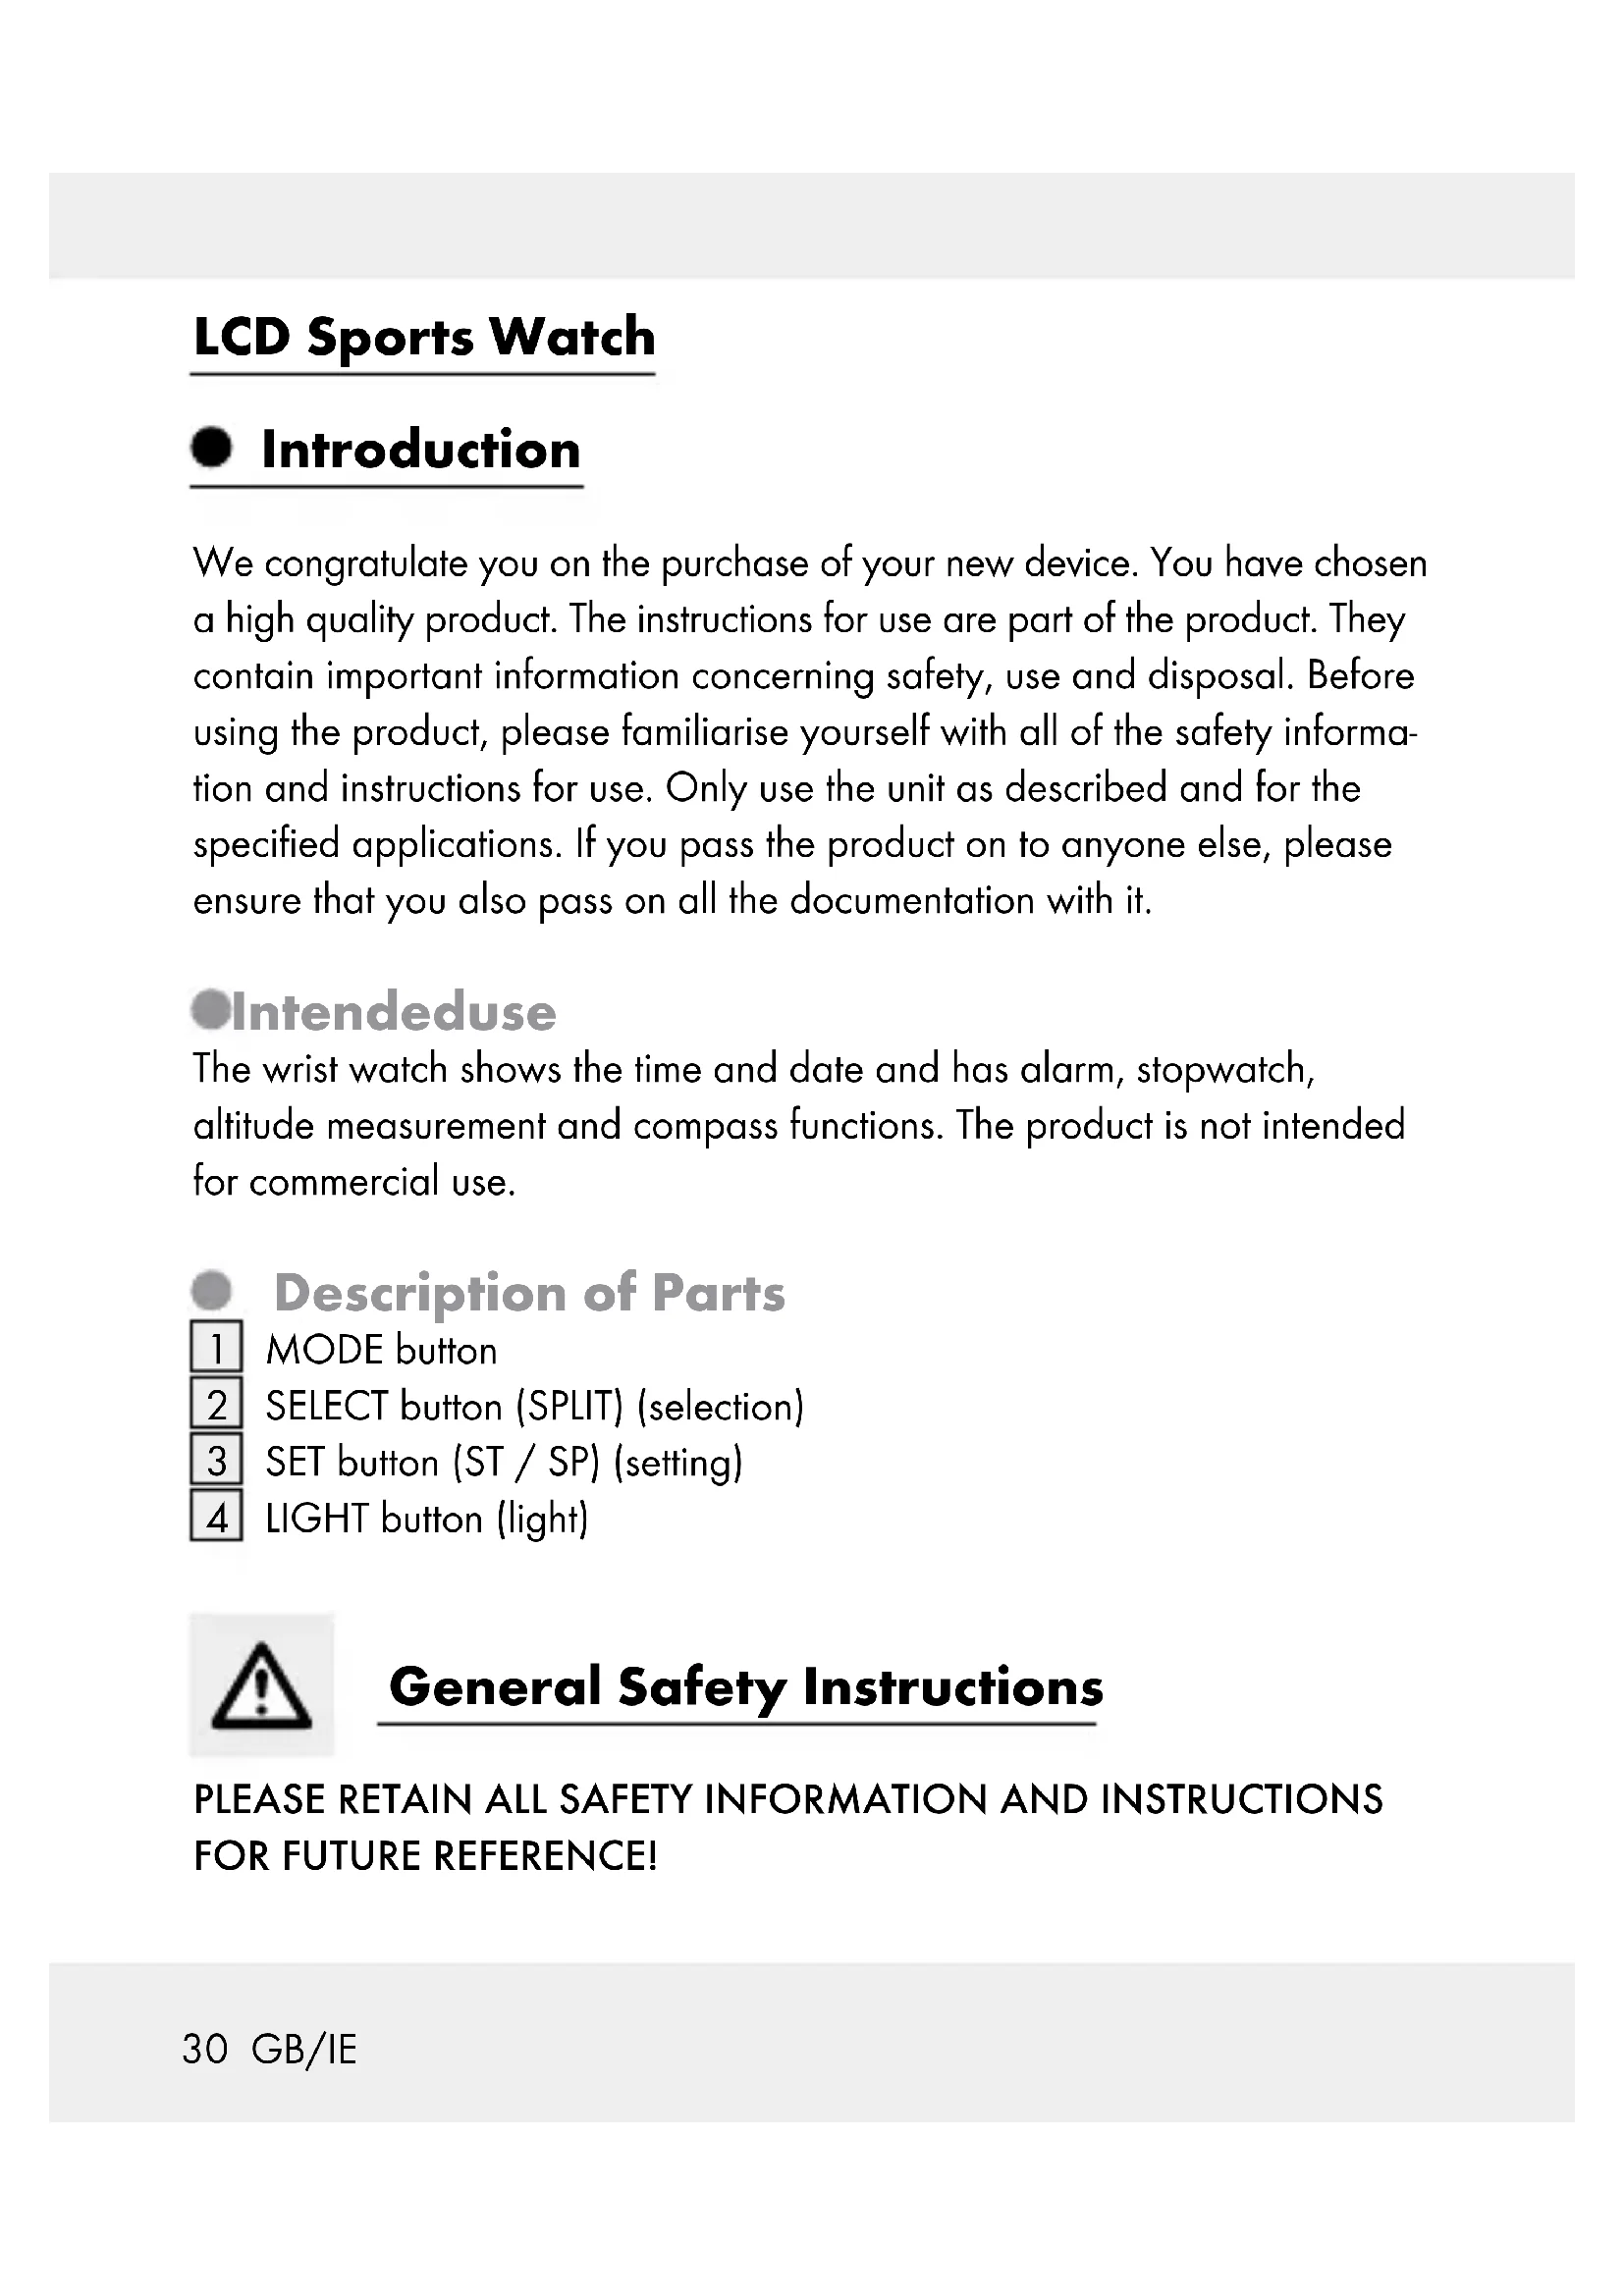
LCD Sports Watch
Introduction
We congratulate you on the purchase of your new device. You have chosen a high quality product. The instructions for use are part of the product. They contain important information concerning safety, use and disposal. Before using the product, please familiarise yourself with all of the safety information and instructions for use. Only use the unit as described and for the specified applications. If you pass the product on to anyone else, please ensure that you also pass on all the documentation with it.
Intendeduse
The wrist watch shows the time and date and has alarm, stopwatch, altitude measurement and compass functions. The product is not intended for commercial use.
Description of Parts
1 MODE button
2 SELECT button (SPLIT) (selection)
3 SET button (ST/SP) (setting)
4 LIGHT button (light)

General Safety Instructions
PLEASE RETAIN ALL SAFETY INFORMATION AND INSTRUCTIONS FOR FUTURE REFERENCE!

Safety Instructions for Batteries

WARNING! DANGER TO LIFE! Batteries / rechargeable batteries could be swallowed, which could pose a lethal hazard. Keep batteries / rechargeable batteries away from small children If a battery / rechargeable batteries has been swallowed, seek medical help immediately.


CAUTION! EXPLOSION HAZARD! The batteries must never be recharged!
Remove a spent battery immediately from the device. There is an increased danger of leaks!
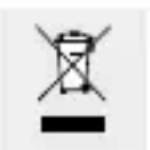
Batteries must not be disposed of in the normal domestic waste!
Every consumer is legally obliged to dispose of batteries in the proper manner!
- Keep batteries away from children. Do not throw batteries into a fire. Never short-circuit them or take them apart.
If you do not observe these instructions, the battery could be discharged beyond the cut-off voltage. There is then a danger of leaking. If the battery has leaked inside your device, you should remove it immediately in order to prevent damage to the device!
Avoid contact with the skin, eyes and mucous membranes. Any parts of the body coming into contact with battery acid should be rinsed off with copious amounts of water and / or a doctor contacted if necessary!
- Watertightness
Preparations for use
- Changing the battery
Note: Have batteries changed in a specialist shop.
Operation
TimeMode
Press the MODE button until the display "TIME" appears to proceed to the time mode.
□ By pressing the SELECT button in time mode, you can switch between the following functions:
- Time (TIME)
- Alarm (ALARM)
- Countdown-Timer (TIMER)
Time (TIME)
Press the SELECT button 2 in time mode until the display "TIME" appears.
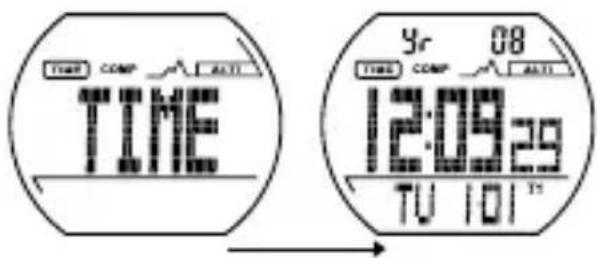
In time mode, the year is displayed in the top area and the weekday and date are displayed in the bottom area.
Setting the time (T1)
Press the SET button 3 and hold for about 3 seconds. "HOLD TO SET" will appear in the display and the hour format 24H " begins to flash.
Press the SELECT button 2, to switch between the 12 and 24 hour format.
Press the SET button to confirm your entry. The second display of the time display will flash.
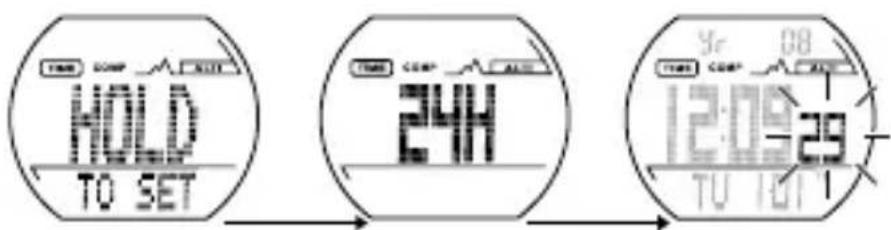
Press the SELECT button 2 to set the second value to 0.
Press the SET button 3 to confirm your entry.
Note: You can hold the SELECT button pressed down to change the settings faster.
Press the SELECT button to set the minute display.
Press the SET button to confirm your entry.
Set the hours, the year, the month and the day the same manner. The measurement unit then starts to flash.
Press the SELECT button to set the desired measurement unit
(METRIC = metric system / IMPERIAL = British system).
Press the MODE button 1. All settings will be saved.
Second time (T2)
Press the SELECT button 2 in time mode and hold down for about 3 seconds. The second time (T2) appears in the bottom area of the display.
To set the second time (T2), proceed in the same manner as for the setting of the first time (T1) (see chapter „Setting the time (T1)”).
Press the SELECT button and hold down for about 3 seconds. The time display switches back to normal time (T1).
Alarm
There are five individual alarm signals that can be individually activated or deactivated according to your wishes. Each alarm can be set for five different purposes.

a) Alarm on a specific date (alarm at 10 am on 19. June) (A1)
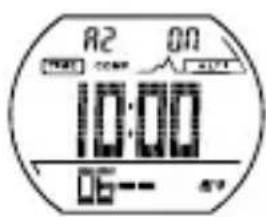
b) Daily alarm in a specific month (alarm every day at 10 am in June) (A2)
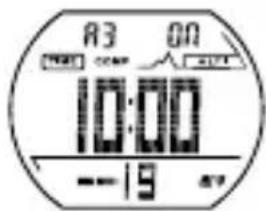
c) Monthly alarm (alarm at 10 am on the 19. of every month) (A3)
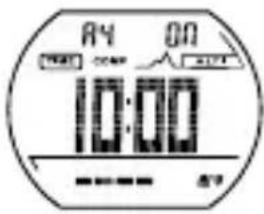
d) Daily alarm (alarm every day at 10 am) (A4)

e) Hourly alarm (alarm every clock hour) (A5)
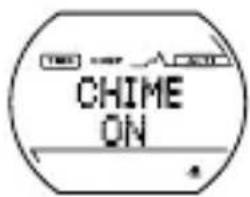
When the alarm is switched on, at the set time an alarm signal will buzz for 30 seconds.
Note: Press the SELECT button 2, the SET button 3 or the LIGHT button 4 to stop the alarm signal. Otherwise it will buzz for another four times at intervals of 2 minutes.
If the hourly alarm is switched on, there will be a beep tone every full hour.
Set the alarm as shown below:
- Press the SELECT button 2 in time mode until the display „ALARM“ appears.
- Press the SET button 3 to select between the alarm signals A1 to A5.
- Hold the SET button pressed down to proceed to the setting of the selected alarm.
- Press the SET button again to make the alarm settings.
- Press the MODE button 1 to save the settings.
To do this, follow Steps 1 to 6:
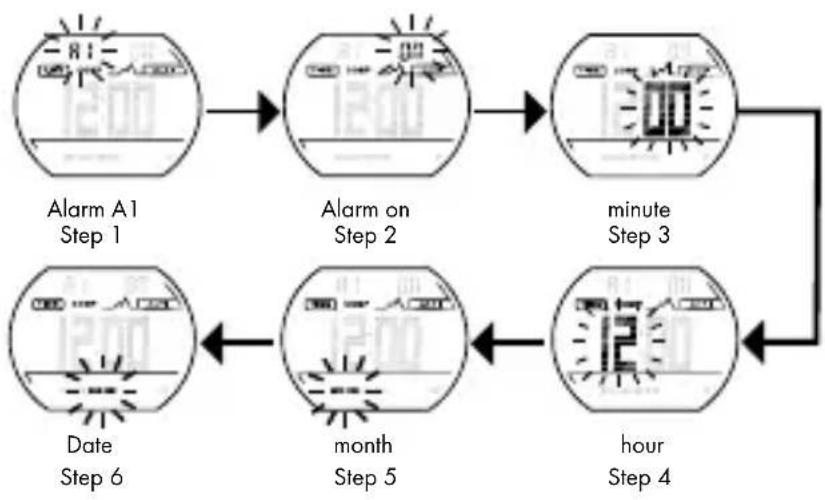
Hourly alarm on
Note: The set alarm is determined by the current time selected (T1 or T2).
Timer
The watch is equipped with a countdown timer and a countup timer.
Basic setting: 0:01.00 (1 minute)
Press the SELECT button 2 in time mode until the display "TIMER" appears.
Press the SET button 3 until the display "HOLD TO SET" appears and the countdown timer can be set.
Press the SELECT button to set the minutes. Press the SET button to proceed to the next setting (hours).
Press the SELECT button to set the hours. Press the SET button to proceed to the next setting "Cd r". The countdown can be set at maximum 23 hours and 59 minutes.
Confirm your setting by pressing the MODE button 1.
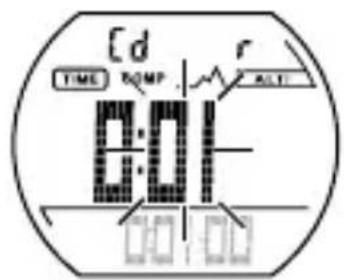
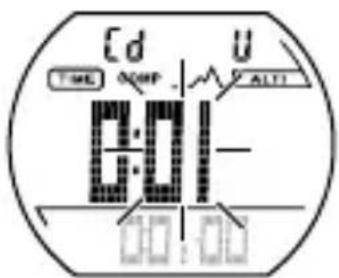
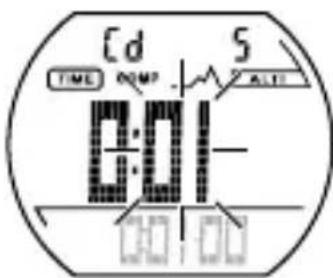
Timer Types:
r: The timer begins to count down the previously set time until 0 is reached.
U: The timer begins to count up the previously set time until 0 is reached.
S: The timer stops as soon as 0 is reached.
The following applies to all three timer types:
Press the SET button 3. The timer starts.
Press the SET button again. The timer stops.
Press the SET button again. The timer continues to count.
Press the SET button again and hold for about 3 seconds. In this way, the timer is set back to the originally set time.
When the timer reaches 0, an alarm signal buzzes for 15 seconds. Press the SELECT button 2, the SET button 3 or the MODE button 1 to stop the alarm signal.
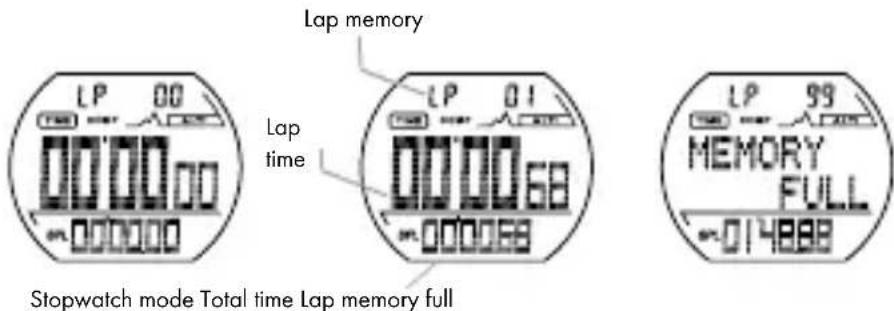
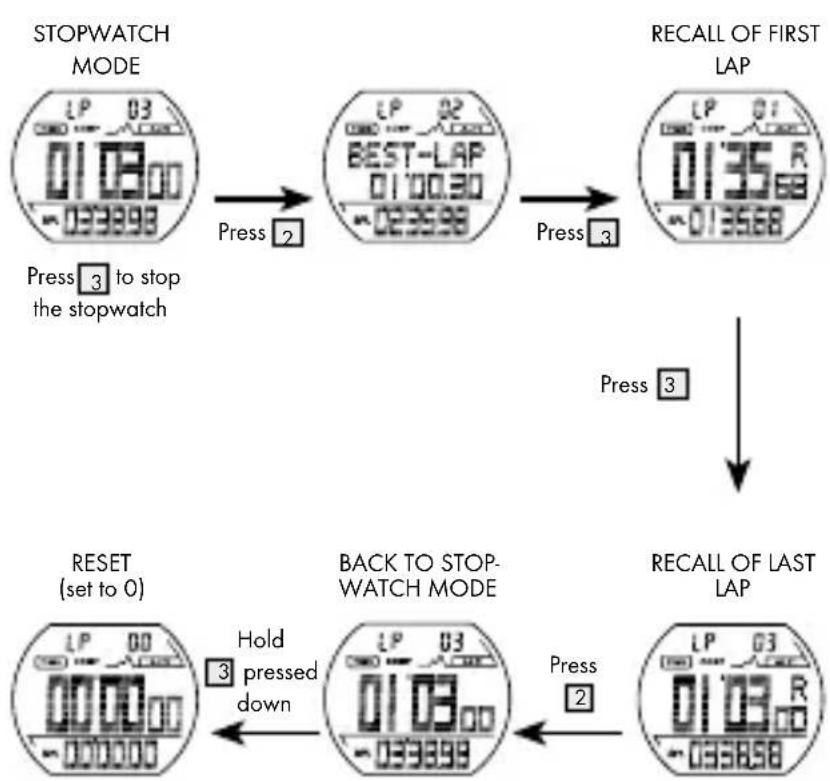
-StopwatchMode
Press the MODE button 1 until the display "CHRONO" appears to proceed to the stopwatch mode.
You can choose between the following sub-function in the stopwatch mode:
- CHRONO (Stopwatch)
- DATA RECALL (data recall)
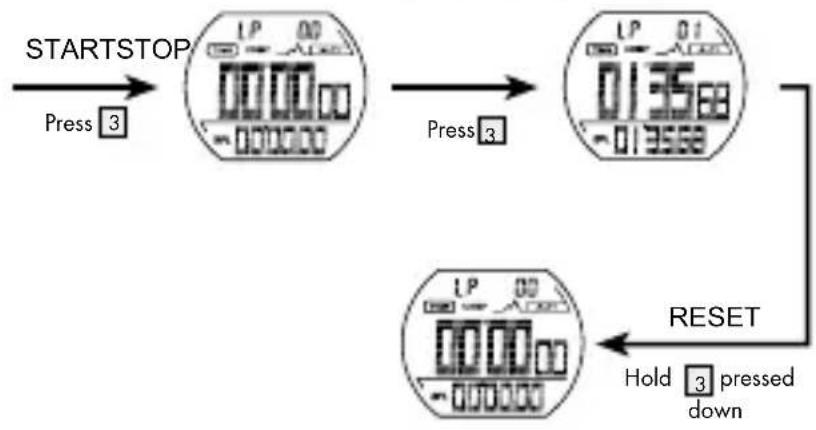
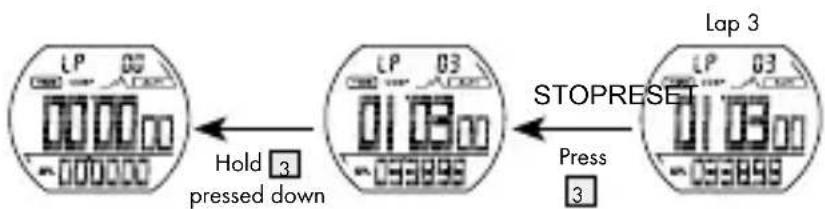
Stopwatch
Press the SET button 3 to start / stop the stopwatch..
Press the SELECT button 2 to record a lap time in the lap memory while the stopwatch is running.
Note: 99 laps can be saved. "MEMORY FULL" will appear in the display when the lap memory is full.
Note: You can only switch between „CHRONO“ and „DATA RECALL“ if at least one lap has been recorded / stopped.
Press and hold down the SET button 3 to reset the stopwatch display and the lap counter to 0.
Stopwatch memory recall
Press the SET button 3 to stop the stopwatch.
Press the SELECT button 2 to proceed to the memory recall mode. In the display "BEST LAP" and the records of the BEST LAPS will appear.
Press the SET button to read the different lap memories.
Press the SELECT button to leave the memory recall mode.
Follow the diagrams to carry out a standard measurement, a lap time measurement and a memory recall:
Standard measurement: 3 - 3 - 3
Measurement of lap time: 3 - 2 - 2 - 3 - 3
Lap 1
Lap 2


Recall of lap memory: 3 - 2 - 3 - 3 ... 2 - 3
- CompassMode
Press the MODE button until the display COMP appears to proceed to the compass mode.
Hold the compass in a horizontal position and mark the required direction with .
There are two display formats: display with large digit and detailed display.
Display with large digits
There are two lines in this display format.
The compass appears in the first line.
The compass direction and the cardinal point appear in the second line
Detail display
There are four lines in this display format.

- The compass appears in the first line.
- An arrow appears in the second line pointing the shortest route to the north.
□ When N^ appears on the left side of the display, go left to reach north faster.
□ When N appears on the right side of the display, go right to reach north faster.
- The bearing appears in the third line.
- The compass with the direction and the cardinal point appear in the fourth line.
Press the SET button 3 to switch between the two display formats.
The compass switches off automatically to save energy:
in idle state after 3 minutes.
in continuous operation after 5 minutes
Note: To reactivate, press the SET button 3.
Ambient interference
-
Digital compasses operate with the magnetic field of the earth. Hence these devices react very sensitively to various ambient influences, that distort the magnetic field of the earth, for example, when approaching heavy metal, household devices, computers and power cables.
Never use the compass in the proximity of another compass or a metal or magnetic object.
To obtain accurate information on the direction of movement, recalibrate the compass (see chapter „Calibration of the device)), if
-
"ERROR" permanently appears in the display.
- The direction details indicate an error of more than 10 degrees.
- The device is used in a vehicle for the first time.
Calibration of the device
Press the MODE button 1 to proceed to compass mode.
Press and hold down the SELECT button 2 to proceed to calibration mode. "CAL" appears in the display.
Press the SELECT button once again to start the calibration. A rotating ring appears in the display.
- Rotate the device twice in a clockwise direction on a level surface that is free from metal plates, household devices, computers, power cables etc. Always rotate in the same direction. Ensure that you take at least 20 seconds for each rotation but not longer than one minute.
Then press the SET button 3 to complete the calibration.
Note: If the calibration is not performed correctly, inaccurate information could be the consequence. Perform the calibration once again if any detail seems to be erroneous.
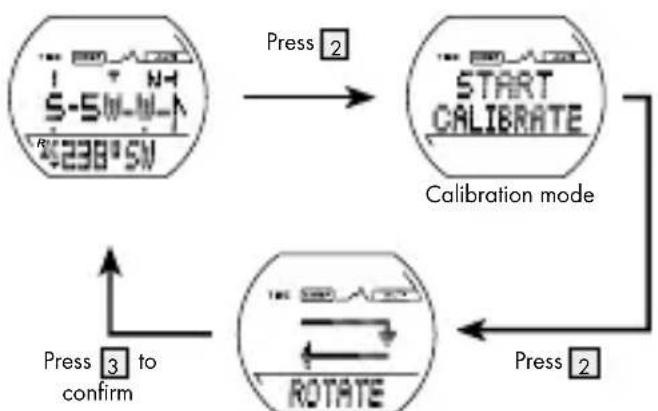
When the ring moves, turn the watch clockwise in two rotations
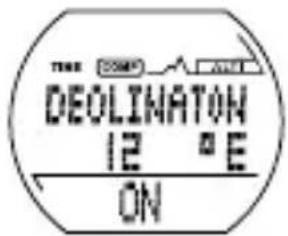
Entry of declination angle for the geographic north (True North)
- The declination indicates the difference between the magnetic north and the geometric north direction at your location.
- The local declination is marked at the edge of the map either as east plus declination (E) or as west minus declination (W). During the orientation, the direction on the map is corrected by subtraction of the plus declination or addition of the minus declination.
Press and hold down the SET button 3 to proceed to the setting mode for the declination. The letter "E" appears in the display and begins to flash.
Press the SELECT button 2 to select the direction east (E) or west (W).
Press the SET button again to confirm your entry The digit for the declination angle begins to flash.
Press the SELECT button to set the angle that should be adjusted. Press the SET button to confirm your entry.
Press the SELECT button to switch the declination function on or off "ON" or "OFF" appears in the bottom area of the display.
Press the MODE button 1 to confirm the setting. You will now return to compass mode.
Please read the following example to understand the declination effect: The current direction is N 10 degrees. If the declination angle is set at 30 degrees, the final direction is changed to NW 340 degrees.
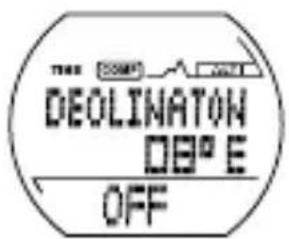
Note: You will find information on the declination data for your location positioning in the Internet.
AltimeterMode
Press the MODE button 1 to proceed to altimeter mode. "ALTI" appears in the display.
Press the SELECT button 2 in altimeter mode. You can choose between the following sub-functions:
Clock(ALTI)
Memory of maximum altitude (HIGH)
Memory of minimum altitude (LOW)
Total height gain (UP)
Total height loss (DOWN)
Number of hills (HILL)
- Record(RECORD)
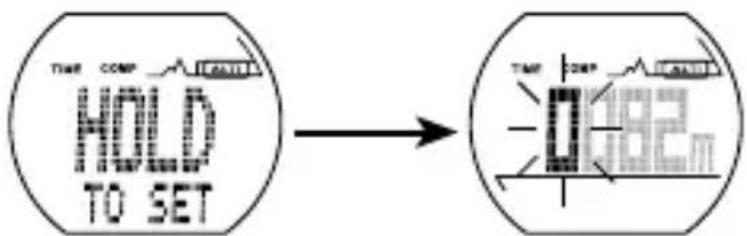
Setting the altimeter
Press the SELECT button 2 in altimeter mode until the display "ALTI" appears.
Press the SET button 3 and hold for about 3 seconds. "HOLD TO SET" appears in the display The altitude display then starts to flash.
Press the SELECT button to set the altimeter.
Press the SET button to proceed to the next digit.
Press the MODE button 1 to confirm the setting.
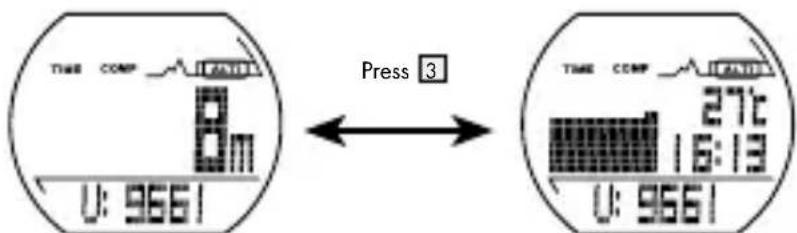
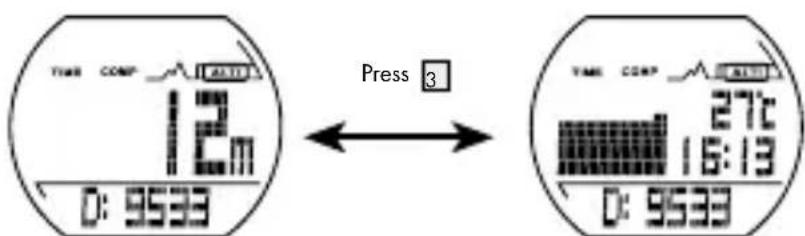
Note: Press the SELECT button 2 to select the desired display in altimeter mode. If you then press the SET button 3, the following data appears in the middle area of the display: temperature, time and graphic altitude display.
Time
Note: You can have your current location displayed in different ways:
- Simple display mode: current altitude and time,
- Detailed display mode: temperature, time, current altitude and graphic altitude display.
Press the SET button 3 to proceed to simple display mode.
Press the SELECT button 2 until the display "CLOCK" appears. The current time appears in the bottom area of the display, the current altitude appears in the middle.
Press the SET button 3 to proceed to detailed display mode. The current altitude appears in the bottom area of the display.
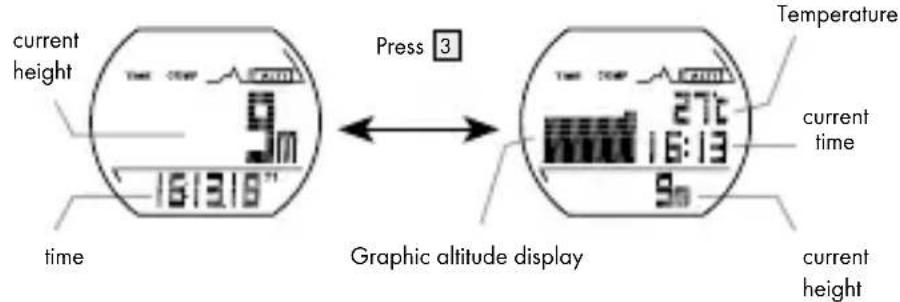
Simple display Detailed display
Memory of maximum altitude (HIGH)
Press the SELECT button 2 in altimeter mode until the display "HIGH" appears. The maximum altitude appears in the bottom area of the display, the current altitude appears in the middle.
Press the SET button 3 and hold for about 3 seconds. "HOLD TO RESET" appears in the bottom area of the display. The last recorded maximum altitude then appears in the bottom area of the display.
Memory of minimum altitude (LOW)
Press the SELECT button 2 in altimeter mode until the display LOW" appears. The minimum altitude memory appears in the bottom area of the display, the current altitude appears in the middle.
Press the SET button 3 and hold for about 3 seconds. "HOLD TO RESET" appears in the bottom area of the display. The last recorded altitude then appears in the bottom area of the display.
Total height gain (UP)
Press the SELECT button 2 in altimeter mode until the display "UP" appears. The total height gain appears in the bottom area of the display, the current altitude appears in the middle.
Hold the SET button 3 pressed down to reset the minimum altitude to 0. "HOLD TO RESET" appears in the display
Total height loss (DOWN)
Press the SELECT button 2 in altimeter mode until the display "DOWN" appears. The total height loss appears in the bottom area of the display, the current altitude appears in the middle.
Hold the SET button 3 pressed down to reset the minimum altitude to 0. "HOLD TO RESET" appears in the display
Counting the number of hills (HILL)
Press the SELECT button 2 in altimeter mode until the display "HILL" appears. The number of hills appears in the bottom area of the display, the current altitude appears in the middle.
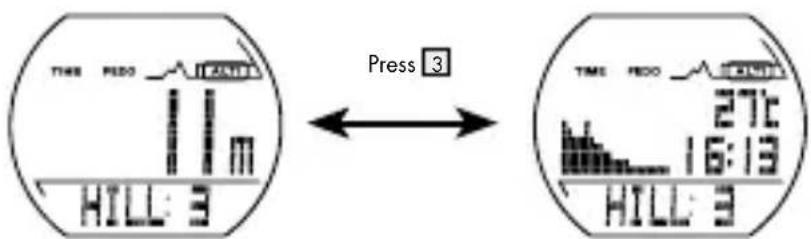
Hold the SET button 3 pressed down to reset the number of hills to 0. "HOLD TO RESET" appears in the display
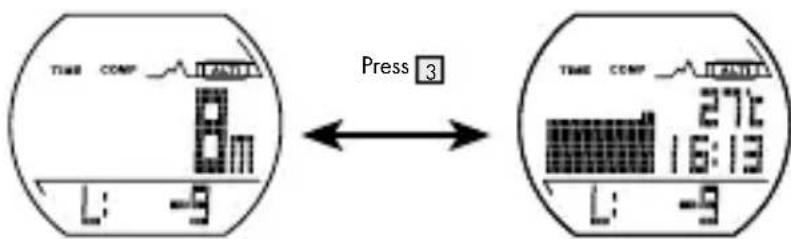
Record
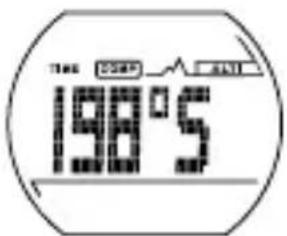
Press the SELECT button 2 in altimeter mode until the display "RECORD" appears. The current altitude appears in the bottom area of the display, the graphic altitude display appears in the middle. The altitude variation and graphic display record the change in altitude within the last 8 hours.
Press the SET button 3 to recall the altitude record for a specific location during the last 8 hours. The time of recording is displayed for every single altitude record.
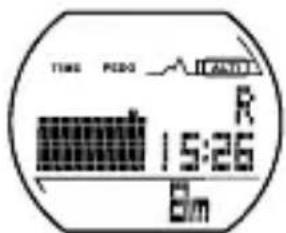
Hold the SET button pressed down to start a new altitude recording. "HOLD TO RESET" appears in the display
Background contrast lighting
Press the LIGHT button 4 to switch on the background lighting for approx. 2 seconds. A permanent lighting of the display is not possible.
Troubleshooting
Altitude measurement
All altimeters are influenced by air pressure (unless they are controlled via GPS etc), as the altitude is calculated with the air pressure.
Therefore check and adjust the altimeter. Make sure that you adjust the altimeter in a place the altitude of which you can enter as a reliable reference point.
Temperature
The temperature of the inside of the housing is displayed. This is also influenced by the body temperature.
- Cleaning and Care
Clean the product with a dry, non-flushing cloth. A spectacle cleaning cloth is ideal
Disposal
The packaging is made entirely of recyclable materials which you can dispose of at your local recycling facilities.
Contact your local waste disposal authority for more details on how to dispose of the product when it is no longer needed.
To help protect the environment, please properly dispose of the product when it has reached the end of its useful life, not through household waste.
Faulty or used batteries must be recycled in accordance with Directive 2006/66/EC and its amendments.
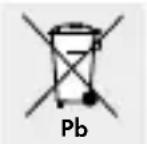
Environmental damage through incorrect disposal of the batteries!
Never dispose of batteries in your household waste. They may contain toxic heavy metals and are subject to hazardous waste regulations. The chemical symbols of the heavy metals are: Cd = cadmium, Hg = mercury, Pb = lead. Therefore dispose of used batteries through your local collection site.
Warranty
The device has been manufactured to strict quality guidelines and meticulously examined before delivery. In the event of product defects you have legal rights against the retailer of this product. Your legal rights are not limited in any way by our warranty detailed below.
The warranty for this device is 3 years from the date of purchase. Should this device show any fault in materials or manufacture within 3 years from the date of purchase, we will repair or replace it - at our choice - free of charge to you.
The warranty period begins on the date of purchase. Please keep the original sales receipt in a safe location. This document is required as your proof of purchase. This warranty becomes void if the device has been damaged or improperly used or maintained.
The warranty applies to faults in material or manufacture. This warranty does not cover product parts subject to normal wear, thus possibly considered consumables (e.g. batteries) or for damage to fragile parts, e.g. switches, rechargeable batteries or glass parts.
The warranty further excludes a reduction in water tightness. The state of water tightness is not a permanent property and should therefore be regularly maintained. Please note, opening and repairs performed by unauthorized individuals will void any warranty.
C
Introduction
in rust na 3 minutes.
In continu gebruik na 5 minutes.