
X91384MIO - Range hood AEG-ELECTROLUX - Free user manual and instructions
Find the device manual for free X91384MIO AEG-ELECTROLUX in PDF.

| Brand | AEG-Electrolux |
| Model | X91384MIO |
| Product type | Cooker hood |
| Minimum safety distance (hob) | 650 mm |
| Air outlet diameter | ≥ 120 mm |
| Power supply | Mains (check rating plate) |
| Earth connection | Mandatory, must comply with standards |
| Control type | Touch controls with LED display |
| Motor speeds | 4 speeds (V1-V4) + Intensive (P, 5 min) |
| Special functions | Automatic Sensor mode, delayed start 10 min, optional remote control |
| Lighting | LED, adjustable intensity (L0-LMax) |
| Metal filters | Cleaning every 2 months |
| Activated carbon filters | Replacement every 4 months |
| Filter saturation alarm | Fixed LED (metal) or flashing LED (carbon) |
| Exterior maintenance | Damp cloth and neutral liquid detergent |
| Safety | Automatic shut-off after 7h without command, flame protection |
| Spare parts | Original recommended |
| After-sales service | Model, PNC and serial number required |
Frequently Asked Questions - X91384MIO AEG-ELECTROLUX
User questions about X91384MIO AEG-ELECTROLUX
0 question about this device. Answer the ones you know or ask your own.
Ask a new question about this device
Download the instructions for your Range hood in PDF format for free! Find your manual X91384MIO - AEG-ELECTROLUX and take your electronic device back in hand. On this page are published all the documents necessary for the use of your device. X91384MIO by AEG-ELECTROLUX.
USER MANUAL X91384MIO AEG-ELECTROLUX
Thank you for choosing this AEG product. We have created it to give you impeccable performance for many years, with innovative technologies that help make life simpler – features you might not find on ordinary appliances. Please spend a few minutes reading to get the very best from it.
ACCESSORIES AND CONSUMABLES
In the AEG webshop, you'll find everything you need to keep all your AEG appliances looking spotless and working perfectly. Along with a wide range of accessories designed and built to the high quality standards you would expect, from specialist cookware to cutlery baskets, from bottle holders to delicate laundry bags...

Visit the webshop at: www.aeg.com/shop
ENVIRONMENT CONCERNS
Recycle the materials with the symbol Put the packaging in applicable containersto recycle it.
Help protect the environment and human health and to recycle waste of electrical and electronic appliances. Do not dispose appliances marked with the symbol with the household waste. Return the product to your local recycling facility or contact your municipal office.
CUSTOMER CARE AND SERVICE
We recommend the use of original spare parts.
When contacting Service, ensure that you have the following data available. The information can be found on the rating plate.
Model
PNC
Serial Number
RECOMMENDATIONS AND SUGGESTIONS
- The Instructions for Use apply to several versions of this appliance. Accordingly, you may find descriptions of individual features that do not apply to your specific appliance.
- The manufacturer will not be held liable for any damages resulting from incorrect or improper installation.
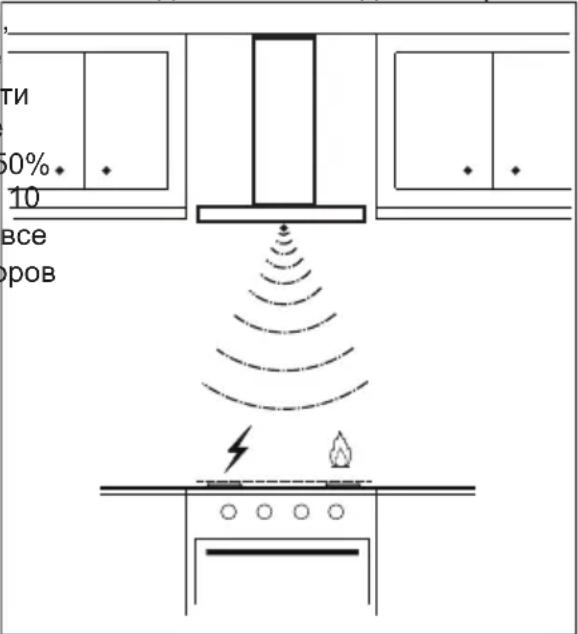
- The minimum safety distance between the cooker top and the extractor hood is 650mm (some models can be installed at a lower height, please refer to the paragraphs on working dimensions and installation).
- Check that the mains voltage corresponds to that indicated on the rating plate fixed to the inside of the hood.
- For Class I appliances, check that the domestic power supply guarantees adequate earthing.
- Connect the extractor to the exhaust flue through a pipe of minimum diameter 120 mm. The route of the flue must be as short as possible.
- Do not connect the extractor hood to exhaust ducts carrying combustion fumes (boilers, fireplaces, etc.).
- If the extractor is used in conjunction with non-electrical appliances (e.g. gas burning appliances), a sufficient degree of aeration must be guaranteed in the room in order to prevent the backflow of exhaust gas. The kitchen must have an opening communicating directly with the open air in order to guarantee the entry of clean air. When the cooker hood is used in conjunction with appliances supplied with energy other than electric, the negative pressure in the room must not exceed 0.04 mbar to prevent fumes being drawn back into the room by the cooker hood.
- If the supply cord is damaged, it must be replaced from the manufacturer or its service agent.
USE
- The extractor hood has been designed exclusively for domestic use to eliminate kitchen smells.
-
Never use the hood for purposes other than for which it has been designed.
-
Never leave high naked flames under the hood when it is in operation.
- Adjust the flame intensity to direct it onto the bottom of the pan only, making sure that it does not engulf the sides.
- Deep fat fryers must be continuously monitored during use: overheated oil can burst into flames.
- Do not flambe under the range hood; risk of fire.
- This appliance is not intended for use by persons (including children) with reduced physical, sensory or mental capabilities, or lack of experience and knowledge, unless they have been given supervision or instruction concerning use of the appliance by a person responsible for their safety.
Children should be supervised to ensure that they do not play with the appliance. - "CAUTION: Accessible parts may become hot when used with cooking ap-pliances".
MAINTENANCE
- Switch off or unplug the appliance from the mains supply before carrying out any maintenance work.
-
Clean and/or replace the Filters after the specified time period (Fire hazard).
-
4 months: for the Activated Charcoal Filters.
- 2 months: for the Metal Grease Filters.
-
Control lights, if present.
-
Clean the hood using a damp cloth and a neutral liquid detergent.
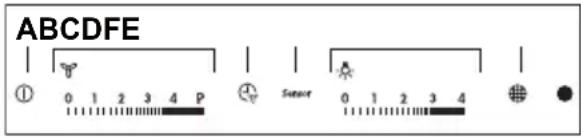
CONTROLS
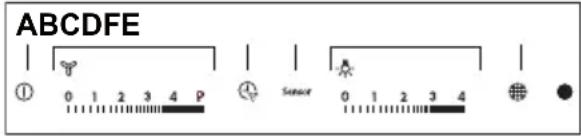
A: Hood Functions On/Off.
When the button is touched with the hood turned off, all functions light up (intensity 50% ) and are enabled.
When the button is touched with the hood in operation, all functions are turned off and disabled (Motor Off + Lights Off).
B: Manages motor speed: 0-V1-V2-V3-V4-P.
When the area is touched, the motor starts at the speed required.
P = Intensive Speed, timed for 5 minutes, after which the system returns to the previous speed.
When activated from Motor Off it returns to speed V1. When the required speed is touched, it will become brighter (intensity 100% ) than the other functions (intensity 50% ).
C: Delay function.
Touching this button activates automatic shutdown of the Motor, the Fans and the Lighting with a 10 minute delay. It can only be activated with the motor on, running at any speed except Intensive, and with the Sensor = Off.
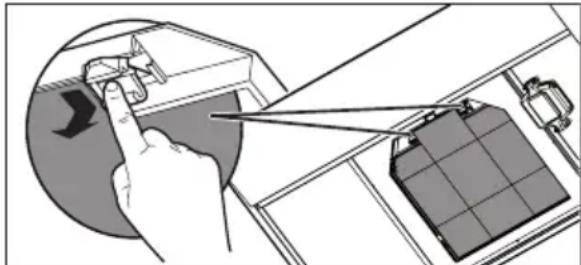
Enables / Disables the Remote Control Receiver.
When this button is pressed and held for 4 seconds (Motor Off + Lights Off, in the absence of other alarms, the Led will light up for:
4 seconds to indicate that the Remote Control has been Activated
2 seconds to indicate that the Remote Control has been Deactivated.
D: Sensor.
In this mode the Hood operates automatically for a maximum of 5 hours, after which it switches the Motor off. The hood modifies the speed of the motor according to the findings of the sensor. Buttons B and C do not work. The function is disabled by pressing the Button or turning the hood off.
E: Manages Lighting Intensity: 0-L1-L2-L3-LMax.
When this area is touched, the Lights turn on at the required intensity. When the lighting intensity is touched, it will become brighter (intensity 100% ) than the other functions (intensity 50% ).
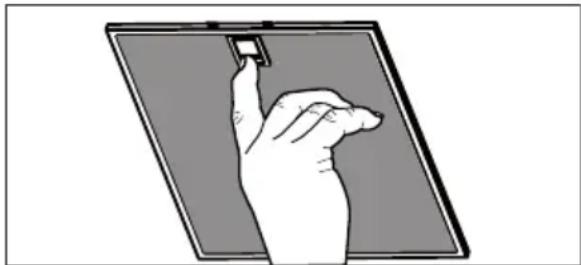
F: Filter Reset Resets the Filter Saturation alarm when the button is touched with the motor and lighting turned off.
After 100 hours operation the Led lights up continuously to indicate saturation of the Metal Grease Filters. After 200 hours operation the Led flashes to indicate saturation of the Activated Charcoal Filters. Enables/Disables the Activated Charcoal Filter Alarm.
When this button is pressed and held for 4 seconds(Motor Off + Lights Off), in the absence of other alarms, the Led will light up for:
4 seconds to indicate the Activated Charcoal Filter Alarm has been activated 2 seconds to indicate the Activated Charcoal Filter Alarm has been deactivated.
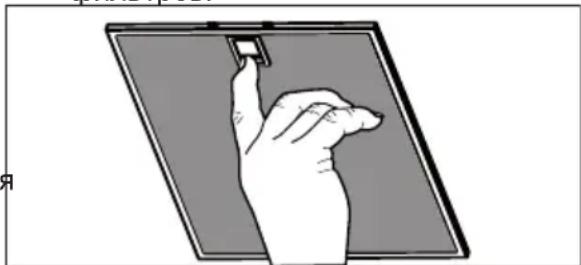
After connecting the hood to the mains, the commands are activated after 4seconds.
When the Hood is switched off, none of the functions is displayed, and only the normal lettering on the control panel is visible. All the rest will light up (intensity 50% ) when button A is touched.
The controls are activated by touching the selected function, which will light up more brightly (intensity 100% ) with respect to the other hood functions (intensity 50% ).
When no commands are given for at least 10 seconds, only the selected functions will be lighted (Intensity 100% ) and all the rest will turn off (Intensity 50% ). After 7 hours in operation, if no further commands are given the hood will switch off (Motor Off + Lights Off), from here you can touch for activated the function, and the next touch you can select the desired function. It is possible to activate one of the hood functions (Speed and Lighting) not just by touching the control panel, but also by placing a finger on the panel and sliding it towards the chosen
function without lifting it off. If the motor and lights are turned off, by setting them to zero, all the command LEDs will remain on at 50% , and if no further commands are given in the next 10 seconds, then all the LEDs will be turned off with the exception of the "0" LEDs, which will remain on for a further 15 minutes.
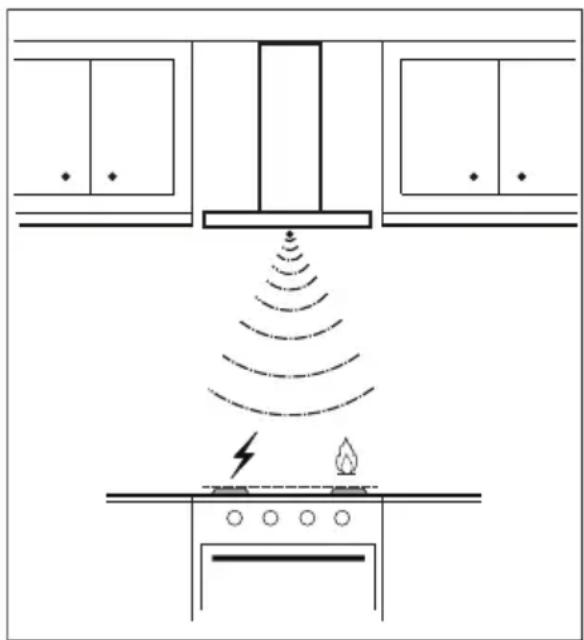
HOOD OPTIONS IN SENSOR MODE
When operating in Sensor mode, the type of hob being used has an influence. Two options are available:
Electric hob;
Gas hob;
Initially it is set to electric hob. To change the setting, proceed as follows:
- Turn the hood off using the hood on/off button
-
Press and hold the Sensor button for 8 seconds until the LED flashes as described:
-
4 flashes indicate selection of the electric hob;
-
2 flashes indicate selection of the gas hob;
-
Remove power for 10 seconds and then reconnect it.
The calibration procedure is carried out every time the type of hob is changed.
Calibration procedure: every time the hood is turned on or the type of hob is changed, the sensor calibration procedure is run. During this time the hood must not be used for cooking or subjected to particularly intense smells, for example solvents or detergents.
This process requires:
13 minutes if the electric hob has been selected;
- 1 minute if the gas hob has been selected; This phase is marked by flashing of the LED on the sensor button, if it has been pressed. Do not turn the motor on during calibration.
Warning: Do not spray directly on the grill cleaning products but only clean with a cloth soaked in detergent. Avoid cleaning the grill alcohol or silicone products.
LIGHTING
Warning: This appliance is fitted with a white LED lamp classed as 1M according to EN 60825-1: 1994 + A1:2002 + A2:2001 standards; maximum optical power emitted @439nm: 7μW. Do not look directly at the light through optical devices (binoculars, magnifying glasses...).
- For replacement contact technical support. ("To purchase contact technical support").
Voyants commands si presents.
A: On/Off Fonctions hotter.
OPTIONS HOTTE MODE SENSOR
Dicho過程oprevenutempode:
-2 MeçaДЯMeTaJIHueCKNXJINPOBbIXФИbTpOB.
- INdikatopbl (rde ectb) yctpoiCTB ynpaBneHn.
-Дя y60pkn NOBepxHocTe BbITaKKn ПОЛь3OBaTbcR BJIaXHOr TprIKNo I XnIDKM HeITpaIbHbIM MblOM.
OPRAHbI UYPABJIEHNIA
A:BkI/BbIKI ΦyHKiN BbITJxKn.
Ipn HaKaTn KHOKN Ha BbIKIOueHHoB BbITAAK3aRopaOTc HNDKAToPbI (rpkoc7 50%) nCTaHOBraTc DeiCtByUOuIMN BCE yHKuIN.
Pn Haxatnn KONKHa pa6oTaIOUeBbITJXKe BBIKIIOuAOTc INHINKaTOpbl N OTKJIIOUaOTc Bce cyHKUN (DBNraTeNb BbIK +OCBeUeHne BbIK)
B:УпраВлЯET ckopoctью Двигател: 0-V1-V2-V3-V4-P.
Pn npNKoCHOBeHN K COOTBeTCTBvIOUcEmy yuaDnIraTeJIb BKJIIOuAeTcHa HxKHO CKOPoCTN.
P = INTEHCNBHаCKOcTB, ORpaHueHHa TaMepom Ha 5 MNHyT; NO NCTeueHn 3TOrBvpeMeHn CNTema BO3BpAuaaetcHa npEdIyUyO CKOpocTB; ecN OHa BKIOuHaETcnpn BbIKIOUeHHOM DBNrTaTeNe, To cpa3y nepeKIOuYaeTcHa CKOpocTB V1. Ppi pNIKOCHOBENK 3HaueHNo HxKHOJ CKOpocTcCTAHOBITcR apYe (ApKoCTb 100%), Yem CNMBON dpyrnxФyHKuIN (RkoCTb 50%).
C:Функцязадерхк.
PnKOCHOBeHnEM K KHONKE BKNIOUaTcA ABTOMATNuecka 3aDEPKN OTKNOUeH DBNrAteJI N OCBETNTeJbHO CnCTeMbI Ha 10 MNHT. MoKeT 6bITb BKNIOUeHa TOnbKO npN BKIOUeHHOM DBNrAteJIe, He INHTEHCNBHAcKOpO I DaTnK = BbIKI.
BkIIOaET/ BbIKIOaET npneMHOe yCTpOiet nyIbTa DY.
Pn npKoCHOBeHn K KHONKe B TeueHne 4 ceKyHd (DvraTeIb Bblk + OcBeUeHne BblKn), npOTCyTCTBn DpyuNx abapnHbIX CnHaNoB, HndKaTOP Mrraet:
4 cekyHdbi, yka3bIbA Ha BkIIOUeHne npIbTa DyTOrO BpeMeHN MIRaEt INHnKAtOp "0" KHOKN 2 cekyHdbi, yka3bIbA Ha OTKIOUeHne npIbTa DynpabNeHna DBIrataTeHem. Ha BBIKIOUeHHoB bITJXke ee cyHKcNn He BnDhbl, 3a NCKIOUeHnEM TOJIbKO CBETlORO yuaCTKa Ha naHeJIynpabLHeHNA. Bcra naHeJIb ocBeucaTcra (rpkocTB 50% ) npn npNKOCHOBEHNI K KHOKe A. YcTpoiCTBa
D:Датунк.
B TAKOM pexKIMe BbITJxKa pa6oTaET
ABTOMaTHUeCKn B TeueHHe MaKcHmym 5 YacOB,
NocIe Yero fYHKZnB bIKIOuHaET DBNrAteJIb.
BbITJXKa MeHReT cKOpOCTb pa6oTbI DBNrAteJIa
NCXODn I3 INΦOpMauIn DaTChKa 3aRpa3HeHnB
BO3dUxa.
KHONK B n C He pa6oTaIOT, OTKlIOuHaETcra
HaxKaTHeM KHONK Nnn BbIKJIIOUeHHeM BbITJXKN.
E:УпраВлЯТярКоCTьЮ CBeТа: 0-L1-L2-L3-LMax.
Ipn npNKoCHOBeHn K COOTBeTCTByIOUeMy eYuactky 3aropaeTcBET HxKHOJrPKOCTN.Ipn npNKoCHOBeHn K 3HaueHnIO HxKHOJrPKOCTN OHO CTaHOBNTcApYe (rPKOCTb 100% ), Yem CmMBOJIbI dpynxФyHKCnI (rPKOCTb 50% ).
F: C6poc φnIbTpOB BblIOJIHReT C6poc aBapnHOrO cnHaJa HacbIeHnA φnIbTpOB
KOKOCHOBENEM KKHONKe npn BbIKIOUeHHOM DBNrAteJe.
Pocne 100 yacob pa6oTbI INHdkaTop ropntPOBhbIM CBetOM, yka3bBaJ Ha HacblueHMeTaJIInuecknxФnIbTpOB.
Iocne 200 yacob pa6oTbI INHnKaTOP MnraeT, yka3bIBaHa HacbIeHne FnIbTpOB Ha AKTNBnPOBaHHOM yrIe.
BIOHIOVAET/OTKNIIOVAET aBAPNHNbIN CNrHaI HAcBiSeHnA ΦNtBTPOB Ha aKTNBnPOBaHHOM yrIe.
BknIOuaeT/OTKnIOUaET aBapnHbI cnHaI
HacblueHnaΦnbltpOB Ha aKTHBnPoBaHHOM yrJIe.
Pn npNKoCHOBeHN K KHONKe B TeueHne 4
ckyHd (DnBnraTeJIb Bblk +OCBeUeHne BblKn),
Pn OTCyTCTBn Dpynx aBapnHbIX CNHaIOB,
NHdkaTOP Muraet:
4ceHyDbI, yKa3bIBaRa Ha BKNIOUeHne aBapnHbIX
CnHaIOB yroJbHbIXΦnbltpOB
2ceKyHdbI, yKa3bIBaRa Ha BblKIOUeHne aBapnHbIX
CnHaIOB yroJbHbIXΦnbltpOB.
Iocne noKIOUeHn BbITaKKn K 3NeKTpueckoCETNuycTPOcTBa ynpabJIeHn npHXoJrB pa6OeecoCToHHe npImepHo uepe3 4 ckyHdb. B TeueHne
ynpaBHeHn npHXoJrB pa6Oee COCTOHNe nppoeDpya KaNbPOBKn:KaKdbIpa3, KOrdaHa
npNKOCHOBeHn K CmBOJy BbIbPAHHo fYHKUuBbITgKky NODaETcHnPRAKeHne NIm MeHReTcR
KOTOpbI 3aropaeTcrape (ApKocTB 100%), YemTN BapOCHo NaHEIN, BKIOuaETcra PooeDpya
CmBOJIb DpynX fYHKUu BbITgKKn (ApKocTB KaNbPOBKn DaTUnKa, B XOJe KOTOpO BbITgKka H
50%).Yepe3 10 cekHyD, B TeueHne KOtOpbIX DoJxHa NOdBepraTbcra BO3deiCTBnIO npouceCa
He 6blNO KOMaHd, OCTAIOTcra TopeTB CmBOJb I rTOBKn NII OcoBo CnIbHbIM 3anaxam, Tnna
ToIbKO BbIbPAHHbIX fYHKUu (ApKocTB 100%), apactBopnteNe nnn DeTepreHTOB.
OCTaJIbHbIe npntyxaIOT (rpkoc7 50%).Yepe3 7IpoUeDypa 3aHnMaET:
YacOB pa6oTbI IN pR N OTCyTCTBmN KOMaH, BblTgKka13 MmHyT, eCIn Bbl6paHa 3JneKTpuecka
BbIKIIOuAeTcra (DbIRaTeJIb Bbl+OCBeUeHHe BapOCHa NaHeJIb;
BbIKI); n3 3TOrO COCTOHNn Pn60pa DeiCTBne - 1 MInHyTy, ecn Bbl6pHa ra3OBaB aPoUHnA cyHKnBocCTaHaBnBaETc npNKoCHOBeHnEM naHeJIb.
K NaHeI, a CneDyUOuIM npNKoCHOBHeHEm 3TOT 3tan 06o3HaayetcMIRaHnEM HndkaTopa BbIbnpaETcR HyxHAnF yHKun. FyHKun BBITJxKONKn DaTuNkA, cIn N KOnKa 6blNa Haxata. He MOxHOb BKIOuATb (CKOpOCTb IN OCBeueHne) He BKNIOuAte DBNRatEnB XOJe KaJIb6pOBKn.
TOLbKO pRnKOCHOBeHEm K naHeJIynpaBNeHna TaKKe MoXHo npIIOxNtB NaIeU K naHeJIu, He OTpBaI erO, "PpOInCTaT" BCE cyHKcIIu HauTn HuxHyIO. Ecn I daETc KOMaHda Ha OTKnIOueHne DBNrAteJIu N OCBeUeHn, OCTaOTcra Ropetb Ha 50%, BCE INDnKaTOpbI KHOON; ecNI B nocJeDuOuIe 10 CEkyND He NoJaTeCn HnKaKaJdpyra KOMaHa, BCE INDnKaTOpbI rachyt, 3a NCKIoUeHnEM INDnKaToPOB "0", KOToPBie ocTaIOTCra Ropetb eue 15 MmHyT.
ОПЦИ NBITЯЖКВ PEXKIME SENSOR
Ha pa60Ty BbITaXKn BpeXnme Sensor (daTvnK) BnIeT TnN nCNoB3YeMoB BapOuHOn naHeN; npedymOTpeHb I Dba Tnna naHeN:
3JIeKtpnuecka BapOuHa nHaJIb;
ra30BaBapOuHa naHeb;
IN3haaIbHO HAcTpoKa CdeJaHa Ha 3neKtpnueckyIO NaHeJI, YTObI ee N3MeHHTb, CNeDyET BblONHHTb CNeDyUOuNE onepaun.
- BbIKJIIOUHTe BbITaKKy KHOKNKOB BKN/BBIKJ.
-Держinte Нжатои Кногу Датунka Sensor В Точеве 8 cekyHД, РOKA He HauHET MIRaTb Индikatop:
-4 BCnblkynyka3bIbaIOT Ha Bbl6Op 3NeKtpuyeckoBapOCHNoHeJI;
-2 BCnblIuKn yka3bIBaHT Ha Bbl6Op ra3OBoN nHaHeJi;
- OTKIIIOUHTe NITaHHe BbITaJxKn Ha 10 cekyHn, 3aTeM BHOBb NOIDKIOUHTe erO K npnbopy.
KaKdbi pa3 npn n3MeHn Tnna BapOuHoi naHeN npOn3BOdntcra pOceDpya KaIb6pOBKn.
BHMaHHe: He pa36pbI3rNBaIe Te IprMo Ha peWetKy OUnuAIOUne COCTaBBI; OUnuAInTe ee TOIbKO CMOueHHbIMN B MOIOUeM BeUeCTBe TpIKNAM.ДЯ OUnCTKn peWetKn He NCNoJIb3yIcoCTaBBI Ha CNIPTOBO INN CNINIKOHOBO OCHOBE
OCBELSEHNE
BHHMaHHe: Pn6Op 6OBpyoDobAH CBeToIONoOM 6eIoro cBeTa KnaCca 1M corNaCHO cTaHdApTy EN 60825-1: 1994 + A1:2002 + A2:2001; MaKcImaJIbHaMy MoUHocTb ONTNUeCKOr O3NPyHeH@439nm: 7MBT: He peKOMeHdyetcra CMOTpeTb Ha CBeToIOIoU chePe3 ONTNUeCKne pnp6Opbl (6INHOKlb yBeInuHTelHoe cTeKlno n npOy.).
1.ДЯЗAMeHbICBEToIOnOdaobpaaaiTeScbB O6cnyKnBaIOUmNZeHTp.("ДЯпрОБpeTeHnA obpaaaiTeScbB O6cnyKnBaIOUmNZeHTp").
PARIMATE TULEMUSTE SAAVUTAMISEKS
DnryHa 3MiHcBcB 3aJexHoCTi BiPearyBaHH DaTnKa. KOnKn B Ta C He npauoToB. FyHKciB BMnKaeTbC npn HATNCHeHHI KOnKn a60B BMKHeHHI BNTaXKn.
E: PeryulobHH iHTeHcBHOCTi oCBiTJIeHH: 0-L1-L2-L3-LMax.
PnHaTnucHeHHi Ha zuo 3OHy BMnKaεTbcraocBtIeHHa BIDnoBIDHI WbNIOKcTI. Pn Bn6opi Notpiio HteHCNBHOCTi OCItIeHHa 3OHa NiDCbiUyeTcRaACKpaIiE (3rckpabicto 100%), HIX iHsi fynkuii (50 %).
F:BCTaHOBJIeHHaΦIbTpBa B NOUaTKOBn CTaH RaKIO KHOJka HaTnCKaETbcra Prn BmKHeHomy DBNrHyi Ta OCBiTJeHHi, BnKOHycTbcra CKNHeHHaNONepeJxKeHHa P0 3a6pydHeHHaΦIbTpA.
Dopo 100 ore di Funzionamento il Led è
Picnra 100 roin ekcnnyatau cbiTnoioHi
iNdkatopn cbiTbcn HenepepbHO, 00
Bka3ye Ha 3a6pydHeHH MeTaNEbNx
phiIbTpIB-KnpoyNoBIObAivB.
PiCnra 200 roin ekcnnyatau cbiTnoioHi
iNdkatopn 6nMaIOb, 0o Bka3ye Ha
3a6pydHeHH φIbTpIB 3akTnbOBaHm
ByrillnM.
BmkaHH / BmkaHH nonepxeHH npo 3a6pydHeHH qInbTp aKTNUBOBaHm ByrIJaM.
PnHaTnCHeHHiTaYTpMaHHi ciEi KhoNkHa npot3i 4ceyHDbMnKaETbCra DBnHyTa ocBtIeHHaKIO BiCyTHi iHJINonepeJxHn,3acBiCyETbcra CbitNoioD:Ha4ceyHn,Bka3yOuHa yBIMKHeHHnonepJxHnΦIbTpca aKTNBoBaHmByrlln;Ha2ceyHn,Bka3yOuHa BUMKHeHHnonepJxHnΦIbTpca aKTNBoBaHmByrlln;
IicnpiKIOUeHNNBUTAKKnDo MEpeXIKINBHeHHKOMAHdN aKTbByOTbcrYepe310 ckyH. Pnp BmKHeHH BNTAKKnФHKii 6IbWe He BNCbYIObC, aHa naHeJI KepyBaHHN BiOobpaKaIObTcB TlkbN 3BnuaHi CNMBOJN. Bci iHsi iNDkaTopn BNCbiYIObC (3 rCKpABiCTHO 50% ) npHaTNCHEHI KHONk A. FHKii BMKAIObC npHaTNCHEHI BiIDNOiDHNX KHOLOK, kI BNCbiYIObC RAckpAbwe (3 rCKpABiCTIO 100% ) BiD KHOLOK IHwix FyHKui BNTAKKN (50%) . Raio Ha npTo3i 10 ckyHd He NoCTynac HIAKnx KOMaHd, bdytB BNCbiYBaTnc Tlkb NbopaHf FyHKii
(3яckpaic10 100%), a bci iHwi 6ydybBIMKHei (Яckpaicb5 50%).Якpo nicra pO6OTnHa npot3i 7 roDnH He noCTynTb HIAKx KOMaHd, BNTJkKa BIMNKaTebC8 (BIMNKaTebC8 DBNrH Ta OCBiTneHH), nicra yoro Dnla Bn6Opy notpi6HoI cyHKuII NOTp6HO HATNCHTN Ha KHONky Dnla II AKTNaBaUc, a Notim IJI BBIMKHeHH. MoXHa AKTByBatn OndHy i3 cyHKui BNTJkKn (WbNDKICTb Ta OCBITNeHH) He HATNCKAIOCh Ha naHeIb KepyBaHHa, a npocTo NOKnABSh naneuB Ha naHeIb Ta He NiDHimaOuH NoTO nepeMICtNBUn B HanpymKy BV6paHOI cyHKuII. RaKIo DBnYh Ta OCBITNeHHB IMNKAIOTbcB CbTaHOBNEHHM B HnyBoE NOLOKeHHRA BCI KOMaHdHi CBITNOIDOn 3aNiShaOTbcB BIMKHeHmHa 50%, a Notim B pa3i, KaIO Ha npot3i 10 cekyHd He noCTynTb iHNX KOMaHd, BCI CBITNOIDOn BIMNKaOTbc3a BVKnIOueHHM CBITNOIDObIB «0», kki 3aNiShaOTbcB BIMKHeHmIe Ha 15 XBNIIN.
Onii BntjKn B peKmI
BNTJAKK
Pobota B peximi DaTnka 3aJekntb BiD Tnny BnKOpNCTOBvBaHOI nINTu. C dBa BapiaHTN:
eNeKtpuHa nnIta; ra3OBA nnIta;
NoaTKOBO Onjia HanaTObaHa Ha eNekTpnuHy nnTu. Dnra 3MiHeHHa HanaTByBaHHB NkOHaTe HaCTyHHe:
BUMKHITb BNTaKKy 3a DOIOMOIO KHOKN BUMKHeHHr;
HaTnCHiB Ta yTpmyTe KONky DaTnKa Ha npot3i 8 cekyHd Do noatKy 6nMaHHcBtIIOjOda:
-46JIIMMaHHBka3yeHaBn6ip eNeKTPnUHoiIINITN;
-26nImaHHBka3yEHa Bn6ip ra3OBoI pNTn.
BIMKHTb KINBHeHHa 10 cekyH, a NOTIM 3HOBY BBIMKHITb Noro.
Kani6pyBaHH noTpi6Ho BnKOHyBaTN KOxHOro pa3y npn 3mHi Tnny nNtN.
IpoeDypa KaIip6pyBaHH: npoedypa KaIip6pyBaHH 3aNyCKaETbcra KOxHOro pa3y npn BBIMKHeHHi BNTJxKn Ta nicna 3mHi TnPy nnTn. B ceN Yac BtJxKa He NOBHHA BnkOpNCTOByBaTncb DnA npiroTyBaHH iXi, a B npMlueHHi He NOBHHO 6TyPi3kX 3anaxIB, HapnKnad po3uHHnka abo MNoUOro 3ac06y. Iny ciieI npoecdyn noTpi6Ho:
13 XBUNH, JIKUO Bn6paHa eJekTpnuHa nnTAt;
1 XBUNHa, KaIO Bn6paHa ra3Oba nnita. Uen npoec cynpoBdoKyeTbcra 6NImaHHm CBITIOJIOHa Ha KHOJI DaTHNKa, KaIO BOHa HATNCHeHa. He BMnKaIte DnBHyn nIac KaJIbpyBaHHa.

PonepeJxHHe po3nIIOHTe qNCTaHi 3ac06b63nocepEnHO Ha peWITKy, a npomBaIte II 3a DOnOMoTO CepBETKN, 3MoueHOI B MNUOHyOMy PO3uHI. He DONYCKaETbcra NCTka 3a DOnOMoTO 3ac06IB HA OCHOBi CnnpTy Ta KpemHieBnx cNOyK.
OcbitIIOBaIbHn npnaI
PonepeJxHn: B cIbOMy npuNadi BCTaHOBHeH NCBITNOIOHN BInpOMIHOBauch, KOTpy KJIacNphiKyeTbcra KaTeOpie1o 1M B BiINOBiHDocTi do EN 60825-1: cTaHapTu 1994 + A1:2002 + A2:2001; MaKcImaJIbHa BInpOMIHOBaHa ONTuHa NotyXHicTB Ha DoBXnHi XBuNl 439 Hm:7 MKBT. He DOnyckAcTbcr DaBHTncb 6e3nocepEhbo Ha dXepeNo CbiTnaYepe3 ONTuHn I pUNaH (6iHoKnb, 36iNbWyBaIbHe CKNo Ta iH.).


- ACCESSORIES AND CONSUMABLES
- ENVIRONMENT CONCERNS
- CUSTOMER CARE AND SERVICE
- RECOMMENDATIONS AND SUGGESTIONS
- USE
- MAINTENANCE
- CONTROLS
- A: Hood Functions On/Off.
- B: Manages motor speed: 0-V1-V2-V3-V4-P.
- C: Delay function.
- Enables / Disables the Remote Control Receiver.
- D: Sensor.
- E: Manages Lighting Intensity: 0-L1-L2-L3-LMax.
- F: Filter Reset Resets the Filter Saturation alarm when the button is touched with the motor and lighting turned off.
- HOOD OPTIONS IN SENSOR MODE
- LIGHTING
- A: On/Off Fonctions hotter.
- OPTIONS HOTTE MODE SENSOR
- OPRAHbI UYPABJIEHNIA
- A:BkI/BbIKI ΦyHKiN BbITJxKn.
- B:УпраВлЯET ckopoctью Двигател: 0-V1-V2-V3-V4-P.
- C:Функцязадерхк.
- BkIIOaET/ BbIKIOaET npneMHOe yCTpOiet nyIbTa DY.
- D:Датунк.
- E:УпраВлЯТярКоCTьЮ CBeТа: 0-L1-L2-L3-LMax.
- F: C6poc φnIbTpOB BblIOJIHReT C6poc aBapnHOrO cnHaJa HacbIeHnA φnIbTpOB
- KOKOCHOBENEM KKHONKe npn BbIKIOUeHHOM DBNrAteJe.
- BIOHIOVAET/OTKNIIOVAET aBAPNHNbIN CNrHaI HAcBiSeHnA ΦNtBTPOB Ha aKTNBnPOBaHHOM yrIe.
- ОПЦИ NBITЯЖКВ PEXKIME SENSOR
- OCBELSEHNE
- PARIMATE TULEMUSTE SAAVUTAMISEKS
- E: PeryulobHH iHTeHcBHOCTi oCBiTJIeHH: 0-L1-L2-L3-LMax.
- F:BCTaHOBJIeHHaΦIbTpBa B NOUaTKOBn CTaH RaKIO KHOJka HaTnCKaETbcra Prn BmKHeHomy DBNrHyi Ta OCBiTJeHHi, BnKOHycTbcra CKNHeHHaNONepeJxKeHHa P0 3a6pydHeHHaΦIbTpA.
- BmkaHH / BmkaHH nonepxeHH npo 3a6pydHeHH qInbTp aKTNUBOBaHm ByrIJaM.
- Onii BntjKn B peKmI
- BNTJAKK
- OcbitIIOBaIbHn npnaI
Brand : AEG-ELECTROLUX
Model : X91384MIO
Category : Range hood