Joy PMP202 - Mp3 player Yarvik - Free user manual and instructions
Find the device manual for free Joy PMP202 Yarvik in PDF.
Frequently Asked Questions - Joy PMP202 Yarvik
User questions about Joy PMP202 Yarvik
0 question about this device. Answer the ones you know or ask your own.
Ask a new question about this device
Download the instructions for your Mp3 player in PDF format for free! Find your manual Joy PMP202 - Yarvik and take your electronic device back in hand. On this page are published all the documents necessary for the use of your device. Joy PMP202 by Yarvik.
USER MANUAL Joy PMP202 Yarvik
When the device is fully charged the power indicator is full.
When the power indicator is empty, the battery is discharged and must be charged before the next use.

During charging, the player must be turned on. Otherwise it can not be charged nor can it be detected by your computer. Turn the player off when not in use.

During charging, do not disconnect the USB cable. The player may remain in USB mode. When finished charging, exit USB mode by disconnecting the USB cable.
Basic functions
Turning the player ON and OFF
You can turn the player ON and OFF by holding the "play/pause" button.
Button functions
- "PLAY" button: Play, Pause/Stop (press button)
- "M" button: Selection, Enter menu (press button)
- "NEXT" button: Next in menu/file, Track, Fast forward (press button)
- "PRE" button: Previous in menu/file, Track, Fast reverse (press button)
- "O" button: Increase or reduce volume (press button)
Enter menu
Enter all menus by pressing "M" on the keypad. The menu includes a main menu and sub-menus. Main menu: Hold "M" to enter. Sub-menus: Press "M" to enter.
Explanation of button operation
Buttons can be operated in two ways: "Press" means press and release immediately.
"Hold" means press and continue pressing until the desired action occurs.
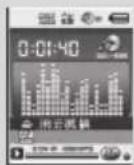
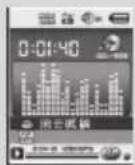
Playing music
- Brief operation
-
Plug earphones into the microphone jack of the PMP200.
-
Turn on the player, enter "MUSIC" mode, and press "PLAY" to start playback.
-
"PRE" button: To select the previous track/song. "NEXT" button: To select the next track/song.
-
Volume adjustment: Press "VOL" button. Press "PRE" button to decrease volume. Press "NEXT" button to increase volume.
-
Repeat play setting: Durng playback, pressing the "M" button will enter the menu for repeat play; it includes seven selections: Normal, Repeat one, Folder, Repeat folder, Repeat all, Random, Intro. Selection mode, which includes seven modes: Natural, Rock, Pop, Classic, Soft, Jazz, DBB.
- Playing speed (Play submenu)
When playing music (only applies to MP3 files), you can choose different play speeds (such as fast or slow), but the voice will not change: In play mode:
- Press "M" to enter the play sub-menu.
- Press "Next" to enter the "Display speed" menu.
- Press "M" to enter the "Display speed" menu.
- Press "Next" to increase the playback speed; press "PRE" to reduce the playback speed.
Attention:
Once the playback speed is set, this will affect every song until it is changed again.
Repeat mode (Play submenu)
1. Please refer to the following descriptions.
2. Enter through the play submenu
Synchronised lyrics display The PMP200 supports the use of **Irc* lyric files for synchronised lyrics display when playing music.
How to use the lyrics file:
The song and lyric file must have the same name.
For example
The song file name is xxx.MP3
The lyric file name should be xxx.LRC
If the song file has a matching lyric file, the lyrics will be shown automatically when the song is played.
What happens when an LRC file is played back?
- The matching lyrics file is found. The red dot at the bottom of the screen turns green.
- Press "M" button enter into the lyric interface.
- Lyrics are shown on the screen.
- Press the "M" button to return to music playback mode.
A-B repeat
- Enter the music playback or recording playback mode.
- Press "M" to enter the play submenu.
- Press "NEXT" to select the "Repeat mode" menu.
- Press "M" button enter "Repeat mode".
Repeat mode: Press the repeat icon "B" "A" to set starting point "A".
- Press "NEXT" to confirm starting point "A". Press the repeat icon "B" to set ending point "B".
- Press "NEXT" to confirm ending point "B". Repeat icon "A-B" fixed. This starts repeat playback between A and B, and it will exit after reaching the set repeat time. Press "PRE" to re-confirmed starting point "A". (For repeat times please refer to "Repeat times").
In Repeat mode, press "VOL+” or "VOL-” to set the "Playback speed".
Playback-after-recording function (does not work with pre-recorded files)
- Enter the "A-B" repeat function.
- Press "NEXT" to enter the playback-after-recording mode.
- When the repeat icon changes to the playback-after-recording icon it begins to record the user's voice. The time length is same as the "A-B" repeat time.
- When the repeat time is over, it begins to play the recording. The icon changes to "A-B", then you can press the "Next" button to enter the contrast function. Pressing the "PRE" button while in this function will take you back to the "A-B" repeat mode.
Contrast function (does not work with pre-recorded files)
- Enter the contrast mode. The repeat icon is shown as 圆 , and the original recording is played.
- After the original track/song is finished, the icon changes to "on", and the user's recording is played.
In this function, pressing the "PRE" button takes you back to the "Playback-after-recording" function.
In any of the three previous functions, pressing the "M" button will exit the repeat mode.
Repeat times (in the play submenu)
For operation please refer to the Backlight intensity setting. The A-B repeat time determines how many times the music is repeated before exit.
- Repeat interval (in the play submenu) For operation please refer to the "Backlight intensity setting". The pause time (in seconds) between the first play and second play in repeat mode.
Playing movies
To play movies, you must convert the video to AMV format. For additional instructions, please see "Playing music".
Button functions
"PLAY": Play/Pause.
"M": Hold to return to the main menu.
"PRE/NEXT": Select Previous/Next files.
Hold for fast forward or reverse.
Record
Prior to recording please make sure that the PMP200 has enough power.
This player supports up to 99 recorded files in each folder.
-
Recording in the "Record mode"
-
There are two ways to enter the "Record mode": In the main menu select "Record" and press the "M" button to enter repeat mode.
-
Press the "Play" button to start and pause recording; hold the "Play" button to save the recording.
The recorded file is saved in the currently selected content: "Recording stopped menu/ Main disk content".
If it shows "Capacity is full" it means no space is left for saving the recorded files.
In this situation you must remove files to make some free storage space.
If it shows "Content is full" means there are 99 files in this folder, please store your files in a different folder.
-
Recording type selection
-
Enter the recording interface.
- Press the "M" button to enter the Record submenu.
- Press "NEXT" to choose the "record style"
submenu, and press "M" to enter the menu. - Press the "M" button to choose the desired recording format, and press the "M" button again to confirm the choice.
The available recording formats are as follows:
| Fine Record | WAV format. Good sound quality. |
| Long Record | ACT format. Average sound quality. |
| Fine VOR | WAV format. Recording will stop when there is no voice. |
| Long VOR | ACT format. Recording will stop when there is no voice. |
S. Press the "Play" button to start recording.
Playback
Playing the recorded files:
- Enter the main menu.
- Press "Next" to choose "playback mode".3. Press
"M" to enter the playback mode interface. - Press "PLAY" again to start playback.
- Select the recorded files:
PRE: Select the previous recorded file.
"NEXT": Select the next recorded file.
Picture browsing
JPEG browser
File selection function
After you enter the Picture menu, the following will be shown:
JPG interfac - File list - Selection file 01.jpg.
If there are no files here, the content will be empty.
Press "PLAY" to enter the picture display.
Press "NEXT" or "PRE" to choose the files.
Press "M" to enter the submenu. Select the files
as follows:
Local folder/Play set/Delete file/Delete all/Exit
Picture display mode
Enter the picture display mode. The following will appear:
Press "NEXT" or "PRE" to display the next or the
previous picture.
Press "PLAY" to return to file selection mode. Hold "M"
to return to the main menu.
Other buttons are invalid in this mode.
System settings
- Enter the main menu.
- Press "NEXT" to choose the "system setting".
- Press "M" to enter the submenus.
List of all the parameters:
| Clock | Setting time and date |
| LCD set | Setting backlight intensity |
| Language | Setting different languages |
| Power off | Setting the player's off time and sleep time |
| Replay mode | Setting replay mode: manual and auto replay |
| Online mode | Setting the location |
| Memory info | Displays the remaining flash memory capacity |
| Firmware version | Player's firmware version |
| Firmware upgrade | Upgrade the player's firmware |
| Exit | Exit the current mode |
Detailed operating instructions
A. Clock:
1. Press "M" to enter the system time interface.
2. Press "VOL" from year start setting. The year
number starts blinking.
3. Press "NEXT" or "PRE" button to adjust the time.
4. Press "M" button to confirm and exit after you have made the necessary adjustment.
B. LCD setting
| 1. Brightness adjustment | Adjust the brightness of the screen |
| 2. Black screen mode (0-30) | Shuts off the screen when the player has not been used for a certain amount of time (unit: second) |
| 3. Exit |
Notes: "Brightness adjustment" adjusts the brightness of
the screen (15 is brightest, 0 is darkest), Press "PRE" or "NEXT" to move the cursor. Press "M" to return to the previous menu. "Dark mode" and "black screen mode". please refer to the "Brightness adjustment" setting.
C. Language
Refer to the "EQ mode" setting
D. Power off
Off mode: Here you set a time. When no button has been pressed for this length of time, the player will be shut off to save power. When set to "0" the function is shut off.
Sleep mode: Here you set a time (unit: seconds) to shut off the player after a certain amount of time has elapsed. This is intended for listening to music before you go to sleep. This setting works one time and is cleared when the player shuts off. You must set it again the next time.
E. Replay mode
For operation refer to the "EQ mode" setting. Manual replay: You must manually select the segment for A-B repeat.
Auto reply: The player creates a segment for A-B repeat (works in English reading mode without music).
F. Online mode
Three modes are available: Multi-drive, Normal only, Encrypted only.
G. Memory info
Shows the flash memory's total capacity and available space.
H. Firmware version
Shows the player's firmware version.

Prompt: After you press "M" to finish a setting, you can press "play" to quickly exit the menu. This works in all menus.
E-book reading (TXT format)
Enter the main interface, press "NEXT" to choose "E-book", press "M" to enter the root directory, and press "NEXT" or "PRE" to choose the files you want to read. Press "M" to return to the upper menus.
Note: It is not necessary to select the file if it is in the root directory.
Reading mode control: To set the play mode when you reading. It has two modes: manual playing and auto playing.
Manual playing: Press "NEXT" or "PRE" to turn pages one at a time.
Auto playing: You can set a time after which the pages will be turned automatically.
Once you have selected the files, press "M" to begin reading.
- Select different content (exit the submenu)
The user can put different files into different folders (the folder should be set up in the computer). This device supports up to 9 folders and each folder supports a maximum of 99 files.
- In the stop
interface
the example
is in music
paying model
- Press "M"
to enter the
:submenu.
- Press "M" again to
enter the menu selec
tion interface.
- Press "M"
to confirm
the selections.
- Press "NEXT" or
"PRE" to make
selectionsin
the menu.
Attention: Music mode, Record mode and Voice can each be set to different content folders. The folder for the three modes will not always have the same content.
- Delete file (stop submenu)
You can delete the related file and folder in music mode, voice mode.
- Enter the stop interface.
- Press "M" to enter the stop submenu.
- Press "NEXT" or "PRE" in the menu to choose
"Delete file". If you want delete all the files, please
choose "Delete all".
-
Press "NEXT" or "PRE" to choose "YES" or "NO".
-
If you choose "YES", pressing the "M" button will delete the file. If you choose "No" the file will not be deleted.
"Delete all" will delete all the related files in the current mode (e.g. selecting "Delete all" in music mode will delete all of the music files but will not delete the recorded files).

When deleting files via the computer, please use the "safe eject" option, then disconnect the USB cable. Otherwise the file will not be deleted.
NEDERLANDS

Power-indicator

The available recording formats are as follows:
1 Repeat-laget, tryk pr "VOL+ effer "VOL- for att stalla in "Playback speed".
Aeroupyies wv tharkpaw
ANAPAPAFH:AvatapaywnyTalian.
M:Kpatnnt matmuvo yte mtpopn a kpu
muov.
TIPOHOYMENO/ENTOMENO:Emoy
mpoynouyovotmuov opkivnKpOtn patmnuov
yaipnyopknjnnnpoc npncn i niu
Eyypapn
Pivat mTvypn,BeBawBtz on to PMP200
Expncy
Eyypaon otyn "karotaon Eyypaon
- Ynpyou bao tpoia va va pntte ct Kataaon Eyyapag
- iko paivoi, emiEte " Record" (Eyypa)
- kai mriote to mkipto "M" va va eiaBte ce
- kai taan enaAynj
- Manjote to mukpato Avattaywn yva va kovitane n va koujte trpuwpo tvyypapn. Kpatite manuvo to mukpato Avattaywn yva va amolkkuocet tvyypapn.
To apexio trc eypipicn aroBncuotri oT npoyen emayevne prryoevo "Yorvouo ot Teypoyep /Kupoipepeyio bixou
Ev yepovotri to pruyuca "Capacitis full" (Eevanon yupnkiadmig), aut o naiva on 6v
eai amouie xuapoc yia my aotnkeun rnu apuyiuyyeyayguo. Eaurn my npimuan, npni va dyapatte apxia yia va eauleepaeet xuo amoohkounc.

Eev eepovnto pruwrn "Content is full (Tnpovtna nepoyouvou), auro anpivzio n uapov 99 apxia oov oukkevo po kao. O npetvi va amboeueoie ta apxia oao ot daepopoiqdo.
Emayn tumou cypapns
- Metapetot oTo mepalov myopn
- Flantare to Record "M" ya va exaABeTe oro umogevou Record (Eygayparr).
- 1arre 'EIOIEMNO' va va emuEeTe to umouevou recordstyle (onu typpap) kai mntirM' va va eiaABeTc oTo yeuov.
- Manjto mtkipo M'va va emtEge ty
emBuunr jppp eyppagKa mannte (Va to
manjto M'va va emtBaaatwe TeymvOy
Olaaonmuocppcysyypaoqicvaiorakou@c:
| Fine Record (Eyyppaɪr Yþmɪnɪs Nɔrɒmɪtɑs) | Mopŋ WAV. Kaɪn triəmɪtæ rɪyau. |
| Long Record (Eyyppaɪr Mɛyʌlɪns Δiʌpʌkɪtɑs) | Mopŋ ACT. Mɪtpia triəmɪtæ rɪyau. |
| Fine VOR (Eyyppaɪr Yþmɪnɪs Nɔrɒmɪtæ μe Φuːvɪnɪkɪ N Evpɔyəmoinən) | Mopŋ WAV. H eyypaɪn rɪpɑnɪzæ ἀταν δεν uːmpɔxɪq iəmɪa. |
| Long VOR (Eyyppaɪr Mɛyʌlɪns Δiʌpʌkɪtæ μe Φuːvɪnɪkɪ N Evpɔyəmoinən) | Mopŋ ACT. H eyypaɪn rɪpɑnɪzæ ἀταν δεν uːmpɔxɪq iəmɪa. |
- PATEOTYE TAMKPO "AVATAPAYUYI" YIA VA EIKYETEPTEY IY VYYAPPI.
Avatapayuyin
Avapaywnf wny apywnw ny cyypn
1. MetaBnt oTo kupu uou
2. 1arrarE ETeVy va va emleefet my kanaanavapayuyh.
3. Flattarite "M" via voDAEBETo oI pTePAAOV mC kanaataor, avamapaywYs
4. ⅡIaTeYcEVA“ANAFAPAFQTH"yia va EeKwyrteTc yiv avamayaruyi.
5. EmAte ta apcyia rau cyypapw: "TPOHOYMOENO: EmAty to npanyouevo apcyio cyyapoc: "EOMENO: EmAty to emuvo apcyio cyyapoc
Eefronnckovw
Eetraon kovw JPEG
Aeroupyia etaioyapxieiow
Apou'mu taeIe Ito neuV Pucie (Einkova), 8a.
epaeviouro aekouko?
PiipBAAov JPG-Aiota apxuiv -Emayevapxio 01.jpg. EAv Ev umapxvavpxia ot oukykepuvt BcT,Ev Bo aupviicra npcxoyvo.
PAnrnte "ANIAPAROTH" ya va uptaette or kardaoon npoBaaLs kovuvw.
PAnrnte "EIOMENO" n "PPOHOYMENO" yva emalect apxia.
Tarnaric M'ya va va oEMBte OTO umuEvO. EmkEe
apella uic Efc
Local folder (Tomkoq pakooc)Play set (Pbuon)
avmopayuyvC/Delete file (Delta paper) apxioi)/Delete all (Delta paper) dawv/Exit (E50Doc).
Kataaon npoaln icovuv
- Firmware version (Ex&con firmware)
Eupovic mx dx&con you firmware you player

Enquuany Apou mntaee M' yia va
aakAnogatte ypa puHn, uptapit va na
"Avatapayuy" ya vya byte aqua atto
Auro bauuee o da yaeuoy.
Avaywnn naxpoviku baiuv (poppn TXT)
MeTaeEe rro kuo pnpBaaov, mntjoe "ETOMENO" yia va emtaeE "E-book"(HkxKropvko BnAo), mntjoe "M" yia va maTeBeE roav poKraKaoyo (reoi) kai mntjoe "ETOMENO" n "TIPHOYMENO" yia va emtaeE ra apceioou bacte va bdocte. Tnptje "M" yia emtaoepoJ e avuupeta paevoi.
JEnueio:DeV gaeiaTcai va etieke To apexio ev Bpioketai oto pikk katoAyo.
Reading mode control (Euyxoc kanaaantc)
avayuans):Mntoite va kaBopiatr nyn kataaon
avatrapayuyc kara nny avayuoy. Ynpyoxu 8oo kanaatotic xipakivtn avatrapayuoykau autouqan
avatrapayuoy
Xupokmny avamapaywn: Flnrrnt 'ETOMENO' n TPOHGYOMENO' yia va aalAte caleIc,mu-ila. Auogam ayavapaywnMtnpert va KaBopictt to xpvdovr atro rrov omolo or alAicBa auogat.
Apoe emaeetie a apexia, narnare "M" yva Eaivnre Tny awvwn.
EAtomaydiAaoepetikou Tneipyeoyevou (Efoa oata to utmoeov)
O xpaTtJc mpoai va oBnKwOa diapopetkia apxia cx daopopetkouoq qakeLauo (ox paekai npnti va ngauynBoov stuv uokayant).H oukeunu utoanpkiie tuc 9 paekauo kai k8e paekao uonatpkiyue 99 apxia.
-
- kataa aon tao (to mapaenpa (naoua) tv kataa an avamapaywms ouan(
- Manjore "M" va va iiaiBare oio umpevou.
-
Flatjorte fava M' yia va oioABeTe OTO npipBAAov emKayrs mevo.
-
Manfot EITOMENO" TIPOHGYMENO VQVADKET eayc 0
-
Manjart M'ya va emieBawotet mc emoyekc
PpOaOH: Oi kataaTaAs MounKIs, EyypaHs Kai Duvns uTPOoov via diaopooBouov yia diapopoeKIOuqakALous Tpeixoyevou kae pia. O qakeLioy iTc Tpeic katoaTozic 6ev Bo xEi mavto to idio trepiexoyeo.
Delete file (Gyapn apxiou, uouvou oot) MIOPTe va aypuyte to oxetepvo axpoia kovqkao oke kaotraon mouokns kai quvnc.
1. Metapetne oto nepaaov onn
2. Namnate M'ya va taalAenr oro unouvouon
3. 10104E "ENOMENO" n "TIPOHYO'MENO" oio
muov yia enmte "Delete file" (Delta page
apxiou). En vte rae vte Dnyapwet oia a paxio,
emtte "Delete all" (Delta page)
4. Yamate "ETOMENO" NO "TIPHOHOTMENO" YA va emaEefct "YES" (No) 1 NO (Ox)
5. Evi emEeTe "YES", oAic manpoTe to mAnktoPo "M" to apGio Bao dypaepi. Evi emEeTe "NO", to apXio Eo Ba dypaepi.
H emayr "Delete all" (Delta paoa kauv) 8a faypaa
0a ta oxynpeva apxia va ty prxouana karoa ton.
(Ta npalacya, cv emaiEe "Delete all" oyn
karoanraouk, 8a faupapovd 8a ta apcxia
pouakic aaaa Ta apxia Tu vyyapuv).

Oraayapopere apxiaeou tou loyotn, va xpanoantitny tmoloy "safecj (aogalac (ayuy) katopynn) pivu amouvdoctoe tokaiio USB. dappopetik, to apexio 6v Bg diaypoge.

Please visit our website for CE declaration: www.yarvik.com

facebook.com/yarvik

twitter.com/yarvikce

youtube.com/yarvikce

forum.yarvik.com