USER MANUAL MS 701 GRAEF
natural_image
Line drawing of a cylindrical water heater with lid and handle, showing internal components (no text or symbols)
EN Operating Instructions
natural_image
Pure electrical circuit lines without any symbols
natural_image
Line drawing of a small cylindrical mechanical seat with a base and wheel (no text or symbols)
natural_image
Technical line drawing of a mechanical device with a base and handle, no visible text or symbols
natural_image
Technical line drawing of a mechanical assembly with a base and mounting ring (no text or symbols)
natural_image
Line drawing of a mechanical device with a top component and base (no text or symbols)
natural_image
Line drawing of a cylindrical container with a handle and lid, no text or symbols present
natural_image
Simple line drawing of a hand pressing a button into a container with two circular buttons (no text or symbols)
Product description....15
Preface....16
Information on these operating instructions....16
Warning messages....16
General safety instructions .... 17
Danger caused by electric current....19
Intended use....19
Limitation of liability....19
After-sales service 20
Unpacking 20

Disposal of the packaging....20
Disposal of the unit....20
Requirements on the installation location 20
Electrical connection 21
Prior to first use 21
Initial operation....21
Hot chocolate / instant drinks etc. 23
Cleaning 23
Two-year warranty 23
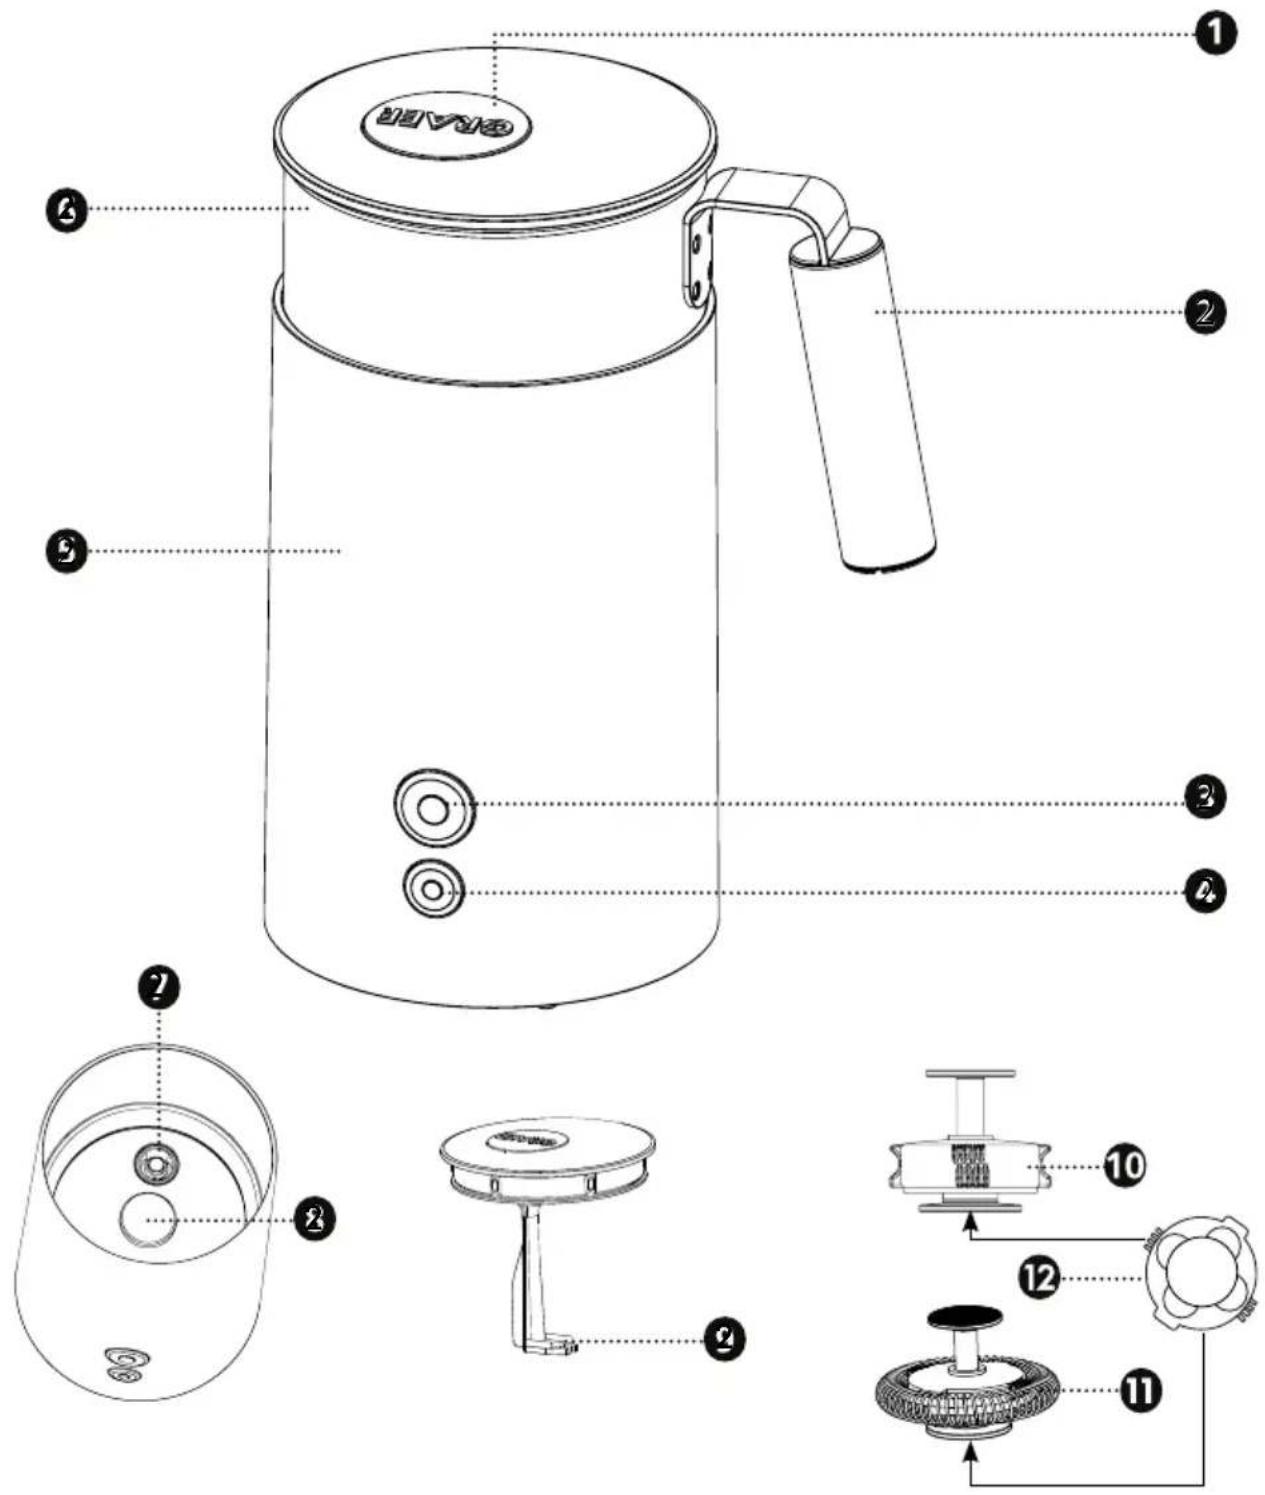
① Removable lid
② Handle
3 Knob for frothing
4 Knob for cold preparation
Base unit
Stainless steel container
2 Temperature sensor
Magnet
2 Whisk holder
10 Whisk for whisking
11 Whisk for frothing
12 Magnet under the whisk
PREFACE
Dear Customer,
You have made a good choice by buying this milk frother. You have purchased a recognised quality product.
We would like to thank you for buying this machine and wish you a lot of fun with your new Graef milk frother.
These operating instructions are part of the milk frother (hereinafter referred to as unit) and provide important information on putting into operation, safety, intended use and the care of the unit.
The operating instructions shall have to be available at the unit at all times. The instructions have to be read and applied by every person who in view of:
- Initial operation,
- operation,
- fault correction and/or
- cleaning
are commissioned to deal with in.
Keep these operating instructions and pass them on to the next owner along with the unit.
These operating instructions cannot take into consideration every conceivable use. For further information or in case of problems which are not dealt with or not dealt with sufficiently in these instructions, please get in touch with Graef customer service or your specialist dealers.
WARNING MESSAGES
In these operating instructions, the following warning messages and signal words are used:

WARNING
This refers to a potentially dangerous situation. Failure to observe this warning may result in serious injury or even death.
CAUTION
This refers to a potentially dangerous situation. In case of non-observation of this warning message, material damage may occur.
IMPORTANT!
This refers to application tips and other especially important information!
GENERAL SAFETY INSTRUCTIONS
This unit is in conformity with the safety instructions mentioned hereinbefore. However, incorrect handling may lead to injury and damage.
For safe handling of this unit, please observe the following safety instructions:
- Before using the unit check for any external visible damage of the housing, the connection cable and plug. Do not operate a damaged unit.
- Repairs may be carried out only by an expert or by Graef after-sales service. Incorrect repairs may cause considerable hazards for the user. In addition, any claim under guarantee is forfeited.
- Defective parts must be replaced by original spare parts only. It is only with these parts that the safety requirements are met.
- This appliance can also be used by children from 8 years age as well as by persons with limited physical, sensory or mental ability or with a lack of experience and/or knowledge if they are supervised or have been trained in using the appliance and have understood the dangers which may result from it. Cleaning and user maintenance must not be carried out by children, unless they are 8 years or older and are supervised.
- The unit and its connection cable have to be clear of children who are younger than 8 years.
- Children should be supervised in order to make sure that they do not play with this unit.
- The unit is not intended to be used with an external timer or a separate remove control.
- Always disconnect the connection cable by using plug; do not pull the connecting cable.
- Do not use the unit if the mains cable or plug are damaged.
- Prevent that liquids get on the plug.
- If the connection cable is damaged, it may only be replaced by the manufacturer, the manufacturer's customer service or a similarly qualified person, in order to avoid potential dangers.
- Do not open the housing under any circumstances. When touching live
connections and if the electric and mechanical structure is changed, there is danger of electric shock.
- Never touch live parts. They may cause an electric shock or even may lead to death.
- Before connecting the unit, compare the connecting data (voltage and frequency) on the type plate with those of your energy network. These details must correspond so that no damage occurs to the unit.
- Check to see that the power cable has been safely laid. Due to getting caught on the cable, the unit might fall down from the work surface.
- Packaging materials must not be used for playing. There is a danger of suffocation.
- Never use the unit in the vicinity of a source of heat.
- Never use the appliance outdoors, and always keep it in a dry place.
- Be especially careful when opening the cap; the contents in the unit tank can squirt out. Risk of burns.
- Do not move the unit while it is switched on. While moving, hot liquid can escape from the unit.
- Do not use the stainless steel tank while on a hot plate or cooking plate. Use the stainless steel tank only in connection with the base station.
- Never touch rotating parts of the unit.
- Never leave the unit unsupervised during operation.
- Fill the unit only up to the MAX mark. If overfilled, hot liquid can escape from the tank.
- Let the unit cool off before cleaning.
- Switch the unit off before cleaning and pull the power cord from the electric socket.
- Never immerse the base unit, the connection cable or the connection plug into water or any other fluid.
- Do not clean the base unit in the dishwasher.
- Use a soft and moist cloth to clean the outer surfaces of the unit. Use a mild detergent in case of heavy soiling.
• The Appliance must not be immersed.
• After use, the surface of the heating element is exposed to residual heat.
DANGER CAUSED BY ELECTRIC CURRENT
WARNING
Mortal danger is caused by contact with energised cables or components!
Please observe the following safety instructions in order to prevent an exposure to electric current:
- Do not use the unit if the mains cable or plug are damaged.
- In this case, you should let the Graef Customer Service install a new connection cable before using the appliance again. This may be done also by an authorised specialist.
- Do not open the housing under any circumstances. When touching live connections and if the electric and mechanical structure is changed, there is danger of electric shock.
- Never touch live parts. They may cause an electric shock or even may lead to death.
INTENDED USE
This unit is not intended for commercial use. Only use the appliance for frothing milk, cocoa and instant drinks.
This appliance is intended for domestic and similar use, such as:
• Staff kitchens in shops and office
• In agricultural estates
- By guests in hotels, motels and other living quarters
• In bed and breakfast boarding houses
IMPORTANT!
Use only for applications akin to households!
Another or any exceeding use shall not be considered intended.
CAUTION
The appliance can cause dangers, if is not used as intended.
- Use the unit exclusively as intended.
- Observe the procedures described in these operating instructions.
Claims of any kind caused by damage by unintended use shall be excluded.
The risk shall be borne sole by the operator.
LIMITATION OF LIABILITY
All technical information, data and notes on the installation, the operation and the care contained in these operating instructions correspond to the last status before printing, and are rendered under consideration of our previous experience and to the best of knowledge.
No claims may be derived from the particulars, illustrations and descriptions in these instructions.
The manufacturer shall not assume any liability for damage caused by:
• non-observation of the instructions
- unintended use
- incorrect repairs
• technical modifications
• use of unapproved spare parts
Translations shall be carried out to the best of knowledge. We shall not assume any liability for translation mistakes. The original German text only shall be binding.
AFTER-SALES SERVICE
If your Graef device is damaged, please contact your dealer or the Graef Customer Service at +49 (2932) 9703677 or write an e-mail to service@graef.de.
IMPORTANT!
If possible, keep the original packaging during the guarantee period of the unit in order to be able to pack the unit correctly in case of guarantee.
UNPACKING
When unpacking the unit, proceed as follows:
- Remove the unit from the box.
- Remove the packaging parts.
- Remove any stickers on the unit. Do not remove the type plate!

DISPOSAL OF THE PACKAGING
The packaging protects the unit against transport damage. The packaging materials are selected according to the environmental compatibility and disposal-related aspects and can therefore be recycled.
The return of packaging into the material cycle saves raw material and reduces the waste volume. Dispose of the packaging material no longer needed at collection points for the "Green Dot" recycling system (in Germany).

DISPOSAL OF THE UNIT
At the end of its service life, this product cannot be disposed of in normal domestic waste. The symbol on the product and in the operating instructions point out to this fact. Reuse the materials according to their marking. With the reuse, recycling or other forms of recycling of old equipment, you make an important contribution to the protection of our environment. Please ask your municipal administration for the disposal point.
REQUIREMENTS ON THE INSTALLATION LOCATION
For safe and fault free operation of the unit, the following requirements of the installation location have to be met:
- The unit has to be placed on a solid, flat, horizontal, and non-slipping surface with a sufficient weight-carrying capacity.
• Make sure that the unit cannot topple over.
- Choose the location in such a way that children cannot reach the supply line of the unit.
- Do not place the appliance on hot surfaces, such as hotplates, or near them.
- Never use the unit in the open, and store in a dry location.
- The unit is not designed for installation in a wall or a built-in cupboard.
- Do not set up the unit in a hot, wet or moist environment.
- The socket has to be easily accessible so that the power cable can be removed easily in case of emergency.
ELECTRICAL CONNECTION
For safe and fault-free operation of the unit, the following requirements have to be met during the electrical connection:
- Before connecting the unit, compare the connecting data (voltage and frequency) on the type plate with those of your energy network. These details must correspond so that no damage occurs to the unit. In case of uncertainty, contact a qualified electrician.
- The socket has to be protected at least by a 10 amps circuit breaker.
- Make sure that the power cable is not damaged and is not laid across hot surfaces or sharp edges.
- The connecting cable must not be stretched tightly.
- The electric safety of the unit is ensured only when it is connected to a socket with protective conductor installed correctly. Operation on a socket without protective conductor is forbidden. If in doubt, let the house installation check by a trained electrician. The manufacturer shall not assume responsibility for damage which has been caused by absent or interrupted protective conductor.
PRIOR TO FIRST USE
Before using the unit for the first time, clean as described in the Cleaning chapter.
INITIAL OPERATION
natural_image
Pure electrical circuit lines without any symbols
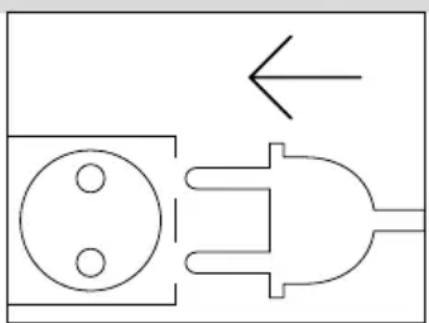
- Connect the unit to the power grid.
natural_image
Technical line drawing of a mechanical support or seat with a circular top and base (no text or symbols)
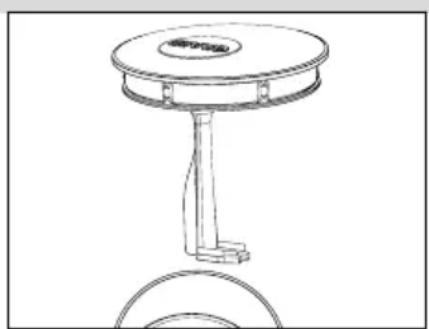
- Remove the lid.
natural_image
Line drawing of a circular mechanical device with a base and a small knob, no text or symbols present
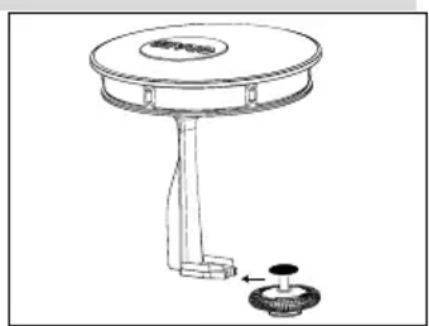
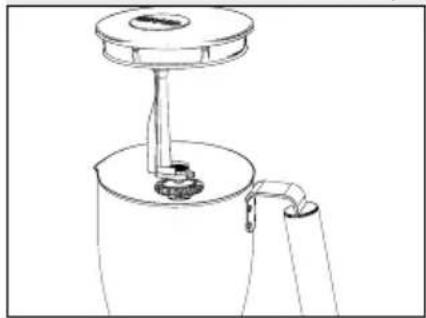
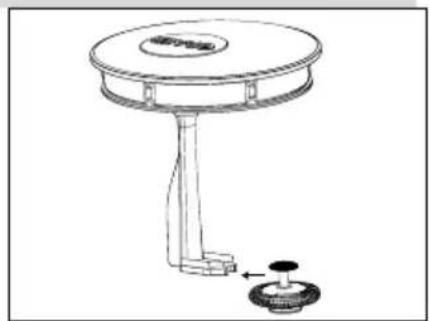
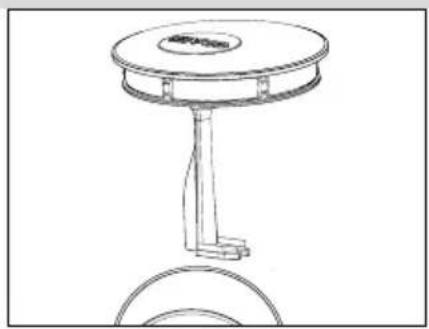
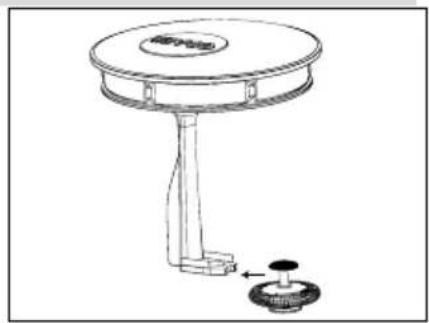
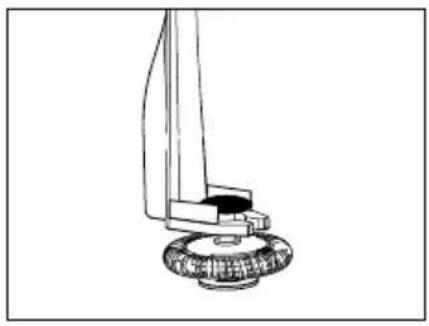
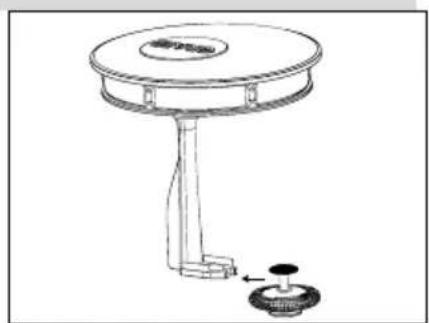
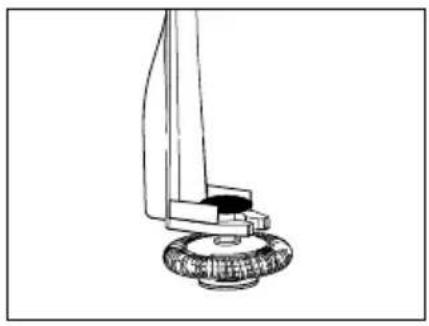
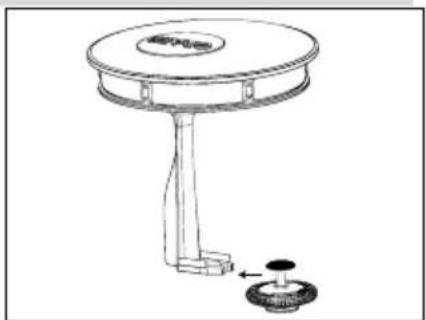
- Insert the whisk with spiral. (Black side up)
natural_image
Mechanical assembly diagram showing a lever and base component (no text or symbols)
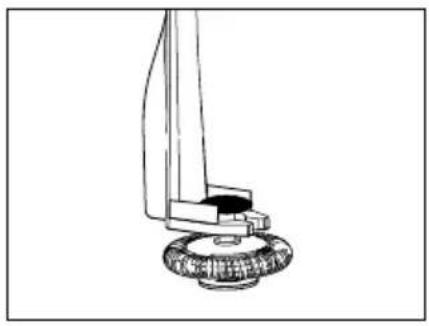
- Insert the whisk between the black side and the spiral.
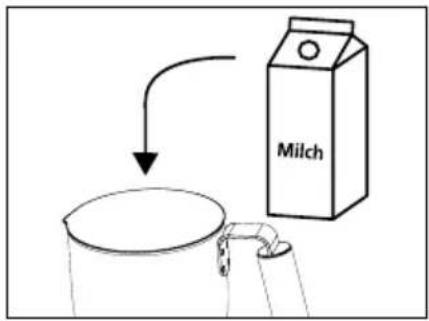
- Put the stainless steel tank on the base station and pour the milk into the stainless steel tank.
WICHTIG!
If the whisk holder is inserted below the spiral or the black side down, the unit will not operate. There are magnets on the lower side (below the spiral) of the whisk, which must face the bottom of the stainless steel container.
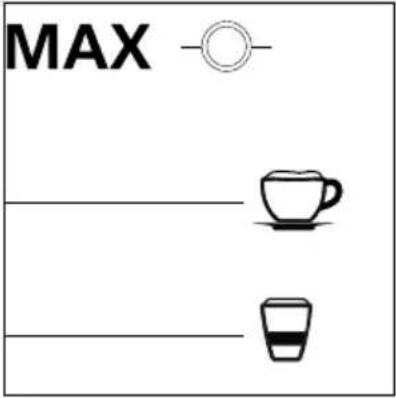
Maximum filling quantity for use without frothing.
Maximum filling quantity for producing creamy milk foam, e.g. for cappuccino.
Maximum filling quantity for producing airier milk foam, e.g. for latte macciato.
WICHTIG!
• The more milk you fill, the creamier the milk foam will be.
- Only fill the stainless steel container, never add liquids to the base station.
- The 'MAX' marking only applies to whisking. Frothed milk expands and will cause the container to overflow if you fill it too much.
natural_image
Line drawing of a mechanical device with a central hub and base, no text or symbols present
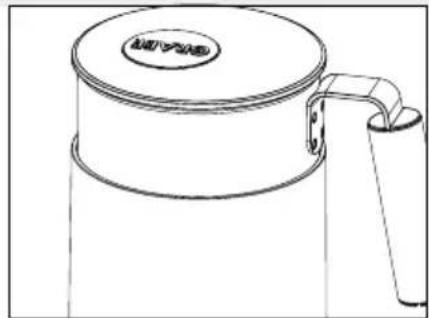
- Put the lid on the stainless steel tank.
natural_image
Line drawing of a cylindrical container with a handle and lid, no text or symbols present
• Make sure that the lid is properly seated.
natural_image
Simple line drawing of a hand pressing a button into a container with two circular buttons (no text or symbols)
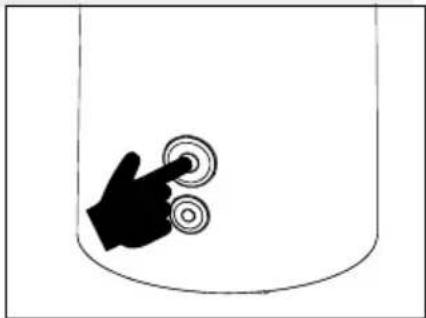
- Press the upper button to froth milk. The button illuminates red.
WICHTIG!
If the lid is not fitted correctly or not fitted at all, the appliance will not work.
- The LED is illuminated as long as the unit is running.
- Open the cap after preparation has finished and pull it up.
• Take the stainless steel tank and pour or ladle the milk froth into a cup or glass.
- The heating element surface is subject to residual heat after use.
WICHTIG!
If the machine makes loud noises, stop the operation and remove the lid. Remove the whisk, clean it and put it back in (there are magnets on the bottom of the whisk, they must point towards the bottom) and continue to froth the milk.
HOT CHOCOLATE / INSTANT DRINKS ETC.
Using the milk frother, you can also prepare, warm milk, hot chocolate (either cold or warm) as well as instant drinks.
- Insert the blunger without spiral.
- Add all ingredients to the stainless steel tank. Comply with the "max" mark.
- Either press the top button to prepare warm drinks or the lower button to prepare cold drinks.
CLEANING
- Clean the outer surfaces of the unit with a soft, damp cloth. In case of heavy soiling, a mild cleaning agent can be used.
- Caution: If the container becomes hot after use, allow it to cool down before cleaning.
- The stainless steel container is dishwasher safe. However, only put it in the dishwasher in the upper rack. The removable lid with whisk holder and the whisk as well as the basic appliance are not dishwasher-safe.
- Clean the removable lid with whisk holder and the whisk by hand with water and a mild detergent.
- Never immerse the basic appliance in water, but wipe it with a damp cloth to clean it.
TWO-YEAR WARRANTY
As from the date of purchase we assume manufacturer warranty of twenty-four months for defects which can be traced back to manufacturing and material defect. Your legal warranty claim in conformity with Section 437 et seq. of the German Civil Code (BGB) shall remain unaffected by this regulation. The guarantee does not cover any damage which is caused by incorrect handling or use as well as defects which only slightly influence the function or the value of the unit. Moreover, transport damage provided we are not responsible shall be excluded from the claims under guarantee. Guarantee shall be ruled out for damage, the repair of which has not been carried out by us or one of our representations. In case of justified complaints, we shall repair the defective product or replace it by a product without defects at our discretion.
natural_image
Pure electrical circuit lines without any symbols
natural_image
Line drawing of a mechanical support structure with a circular top and base (no text or symbols)
• Retirez le couvercle.
natural_image
Technical line drawing of a mechanical device with a circular top and base, showing a knob and adjustment knob (no text or symbols)
natural_image
Technical line drawing of a mechanical assembly with a base and clamped component (no text or symbols)
natural_image
Line drawing of a mechanical device with a circular top and cylindrical base (no text or symbols)
natural_image
Line drawing of a cylindrical container with a handle and lid, no text or symbols present
natural_image
Simple line drawing of a hand pointing at two circular buttons inside a container (no text or symbols)
natural_image
Pure electrical circuit lines without any symbols
natural_image
Line drawing of a mechanical seat with a circular top and base, no text or symbols present
natural_image
Technical line drawing of a mechanical device with a circular top and base, showing a knob and adjustment knob (no text or symbols)
natural_image
Technical line drawing of a mechanical component with a base and mounting base (no text or symbols)
natural_image
Technical line drawing of a mechanical device with a cylindrical top and internal components (no text or symbols)
natural_image
Line drawing of a cylindrical container with a lid and handle, no text or symbols present
natural_image
Simple line drawing of a hand pressing a button into a container with two circular buttons (no text or symbols)
natural_image
Pure electrical circuit lines without any symbols
natural_image
Line drawing of a mechanical stand with a circular top and base, no text or symbols present
natural_image
Technical line drawing of a circular mechanical device with a base and a small component attached (no text or symbols)
natural_image
Technical line drawing of a mechanical component with a circular base and a curved top (no text or symbols)
natural_image
Line drawing of a mechanical device with a central shaft and base, no text or symbols present
natural_image
Line drawing of a cylindrical container with a handle and lid, no text or symbols present
natural_image
Simple line drawing of a hand pressing a button into a container with two circular buttons (no text or symbols)
natural_image
Pure electrical circuit lines without any symbols
natural_image
Line drawing of a circular mechanical seat with a base and side mount (no text or symbols)
natural_image
Line drawing of a circular mechanical device with a base and a small knob, no text or symbols present
natural_image
Mechanical assembly diagram showing a lever and base component (no text or symbols)
natural_image
Line drawing of a mechanical device with a top component and handle (no text or symbols)
natural_image
Line drawing of a cylindrical container with a handle and lid, no text or symbols present
natural_image
Simple line drawing of a hand pressing a button into a container with two circular buttons (no text or symbols)
natural_image
Pure electrical circuit lines without any symbols
natural_image
Line drawing of a mechanical support with a circular top and base, no text or symbols present
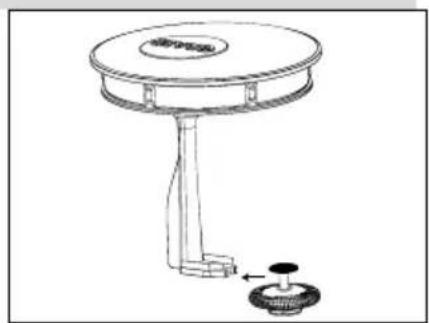
• Fjern låget.
natural_image
Technical line drawing of a mechanical device with a circular top and base, showing a knob and adjustment knob (no text or symbols)
natural_image
Technical line drawing of a mechanical component with a base and mounting bracket (no text or symbols)
natural_image
Technical line drawing of a mechanical device with a circular top and cylindrical base (no text or symbols)
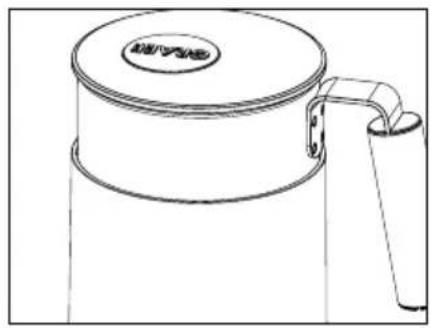
- Placer nu låget på den rustfri stålbeholder.
natural_image
Line drawing of a cylindrical container with a handle and lid, no text or symbols present
natural_image
Simple line drawing of a hand pressing a button into a container with two circular buttons (no text or symbols)
natural_image
Pure electrical circuit lines without any symbols
- Anslut apparaten till elnätet.
natural_image
Line drawing of a mechanical support structure with a circular top and base (no text or symbols)
- Ta bort locket.
natural_image
Technical line drawing of a mechanical device with a circular top and base, showing a knob and adjustment knob (no text or symbols)
- Sätt in vispen.
natural_image
Technical line drawing of a mechanical component with a base and mounting bracket (no text or symbols)
natural_image
Technical line drawing of a mechanical device with a cylindrical top and internal components (no text or symbols)
natural_image
Line drawing of a cylindrical container with a lid and handle, no text or symbols present
natural_image
Simple line drawing of a hand pressing a button into a container with two circular buttons (no text or symbols)
natural_image
Pure electrical circuit lines without any symbols
natural_image
Line drawing of a small mechanical component with a circular top and base, no text or symbols present
• Ta av lokket.
natural_image
Technical line drawing of a mechanical device with a circular top and base, showing a knob and adjustment knob (no text or symbols)
- Sett inn quirlen.
natural_image
Mechanical assembly diagram showing a lever and base component (no text or symbols)
natural_image
Line drawing of a mechanical device with a central shaft and base, no text or symbols present
natural_image
Line drawing of a cylindrical container with a lid and handle, no text or symbols present
natural_image
Simple line drawing of a hand pointing at two circular buttons inside a container (no text or symbols)
natural_image
Pure electrical circuit lines without any symbols
natural_image
Line drawing of a mechanical support structure with a circular top and base (no text or symbols)
- Zdiąć pokrywkę.
natural_image
Technical line drawing of a mechanical device with a base and mounting base (no text or symbols)
natural_image
Technical line drawing of a mechanical component with a circular base and lever (no text or symbols)
natural_image
Line drawing of a mechanical device with a circular top and cylindrical base (no text or symbols)
natural_image
Line drawing of a cylindrical container with a handle and lid, no text or symbols present
natural_image
Simple line drawing of a hand pressing a button into a container with two circular buttons (no text or symbols)