CD 740 - Cd player/recorder CREATIVE - Free user manual and instructions
Find the device manual for free CD 740 CREATIVE in PDF.
Frequently Asked Questions - CD 740 CREATIVE
User questions about CD 740 CREATIVE
0 question about this device. Answer the ones you know or ask your own.
Ask a new question about this device
Download the instructions for your Cd player/recorder in PDF format for free! Find your manual CD 740 - CREATIVE and take your electronic device back in hand. On this page are published all the documents necessary for the use of your device. CD 740 by CREATIVE.
USER MANUAL CD 740 CREATIVE
text_image
SNOOZE/MUTE 743 AM CREATIVESoundWorks Radio CD 740
User Manual
CREATIVE®
English 2
Français 27
Deutsch 53
Italiano 79
Español 105
Nederlands 131

The lightning flash with arrowhead, within an equilateral triangle, is intended to alert the user to the presence of uninsulated "dangerous voltage" within the product's enclosure that may be of sufficient magnitude to constitute risk of electric shock to persons.

The exclamation point within an equilateral triangle is intended to alert the user to the presence of important operating and maintenance (servicing) instructions in the literature accompanying this product
WARNING
DO NOT OPEN TO PREVENT THE RISK OF ELECTRIC SHOCK, DO NOT REMOVE SPEAKER'S COVER. NO USER-SERVICEABLE PARTS INSIDE. REFER SERVICING TO QUALIFIED SERVICE PERSONNEL.
AVERTISSEMENT
POUR EVITER TOUT RISQUE DE CHOC ELECTRIQUE, NE PAS DEMONTER LE COUVERCLE DU HAUT PARLEUR. AUCUN ENTRETIEN DES PIECES INTERIEURES N'EST REQUIS.TOUT SERVICE D'ENTRETIEN NE DOIT ETRE EFFECTUE QUE PAR DU PERSONNEL D'ENTRETIEN QUALIFIE.
READ AND HEED IMPORTANT SAFTEY WARNINGS ON THE ENCLOSURE
CAUTION:
TO PREVENT ELECTRIC SHOCK, MATCH WIDE BLADE OF PLUG TO WIDE SLOT, INSERT FULLY.
ATTENTION:
POUR EVITER LES CHOCS ELECTRIQUES, INTRO- DUIRE LA LAME LA PLUS LARGE DE LA FICHE DANS LA BORNE CORRESPONDANTE DE LA PRISE ET POUSSER JUSQU'AU FOND.
IMPORTANT NOTICE:
THE SERIAL NUMBER FOR THE SPEAKER IS LOCATED ON THE SPEAKER'S CONTROL PANEL. PLEASE WRITE THIS NUMBER DOWN AND KEEP IT IN A SECURE AREA. THIS IS FOR YOUR SECURITY.
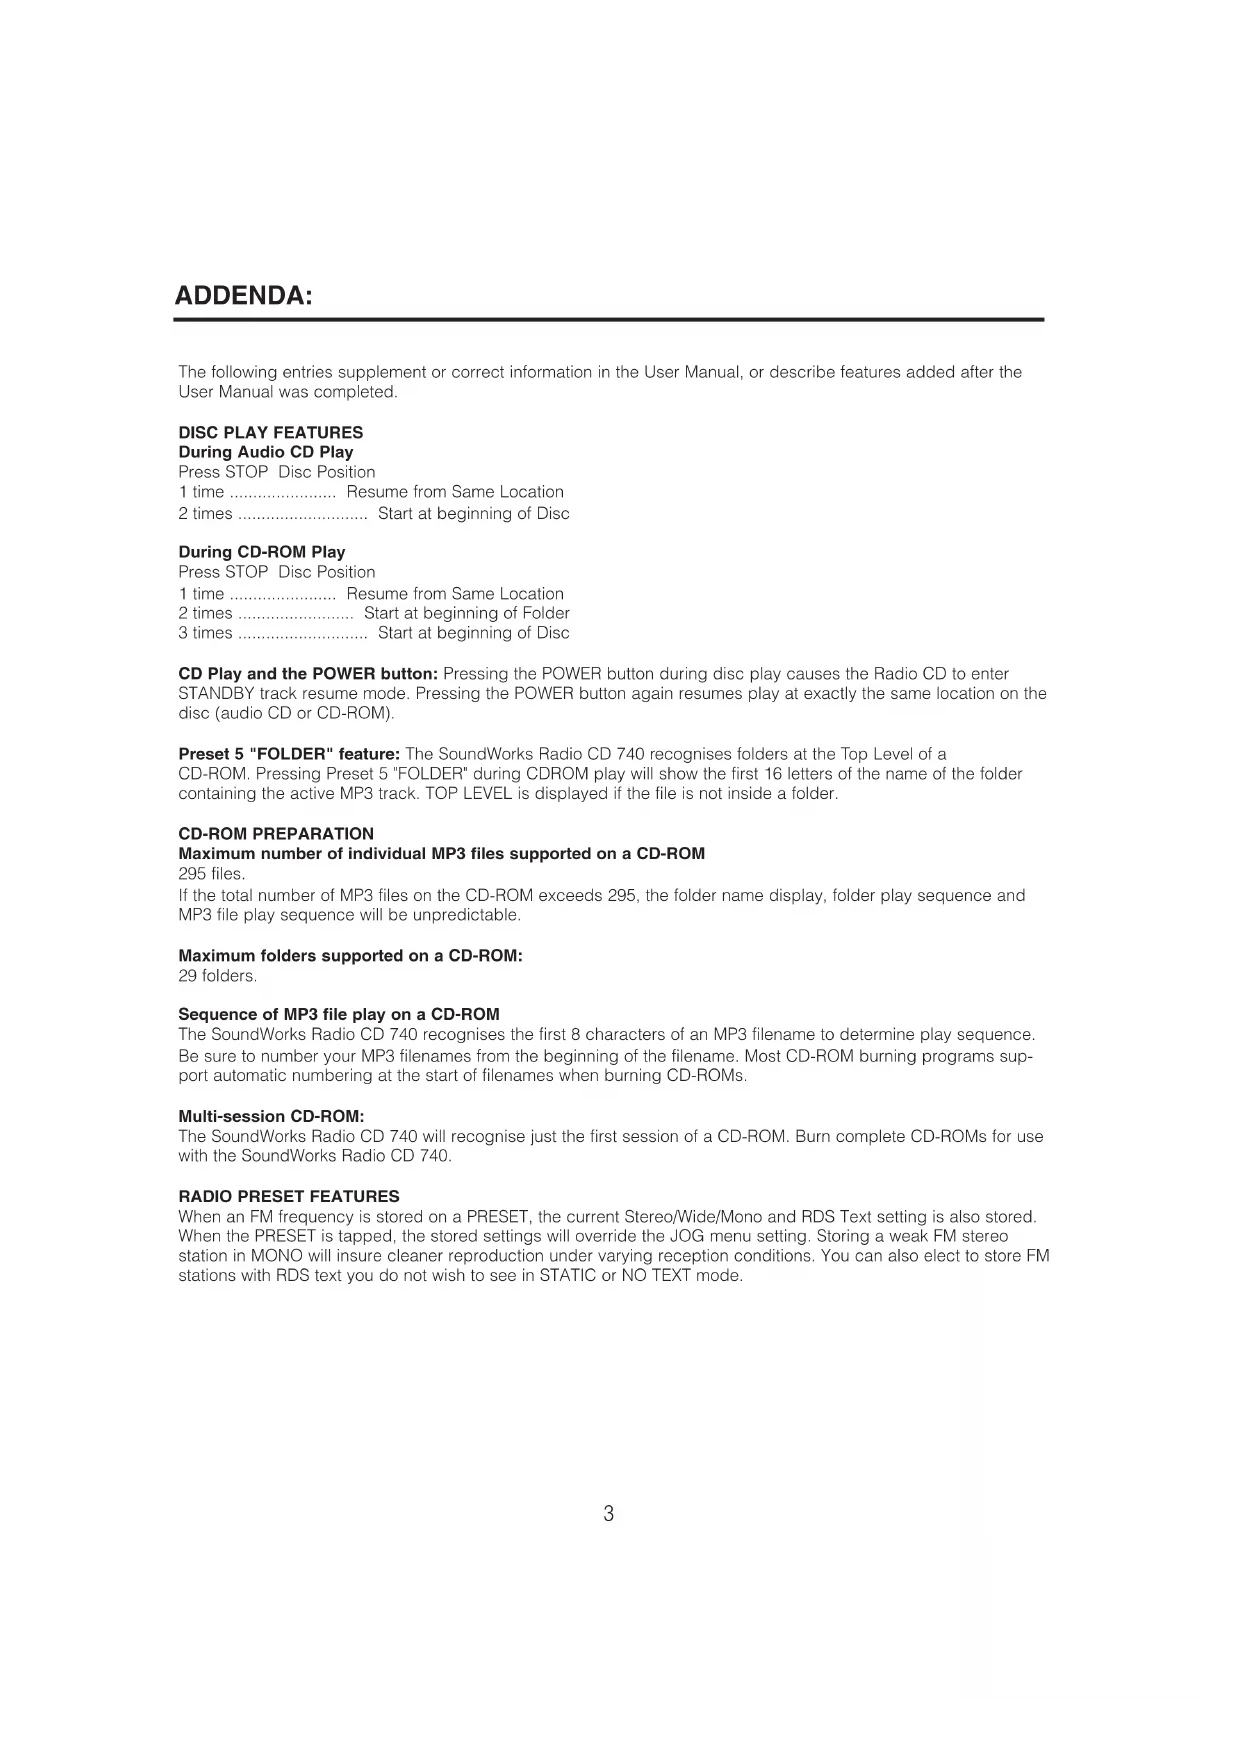
The following entries supplement or correct information in the User Manual, or describe features added after the User Manual was completed.
DISC PLAY FEATURES
During Audio CD Play
Press STOP Disc Position
1 time ...... Resume from Same Location
2 times ...... Start at beginning of Disc
During CD-ROM Play
Press STOP Disc Position
1 time ...... Resume from Same Location
2 times ...... Start at beginning of Folder
3 times Start at beginning of Disc
CD Play and the POWER button: Pressing the POWER button during disc play causes the Radio CD to enter STANDBY track resume mode. Pressing the POWER button again resumes play at exactly the same location on the disc (audio CD or CD-ROM).
Preset 5 "FOLDER" feature: The SoundWorks Radio CD 740 recognises folders at the Top Level of a CD-ROM. Pressing Preset 5 "FOLDER" during CDROM play will show the first 16 letters of the name of the folder containing the active MP3 track. TOP LEVEL is displayed if the file is not inside a folder.
CD-ROM PREPARATION
Maximum number of individual MP3 files supported on a CD-ROM
295 files.
If the total number of MP3 files on the CD-ROM exceeds 295, the folder name display, folder play sequence and MP3 file play sequence will be unpredictable.
Maximum folders supported on a CD-ROM:
29 folders.
Sequence of MP3 file play on a CD-ROM
The SoundWorks Radio CD 740 recognises the first 8 characters of an MP3 filename to determine play sequence. Be sure to number your MP3 filenames from the beginning of the filename. Most CD-ROM burning programs support automatic numbering at the start of filenames when burning CD-ROMs.
Multi-session CD-ROM:
The SoundWorks Radio CD 740 will recognise just the first session of a CD-ROM. Burn complete CD-ROMs for use with the SoundWorks Radio CD 740.
RADIO PRESET FEATURES
When an FM frequency is stored on a PRESET, the current Stereo/Wide/Mono and RDS Text setting is also stored. When the PRESET is tapped, the stored settings will override the JOG menu setting. Storing a weak FM stereo station in MONO will insure cleaner reproduction under varying reception conditions. You can also elect to store FM stations with RDS text you do not wish to see in STATIC or NO TEXT mode.
ALARM ADJUSTMENT FEATURES
To wake to a specific audio CD track: Insert an audio CD into the radio and press Alarm 1 or Alarm 2 for two seconds to enter an Alarm Adjustment session. During the Alarm Adjustment session, first press the CD Play/Pause button to select Wake to CD. Then use the Track/Tune buttons on the Radio CD faceplate to select which track you would like to play. During alarm activation, the radio will start CD play from your selected track and continue playing the CD tracks in sequence.
To wake to a specific MP3 file on a CD-ROM: The SoundWorks Radio CD 740 also lets you select an MP3 file (or track) on a CD-ROM for wakeup using the Track/Tune button. During an Alarm Activation session, a specific MP3 file for wakeup is selected from the faceplate Track/Tune buttons. A simplified scheme for track selection on CD-ROM is supported. All MP3 files on a disc are represented by a number that corresponds to the play sequence of the disc's MP3 files in Play All mode. Tracks at the top level of the disc are numbered first followed by the tracks in the first folder, then the second folder and so on.
Read Instructions
Read all safety and operating instructions before operating the product.
Retain Instructions
Keep all safety and operating instructions for future reference.
Heed Warnings
Take note of all warnings on the product and in the operating instructions.
Follow Instructions
Follow all operating and usage instructions.
Cleaning
Unplug this product from the power source before cleaning. Do not use liquid or aerosol cleaners. Use a damp cloth for cleaning.
Attachments
Do not use attachments or accessories not recommended by Creative as they may cause hazards.
Water and Moisture
Do not use this product near any water source or water hazard.
Placement
Place the product on a stable surface or recommended stand, or sold with the product. Otherwise, the product may fall and cause injury to a person, and damage to the product. Follow the manufacturer's instructions for mounting the product.
Ventilation
To ensure reliable operation and to prevent overheating, do not block or cover ventilation openings and slots with fabrics or impermeable material. Do not place in a built-in installation such as a bookcase or rack unless there is proper ventilation or Creative's instructions have been adhered to.
Heat
Do not place this product anywhere near heat sources such as radiators, stoves, and other products (including amplifiers) that produce heat.
Power Sources
This speaker system is specifically designed for operation within the electrical range(s) specified on the provided power adapter and use outside of this range shall be at your own risk. Please contact your local electric utility company if you have any questions about the electrical voltage at your intended location of use.
IMPORTANT SAFETY INSTRUCTIONS
Polarisation
The product may be equipped with a polarised alternating-current line plug, a safety feature. As one blade is wider than the other, this plug can only fit into the power outlet in one way. If you cannot insert the plug fully into the outlet, reverse the plug. If the plug still fails to fit, contact your electrician to replace your obsolete outlet. Do not force the plug into the outlet.
Power-cord Protection
Arrange the power-cords to minimise the risk of damage from traffic or other hazards. Pay particular attention to the area near the plug head, the power source outlet and the connection from the product.
Lightning
Unplug the product from the power source during lightning storms or if unused for long periods of time. This will prevent lightning and power-line surge damage to the product.
Overloading
Do not overload wall outlets, extension cords, or integral power circuits as this can result in a risk of fire or electric shock.
Object and Liquid Entry
Never push any object through the product's openings, as this can result in a fire, electric shock or damage. Do not spill liquids on the product.
Servicing
Do not attempt to service the product yourself. Refer all servicing to qualified service personnel.
Damage Requiring Service
Unplug the product from the power source. Call for servicing when:
a) the power-supply cord or plug is damaged.
b) objects have fallen through or liquids have been spilled into the product's openings.
c) the product has been exposed to rain or water.
d) the product does not operate normally when following the operating instructions
e) the product behaves differently.
f) the product has been dropped or damaged in any way.
Replacement Parts
When replacing parts, check that the service technician has used replacement parts specified by Creative or have the same characteristics as the original parts. Unauthorised substitutions may result in fire, electric shock, or other hazards.
Safety Check
After servicing or repairing the product, get the service technician to perform safety checks to be sure that the product is working properly.
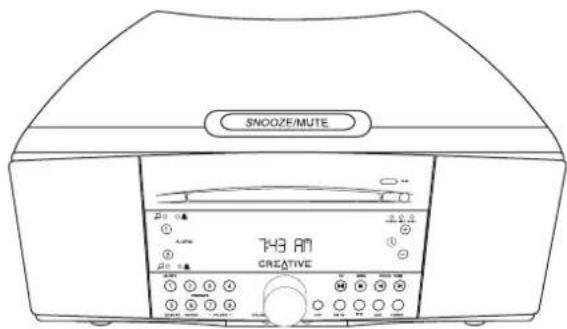
INTRODUCTION
The people at Cambridge SoundWorks hope you enjoy your new high-performance SoundWorks Radio CD 740. Your new radio has great FM stereo sound and plays useful MW band stations. It stores 16 FM station presets along with 8 MW station presets. An integral, slot-load disc player plays audio CDs and MP3 files on CD-ROM. The large 32-character display and full-function remote makes radio operation easy from across the room.
The SoundWorks Radio CD 740 displays three types of supplementary text:
• Radio Data Service (RDS) FM station text
- CD-text
- "ID3" text stored in most MP3 files.
An automatic dimmer function reduces display brightness in dark rooms while maintaining good legibility in bright light. An internal long-life power cell maintains the current time accurately for many years. By inserting a 9V battery (not supplied), a user ensures that an activated wakeup function will work even during a power outage.
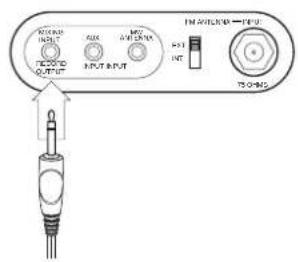
Front and rear inputs allow easy connection of audio program sources (like portable MP3 and cassette players). A Record Output lets you send the current audio program signal to other devices.
A convenient JOG button lets you select from a variety of secondary adjustments (Bass and Treble, Snooze time and Text display modes, among others).
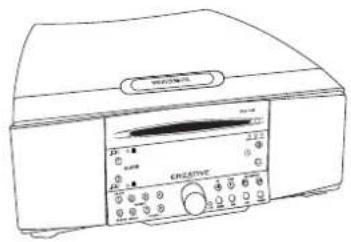
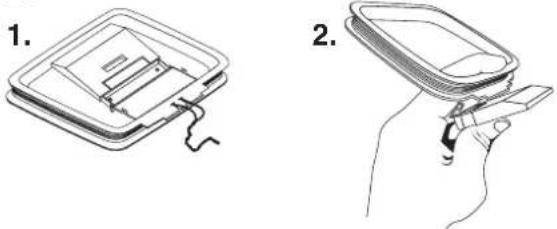
Remove the SoundWorks Radio CD (See A) from its protective polybag and place it in your preferred location. The Radio CD's Tone alarm sound and bass output will be reduced if the Radio is placed on a compliant, soft surface.
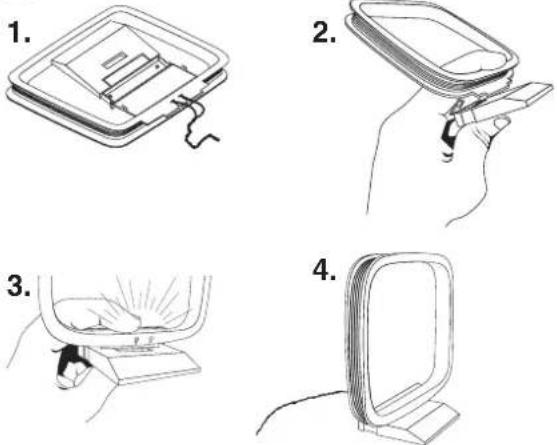
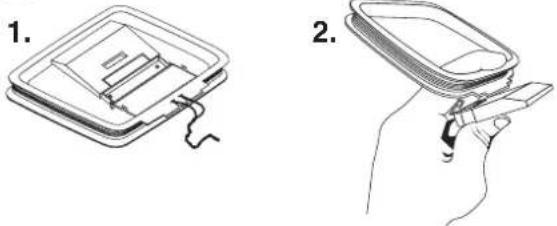
Connect the MW antenna (See B): To prepare the antenna (1), fold the base (2) and snap it into place (3). Position the MW antenna (4) in any out-of-the way site, preferably at least 8 inches apart from the Radio CD. Insert the MW Antenna's miniplug into the Radio CD's rear panel minijack marked MW ANTENNA (5).
Rotate the MW antenna to achieve the best signal for MW stations.
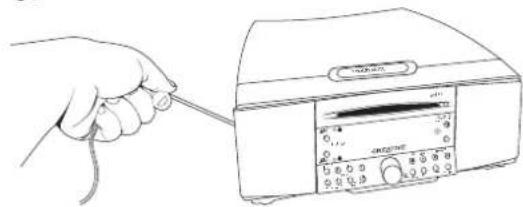
Connect the power cord by inserting the SoundWorks Radio CD's AC plug into a convenient outlet.
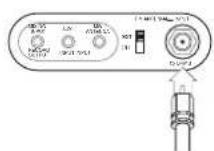
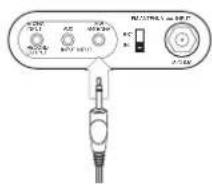
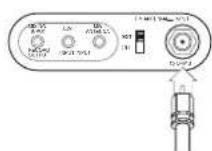
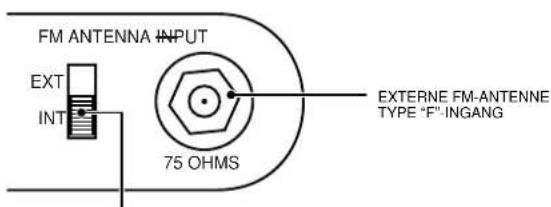
The AC cord is also the Radio CD's primary FM antenna. It will function better if at least 50% or more of it's length follows a straight line (See C). Check to make sure the FM antenna switch on the rear panel of the Radio enclosure is in the INT (internal) position (factory default).
If desired, the external FM antenna can be connected and used instead of the internal antenna (See D). Connect the external antenna to the "F"-type connector of the rear panel. Set the FM antenna switch to EXT (external).
A.
text_image
Line drawing of a vintage electronic device with labeled ports and control panelB.
text_image
Illustration showing four steps of a device installation or cleaning procedure, labeled 1 to 4.5.

text_image
R2.57/16.1 μs 0.001 J-7.043C.

natural_image
Line drawing of a hand holding a cable next to an electronic device with a display (no text or symbols visible)D.

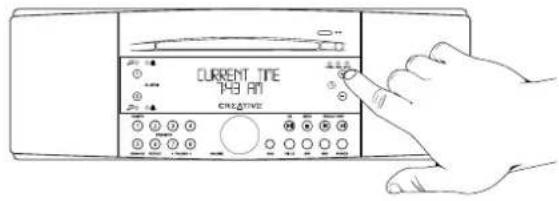
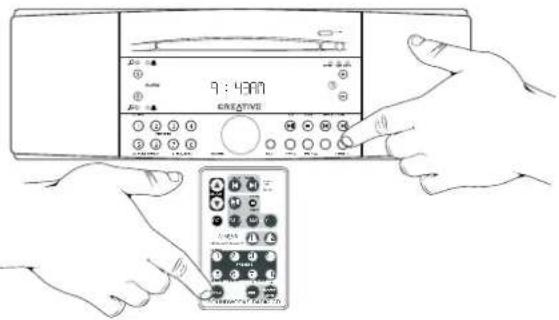
Setting the Clock
You can adjust the current time whether the radio is in Standby or On. Just press the time adjust buttons (next to the Ⓐ symbol) on the right hand side of the display (See E).
Note: The current time can only be adjusted from the Radio CD faceplate. The Remote Control can adjust the wake up time setting, but not the current time.
Tone Alarm Backup Battery
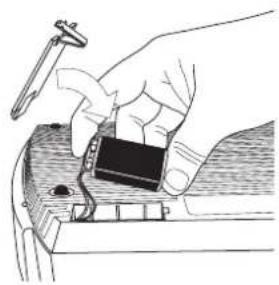
For 48 hours of alarm function backup during an AC power failure, obtain and install a 9 volt battery in the radio compartment. Release the battery cover, attach the battery and restore the cover.
If either alarm is set to activate (music or tone wake-up) and the power fails, the battery sounds the tone alarm at the appropriate time. Press Power on the radio to silence the alarm. Remove the battery if the unit is unplugged for more than 24 hours. Replace the battery after 30 minutes of emergency tone alarm operation (See F).
Standby and On
Pushing the POWER button chooses Standby or On operation (See G)
The faceplate Power button can also be used to engage SLEEP delay operation (See page 13).
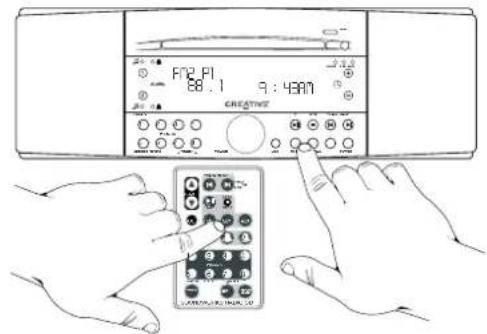
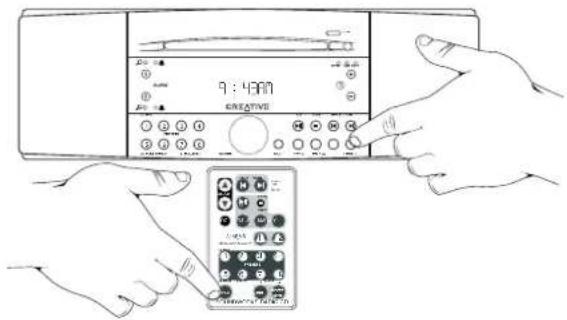
Selecting The Radio Bands
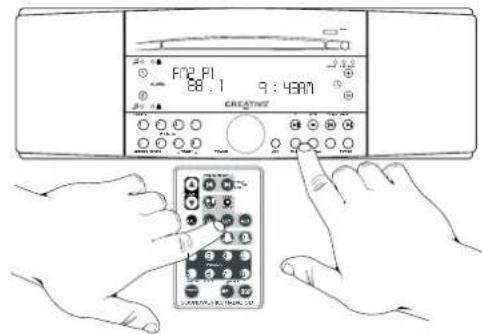
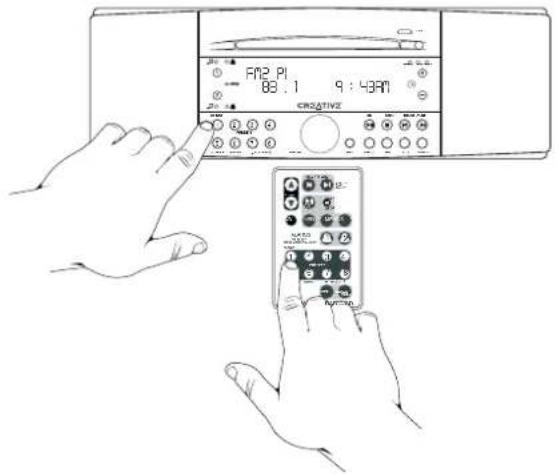
1) Pressing the FM 1/2 button selects the FM radio band and one of two banks of FM station presets. You can store eight FM stations in the PRESET bank FM1 and eight different FM stations in PRESET bank FM2 (See H).
2) If you switch from another mode to FM, the Radio will return to the last PRESET bank used (from Standby, MW, CD or from an AUX input). Pressing the FM 1/2 button during FM operation selects the other preset bank.
3) Pressing the MW button selects the MW radio band. The MW band has one PRESET bank.
E.
text_image
CURRENT TTE 748 AM CREATIVEF.

natural_image
Illustration of hands using a tool to interact with a small electronic device (no text or symbols visible)G.

text_image
9:48AM CREATIVEH.

text_image
F12.PI 88.1 9:48AM CRESTINGTuning Stations (FM or MW)
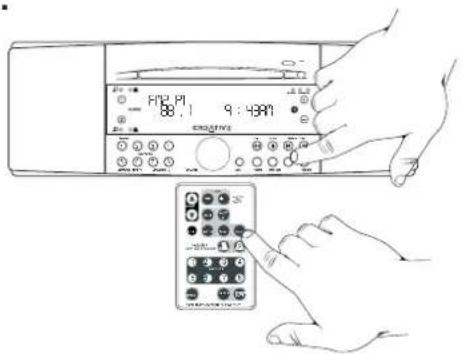
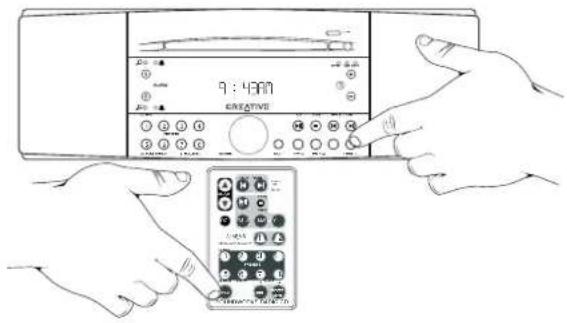
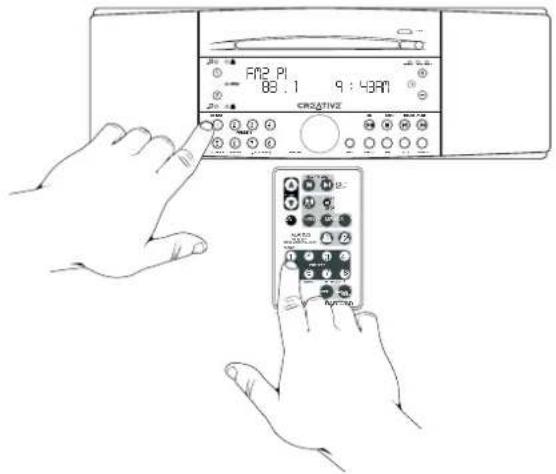
- Autotune Method 1: Press the SEEK button (remote or radio face) to automatically find the next station of higher frequency (See I).
- Autotune Method 2: Press and hold either TRACK/TUNE button to seek the next station (the ⏻ button seeks down, the ⏻ button seeks up). (See J)
- Manual Tune: To find a specific frequency, tap the appropriate TRACK/TUNE button (☑ or ☑).
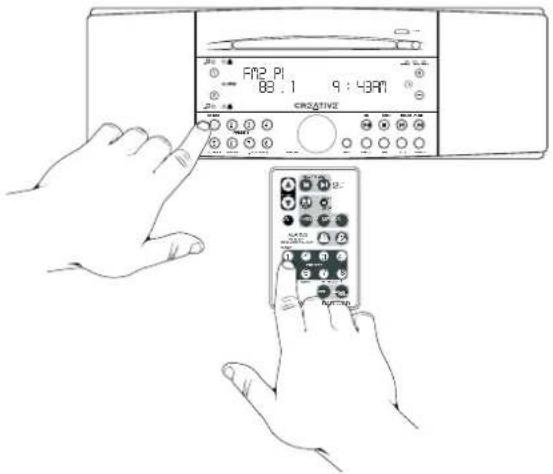
Storing Stations in PRESET banks
Press the FM 1/2 button to choose the desired PRESET bank (FM1 or FM2) or choose the MW radio band. Tune to the desired station. Press and hold the desired PRESET button until a short tone is heard. The station is stored (See K).
text_image
FPT2, PI 58.1 9 : 43M CROGINSJ.

text_image
J. FAN2 PI 88.1 9:43AM CREATIVEK.

text_image
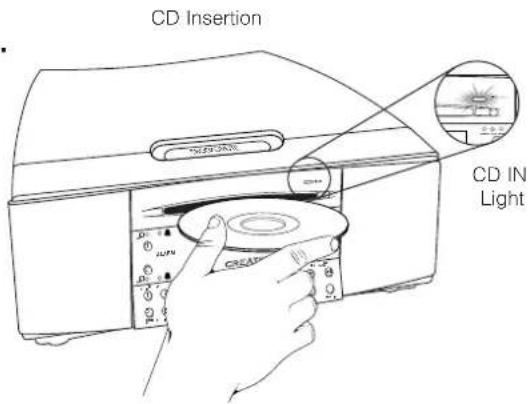
FM2 PI 88.1 9:43AM CRISATIVEImportant: Use only standard 12cm (4 ^3/4 ) compact discs. Smaller discs will not work in the slot load mechanism.
1) Insert a CD disc into the slot to automatically select CD play. The CD IN light indicates if there is a disc inside the Radio CD (See L).
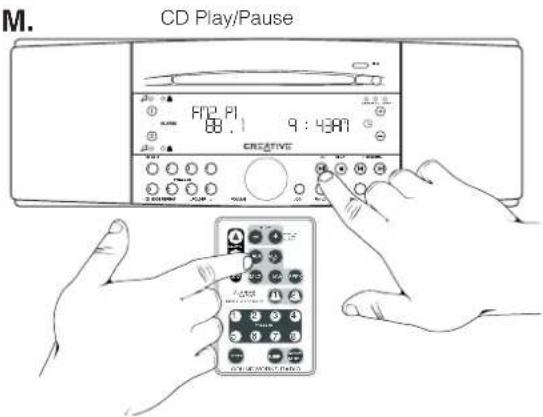
2) If there is a CD disc inside the Radio CD, tapping the CD button will start disc play (See M).
Choosing Selections
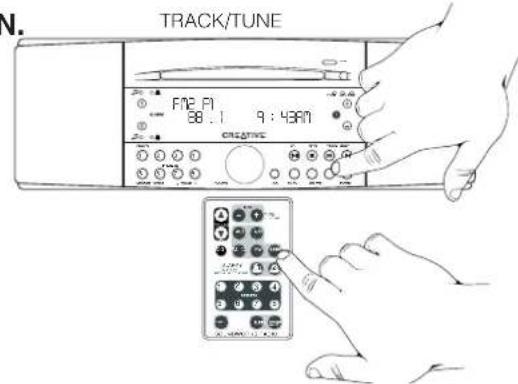
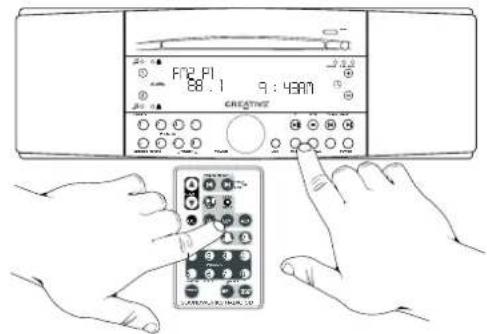
- Track selection: Tap the appropriate TRACK/TUNE button (☑ or ☑) (See N).
- CD-ROM folder selection: To move from the current folder (directory), tap either ⑦ or ⑧. See page 23-25 for an explanation of folder (directory) navigation.
- Forward scan and reverse scan: Press and hold a TRACK/TUNE button (播放or播放).
Disc Stop
Press the Stop button once (inline image of stop button only) to stop disc play with "resume from same location" feature. Press the stop button twice to stop disc play and return to the start of the disc.
Disc Eject
Press the disc eject button (See 0).
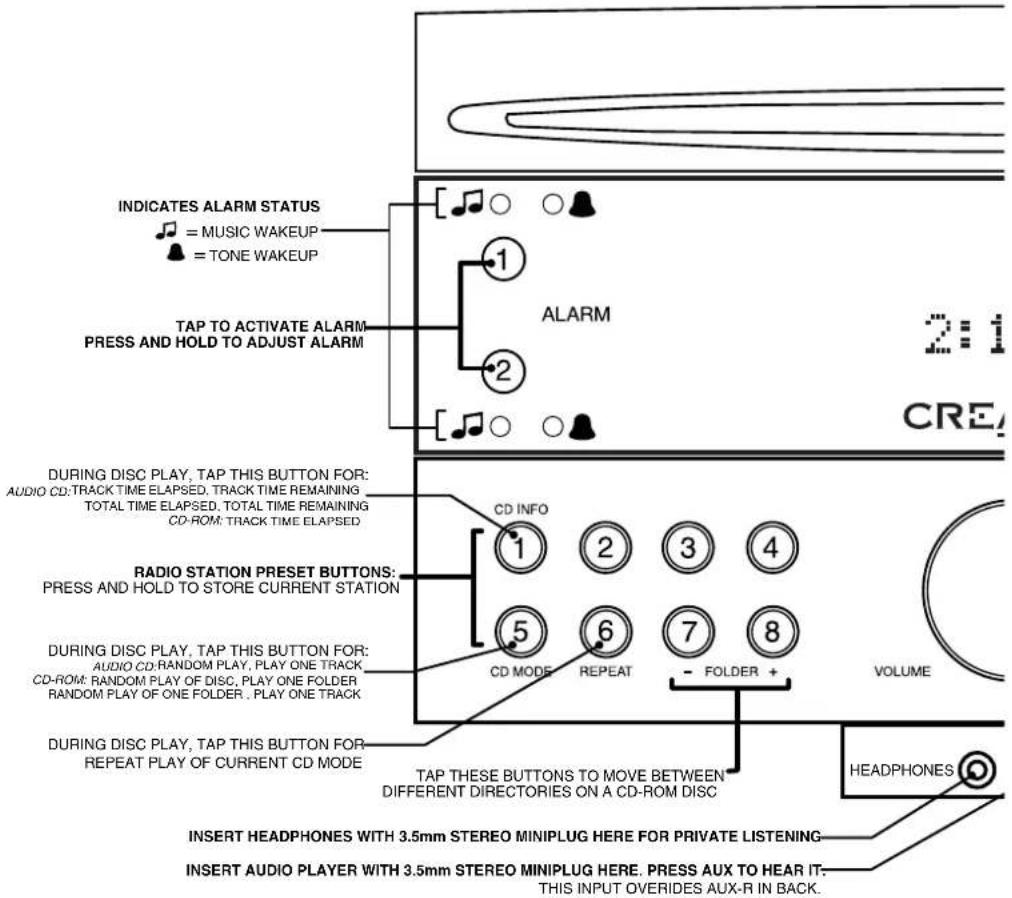
CD INFO
The CD INFO button (preset 1) displays disc playing time readouts, as follows:
Audio CD - Track time elapsed • Track time remaining • CD time elapsed • CD time remaining
CD-ROM - File time elapsed
CD MODE
The CD MODE button (preset 5) selects the following other disc play modes:
Audio CD - Random Play • Play 1 track
CD-ROM – Random Play • Play Folder • Random Play Folder • Play 1 file
REPEAT
The REPEAT button (preset 6) will repeat the current play mode until the disc is ejected or the POWER button is pressed. The Repeat mode is maintained until the disc is ejected or the POWER button is pressed.
L.
text_image
CD Insertion CD IN LightM.
text_image
M. CD Play/PauseN.
text_image
N. TRACK/TUNE F12 P1 88.1 9:48AM CREATIVE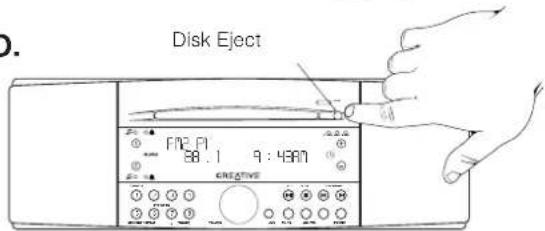
text_image
Disk Eject FNC P1 88.1 9:4307 CREATIVEListening To External Sound sources
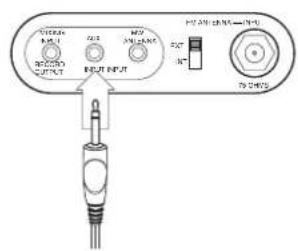
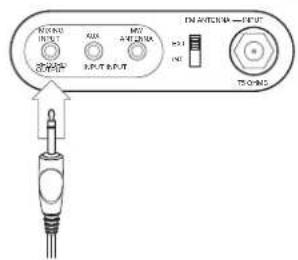
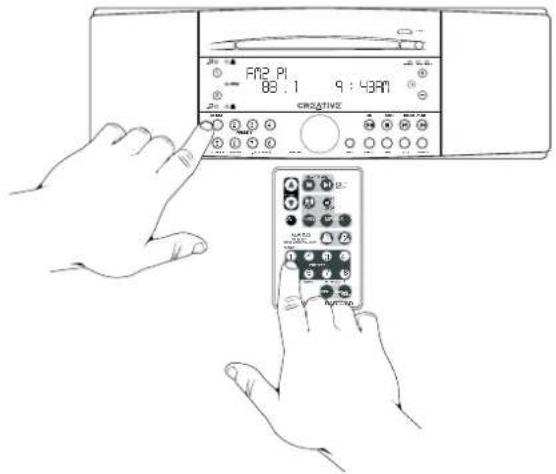
If you have an external audio source you always want to keep connected to the SoundWorks Radio CD, like a desktop cassette player, connect it to the AUX input on the rear panel (See P). Press the AUX button on the front panel or remote control to select this input (See Q).
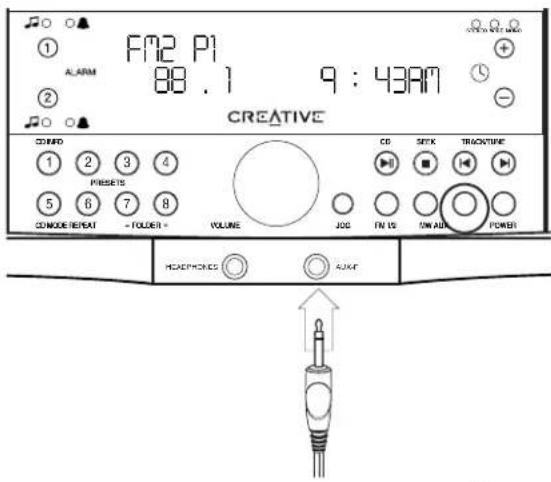
If you have an external audio program source you occasionally want to connect to the Radio CD, like a portable MP3 player, connect it to the AUX-F input on the front panel (See Q). This input overrides the rear AUX input. The AUX button on the front panel or remote control selects this input (See R).
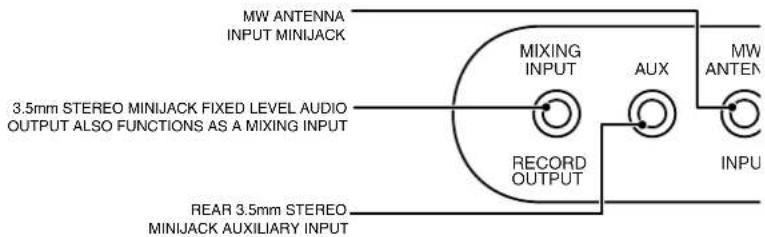
Mixing Input/Record Output
You may want to mix the sound from an audio program source (computer audio output, for instance) with the other Radio CD audio sources (FM, MW, Disc, Aux).
Connect the audio source to the MIXING INPUT on the rear panel (See S). The program source will be mixed with the currently selected Radio CD program source.
The audio source connected to the Mixing Input must have a level control if you wish to adjust the balance between the Radio CD program source and the Mixing Input audio source.
P.
text_image
100V RCL 20V MOS 30V RCL RCL RCL RCL RCL RCL RCL RCL RCL RCL RCL RCL RCL RCL RCL RCL RCL RCL RCL RCL RCL RCL RCL RCL RCL RCL RCL RCL RCL RCL RCL RCL RCL RCLQ.
text_image
FM2 P1 88.1 9:43AM CREATIVE COMED 1 2 3 4 PRESITS 5 6 7 8 COMODE REPEAT - FOLDER - VOLUME CD SETK TRACKTIME JOG FN US UNAID POWER HEADphones AUXF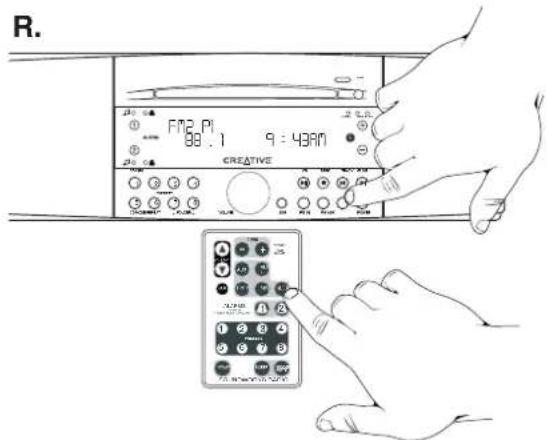
text_image
R. F72 Pi 88.1 9:43AM CREATIVE 12 1 2 3 4 5 6 7 8 9 10 11 12 13 14 15 16 17 18 19 20 21 22 23 24 25 26 27 28 29 30 31 32 33 34 35 36 37 38 39 40 41 42 43 44 45 46 47 48 49 50 51 52 53 54 55 56 57 58 59 60 61 62 63 64 65 66 67 68 69 70 71 72 73 74 75 76 77 78 79 80s.
text_image
MOS INTU R10 MOS INTU R10 T20 T20 T20 T20 T20 T20 T20 T20 T20 T20 T20 T20 T20 T20 T20 T20 T20 T20 T20 T20 T20 T20 T20 T20 T20 T30 T30 T30 T30 T30 T30 T30 T30 T30 T30 T30 T30 T30 T30 T30 T30 T30 T30 T30 T30 T30 T30 T30 T30 T30 T40Mute
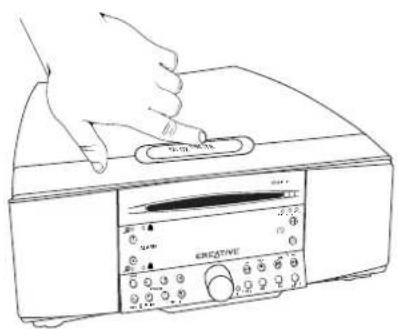
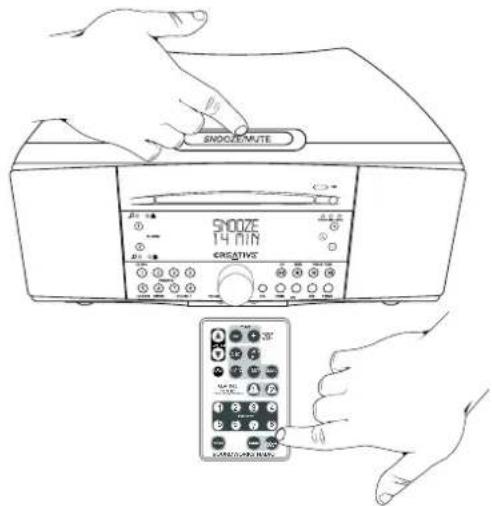
To mute the SoundWorks Radio CD: Press the SNOOZE/MUTE bar or the SNOOZE/MUTE button on the Remote Control (See T). Mute is cancelled if the POWER button is pressed, if a disc is inserted or the Volume is adjusted.
Sleep Delay
To make the Radio CD automatically turn off after a specific period of time:
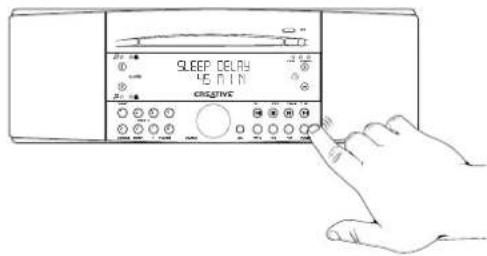
- Press the SLEEP button on the Remote Control until the desired amount of play time is reached (See U).
OR
- With the Radio CD in Standby, rapidly tap the POWER button until the desired amount of play time is reached (See V).
Sleep delay is available for 15, 30, 45, 60, 90 and 120 minute lengths. Sleep delay is cancelled if the POWER button is pressed or if a disc is inserted. Insert a disc before choosing the Sleep function if you wish to use the Sleep function during disc play.
T.
text_image
Line drawing of a hand pressing down on a device labeled 'REVATIVE' with control knobs and buttons
text_image
Hand pointing at a control panel with labeled buttons and icons, likely for interface or device selection.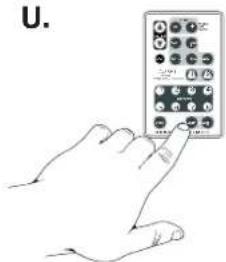
text_image
U.V.

text_image
SLEEP DELAY 4.5 MIN CREATIVESOUNDWORKS RADIO CD FRONT AND TOP PANEL FUNCTIONS
NORMAL OPERATION: PRES-DURING WAKEUP: PRESS TC

text_image
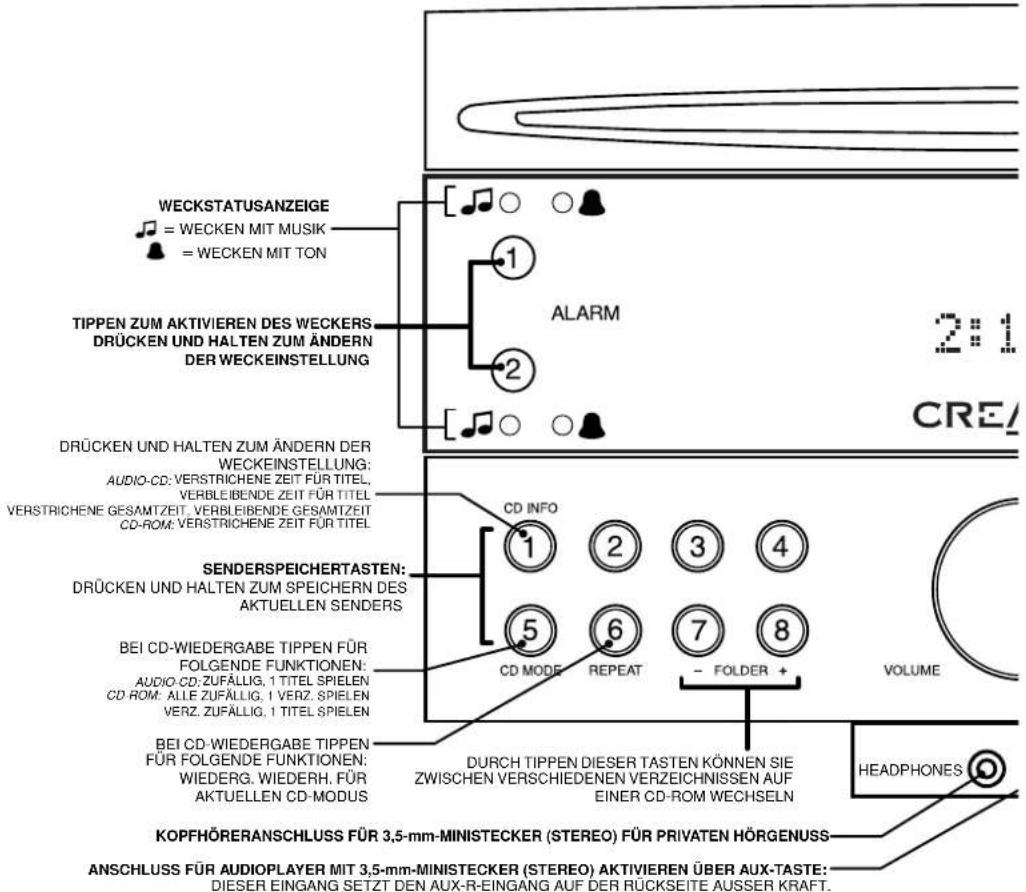
INDICATES ALARM STATUS = MUSIC WAKEUP = TONE WAKEUP TAP TO ACTIVATE ALARM PRESS AND HOLD TO ADJUST ALARM ALARM DURING DISC PLAY, TAP THIS BUTTON FOR: AUDIO CD: TRACK TIME ELAPSED, TRACK TIME REMAINING TOTAL TIME ELAPSED, TOTAL TIME REMAINING CD-ROM: TRACK TIME ELAPSED RADIO STATION PRESET BUTTONS: PRESS AND HOLD TO STORE CURRENT STATION DURING DISC PLAY, TAP THIS BUTTON FOR: AUDIO CD: RANDOM PLAY, PLAY ONE TRACK, CD-ROM: RANDOM PLAY OF DISC, PLAY ONE FOLDER RANDOM PLAY OF ONE FOLDER . PLAY ONE TRACK DURING DISC PLAY, TAP THIS BUTTON FOR: REPEAT PLAY OF CURRENT CD MODE CD INFO 1 2 3 4 5 6 7 8 CD MODE REPEAT - FOLDER + VOLUME TAP THESE BUTTONS TO MOVE BETWEEN DIFFERENT DIRECTORIES ON A CD-ROM DISC HEADPHONES INSERT HEADPHONES WITH 3.5mm STEREO MINIPLUG HERE FOR PRIVATE LISTENING INSERT AUDIO PLAYER WITH 3.5mm STEREO MINIPLUG HERE. PRESS AUX TO HEAR IT. THIS INPUT OVERIDES AUX-R IN BACK.ADJUSTS VOLUME DURING NORMAL OPERATION: ADJUSTS SETTINGS IN JOG BUTTON
text_image
MW ANTENNA INPUT MINIJACK 3.5mm STEREO MINIJACK FIXED LEVEL AUDIO OUTPUT ALSO FUNCTIONS AS A MIXING INPUT MIXING INPUT AUX MW ANTEN RECORD OUTPUT INPU REAR 3.5mm STEREO MINIJACK AUXILIARY INPUT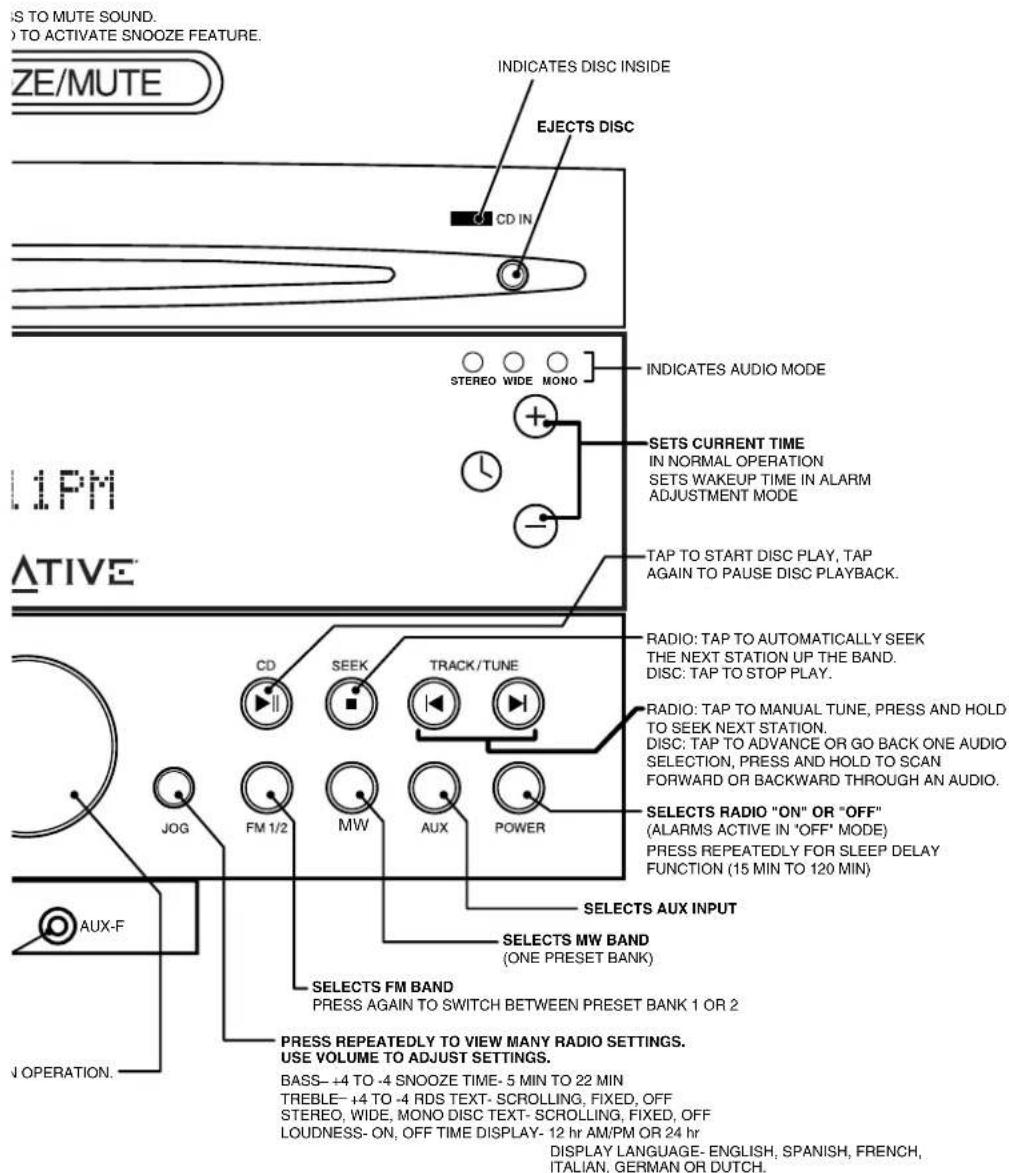
text_image
IS TO MUTE SOUND. ) TO ACTIVATE SNOOZE FEATURE. ZE/MUTE INDICATES DISC INSIDE EJECTS DISC CD IN STEREO WIDE MONO INDICATES AUDIO MODE SETS CURRENT TIME IN NORMAL OPERATION SETS WAKEUP TIME IN ALARM ADJUSTMENT MODE TAP TO START DISC PLAY, TAP AGAIN TO PAUSE DISC PLAYBACK. L1PM ATIVE CD SEEK TRACK/TUNE RADIO: TAP TO AUTOMATICALLY SEEK THE NEXT STATION UP THE BAND. DISC: TAP TO STOP PLAY. RADIO: TAP TO MANUAL TUNE, PRESS AND HOLD TO SEEK NEXT STATION. DISC: TAP TO ADVANCE OR GO BACK ONE AUDIO SELECTION, PRESS AND HOLD TO SCAN FORWARD OR BACKWARD THROUGH AN AUDIO. SELECTS RADIO "ON" OR "OFF" (ALARMS ACTIVE IN "OFF" MODE) PRESS REPEATEDLY FOR SLEEP DELAY FUNCTION (15 MIN TO 120 MIN) SELECTS AUX INPUT SELECTS MW BAND (ONE PRESET BANK) SELECTS FM BAND PRESS AGAIN TO SWITCH BETWEEN PRESET BANK 1 OR 2 PRESS REPEATEDLY TO VIEW MANY RADIO SETTINGS. USE VOLUME TO ADJUST SETTINGS. BASS- +4 TO -4 SNOOZE TIME- 5 MIN TO 22 MIN TREBLE- +4 TO -4 RDS TEXT- SCROLLING, FIXED, OFF STEREO, WIDE, MONO DISC TEXT- SCROLLING, FIXED, OFF LOUDNESS- ON, OFF TIME DISPLAY- 12 hr AM/PM OR 24 hr DISPLAY LANGUAGE- ENGLISH, SPANISH, FRENCH, ITALIAN, GERMAN OR DUTCH.
text_image
FM ANTENNAW INPUT VNA EXT INT 75 OHMS EXTERNAL FM ANTENNA *F* TYPE INPUT INTERNAL / EXTERNAL FM ANTENNA SELECTORSOUNDWORKS RADIO CD 740
REMOTE CONTROL
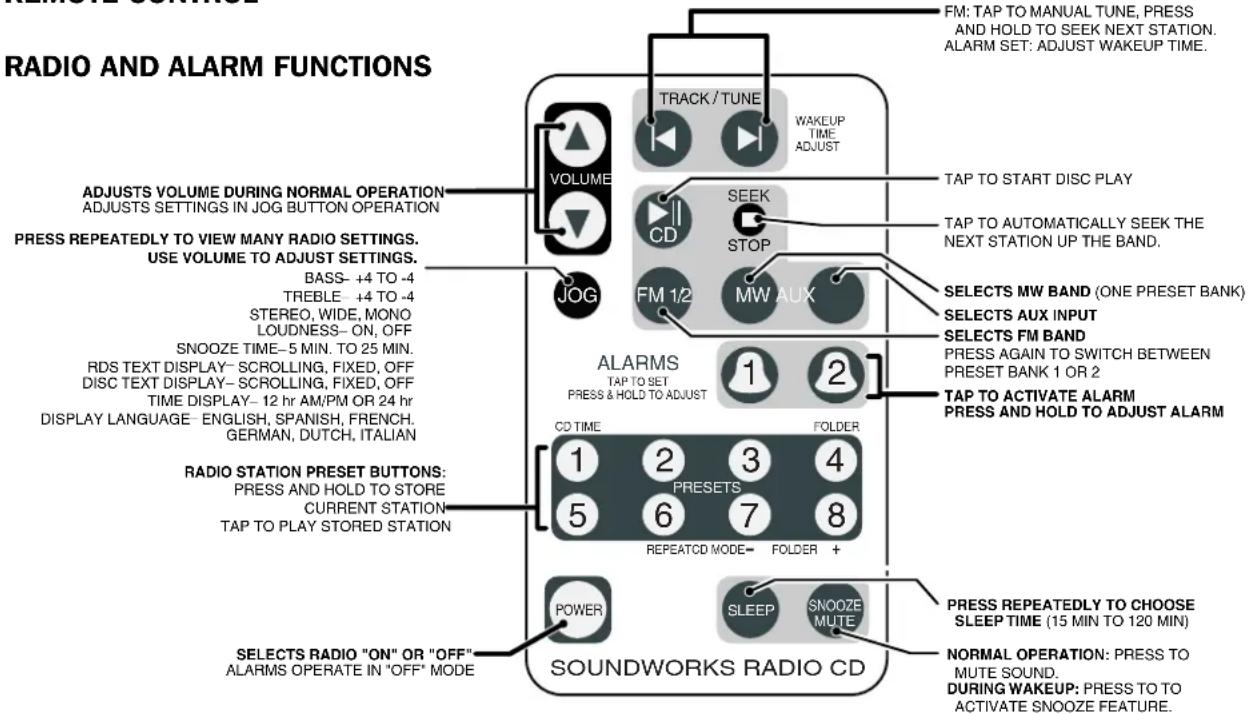
text_image
RADIO AND ALARM FUNCTIONS ADJUSTS VOLUME DURING NORMAL OPERATION ADJUSTS SETTINGS IN JOG BUTTON OPERATION PRESS REPEATEDLY TO VIEW MANY RADIO SETTINGS. USE VOLUME TO ADJUST SETTINGS. BASS- +4 TO -4 TREBLE - +4 TO -4 STEREO, WIDE, MONO LOUDNESS- ON, OFF SNOOZE TIME- 5 MIN. TO 25 MIN. RDS TEXT DISPLAY- SCROLLING, FIXED, OFF DISC TEXT DISPLAY- SCROLLING, FIXED, OFF TIME DISPLAY- 12 hr AM/PM OR 24 hr DISPLAY LANGUAGE- ENGLISH, SPANISH, FRENCH. GERMAN, DUTCH, ITALIAN RADIO STATION PRESET BUTTONS: PRESS AND HOLD TO STORE CURRENT STATION TAP TO PLAY STORED STATION SELECTS RADIO "ON" OR "OFF" ALARMS OPERATE IN "OFF" MODE TRACK/TUNE WAKEUP TIME ADJUST TAP TO START DISC PLAY TAP TO AUTOMATICALLY SEEK THE NEXT STATION UP THE BAND. SOEP STOP FM 1/2 MW AUX ALARMS TAP TO SET PRESS & HOLD TO ADJUST CD TIME FOLDER 1 2 3 4 5 6 7 8 REPEATED MODE+ FOLDER + POWER SLEEP SNOOZE MUTE SOUNDWORKS RADIO CD FM: TAP TO MANUAL TUNE, PRESS AND HOLD TO SEEK NEXT STATION. ALARM SET: ADJUST WAKEUP TIME. SELECTS MW BAND (ONE PRESET BANK) SELECTS AUX INPUT SELECTS FM BAND PRESS AGAIN TO SWITCH BETWEEN PRESET BANK 1 OR 2 TAP TO ACTIVATE ALARM PRESS AND HOLD TO ADJUST ALARM PRESS REPEATEDLY TO CHOOSE SLEEP TIME (15 MIN TO 120 MIN) NORMAL OPERATION: PRESS TO MUTE SOUND. DURING WAKEUP: PRESS TO TO ACTIVATE SNOOZE FEATURE.SOUNDWORKS RADIO CD 740
REMOTE CONTROL

text_image
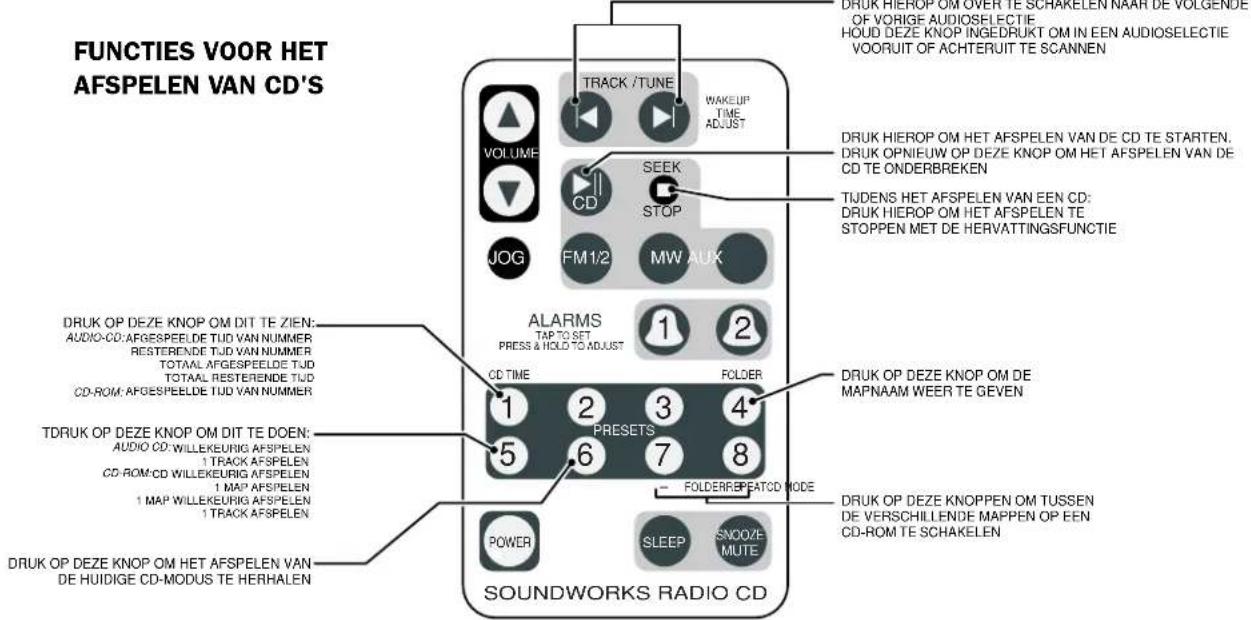
DISC PLAY FUNCTIONS TAP TO ADVANCE OR GO BACK ONE AUDIO SELECTION PRESS AND HOLD TO SCAN FORWARD OR BACKWARD THROUGH AN AUDIO SELECTION VOLUME TRACK / TUNE WAKEUP TIME ADJUST SEEK STOP FM 1/2 MW AUX JOG DURING DISC PLAY: TAP TO STOP PLAY WITH RESUME FEATURE TAP TWICE TO CLEAR RESUME FEATURE TAP THIS BUTTON FOR: AUDIO CD: TRACK TIME ELAPSED TRACK TIME REMAINING TOTAL TIME ELAPSED TOTAL TIME REMAINING CD-ROM: TRACK TIME ELAPSED ALARMS TAP TO SET PRESS & HOLD TO ADJUST 1 2 CD TIME FOLDER 1 2 3 4 PRESETS 5 6 7 8 FOLDERREPLATED MODE POWER SLEEP SNOOZE MUTE TAP THIS BUTTON FOR: AUDIO CD:RANDOM PLAY PLAY ONE TRACK CD-ROM: RANDOM PLAY OF DISC PLAY ONE FOLDER RANDOM PLAY OF ONE FOLDER PLAY ONE TRACK TAP THIS BUTTON FOR REPEATED PLAY OF CURRENT DISC MODE TAP THESE BUTTONS TO MOVE BETWEEN DIFFERENT FOLDERS ON A CD-ROM SOUNDWORKS RADIO CDJOG button operation:
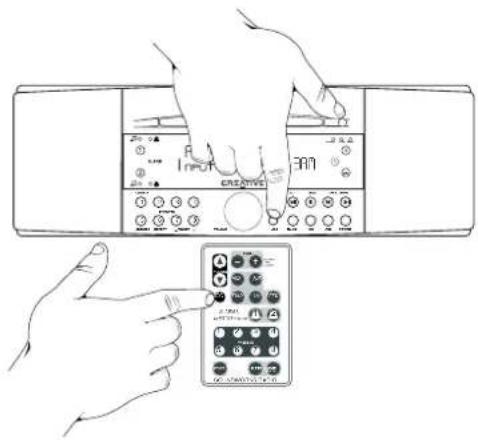
Press the JOG button on the radio or on the remote control to select the first JOG (See W). Press the JOG button again to select additional JOG functions.
Use the VOLUME knob or the buttons on the remote control to adjust settings of JOG functions. JOG operation is cancelled five seconds after the last JOG or VOLUME adjustment. Pressing any other Radio CD function also cancels JOG operation.
JOG functions
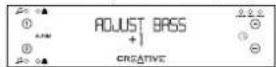
Bass: Bass output can be adjusted in four steps up or down.
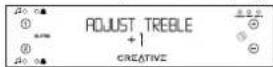
Treble: Treble output can be adjusted in four steps up or down.
Stereo/Wide/Mono: Adjustment cycles through STEREO, WIDE and MONO modes. MONO operation is cancelled when standby is entered.
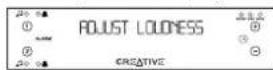
Loudness: With LOUDNESS engaged, the Radio CD will boost the bass output at low VOLUME settings.
Snooze Time: Adjustable from 5 minutes to 22 minutes
RDS Text Display: For FM station RDS text, choose between "scrolling text" display, "static text" display and no text display.
Disc Text Display: For audio CDs that have CD text or MP3 files, choose between "scrolling text" display, "static text" display and no text display.
Time Display Mode: Choose 12 hour AM/PM time (US standard) or 24 hour time (International standard)
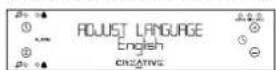
Display Language: Choose English, Spanish, French, Italian or German or Dutch.
text_image
Diagram showing hands operating a device with a creative remote control, labeled with icons and text.BASS Adjustment display
TREBLE Adjustment display
STEREO/WIDE/MONO
Adjustment display

LOUDNESS
Adjustment display
SNOOZE Adjustment display
RDS TEXT
Adjustment display
DISC TEXT
Adjustment display
Time Adjustment display
Language Adjustment display
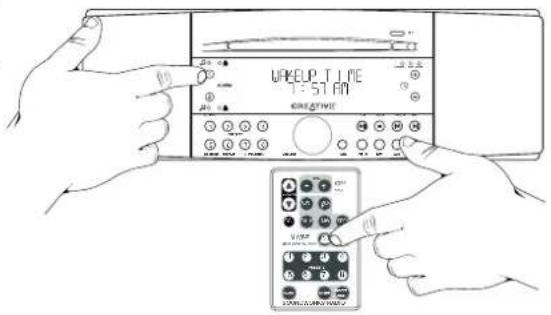
Adjusting The Wakeup Settings
During Wakeup Settings adjustment, you select Wakeup time and the Music Wakeup Source and Volume. The choice of Tone or Music Wakeup is selected later as the Alarm is activated.
Note: Store any radio station you wish to use as a Wakeup station in a PRESET location.
1) Press and hold either the Alarm 1 or the Alarm 2 button until a short tone is heard (about 1.5 seconds). The Radio CD enters Wakeup Adjustment mode. Wakeup Adjustment persists for about 15 seconds if no button is pressed. You always have five seconds between adjustments.
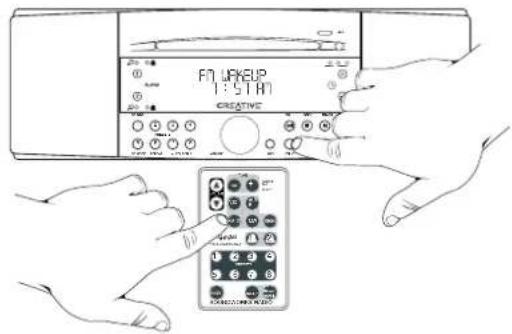
2) At any point during the Wakeup Adjustment session, you can choose your preferred Music Wakeup by selecting FM1, FM2, MW or CD. After choosing a radio preset bank (FM1, FM2, or MW), choose the desired station by pressing its PRESET button on the remote control of the radio faceplate.
You can only choose CD wakeup if there is a CD stored in the Radio CD. If the CD is removed after CD wakeup is selected, the Wakeup Setting will default to Tone Wakeup.
The AUX inputs are not available for Wakeup.
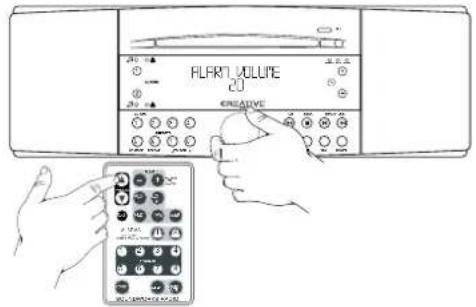
3) At any time during the Wakeup Adjustment session, you can determine the Music Wakeup volume by adjusting the VOLUME on either the remote control or the radio faceplate.
- Entering WAKEUP Adjustment
text_image
UPEUP TIME 1:57 P.M- MUSIC WAKEUP Adjustment, First screen
text_image
FN WAREUP 1:5 PM CREATIVE- WAKEUP Volume adjustment
text_image
ALART VOLUME CJ CREATIVEAdjusting The Wakeup Settings
4) At any point in the Wakeup Adjustment session, you can determine the wakeup time by using the Time adjustment on the front panel or the TRACK/TUNE adjustment on the remote control.
5) End the Wakeup Adjustment session by pressing the same Alarm button again, or just wait about ten seconds. The Wakeup Adjustment session will automatically end. Either way, the Radio CD will store your new settings.
- WAKEUP Time adjustment

text_image
FN YAKELP 7:51 AM CREATIVE- WAKEUP Setting Stored display
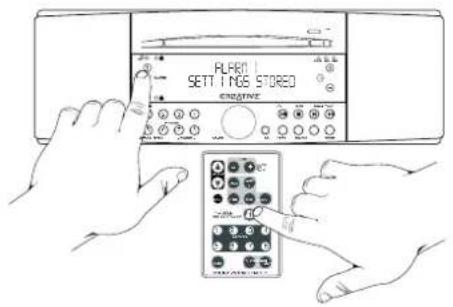
text_image
PLAEN SETTINGS STORED CREATIVEActivating Wakeup
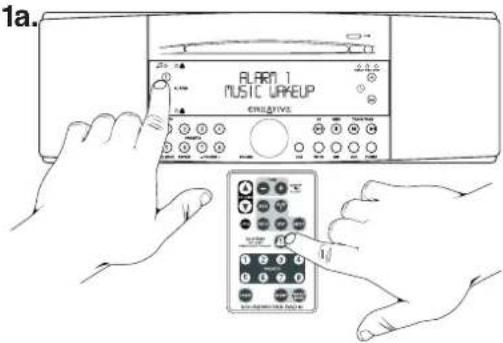
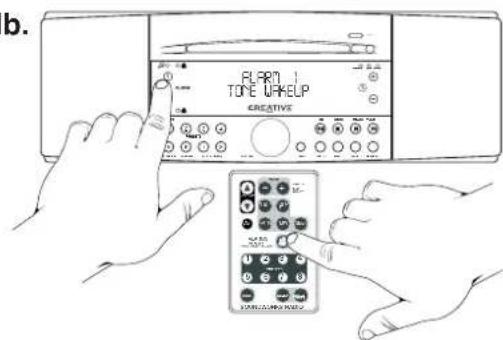
While in Standby or normal operation, tap either Alarm button to cycle between
Music Wakeup
Tone Wakeup
No Wakeup
A Music Wakeup indicator ( musical) or a Tone Wakeup indicator ( musical) lights to show activation.
Music Wakeup only functions if the Radio remains in Standby mode.
Tone Wakeup operates whenever it is activated. You can use Tone Wakeup as a reminder function during the day while using the Radio normally.
Silencing a Wakeup
To cancel an operating Wakeup alarm for the day, but keep it activated, tap the Power button on the front panel or the remote control. The Wakeup settings will remain active and operate the next day.
To silence an alarm and deactivate it (cancel it from functioning the next day), press the appropriate Alarm button on the radio face or the remote control.
Snooze Function
Tapping the SNOOZE/MUTE bar on the radio, or the SNOOZE MUTE button (2) on the remote will silence a Wakeup alarm for a pre-determined period of time (5 to 22 minutes).
Adjust the SNOOZE delay period by using the JOG function.
1a.
text_image
1a. BLARM 1 MUSIC UPKUP ORIGINAL1b.
text_image
b. FLAM TOYE WAKELP CREATIVE1c.

text_image
PLRAM OFF 12.0000000000000000000000000000000000000000000000000000000000000000000000000000000000000000000000000000Snooze Function
2.

text_image
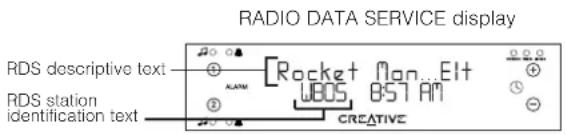
SNOO/EAUTE SNOO/EAUTE 14 MIN CREATIVE CONCUCUM RUN 212121RADIO DATA SERVICE (RDS)
Some FM radio stations broadcast Radio Data Service (RDS) text along with their programs. Station Identification Text is displayed in the first 8 characters of the lower line. This text generally does not change. Descriptive Text is displayed on the top line. This text may describe the station's format or it may show the song title and artist.
CD-Text
Audio CDs now include descriptive text stored along with their audio programs. The Radio CD will decode and display this text.
MP3 File ID3 Text Information
MP3 files downloaded from the Internet may contain ID3 text information. ID3 text information can be added to MP3 files as the file is created from an uncompressed audio source. The Radio CD will display this text when present in MP3 files. If there is no ID3 text information, the Radio CD will display the file name.
Choosing Text Displays
The JOG menu has separate RDS text and DISC text headings that let you choose between scrolling text display, static text display or no text display.
text_image
RADIO DATA SERVICE display RDS descriptive text RDS station identification text ●○○● ●○○○ ●○○○ ●○○○ ●○○○ ●○○○ ●○○○ ●○○○ ●○○○ ●○○○ ●○○○ ●○○○ ●○○○ ●○○○ ●○○○ ●○○○ ●○○○ ●○○○ ●○○○ ●○○○ ●○○○ ●○○-● ●○○-● ●○○-● ●○○-● ●○○-● ●○○-● ●○○-● ●○○-● ●○○-● ●○○-● ●○○-● ●○○-● ●○○-● ●○○-● ●○○-● ●○○-● ●○○-● ●○-● ●○-● ●○-● ●○-● ●○-● ●○-● ●○-● ●○-● ●○-● ●○-● ●○-● ●○-● ●○-● ●○-● ●○-● ●○-● ●○-● ●○-● ●○-● ●○-● ★RRocket Mon...Elt WBOS 8:57 AM CREATIVE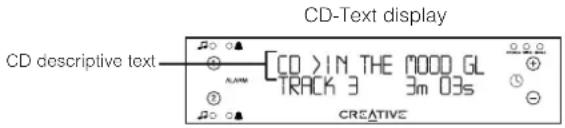
text_image
CD-Text display CD descriptive text CO > IN THE NOOD GL TRACK 3 3m 03s CREATIVE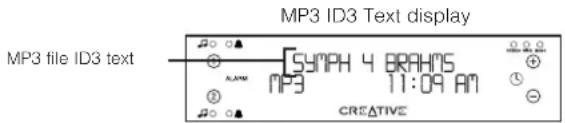
text_image
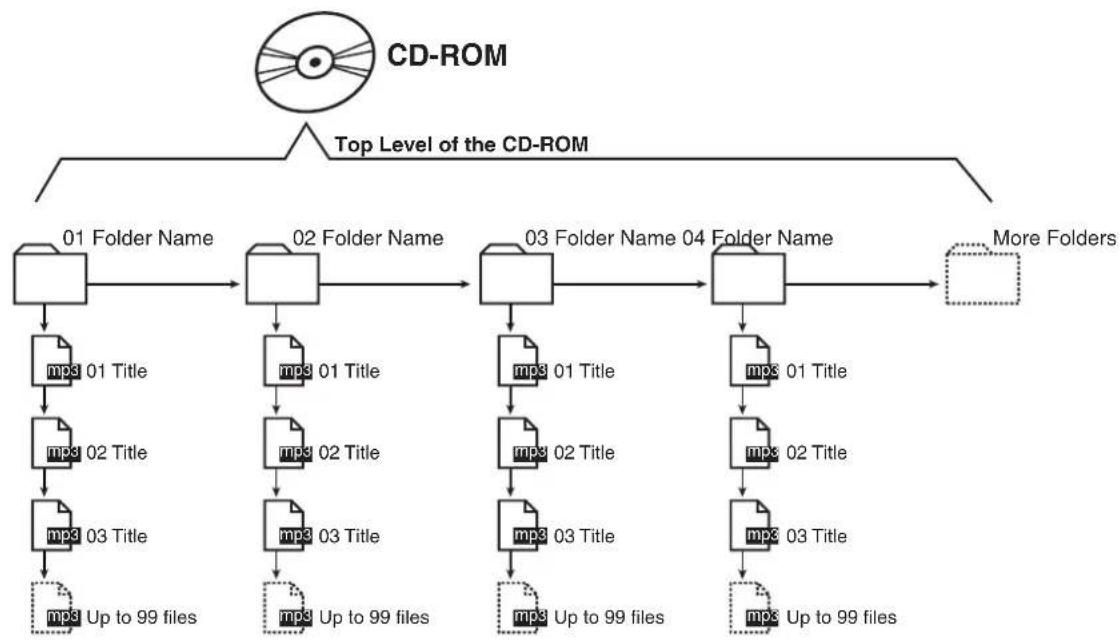
MP3 ID3 Text display MP3 file ID3 text SYMPH 4 BRAHNS MP3 11:09 AM CREATIVEThe Radio CD recognises MP3 compressed audio files stored on a CD-ROM disc. You can create (or "burn") your own CD-ROM compilation discs containing much more music than would fit on an audio CD. The Radio CD will also recognise folders at the top level of a CD-ROM and display their folder names. Use folders on a CD-ROM as a convenient way to select between different groups of music.
The Radio CD recognises a maximum of 99 tracks in any folder, or at the top level of a disc. The Radio CD will not recognise subfolders. The Radio CD will treat MP3 files inside subfolders as being inside the top level folder.
Sequence of Play on a CD-ROM
a) The Radio CD will first recognise any MP3 files stored on the top level of the CD-ROM. It will play those files "file name" sequence. The Radio CD will ignore any files that do not end in ".mp3".
b) After the Radio CD has played all MP3 files on the top level of the CD-ROM, it will then play the contents of any folders present on the CD-ROM in "file name" sequence.

flowchart
graph TD
    A["Top Level of the CD-ROM"] --> B["1"]
    B --> C["2"]
    C --> D["3"]
    D --> E["4"]
    E --> F["5"]
    F --> G["6"]
    G --> H["7"]
    H --> I["8"]
    I --> J["9"]
    J --> K["10"]
    K --> L["11"]
    style A fill:#f9f,stroke:#333
    style B fill:#ccf,stroke:#333
    style C fill:#cfc,stroke:#333
    style D fill:#fcc,stroke:#333
    style E fill:#cff,stroke:#333
    style F fill:#ffc,stroke:#333
    style G fill:#fcf,stroke:#333
    style H fill:#cff,stroke:#333
    style I fill:#ffc,stroke:#333
    style J fill:#cff,stroke:#333
    style K fill:#ffc,stroke:#333
    style L fill:#cff,stroke:#333
c) If there are no “.mp3” audio files in the top level of the CD-ROM, the Radio CD will automatically play the contents of the first folder on the CD-ROM (according to the “folder name” sequence).
Press Preset 4 during MP3 file play to briefly display the name of the active folder.
d) Once all the contents of the first folder are played, the Radio CD will play the contents of any remaining folders at the top level of the disc.
e) The FOLDER + and FOLDER - buttons skip to the next or previous directory in sequence according to the folder names.
f) The diagram on page 19 is an example of the automatic play sequence the Radio CD follows when playing the contents of a CD-ROM.
Tips For Preparing An MP3 CD-ROM
1) Start the title of each track or folder with a number to designate its sequence. Many CD-ROM recording programs support the automatic addition of sequence numbers to the start of each MP3 file name.
2) The Radio CD treats numbers as text when determining track and folder sequence. Use a leading zero on single digit numbers (01, 02, 03, ...) if the total of your tracks or folders is ten or greater.
3) The Radio CD supports a maximum of 99 tracks at the top level of a CD or within any folder at the top level of the CD-ROM.
Arranging MP3 Files and Folders on a CD-ROM
a) Place only folders at the top level of your CD-ROM (no MP3 files). This lets you cycle through the folders using the FOLDER + and FOLDER - buttons in a similar manner to choosing discs in a multiple CD player.
b) RIP (compress) your favorite tracks from an audio CD into a folder on your computer hard drive. Make sure the track titles start with numbers according to your desired track sequence.
c) Repeat the procedure for other groups of compressed audio files you wish to store on the same CD-ROM, saving the files in separate folders on your hard drive.
d) Use folder titles with a number at the start, in a sequence of your choice.
e) "Burn" all the folders onto a CD-ROM at once.
Once completed, you could have a CD-ROM with much more music than a conventional Audio CD. You can navigate through each folder simply by pressing the FOLDER + and FOLDER - buttons.
flowchart
graph TD
    A["CD-ROM"] --> B["Top Level of the CD-ROM"]
    B --> C["01 Folder Name"]
    C --> D["mp3 01 Title"]
    D --> E["mp3 02 Title"]
    E --> F["mp3 03 Title"]
    F --> G["Up to 99 files"]
    C --> H["02 Folder Name"]
    H --> I["mp3 01 Title"]
    I --> J["mp3 02 Title"]
    J --> K["mp3 03 Title"]
    K --> L["Up to 99 files"]
    H --> M["03 Folder Name"]
    M --> N["mp3 01 Title"]
    N --> O["mp3 02 Title"]
    O --> P["mp3 03 Title"]
    P --> Q["Up to 99 files"]
    M --> R["04 Folder Name"]
    R --> S["mp3 01 Title"]
    S --> T["mp3 02 Title"]
    T --> U["mp3 03 Title"]
    U --> V["Up to 99 files"]
    R --> W["More Folders"]
Internal audio sources:
FM stereo tuner with display of Radio Data Service text from supporting FM stations.
MW tuner.
CD Transport With:
INPUT VOLTAGE: 230VAC 50HZ 0.5A
Audio CD play supporting display of CD-text
Decode and playback of MP3 files from CD-ROM disc.
MP3 data rates supported: 30-300 kbps and variable data rates
Inputs:
INPUT VOLTAGE: 230VAC 50HZ 0.5A
One rear panel AUX IN 3.5 mm stereo minijack
One rear panel MIXING INPUT (combined with REC
OUT) 3.5 mm stereo minijack
One rear panel MW Antenna 3.5 mm stereo minijack
sleeve – no connection, tip and ring-wire loop antenna
One rear panel FM Antenna "F"-type jack, 75 ohms
One front panel AUX-F 3.5 mm stereo minijack
Outputs:
One rear panel REC OUT stereo minijack
One front panel Headphone 3.5 mm stereo minijack
Rear Panel Controls:
FM antenna INT/EXT switch
Dimensions:
English Metric
Height: 4 ^15/_16 inches 125 mm
Width: 14 inches 356 mm
Depth: 9 78 inches 248 mm
Depth (with knob and AC cord):
10 ^3 / _8 inches 258 mm
Weight: 12 lbs 5.5 kg
text_image
SNOOZE/MUTE 749 AM CREATIVESoundWorks Radio CD 740
text_image
Line drawing of a portable electronic device with labeled control panel and buttonsB.

text_image
Illustration showing four steps of a device installation or cleaning procedure, labeled 1 to 4.5.

text_image
AC250 DC1 AC DC250 DC1 AC DC250 DC1 AC DC250 DC1 AC DC250 DC1 AC DC250 DC1 AC DC250 DC1 AC DC250 DC1 AC DC250 DC1 AC DC250 DC1 AC DC250 DC1 AC AC DC250 DC1 AC DC250 DC1 AC DC250 DC1 AC DC250 DC1 AC DC250 DC1 AC DC250 DC1 AC DC250 DC1 AC DC250 DC1 AC DC250 DC1 AC DC250 DC3 AC DC300 DC300 DC300 DC300 DC300 DC300 DC300 DC300 DC300 DC300 DC300 DC300 DC300 DC300 DC300 DC300 DC300 DC300 DC300 DC300 DC301 DC301 DC301 DC301 DC301 DC301 DC301 DC301 DC301 DC301 DC301 DC301 DC301 DC301 DC301 DC301 DC301 DC301 DC301 DC301 DC302 DC302 DC302 DC302 DC302 DC302 DC302 DC302 DC302 DC302 DC302 DC302 DC302 DC302 DC302 DC302 DC302 DC302C.

natural_image
Line drawing of a hand holding a cable next to an electronic device with a display (no text or symbols visible)D.

natural_image
Illustration of a hand using a tool to adjust or install a small electronic component (no text or symbols visible)G.

text_image
9:4300 CREATIVEH.
text_image
F12.PI 88.1 9:48AM CRESTINGtext_image
M. Lecture/Pause CD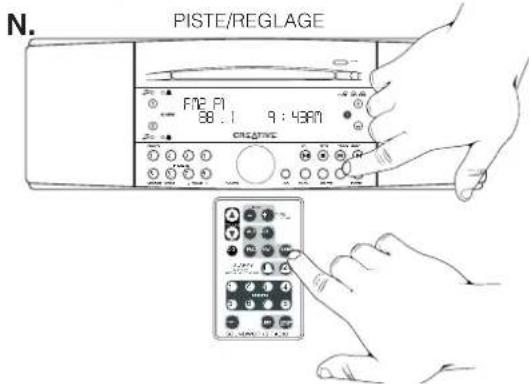
text_image
PISTE/REGLAGE N. FNE PI 88 : 1 9 : 48AM CREATIVE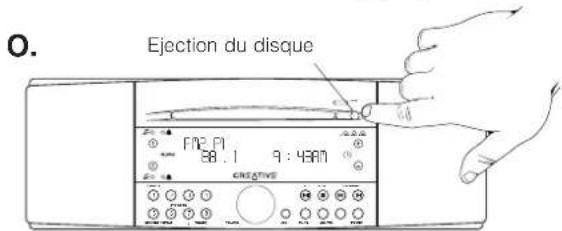
text_image
O. Ejection du disque F12.71 38.1 9:43AM CREATIVEEcoute de sources sonores externes
text_image
Line drawing of a hand pressing down on a device labeled 'CREATIVE' with a knob, likely illustrating a computer control or testing setup.
natural_image
Hand pointing at a remote control panel (no text or symbols visible)
text_image
U.V.

text_image
SLEEP DELAY 45 MIN CREATIVEGUIDE DE REFERENCE RAPIDE – PANNEAU AVANT DU RADIO CD SOUNDWORKS
FONCTIONS DES PANNEAUX AVANT ET SUPERIEUR DU RADIO CD SOUNDWORKS
text_image
Diagram showing hands operating a device with labeled buttons and a remote control panel, illustrating a home control system.text_image
RLART VOLUME CU CREATIVEtext_image
PLA01 1 OFFFonction Rappel
2.
text_image
SNR/DAUTE SNR/DAUTE 14 MIN CREATIVERADIO DATA SERVICE (RDS)
text_image
Line drawing of a portable electronic device with labeled control panel and buttonsB.

text_image
Illustration showing four steps of a device packaging or assembly process, labeled 1 to 4.5.

text_image
AC250 DC1 AC DC250 DC1 AC DC250 DC1 AC DC250 DC1 AC DC250 DC1 AC DC250 DC1 AC DC250 DC1 AC DC250 DC1 AC DC250 DC1 AC DC250 DC1 AC DC250 DC1 AC AC DC250 DC1 AC DC250 DC1 AC DC250 DC1 AC DC250 DC1 AC DC250 DC1 AC DC250 DC1 AC DC250 DC1 AC DC250 DC1 AC DC250 DC1 AC DC250 DC3 AC DC300 DC300 DC300 DC300 DC300 DC300 DC300 DC300 DC300 DC300 DC300 DC300 DC300 DC300 DC300 DC300 DC300 DC300 DC300 DC300 DC301 DC301 DC301 DC301 DC301 DC301 DC301 DC301 DC301 DC301 DC301 DC301 DC301 DC301 DC301 DC301 DC301 DC301 DC301 DC301 DC302 DC302 DC302 DC302 DC302 DC302 DC302 DC302 DC302 DC302 DC302 DC302 DC302 DC302 DC302 DC302 DC302 DC302C.

text_image
Hand-drawn illustration showing a hand holding a test device connected to a control panel with labeled ports and a display screen.D.

Stellen der Uhr
text_image
CURRENT TPE TPB AM CREATIVEF.

natural_image
Illustration of hands using a handheld device to interact with a small electronic device (no text or symbols visible)G.
text_image
9:40am CREATIVEH.
text_image
F12. PI 88.1 9:48AM CRESTINGtext_image
J. FM2 P1 88.1 9:43AM CREATIVEK.
text_image
F12 PI 88.1 9:43AM CROATIVEAUSWÄHLEN DER CD-WIEDERGABE
text_image
Line drawing of a hand pressing down on a device labeled 'CREATIVE' with a knob, showing control panel and buttons.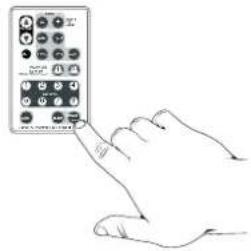
natural_image
Hand pointing at a remote control panel with icons (no text or symbols visible)U.

text_image
U.V.

text_image
SLEEP DELAY 45 MIN CREATIVEFUNKTIONEN AUF DER
SOUNDWORKS RADIO
CD-VORDER- UND
-OBERSEITE
NORMALBETRIEB: DRÜCKEN ZUM S
IM WECKMODUS: DRÜCKEN ZUM AK

text_image
Diagram showing hands interacting with a device labeled 'CREATIVE' and a remote control with icons for function keys.text_image
RLART VOLUME CU CREATIVEtext_image
FN WAKUP 7:51 AM CREATIVEtext_image
Beschreibender RDS-Text RDS-Sender-ID ● ● ● ● ● ● ● ● ● ● ● ● ● ● ● ● ● ● ● ● ● ● ● ● ● ● ● ● ● ● ● ● ● ● ● ● ● ● ● ● ● ● ● ● ● ● ● ● ● ● ○○○○○○○○○○○○○○○○○○○○○○○○○○○○○○○○○○○○○○○○○○○○○○○○○○○○○○○○○○○○○○○○○○○○○○○○○○○○○○○○○○○○○○○○○○○○○○○○○○○○ ● ● ● ● ● ● ● ● ● ● ● ● ● ● ● ● ● ● ● ● ● ● ● ● ● ● ● ● ● ● ● ● ● ● ●Anzeige von CD-Text

text_image
Beschreibender CD-Text CO > IN THE MOOD GL TRACK 3 3m 03s CREATIVEPress STOP Disc Position
text_image
Line drawing of a portable electronic device with labeled control panel and buttonsB.
natural_image
Two-step diagram showing a device with internal components and a hand holding a clip (no text or symbols)
natural_image
Illustration showing a hand pressing a component on a slide, and a separate view of a slide with a curved handle (no text or symbols)5.

text_image
AC250 DC1 AC DC250 DC1 AC DC250 DC1 AC DC250 DC1 AC DC250 DC1 AC DC250 DC1 AC DC250 DC1 AC DC250 DC1 AC DC250 DC1 AC DC250 DC1 AC DC250 DC1 AC AC DC250 DC1 AC DC250 DC1 AC DC250 DC1 AC DC250 DC1 AC DC250 DC1 AC DC250 DC1 AC DC250 DC1 AC DC250 DC1 AC DC250 DC1 AC DC250 DC3 AC DC300 DC300 DC300 DC300 DC300 DC300 DC300 DC300 DC300 DC300 DC300 DC300 DC300 DC300 DC300 DC300 DC300 DC300 DC300 DC300 DC301 DC301 DC301 DC301 DC301 DC301 DC301 DC301 DC301 DC301 DC301 DC301 DC301 DC301 DC301 DC301 DC301 DC301 DC301 DC301 DC302 DC302 DC302 DC302 DC302 DC302 DC302 DC302 DC302 DC302 DC302 DC302 DC302 DC302 DC302 DC302 DC302 DC302C.

natural_image
Hand holding a probe next to a portable electronic device (no visible text or symbols)D.
text_image
CURRENT TPE TPB AM CREATIVEF.

natural_image
Illustration of hands using a handheld device to interact with a small electronic device (no text or symbols visible)G.

text_image
9:48AM CREATIVEH.

text_image
F12.PI 88.1 9:48AM CRESTINGtext_image
J. F12 PI 88.1 9:43AM CREATIVEK.
text_image
FM2 PI 88.1 9:43PM CRISATIVEtext_image
R. F72 Pi 88.1 9:43AM CREATIVES.
text_image
TENGLISH INT PWR INT TENGLISH INT TENGLISH INT TENGLISH INT TENGLISH INT TENGLISH INT TENGLISH INT TENGLISH INT TENGLISH INT TENGLISH INT TENGLISH INT TENGLISH INT TENGLISH INT TENGLISH INT TENGLISH INT TENGLISH INT TENGLISH INT TENGLISH INT 10000000000000000000000000000000000000000000000000000000000000000000000000000000000000000000000000000text_image
Line drawing of a hand pressing down on a device labeled 'CREATIVE' with a knob, showing control panel and buttons.
natural_image
Hand pointing at a remote control panel with icons (no text or symbols visible)U.

text_image
U.V.

text_image
SLEEP DELAY 45 MIN CREATIVEMANUALE DI RIFERIMENTO RAPIDO - PANNELLO FRONTALE DEL SOUNDWORKS RADIO CD
text_image
FM ANTENNA INPUT EXT INT 75 OHMS INGRESSO DI TIPO "F" PER L'ANTENNA FM ESTERNA SELETTORE ANTENNA FM INTERNA/ESTERNASOUNDWORKS RADIO CD 740 TELECOMANDO
BOOST- SPENTO. ACCESC
RITARDO- DA 5 A 25 MINUTI
VISUALIZZAZIONE TESTO RDS- MOBILE, STATICO, NO TESTO VISUALIZZAZIONE TESTO DISCO- MOBILE, STATICO, NO TESTO VISUALIZZAZIONE ORA - 12 hr AM/PM OPPURE 24 hr LINGUA DI VISUALIZZAZIONE - INGLESE, SPAGNOLO, FRANCESE, ITALIANO, TEDESCO O OLANDESE
PULSANTI PRESET DELLE STAZIONI RADIO:
TENERE PREMUTI PER MEMORIZZARE LA
STAZIONE CORRENTE
text_image
Diagram showing hands operating a device with labeled buttons and a remote control panel, illustrating electrical or home control system.text_image
ALART VOLUME 20 CREATIVERDS (RADIO DATA SERVICE)
text_image
Line drawing of a portable electronic device with labeled control panel and buttonsB.
natural_image
Two-step diagram showing a device with internal components and a hand holding a clip (no text or symbols)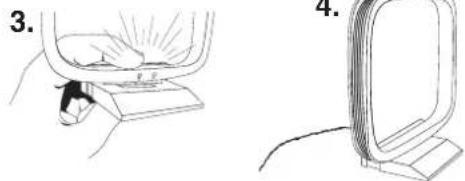
natural_image
Illustration showing a hand pressing a component on a slide, and a separate view of a slide with a curved handle (no text or symbols)5.
text_image
AC250 DC1 AC DC250 DC1 AC DC250 DC1 AC DC250 DC1 AC DC250 DC1 AC DC250 DC1 AC DC250 DC1 AC DC250 DC1 AC DC250 DC1 AC DC250 DC1 AC DC250 DC1 AC AC DC250 DC1 AC DC250 DC1 AC DC250 DC1 AC DC250 DC1 AC DC250 DC1 AC DC250 DC1 AC DC250 DC1 AC DC250 DC1 AC DC250 DC1 AC DC250 DC3 AC DC300 DC300 DC300 DC300 DC300 DC300 DC300 DC300 DC300 DC300 DC300 DC300 DC300 DC300 DC300 DC300 DC300 DC300 DC300 DC300 DC301 DC301 DC301 DC301 DC301 DC301 DC301 DC301 DC301 DC301 DC301 DC301 DC301 DC301 DC301 DC301 DC301 DC301 DC301 DC301 DC302 DC302 DC302 DC302 DC302 DC302 DC302 DC302 DC302 DC302 DC302 DC302 DC302 DC302 DC302 DC302 DC302C.
natural_image
Hand holding a cable next to a device with a display panel (no visible text or symbols)D.

text_image
CURRENT TPE TPB AM CREATIVEF.
natural_image
Illustration of a hand using a tool to adjust or install a small electronic component (no text or symbols visible)G.
text_image
9:4300 CREATIVEH.
text_image
F12.1 88.1 9:48AM CREATIVEtext_image
FN3 PI 58.1 9:43M ENGLISHJ.

text_image
J. FN2 PI 88.1 9:43AM ORIGINALK.
text_image
FM2 PI 88.1 9:43PM CRISATIVOtext_image
Line drawing of a hand pressing down on a device labeled 'CREATIVE' with a knob, showing control panel and buttons.
natural_image
Hand pointing at a remote control panel with icons (no text or symbols visible)U.

text_image
U.V.
text_image
SLEEP DELAY 45 MIN CREATIVEGUÍA DE REFERENCIA RÁPIDA - PANEL FRONTAL DE LA SOUNDWORKS RADIO CD
FUNCIONES DEL PANEL FRONTAL Y SUPERIOR DE LA SOUNDWORKS RADIO CD
text_image
Diagram showing hands interacting with a device labeled 'CREATIVE' and a remote control panel with icons for function keys.text_image
ALART VOLUME CU CREATIVEtext_image
SNR/PMUTE SNR/PMUTE 14 MIN CREATIVERDS (SERVICIO DE DATOS POR RADIO)
text_image
Line drawing of a portable electronic device with labeled control panel and buttonsB.

text_image
Diagram showing two steps of a device installation or assembly, labeled 1 and 2, with numbered components and hands.。

natural_image
Illustration showing a hand pressing a button on a device, and a close-up of the device's side view (no text or symbols present)5.

text_image
AC250 DC1 AC DC250 DC1 AC DC250 DC1 AC DC250 DC1 AC DC250 DC1 AC DC250 DC1 AC DC250 DC1 AC DC250 DC1 AC DC250 DC1 AC DC250 DC1 AC DC250 DC1 AC AC DC250 DC1 AC DC250 DC1 AC DC250 DC1 AC DC250 DC1 AC DC250 DC1 AC DC250 DC1 AC DC250 DC1 AC DC250 DC1 AC DC250 DC1 AC DC250 DC3 AC DC300 DC300 DC300 DC300 DC300 DC300 DC300 DC300 DC300 DC300 DC300 DC300 DC300 DC300 DC300 DC300 DC300 DC300 DC300C.

natural_image
Line drawing of a hand holding a test device connected to a power supply unit (no text or symbols visible)D.
De klok instellen
natural_image
Illustration of a hand using a pipette to adjust or install a small electronic component (no text or symbols visible)G.
text_image
9:4800 ECREATIVEH.

text_image
F12, PI 88.1 9:48AM CRESTINGRadiostations zoeken (FM of MW)
text_image
FN2 PI 58.1 9:43M ENGLISHJ.

text_image
J. FM2 PI 88.1 9:43AM EFFECTIVEK.
text_image
FM2 PI 88.1 9:43AM CREATIVEtext_image
Line drawing of a hand pressing down on a device labeled 'CREATIVE' with a knob, showing control panel and buttons.
text_image
Hand pointing at a remote control panel with icons for status and functionU.

text_image
U.V.

text_image
SLEEP DELAY 45 MIN CREATIVEOVERZICHT - BEDIENINGSPANEEEL VAN SOUNDWORKS RADIO CD
SOUNDWORKS RADIO CD - FUNCTIES VAN BEDIENINGSPANEEEL BOVEN- EN VOORAAN
NORMALE WERKING: DRUK HIEROP OM TIJDENS WEKKEN: DRUK HIEROP OM D

text_image
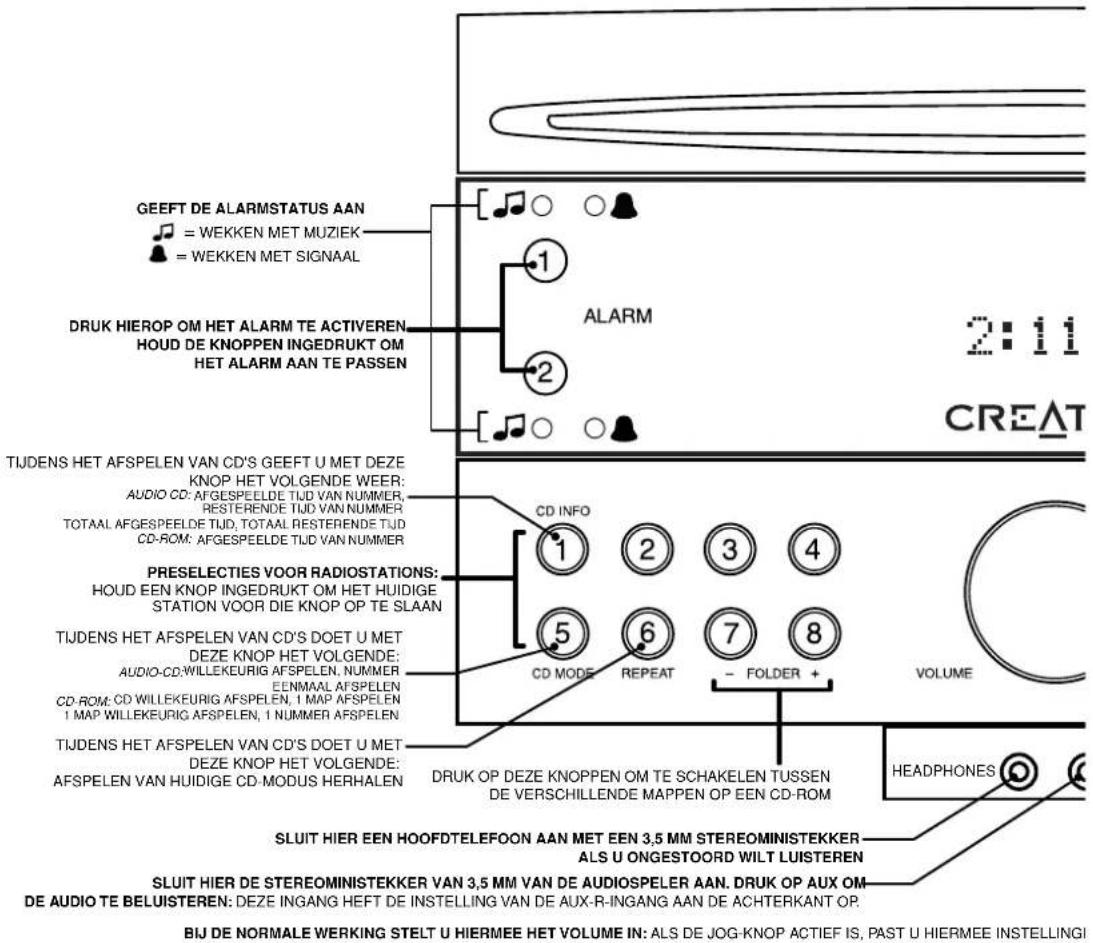
GEEFT DE ALARMSTATUS AAN = WEKKEN MET MUZIEK = WEKKEN MET SIGNAAL DRUK HIEROP OM HET ALARM TE ACTIVEREN HOUD DE KNOPPEN INGEDRUKT OM HET ALARM AAN TE PASSEN TIJDENS HET AFSPELEN VAN CD'S GEEFT U MET DEZE KNOP HET VOLGENDE WEER: AUDIO CD: AFGESPEELDE TIJD VAN NUMMER, RESTERENDE TIJD VAN NUMMER TOTAAL AFGESPEELDE TIJD, TOTAAL RESTERENDE TIJD CD-ROM: AFGESPEELDE TIJD VAN NUMMER PRESELECTIES VOOR RADIOSTATIONS: HOUD EEN KNOP INGEDRUKT OM HET HUIDIGE STATION VOOR DIE KNOP OP TE SLAAN TIJDENS HET AFSPELEN VAN CD'S DOET U MET DEZE KNOP HET VOLGENDE: AUDIO-CD:WILLEKEURIG AFSPELEN, NUMMER EENMAAL AFSPELEN CD-ROM: CD WILLEKEURIG AFSPELEN, 1 MAP AFSPELEN 1 MAP WILLEKEURIG AFSPELEN, 1 NUMMER AFSPELEN TIJDENS HET AFSPELEN VAN CD'S DOET U MET DEZE KNOP HET VOLGENDE: AFSPELEN VAN HUIDIGE CD-MODUS HERHALEN ALARM CD INFO 1 2 3 4 5 6 7 8 CD MODE REPEAT - FOLDER + DRUK OP DEZE KNOPPEN OM TE SCHAKELN TUSSEN DE VERSCHILLLENDE MAPPEN OP EEN CD-ROM VOLUME HEADPHONES SLUIT HIER EEN HOOFDTELEFOON AAN MET EEN 3,5 MM STEREOMINISTEKKER ALS U ONGESTOORD WILT LUISTEREN SLUIT HIER DE STEREOMINISTEKKER VAN 3,5 MM VAN DE AUDIOSPELER AAN. DRUK OP AUX OM DE AUDIO TE BELUISTEREN: DEZE INGANG HEFT DE INSTELLING VAN DE AUX-R-INGANG AAN DE ACHTERKANT OP. BIJ DE NORMALE WERKING STELT U HIERMEE HET VOLUME IN: ALS DE JOG-KNOP ACTIEF IS, PAST U HIERMEE INSTELLINGI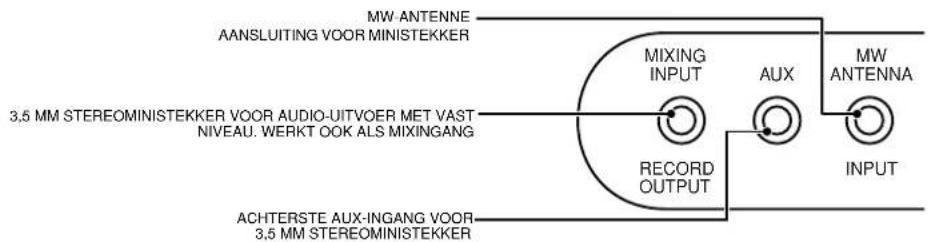
text_image
MW ANTENNE AANSLUITING VOOR MINISTEKKER 3,5 MM STEREOMINISTEKKER VOOR AUDIO-UITVOER MET VAST NIVEAU. WERKT OOK ALS MIXINGANG MIXING INPUT AUX MW ANTENNA RECORD OUTPUT INPUT ACHTERSTE AUX-INGANG VOOR 3,5 MM STEREOMINISTEKKERM HET GELUID TE DEMPEN.
DE SLUIMERFUNCTIE TE ACTIVEREN.
text_image
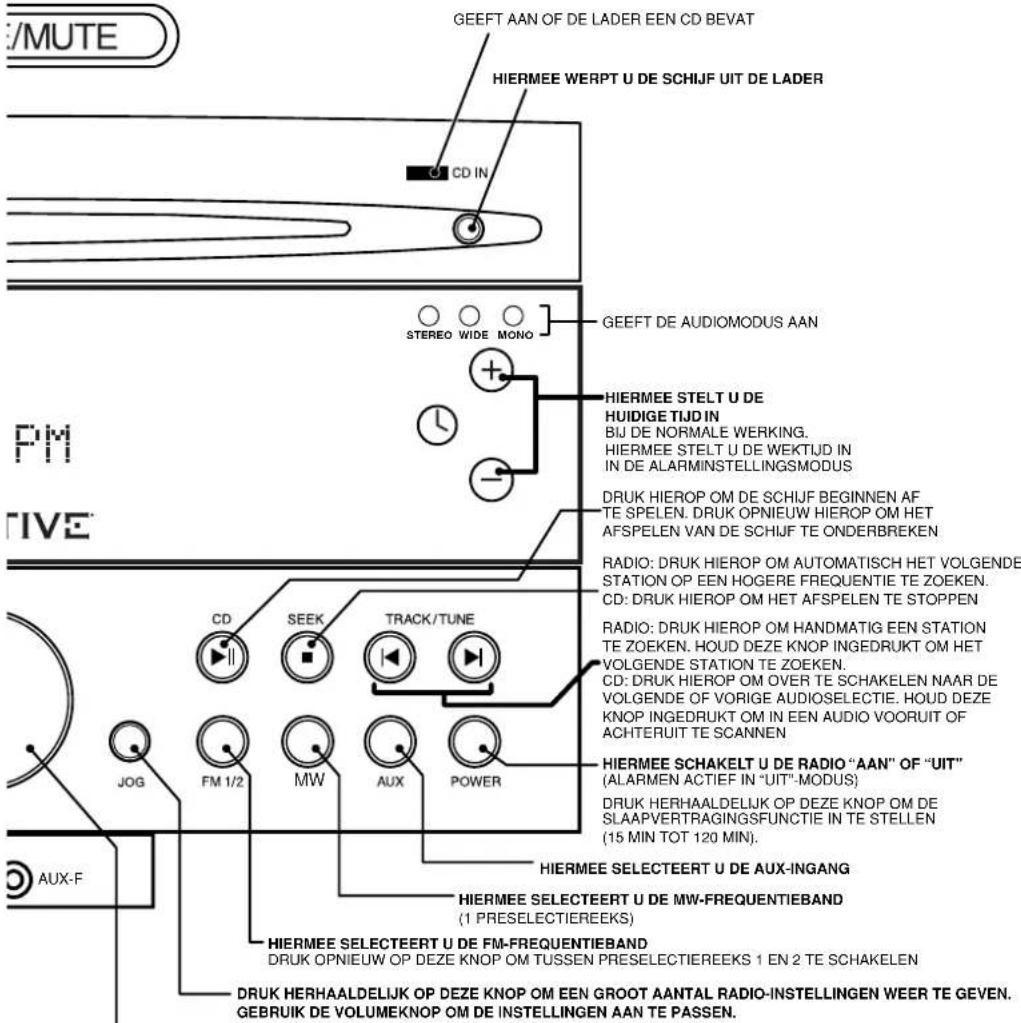
GEEFT AAN OF DE LADER EEN CD BEVAT HIERMEE WERPT U DE SCHIJF UIT DE LADER CD IN STEREO WIDE MONO GEEFT DE AUDIOMODUS AAN HIERMEE STELT U DE HUIDIGE TIJD IN BIJ DE NORMALE WERKING. HIERMEE STELT U DE WEKTijd IN IN DE ALARMINSTELLINGSMODUS DRUK HIEROP OM DE SCHIJF BEGINNEN AF TE SPELEN. DRUK OPNIEUW HIEROP OM HET AFSPELEN VAN DE SCHIJF TE ONDERBREKEN RADIO: DRUK HIEROP OM AUTOMATISCH HET VOLGENDE STATION OP EEN HOGERE FREQUENTIE TE ZOEKEN. CD: DRUK HIEROP OM HET AFSPELEN TE STOPPEN RADIO: DRUK HIEROP OM HANDMATIG EEN STATION TE ZOEKEN. HOUD DEZE KNOP INGEDRUKT OM HET VOLGENDE STATION TE ZOEKEN. CD: DRUK HIEROP OM OVER TE SCHAKELEN NAAR DE VOLGENDE OF VORIGE AUDIOSELECTIE. HOUD DEZE KNOP INGEDRUKT OM IN EEN AUDIO VOORUIT OF ACHTERUIT TE SCANNEN HIERMEE SCHAKELT U DE RADIO “AAN” OF “UIT” (ALARMEN ACTIEF IN “UIT”-MODUS) DRUK HERHAALDELIJK OP DEZE KNOP OM DE SLAAPVERTRAGINGSFUNCTIE IN TE STELLEN (15 MIN TOT 120 MIN). HIERMEE SELECTEERT U DE AUX-INGANG HIERMEE SELECTEERT U DE MW-FREQUENTIEBAND (1 PRESELECTIEREEKS) HIERMEE SELECTEERT U DE FM-FREQUENTIEBAND DRUK OPNIEUW OP DEZE KNOP OM TUSSEN PRESELECTIEREEKS 1 EN 2 TE SCHAKELEN DRUK HERHAALDELIJK OP DEZE KNOP OM EEN GROOT AANTAL RADIO-INSTELLINGEN WEER TE GEVEN. GEBRIUK DE VOLUMEKNOP OM DE INSTELLINGEN AAN TE PASSEN.LAGE TONEN: +4 TOT -4 SLUIMERTJJD: 5 MIN TOT 22 MIN HOGE TONEN: +4 TOT -4 RDS-TEKST: SCHUIFTEKST, STATISCHE TEKST, UIT STEREO, BREED, MONO CD-TEKST: SCHUIFTEKST, STATISCHE TEKST, UIT LOUDNESS: AAN, UIT TIJDWEERGAVE: 12 uur AM/PM OF 24 uur SCHERMTAAL: ENGELS, SPAANS, FRANS, ITALIAANS, Duits OF NEDERLANDS.
text_image
FM ANTENNA INPUT EXT INT 75 OHMS EXTERNE FM-ANTENNE TYPE "F"-INGANGSCHAKELKNOP VOOR INTERNE/EXTERNE
FM-ANTENNE
SOUNDWORKS RADIO CD 740
AFSTANDSBEDIENING
text_image
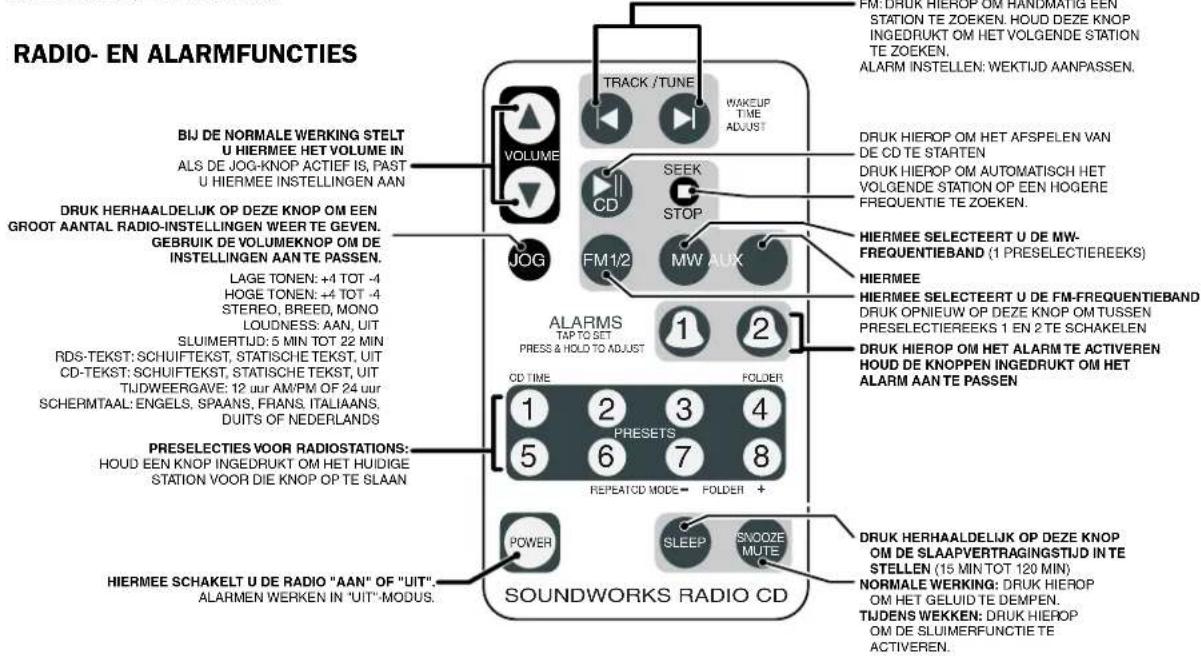
RADIO- EN ALARMFUNCTIONS BIJ DE NORMALE WERKING STELT U HIERMEE HET VOLUME IN ALS DE JOG-KNOP ACTIEF IS, PAST U HIERMEE INSTELLINGEN AAN DRUK HERHAALDELIJK OP DEZE KNOP OM EEN GROOT AANTAL RADIO-INSTELLINGEN WEER TE GEVEN. GEBRIUK DE VOLUMEKNOP OM DE INSTELLINGEN AAN TE PASSEN. LAGE TONEN: +4 TOT -4 HOGE TONEN: +4 TOT -4 STEREO, BREED, MONO LOUDNESS, AAN, UIT SLUIMERTIJD: 5 MIN TOT 22 MIN RDS-TEKST: SCHUIFTEKST, STATISCHE TEKST, UIT CD-TEKST: SCHUIFTEKST, STATISCHE TEKST, UIT TIJDWEERGAVE: 12 uur AM/PM OF 24 uur SCHERMTAAL: ENGELS, SPAANS, FRANS, ITALIAANS. DUITS OF NEDERLANDS PRESELECTIES VOOR RADIOSTATIONS: HOUD EEN KNOP INGEDRUKT OM HET HUIDIGE STATION VOOR DIE KNOP OP TE SLAAN HIERMEE SCHAKELT U DE RADIO "AAN" OF "UIT". ALARMEN WERKEN IN "UIT"-MODUS. TRACK /TUNE WAKEUP TIME ADJUST VOLUME CD SEEK STOP FM1/2 MW AUX ALARMS TAP TO SET PRESS & HOLD TO ADJUST 1 2 CD TIME FOLDER 1 2 3 4 5 6 7 8 REPEATCD MODE = FOLDER + POWER SLEEP SNOOZE MUTE SOUNDWORKS RADIO CD FM: DRUK HIEROP OM HANDMATIG EEN STATION TE ZOEKEN. HOUD DEZE KNOP INGEDRUKT OM HET VOLGENDE STATION TE ZOEKEN. ALARM INSTELLEN: WEKTijd AANPASSEN. DRUK HIEROP OM HET AFSPELEN VAN DE CD TE STARTEN DRUK HIEROP OM AUTOMATISCH HET VOLGENDE STATION OP EEN HOGERE FREQUENTIE TE ZOEKEN. HIERMEE SELECTEERT U DE MW- FREQUENTIEBAND (1 PRESELECTIEREEKS) HIERMEE HIERMEE SELECTEERT U DE FM-FREQUENTIEBAND DRUK OPNIEUW OP DEZE KNOP OM TUSSEN PRESELECTIEREEKS 1 EN 2 TE SCHAKELN DRUK HIEROP OM HET ALARM TE ACTIVEREN HOUD DE KNOPPEN INGEDRUKT OM HET ALARM AAN TE PASSEN. DRUK HERHAALDELIJK OP DEZE KNOP OM DE SLAAPVERTRAGINGSTijd IN TE STELLEN (15 MIN TOT 120 MIN) NORMALE WERKING: DRUK HIEROP OM HET GELUID TE DEMPEN. TIJDENS WEKKEN: DRUK HIEROP OM DE SLUIMERFUNCTIE TE ACTIVEREN.SOUNDWORKS RADIO CD 740
AFSTANDSBEDIENING