
Roar Pro - Loudspeaker CREATIVE - Free user manual and instructions
Find the device manual for free Roar Pro CREATIVE in PDF.


| Product Type | Portable Bluetooth Speaker with built-in microphone |
| Bluetooth Version | Bluetooth 3.0 |
| Bluetooth Profiles | A2DP, AVRCP, HFP |
| Audio Codecs | SBC, aptX, AAC |
| NFC | One-touch pairing |
| Battery Capacity | Lithium Ion 6000mAh |
| Charging Time | 3 hours with power adapter |
| Power Adapter Input | 100-240VAC, 50/60Hz |
| Power Adapter Output | 15VDC, 1.6A |
| USB Output (for charging devices) | 5V, 1A |
| microSD Card Support | Class 4 and above, up to 32GB (FAT16/32) |
| Supported Audio Formats (microSD) | MP3, WMA, WAV (16-bit 48kHz PCM) |
| Recording | Built-in microphone, records to microSD as ADPCM WAV at 16kHz |
| Speakerphone | Yes, with call recording |
| Audio Profiles | Energetic, Neutral, Warm |
| Special Audio Features | ROAR mode (loudness boost), TeraBass (bass enhancement) |
| Multipoint Bluetooth | Connect up to 2 devices simultaneously |
| MegaStereo Feature | Connect two Roar Pro speakers for wider soundstage (cable sold separately) |
| Wireless Microphone Support | Optional iRoar Mic for P.A. system |
| USB Audio Mode | Connect to PC/Mac for high-quality audio playback |
| Power Saving | Auto power off after 28 hours (adapter) or 15 minutes (battery) |
| Operating Temperature Range | 0°C to 45°C |
| Dimensions (Approx.) | Not specified in manual |
| Weight (Approx.) | Not specified in manual |
Frequently Asked Questions - Roar Pro CREATIVE
User questions about Roar Pro CREATIVE
0 question about this device. Answer the ones you know or ask your own.
Ask a new question about this device
Download the instructions for your Loudspeaker in PDF format for free! Find your manual Roar Pro - CREATIVE and take your electronic device back in hand. On this page are published all the documents necessary for the use of your device. Roar Pro by CREATIVE.
USER MANUAL Roar Pro CREATIVE

Discover the many features of the Sound Blaster Roar!

Discover more ways
to experience your
Sound Blaster Roar Pro!
Bluetooth® Version: Bluetooth 3.0
Operating Frequency: 2402 - 2480 MHz
Lithium Ion Battery: 6000mAh
USB Input: 5V=500 - 1000mA
DC Output: 5V=1000mA
Energy Saving Information
Power consumption
- Standby/Off : 0.2 W
- Networked Standby : 1.7 W [Bluetooth]
1.9 W (USB)
1.9 W (all network ports activated)
Power Management
- Power consumption < 0.5W after 28 hours inactivity when all network ports are deactivated /disconnected
- Networked standby after 20 minutes inactivity (Bluetooth, USB)
Activation & deactivation of wireless network port(s)
- To activate, performBluetooth device pairing
- To deactivate, disconnect from external device

Power Adapter Information
Model Number: FJ-SW1501600N or GPE024W-150160-Z
Input: 100-240VAC 50/60Hz
Output: 15VDC 1.6A
Operating Temperature range: 0°C to 45°C
Supported Bluetooth profiles*:
A2DP (Wireless Stereo Bluetooth), AVRCP (Bluetooth Remote Control), HFP (Handsfree profile)
Supported Codec: SBC, aptX, AAC
Operating Range: Up to 10 meters, measured in open space.
Walls and structures may affect range of device.
Supports microSD cards of Class 4 and above, up to 32GB in FAT16/32 format
Supported audio formats: MP3, WMA and WAV (16 bit 48Khz PCM)
Support Mp3 and WMA up to 320kbps. Does not support WMA Pro / Lossless
Records audio, voice or mobile calls at 16k, ADPCM WAV format.

Note: Compliance markings are located on the bottom of this product.
* Refer to your Bluetooth device (notebook 1 , PC 1 , or mobile device 2 ) manufacturer's documentation/website for supported profiles.
1 Compatible with PC (Windows XP/Vista/7/8/8.1), Apple Macintoshes equipped with Bluetooth wireless stereo.
2 Compatible with most major brands of Bluetooth A2DP enabled mobile phones.
Compatibility Disclaimer
Wireless performance is dependent on your device's Bluetooth wireless technology. Refer to your device manufacturer's manual. Creative will not be liable for any lost of data or leakages resulting from the use of these devices.
Product Registration
Registering your product ensures you receive the most appropriate service and product support available. You can register your product during installation or at http://www.creative.com/register.
Please note that your warranty rights are not dependent on registration.
Safe Removal of Built-in Battery
Detailed instructions on removal of integrated battery can be found at creative.com/support/
ROARPRO, these instructions are meant strictly for independently qualified professionals.
Top Rear

- NFC Receptor
- Battery Indicator
- Record Indicator
- Power / Bluetooth® Status Indicator
- Multifunction Button
- Volume Up / Down Button
- ROAR Button
- Power ON / Standby Button
- Microphone
- DC Input
- Aux-in / MegaStereo Feature
-
DC Out (USB 1.0A)
-
Micro USB Connector
- MicroSD Slot
- Mic On / Mute Switch
- Record Button
- (Record) Play / Pause Button
- Random / Repeat All Switch
- Previous Button
- Next Button
- (MP3 Playback) Play / Pause Button
- Energetic, Neutral, Warm Profile
- TeraBass Mode Button
- USB Audio / Mass Storage mode switch
Option 1 : Power Adapter


3 Hours
Charge the speaker with the supplied power adapter for at least 3 hours before use. Please ensure your speaker is powered off for optimised charging.*
* Battery performance may degrade over time depending on charge cycles.
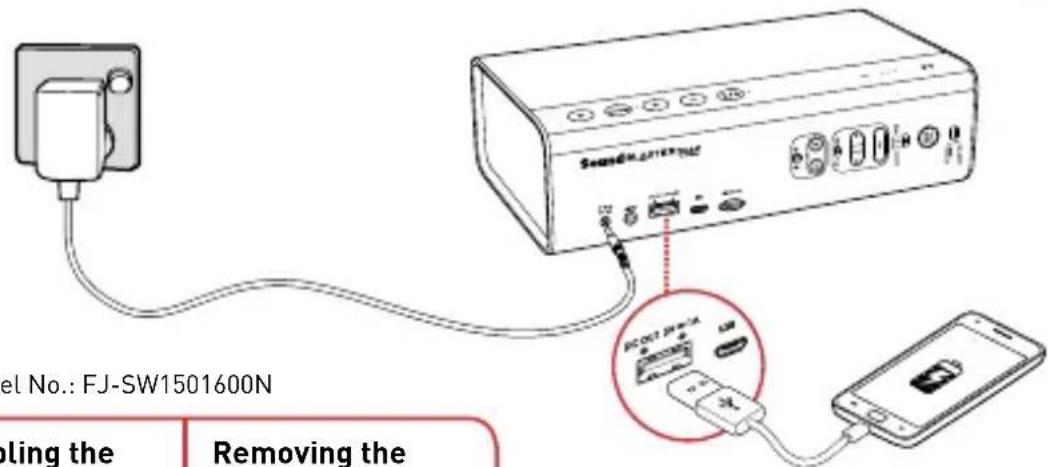
Adapter Model No.: FJ-SW1501600N
Assembling the Power Adapter

Removing the Power Adapter

The dual-purpose battery powers your Sound Blaster Roar and also charges your smartphone!
Here's how you do it!
Simply connect a USB cable to the Sound Blaster Roar's USB DC Out and the other end to your smartphone.
Adapter Model No.: GPE024W-150160-Z
Assembling the Power Adapter Removing Adapter Plug Head
US, Japan & Taiwan
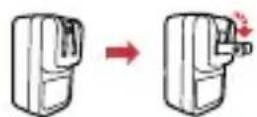
Europe

- Supplied interchangeable plugs may vary to region and country


Optimize your charging
- The speaker will charge your smartphones even when the speaker is off.
- When turned on, some smartphones require a higher charging rate than battery banks can typically provide. For the quickest charging time, turn off your smartphone before charging it.
Option 2 : USB

The Sound Blaster ROAR can also be charged using a USB cable.
It may take longer to charge due to USB power limitation.
Switch off your speaker when charging.
![graph TD A["SoundMaster/TV Device"] -->|USB| B["USB Adapter"] B --> C["PC/Mac Computer"] D["Mains"] -->|* Not included, USB adapter with DC 5V and up to 1A output rating can be used.| E["PC/Mac"]](/content/2026/05/762566/images/b4fd2c0ff205a539852875cfee9ea63d805eed9edc777b3830ad46bdf1091cc9.jpg)
TIP:
Lithium-ion battery life may suffer when it is constantly fully depleted or overexerted at low voltage. It is a good practice to keep the battery well charged.
For optimized charging: Creative recommends using the bundled USB cable for optimized charging.
Battery Status Indication
![graph TD A["Battery full"] --> B["Battery at about 70%"] B --> C["Battery low"] D["Slow Blink"] --> E["Battery extremely low"] F["Running LED"] --> G["Battery charging*"] H["Diagram of battery charging system"] --> I["Central component with dot pattern"]](/content/2026/05/762566/images/7cca6ddd128a0bee9fcd00f0299afa57fd33234422672e80ea91749a49ee8b1e.jpg)
* Whenever the speaker is ON and connected to a power source, the LED status indicators will continually blink in sequence. To check the battery capacity, power OFF the speaker or disconnect it from the power adapter.
Power Saving
For better user connectivity experience, the Sound Blaster Roar will now by default automatically enter power saving mode only after approximately 28 hours of inactivity when the power adapter is attached via a main outlet to the speaker. However, you have the option to keep the power on permanently if needed.
To Disable Power saving mode with power adapter attached (For keeping your speaker ON permanently):
1) Ensure that the speaker is powered ON and not connected to any other devices.
2) Press the Power and Volume “+” button together. The LED status indicator will flash once to indicate power saving feature is disabled.
To Enable Power saving mode with power adapter attached:
1) Ensure that the speaker is powered ON and not connected to any other devices.
2) Press the Power and Volume “-” button together. The LED status indicator will flash once to indicate power saving feature is enabled.
Note: The speaker automatically powers down when there is no Bluetooth connection, recording using microSD card, microSD card playback or audio input for more than 15 minutes on battery mode. This feature helps to protect the internal battery and cannot be disabled.
The Sound Blaster Roar lets you stream music wirelessly.
The Sound Blaster Roar connects to Bluetooth devices with robust high-quality aptX® and AAC music streaming. NFC technology makes connecting even easier – just tap and play!

Here's how you do it!
1 A. One-touch pairing with NFC
Turn on NFC on your NFC-enabled device and tap your device on the NFC logo to connect.
To disconnect, tap your device on the Sound Blaster Roar again.
OR
B. Manual Bluetooth pairing
(i) Press and hold 📞/ 📞 until the white LED blinks rapidly.
(ii) Select SB ROAR PRO on your device.
2 Start playback on your connected device.
| LED Indication | Status |
| Green LED stays lit | Powered ON but not connected to any Bluetooth devices |
| White LED blinking rapidly | Bluetooth Pairing Mode, waiting for device to connect |
| White LED stays lit | Connected to a Bluetooth device |
You can choose between THREE different audio profiles to suit your preference or environment and enhance your listening experience
Warm – Experience tube like warmth with richness in your vocal, instruments and tones.
Neutral – Experience balanced audio from the original Sound Blaster Roar classic that has thousands of reviews all over the world.
Energetic – Inject energy and life for a more expansive and dynamic feel.
Here's how you do it!
Simply flick the slider switch to your desired preference and you are done!

Connecting your speakers - Understanding Multipoint
Creative Bluetooth Multipoint lets you pair 2 devices to the Sound Blaster Roar.
With Creative Bluetooth Multipoint, you can connect up to two Bluetooth devices simultaneously. Toggle easily between your phone and tablet, or share music playback from your phone or a friend's phone.
Here's how you do it!
1 Pause playback on the connected device.
2 Pair and connect a second device.
3 Start playback on either one of the connected devices.
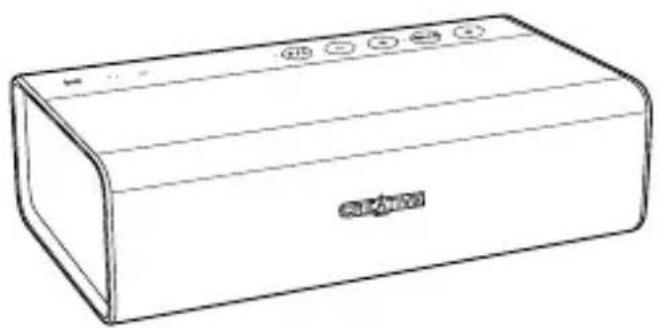





To toggle between devices
Pause playback on the first connected device before starting playback on the second connected device.
Note : Creative Muitipoint is not available when the iRoar mic is connected to the Sound Blaster Roar Pro.
ROAR / TeraBass button intelligently boost the bass and loudness of your music.
Like our in-house reference systems, the Roar is tuned to be accurate, balanced, and well defined, while delivering full spectral output at maximum levels with minimal or no compression. (NOT common in many battery operated portables). At low level listening conditions, some people may perceive audio differently. Be it being less sensitive to bass reproduction, in less than ideal environments or strictly personal preference. The TeraBass feature intelligently compensates the loss of perceived loudness in bass during low level playback without artificially over accentuating bass levels.
However when sheer audio power is needed – such as large parties and social gatherings – the ROAR mode instantly boost the loudness, depth and spaciousness of the audio.

For added boost
Connecting the Sound Blaster Roar to the power adapter gives your music added volume boost. It is recommended to use a power adapter when using the ROAR feature.
ROAR
Press ROAR during music playback.

TeraBass
Press the TeraBass button while your music is playing and hear the difference!

You can play digital audio from your PC/Mac with the Sound Blaster Roar.
Enhance music playback from your PC/Mac with the powerful Sound Blaster Roar by connecting it with the USB cable supplied.
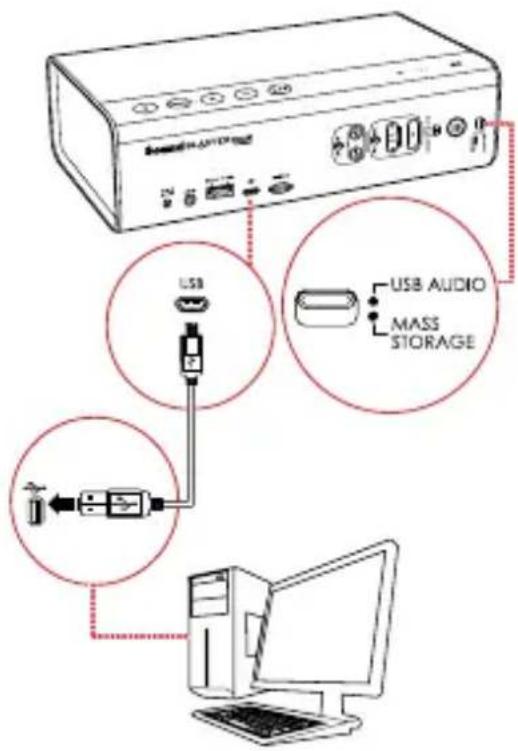
Note: If the Sound Blaster Roar is not detected by the computer after your computer recovers from sleep / hibernate / restart, please Power OFF and ON the Sound Blaster Roar to re-establish the USB audio connection. You may also need to restart your computer's media player.
- USB audio will disconnect if button is pressed during USB audio mode.
Here's how you do it!
1 Slide the slider switch to USB Audio to connect USB Audio mode.
2 Connect the Sound Blaster Roar to a PC/Mac. A tone is heard indicating USB audio is connected. *
* If no tone is heard, disconnect the cable from the computer, and start from Step 1 again.
3 Play your music on the PC/Mac.

Enhance your audio
To enhance your digital music further, you can use the Sound Blaster Control Panel software. See next page.

If no audio is heard
For Windows:
Click Volume Control and select Sound Blaster Roar Pro as your output device.
For Mac:
-
Go to System Preferences and click Sound.
-
Click the Output tab and select Sound Blaster Roar Pro.
The Sound Blaster Control Panel enhances PC/Mac audio in real time.
Have complete control over your PC/Mac audio with the Sound Blaster Control Panel software. The SBX Pro Studio technologies – such as SBX Bass and SBX Dialog Plus – intelligently enhance PC/Mac audio in real time.

Here's how you do it!
1 Connect the Sound Blaster Roar to a PC/Mac with a USB cable.
2 Visit www.soundblaster.com/downloads/ROARPRO/SBCP to download and install the Sound Blaster Control Panel. *
3 Setting the default audio device.
a. For Windows
This setting will be automatically configured after Sound Blaster Control Panel is installed.
b. For Mac
-
Go to System Preferences and click Sound.
-
Click the Output tab and select Sound Blaster Roar Pro.
* The Sound Blaster Control Panel requires the speaker to be connected to your computer as USB audio before it can be installed.
Your Sound Blaster Roar comes with a built-in WMA/MP3 player.
Besides streaming music from your smart phone wirelessly via Bluetooth, the Sound Blaster Roar can also play audio files on a microSD card with the built-in WMA/MP3 player.

Playback tips
- You can play WMA, WAV or MP3 files.
- The Sound Blaster Roar supports microSD or microSDHC cards up to 32GB.
Here's how you do it!
1 Insert a microSD card.
2 Press ▶II.
3 Navigate through tracks.

microSD Card
To skip tracks (in Repeat All mode):

Press ◀ or ▶ during playback.
To skip folders:
Press and hold |◀ or ▶| during playback. OR
Press◀ or▶ when playback is stopped.
The Sound Blaster Roar doubles up as a microSD card reader!

Here's how you do it!
1 Slide the slider switch to USB Mass Storage to connect as USB Mass Storage mode.
2 Connect the speaker to a computer via USB cable.
3 Insert a microSD card.
4 Browse or modify microSD card contents on your computer.
Note:
- To switch back to USB Audio mode, slide the slider switch to USB Audio.
- Depending on your operating system, a pop-up message may appear informing you that the Mass Storage Device has not been ejected properly. This is normal and not disruptive to your microSD card.
Recording is made really easy with the Sound Blaster Roar.
If you need to record the song playing on your Sound Blaster Roar or do a voice recording, just insert a microSD card and you're ready to go.

Recording specifications
• Audio recording is saved in WAV format in the VOICE folder.
- For recording, a Class 4 microSD card is recommended.
- The default recording sampling rate is at 16 kHz. This is designed to record longer voice recording sessions (e.g. meetings) and avoid large file sizes.
- Recording from microphone also records the audio coming out from Bluetooth and Aux-in audio sources.
- Simultaneous WMA / MP3 audio playback using microSD card and audio recording is not supported.
Here's how you do it!
1 Insert a microSD card.

microSD Card
2 Select source.
From built-in microphone

Switch on the microphone.
- Records voice and sounds picked up by the microphone.
From Aux-in / Bluetooth source

Mute the microphone.
- Records Aux-in audio directly from your media player or Bluetooth device.

3 Press (REC) to start recording.
Press (REC) again to stop recording.
4 Press (REC) to playback recordings.
To skip recorded tracks:
Press ◀ or ▶ during playback.
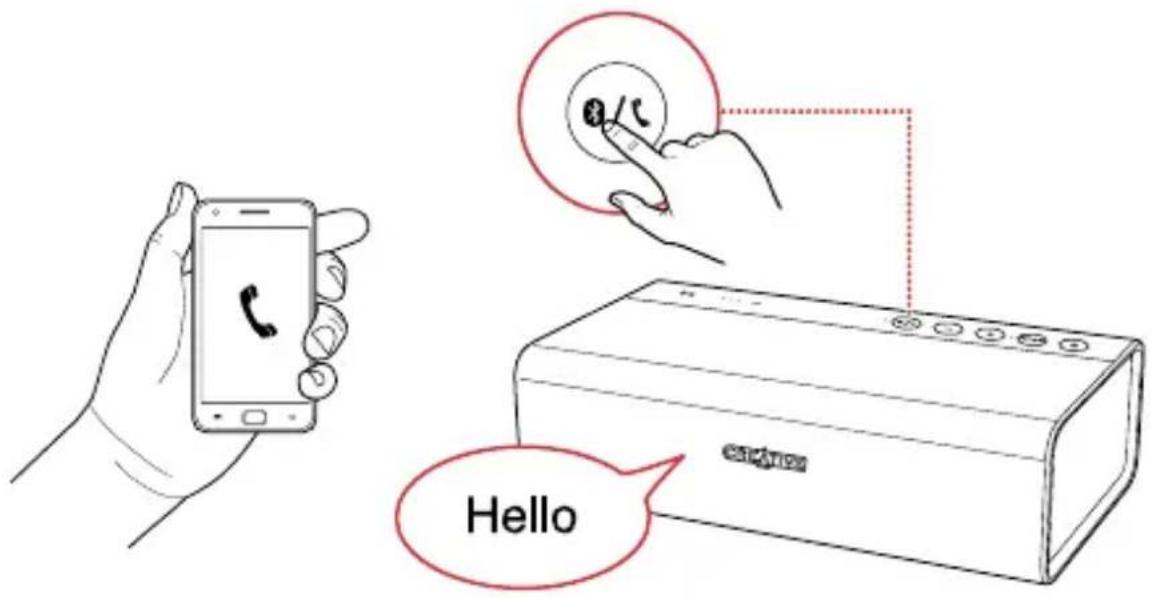
You can use the Sound Blaster Roar as a speakerphone.
When your phone is connected to the Sound Blaster Roar you can simply answer calls without lifting your phone – just press a button!

Recording calls
Press (REC) during
a call to start recording.
Ensure a microSD card is inserted into the speaker and the conversation will be saved in the VOICE folder on the microSD card.

Here's how you do it!
1 Connect your smart device. (Ensure the microphone is on)

2 Press 📞/ telephone to answer an incoming call.
3 Press call. 📞/ CALL again to end a
To reject a call:
Press and hold 📞/ CALL for more than 2 seconds.
The Sound Blaster Roar is the perfect companion to end the day with.
Besides playing music at loud volumes, the Sound Blaster Roar can also gently soothe you to sleep. In Bedtime Mode, audio playback from the microSD card will gradually fade out within 15 or 30 minutes, after which the speaker will power off automatically. This is great for parents of young children – you can record yourself reading a bedtime story and play it back to your children as they are about to sleep. You can also use it to play music before you sleep!
Here's how you do it!
1 Insert a microSD card.
2 Start audio playback.
To play music files:
Press ▶!!
To play voice recordings:

Press (REC).
3 Activate Bedtime Mode.

For 15 minutes:
Press and hold (REC) until you hear a beep.
For 30 minutes:
Press and hold (REC) until you hear two beeps.
OR
To deactivate Bedtime Mode:
Press ▶II.
MegaStereo Feature
Enjoy the full MegaStereo experience with another Sound Blaster Roar Pro!^
The MegaStereo technology is a unique feature built into the Sound Blaster Roar to give you a wider soundstage and double the punch when 2 Sound Blaster Roar are connected together with a MegaStereo cable.
Use the MegaStereo cable for
1 A wider stereo experience*

2 Connecting to other audio devices

May not work with audio devices using the OMTP standard.
3 Having fun enslaving other speakers!^^

MASTER (LEFT) SLAVE (RIGHT)
How to use :
After establishing connection via the above diagram with the MegaStereo cable, ensure that the slave (Right) unit is set to the maximum volume. Thereafter you may use the Master (Left) speaker to control the volume for both speakers.
MegaStereo Cable sold separately.
*Aux-in for both speakers are disabled when the MegaStereo cable is connected.
- For optimum sound performance, it is recommended to connect both speakers to their power adapters.
^ MegaStereo feature is only available on the Sound Blaster Roar and Roar Pro. For an updated list of supported speakers please visit. www.creative.com/qr/megastereo
^^Audio may sound unbalanced due to difference in speaker matching.
Note : When connected via the MegaStereo Cable, the audio from the two connected Sound Blaster Roars may sound unbalanced after running on battery for an extended period of time. This is due to the difference in the battery levels between the two speakers. For optimum performance, it is recommended to connect both speakers to their power adapters.
Next-Generation Personal P.A. System (with optional iRoar Mic)
Transform the Sound Blaster Roar Pro into the next generation portable wireless Public Address (P.A.) System when paired with the Wireless iRoar Mic*. The iRoar Mic delivers clear and loud voice, which is great for power presentations, public speaking, teaching, storytelling or singing!
For more information about the iRoar Wireless Mic, please see visit www.creative.com
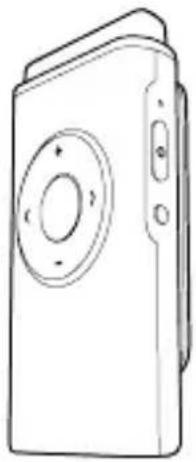

Note : Creative Bluetooth Muitipoint is not available when the iRoar mic is connected to the Sound Blaster Roar Pro.
* With optional iRoar Mic
Perform the following trouble-shooting steps before sending it for servicing. For more information, please refer to www.creative.com/support.
If there is no audio heard after connecting your phone or tablet with the Sound Blaster Roar via Bluetooth......
It could be a case of your phone or tablet having a firmware bug that makes it unable to choose the right audio codec. The Sound Blaster Roar can help enhance compatibility by disabling its advanced audio codec and switching only to the basic codec*. However, we advise customers facing this problem to update your phone / tablet with the latest firmware before attempting the following steps below which may just solve this problem.
To bypass this bug (by disabling advanced audio codec)
1 Ensure that the speaker is Powered on
2 Press the Vol "-"and ROAR button together. (A voice prompt is heard indicating Advanced Codec disabled). The speaker will reboot to remember your settings.
3 Power OFF and ON your audio device again
4 Connect to the Sound Blaster Roar via Bluetooth and play music
To restore advanced audio codec feature
1 Ensure that the speaker is Powered on
2 Press the Vol "+" and ROAR button together. (A voice prompt is heard indicating Advanced Codec enabled). The speaker will reboot to remember your settings.
3 Power OFF and ON your audio device again
4 Connect to the Sound Blaster Roar via Bluetooth and play music
* You would only need to do this once and the Sound Blaster Roar will remember your preference.
How do I disable Voice Prompt?
- With the speaker powered ON, press both Volume “-” and Multifunction Button at the same time. A prompt is heard indicating voice prompt is disabled.
How do I enable Voice Prompt?
- On a speaker with disabled voice prompt, ensure that it is powered ON. Press both Volume “+” and Multifunction Button at the same time. A prompt is heard indicating voice prompt is enabled.
What do I do if I find that the speaker is not behaving the way it should?
- Should any of the above happens, we would recommend that you master reset the speaker. In any state, press and hold the Power button for more than 10 seconds then press the Power button again to turn on the speaker.
Alternatively
You can perform a factory master reset to clear paired device list.
1 Ensure your speaker is not connected to any Bluetooth device.
2 With your speaker powered on, Press and hold the Multifunction button until the white LED blinks rapidly. Press and hold the Multifunction button and Volume "-" button until a voice prompt is heard indicating the speaker has been master reset and returned to pairing mode.
Why do I hear beep tones when I disable voice prompts?
The beep tones are meant to be indicators for the following items:
| 1 Beep tone | Feature activated indicator |
| 2 Beep tone | Feature confirmation indicator |
| 3 Beep tone | Error indicator |
CREATIVE
creative.com
Supplementary documentation for this product includes:
DoC, safety and regulatory information, ErP Regulatory information, and other related regulatory notices. For more details please visit creative.com/support/ROARPRO
For the latest, online version of this guide, visit creative.com/support/ROARPRO
Creative Limited Hardware Warranty ("Creative Warranty")
Creative warrants that the accompanying product is free from material or workmanship defects for a period of 12 months (non-transferable Creative Warranty period) from your purchase date. In the event of a genuine product failure, Creative will assume repair or part replacement (new or refurbished) within the Creative Warranty period. However, this Creative Warranty does not cover (but not limited to) normal wear and tear, abnormal usage, improper storage and handling, unauthorised modifications or repair, damages arising from an Act of God and theft. In the event of a genuine product failure you must provide Creative with the product and proof of purchase of the product by a dated itemised receipt. For the entire details on the Creative Warranty period of your product, Creative Warranty terms, product returns and repair procedure, and Creative Customer Support services and contact information, you are advised to refer to our website at www.creative.com. From here, select your country of residence and proceed to the Support section. We also recommend you to register your product with us at www.creative.com/register to enjoy a host of additional product benefits that includes latest news and promotions. Note that your entitlement to the Creative Warranty is not dependent on product registration.
Please note the Creative Warranty does not affect your statutory rights. Thank you.
The limited warranty for the Product is for twelve (12) months (for the European Union, twenty-four (24) months (excluding all wear and tear), subject to certain exceptions as stated in the EU Directive 1999/44/EC**) from the date of Your purchase ("Warranty Period"). The Warranty Period will be extended by each whole day that the Product is out of Your possession for repair under this warranty.
**Only Applicable for European (EU) countries
A seller in the European Union (EU) may be entitled to refuse to repair or replace the goods if it is (i) impossible or (ii) disproportionate (eg. where the costs are unreasonably high for the seller) to do so, taking into account the value the goods would have had (if there were no lack of conformity), the significance of the lack of conformity and where an alternative remedy would be completed without significant inconvenience to the consumer. In such cases, the consumer may ask for an appropriate reduction of the price or have the contract rescinded. The consumer is not entitled to have the contract rescinded if the lack of conformity (or defect or fault) is minor. In which case, the seller is entitled to turn down a request for rescission of the contract in such a situation. For further details, please refer to Articles 3(3), 3(5) and 3(6) of the EU Directive 1999/44/EC.
For Australia only:
Our goods come with guarantees that cannot be excluded under the Australian Consumer Law. You are entitled to a replacement or refund for a major failure and for compensation for any other reasonably foreseeable loss or damage. You are also entitled to have the goods repaired or replaced if the goods fail to be of acceptable quality and the failure does not amount to a major failure. (Creative Technology Ltd, 31 International Business Park, #03-96, Creative Resource, Singapore 609921. Telephone: +65 6895 4433 (standard international call charges apply.)
- ENERGY SAVING INFORMATION
- POWER CONSUMPTION
- POWER MANAGEMENT
- POWER ADAPTER INFORMATION
- SUPPORTED BLUETOOTH PROFILES
- COMPATIBILITY DISCLAIMER
- PRODUCT REGISTRATION
- SAFE REMOVAL OF BUILT-IN BATTERY
- TOP REAR
- OPTION 1 : POWER ADAPTER
- 3 HOURS
- HERE'S HOW YOU DO IT
- ASSEMBLING THE POWER ADAPTER REMOVING ADAPTER PLUG HEAD
- OPTIMIZE YOUR CHARGING
- OPTION 2 : USB
- TIP
- BATTERY STATUS INDICATION
- POWER SAVING
- TO DISABLE POWER SAVING MODE WITH POWER ADAPTER ATTACHED (FOR KEEPING YOUR SPEAKER ON PERMANENTLY)
- TO ENABLE POWER SAVING MODE WITH POWER ADAPTER ATTACHED
- THE SOUND BLASTER ROAR LETS YOU STREAM MUSIC WIRELESSLY
- 1 A. ONE-TOUCH PAIRING WITH NFC
- OR
- MANUAL BLUETOOTH PAIRING
- YOU CAN CHOOSE BETWEEN THREE DIFFERENT AUDIO PROFILES TO SUIT YOUR PREFERENCE OR ENVIRONMENT AND ENHANCE YOUR LISTENING EXPERIENCE
- CONNECTING YOUR SPEAKERS - UNDERSTANDING MULTIPOINT
- CREATIVE BLUETOOTH MULTIPOINT LETS YOU PAIR 2 DEVICES TO THE SOUND BLASTER ROAR
- TO TOGGLE BETWEEN DEVICES
- ROAR / TERABASS BUTTON INTELLIGENTLY BOOST THE BASS AND LOUDNESS OF YOUR MUSIC
- FOR ADDED BOOST
- ROAR
- TERABASS
- YOU CAN PLAY DIGITAL AUDIO FROM YOUR PC/MAC WITH THE SOUND BLASTER ROAR
- ENHANCE YOUR AUDIO
- IF NO AUDIO IS HEARD
- FOR WINDOWS
- FOR MAC
- THE SOUND BLASTER CONTROL PANEL ENHANCES PC/MAC AUDIO IN REAL TIME
- YOUR SOUND BLASTER ROAR COMES WITH A BUILT-IN WMA/MP3 PLAYER
- PLAYBACK TIPS
- TO SKIP FOLDERS
- THE SOUND BLASTER ROAR DOUBLES UP AS A MICROSD CARD READER
- NOTE
- RECORDING IS MADE REALLY EASY WITH THE SOUND BLASTER ROAR
- RECORDING SPECIFICATIONS
- FROM BUILT-IN MICROPHONE
- FROM AUX-IN / BLUETOOTH SOURCE
- TO SKIP RECORDED TRACKS
- YOU CAN USE THE SOUND BLASTER ROAR AS A SPEAKERPHONE
- RECORDING CALLS
- TO REJECT A CALL
- THE SOUND BLASTER ROAR IS THE PERFECT COMPANION TO END THE DAY WITH
- MEGASTEREO FEATURE
- USE THE MEGASTEREO CABLE FOR
- 1 A WIDER STEREO EXPERIENCE
- 2 CONNECTING TO OTHER AUDIO DEVICES
- 3 HAVING FUN ENSLAVING OTHER SPEAKERS
- HOW TO USE
- NEXT-GENERATION PERSONAL P.A. SYSTEM (WITH OPTIONAL IROAR MIC)
- IF THERE IS NO AUDIO HEARD AFTER CONNECTING YOUR PHONE OR TABLET WITH THE SOUND BLASTER ROAR VIA BLUETOOTH
- TO BYPASS THIS BUG (BY DISABLING ADVANCED AUDIO CODEC)
- TO RESTORE ADVANCED AUDIO CODEC FEATURE
- HOW DO I DISABLE VOICE PROMPT
- HOW DO I ENABLE VOICE PROMPT
- WHAT DO I DO IF I FIND THAT THE SPEAKER IS NOT BEHAVING THE WAY IT SHOULD
- ALTERNATIVELY
- WHY DO I HEAR BEEP TONES WHEN I DISABLE VOICE PROMPTS
- CREATIVE
- FOR THE LATEST, ONLINE VERSION OF THIS GUIDE, VISIT CREATIVE.COM/SUPPORT/ROARPRO
- CREATIVE LIMITED HARDWARE WARRANTY ("CREATIVE WARRANTY")
- FOR AUSTRALIA ONLY
Brand : CREATIVE
Model : Roar Pro
Category : Loudspeaker