HZ500 - Effect machine Antari - Free user manual and instructions
Find the device manual for free HZ500 Antari in PDF.

Frequently Asked Questions - HZ500 Antari
User questions about HZ500 Antari
0 question about this device. Answer the ones you know or ask your own.
Ask a new question about this device
Download the instructions for your Effect machine in PDF format for free! Find your manual HZ500 - Antari and take your electronic device back in hand. On this page are published all the documents necessary for the use of your device. HZ500 by Antari.
USER MANUAL HZ500 Antari
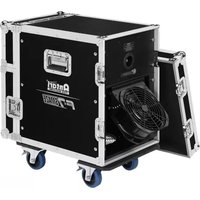
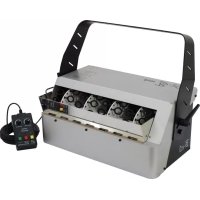
Hazer Technology HZ500
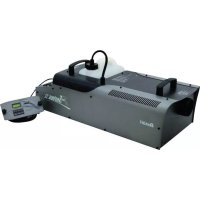
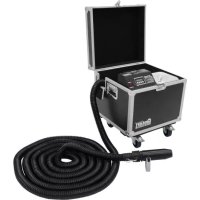
Congratulations on the purchase of your new ANTARI HZ-500 HAZE MACHINE
Introduction
Thank you for choosing the ANTARI HZ-500 Haze Machine. You now own a rugged and powerful state-of-the-art machine. Prior to use, we suggest that you carefully read all of the instructions. By following the suggestions found in this user manual, you can look forward to the best, virtually invisible haze effect and reliable, satisfactory performance of your ANTARI HZ-500 Hazer for years to come.
Please follow these operation and safety instructions to ensure a long and safe life for your hazer.
Danger of Electric Shock
- Keep this device dry
Use a grounded electrical outlet. Prior to use take care to determine that the unit is installed at the rated voltage.
Always unplug the hazer before filling its tank.
- Turn off or unplug when not in use.
- This machine is not water-proof. If moisture, water, or hazer fluid gets inside the housing, immediately unplug the unit and contact a service technician or your ANTARI dealer before using it again.
Grounding Instructions
- This product must be grounded. In the event of an electrical short circuit,
grounding reduces the risk of electric shock by providing an escape wire for the electric current. - This product is equipped with a cord having a grounding wire with an appropriate grounding plug.
- The plug must be plugged into an outlet that is properly installed and grounded in accordance with all local codes and ordinances

WARNING
Improper installation of the grounding plug is able to result in a risk of electric shock. When repair or replacement of the cord or plug is required, do not connect the grounding wire to either flat blade terminal
The wire with insulation having an outer surface that is green with or without yellow stripes is the grounding wire.
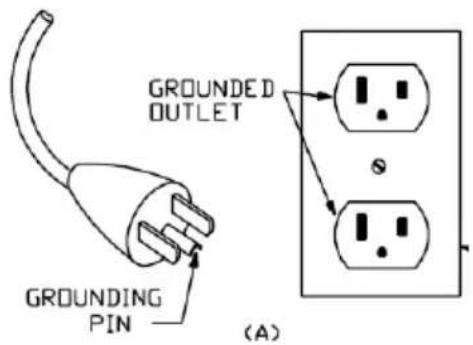
This product is for use on a nominal 120-V circuit and has a grounding plug similar to the plug illustrated in sketch A in the following Figure. Only connect the product to an outlet having the same configuration as the plug. Do not use an adapter with this product.
Use only a 3-wire extension cord that has a 3-blade grounding plug, and a 3-slot receptacle that accepts the plug on the product. Make sure your extension cord is not damaged. When using an extension cord, be sure to use one heavy enough to carry the current your product draws. For lengths less than ft, AWG extension cords shall be used. An undersized cord results in a drop in line voltage and loss of power and overheating.
| Ampere Rating Range | Voltage | Length of cord in ft | ||||||||
| 120V | 25 ft | 50 ft | 100 ft | 150 ft | 200 ft | 250 ft | 300 ft | 400 ft | 500 ft | |
| 240V | 50 ft | 100 ft | 200 ft | 300 ft | 400 ft | 500 ft | 600 ft | 800 ft | 1000 ft | |
| 0-2 | 18 | 18 | 18 | 16 | 16 | 14 | 14 | 12 | 12 | |
| 2-3 | 18 | 18 | 16 | 14 | 14 | 12 | 12 | 10 | 10 | |
| 3-4 | 18 | 18 | 16 | 14 | 12 | 12 | 10 | 10 | 8 | |
| 4-5 | 18 | 18 | 14 | 12 | 12 | 10 | 10 | 8 | 8 | |
| 5-6 | 18 | 16 | 14 | 12 | 10 | 10 | 8 | 8 | 6 | |
| 6-8 | 18 | 16 | 12 | 10 | 10 | 8 | 6 | 6 | 6 | |
| 8-10 | 18 | 14 | 12 | 10 | 8 | 8 | 6 | 6 | 4 | |
| 10-12 | 16 | 14 | 10 | 8 | 8 | 6 | 6 | 4 | 4 | |
| 12-14 | 16 | 12 | 10 | 8 | 6 | 6 | 6 | 4 | 2 | |
| 14-16 | 16 | 12 | 10 | 8 | 6 | 6 | 4 | 4 | 2 | |
Danger of Burn
- No user serviceable and modifiable parts inside. Do not disassemble the housing and do any modification; otherwise damage of the device or danger of burn may be caused.
- For adult use only. The Hazer must be installed out of the reach of children. Never leave the unit running unattended.
-
Position the haze machine in well-ventilated area. Please leave about 20 cm space surrounding the machine.
-
Never aim the machine at open flames or close to flammable items.
- Never add flammable liquids of any kind (oil, gas, perfume) to the hazer liquid.
- Use only dealer recommended ANTARI high-quality hazer liquid (HZL). Please do not use any other liquid which may cause erosion of inner parts.
- If your ANTARI HZ-500 Hazer fails to work properly, stop using it immediately. Drain all hazer liquid from the tank, pack the unit securely (preferably in the original packing material), and return it to your ANTARI dealer for service.
- Please note before sending the machine for transporting purpose, make sure the haze fluid tank is empty.
- Never drink haze liquid. If it is ingested, call a doctor immediately. If hazer liquid comes in contact with skin or eyes, rinse thoroughly with water.
Pay attention to all warning labels and instructions printed on the exterior of your ANTARI Hazer
Unpacking & Inspection
Open the shipping carton and verify that all equipment necessary to operate the system has arrived intact. Before beginning initial setup of your ANTARI HZ-500 Hazer, make sure that there is no evident damage caused by transportation. In the event that the unit's housing or cable is damaged, do not plug it in and do not use it after having contacted your ANTARI dealer for assistance.
Operation & Filling Haze Liquid
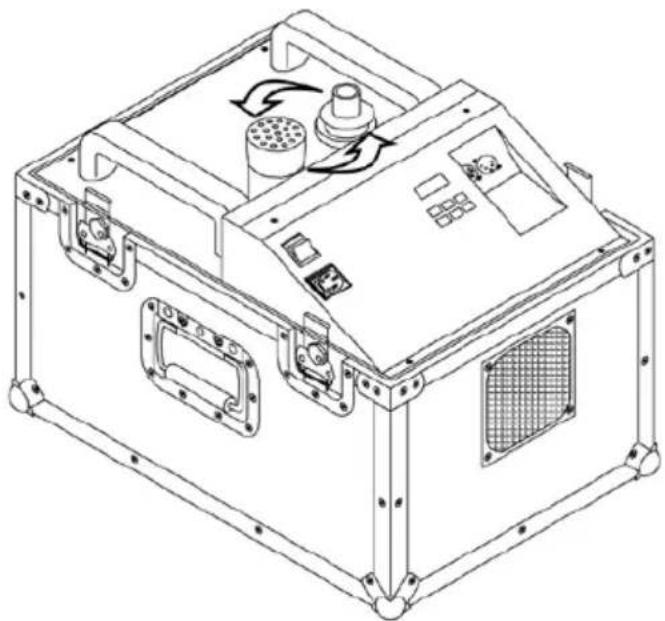
- Place the unit on a flat surface. Plug the power cord into a grounded electrical outlet.
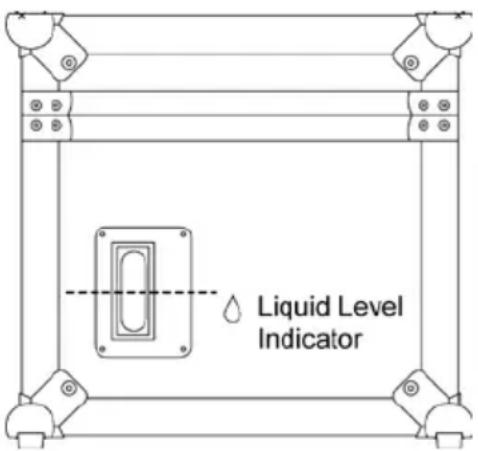
- Remove the fluid tank cap and pour the ANTARI Haze Liquid into the tank slowly and carefully to avoid overfilling. (Filling suggestion: Please add 2 liters haze liquid in the first time of refill. From the second refill on, add 1 liter haze liquid for every refill.) Make sure the liquid level does not exceed the mark on the tank.
- Please refill haze liquid slowly. Otherwise, the haze liquid may overfill and damage the machine. Basically, every refill process of 1 liter haze liquid must be separated into 5 times, i.e. after refilling about 200 cc haze liquid you have to stop refilling and check the tank.
Please make sure that the last 200 cc haze liquid goes through the filter inside the tank properly before pouring the next 200 cc haze liquid into the tank. (Usually it takes about 10 seconds for 200 cc haze liquid to go through the filter).
-
Please use only dealer-recommended high-quality haze liquid. Any other types of fluids may cause health hazard and damage the unit. Use of any other liquids may void warranty.
-
Please open the square door on the top of the flightcase before operation in order to let the haze come out smoothly.
- Set the power switch to "ON" on the control panel of the machine. Make sure that the red indicator light is on.
- There is an intake hole in the back of the flightcase. There are a metal net and a filter attached on the intake, which can prevent a clogging problem. Please inspect and clean the metal net and filter periodically.
Caution
- Always monitor and make sure that there is sufficient haze liquid inside the tank during operation.
- When the machine is operated for a longer period of time under open- air conditions, falling dust/debris might attach to the metal net and filter on the intake hole. The metal net and filter is serviceable, which means those can be detached easily by screw driver. Please use water to clean the metal net and filter periodically. By doing this you can avoid dust going into the hazers and prevent the clogging problem of hazers.
- If you have followed the above operation steps, and you still experience low output, mechanical noise or no output at all, unplug the unit immediately from the mains. Check the fluid level, the external fuse, the remote control connection, and the power cable from the wall. If all of the above appears to be OK, plug the unit in again. If the hazer still does not function, discontinue operation or it may result in permanent damage to the unit. Return the machine to your Antari dealer. Always drain tank before mailing or transporting this unit.
- Please detach the cap on the tank if you want to clean the cap.
Do not wipe it directly when the cap is attached on the tank. By doing this you can avoid the dust falling into the fluid tank and contaminate the haze liquids.
- Please do not allow magnetic equipment to be close to the haze outlet door of the hazer. Magnetic equipment could cause wrong action of the door sensor.
Control Panel Operation
The built-in control panel on the rear of the machine features an LCD panel displaying all operation statuses of the haze machine. The control panel allows the user to customize functions by adjusting the fogging duration and interval as well as the DMX address and the door sensor. There are six buttons on the control board. All current operating parameters are automatically stored in non-volatile memory, allowing the machine to be powered down without losing function settings. The control buttons are: FUNCTION, Up, Down, TIMER, VOLUME and MANUAL. You can program the necessary menu settings with the control panel when the display indicates »Ready To Haze«.
After switching on, the display shortly indicates Antari Hz-500 and is ready for haze output. The display indicates Ready To Haze.
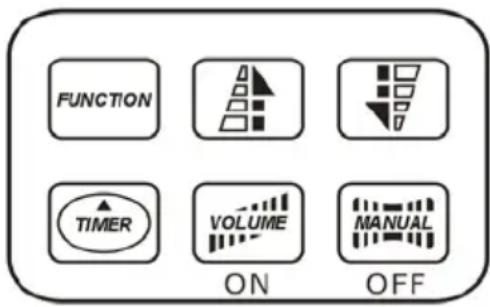
-Continuous operation
When the machine is ready for haze output, short actuation of the button VOLUME activates continuous haze output. The display indicates »Working«. To stop the haze output, press the button VOLUME once again.
-Manual operation
For immediate haze output, keep the button MANUAL pressed. The display indicates Working . As soon as you release the button, the haze output will stop. The manual operation will take priority over the continuous operation and the timer operation. Even if one of these operating modes is activated, the haze machine will always emit haze when the button MANUAL is pressed.
-Timer operation
In the timer mode, the haze machine will automatically emit haze. The time intervals, duration and haze volume depend on the corresponding menu settings. Press the button TIMER, to activate the timer mode.
The display indicates the set time interval. The unit counts down to 0 seconds and emits haze. To deactivate the timer mode, press the button TIMER again.
-Menu settings with the button FUNCTION
1. Setting time intervals for timer operation
Press the button FUNCTION until the display indicates Interval Set. Use the buttons UP and DOWN to adjust the intervals between the individual fog outputs in timer mode within the range of 1 and 200 seconds.
2. Setting the output duration for timer operation
Press the button FUNCTION until the display indicates Duration Set. Use the buttons UP and DOWN to adjust the duration of the fog outputs in timer mode within the range of 1 and 200 seconds.
3. Setting the DMX512 address
Press the FUNCTION until the display indicates »DMX 512«. Use the buttons UP and DOWN, to set the machine to the same address as on your DMX controller. Please refer to chapter DMX512 settings for more information on DMX operation.
4. Switching the door sensor on and off
Press the button FUNCTION until the display indicates >DOOR ON SENSOR<. Press the button MANUAL to deactivate the door sensor (indication > DOOR OFF SENSOR <) and the button VOLUME to reactivate it. Please see *Note 2.
5. Direct haze
Press the button FUNCTION until the display indicates »Direct Haze«. Press the button MANUAL to activate the direct haze mode. Then the machine directly starts producing haze after switching on the power. The display indicates »Direct Haze« and starts flashing. To stop the haze output, shortly press the button MANUAL again. The display stops flashing.
-
Note 1: The control of the master unit will override the control of the panel controller when connecting the haze machine via DMX.
-
Note 2: If the haze outlet door sensor is activated (indication >DOOR ON SENSOR<), a warning sound will beep when haze output is activated and the door is not completely open. The flashes and indicates >DOOR CLOSED!!<. The haze production stops until the door is completely opened. If the door sensor is not activated (indication >DOOR OFF
SENSOR ) , this safety features will not occur.
*Note 3: If the displays shows «Out Of Order«, the machine's internal temperature is too high and as a result the thermostat has been set off to shut-down the hazer.
If you experience this problem, please check two points as described below:
- Check if the mesh (filter) outside the ventilation fan is clean and without debris. If the mesh is covered by dust or obstruction (such as paper, plastic bag, etc.), the machine is put into a very poor ventilation condition and causes the internal temperature to rise. Therefore, it is strongly suggested to clean the mesh regularly.
- Check the surrounding temperature at the hazer's place of installation. If the temperature of the surrounding environment is too high, please move the machine to a cooler place with better ventilation.
*Note 4: Before moving the machine, it is important to replace the nozzle by the black rubber stopper. Please make sure it fits tightly in order to prevent spillage of the HZL-1 Haze liquid in case the machine is turned upside down during the transportation. Before reusing the machine, please put the nozzle back on the outlet and make sure it is properly installed.
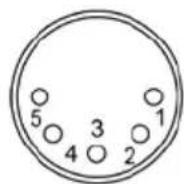
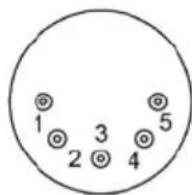
DMX Connector Pin Assignment
The machine provide 3 or 5 pin XLR connector for DMX connection. Diagram below indicate pin assignment information

3 pin XLR

5 pin XLR
| Pin | Function |
| 1 | Ground |
| 2 | Data- |
| 3 | Data+ |
HZ-500 has on-board DMX control and the addressing is via the LCD control panel. The
HZ-500 uses 1 channel to control on/off operation. The channel has a value range from 0 to 255. The on/off function can also be programmed with a DMX controller or DMX control software used by lighting and effects operator.
Channel A

251-255=ON
0-250 = OFF
If the value of channel A is set between 0 and 250, the unit is off.
While the value is set between 251 and 255, the unit is on.
Note: Once DMX cable is connected to the unit, then the LCD control panel cannot be used.
Hazer Liquid
Antari HZL-1 haze liquid was designed for use with the Antari HZ-500. Antari HZL-1 is a non-toxic solution that produces a pure, translucent haze with extremely long hang time and low moisture, perfect for the HZ-500.
Important: Never mix oil-based and water-based hazer liquids. Before switching the kind of haze liquid
in use, completely drain the hazer's tank to avoid mixing.
Technical Specifications
| Model: | HZ-500 |
| Power supply: | 100-120V / 220-240V AC, 50/60Hz~ |
| Nominal power consumption: | 400 W |
| Output volume: | 3,000 cu'ft'/min., 105 m³/min. |
| Tank capacity: | 2.5 liters |
| Fluid consumption: | 20 hrs/liter |
| Weight: | 31.5 kg |
| Dimensions (LxWxH) mm: | 510 x 375 x 350 |
Save these instructions.
Hazer Technology HZ500
Hazer Technology HZ500
Hazer Technology HZ500
安特利HZ-500HAZER特效煙霧機
For current product information visit Antari at:www.antari.com For information requests please contact us at:sales@antari.com