Duo Control - Blood pressure monitor Tensoval - Free user manual and instructions
Find the device manual for free Duo Control Tensoval in PDF.
Frequently Asked Questions - Duo Control Tensoval
User questions about Duo Control Tensoval
0 question about this device. Answer the ones you know or ask your own.
Ask a new question about this device
Download the instructions for your Blood pressure monitor in PDF format for free! Find your manual Duo Control - Tensoval and take your electronic device back in hand. On this page are published all the documents necessary for the use of your device. Duo Control by Tensoval.
USER MANUAL Duo Control Tensoval
Tensoval duo control
Gebrauchsausleitung Mode d'emploi Gebrukturierung Grubuzhanka per l'asso Institutions for use

helps heal.
PAUL HARIMAN AG-89522 Heidenheim, Germany
A1- PAUL HARIMAN Gao, m.b.H.-2355 Merier Neufort
B1-NY PAUL HARIMAN S.A. 1480 SainteSint Berne
CH-17 PAUL HARIMAN AG-8212 Niedermaar
F8-Lab. PAUL HARIMAN S.A. 3670 Seletat Cedex
IT- PAUL HARIMAN S.p.A. -37139 Verona
www.hartmar.info www.tencosal.com

Hre
123456
Deutsch
12.13.13.14.15.16.17.18.19.20.21.22.23.24.25.26.27.28.29.30.31.32.33.34.35.36.37.38.39.40.41.42.43.44.45.46.47.48.49.50.51.52.53.54.55.56.57.58.59.60.61.62.63.64.65.66.67.68.69.70.71.72.73.74.75.76.77.78.79.80.81.82.83.84.85.86.87.88.89.90.91.92.93.94.95.96.97.98.99.
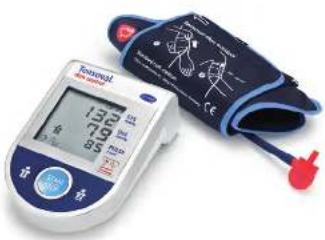
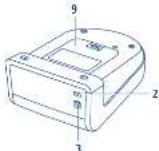
1 Cuff socket
2 Connection to computer (USB)
3 Mains adapter socket
4 Extra large LCD display
5 Identification fields for user names
6 Memory button for user 2
7 Memory button for user 1
8 START / STOP button
9 Battery compartment with mechanism for easy battery removal
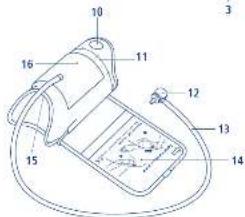
10 Grip tab for pulling the cuff on
11 Sizing scale for correct adjustment of the cuff
12 Cuff connector with extra wide grip
13 Extra long tube
14 Drawing to help with the correct applying of the cuff
15 Recess for bend of the elbow: ergonomic shape of cuff prevents incorrect applying and slipping
16 Easy to open Velcro fastener
Vorbemerkungen
Duo Sensor Technology
$$ \left[\begin{array}{l}R 7\\text {M E M O M E M O M E M O}\end{array}\right]\rightarrow \left[\begin{array}{l}R 7\\text {M E M O M E M O}\end{array}\right]\rightarrow \left[\begin{array}{l}R\\text {M E M O M E M O}\end{array}\right]\rightarrow \left[\begin{array}{l}0\\text {M E M O M E M O}\end{array}\right]\rightarrow \left[\begin{array}{l}0 2\\text {M E M O M E M O}\end{array}\right] $$
| 17 – 22cm small | |
| 22 – 32 cm medium | |
| 32 – 42 cm large |
15.3 Service clients
France :
Lab. PAUL HARTMANN S.à.r.l.
| 17 – 22cm small | |
| 22 – 32 cm medium | |
| 32 – 42 cm large |
Duo Sensor Technology
| 17 a 22cm small |
| 22 a 32 cm medium |
| 32 a 42 cm large |
Tensoval duo control large: >1400 misurazioni
Please read these instructions carefully before first use as correct blood pressure measurement depends on the appropriate use of the device. These instructions for use are designed to instruct you, from the very start, in the individual steps of self-measurement of blood pressure using Tensoval duo control. You will thus receive important and helpful hints for producing reliable results for your personal blood pressure profile. Be sure to keep these instructions for use for future reference.
Duo Sensor Technology
The innovative Duo Sensor Technology combines two professional measuring tech

nologies: the oscillometric technology and the Korotkoff's technology. Whilst most automatic blood pressure devices only use oscillometric technology, Duo Sensor Technology also utilises Korotkoff's highly accurate method of blood pressure measurement, which is also used by doctors to measure blood pressure.
Korotkoff's principle of blood pressure measurement is characterised by its reduced susceptibility to malfunction, producing correct measured values even in patients with a variety of heart rhythm disorders.
Doctors use a stethoscope to listen to the so-called Korotkoff sounds and thereby to determine blood
pressure; the Tensoval duo control does exactly the same via an integrated microphone.

There are few people whose pulse sounds are so faint that they cannot be picked up by Korotkoff's method. In these cases, Duo Sensor Technology will automatically kick in to display the oscillometric blood pressure measurements based on arterial pulse waves rather than pulse sounds.
Duo Sensor Technology thus produces accurate results and is still easy to use.
Comfort Air Technology
The Comfort Air Technology enables approximate determination of the systolic blood pressure

value during inflation, and on that basis the individually required inflation pressure for blood pressure measurement. This allows measurements on the upper arm to be taken with less discomfort.
Table of Contents Page
1. Introduction 124
2. General information on blood pressure 124
2.1 Significance of blood pressure values 124
2.2 Importance of self-measurement of blood pressure 125
2.3 Objectives of self-measurement of blood pressure 126
2.4 Regular blood pressure measurement 126
3. Getting ready for self-measurement 127
3.1 Inserting / changing the batteries 127
3.2 Setting date and time 128
3.3 10 golden rules for blood pressure measurement 128
3.4 Applying the cuff 130
4. Measuring blood pressure 131
5. Memory function 133
5.1 Storing measured values 133
5.2 Recalling the measured values 133
5.3 Deleting the measured values 135
5.4 Using guest mode 136
6.Explanation of error displays 137
7. Significance of symbols on the device and cuff 140
8. Important notes 140
8.1 Drugs 140
8.2 Pregnancy 140
8.3 Diabetes, history of other medical conditions 141
8.4 Arrhythmias, heart rhythm disorders, cardiac pacemakers 141
9.Maintenance of the device 142
10. Accessories and spare parts 142
11. Warranty conditions 142
12. Technical data 144
- Power supply, disposal notes and safety information 145
13.1 Batteries, mains adapters and disposal 145
13.2 Safety information 146 - Legal requirements and guidelines 146
- Calibration check and service addresses 146
15.1 Explanation of calibration check 146
15.2 Instructions for the calibration check 147
15.3 Contact information for customer queries 147
1. Introduction
Dear Customer,
We are pleased that you have decided to purchase a blood pressure device from HARTMANN. Tensoval duo control is a quality product for fully automatic self-measurement of blood pressure on the upper arm. Requiring no preliminary settings, this device conveniently inflates automatically for easy, quick and reliable measurement of the systolic and diastolic blood pressures as well as the pulse rate.
In addition, you are informed if an irregular heartbeat is detected.
The used HARTMANN Duo Sensor Technology is based on an innovative combination of the proven oscillometric measuring technology used by digital blood pressure devices and Korotkoff's traditional principle of blood pressure measurement applied by the doctor. This device is designed to optimally support you in monitoring your blood pressure. We wish you all the best for your health.
2. General information on blood pressure
2.1 Significance of blood pressure values
To determine your blood pressure you need to measure two values:
Systolic (upper) blood pressure: is produced when the heart contracts and pumps blood into the blood vessels.
Diastolic (lower) blood pressure: this is the value measured when the heart muscle is dilated and again fills with blood.
Blood pressure readings are expressed in mmHg.
The World Health Organisation (WHO) and the International Society of Hypertension (ISH) have developed the following classification for blood pressure values:
| Assessment Systolic pressure Diastolic pressure | ||
| Optimal up to 120 mmHg up to 80 mmHg | ||
| Normal up to 130 mmHg up to 85 mmHg | ||
| Normal limit values 130 – 139 mmHg 85 – 89 mmHg | ||
| Grade 1 hypertension 140 – 159 mmHg 90 – 99 mmHg | ||
| Grade 2 hypertension 160 – 179 mmHg 100 – 109 mmHg | ||
| Grade 3 hypertension over 180 mmHg over 110 mmHg | ||
Please note that this classification of blood pressure values is independent of age.
Established hypertension (high blood pressure) is defined as measurement of a systolic value greater than 140mmHg and/or a diastolic value greater than 90mmHg .
In general, blood pressure is considered to be too low in women (hypotension) with values of less than 100mmHg systolic and less than 60mmHg diastolic, and with values of less than 110mmHg systolic and less than 70mmHg diastolic in men. Please note that, unlike too-high blood pressure values, too-low blood pressure values are not usually expected to be associated with health risks.
2.2 Importance of self-measurement of blood pressure
Constantly elevated blood pressure multiplies the risk for other health problems. The most common causes of death worldwide are physical consequences such as heart attack, stroke and organic damages. Daily blood pressure monitoring is thus an important measure which will help to protect you from these risks.
Thickening of the heart muscle, weakness of the heart muscle
Stroke
7x
8x
3x8x
Heart attack
Arteriosclerosis
6x
2x
Shrunken kidney, kidney problems, kidney failure
Impaired blood flow
= higher risk
2.3 Objectives of self-measurement of blood pressure
Your personal blood pressure profile is the regular documentation of the measured values over a certain period of time and therefore important information. In case of drug treatment in high blood pressure, your doctor can use your blood pressure profile to tailor your treatment to your particular needs. The better your drug treatment is tailored to your needs, the better you will feel. Regular, accurate blood pressure monitoring with Tensoval duo control will help you achieve this goal.
Many people manage to lower their blood pressure through life-style changes (such as losing weight, dietary modification and getting more exercise) to levels that do not require drug treatment.
2.4 Regular blood pressure measurement
Numerous factors including physical exertion, taking drugs or the time of day may have an impact on blood pressure. Blood pressure should therefore always be measured at the same time of day under similar conditions.
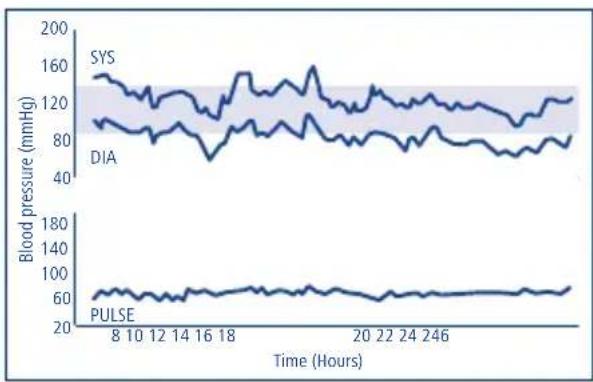
Our heart may beat up to 100,000 times a day, producing 100,000 different blood pressure values.
3. Getting ready for self-measurement
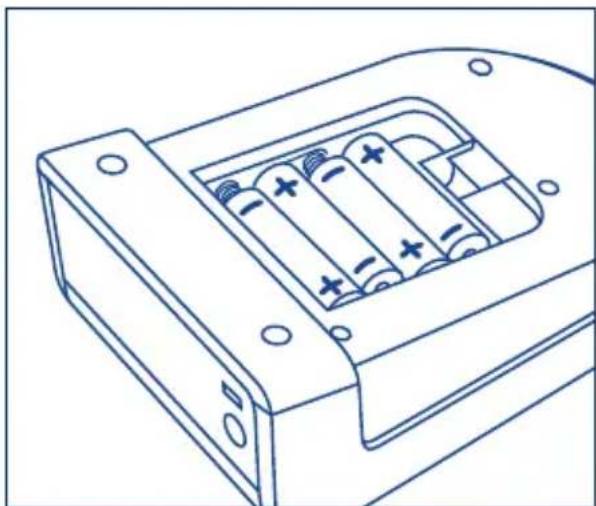
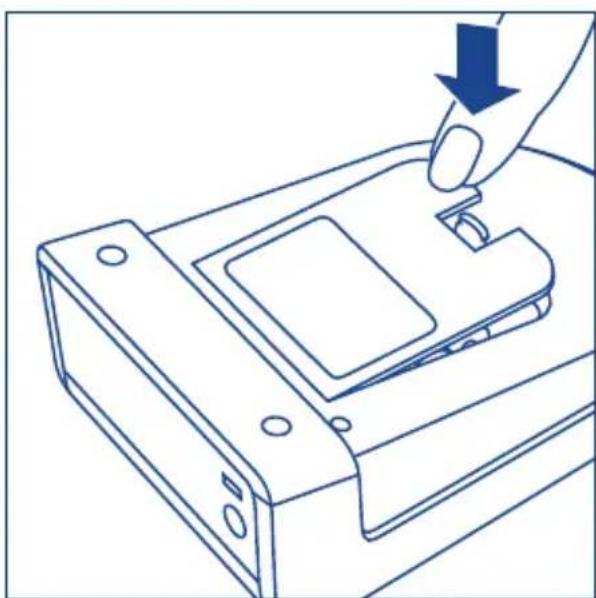
3.1 Inserting / changing the batteries
Open the battery cover on the underside of the device by applying gentle pressure on the hook.
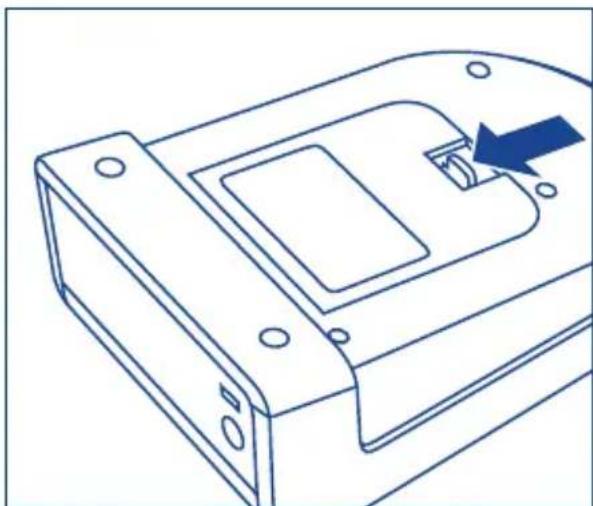
Insert the four batteries (type AA) so that the positive (+) and negative (-) polarities match the marking of the polarities on the battery compartment as indicated. If the
polarities do not match, the device will not work and the batteries may leak!
Replace the lid of the battery compartment, applying gentle pressure until the hook snaps in place. The measured values recorded in the memory will not be lost when changing the batteries. The date settings will also not be lost but the time settings must however be reset.
3.2 Setting date and time
When you insert batteries for the first time or change the batteries, the device automatically switches to the date / time function. You can also reset the date and time at any point by pressing down the START button for 5 seconds while the device is switched off.
When first used, the display shows the number "31" for the day and "12" for the month. The date set is thus the 31st of December.
You must correctly set the date / time before using the device for the first time, so that all memory and evaluation functions function correctly.
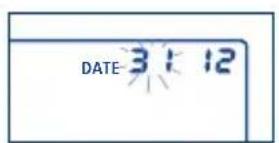
The number on the left (date indication) in the
display flashes. Press the () or () buttons to change the day displayed. For example, press twice to set the date to the 29th of December. Store the current day by pressing the START / STOP button.

Now the number on the right flashes, which
displays the month. You can set the month also by pressing the () or () button and store it by pressing the START / STOP button.

Now the year 2011 is displayed. You can
change the year displayed as mentioned above and store it by pressing the START / STOP button.

Then you may set the time. The number on the
left in the display flashes, indicating 12:00. Once the desired number of hours has been set, store it by pressing the START / STOP button.
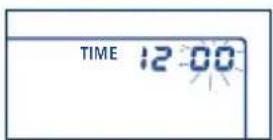
Now the number on the right flashes. Here you
can change the minutes display and store it by pressing the START / STOP button.
3.3 10 golden rules for blood pressure measurement
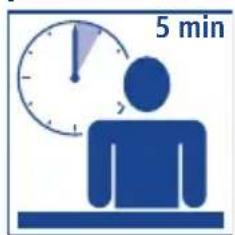
- Rest for approx. 5 minutes before measurement. Even deskwork increases blood
pressure by an average of approx. 6mmHg systolic and 5mmHg diastolic.

- Do not consume any coffee or nicotine up to one hour before measurement.

- Do not measure when you have a strong urge to urinate. A full bladder can lead
to an increase in blood pressure of approx. 10mmHg
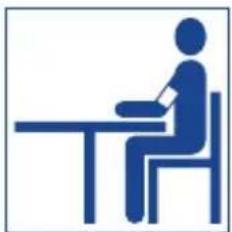
- Take measurements from the naked upper arm while sitting upright.

- In the case of using a wrist monitor, hold the cuff at heart level during the
measuring procedure. The cuff of an upper arm monitor is automatically placed at the correct level of the arm.
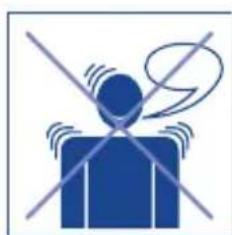
- Do not talk or move during the measuring procedure. Talking increases
the values by approx. 6 - 7mmHg
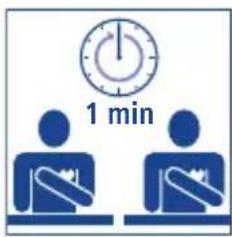
- Wait at least one minute between two measurements, so that the vessels are
relieved from pressure in preparation for a new measurement.
- Enter values in the blood pressure diary: note down the measured values,
together with any drugs taken, the date and time in your blood pressure diary.

- Take measurements regularly. Even if your values have improved, you
should continue to check them for monitoring purposes.

- Always take measurements at the same time of day. Because a person has
approx. 100,000 different blood pressure values every day, individual measurements have no significance. Only regular measurements at the same time each day over a long period of time allows a meaningful evaluation of blood pressure values.

Further notes:
You should take your blood pressure in a quiet place, in a relaxed seated position. Measurement can be taken on the right or left arm. The arm giving higher readings should be used for long-term blood pressure monitoring.
Do not take your blood pressure after taking a bath or exercising.
3.4 Applying the cuff
Before you apply the cuff, insert the red cuff connector into the red cuff socket on the left side of the device.
Measurement should be taken on the naked upper arm. If your cuff is completely open, thread the end of the cuff through the metal hoop, so as to form a loop. In this instance, the Velcro fastener must be on the outside. Grasp the cuff by the gript tab (see illustration in the inside cover of the instructions for use) and wrap this over the upper arm.
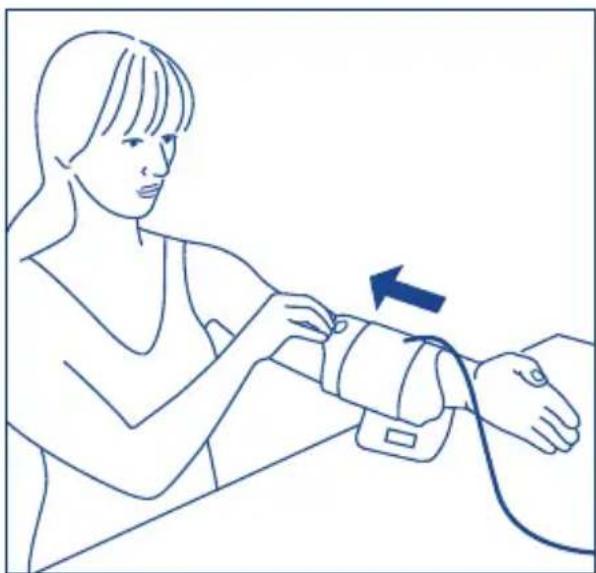
The recess (see illustration in the inside cover of the instructions for use) in the cuff, opposite the grip tab, should lie in the bend of the elbow. The tube should lie in the centre of the bend of the elbow, pointing towards the hand.
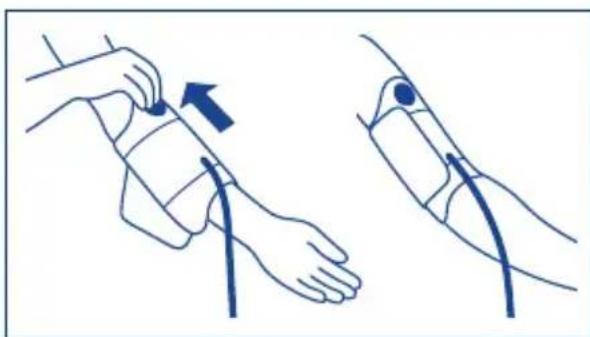
Now lightly bend your arm, take the free end of the cuff, wrap it firmly round your arm and close the Velcro fastener.
The cuff should be firm but not too tight.
Important: The correct applying of the cuff is essential for a correct measurement result. The marking on the edge of the cuff helps you to choose the correct cuff size. The white arrow must point to an area within the sizing scale. If the white arrow is outside the scale, you need another cuff size (see Chapter 10 "Accessories and spare parts").
4. Measuring blood pressure
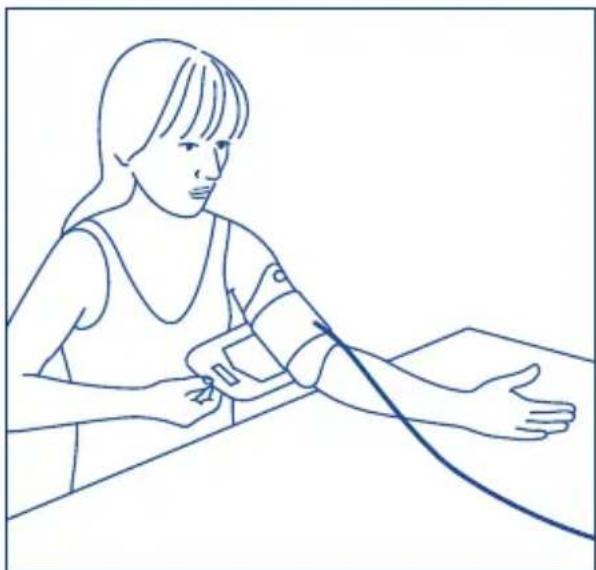
We recommend carrying out blood pressure measurements whilst seated. Place your arm with the palm relaxed upwards on a support and make sure the cuff is at the level of the heart.
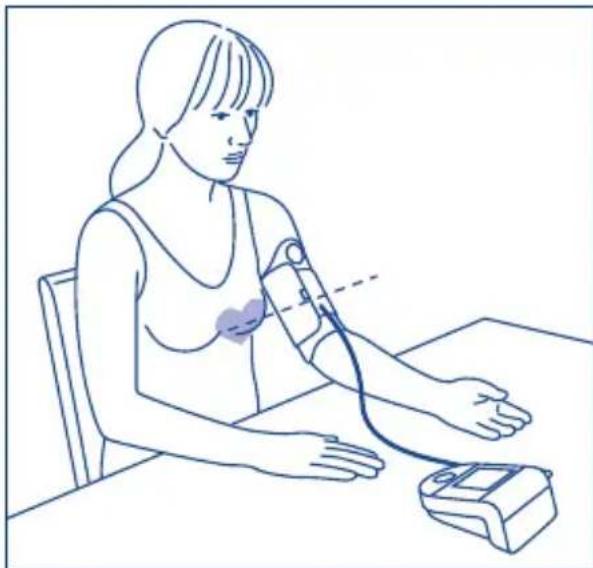
Do not turn the device on until the cuff has been applied, otherwise the cuff can become damaged through the resulting excess pressure.
Press the START / STOP button.
The appearance of all display elements, followed by a flashing part of the progress bar, shows that the device is carrying out a test run for checking and is ready for use.
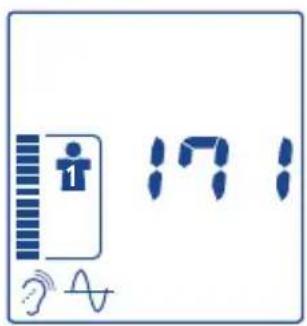
Subsequently, automatic inflation begins. Tensoval duo control is equipped with Comfort Air Technology, whereby the inflation pressure is only as high as necessary (30 mmHg over the systolic value), therefore allowing measurements to be taken without discomfort. If this inflation pressure is insufficient, the device continues to pump until a high enough pressure is reached. Three short beeps
indicate that the necessary inflation pressure has been reached, and that measurement is starting. Then the measuring procedure begins with the release of the air.
If you require a higher inflation pressure, you can avoid having to repeat pumping by pressing the blue START / STOP button again after inflation starts and holding down on it until the desired cuff pressure is reached. This should be approx. 30mmHg over the systolic (upper) value.
You can track the measuring progress via the progress bar. This increases during the inflation phase and decreases in the measuring phase. During the measuring phase, you will also see the symbols for the two Duo Sensor Technology measuring methods. These indicate that the sensors are functioning correctly. In addition, the heart symbol shows your pulse rate, which is also measured.
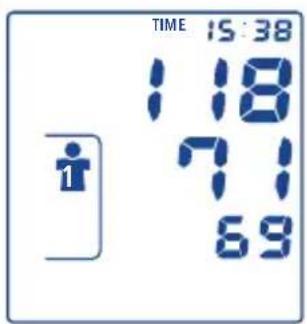
A long beep indicates the end of measurement. Then the systolic and
diastolic blood pressure values appear simultaneously one below the other on the display as well as the pulse rate.
Important: You should not move or talk throughout the entire measuring procedure! If you wish to stop the measuring procedure for any reason, simply press the START / STOP button. The inflation or measuring procedure is interrupted and an automatic fall in pressure occurs.
If you see this symbol under the pulse rate, then the device has detected an irregular heartbeat during the measurement. But it is also possible that the measurement was falsified by body movement or talking. The best thing to do is to repeat the measurement. If you regularly see this symbol when measuring blood pressure, we recommend that you have your heart rhythm checked by your doctor.
Once the measurement is finished or ±b is displayed on the left. represents the measured values
for the first user. Using you can store the measured values for a second user (see 5.1 "Storing measured values").
In order to switch off the device, press the START / STOP button. Otherwise the device will switch itself off automatically after 3 minutes.
5. Memory function
5.1 Storing measured values
The device features two memory buttons and to store measurement results for two different users. represents the measured values for a first user, represents the measured values for a second user. When a beep indicates the end of measurement, you may press to apply the measured value to the respective person. This assignment can be made as long as the values are displayed. If you do not assign them, the measured value is automatically stored to the displayed measurement memory.
The time the measurement was taken is always stored with the
blood pressure values in order to determine e.g. the morning or evening averages correctly. The time stored in the device must therefore match the actual time of day. (see 3.2 Setting date and time").
5.2 Recalling the measured values
Tensoval duo control keeps handy the following measurement memories (corresponding to the ESH (European Society of Hypertension) guidelines)
Individual measurement memory
Average value of all measured blood pressure values per user
Average value of the morning values
Average value of the evening values
The device must be switched off to recall data from the measurement memory. Press the memory button for recalling the first user's stored values and the memory button for the second user's values. The corresponding symbol nd/or will be displayed.
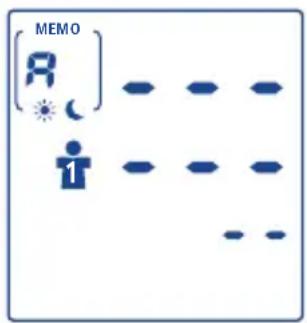
Tensoval duo control distinguishes between values measured in the morning and in the evening. Initially, the average of the morning values over the last seven days for the selected person is displayed
MEMO A stands for average, 7
stands for seven days). After pressing again the memory button, the average of the evening values over the last seven days appears MEMO
After pressing the memory button again, the average of all measurements appears. The number
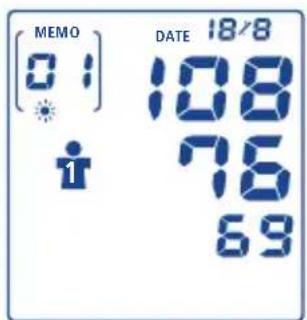
of the stored measured values is displayed alternately with the sign "A". Each time the button is pressed after this, all stored measured values from the last 60 measurements appear one after the other, starting with the most recent value, along with the time, date and year, as well as displaying whether it is a morning or evening value (01 is the latest
measurement, 02 the next-to-last measurement, ...). The display alternates between the time, date and year of the measured value every 2 - 3 seconds.
You can switch directly between the two users at any point in the memory display by pressing the respective memory button.
Tensoval duo control can store up to 60 measured values for each
person (der). The most recent measured value is always in memory position No.1. When all memory positions are occupied, the oldest value will be deleted each time.
$$ \left[\begin{array}{l}R 7\\text {M E M O M E M O M E M O}\end{array}\right]\rightarrow \left[\begin{array}{l}R 7\\text {M E M O M E M O}\end{array}\right]\rightarrow \left[\begin{array}{l}R\\text {M E M O M E M O}\end{array}\right]\rightarrow \left[\begin{array}{l}0\\text {M E M O M E M O}\end{array}\right]\rightarrow \left[\begin{array}{l}0 2\\text {M E M O M E M O}\end{array}\right] $$
Important: Tensoval duo control follows the recommendations of the European Society of Hypertension and distinguishes between the measured morning values and the measured evening values. This distinction is medically relevant, as blood pressure changes throughout the day. With this information, your doctor is more likely to find the right treatment option for you in the event of you receiving medical treatment for high blood pressure.
A measured value is assigned as a measured morning value if it is taken between 0.00 h and 12.00 h and as a measured evening value if it is taken between 12.01 h and 23.59 h. Please ensure that you always measure your blood pressure at the same time in the morn
ings and evenings.
The calculated general mean value is based on all measured values stored for the respective person. If only two measured values are in memory, the mean value will be calculated from these two measured values. If only one measured value is in memory, this measured value corresponds to the mean value.
If there is no morning and/or evening value for the last seven days in the memory, then dashes are displayed instead of values in the display for morning and evening averages over the last seven days. If no values are stored at all in the memory, then dashes are also displayed instead of values in the display for the overall average.
If an irregular heartbeat was detected during measurement, this information is also stored and displayed when recalling the measured values from the device memory, together with the systolic and diastolic blood pressure value, the pulse rate, the time, date and year.
You can cancel the memory's recall of data at any time by pressing the START / STOP button. Otherwise the device will switch itself off automatically after approx. 30 seconds. Even if the power supply fails, e.g. when changing the batteries, the stored values will still be available.
5.3 Deleting the measured values
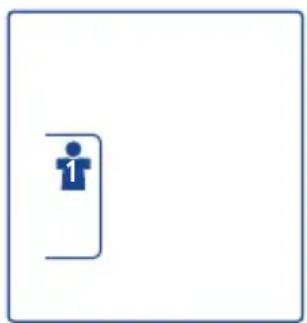
You can delete the stored values for and separately. In order to delete all values of a user, press the memory button of the corresponding measurement memory . The morning average values over the last seven days will be displayed. If you press the button again and then hold down the memory button for 4 seconds, the numbers and signs except and/or start to flash in the display. If you hold down the memory button for another 4 seconds, all data for the selected user is deleted. Now the display either shows .
If you would like to delete individual values, please call up the corresponding individual value to be deleted (see 5.2) and press the respective memory button for 4 seconds, so that the display flashes. After pressing for another 4 seconds, the respective individual value is deleted. Now the display either shows or
Important: If you release the memory button ahead of time, no data will be deleted. When you delete an individual value, the next oldest measured value shifts to the memory position of the deleted measured value. When a measured value is deleted, the respective average values concerned are also recalculated.
5.4 Using guest mode
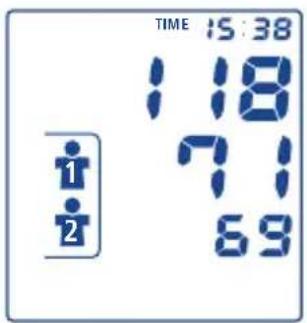
When a third person uses Tensoval duo control, it is recommended that they use the guest mode. This one is used to store a measured value neither to the memory positions nor to this avoids bias to the series of measurements and the average values of the two main users of the device. To take measurements in guest mode, start the measuring procedure by simultaneously pressing the memory buttons and. The START / STOP button need not be pressed. During and at the end of measurement the display simultaneously shows the two symbols and next to the measured values. The measured value can thus not be applied to either person, and the measured values will not be stored.
To switch off the device, press the START / STOP button, also in guest mode. Otherwise the device will switch itself off automatically after 3 minutes.
6. Explanation of error displays
| Error which has occurred | Possible causes | Remedy |
| Device will not turn on. | No batteries, they have been inserted incorrectly or are dead. | Check batteries and insert four identical, new batteries, if and when necessary. |
| Mains adapter not correctly connected or defective. | Ensure the mains adapter is plugged in the connecting socket on the rear side of the device. | |
| Cuff will not inflate. | Cuff connector is incorrectly positioned in the connecting socket of the device. | Check connection between the red cuff connector and the red connecting socket. |
| Wrong cuff type connected. | Check to make sure that only the approved Tensoval duo control cuffs and the corresponding connectors were used. | |
| E-r-1 | Because of external disturbances, the measured value could not be accurately determined. | Make sure to abide by the 10 rules as well as the instructions in Chapter 3.3 and take the measurement again. |
| E-r-2 | Cuff is too loosely applied. | Apply the cuff so that you are able to push about two fingers between the cuff and the upper arm. |
| ε-2 | Cuff does not inflate or does not inflate fast enough. | Air tube is not correctly inserted into the device. Check the correct position of the red connector. If this error occurs often, use a new cuff. |
| ε-3 | Moving during the measuring procedure. | Do not talk or move during the measuring procedure. |
| ε-300 | The pressure in cuff exceeds 300 mmHg. Therefore, an automatic fall in pressure occurs. | Please rest for at least a minute and take the measurement again. |
| Batteries are almost dead. Only a few more measurements are possible (approx. 30). | Keep new batteries of the same manufacture handy (type AA LR06). | |
| Batteries are dead and have to be replaced. | Insert new batteries of the same manufacture (type AA LR06). However, please note that the battery sign which appears when the device is turned on together with all display functions, and then goes out again, does not provide an indication of the battery charging level. | |
| Implausible measured values. | Incorrect cuff size. | Use the cuff corresponding to your upper arm size. |
| Cuff placed on top of clothing. | Apply cuff on the naked skin. | |
| Rolled-up clothing impedes blood circulation. | Wear loose clothing. Make sure that rolled-up sleeves do not impair circulation in the upper arm. | |
| Cuff wrongly applied. | Take note of the instructions and images showing how to apply the cuff correctly to the upper arm. | |
| Cuff tube folded or squashed. | Ensure that the cuff tube lies straight and loose. | |
| Cuff was not correctly inflated. | Check the correct position of the upper arm cuff. | |
| Moving, talking or excitement during the measuring procedure. | Please take measurements in a relaxed position whilst seated. Do not talk or move during the measuring procedure. | |
| Lack of relaxation before taking a measurement. | Relax for 5 minutes before taking a measurement. | |
| Implausible measured values. | Stimulants taken before measurement. | Please avoid alcohol / nicotine and caffeine for one hour before taking a measurement. |
Please check the possible causes, when an error symbol appears and note the instructions on self-measurement in Chapter 3. Relax for a minute and take the measurement again.
7. Significance of symbols on the device and cuff

Pay attention to the operating instructions

Please note

Protection from electric shock (type BF)

PAUL HARTMANN AG
89522 Heidenheim
Germany

Electronic device disposal note

Disposal note
8. Important notes
8.1 Drugs
Self-measurement of blood pressure does not replace treatment! So do not interpret your measured values on your own and do not use them for self-prescribed treatment. Take measurements as instructed by your doctor and have confidence in his diagnosis. Take drugs as prescribed by your doctor and never alter the dose on your own. Discuss the appropriate time for self-measurement of blood pressure with your doctor.
8.2 Pregnancy
Blood pressure may change during pregnancy. Regular blood pressure monitoring is particularly important if you have high blood pressure because the elevated blood pressure values may affect the development of the foetus. Check with your doctor whether and, if so, when
you should carry out self-measurement of blood pressure.
8.3 Diabetes, history of other medical conditions
If you have diabetes, hepatic disorders or narrowed blood vessels (e.g. arteriosclerosis, peripheral arterial occlusive diseases (PAOD)), you should consult your doctor before carrying out self-measurement because altered measured values may occur in such cases. If you suffer from certain blood diseases (e.g. haemophilia), severely impaired blood flow or if you take blood-thinning drugs, you should also ask your doctor before carrying out self-measurement.
8.4 Arrhythmias, heart rhythm disorders, cardiac pacemakers
Heart rhythm disorders (arrhythmias) are disturbances of the normal rate or rhythm of the heartbeat. A distinction should be made between mild and severe heart rhythm disorders. This can only be determined by a special investigation carried out by a doctor. Using Korotkoff's technology, Tensoval duo control can measure correctly in the case of various types of heart rhythm disorders and thus produces correct readings.
An irregular heartbeat is when the heart rhythm deviates by more than 25% from the average heart rhythm.
If this symbol appears often, it can by a sign of heart rhythm disorders. In this case, consult your doctor. Severe heart rhythm disorders may produce false measurements or impair the measuring accuracy. Please discuss with your doctor whether self-measurement of blood pressure is suitable for you. Altered measured values may occur in the case of self-measurement performed by cardiac pacemaker wearers. The blood pressure monitor itself has no impact on the cardiac pacemaker. Please note that the displayed pulse rate is not suitable for checking the rate of cardiac pacemakers. Please check with your doctor whether self-measurement of blood pressure is advisable if you are wearing a cardiac pacemaker.
The contraction of the heart muscle is stimulated by electrical signals. A disturbance in these electrical signals is called arrhythmia. This can be caused by genetic disposition, stress, age, lack of sleep, exhaustion, et cetera. A doctor can establish whether an irregular heartbeat is the result of arrhythmia.
9. Maintenance of the device
Do not expose the device neither to extreme temperatures nor to humidity, dust or direct sunlight because this may lead to malfunction. This device consists of high-quality electronic precision components. Protect the device from shock and do not immerse in water. Only use a soft, moistened cloth to clean the device. Please use neither a diluter nor alcohol, detergents or solvents. The cuff can be cleaned carefully with a lightly moistened cloth and mild, pH-neutral soap. Do not completely immerse the cuff in water. To protect them from external influences keep the device and cuff as well as these instructions in the storage bag.
10. Accessories and spare parts
To ensure measurement accuracy, only use original HARTMANN accessories which may be obtained from your pharmacist or specialist medical supplier.
Upper arm Required circumference cuff
| 17 – 22cm small | |
| 22 – 32 cm medium | |
| 32 – 42 cm large |
Standard cuff, small
for upper arm circumference of 17 - 22cm
Code no. 900 241
Standard cuff, medium
for upper arm circumference of
22-32cm
Code no. 900 242
Standard cuff, large
for upper arm circumference of
32-42cm
Code no. 900 243
Preformed moulded cuff, medium for upper arm circumference of
22-32cm
Code no. 900 244
USB kit
for connecting the Tensoval duo
control to a computer
Tensoval mains adapter
Code no. 900 152
11. Warranty conditions
We give a 3-year warranty on this high-quality device for measuring blood pressure from the day of purchase and in accordance with the following conditions.
Claims must be made during the warranty period. The date of purchase may be documented by the appropriately completed and stamped warranty document or proof of purchase.
Within the warranty period, HARTMANN shall replace or repair any faulty device components free of charge which were caused by material or manufacturing errors. This does not extend the warranty period.
This warranty is not applicable to damage caused by improper use or unauthorized interference. Parts that are subject to wear and tear, such as batteries, cuffs, mains adapters etc. are excluded from the warranty. Claims for compensation are limited to the value of the goods; compensation for subsequent damages is expressly excluded.
In warranty cases please send the device with cuff and, if applicable, the mains adapter together with the fully completed and stamped
warranty certificate direct, or via your dealer to the Customer Services department for your country.
AE - PAUL HARTMANN
Middle East FZE
Dubai
AU - PAUL HARTMANN Pty. Ltd.
Level 6, 5 Ryder Boulevard
Rhodes, NSW 2138 Australia
HK - PAUL HARTMANN
Asia-Pacific Ltd.
Hong Kong
ZA - HARTMANN South Africa 2194 Johannesburg
12. Technical data
Measuring method: Oscillometric and Korotkoff's principle of blood pressure measurement
Display range: 0 - 300mmHg
Measuring range: Systole (SYS): 50 - 250 mmHg Diastole (DIA): 40 - 160 mmHg
Pulse: 40 - 160 beats / minute
Technical measuring accuracy: Cuff pressure: + / - 3mmHg Pulse: + / - 5% of displayed pulse rate
Power supply: 4 × 1.5 ~V Mignon alkaline-manganese (AA/LR06) batteries or optional HARTMANN Tensoval mains adapter.
Battery capacity: Tensoidal duo control: >1,400 measurements
Tensoidal duo control large: >1,400 measurements
Inflation pressure: Min. 140 mmHg
Comfort Air Technology: Individually determined inflation pressure dependent on systolic blood pressure +30mmHg .
Automatic switch-off function: 3 minutes after end of measurement
Cuff: Standard cuff 22 - 32 cm Large cuff 32 - 42 cm Small cuff 17 - 22 cm (optionally) Preformed moulded cuff 22 - 32 cm (optionally)
Pressure release valve: Electronically controlled linear valve
Memory capacity: 2 × 60 measurements and mean value over 7 days and overall mean value
Operating conditions: Ambient temperature: +10^ to +40^ (+50^ to +104^)
Relative humidity: 15 - 90%
Storage / transport
conditions: Ambient temperature: -20^ to +50^
$$ (- 4 ^ {\circ} F t o + 1 2 2 ^ {\circ} F) $$
Serial number: In battery compartment
Computer connection to PC: With the aid of the USB kit and software the measurement memory and a graphic display of the measured values can be viewed on your computer.
13. Power supply, disposal notes and safety information

13.1 Batteries, mains adapters and disposal
The four high-quality batteries included with the device guarantee about 1,400 measurements. Use only high-quality batteries (see specification in Chapter 12 "Technical data"). If you are using less efficient batteries, we can no longer guarantee 1,400 measurements.
- Never mix old and new batteries or batteries made by different manufacturers.
- Immediately remove exhausted batteries.
If you do not intend to use the device for a longer period of time, you should remove the batteries to prevent possible
leakage.
Please help protect the environment: Do not dispose of batteries in household waste! Use designated collection points or municipal collection / recycling centres to dispose of hazardous household waste.
Information concerning the disposal of electronic devices (private households):

This symbol on products and/or accompanying documents means that spent electronic products must not be mixed with regular household waste. Proper disposal is in the interests of environmental protection and prevents possible harmful effects on people and the environment that may result from inappropriate handling of wastes.
13.2 Safety information
Do not leave the device unattended near toddlers or persons who cannot operate it themselves.
Use the device for taking blood pressure measurements on the upper arm only.
Do not expose the device to hard knocks or vibrations.
- Do not drop the device to the floor.
- Do not excessively bend or fold the arm cuff and the air tube.
The device must not be altered, dismantled or repaired by the user.
Use the device only with the approved upper arm cuff; otherwise the device can be damaged externally or internally.
The cuff tube may only be removed from the device by pulling the red connector. Never pull on the tube itself.
Never inflate the cuff when it is not properly applied to the upper arm
14. Legal requirements and guidelines
Tensoval duo control complies with the requirements of the EC directive 93/42/EEC on medical devices (Medical Device Directive MDD) and bears the CE mark.
The device complies, for example, with the European Standard EN
1060:
Non-invasive blood pressure measuring devices, Part 1: General requirements and Part 3:
Supplementary requirements for electro-mechanical blood pressure measuring systems.
Clinical testing of measurement accuracy was performed according to the European Standard EN 1060-4 as well as the ISO Standard 81060-2.
Portable and mobile high-frequency and communication devices can impair the functional capability of electronic medical devices.
In compliance with European Standard EN 60601-1-2 further information can be supplied by HARTMANN on request.
15. Calibration check and service addresses
15.1 Explanation of calibration check
Each Tensoidal duo control device has been carefully tested by HARTMANN for measuring accuracy, and been developed for a long useable service life. We recommend a calibration check at intervals of two years in the case of professionally used devices, for example in pharmacies, medical practices or hospitals. You should also observe the national regulations determined
by the legislator, such as, in Germany, the "Medizinprodukte-Betreiberverordnung" (Medical Device Operating Regulation).
15.2 Instructions for the calibration check
The calibration check can be carried out by the competent authorities or authorised maintenance providers against compensation. A device function check can be carried out on people or using a suitable simulator. Calibration check involves testing for leak tightness of the pressure system and possible deviations of the pressure reading. Remove at least one battery in order to switch to calibration mode. Hold down on the START / STOP button and then insert the battery. Release the button and, after a few moments, two zeros will appear one above each other on the display. Instructions on the calibration check will be supplied on request to competent authorities or authorised maintenance providers by HARTMANN.
15.3 Contact information for customer queries
AE - PAUL HARTMANN Middle East FZE Dubai
AU- PAUL HARTMANN Pty. Ltd. Level 6, 5 Ryder Boulevard Rhodes, NSW 2138 Australia
HK- PAUL HARTMANN
Asia-Pacific Ltd.
Hong Kong
ZA-HARTMANN South Africa 2194 Johannesburg
Date of revision of the text: 2011-07
Deutsch
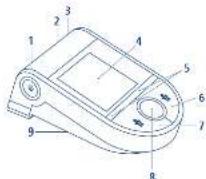
1 Symbol for stored morning values
2 Symbol for stored evening values
3 Time / date
4 Systolic value
5 Diastolic value
6 Pulse
7 Irregular heartbeat
8 Battery symbol
9 Oscillometric measurement
10 Korotkoff's principle of blood pressure measurement
11 Memory user 2
12 Memory user 1
13 Progress bar