F60 RELOADED+ - Camcorder NILOX - Free user manual and instructions
Find the device manual for free F60 RELOADED+ NILOX in PDF.
Frequently Asked Questions - F60 RELOADED+ NILOX
User questions about F60 RELOADED+ NILOX
0 question about this device. Answer the ones you know or ask your own.
Ask a new question about this device
Download the instructions for your Camcorder in PDF format for free! Find your manual F60 RELOADED+ - NILOX and take your electronic device back in hand. On this page are published all the documents necessary for the use of your device. F60 RELOADED+ by NILOX.
USER MANUAL F60 RELOADED+ NILOX
INSERTING AND REMOVING THE MEMORY CARD 6
METHOD OF USE AND SYMBOLS 7
VIDEO MODE 7
PHOTO MODE 7
BURST MODE 8
TIME-LAPSE MODE 8
PARAMETER SETTINGS(CAM) 9
VIDEO RESOLUTION 9
LOOPVIDEO 9
DISPLAY DATE 9
EXPOSURE 10
RESOLUTION 10
TIME-LAPSE. 10
CONTINUOUS CAPTURE
FREQUENCY
LANGUAGE
DATE AND TIME 12
SOUND 12
ROTATE SCREEN 12
SCREENSAVER 12
AUTO POWER OFF. 13
FORMAT 13
RESET 13
VERSION 14
VIEWING PHOTOS AND VIDEOS AND DELETE 14
CONNECTIVITY 14
COMPUTER CONNECTION 14
CONNECTION WITH A VIDEO OR TELEVISION 15
WI-FI CONNECTION 16
CONNECTING YOUR SMARTPHONE AND VIDEO CAMERA 16
APP ANDAndroid AND iOS FUNCTIONS 17
BATTERY LEVEL 17
RESOLUTION 17
REMAININGVIDEORECORDINGSHOTS 18
WHITE BALANCE. 18
PARAMETERS SETTING 18
FREQUENCY: 18
UPSIDE-DOWN: 18
VIEW PHOTOS AND VIDEOS 18
SHOOT BUTTON 18
CURRENT MODE AND STATUS SWITCH 18
DISPLAY PHOTOS AND VIDEOS (WITH APP) 19
PRECAUTIONS 19
PRECAUTIONS FOR THE CAMERA CASE 19
PRECAUTIONS FOR THE 3M DUAL-SIDE FOAM TAPE 20
WARRANTY AND LEGAL NOTES 21
PREFACE
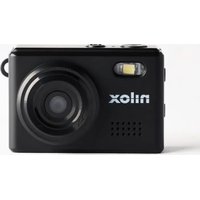
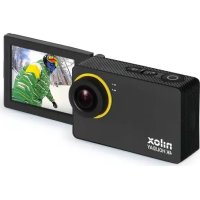
Thank you for choosing F-60 RELOADED +, the high-definition digital camera. Easy to use, compact and with an integrated design.
With its high-definition and dynamic image capturing technology it can record your daily activities at anytime and anywhere,
so you can remember your experiences and share them with your family and friends.
This manual will clearly explain you how to use and install the video camera, providing detailed information as well as technical specifications.
Please read this Manual carefully before the use and keep it for long-term reference.
PRECAUTIONS
Please observe the following points when using the cam:
- Do not drop, hit or shake the camera.
- Keep the device away from any electromagnetic source, such as magnets or electro motors, or from any other object emitting strong radio waves, like antennas. Strong magnetic fields may cause failures to the camera or damages to image and audio.
- Do not expose the camera to high temperatures or to sunlight directly.
- Keep the memory card away from electromagnetic sources, such as TVs, speakers or magnets. Do not put it in any place with potential static, as the data stored may be lost.
- If the device overheats, smokes or smells in charging, please disconnect the power supply immediately.
- Keep the camera out of the reach of children in charging, as the power cord may cause accidental suffocation or electric shock.
- Keep the camera in a cool, dry and dust-free place.
- Use a lens and screen guard to prevent scratching or permanent damages.
- Use a cloth and specific products to clean the lens and screen; do not use any organic solvent.
DESCRIPTION
able to perform the following functions:
High definition (HD) video recording and photos.
Real-time image display.
- Recorded video recall function.
- Photo files recall function.
- Complete control via APP.
2.0 USB high-speed data transfer (output only).
USB cable for battery charging.
All accessories are easy to use to facilitate shooting in any place and at any time.
Supplemented by its accessories, this product is the result of multiple patented technologies and can be used for recording anything, anytime, anywhere.
TECHNICAL SPECIFICATIONS
F-60 RELOADED + camera has the following specifications:
- Image sensor: 16 mega-pixel CMOS.
- Functions: Video recording, photos, preview, burst mode, time-lapse.
- Display Screen: LCD 2.0".
- Photo resolution: 16M, 12M 8M, 5M, 4M.
Video resolution: 1080P 60fps, 1080P 30fps 720P/120fps. - External memory: TF card (Maximum 32GB).
File format: JPEG, MOV H.264. - USB Port: One way USB 2.0
- Battery: Internal 3.8 V 1050 mAh rechargeable lithium battery.
Supported operating systems Windows XP/Vista/7/08/10, or higher, Mac 10.2. - Dimensions: 59.8 × 40 × 22.5 mm .
Weight: 66 gr with battery
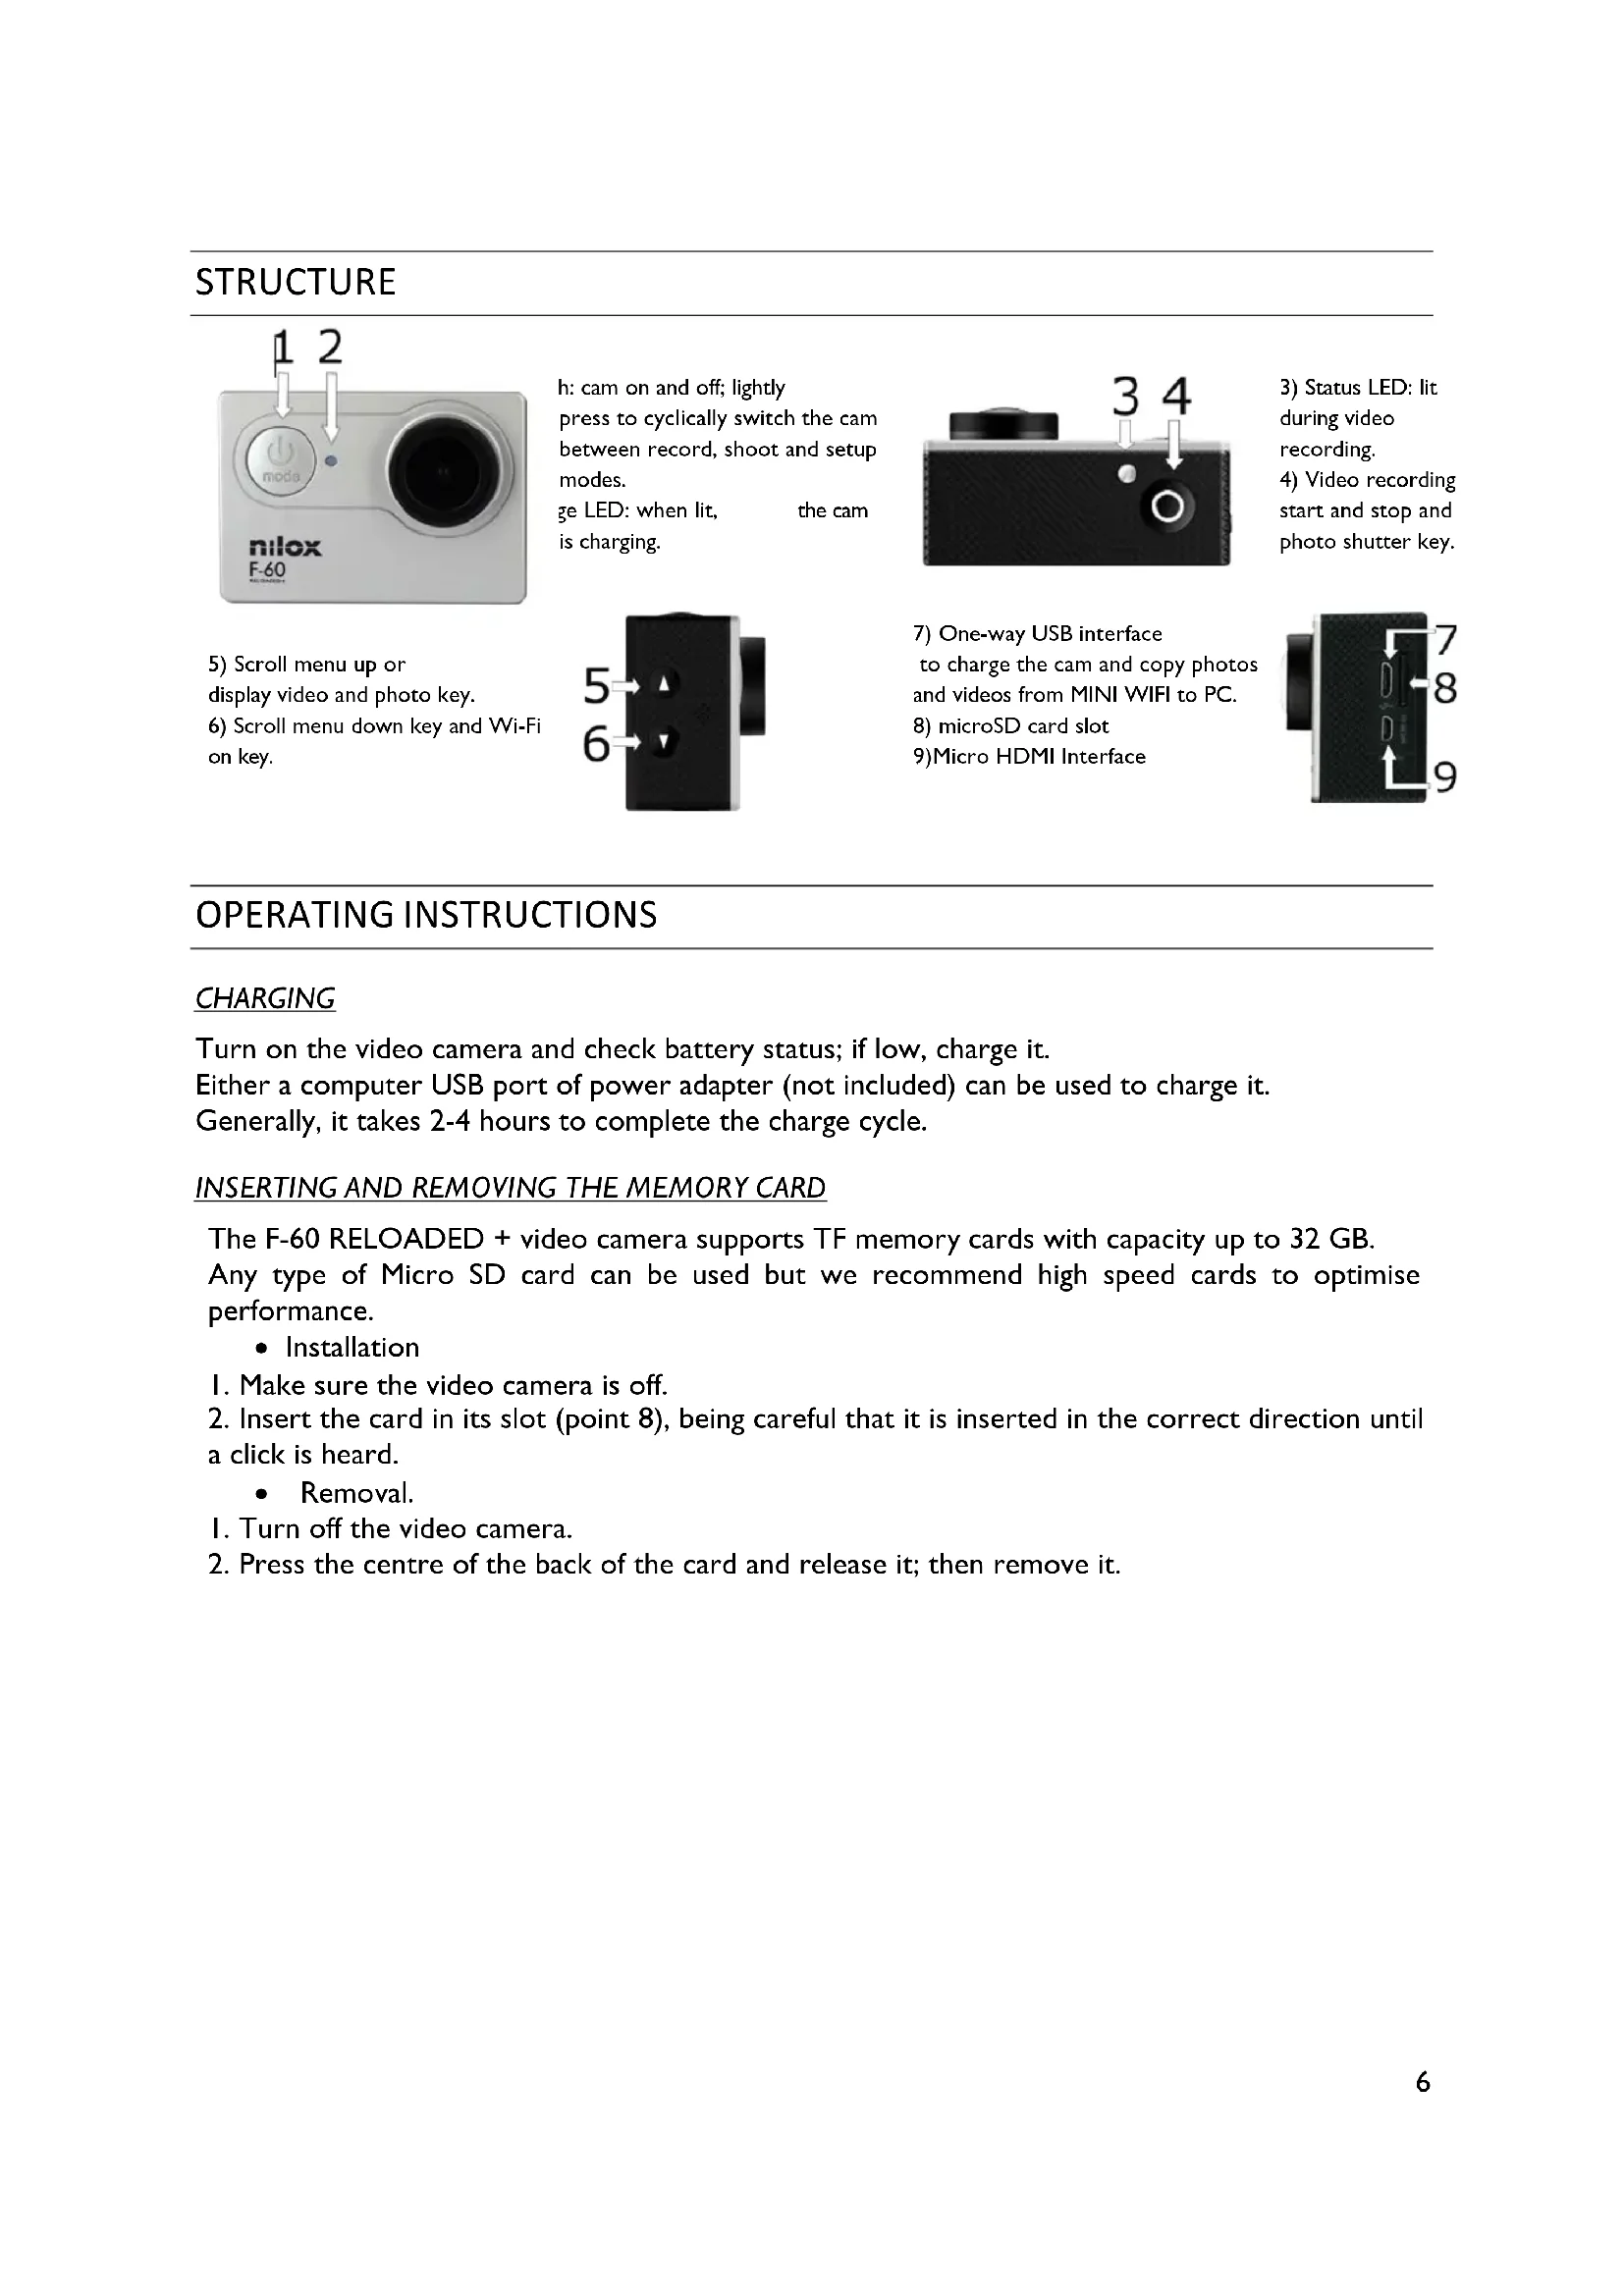
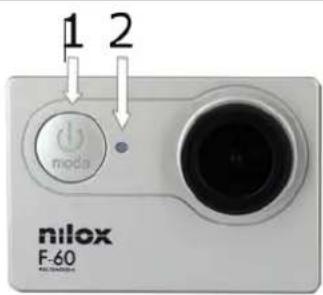
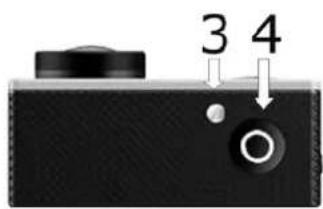
STRUCTURE
h: cam on and off; lightly press to cyclically switch the cam between record, shoot and setup modes.
geLED:whenlit, thecam ischarging.
3) Status LED: lit during video recording.
4) Video recording start and stop and photo shutter key.
5) Scroll menu up or display video and photo key.
6) Scroll menu down key and Wi-Fi on key.

7) One-way USB interface to charge the cam and copy photos and videos from MINI WIFI to PC.
8) microSD card slot 9)Micro HDMI Interface
OPERATINGINSTRUCTIONS
CHARGING
Turn on the video camera and check battery status; if low, charge it. Either a computer USB port of power adapter (not included) can be used to charge it. Generally, it takes 2-4 hours to complete the charge cycle.
INSERTING AND REMOVING THE MEMORY CARD
The F-60 RELOADED + video camera supports TF memory cards with capacity up to 32 GB. Any type of Micro SD card can be used but we recommend high speed cards to optimise performance.
- Installation
I. Make sure the video camera is off.
2. Insert the card in its slot (point 8), being careful that it is inserted in the correct direction until a click is heard.
- Removal.
I. Turn off the video camera.
2. Press the centre of the back of the card and release it; then remove it.
METHOD OF USE AND SYMBOLS
The camera has 5 use modes immediately available by pressing the key in sequence when turned on:
Video recording mode
- Photo mode
- Burst-mode
Time-lapse mode
Parameters setting.
- Press the key on the right side of the cam to view photos and videos.
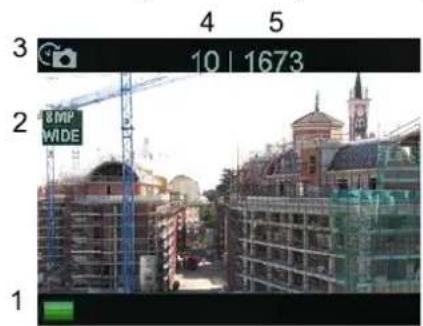
The camera is set to video mode by default when turned on. Following are some of the symbols that most commonly appear on the screen.
VIDEO MODE
This is the default mode when the F-60 RELOADED ^+ is turned on These are the indications that appear on the cam display The resolution parameters are set in the settings menu

I. Battery charge level.
2. Video resolution.
3. Current mode.
4. Recording time
5. Remaining recording time (^)
() With reference to the set resolution
PHOTO MODE
From Video mode, press the key to switch to Photo mode. These are the indications that appear on the cam display The resolution parameters are set in the settings menu

I. Battery charge level.
2. Photo resolution.
3. Current mode.
4. Shots taken.
5. Remaining photos (^)
() With reference to the set resolution
BURST MODE
Lets you take 3 photos in sequence every time the shutter button is pressed.
Enable this mode by pressing the key in photo mode.
These are the indications that appear on the cam display
The resolution parameters are set in the settings menu

I. Battery charge level.
2. Photo resolution.
3. Current mode.
4. Shots taken.
5. Remaining photos (^)
() With reference to the set resolution
TIME-LAPSE MODE
Lets you take a series of shots with settable time sequence.
These shots will make up a video.
To correctly set time-lapse mode, following the instructions in the parameter setting menu.
I. Battery charge level.
2. Photo resolution.
3. Current mode.
4. Shots taken.
5. Remaining photos (^)
() With reference to the set resolution
PARAMETER SETTINGS (CAM)
To set camera parameters, repeatedly press the key until appears, confirm by pressing and scroll the menu using the keys.
To exit the menu when you reach the last item, press the keys to enable the "X" at the top right. Confirm with exit.
VIDEO RESOLUTION
It allows to select the desired resolution for the video recording.
Go to:
Video resolution
Press confirm
Select with and confirm with .

The choices for the video resolution are the following:
1080p (60 fps)
1080p (30 fps)
- 720p (120 fps)
LOOPVIDEO
Lets you decide whether the cam cyclically overwrites the oldest videos or images when the microSD card is out of memory.
Go to:
Loop video
Press to confirm
Select with and confirm with .

The choices are as follows:
On, Off
DISPLAY DATE
Lets you print the date and time in the video recording.
Go to:
Display date
Press to confirm

Select with and confirm with

Possible choices are:
- Off
- Date
- Date and time
EXPOSURE
It lets you manually increase or decrease light exposure.
This mode is especially helpful when extreme conditions mislead the camera exposure meter (back lighting for example).
Go to:
Exposure
Press to confirm

Select with and confirm with

Possible choices are:
-2.0,-1.7,-1.3,-1.0,-0.7,-0.3,0,+0.3,+0.7,+1.0,+1.3,+1.7,+2.0
RESOLUTION
It lets you set photo resolution.
Go to:
Resolution
Press to confirm.

Select with and confirm with .

Possible choices are:
16M, 12 M, 8 M, 5M, 2M
TIME-LAPSE
Lets you take a series of shots with settable time sequence.
These shots will make up a video.
Set this item to set the shot time interval.
Use the shutter key to start the sequence in Time-lapse. Press again to stop.
Go to:
Time-Lapse
Press to confirm.
Select with and confirm with

Possible choices are:
2,3,5,20,30,60 seconds.
CONTINUOUS CAPTURE
This item is closely connected to the previously described item (Time-Lapse). To enable the Time-Lapse function, it must be activated.
Go to:
Continuous shooting
Press to confirm.
Select with and confirm with

Possible choices are:
On, Off.
FREQUENCY
Lets you define the transmission frequency to an external device.
Go to:
Frequency
Press to confirm
Select with and confirm with
Possible choices are:
- 50HZ,60HZ,Auto
LANGUAGE
This lets you set the F-60 RELOADED + display language.
Go to:
Language
Press to confirm.
Select with and confirm with

Possible choices are:
- English, French, Spanish, Italian, Portuguese, German
DATE AND TIME
Go to:
Date Time
Press key to confirm.
Select with and confirm with

Use the keys to select and confirm by pressing to move to the next step; once the date and time are set, exit by pressing
SOUND
This lets you enable F-60 RELOADED + system sound.
Go to:
Sound
Press to confirm
Select one of the various options with and confirm with .
Possible choices are:
- Shutter (On, Off)
- Start (On, Off)
Bip (On, Off)
Volume (0,1,2,3)
ROTATE SCREEN
Rotates the screen 180 degrees.
This way this cam can be handled suspended (like Dash-cam).
Go to:
Rotate screen
Press to confirm
Select with and confirm with

Possible choices are:
On, Off
SCREENSAVER
Lets you deactivate the screen if the cam is not used after a settable number of minutes.
Go to:
Screen saver
Press key to confirm.

Select with and confirm with

Possible choices are:
- Off, 1.3, 5 minutes
AUTO POWER OFF
Turns off the cam if not used after a settable number of minutes.
Go to:
Auto power of
Press to confirm.

Select with and confirm with

Possible choices are:
- Off, 1.3, 5 minutes
FORMAT
Lets you format the microSD card in the action cam.
Go to:
Format
Press to confirm.

Select with and confirm with.

Possible choices are:
No, Yes
Note: Formatting the MicroSD will delete all saved data. You will not be asked to confirm. Formatting finished, in function to the microSD type inserted, the cam should switch off to restore the memory sectors.
RESET
Restores the F-60 RELOADED + to factory settings.
Go to:
Reset
Press to confirm.

Select with and confirm with .

Possible choices are:
No, Yes
NOTE: RESET RESTORES THE CAM MENU TO ENGLISH.
VERSION
Displays the cam firmware version.
Go to:
Version
Press key to confirm.
Select with and confirm with.
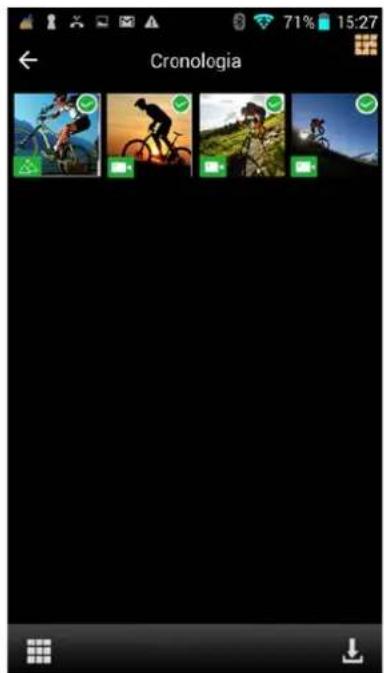
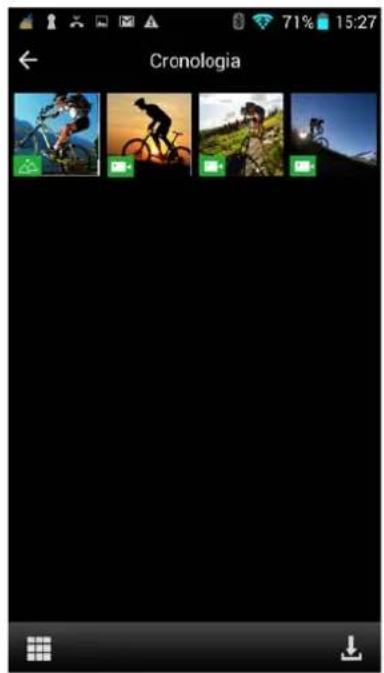
VIEWING PHOTOS AND VIDEOS AND DELETE

Press key: symbols will appear.
The upper symbol will allow to view the recorded videos, the lower symbol the pictures.
Select the picture or the video and press key to view it, or long press key to delete it.
CONNECTIVITY
COMPUTER CONNECTION
The F-60 RELOADED + camera has I USB micro port.
Use this port to connect the camera to a computer to charge or download photos and videos from the memory card.
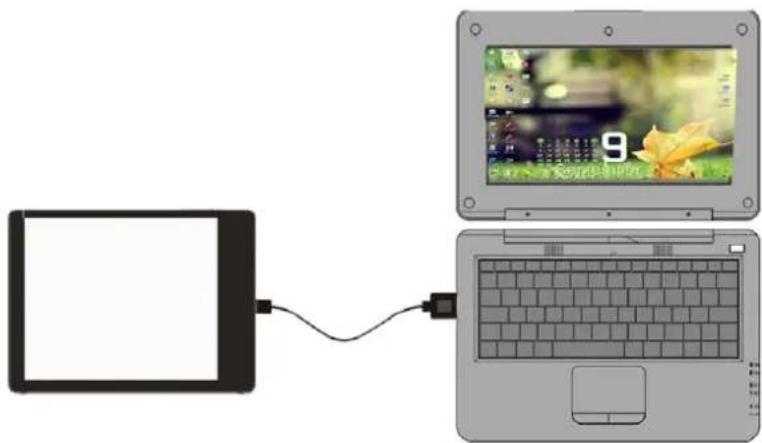
The internal F-60 RELOADED + card is displayed as an external disk drive.
NOTE: the USB outlet is unidirectional.
You can download photos and videos from cam to computer but not the other way round.
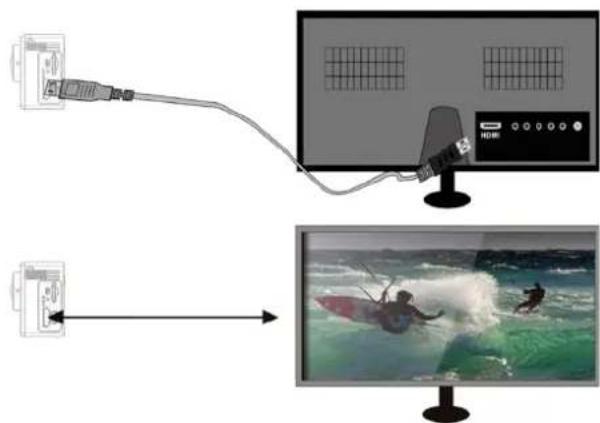
CONNECTION WITH A VIDEO OR TELEVISION
The F-60 RELOADED + camera has | Micro HDMI port.
You can use the HDMI port to connect the camera to a television or video using a suitable cable (not provided).
WI-FI CONNECTION
Thanks to the built-in Wi-Fi module, F-60 RELOADED + can be connected to Apple or Android Smartphones and Tablets and remotely controlled.
Just download the free NILOX ACTION App to connect the device in Wi-Fi.
Open the App-Store or Google-Play Store, search for the NILOX ACTION App and download it; the following icon will be displayed:

CONNECTING YOUR SMARTPHONE AND VIDEO CAMERA
- Press O on the right side of the cam.
- Awaiting Wi-Fi connection.
The network (SSID) is F-60 REOADED +followed by a progressive number.
The default password is Nilox1234 - Connect the cam and smartphone.
- At this point, start the App you previously downloaded on your phone.
- For iOS devices, press "connection", for Android devices, press + at the top right.
APP ANDAndroid AND iOS FUNCTIONS
Once the F-60 RELOADED + and Smartphone are connected and you have started the application, you can manage the cam from your smartphone or tablet.
Some settings are available from the IOS control screen and Android settings menu.
The display modes for Android and iOS are very similar.
The iOS mode follows.
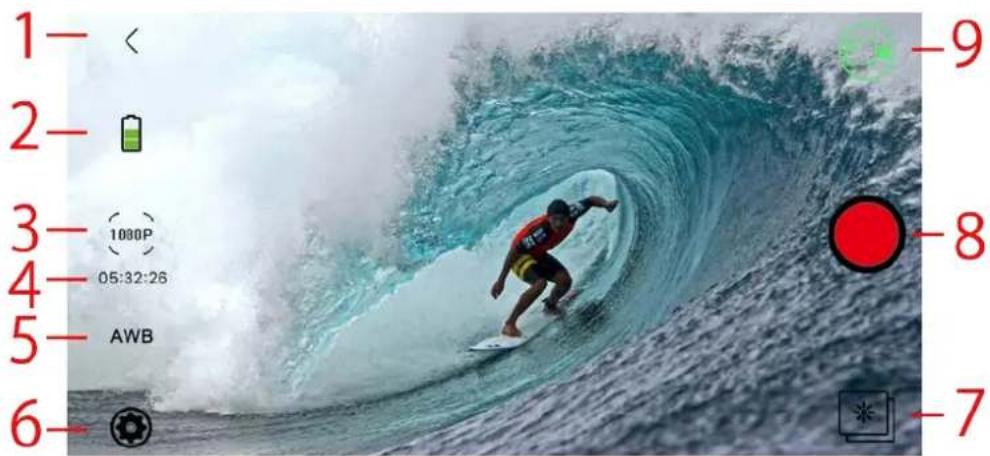
I Exit APP.
2 Battery level.
3 Resolution.
4 Remaining video or shots.
5 White balance.
6 Parameters setting.
7 Viewing photos and videos.
8 Photo/video recording button.
9 Current mode.
BATTERY LEVEL
Shows the remaining charge.
NOTE: How long the battery lasts depends on the video resolution, the Wi-Fi connection and the stability of the signal.
A very weak Wi-Fi signal drains the battery more quickly.
Under normal conditions with HD video resolution, the battery lasts about 1 hour; if the Wi-Fi connection is not used, it will last more than twice that.
RESOLUTION
Lets you set the resolution: video in a video environment and photo in a photo environment.
Video resolution:
1920x1080 60fps, 1920x1080 30fps 1280x720 120fps.
Photo resolution:
16M, 12M, 8M, 5M, 4M.
Signals the time remaining on the microSD card if recording videos and the number of shots if, vice versa, in photo mode.
This obviously depends on the memory card and type of resolution used.
WHITE BALANCE
This lets you achieve higher brightness and colour saturation depending on the light conditions.
Possible choices are:
Automatic.
Daylight.
Cloudy.
Fluor.
Tungsten (internal traditional incandescent bulb).
PARAMETERS SETTING
This lets you set a series of additional parameters on your F-60 RELOADED +.
FREQUENCY:
Lets you define the transmission frequency to an external device.
Possible choices are:
- 50HZ,60HZ
UPSIDE-DOWN:
Lets you invert the video and photo view on the cam.
This function is especially helpful if you hand the cam upside-down (as, for example, a Dash-cam in a car)
Possible choices are:
On, Off
VIEW PHOTOS AND VIDEOS
Lets you see the photos and videos saved on the cam memory.
Details of this function will follow below.
SHOOT BUTTON
Lets you take videos and photos; pressing the same button again stops video recording.
CURRENT MODE AND STATUS SWITCH
Displays whether the cam is running in video or photo mode. Press the icon to switch the cam from one mode to another. The displayed icon consequently changes.
DISPLAY PHOTOS AND VIDEOS (WITH APP)
As previously seen, you can access the photo and video archive on the MicroSD at any time in both
applications.

Press the icon (7) videos and photos are displayed.
Switch from one mode to another by touching the relevant icon. (For iOS only).
Selecting the photo or video they will be directly displayed (just for iOS systems).
When you select an individual photo or video, it is automatically displayed.
Regarding Android, instead, If you touch the icon with the squares at the bottom left you can select photos and videos and download them to your smartphone.
The eye's symbol indicates a photo in iOS system, while a little icon indicating two little mountains
will appear for Android. For both sytems the movies will be symbolized by a camera icon

PRECAUTIONS
PRECAUTIONS FOR THE CAMERA CASE
The waterproof case is a precision component. Please use the following precautions:
-
Do not randomly dismount and mount the O-ring of the case, keys and lens cover, otherwise the waterproof performance deteriorates.
-
Do not put the case in a place where it is exposed to corrosive acid or alkaline gases and keep it away from chemical or corrosive substances.
- To prevent deformation, do not store the product for long periods in a place where temperatures are high (over 50^ ) or low (-10^) .
- Do not expose to direct sunlight for long periods to prevent deterioration of waterproofing.
- Before every use, ensure that the O-ring is intact, that there are no foreign bodies on the seal, that the case is properly sealed and that the seal is watertight.
After use in salt water, immediately rinse the case under running water. - Use a dry cloth to dry the surface and store the device in a dry and ventilated place.
PRECAUTIONS FOR THE 3M DUAL-SIDE FOAM TAPE
When using the 3M dual-side foam tape, adhere to the following precautions:
- Before fixing the 3M dual-side foam tape, select a proper surface to ensure proper contact between the foam tape and the surface.
- Before using the 3M dual-side foam tape, clean the surface and heat the foam tape, using for instance an electric blower, especially in a place where temperature is lower than 0^ .
Before using F-60 RELOADED + video camera, pay attention to the following notice information:
- During continuous use, the body temperature of F-60 RELOADED + video camera increases. The situation is normal. The camera surface may be hot after prolonged use.
- If the video camera is not used for a long time, remove and keep the battery properly and recharge it every three months to ensure the battery performance.
- Shooting view angles are slightly different in different working modes of the video camera.
- If a video file is large in size, a computer or other professional players are preferred for a smooth playback.
- Cyclic recording and frequent recording/deleting operations may leave data fragments in the SD card, causing failure to file recording or saving. To solve this problem, just backup the data on an external storage and format the SD card.
F-60 RELOADED + is equipped with a rechargeable lithium polymer battery. To reduce the risk of fire, please do not tamper with it and avoid falls, contact with water and fire.
To avoid personal injury, electric shock, fire or damage to various parts of the product, please follow the following instructions: Do not immerse the product without its waterproof case into water
PERSONAL SAFETY.
Do not disassemble, repair, alter or modify any part of the product. Do not touch the product with metal objects or chemicals.
Any failure to comply with what above can cause risks to the person and other people.
In case of malfunctioning of the product, please contact the technical service or a qualified supplier.
TECHNICAL SUPPORT.
This product is warranted in accordance with current legislation; please contact your dealer if you require technical assistance and / or warranty service.
INSTRUCTIONS FOR THE ENVIRONMENT

This product may contain substances that can be harmful to the environment and to the human health, if not disposed of properly. We therefore provide you the following information in order to prevent the release of such substances and to optimize use of natural resources. The electrical and electronic products should not be disposed of in
the normal household waste, but should be properly collected in order to be correctly treated. The symbol of the crossed bin shown on the product and in this page reminds the need to properly dispose of the product at the end of its life. In this way you can avoid that a non-specific treatment of the substances contained in these products, or an improper use of parts of them can lead to harmful consequences for the environment and human health. Moreover, you can contribute to the recovery, recycling and reuse of many of the materials composing these products. This is why the manufacturers and distributors of Electrical and Electronic Equipment (EEE) organize proper collection and disposal of the equipment themselves. At the end of the product's lifespan, please contact your dealer for instructions regarding disposal. When purchasing this product your distributor will inform you of the possibility to replace your old device with a new one, on condition that the type of product and its functions are the same. If the dimensions are not over 25cm , the EEE (Electrical and Electronic Equipment) can be returned without any equivalent product purchase obligation. Disposal of the product in any other way will be liable to the penalties foreseen by the laws in force in the country where the product is disposed of. Moreover, we suggest adoption of the following measures to protect the environment: recycling the inner and outer packaging supplied with the product and disposing of used batteries (if contained in the product) correctly. With your help, we can reduce the amount of natural resources used in the manufacture of EEE (Electrical and Electronic Equipment), minimize use of landfills for product disposal and improve quality of life by preventing the release into the environment of potentially dangerous substances.
INSTALLING AND REPLACING BATTERIES

The product contains a battery, which must be disposed of separately from general household waste. Throw the battery in the appropriate containers. Collection and recycling of batteries helps protect the environment and preserve material resources,
through the recovery of valuable materials. The battery in this product might not be directly removable. If this is the case, instructions for its removal by qualified personnel can be found online at: ftp://ftp.hellatron.it username: disposal@hellatron - password: hellatron).
For your own safety, do not attempt to remove the battery. Incorrect removal of the battery could damage the battery and device, cause accidents and/or make the device unsafe. We shall not be held liable for any losses or damage caused by failure to comply with these warnings and precautions. The device and accessories shown in this manual could vary according to the country where the products are distributed.
WARRANTY VALIDITY
- One year if the product is purchased by a natural or legal person who uses it in business as an entrepreneur, sales representative, craftsman or professional or his/her intermediary.
- Two years if the product is purchased by a consumer or user (the natural person who does not use it in business as an entrepreneur, sales representative, craftsman or professional).
-
Six month on the battery, regardless of the occupation of the product purchaser.
-
The warranty covers factory or material defects.
- Product support and warranty: visit www.nilox.com to learn more.
WARRANTY RESTRICTIONS
The warranty is null and void in the following cases:
- No proof of purchase (invoice or receipt).
- Tampering or alteration of hardware parts and the display.
- Other defects due to: inappropriate use, unauthorized hardware/software changes, operations or storage not in accordance with technical product specifications; incorrect maintenance; defects due to use of software other than that supplied and all elements (hardware and software) not designed to be used with the product; technical work performed by unauthorized personnel.
The above refers to consumer goods warranty principles pursuant to Directive 1999/44/EC.
Short declaration of conformity
CE This device complies with European Parliament and European Commission Directive 2014/53/EC concerning radio equipment and peripheral devices for telecommunications and their mutual recognition. The declaration of conformity is available on line at ftp:\ftp.hellatron.it (user name: declaration@hellatron - password: hellatron). This device can thus be used in all EEC countries and in all countries where Directive 2014/53/EC applies, without restrictions, except for:
Italy (IT): This peripheral complies with the National Radio Interface and meets requirements on Frequency Assignment. The use of this device beyond the areas where the owner works requires general authorisation.
We recommend you keep the original packaging.
MANUALE UTENTE


F-60
RELOADED+


FULLHD
1080P
40EPS
12 = 1 - 2^n2 + 22^n > 1 - 3^n2
HDSCREEN
2

MP
PHOTO

SPOSSING

ip68
1 + u1 - 1 = ( 1 + u) u1 < 1 = u
SOMMARIO
PREFAZIONE 4
PRECAUZIONI 4
DESCRIZIONE 4
1080p (60 fps)
1080p (30 fps)
- 720p (120 fps)
LOOPVIDEO
- Otturatore (On, Off)
- Avvio (On, Off)
Bip (On, Off)
Volume (0,1,2,3)
RUOTA SCHERMO
ACCOPIAMENTO SMARTPHONEVIDEOCAMERA
1920x1080 60fps, 1920x1080 30fps 1280x720 120fps.
Risoluzione Foto:
16M,12M,8M,5M,3M.
RESIDUO REGISTRAZIONEVIDEO SCATTI FOTO
ACOPLAMENTO SMARTPHONE - CÁMARA 16
APP Y FUNCIONES ANDROID E iOS 17
NIVEL DE LA BATERIA 17
RESOLUCION 17
GRABACION VIDEO O FOTOS RESTANTES 18
BALANCE DE BLANCOS 18
CONFIGURACION DE PARÁMETROS 18
FRECUENCIA: 18
VOLTEO HORIZONTAL: 18
VISUALIZACION DE FOTOS Y VIDEOS 18
BOTON DE DISPARO 18
MODO UTILIZADO Y CÁMBO DE ESTADO 18
VISUALIZACION DE FOTOS Y VIDEOS (CON APP) 19
PRECAUcIONES 19
PRECAUCIONES PARA LA CARCASA. 19
PRECAUICIONES PARA LA CINTA 3M DE DOBLE CARA 20
GARANTIA Y NOTAS LEGALES 21
PROLOGO
1080p (60 fps)
1080p (30 fps)
- 720p (120 fps
LOOPVIDEO
1920x1080 60fps, 1920x1080 30fps 1280x720 120fps.
Resolution foto:
16M, 12M, 8M, 5M, 3M.
1080p (60 fps)
1080p (30 fps)
- 720p (120 fps)
VIDEO-LOOP
1920x1080 60fps, 1920x1080 30fps 1280x720 120fps.
Bildauflosung:
16M, 12M, 8M, 5M, 3M.

FULLHD 1080P 60 F P S


SOMMAIRE
PRÉFACE 4
CONSIGNES 4
DESCRIPTION 4
VISUALISATION PHOTOS ET FILMS (AVEC APP) 18
CONSIGNES 18
CONSIGNES POUR LE BOITIER 18
CONSIGNES POUR LE RUBAN 3M BI-ADHESIF. 19
GARANTIE ET REMARQUES LEGALES 19
PRÉFACE
1080p (60 fps)
1080p (30 fps)
- 720p (120 fps)
LOOPVIDEO
2,3,5,20,30,60 seconds.
PRISE DE VUE CONTINUE
Obturateur (On, Off)
- Demarrage (On, Off)
Bip (On, Off)
Volume (0,1,2,3)
PIVOT DE L'ÉCRAN
1920x1080 60fps, 1920x1080 30fps 1280x720 120fps.
Résolution photo :
16M, 12M, 8M, 5M, 3M.
RESIDU ENREGISTREMENTVIDEO ET PHOTOS
VISUALISATION PHOTOS ET FILMS (AVEC APP)
CONSIGNES POUR LE RUBAN 3M BI-ADHESIF
1080p (60 fps)
1080p (30 fps)
- 720p (120 fps)
LOOPVIDEO
Obturador (On, Off)
- Inicio (On, Off)
Bip (On, Off)
Volume (0,1,2,3)
RODAR O ECRA
Permite rodar o ecr de 180 graus.
NOTA: APOS O RESET O MENU DA CÁMARA REGRESSA A INGLÉS.
VERSão
Visualiza a versao de firmware presente na camara.
Alcance o item
Versão
Confirme a entrada com o botao
1920x1080 60fps, 1920x1080 30fps 1280x720 120fps.
16M, 12M, 8M, 5M, 3M.