USER MANUAL JS63VC JOHN DEERE
Corta-relvas JS63V / JS63VC
MANUAL DO OPERADOR

JOHN DEERE
SAU10732
Printed in Germany

Deutsch
When you are reading the operator's manual, please unfold the front and back page.

Nederlandss
1 Explanation of the rating plate affixed to the machine.2
2 Introduction. 2
3 Explanation of the symbols. 3
4 Proper use. 4
5 General Safety Guidelines for the hand-held rotary lawnmower (petrol) 4
General safety instructions 4
Preparatory measures 4
Handling. 5
Maintenance and storage 7
6 Description of components 7
7 Preparation 8
Opening out the handle
(Illustration A1 + E1 + B1) 8
Handle starter assembly (Illustration D + L1)......8
To lock and unlock front wheels (JS63VC)
(Illustration T3) 8
Adjusting the cutting height. 8
Adjusting handle height (Illustration W3) 9
8 Before using the lawnmower for the first time. 9
Filling with oil (Illustration Y1) 9
Filling with fuel 9
9 Starting the engine (Illustration B + Z + E) 10
10 Switching off the Engine. 10
11 Emergency stopping (Illustration F) 10
12 Movement drive. 10
Operating the rear wheel drive (Illustration G) 10
Adjusting the speed (Illustration H) 10
13 Mowing. 11
Mowing on slopes 11
Checking the oil level 11
Checking operating safety. 11
Time restrictions 11
Tips on caring for your lawn 11
Mowing (Illustration M) 11
Mulching. 11
What is understood by the term mulching? 11
How is the perfect grass blade cut achieved? 12
Converting the machine to side ejection. 12
14 Service intervals 12
15 Care and servicing of your lawnmower. 13
Cleaning 13
Collapsing the handle
(Illustration B4 + C4 + D4) 13
Maintenance of the blade 13
Sharpening and balancing the blade. 13
Replacing the blade (Illustration P) 13
Servicing the front wheels 13
Servicing the rear wheel drive (Illustration R) 14
Greasing the front wheel bearings JS63VC (Illustration E4) 14
Cleaning the front wheel locking pin JS63VC (Illustration F4 + G4) 14
Servicing the drive 14
Storage of your lawnmower. 14
16 Servicing the engine 14
Cleaning engine cooling fins (Illustration H4) 15
Oil change (Illustration V) 15
Filling fuel tank. 15
Cleaning and replacing the air filter (Illustration W). 15
Checking the spark plug (Illustration Y) 15
Correct winter storage of the engine (or when not used for a long period of time) 16
17 Troubleshooting 16
Technical data .. see inner cover
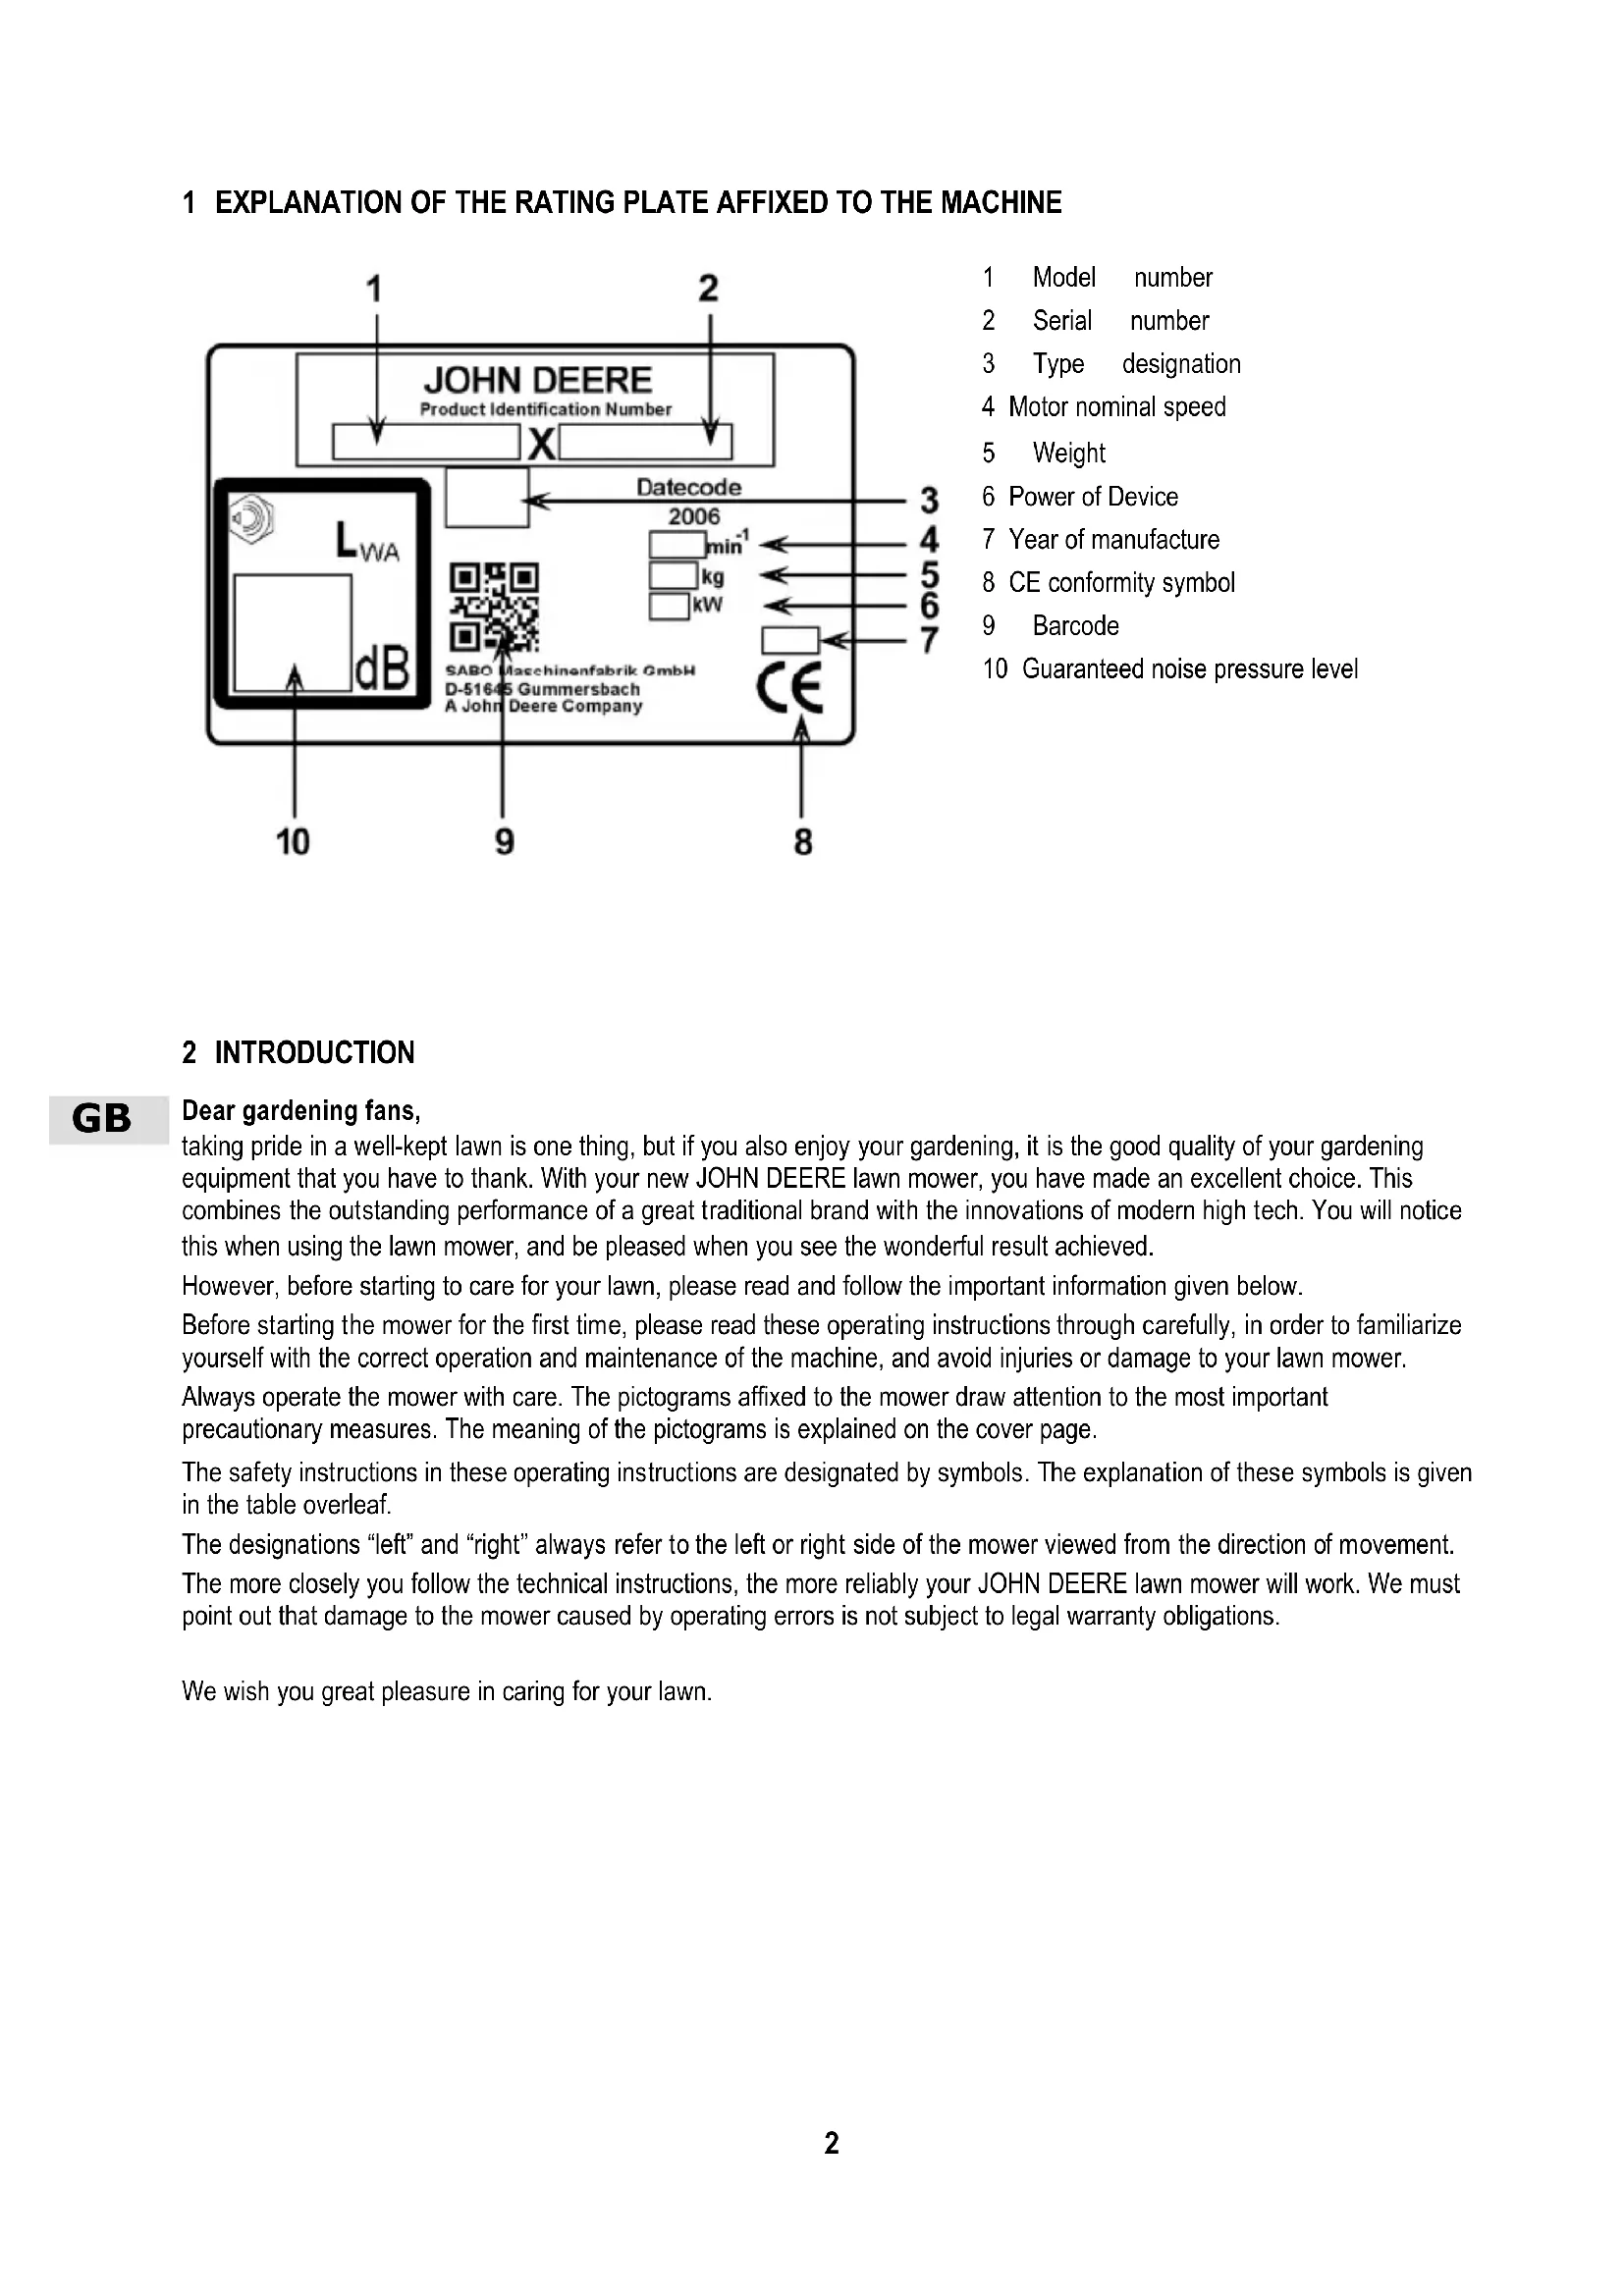
1 EXPLANATION OF THE RATING PLATE AFFIXED TO THE MACHINE

1 Model number
2 Serial number
3 Type designation
4 Motor nominal speed
5 Weight
6 Power of Device
7 Year of manufacture
8 CE conformity symbol
9 Barcode
10 Guaranteed noise pressure level
2 INTRODUCTION
GB
Dear gardening fans,
taking pride in a well-kept lawn is one thing, but if you also enjoy your gardening, it is the good quality of your gardening equipment that you have to thank. With your new JOHN DEERE lawn mower, you have made an excellent choice. This combines the outstanding performance of a great traditional brand with the innovations of modern high tech. You will notice this when using the lawn mower, and be pleased when you see the wonderful result achieved.
However, before starting to care for your lawn, please read and follow the important information given below.
Before starting the mower for the first time, please read these operating instructions through carefully, in order to familiarize yourself with the correct operation and maintenance of the machine, and avoid injuries or damage to your lawn mower.
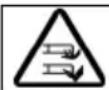
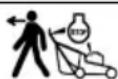
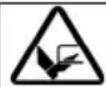
Always operate the mower with care. The pictograms affixed to the mower draw attention to the most important precautionary measures. The meaning of the pictograms is explained on the cover page.
The safety instructions in these operating instructions are designated by symbols. The explanation of these symbols is given in the table overleaf.
The designations "left" and "right" always refer to the left or right side of the mower viewed from the direction of movement.
The more closely you follow the technical instructions, the more reliably your JOHN DEERE lawn mower will work. We must point out that damage to the mower caused by operating errors is not subject to legal warranty obligations.
We wish you great pleasure in caring for your lawn.
3 EXPLANATION OF THE SYMBOLS
| WARNING
Please read and observe the operating instructions and general safety instructions.
Proper use of the machine also includes the observation of the operating, maintenance and servicing requirements specified by the manufacturer. |
| WARNING
Keep all persons outside the danger area!
Contact with the rotating blade can cause severe injury.
Objects ejected at high speed can cause severe injury.
You must never mow the lawn if there are other persons nearby, especially children or animals. |
| WARNING
Petrol is highly inflammable and explosive.
Petrol or oil leaking out onto the hot engine are highly inflammable.
Fire and explosions can cause severe injury and material damage.
Whilst the engine is running or if the machine is hot, the lid of the petrol tank must not be opened, nor may the tank be filled with more petrol.
When the engine is running, the dipstick must always be screwed in firmly. |
| WARNING
Petrol is highly inflammable and explosive.
Fire and explosions can cause severe injury and material damage.
No smoking and no naked flames while filling the tank. |
| WARNING
Watch out for sharp blades! Contact with the rotating blade can cause severe foot injuries.
Only start the engine when standing behind the mower.
Ensure that your feet do not get under the housing. |
| WARNING
Watch out for sharp blades! Contact with the rotating blade can cause severe hand and foot injuries.
When the engine is running, always observe the safety distance to the machine which is maintained by the handlebar.
Ensure that your hands and feet do not get under the housing. |
| WARNING
Objects ejected at high speed can cause severe injury.
Before mowing, and especially in areas covered by leaves and foliage, remove all stones, sticks, wires and other foreign objects from the lawn.
Never operate the machine with damaged or missing safety devices.
Before first using the mower, check the attachment of the blade screw, and thereafter regularly check the blade for firm seating, wear and damage. Replace the blade if worn or damaged.
Before starting the engine, check that all tools have been removed. |
| CAUTION
The engine and exhaust reach very high temperatures during operation. Danger of burns!
Allow the machine to cool down for at least 15 minutes before starting any maintenance or cleaning work.
Never operate the machine with a damaged or missing exhaust protection grill. |
| CAUTION
If the spark plug connector is not removed when working on the machine, the engine could be started, resulting in severe injury.
Before starting any maintenance or repair work, switch the engine off, remove the spark plug connector and key, if fitted.
Refer to the operating instructions for relevant cleaning and maintenance instructions. |
| WARNING
Contact with the rotating blade can cause severe hand and foot injury. Objects ejected at high speeds can cause severe injury.
Switch the motor off and wait until the blade comes to stop: |
| - if the mower has to be lifted or tilted, e.g. in order to transport it;- when moving off the lawn onto paths or roads;- if the machine is left unattended for any time;- before adjusting the cutting height;- before attaching and/or removing the discharge chute;- before inserting and/or removing the grass collection bag;- before refuelling. |

CAUTION
Contact with the sharp edges of the blade can cause severe injury. Protective gloves must be worn at all times during maintenance and cleaning work.
4 PROPER USE
- The machine is intended solely for the mowing of grass and lawn surfaces in the course of normal garden and landscaping care ("Proper use"). Any further form of use constitutes improper use; the manufacturer accepts no liability for any resulting damage; the risk is borne solely by the user. Proper use of the machine also includes the observation of the operating, maintenance and servicing requirements specified by the manufacturer.
If used in public areas, parks, sports grounds, on roads and in agricultural and forest areas, special care must be taken.
- The lawnmower must not be used in particular to trim bushes, hedges and shrubs, it must not be used to cut climbing plants or plants growing on roofs and on balconies, or to vacuum or clear pavements.
- The use of any additional devices not approved by JOHN DEERE is prohibited. If such additional devices are used, this invalidates the CE conformity and any warranty claims. Unauthorized modifications to this lawnmower rule out any liability on the part of the manufacturer for resulting damages.
5 GENERAL SAFETY GUIDELINES FOR THE HAND-HELD ROTARY LAWNMOWER (PETROL)
General safety instructions

For your own safety and in order to ensure that the machine functions correctly, please read this operator's manual carefully. Acquaint yourself with the controls and the correct use of the machine.
Please remember that the person operating or using the machine bears full responsibility not only for possible risks to other people or their property, but also for accidents which occur whilst using the machine.
This operator's manual is part of the scope of supply of the machine and must be handed over to the purchaser of the machine in the event of resale.
- Never allow children or persons under the age of 16 or other persons who are not familiar with the operator's manual to use the machine. Local regulations can determine the minimum age of the person allowed to use the machine.
- Please explain the possible dangers and how to prevent accidents to every person who is supposed to work with this machine. This machine may only be used, maintained or serviced by persons who are familiar with the machine, and who are aware of the possible dangers.

You must never mow the lawn if there are other persons nearby, especially children or animals.
- Please keep your machine in a safe place! Machines which are not being used should be kept in a dry, locked room out of reach of children.
Preparatory measures
- Always wear proper shoes or safety shoes and long trousers when mowing. Do not use the lawnmower if you are barefoot or wearing sandals.

Always check the area where you intend to use the machine completely for stones, sticks, wires and other foreign objects which might be picked up and ejected, before and during mowing.
- Low-hanging branches and similar obstacles can injure the operator or interfere with the mowing operation. Before mowing, identify potential obstacles such as low-hanging branches, and trim back or remove those obstacles.
WARNING


- Petrol is highly inflammable and explosive.
Fire and explosions can cause severe injury and material damage.
- Store petrol only in a suitable container, and out of the reach of children.
- Never fill containers inside a vehicle or on a truck or trailer bed with a plastic liner. Always place containers on the ground away from your vehicle before filling up.
- Only fill the tank in the open and when the engine is cold. No smoking and no naked flames while filling the tank.
- Fuel operated equipment, which is positioned on a load floor or a trailer, must not be refueld from a filling pump, but must be refueled by a fuel container.
- The petrol must be filled into the tank before starting the engine.
- Whilst the engine is running or if the machine is hot, the lid of the petrol tank must not be opened, nor may the tank be filled with more petrol.
- If petrol has overflowed, you must not attempt to start the engine. Instead, remove the machine from the area contaminated with petrol, and wipe the overflowed petrol off the engine. Avoid any attempt to start the engine until the petrol fumes have evaporated.
- For safety reasons, the petrol tank on the lawnmower and the petrol container must be closed again carefully.
-
If any damage has occurred, the petrol tank and the petrol tank lid must be exchanged.
-
Before you use the lawnmower, always check visually to see whether cutting tools, attachment screws and the entire cutting unit are worn or damaged. Worn or damaged blades and attachment screws must be always replaced to avoid any imbalance in the lawnmower.
Handling
- The machine must not be operated in potentially explosive surroundings.
- The internal combustion engine must never be used in enclosed rooms in which dangerous exhaust fumes can build up - danger of poisoning.
- People with pacemakers must not touch any parts of the engine which might be live.
- Do not wear radio or music headphones. Safe service and operation requires your full attention.
- Only mow during daylight or if the lighting is good. Always push the machine at walking pace.
- Please adjust the driving speed depending on the person and the terrain. Increase the speed gradually until you reached an adequate driving speed.
- Use care when approaching blind corners, shrubs, trees, or other obstacles that may obscure vision.
- Please be careful when mowing underneath playground equipment (e.g. swings). The equipment could get into an unsafe position. This may result in risk of injury.
- Do not operate the machine under the influence of alcohol, medications or drugs.
- Avoid using the machine if possible on wet grass, in order to avoid the danger of slipping.
- Always make sure that you are standing securely whilst mowing slopes. Always mow at right angles to the slope, never mow straight up or down. Please be especially careful when you change direction when mowing on a slope.
- Do not mow on extremely steep slopes! Mowing on slopes always involves risks. Your mower is powerful enough to mow slopes up to a gradient of 25^ . For reasons of safety, however, we urgently recommend that you do not attempt to exploit this theoretical potential capacity to the full. Hand-held lawnmowers should never be used on slopes steeper than 15^ .
- Please be especially careful when turning the machine or pulling it towards yourself.
If you walk backwards whilst using the machine, you can easily stumble so this should be avoided. Avoid unnatural body positions. Ensure that you are standing securely and keep your balance at all times.
- Always observe the safety distance to the machine which is maintained by the handlebar.
- In order to avoid the machine slipping when being carried, always hold the machine by the grip devices provided (carrying handle, housing, handlebar ends or transverse bar of the lower handlebar section). Do not grasp the machine by the ejection flap!
Note the weight of the machine before lifting or carrying it (see technical data). Lifting heavy weights can lead to health problems.
- Never lift or carry the machine when the engine is running.
- Never operate the machine with damaged or missing safety or protective devices.
Safety devices include:

Safety control bracket
In the event of danger, release the safety control bracket for the engine brake: The motor and blade come to a stop within three seconds.
The safety control bracket must not be deactivated or rendered inoperable.
It is important to make sure that the safety control bracket functions correctly. If it does not, have it repaired by an authorized specialist workshop.
Protective devices include:

- Housing, mulch guard, discharge chute, grass and collecting bag, splash guard
The protective devices protect the user against objects being ejected at high speed.
The equipment must not be operated with a damaged housing of without a correctly attached splash guard, mulch cover, discharge chute or grass collection bag.

Housing
This protection unit protects against injuries through contact with the rotating cutting blade bar.
The equipment must not be operated with a damaged housing. Please make sure that hands and feet are not placed underneath the housing.
- Belt drive covers, engine covers
These protection units protect against injuries through moving parts.
The equipment must not be operated with damaged covers or without correctly attached covers.

The engine/exhaust becomes very hot. The protection grill protects the user against burns.
Do not operate the machine without the exhaust protection grill.
The safety devices must not be modified.
- Do not change the basic settings of the engine or operate the engine at excessive speed.
- During the starting process, do not switch on the drive if available.

When you start the machine, make sure that your feet are at a sufficiently safe distance away from the cutting blades.

When you start the motor, the machine must not be lying on its side or in a slanting position. If it is necessary to hold the machine at a slant, always ensure that the cutting tools are pointing away from the person using the machine, although only as far as absolutely necessary. In case of machines with side dejection, do not start the motor in standing in front of the ejection channel.

Never put your hands or feet near or under revolving parts. Always make sure that your hands or feet do not get under the housing. Always maintain a safe distance from the ejector opening.

Turn the engine off and remove the spark plug connector, ensure that all moving parts have come to a complete standstill, and that the spark plug key, if fitted, has been removed:
before you check, clean or perform any work on the machine,
- before you remove any blockages or items clogging up the ejection chute.
- if any foreign objects have been encountered.
- If a foreign object has been encountered or if the machine becomes blocked, e.g. by driving onto an obstacle, a specialist dealer must check whether parts of the machine have been damaged or deformed. Any necessary repairs must also be carried out by an authorized specialist workshop.
- If you notice unusually strong vibrations in your machine, you must have it checked by an authorized dealer.

Switch the engine off, and ensure that all moving parts have come to a complete standstill, and that the spark plug key, if fitted, has been removed:
- if you have to lift or tilt the lawnmower, e.g. in order to transport it,
-
when transporting the machine to and from the lawn
-
when moving the machine off the lawn area;
- if the machine is left unattended for a few minutes;
- when adjusting the cutting height;
- before installing or removing the discharge chute;
-
before attaching and removing the grass collection bag;
before you re-fill the tank.
-
If the engine is equipped with a petrol shut-off valve, this should be closed after mowing.
Maintenance and storage
- Ensure that all screws have been tightened securely and that the machine is in a safe working condition.

The engine must be turned off when lifting the mulch guard and attaching or removing the discharge chute.

Never store a machine which still contains petrol inside a building where petrol fumes may come into contact with naked flames or sparks or where they may ignite.

The engine and exhaust reach very high temperatures during operation.
Allow the machine to cool down for at least 15 minutes before starting any maintenance or cleaning work.
In order to prevent a fire, please keep grass, leaves or leaking oil (grease) away from the engine, silencer (exhaust) and petrol tank.
Always allow the engine to cool down before you store the machine in a closed room.

Always check the grass collector at regular intervals for wear and tear or loss of function.

Always check the condition and tightness of the blade prior to mowing. A worn or damaged blade must be replaced immediately.
The blade should always be changed by a specialist workshop. An incorrectly assembled blade clutch can lead to the blade becoming detached, which can cause severe injury.
Always have the sharpening and balancing of the blade carried out by a specialist workshop. An improperly sharpened or unbalanced blade can cause severe vibrations, and damage the lawnmower.
- For reasons of safety, always replace worn or damaged parts.

Protective gloves must be worn at all times during maintenance and cleaning work.

Maintenance and cleaning work must only be carried out if the engine has been turned off and the spark plug connector has been removed.
If the tank has to be emptied, this should be done in the open, and with a cold engine. Take care to ensure that no fuel is spilt.
For warranty and safety reasons, only original replacement parts may be used.
6 DESCRIPTION OF COMPONENTS
1 Safety control bracket for the engine brake
2 Front wheel locking device lever (JS63VC)
3 Drive switch bar
4 Oil filling nozzle with dipstick
5 Front wheels (JS63VC)
6 Cutting height adjusting levers
7 Primer pump
8 Spark plug
9 Air filter
10 Tank cap
11 Handle height adjustment
12 Starter cable grip
13 Variable speed switch lever
7 PREPARATION
The following parts are included in the packaging for assembly of the mower:
- Mower with preassembled handle
- Side discharge chute
- Tool bag with the following contents:
Operator's manual
- Declaration of Conformity
- Various fixing parts.
In the unlikely event of a missing part, please contact your dealer.
Opening out the handle (Illustration A1 + E1 + B1)
IMPORTANT
Avoid damage! Prevent damage to mower control cables when assembling handle system. Do not kink or damage control cables. Control cables must be inside of handle and unrestricted before tightening hardware.
- Carefully remove mower from packaging.
- Loosen knurled nut (A) approximately 25mm (1 in.) on each side of upper handle A1.
- Remove knurled nut (B) and carriage bolt (D) from each side A1.
- Pull the folded-up Z-shaped handle apart and upwards.
- When upper and lower handles are aligned tighten the knurled nuts (A) on both sides by hand E1.
- Carefully pull the handle assembly rearward and align the lower handle hole with the desired height setting hole in bracket (C) B1.
In this way, three different handle heights can be set.
From inside pull the bolts (D) on both sides through the bracket and lower handle and screw tight with the knurled nut (B). Use the same opening in the bracket on both sides (C) B1.
- Fasten the Bowden cables to the lower part of the handle with the aid of cable ties from the tool bag.
GB
Handle starter assembly (Illustration D + L1)
- The safety control bracket (A) on the upper handle must be folded down before the starter cable can be suspended.
- Pull out the starter cable (B) slowly and fit in the starter handle mount (C) with a twist motion.
To lock and unlock front wheels (JS63VC) (Illustration T3)
NOTE
Front wheels will not lock when mower is on an even surface. To lock front wheels, push the mower in the garden. Lock front wheels by mowing on a slope or uneven surfaces, or by pulling mower backwards away from wall or out of narrow space.
- Push mower forward on an uneven surface.
- Pull lever (A) backward to lock position (B).
- To unlock front wheels push lever (A) forward to unlock position (C)
Adjusting the cutting height
Safety instruction!
See table for explanation of symbols page 3
Adjusting front wheel height
JS63V
A height adjustment lever on left front wheel adjusts both front wheels.
- Move height adjustment lever to desired position.
JS63VC (Illustration U3)
- Move height adjustment lever on both front wheels to desired position.
Adjusting rear wheel height (Illustration V3)
A height adjustment lever on left rear wheel adjusts both rear wheels.
- Lift the mower at the lower handlebar slightly with one hand to take some weight off wheel.
- Move height adjustment lever to desired position with other hand.
NOTE
Adjust all levers to same height except for two lowest cutting heights (A and B on following chart). At two lowest cutting heights, raise rear lever one notch higher than front lever.
This setting optimises airflow during discharge and provides optimal cutting in the mulching process. Begin with a higher setting, then adjust downward as desired, to avoid scalping lawn with too low a setting.
| Key Cutting Height Adjustments in mm |
| (A) | 20 | mm |
| (B) | 33 | mm |
| (C) | 45 | mm |
| (D) | 59 | mm |
| (E) | 70 | mm |
| (F) | 85 | mm |
| (G) | 97 | mm |
Adjusting handle height (Illustration W3)
NOTE
Lower handle height can be independently adjusted to three positions.
- Remove knurled nut (A) and bolt (B) on each side of handle.
- Pivot handle to the desired height (C).
- From inside pull the bolt (B) through the bracket and lower handle and screw tight with the knurled nut (A). Use the same opening in the bracket on both sides.
8 BEFORE USING THE LAWNMOWER FOR THE FIRST TIME

Safety instruction!
See table for explanation of symbols page 3
Check that all connections and the spark plug connector are fitted firmly. Tighten the screws if necessary! In particular make sure that the cutter bar is fitted correctly (see Chapter "Maintenance of the blade").
The blade attachment screw should always be fitted and tightened by a specialist workshop. If the blade attachment screw is too tight or too loose, the blade clutch and blade can be damaged or become detached, which can cause severe injury. Make sure that all safety devices are fitted properly and are not damaged.
Filling with oil (Illustration Y1)

Safety instruction!
See table for explanation of symbols page 3
IMPORTANT
Avoid damage! Engine is delivered without oil. You must add oil before running the engine.
Before starting the mower the first time fill motor oil (for quantity and type, see technical data) into this opening with a funnel after unscrewing the dipstick.
- Park mower on a level surface.
- Pour in oil slowly into the oil filler. Do not pour in too much oil.
- Check the oil level.
Remove the dipstick. Wipe the dipstick with a clean cloth, insert the dipstick into oil filler and re-tighten. Then remove the dipstick once again and read off the oil level. The oil must be between the marks "ADD" and "FULL". Add oil if necessary. However the oil level should not be above "FULL" mark.
Replace oil dipstick and retighten.
- After filling up for the first time remove the "NO OIL" sign on top of the engine.
Filling with fuel


Safety instruction!
See table for explanation of symbols page 3
- Only fill the tank with fresh and clean unleaded standard petrol.
Unscrew tank cap.
- Fill tank with fuel using a funnel up to max. lower edge of filling nozzle.
- Replace tank cap and screw tight.


Safety instruction!
See table for explanation of symbols page 3
Only start the engine when standing behind of the mower. Never stand on ejection side!
Place the mower on a level surface where the grass is not too high (high grass inhibits the start of the cutter bar and makes starting more difficult). Where this is not possible, position the mower in such a way that the cutter is facing diagonally away from the user, although only as far as absolutely necessary.
Press the primer pump (A) firmly three to five times (even if the engine has come to a standstill due to lack of fuel, fill the tank with fuel and then press the primer three to five times) B.
NOTE
Priming is usually not necessary when restarting the engine once it is warm. In cold weather however, repeated priming may be necessary.
Press the safety control bracket (B) on to the handle and hold tight Z.
- Slowly pull the starter cable (C) until resistance is felt; then rapidly pull it out E, - the engine begins to run, then slowly recoil the cable.
If the engine does not start after 3 attempts, press the primer three to five times and pull the starter cable again.
IMPORTANT
The motor only operates when the safety control bracket is pressed against the upper part of the handlebar. As soon as the safety control bracket is released, this returns to its original position under spring force, the motor brake is actuated, and the motor and blade come to stop within three seconds.
10 SWITCHING OFF THE ENGINE
- Release the safety control bracket.
GB
11 EMERGENCY STOPPING (Illustration F)
ATTENTION
Avoid injury! Engine and blade must stop within 3 seconds. If not, please contact the nearest authorized dealer.
Release the safety control lever (A) and the drive switch bar (B).
- The mower will stop.
- The blade will stop.
- The engine will stop.
12 MOVEMENT DRIVE
Operating the rear wheel drive (Illustration G)
The rear wheel drive is switched on and off using the drive switch bar (A) on the upper handle when the engine is running:
- Press drive switch bar and hold = mower runs.
- Release drive switch bar = mower stops (0 position).
NOTE
Click the rear wheels if the mower thrusts forward when the engine is turned off.
Adjusting the speed (Illustration H)
IMPORTANT
The speed may only be adjusted when the engine is running in order to avoid damage!
The operating speed can be continuously adjusted using the operating lever of the variable speed switch mounted on the right-hand side.
-
First, pull the lever out of the catch (1) and then set the desired driving speed (2) by adjusting the position of the lever. The lever automatically clicks back into the nearest new position.
-
Position "hare" = fast (max. speed).
- Position "tortoise" = slow (min. speed).
13 MOWING


Safety instruction!
See table for explanation of symbols page 3
Mowing on slopes
ATTENTION
The mower can be operated on slopes and inclines up to an angle of 25^ . Slopes steeper than this may lead to engine damage.
For reasons of safety, however, we urgently recommend that you do not attempt to exploit this theoretical potential capacity to the full. Hand-held lawnmowers should never be used on slopes steeper than 15^ .
Checking the oil level
Check oil level each time prior to mowing Y1 . Never let the engine to run with too little or too much oil. Irreparable damages could occur.
Checking operating safety
Before using the mower, ensure that the safety control bracket for the motor brake is functioning correctly. When the safety control bracket is released, the motor and blade should come to a stop within three seconds. If not, please contact the nearest authorized dealer.
Retighten all screws and nuts after the first few operating hours and from time to time thereafter. Always check that the blade is in good condition and tightly screwed before mowing in order to avoid accidents (see Chapter "Maintenance of the blade"). If the cutter is blocked, e.g. by driving over an obstacle, have an authorized dealer check if parts of the mower are damaged or deformed. All required repairs should only be carried out by an authorized dealer.
Time restrictions
The time at which lawnmowers may be used varies from region to region. Please ask the corresponding authorities before using your mower.
Tips on caring for your lawn
Mowing (Illustration M)
After 10 - 14 days every lawn starts becoming overgrown. You will realize that: the often it is cut the better and the stronger it will look; since regular mowing promotes uniform growth.
Remove strange objects (stones, wood, branches, etc.) from the lawn before each cutting process; pay attention still to objects lying around, also during the mowing process.
Make sure as much as possible to mow only dry lawns. When the ground is wet, turf will be damaged easily; the wheels will press deeply into the ground and leave ridges behind.
Once the grass has become tool long, first you should mow with a higher cutting height in one direction and afterwards with a lower desire height; you should cut across the first direction. Only cut with a sharp flawless blade so that grass holms do not fray. You obtain a clean cutting pattern when you mow at creeping speeds in straight lanes. These lanes should always overlap over several centimetres so that no strips remain behind.
Mowing at the lowest cutting height should only be carried out on level and plane lawns!
Please observe that the lower cutting height settings may only be used for optimal conditions. If you select cutting height too low, the turf can be damaged and under certain circumstances be even destroyed.
Besides the cutting height, also the moving speed influences the cutting pattern and collection characteristic. Adapt the moving speed to the person, grounds and to the grass height to be cut. For longer grass sections, a slower moving speed should be selected.
Mulching
What is understood by the term mulching?
When mulching, the lawn is cut and the cut blades of grass are then, immediately thereafter, chopped several times to become even smaller using the special mulch blade. This mulch blade straightens the grass blades and cuts the blades into very short segments which are then distributed evenly over the lawn surface.
The grass blade segments can now dry and rot more quickly, thus facilitating the production of humus. This enables natural fertilisation of the soil and also protects against dehydration.
Gathering and removal of cuttings is no longer necessary. The mulch concept is thus environmentally-friendly and stimulates the ecology.
How is the perfect grass blade cut achieved?
The best type of cut and results are achieved when the lawn is dry because wet lawns can result in a speedy clogging and coagulation due to the short grass blade segments. These clumps of grass lead to putrefaction and mould and hamper the desired ecological result.
However, if the lawn must be mowed in a very wet state, then the grass blade segments must be cut even shorter, i.e. the cutting height must be set at 1-2 stages higher as compared to when cutting a dry lawn.
If possible the height of the grass blades to be cut should never exceed 10cm when using the Mulch-Mower. A maximum of only 1/3 of the grass blade height should be cut in one pass. If the results are not acceptable then it may be necessary to mulch twice consecutively.
Depending upon the type of lawn and the growth intensity it may be necessary to mow the lawn twice weekly whereby a maximum of 1/3 of the grass blade height should be cut.
If at some point the grass has become too long for mulching, then the Mulch-Mower can be quickly changed over to a side ejection mower.
Converting the machine to side ejection
Installing discharge chute (Illustration Y3 + T1)
- Switch off the engine.
- Remove the safety nut (A) and the washer Y3.
- Lift and hold the mulch cover (B).
Fix the discharge chute (C) under the mulch cover feeder and assembly support (D) lower to the bolt T1.
- Place the washer on the bolt and secure tightly with the safety nut (A).
- Close the mulch cover.
The mower is supplied ex-works with an integrated standard mulching blade. The mulching blade functions equally well with the mulch cover or the discharge chute.
To convert the machine into a mulching mower again the discharge chute must be removed again. To do this turn the engine off, remove the discharge chute (C), close the mulch cover and place the washer on the bolt and secure tightly with the safety nut (A).
14 SERVICE INTERVALS
Please use the following timetables to perform routine maintenance on your machine. Service procedures included in this manual but not on this chart are to be performed on an as needed basis.
IMPORTANT
Avoid damage! Operating in extreme and/or exceptional conditions, such as heat or dust, may require more frequent service intervals.
Before each use
- Check oil level Y1.
- Check and tighten blade bolts if necessary.
After each use
- Clean the mower.
- Check the blade for damage.
Breaking-in period - After first 5 hours of operation
Change engine oil V + Y1.
Every 25 hours or once a year
- Clean or replace air cleaner paper element W.
- Clean spark plug and set electrode spacing Y.
Change engine oil V + Y1.
- Clean the gearbox and the area under the belt cover.
- Have the input shaft hub connector greased.
Every 50 hours
- Check the drive throttle cable and adjust it if necessary.
Grease the front wheel bearing (JS63VC).
15 CARE AND SERVICING OF YOUR LAWNMOWER
Regular care is the best guarantee of long working life and trouble-free operation!
Only use original spare parts because only those guarantee safety and quality!


Safety instruction!
See table for explanation of symbols page 3
Cleaning
IMPORTANT
For cleaning and maintenance work place the mower on the left-hand side (in the direction of movement), otherwise starting difficulties may occur.
Remove all dirt and grass directly after mowing. Use a brush or cloth to clean.
Do not rotate the cutter bar if possible, as otherwise engine oil is pumped into the carburettor/air filter and there may be problems starting the engine.
Never spray the mower with water since this may damage the ignition system and carburettor.
Collapsing the handle (Illustration B4 + C4 + D4)
- Remove discharge chute T1 + Y3.
- Remove starter handle from bracket.
- Loosen knurled nut (A) 25mm (1 in.) on each side. Carefully pivot upper handle (B) down B4
- Remove knurled nut (C) and carriage bolt (D) on both sides C4.
Carefully fold lower handle (E) forward. Guide cables inside lower handle. Do not catch, kink or crush the cables D4
- Install carriage bolts and knurled nuts in bracket.
Maintenance of the blade
A sharp blade guarantees the optimum cutting performance. Check the condition and firm seating of the blade before every use. A worn or damaged blade must be replaced immediately.
Sharpening and balancing the blade
WARNING
The sharpening and balancing of the blade should be carried out only by an authorized specialist workshop. An improperly sharpened or unbalanced blade can cause severe vibrations, and damage the lawnmower.
Replacing the blade (Illustration P)
WARNING
The blade should only be changed by an authorized specialist workshop. An incorrectly assembled blade clutch or a too tight or too loose blade screw can lead to the blade becoming detached, which can cause severe injury.
- Turn the mower over onto its left side (in the direction of movement).
- Remove bolt (A), the washer and the blade.
- Check the blade and resharpen if necessary and have it balanced or exchange it.
- Only use original blades for replacement purposes (Order no. see original spare parts and accessories).
Blades must be indelibly marked with name and/or trademark of the manufacturer or supplier and with the parts number. Blades must only be fitted according to the appropriate operating instructions for the respective mower.
IMPORTANT
Reassembly is carried out in the reverse order. The projecting ends of the blade must thereby point toward the housing.
- Tighten the blade fixing screw to 45Nm with a torque wrench. Do not use an impact screwdriver!
If you do not have the necessary tools, have the work carried out by an authorized specialist workshop. If the blade screw is tightened too firmly or too loosely, the blade clutch and the blade can be damaged or become detached, which can cause severe injury.
Servicing the front wheels
Oil the bearings of the wheels once a year or every 20 operating hours.
- Loosen the hexagon head nuts using a socket wrench and remove the wheels.
After oiling the bearings, push the wheels on and tighten them again so that they still turn easily but without any play.
Servicing the rear wheel drive (Illustration R)
- Remove the drive wheels from the wheel axle after loosening of the nut.
- Remove dirt and any grease from the wheel cover, from the free wheel pinion on the gear shaft and the drive pinion on the inside of the wheel.
NOTE
Do not remove the free wheel pinion from the gear shaft!
- Grease the pinion pair (free wheel pinion and drive pinion in the wheel) with the roller bearing grease "KAJO LZR 2 lubricating grease", so that the toothed intermediate spaces are completely filled.
- When pushing on the drive wheel make sure that the pinions engage; it may be necessary to turn the wheel on the axle slightly.
Greasing the front wheel bearings JS63VC (Illustration E4)
- Grease the opening of the front wheel bearing (A) with multi-purpose grease.
- Repeat for other front wheel.
Cleaning the front wheel locking pin JS63VC (Illustration F4 + G4)
- Remove cover (A) on the front wheel.
- Clean the dirt from around and on the pin and the spring (B).
- Attach the cover.
Servicing the drive
The
- Checking and adjusting of the drive throttle cable
- Cleaning of the drive fan belt and the area of the gearbox
- Adjustment, checking and exchange of the drive fan belt should only be carried out by a specialist workshop.
Storage of your lawnmower
- Repair any worn or damaged parts. Replace parts if necessary. Tighten loose hardware.
- Remove grass and debris from machine.
- Clean under the deck and remove grass and debris from inside discharge chute.
- Paint scratched or chipped metal surfaces to prevent rust.
Lubricate grease points.
- Prepare engine for winter storage (or when not used for a long period of time)
Always keep the machine in a clean condition in a closed, dry room out of reach of children.
See table for explanation of symbols page 3
WARNING
Avoid injury! Engine exhaust fumes contain carbon monoxide and can cause serious illness or death.
Do not run an engine in an enclosed area, such as a garage, even with doors and windows open.
Move the machine to an outside area before starting the engine.
IMPORTANT
For maintenance work lay the engine and/or the mower on the left-hand side (in the direction of movement) because otherwise there may be problems starting the engine.
The prescribed maintenance and service work must be performed on a regular basis to ensure long and fault-free life of the engine.
Keep the engine clean paying particular attention to the exterior. The perforated plate of the fan wheel must always be kept free from particles (e.g. grass cuttings) in particular.
Never spray clean with water as this would result in damage to the ignition system and carburettor.
Perfect cooling of the engine will only be guaranteed if the cylinder fins are always kept clean.
Cleaning engine cooling fins (Illustration H4)
IMPORTANT
Avoid damage! Keep fins clean or engine may overheat.
- Park the mower on level surface and switch off engine.
- Let engine cool.
- Disconnect the spark plug cable.
Clean the fins (A) with a brush or rag.
Oil change (Illustration V)
NOTE
For environmental reasons, we recommend that the oil change is performed by an authorised workshop.
The first oil change of a new engine is necessary after 5 operating hours, and thereafter every 25 hours of operation or at least once per mowing season.
Before the engine or whole device is tipped to drain the oil off, empty the petrol tank and allow the engine to run until it stops due to lack of fuel.
- Switch off the engine and disconnect the spark plug cable.
- Change the oil with the engine still warm.
To change the oil, remove the dipstick from the filler and lay the mower on its side so that the used oil drains into the catch tray.
Old oil should be disposed off in accordance with the relevant local regulations and on no account be discharged into the sewerage system or into the ground.
Turn the mower upright and pour high quality oil (for quantity and type, see technical data) into the filler. Screw on dipstick and check oil (see Chapter Filling with oil, illustration Y1)!
Filling fuel tank
IMPORTANT
Avoid damage! Dirt and water in fuel can cause engine damage.
Clean dirt and debris from the fuel tank opening.
Use clean, fresh unleaded fuel.
Fill the fuel tank at the end of each day's operation to keep condensation out of the fuel tank.
- Switch off engine. If engine is hot let it cool several minutes before you add fuel.
- Remove grass clippings and other dirt from tank area.
- Remove fuel cap.
- Fill tank with fresh fuel only to bottom of filler pipe.
- Reinsert fuel cap.
Cleaning and replacing the air filter (Illustration W)
- Loosen the screws (1) on the air filter cover (2) and lift the cover (2).
- Remove the pre-filter (3) and the paper filter insert (4).
If lightly soiled, simply remove the dirt on the paper filter insert by tapping; if heavily soiled or damaged, replace. Do not blow out the paper filter insert with compressed air. Do not oil the insert.
- Wash pre-filter in liquid detergent and water. Allow to air dry thoroughly before using. Do not oil pre-filter.
- Reassemble the pre-filter on the paper filter insert and install the insert/pre-filter assembly on base (5).
- Replace the cover (2) on air filter and tighten screws (1) securely to base (5).
In the worst conditions (large amounts of dust) it is necessary to clean the mower whenever it has been used, otherwise after 25 hours of operation or once per season.
(Order no. filter insert and pre-filter see original spare parts and accessories)
Checking the spark plug (Illustration Y)
To check for wear, remove the spark plug connector (A) and unscrew the spark plug (B). If the electrode is badly worn the spark plug must be replaced as a matter of course. (Order no. see original spare parts list and accessories).
Otherwise it is sufficient to clean the spark plug and set the electrode gap to 0.5mm . Screw the spark plug (pay attention to sealing ring) into the engine by hand and tighten using the socket wrench. Press on spark plug connector.
Correct winter storage of the engine (or when not used for a long period of time)
- Empty the petrol tank or allow the engine to run until it stops due to lack of fuel.
- Switch off engine and disconnect spark plug cable.
- Drain off the oil while the engine is still warm. Fill with fresh oil (for quantity and type, see technical data).
- Clean grass and chaff from cylinder and cylinder head fins and around muffler.
- Always keep the machine in a clean condition in a closed, dry room out of reach of children.
17 TROUBLESHOOTING
| Fault | Possible | cause |
| Engine does not start | Control bracket not pressed down. Press control bracket to upper part of handlebar Z . |
| Primer pump not operating | Activate primer pump B . |
| Fuel tank is empty. Fill fuel tank with clean and fresh fuel. |
| Spark plug connector loose. Press on spark plug connector or have it checked by an authorized dealer. |
| Spark plug defective or dirty or electrode burnt out. | Replace or clean spark plug, set electrode gap to 0.5 mm Y . |
| Excessive fuel supply to engine (spark plug wet). | Have it checked by an authorized dealer. |
| Air filter dirty | Clean or replace air filter insert W . |
| Engine performance decreases | Air filter dirty. | Clean or replace air filter insert W . |
| Spark plug contaminated with soot. Have it cleaned by an authorized dealer. |
| Engine runs irregularly | Air filter dirty. | Clean or replace air filter insert W . |
| Spark plug contaminated with soot. Have it cleaned by an authorized dealer. |
| Dirty engine cooling fins. Clean engine cooling fins H4 . |
| Have it checked by an authorized dealer. |
| Extreme vibration | Have it checked by an authorized dealer |
| Drive speed cannot be regulated | Have it checked by an authorized dealer |
| Mower will not move forward | Drive control bracket not pulled. | Pull drive switch bar G . |
| Have it checked by an authorized dealer. |
| The mower doesn't drive on a slope (Clutch slips) | The primary tension on the throttle cable spring is too low. | Get the drive throttle cable adjusted by a specialist workshop. |
| Unclean cut, lawn is yellow | Blade blunt. | Have it sharpened and balanced by an authorized dealer. |
| Cutting height too low. | Adjust to higher cutting height U3 + V3 . |
| Engine speed too low. | Have it checked by an authorized dealer. |
| Mowing too fast. | Adjust mowing speed. |
| Insufficient overlapping of cuts when mowing. | Tall grass conditions may dictate that more overlapping of cuts is required. |
| Lawn becomes matted. | A lawn scarifier can remedy the problem considerably |
| Mulched grass appearance is poor:
clumps, excessive clippings,
rough cut. | Blade blunt. Have it sharpened and balanced by an authorized dealer. |
| Mulching rule not followed (cut max. 1/3 of the grass height; the height of the grass to be cut must be lower than 10 cm) | Adjust to higher cutting height U3 + V3.
Convert mower to side discharge Y3 + T1 and mow grass first with higher cutting setting. |
| Travel speed too fast. Adjust travel speed. |
| Grass build-up under deck. | Adjust to higher cutting height U3 + V3. |
| Insufficient overlapping of cuts when mowing. | Tall grass conditions may dictate that more overlapping of cuts is required |
| Grass not dry. | Adjust to higher cutting height U3 + V3.
Let grass dry. |
| Ejection blocked | Engine speed too low. Have it checked by an authorized dealer. |
| Cutting height too low for grass that is too high. | Adjust to higher cutting height U3 + V3. |
| Pushing mower too fast. Adjust mowing speed. |
| Grass not dry. Let grass dry. | |
| Front wheels do not lock
(JS63VC) | The front wheel locking lever is the unlocked setting. | Turn the front wheel locking lever back into a locked setting T3. |
| The mower is on an even surface. Push the mower into the garden. |
| Front wheel locking device pin is dirty. | Clean the pin in the front wheel casing F4 + G4. |
| Mower turns downhill when cutting on slope
(JS63VC) | Front wheels not locked. | Lock front wheels. T3. |
| Mower does not move in straight line; mower follows bumps and ruts in ground
(JS63VC) | Front wheels not locked. | Lock front wheels. T3. |
| Front wheels drag when mower pulled backwards
(JS63VC) | Front wheels not locked. | Lock front wheels. T3. |
In case of faults and defects which have not been listed here, please contact the nearest authorized dealer.
Repairs which require specialized knowledge should only be performed by a qualified expert. Your authorized dealer will naturally also be glad to help if you do not wish to perform the maintenance work described here yourself.
GB
Limpar as nervuras de refrigeracao (ilustracao H4)
IMPORTANT:
IMPORTANT: