AE4415 - Vacuum Cleaner UFESA - Free user manual and instructions
Find the device manual for free AE4415 UFESA in PDF.
Frequently Asked Questions - AE4415 UFESA
User questions about AE4415 UFESA
0 question about this device. Answer the ones you know or ask your own.
Ask a new question about this device
Download the instructions for your Vacuum Cleaner in PDF format for free! Find your manual AE4415 - UFESA and take your electronic device back in hand. On this page are published all the documents necessary for the use of your device. AE4415 by UFESA.
USER MANUAL AE4415 UFESA
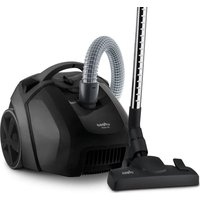
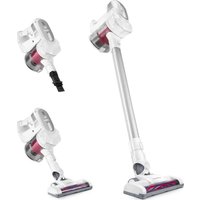
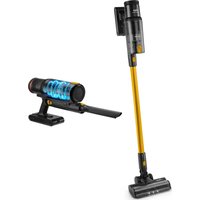
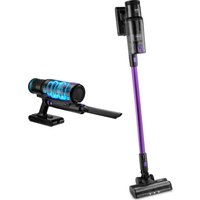
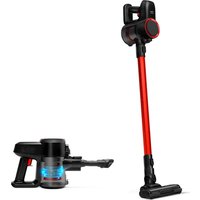
DESCRIPTION OF THE APPLIANCE
- Handstick vacuum cleaner ON/OFF button
- Handheld vacuum cleaner pushbutton
- Handstick vacuum cleaner handle
- Handle release button
- Detachable handheld vacuum cleaner
- Handheld vacuum cleaner release buttons
- Dirt container
- Floor tool
- Floor tool release button
- Rotating floor tool
- Floor tool function indicator
- Battery charging indicator
- Textile & HEPA filter (HEPA only for AE4416)
- Nylon filter
- Wall mount for charger unit
- Floor support for charger unit
- Charging cable
- Luminous battery level indicator (Mod. AE4417)
IMPORTANT NOTES
- This appliance can be used by children aged from 8 years and above and persons with reduced physical, sensory or mental capabilities or lack of experience and knowledge if they have been given supervision or instruction concerning use of the appliance in a safe way and understand the hazards involved. Children shall not play
with the appliance. Cleaning and user maintenance shall not be made by children without supervision.
- Read through the instructions carefully before using the appliance for the first time. Keep them for future reference. When passing the vacuum cleaner on to a third party please also pass on this instruction manual.
- This appliance has been designed for domestic use only. It must only be used in accordance with these instructions. The manufacturer will not be held responsible for any damage caused by incorrect operation or misuse of the appliance.
- Connect it only to the voltage stated on the rating plate.
- Never leave the vacuum cleaner unattended while it is running.
- Do not try to charge the appliance at temperatures below 0^ or above 40^ .
- Do not dismantle the vacuum cleaner while the motor is still operating.
- Never use the vacuum without the filter.
Always keep the openings clean and prevent dust or dirt from blocking the air passage. - Never use the vacuum cleaner to suck up flammable liquids nor anything that may be still burning such as cigarette butts or ash/cinders. Never vacuum up toxic materials, solvents or acids. Never vacuum up solid, sharp or piercing objects that may damage the filter.
- Do not use wet hands nor tug on the cable in order to unplug it.
- Protect vacuum cleaner and charger from atmospheric exposure, moisture and sources of heat.
DO NOT IMMERSE THE MOTOR HOUSING, CABLE OR TRANSFORMER IN WATER OR ANY OTHER LIQUID. - Do not connect or open a defective charger; replace it with a new unit.
- Any type of repair work other than that stated in "Cleaning & Maintenance" must be done exclusively by an Authorized Technical Service Centre.

ASSEMBLING THE APPLIANCE
Attaching the handle of the handstick vacuum cleaner:
To attach the handle of the handstick vacuum cleaner simply fold it upward until it locks into position on the vacuum cleaner. (Figure 1)
To fold it back down again press release button "4" and this will free the clips that attach it to the vacuum cleaner (Figure 2).
Attaching the floor tool "8":
To attach the floor tool to the handstick vacuum cleaner insert it into its housing and press it so that it locks on to the vacuum cleaner. (Figure 3)
To take it off again press the release button "9" which will free the clips that attach it to the vacuum cleaner (Figure 4).
Attaching the handheld vacuum cleaner:
Insert the handheld vacuum cleaner into the handstick vacuum cleaner as shown and lock into place. (Figure 5)
To take it off again press release button "6" and remove it from the handstick vacuum cleaner. (Figure 6)
WALL MOUNT
The charger support can be either wall mounted or placed on the floor. (Figures 7 & 8)
To use the charger base as a floor stand:
Slot the wall mount section "15" into the floor stand section "16" so that it locks into position. (Figure 9)
Insert the jack for the charger "17" into socket "A" on the wall mount. (Figure 10)
To use the charger base as a wall mount:
To install the wall mount "15", choose a position close to an electrical wall socket. Before fitting it, make sure that there are no dangerous objects hidden below the surface of the wall, such as electrical wires, pipes, etc.
Place the wall mount against the wall as shown in (Figure 11) and mark the places where the screws will go. Once the screws are fitted, place the wall mount onto them and press it gently downward to make it secure.
Insert the jack for the charger "17" into socket "A" on the wall mount. (Figure 10)
CHARGING THE BATTERY
Charge up the vacuum cleaner's batteries for approximately 16 hours before using it for the first time.
Insert the vacuum cleaner into its socket (Figure 12). The charge indicator (12) will light up. This indicator will remain lit as long as the vacuum cleaner is plugged in, even if the battery is fully charged. The vacuum cleaner will become warm while it is charging. This is quite normal and will not interfere with the appliance's safety or operation.
The vacuum cleaner can always be left to charge when it is not in use. This will ensure that the battery is always fully charged and ready for use.
OPERATING INSTRUCTIONS
The AE4417 model has a luminous indicator that shows the battery capacity level when the appliance is working (18). When the indicator remains in red colour, it means that the battery is in low level and needs to be charged.
Use as a handstick vacuum cleaner:
Take the handstick vacuum cleaner off the charger unit and press the On/Off button "1" (Figure 13).
The indicator "11" will light up, this indicator shows that the rotating floor tool "10" is working.
Make sure that none of the nozzles is blocked and that the rotating floor tool is clean.
Use as a handheld vacuum cleaner:
Take the handheld vacuum cleaner off by pressing release button "6". (Figure 6)
The suction nozzle on the handheld vacuum cleaner can be adjusted allowing the vacuum to get into awkward places, to do this pull on it gently until it is full extended. (Figure 14)
To slide the nozzle back in, press on the release clip and push the nozzle back. (Figure 15)
To pick up dry remains, vacuum in any direction until the area is clean. Do not overfill the container. Empty it out regularly.
When storing or charging the handheld vacuum cleaner, slot the suction nozzle back into its parking position on the handstick vacuum cleaner, making sure that it is seated correctly. (Figure 5)

CLEANING & MAINTENANCE
Clean the container "7" and the filters "13" and "14" after each use. To do this:
Take the handheld vacuum cleaner off the handstick vacuum cleaner and remove the dirt container by pressing the release clip and turning the container anti-clockwise. (Figure 16)
Remove the textile & HEPA filter (HEPA only for AE4416) "13" and the nylon filter "14", lifting them up as shown in Figures 17 & 18.
Empty the dirt container, Figure 19.
Clean the container with a soft brush. If it is very dirty it can be washed in soapy water, make sure to rinse it well and leave it to dry completely before refitting it.
The textile & HEPA filter (HEPA only for AE4416) "13" and the nylon filter "14" can also be washed in soapy water, however make sure that they are completely dry before refitting them.
To reassemble the vacuum, place the nylon filter into position and press down on it as shown in Figure 20.
Fit the textile & HEPA filter (HEPA only for AE4416) "13" and press on it so that it slots in correctly, Figure 21.
Place the container back on the motor housing of the handheld vacuum cleaner.
Put it back on the body of the handstick vacuum cleaner.
The motor housing and the casings can be wiped clean with a damp cloth, do not use harsh detergents.
Change the filters regularly. Spare parts can be obtained from Authorised Technical Service Centres.
Cleaning the floor tool
Figure 22
- The floor tool should be cleaned at regular intervals.
To clean it, release the floor tool from the hand vacuum cleaner. (See Figure 4) - Cut through threads and hairs wound round the rollers using scissors.
Vacuum threads and hairs with the crevice nozzle.
METHOD FOR REMOVING THE BATTERIES:

Ni-MH
To protect the environment, never put this product in with household rubbish at the end of its life time.
This appliance contains Ni-MH batteries that must be taken out of the appliance
for recycling.
Do the following to remove the batteries:
With the help of a small screwdriver, remove the battery cover on the back of the hand vacuum, Figure 23. For AE4417, use the screwdriver to remove all the screws on the hand vacuum.
On the inside you will find that the batteries are soldered into the appliance.
Pull the battery pack out and cut the cables with scissors, Figure 24.
Deposit the batteries in the special containers provided by your local authorities.
Similarly, to dispose of the appliance at the end of its useful life, you can take it to an authorized technical service centre.
ADVICE ON DISPOSAL:

Our goods come in optimised packaging. This basically consists
in using non-contaminating materials which should be handed over to the local waste disposal service as secondary raw materials.
This product complies with EU Directive 2002/96/CE.
The crossed wheelie bin symbol shown on the appliance
indicates that when it comes to dispose of the product it must not be included in with household refuse. It must be taken to a special refuse collection point for electric and electronic appliances or returned to the distributor when purchasing a similar appliance. Under current refuse disposal regulations, users who fail to take discarded appliances to special refuse collection points may be penalised. Correct disposal of discarded appliances means that they can be recycled and processed ecologically, helping the environment and allowing materials used in the product to be reused. For more information on available waste disposal schemes contact your local refuse service or the shop where the product was purchased. Manufacturers and importers are responsible for ecological recycling, processing and disposal of products, whether directly or via a public system.
Your local town council can provide you with information about how to dispose of obsolete appliances.

FRANÇAIS
DESCRIPTION DE L'APPAREIL
jally aaiil 1y jlll 1s lally
a aalll glll l 111 111 111 111 111 111 111
3g2110g 1
Jus Jus Jus Jus Jus Jus Jus Jus Jus Jus Jus Jus Jus Jus Jus Jus Jus Jus Jus Jus Jus Jus Jus Jus Jus Jus Jus Jus Jus Jus Jus Jus Jus Jus Jus Jus Jus
aaiy 1
g j 1 1 1 1 1 1 1 1 1 1 1 1 1 1 1 1 1 1 1 1 1 1 1 1 1 1 1 1 1 1 1 1 1 1 1 1 1 1 1 1 1 1 1 1 1 1 1 1 1 1 0
j g j j j j j j j j j j j j j j j j j j j j j j j j j j j j j j j j j j j j j j j j j j j j j j j j j j j j j j j j j j j j j j j j j j j j j j j j j j j j j j j j j j j j j j j j j j j j j j j j j j j jj
A
(19)Jzall jzll 2
(15)aBjR aBjAaBjLjBj
(1)ALLGLALGLALGLALGLALGLALGLALGLALGLALGLALGLALGLALGLALGLALGLALGLALGLALGLALGLALGLALGLALGLALGLALGLALGLALGLALGLALGLALGLALGLALGLALGLALGLALGLALGLALGLALGLALGLALGLALGLALGLALGLALGLALGLALGLALGLALGLALGLALGLALGLALGLALGL
HEPA 13 (HEPA
Ae416) 13 (HEPA
aie lai, 14 14
. (11 kill) .
Jz
Jz
Jz
Jz
Jz
Jz
Jz
Jz
Jz
Jz
Jz
Jz
Jz
Jz
Jz
Jz
Jz
Jz
Jz
Jz
Jz
jll j 1000000000000000000000000000000000000000000000000000000000000000000000000
jglal pliaiui jaiyaiyaiyaiill j.
g l 1 g yaiyaiyaiyaiyaiyaiyaiyaiyaiyaiyaiyaiyaiyaiyaiyaiyaiyaiyaiyaiyaiyaiyaiyaiyaiyaiyaiyaiyaiyaiyaiyaiyaiyaiyaiyaiyaiyaiyaiyaiyaiyaiyaiyaiyaiyaiyaiyaiyaiyaiyai
jiaol puiu jlgai li paoai p 10i i aai 1000000000000000000000000000000000000000000000000000
5e 2511 5e b 5e g y
a 1
y
j 1
J 1
J 1 J 1 1 1 1 1 1 1 1 1 1 1 1 1 1 1 1 1 1 1 1 1 1 1 1 1 1 1 1 1 1 1 1 1 1 1 1 1 1 1 1 1 1 1 1 1 1 1
y j 1
Jn Jn Jn Jn Jn Jn Jn Jn Jn Jn Jn Jn Jn Jn Jn Jn Jn Jn Jn Jn Jn Jn Jn Jn Jn Jn Jn Jn Jn Jn Jn Jn Jn Jn Jn Jn Jn Jn Jn Jn Jn Jn Jn Jn
1 2 3 4 5 6 7 8 9 10
yolol jolil jolil jolil jolil jolil jolil jolil jolil jolil jolil jolil jolil jolil jolil jolil jolil jolil jolil jolil jolil jolil jolil jolil jolil jolil jolil jolil jolil jolil jolil jolil jolil jolil jolil
aBla 1jLl Cilg 1Cldal aI
yllll> Aai i yaa Lao
oigao ay g Bc.<<Aiyall
aay all aai all ae SnaJn
4
jgl21 lclalgo
1
4.11 4.12
ii 1
i 1
[ \Leftrightarrow \frac{1}{{a}^{2}}\left( {{b}^{2} + {c}^{2}}\right) = - {\left( a + b + c\right) }^{2} + 4]
aai 1
1
a_i a j all i. A
2.2.2.1 2.2.2.2
a 1.
aui 1011ai iui, uui.11
yj11 jzj 30.17
HEPA) HEPA
(AE:2)
j5i slia 12
y j 10
a1s 10000000000000000000000000000000000000000000
jblzollgic gai
jglal plaiiyabjy jll Jlubj y
y j 1
ufesa
estas en casa
BSH Electrodomesticos Espana, S.A.
CIF A-28-893550
C/Itaroa, n^ 1,31.620 HUARTE (Navarra)
Espana

100% recycled paper
0