ML125 - Flashlight Maglite - Free user manual and instructions
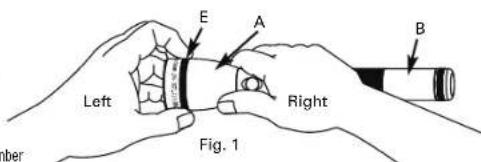
Find the device manual for free ML125 Maglite in PDF.
Frequently Asked Questions - ML125 Maglite
User questions about ML125 Maglite
0 question about this device. Answer the ones you know or ask your own.
Ask a new question about this device
Download the instructions for your Flashlight in PDF format for free! Find your manual ML125 - Maglite and take your electronic device back in hand. On this page are published all the documents necessary for the use of your device. ML125 by Maglite.
USER MANUAL ML125 Maglite
Always read and understand all of the warnings and safety instructions contained in this manual before attempting to use the Maglite® ML125™ Rechargeable Flashlight System to help avoid potential hazards that could result in bodily injur or property damage.
Always keep this manual conveniently available for future reference, as it contains important information that will help effect the safe operation and maintenance of this instrument. Any battery may leak harmful chemicals which may damage skin, clothing, or the inside of the flashlight. TO AVOID RISK OF INJURY, DO NOT LET ANY MATERIAL LEAKED FROM A BATTERY COME IN CONTACT WITH EYES OR SKIN. Any battery may rupture or explode if put in a fire or otherwise exposed to excessive heat. TO AVOID RISK OF INJURY, DO NOT EXPOSE BATTERIES
TO EXCESSIVE HEAT. To reduce the risk of personal injury or harm to your flashlight, take th following precautions:
- Use only a MAG® rechargeable battery pack (Model No. ML125-A3015) with this flashlight.
Always install the battery pack with the positive (+) end facing the head end of the flashlight and the negative (-) end facing the tailcap end of the flashlight - When storing your flashlight for long periods of
time, remove the battery pack and store it separately.
- Carefully follow the steps listed under "Inspection and Maintenance" in this manual.
- This product is not recommended for use by children.
The safety instructions have been classified according to the seriousness of the risk, as follows:
DANGER:
"Danger" indicates the existence of a hazard that could result in death or catastrophic bodily injury, if the safety instruction is not observed.
△WARNING:
"Warning" indicates the existence of a hazard that could result in serious bodily injury, if the safety instruction is not observed.
CAUTION:
"Caution" indicates the existence of a hazard that could result in minor bodily injury or property damage, if the safety instruction is not observed. NOTICE:
"Notice" contains general information that relates to the safe operation of the flashlight system.
PROTECTION OF CHILDREN
-
Never allow children to play with your flashlight as they might hurt themselves or others.
-
Always keep all accessories and components of the reach of small children. Small parts, in particular, might present a choking hazard to children.
- Do not allow children to handle or operate this flashlight.
BATTERY DISPOSAL
- Never discard a used battery pack with ordinary solid wastes, since it contains toxic substances.
- Always dispose of a used battery pack in accordance with prevailing community regulations relating to the disposal of household, toxic wastes.
- Always cover the metal terminals with insulating tape first, to prevent accidental short-circuiting whenever transporting outside of flashlight.
- The sealed battery stick contains nickel metal hydride and must be recycled or disposed of properly. Contact your local county solid waste authority for proper recycling or disposal information.
Mag Instrument, Inc. is a proud participant in the RBRC (Rechargeable Battery Recharging Corporation). By recycling NiMH rechargeable batteries, you are helping to keep NiMH batteries out of the solid waste stream. When it, you throw away a NiMH battery, it eventually ends up in a landfill or municipal incinerator. By
recycling your used NiMH batteries through Mag Instrument's Battery Recycling Program, you are helping to create a cleaner and safer environment for generations to come. For more information about the RBRC visit www.rbrc.com DANGER:
To prevent serious damage to eyesight, never look into flashlight when light is on. Do not shine light into the face of someone else.
- Never attempt to disassemble or repair the AC adapter or charging cradle as exposure to electric shock hazards may result. Always contact a Mag Authorized Warranty Service Center, if repair or replacement is required.
- Never alter the AC cord or plug on your AC adapter or charging cradle. If the plug will not fit into the available outlet, have a proper outlet installed by a qualified electrician. Improper connection can result in the risk of electric shock.
WARNING:
- Never attempt to disassemble the flashlight or any of its components and or accessories. If service or repair is required, return the unit to a Mag Authorized Warranty Service Center.
Always use genuine Maglite® replacement parts and accessories when operating this flashlight system, as the use of incompatible auxiliary equipment could result in fire, electric
shock or other bodily injury. Never connect this flashlight to any unauthorized or incompatible auxiliary product that has not been expressly approved by Mag Instrument, Inc. Use of an unauthorized accessory that is not the technical equivalent of an authorized accessory may damage the product and void your warranty.
- Never store or transport flammable liquids, gases or explosive materials in the same compartment as the flashlight or any of its accessories, as possible sparking in the equipment could ignite a fire or explosion.
- Never place the flashlight on the passenger seat or anyplace else in the car where it can become a projectile during a collision or sudden stop.
- Never short-circuit a battery pack by either accidentally or intentionally bringing the terminals in contact with another metal object. That could result in burns, other bodily injury or a fire, and could also damage the battery pack.
- Never expose the terminals of the battery pack
Before, it's important to be able to carry the body plate to any other metal object. Always wrap it or place it in a plastic bag, whenever transporting it.
- Never heat and never attempt to disassemble the battery pack, as that could cause leakage of the caustic electrolyte. If the battery is accidentally broken, avoid skin contact with the contents. In the event of skin contact, wash the affected area immediately and obtain prompt
medical attention.
- Never attempt to dispose of a battery pack by throwing it into a fire. That can cause the battery pack to explode.
- In order to avoid any risk of bodily injury or property damage never attempt to use an unauthorized battery pack with your flashlight.
- Never allow any liquids or water to spill on the AC adapter or charging cradle. There is a risk of fire or electric shock.
Always use the authorized Maglite® AC adapter and charging cradle to avoid any risk of fire or damage to your flashlight or battery.
Bodily injury or property damage may occur as a result of the use of an unauthorized and
incompatible AC adapter or charger.
- Never use an AC adapter or charging cradle if it has a damaged or worn power cord or plug. The use of damaged or worn power cords or plugs could result in electric shock, burns or fire.
- Contact a Mag authorized warranty service center immediately to obtain a suitable replacement.
- Do not attempt to charge this flashlight if cords, I adaptors, battery, LED or any part of the flashlight or charger is damaged or corroded.
- Always unplug the AC adapter or charging cradledamage.
from the power source before attempting any Do not charge or operate in close proximity of cleaning in order to avoid the risk of electric shockcombustible or flammable materials.
- Always confirm that the power cord is located so that it will not be stepped on, tripped over, or otherwise subjected to damage or stress.
- Never place heavy objects on a power cord, as this could result in damage to the cord.
- Never bend or twist a power cord, and never pull on a power cord in a attempt to remove an AC adapter or accessory plug from a socket. Always grasp the AC adapter or the accessory plug directly when unplugging the device in order to avoid damaging the cord.
- Always disconnect the AC adapter or charging cradle from the power source when it is not in u NOTICE:
- Do not use this product for other than its intended use.
- Do not use an outdoor AC outlet to recharge battery.
- Never expose this flashlight system to high temperatures, such as those found near a heater or in a closed car parked in the sun. This can cause heat-damage to the plastic parts, the electronic components and the battery.
- Dropping this flashlight or subjecting it to violent impact or shock can cause mechanical
FCAUTION:
- Do not charge battery in gas tight enclosures.
- Never store this flashlight in cold areas. When the flashlight warms up (to its normal operating temperature), moisture can form inside the flashlight, which may damage the flashlight's electronic components.
- Never paint this flashlight. This can clog the moving parts.
- Discontinue use immediately should you notice any changes in the battery, such as discoloration or malformation
- Recharge the Battery at room temperatures: 68^ to 86^ (20^ to 30^) to prevent hazardous gas venting from the battery cells and potentially reduced battery capacity
After extended and/or high temperature storage, all NiMH batteries may only accept a partial charge even with full recharging time. The capacity returns to normal after 1 to 3 charge/discharge cycles.
Getting Started
Congratulations
Thank you for purchasing a MagLite® ML125™ Rechargeable Flashlight System. To register your new Mag® flashlight visit our website at www.maglite.com. From our home page just go to "Register Your Flashlight". To view the entire product line click on "The Maglite® flashlight". Please review all the information contained in this pamphlet.
You have just made a life-long investment in one of the most highly-advanced precision instruments in illumination technology. Taking a few moments to read this manual and familiarizing yourself with the Maglite® ML125™ Rechargeable Flashlight System will help to insure years of superior service and satisfaction.
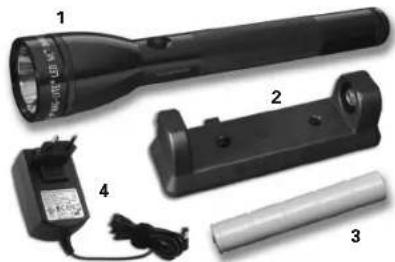
What this package contains:
- Flashlight
- Charging Cradle
- Rechargeable Battery (NiMH)
4.230 Volt Converter
Your Battery's First Charge Is Important!
Your battery was shipped from the factory with less than a full charge, and has naturally self-discharged since then. To bring the battery back to its fullest charge, be sure to follow these steps, IN THIS EXACT ORDER, when you charge it for the first time:
First Charge Procedure
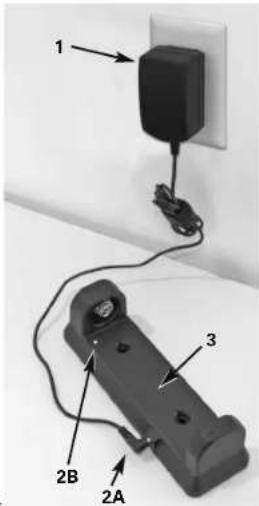
- Plug the two-prong plug of the supplied AC converter (1) into the wall outlet.
- Plug the AC converter's other end (DC connector, 2A) into the socket on the side of the charging cradle. The green LED (2B) should turn on.
- Make sure the temperature sensor window (3) is clear and unobstructed.
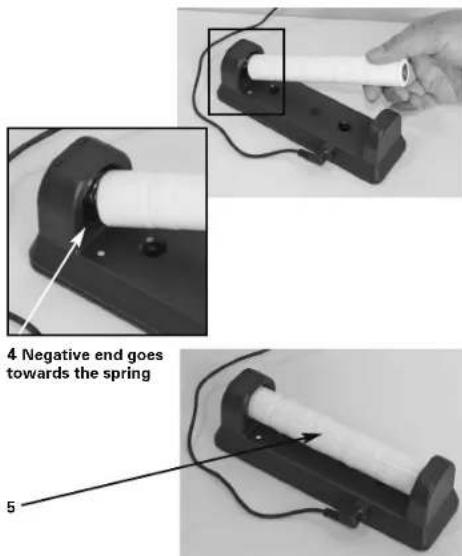
- Insert the ML125TM 6.0V 2.5Ah NiMH battery into the cradle, making sure the "+" end of the battery is inserted into the "+" and of the cradle. (Note: Be sure the cradle is plugged in FIRST, then insert the battery.)
- When the battery is correctly inserted (5), the green LED (2B) should turn red, indicating that the battery is quick-charging.
- When the battery is approaching full charge, the red LED will turn back to green. Nevertheless, let the battery charge A FULL 24 HOURS the first time you charge it, even if it turns green long before 24 hours have elapsed.
Subsequent Charges Are Much Quicker
After your battery has been correctly charged for the first time, you can recharge it much more quickly. Follow Steps 1-5 above. A fully depleted battery should fully recharge in about 2 hours. When the LED goes from red to green, the battery is ready to use.
What Do The LED Lights Mean?
LED Not Lit - Charging cradle is disconnected from AC power
LED Steady Green With No Battery Inserted Cradle is connected to AC power and ready to accept battery
LED Turns Red When Battery Is First Inserted - You have correctly inserted the battery and it is quick-charging.
LED Stays Green When Battery Is First Inserted - You have inserted the battery BEFORE, instead of AFTER, plugging in the cradle. If so, remove and reinsert the battery. LED should then turn red.
After Battery Has Been In Cradle For Some Time, LED Turns From Red To Green - When LED turns green, it has finished quick-charging and is now in "top-off" or "trickle-charge" mode. Battery is ready to use when LED turns green.
LED Blinking Red - This indicates one of the following "fault" conditio
(1) Battery has been inserted backwards. Solution: Remove battery and reinsert in correct polarity (with "+" mark on battery at "+" end of cradle).
(2) Cradle and/or battery exceeds maximum charging temperature. Solution: Remove cradle and battery to cooler location, wait until they cool off, retry.
(3) Cradle and/or battery below minimum charging temperature. Solution: Remove cradle and battery to warmer location, wait until they warm up, retry.
NOTE: If AC power is interrupted during charging, the LED can go from red to green even though the battery is not yet fully charged. To resume quick-charge after power has been restored, remove and reinsert the battery in the cradle. LED should now be red, and should stay red until battery approaches full charge, and then turn green.
Battery Maintenance
(A) Train your battery's memory: After many charge and discharge cycles, the battery life might seem noticeably less than when the battery was new. This is possible because of the memory effect of the battery, which causes it to "forget" how much charge it can hold. To restore your battery's ability to accept and hold a full charge, follow these steps:
- Allow the battery to completely discharge inside the flashlight (i.e. leave flashlight on until it turns off -- this may take up to 8 hours.)
- Allow the battery to fully charge in the charging cradle.
- Repeat steps 1-2.
(B) Avoid "Deep Discharge" Damage -- The 6-Month Rule: Rechargeable batteries slowly discharge even when not used. If left inactive for more than 6 months, your battery can become "deeply discharged" and suffer permanent damage. This will never be a problem if you use and recharge your flashlight frequently. But if you expect a long period of non-use, protect your battery from "deep discharge" damage by either (1) discharging and recharging the battery at least once every 6 months or (2) removing it from the flashlight and storing it in the charging cradle with AC power connected.
Battery Installation
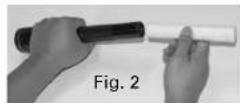
Unscrew the tail cap (Fig. 1) and insert battery pack (Fig. 2) into the barrel, positive (+) end—this is the end with a button—goes into the barrel first. If screw on the tail cap and make sure it's tight.
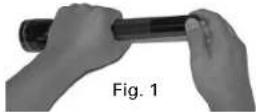
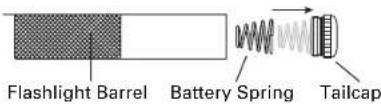
NOTE: Large end of the battery spring must be snapped into the tailcap.
WARNING: Do not "short" or "ground out" battery pack to "deeply discharge". Doing so is hazardous and will damage the battery pack.
Operation
Switch-Push button switch. Focus - Rotate head of flashlight to adjust from a wide flood. Waim to an intense spotlight.
Your Flashlight's Function Sets and the Functions Within Each Set
As the chart below shows, your MAGLITE® ML125™ flashlight is capable of five different types of flashlight as you would say "Click Click" and it turns on at 25° power—the PowerSeaveflashlight is capable of five different types of flashlight as you would say "Click Click" and it turns on at three Quick Clicks (about as fast as Full Power, PowerSave (25% power), Strobe (flashes 12 times per second), SOS Signal line). International Morse Code distress signal) and Momentary On/Off (stays on only while the SW would say "Click Click Click") and you have the Strobe function. button is held down). Not all of these functions are equally important to every user. That is, selecting a function within any of the other function sets works the same way with one, these functions are organized into four different function sets - so that you can personallumpthree Quick Clicks, as the chart shows. For example, if you are in Function Set #2 flashlight to suit your needs, configuring it for quickest access to the functions that best ran you want to select the SOS Signal function, begin with the flashlight off, apply three preference. Quick Clicks, and your flashlight will signal SOS (the familiar three dots, three dashes and
How To Choose A Function Within a Set
The available function sets, and the functions within each one, are shown in the follo
| 1 Checkin | 1 | 2FU | cfcfmd#tin Set3Fum | cfcfmd#tin Set4 |
| Full Power | Full Power | Momentary Momentary | ||
| Power Save | Power Save | Full Power Full Power | ||
| Stroke SCS Signal Power Save Strohe | ||||
As it comes out of the package, your MAGLITE® ML125TM LED flashlight is set to the "Standard" function set (Function Set #1 in the chart). If you require only those three functions (Full Power, PowerSave and Strobel), then you never have to change it. You can select a function within that set by the "Quick Click" method: Turn the flashlight on with one Quick Click and it is on at Full Power. Turn it off, then turn it on with two Quick Clicks about as fast as you would say "Click Click") and it turns on at 25% power - the PowerSave function. Turn it off, then turn it on with three Quick Clicks (about as fast as you would say "Click Click Click") and you have the Strobe function. Selecting a function within any of the other function sets works the same way - with one, two or three Quick Clicks, as the chart shows. For example, if you are in Function Set #2 you want to select the SOS Signal function, begin with the flashlight off, apply three Quick Clicks, and your flashlight will signal SOS (the familiar three dots, three desnes and three dots...
How Go From One Function Set To Another
YOUR MAGLITE® ML125™ LED flashlight's "standard" setting is Function Set #1. If you want to keep that setting you don't have to do anything. Function Set will always be in effect unless it is changed. If you want to choose a different function set, follow these steps:
- Unscrew the tail cap? you may not have to remove it all the way; you only need to back it out of the barrel enough that the flashlight will not turn on.
-
Pause for 2 seconds.
-
Press the switch button and keep holding it down.
-
While still holding down the switch button, screw the tail cap back in until it is tight.
-
Keep holding down the switch button. Within about 4 seconds the flashlight will start to blink.
-
The number of blinks indicates the new selected Function Set.
-
To choose a new Function Set, release the switch button after the corresponding number of blinks (releasing after 1 blink chooses Function Set #releasing after 2 blinks chooses
Function Set #2 release after 3 blinks for Function Set #3, and release after 4 blinks to choose Function Set #4. Your choice of a Function Set remains in effect until you change it by repeating the above process. (See our Demo video at www.magite.com)
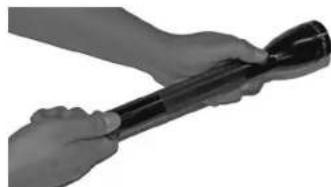
How To Fine-Adjust The Flashlight's Beam Alignment
Your MAGLITE® ML125TM LED flashlight's beam is aligned at the factory, and you can approximately 1/16th turn, release the forward pressure on the skirt (A) and the flashlight just as it comes out of the package. The steps described below are approximately to turn the knurled ring (E). The knurled ring (E) will spring back, releasing the who wish to refine the beam pattern to achieve the brightest, tightest, best-controlled spot beam possible. This feature is also useful to readjust beam alignment, if necessary, after the flashlight has undergone particularly rough use.
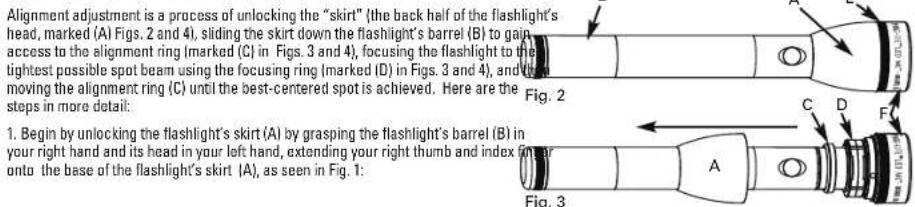
- Once you have slid the skirt (A) down the barrel (B), as seen in Figs. 3 and 4, turn the flashlight on. Just behind the knurled ring (E) is a large plastic ring called the focusing ring (D). By turning the focusing ring (D) in either direction, focus the light to the tight spot possible. Once focused, locate the smaller plastic ring, called the alignment ring (C), which you will use to adjust the beam alignment. Grasping the flashlight's barrel (E) in your left hand (see Fig. 4), take the alignment ring (C) between the thumb and index finger of your right hand. Then "tilt" the alignment ring (C) in different directions and watch the effect on the spot as you do this. You will see the spot become either more distorted or closer to round. When you find the position where the spot is as close to round as possible, the beam is optimally aligned. Leave the alignment ring (C) in that

- Once the optimal alignment has been achieved, turn the light off and lock the skirt I back into its normal position at the back of the head of the flashlight. Begin by sliding 1
skirt (A) up the barrel (B) all the way to the back edge of the knurled ring (E). If it will not go up all the way, the skirt (A) will have to be turned while pushing it forward until it re-aligns with the ribs on the large plastic focusing ring (D). Once it slips over these ribs it will go all the way up to the back of the knurled ring (E). Once the skirt (A) is against the knurled ring (E), again push the skirt forward to close the gap between the knurled ring (E) and the face cap (F) and turn the knurled ring (E) 1/16th turn in either direction; then release the forward pressure on the skirt and continue tuming the knurled ring (E). You should hear / see the skirt push back into the locked position. When the skirt (A) is back in its locked position, tuming it will focus the light from spot to flood as usual.
NOTE: If the knurled ring (E) is moved forward and turned while the skirt is out of position, the mechanism could lock and prevent the skirt from returning to its normal position. If this occurs, push the knuied ring forward (toward the flashlight's head) and turn it slightly it will require less than 1/16 inch of a turn until it clicks and backs away from the face cap (F). Then return the skirt to its normal position by following instruction #4.
| MAGLITE-ML125TMLED FLASHLIGHT SPECIFICATIONS |
| Overall Length:11.164 in. 282.042 mm |
| Barrel Diameter:1.199 in. 30.455 mm |
| Head Diameter:1.377 in. 50.216 mm |
| Weight without battery:11.2 oz. 317.514 g |
| Weight with battery:18.4 oz. 521.631 g |
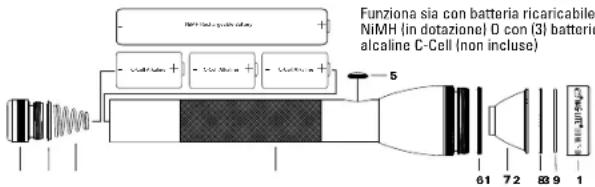
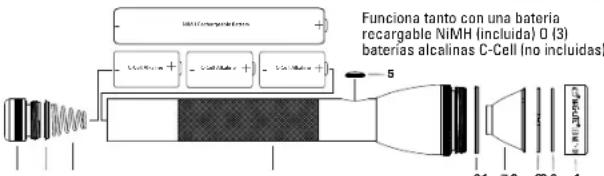
| Batteries Required:(3)C-Cell size alkaline or supplied NiMH rechargeable battery pack |

MAGLITE A Work Of Art That Works
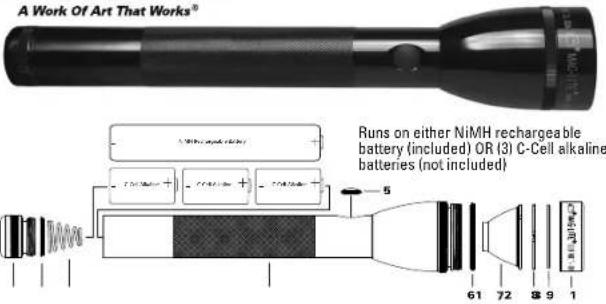
| 1 | Tail cap Actitrachea lissipap Expectorate a stix Endorphin Tangpin Tapiao caesari |
| 2 | Lip Salal, tail cap Lucina's lip cap, actrastus sliphap Joint, o Hora Buccinatian lip Uropunctifung |
TROUBLESHOOTING GUIDE: If flashlight does not turn on or stay on 1. Check the batteries.
If using alkalines and they are exhausted, replace. If using the NiMH battery pack, it. 2. Check the tail cap. Make sure it is fully tightened. The metal surfaces contacting barrel, tail cap and spring assembly should be shiny metal without obstruction between them. Any corrosion formed by a foreign substance should be carefully removed. 3. In the above steps have been followed and the flashlight still does not perform proper in the steps in the How and When to Make a Warranty Claim section, or see the Custody Service Section at www.maglite.com or contact our Warranty/Repair facility: Tel: 01-947-1006, Fax: 01 (909) 947-5041.
INSPECTION AND MAINTENANCE Battery Pack - See Warnings Section for more information. Periodically (approximately every month) remove the battery from the flashlight and visually inspect for signs of gas or chemical leakage. Indications of leakage are discoloration of the plastic sleeve or white fuzzy in near the top (positive side button) of each cell. Another indication would be bulging deformation of the bottom (negative flat end) of the cell can. If these are observed the battery pack should be removed from service to prevent chemical damage to the inside of the flashlight. See One Year Battery Pack Warranty for more information concerning warranty coverage.
Fully Charged Battery Storage - If you do not use your flashlight for long periods (four months or more) we suggest you remove the battery pack from the flashlight to prevent chemical damage (acid leaks). Electrical Contacts - The bare and bright metal surfaces between the tailcap and barrel must be cleaned periodically to ensure a good electrical contact. Also keep the tailcap spring clean, O-ring and Screw Threads - To keep seals from drying out and the threads operating smoothly, apply several drops of clean petroleum oil or jelly to these surfaces or three times a year. Anodized Exterior Finish - The protective finish on the flashlight is very durable; however, constant exposure to sunlight, water, chemicals, and other, will dull, discolor and eventually destroy the protective finish. Care should be taken to avoid any harsh environment.
Ten Year Limited Warranty on Flashlight System / One Year Limited Warranty on Battery Pack
RECHARGEable battery failure more than one year after purchase.
MAG INSTRUMENT, INC. ("Mag") warrants to the originaldate, do not return the flashlight or other system component owner that this MAGLITE ML125^TM LED FLASHLIGHT to Mag but replace the NiMH battery. You can buy replacement (SYSTEM) the "SYSTEM") is free from defects in parts and NiMH batteries directly from Mag or from most retail outlets workmanship. As to the flashlight and other components where Mag flashlights are sold. 2. For warranty returns: Send the SYSTEM, except the rechargeable NiMH battery supplethe flashlight or other SYSTEM component (postage or herewith, this warranty lasts for ten years from the date of shipping prepaid) to Mag Instrument, 1721 East Locust Street first retail purchase. As to the NiMH battery, this warranty- 51453, Ontario, California, USA 91761-7769, Attention: lasts for one year from date of purchase. Registration is not Warranty/Repair Department, or to an authorized Mag required for warranty coverage. Mag or an authorized Mag/Warranty Service Center. For the location of an authorized Mag a Warranty Service Centewill repair the flashlight or other Warranty Service Center in your area, consult the retailer.
SYSTEM component or, at its option, replace a defective where you purchased the flashlight. For your protection and flashlight or other SYSTEM component free of charge. This expedite handling and/or postal claims, we recommend that warranty is in lieu of all other warranties and conditionslll returns be insured and sent Certified and/or Return Receipt express or implied. Exclusions: This warranty does not conquested. 3. If the flashlight has been damaged by leakage LED burnout and/or LED module faai damage to or failure of alkaline batteries, do not return the flashlight to Mag, but of theSYSTEM or any component thereof due to alteration determine what brand of battery caused the damage and product misuse, lack of maintenance or leakage of a NiMH follow the battery manufacturer's instructions about how to battery more than one year after date of purchase. (Produce a damage claim.
misuse includes, but is not limited to, installing any In Canada and the United States this warranty gives you
psechargable battery pack other than a Mag® battery pack specific legal rights, and you may have other rights which vary from state to state and from province to province. Where any Mag disclaims any responsibility for incidental or consequential damages. Some jurisdictions in Canada and jurisdiction, such term shall there be null and void, but the United States do not allow exclusion or limitation of implia remainder of this warranty shall remain in full force and effect. ranties, incidental or consequential damages and/or To register your new Mag® flashlight visit our website at ultifications on transferability, so the above limitations and www.maglite.com. From our home page just go to "Register exclusions may not apply to you. Your Flashlight".
How and when to make a warranty claim: Before returning the flashlight or other SYSTEM component for service, be sure you have followed the steps outlined in the Troubleshooting
WAARSCHUWING:
A Work Of Art That Works
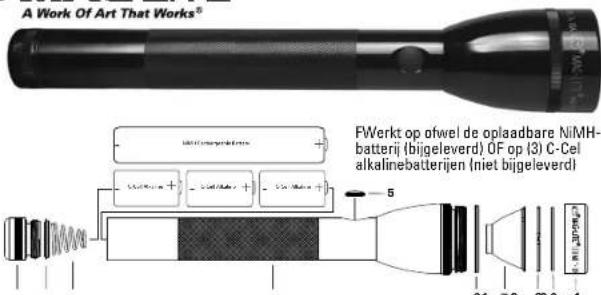
1 Taliap Endip
Cauzchon 48
Endapke
Tape porpoise
Tepe porpoise
2 Lip Seel, ta cas
Upkasingh, Endip
Joint, a leys
Boicei Amire
Upengtirichn,
Endip
Gumuzore, chirsuris di fondo
Sete Lio,
Base posterior
3 Baranyu yin
Bantwen
Bantowour the
Bantowon
Motharita
Bantown
Bantwata pan
1 Baranr Aasieny
Dienor Mortgage
"Uae Ausherenb"
Dienor Mortgage
Bantoware
Dienor Mortgage
MAG-LITE A Work Of Art That Works
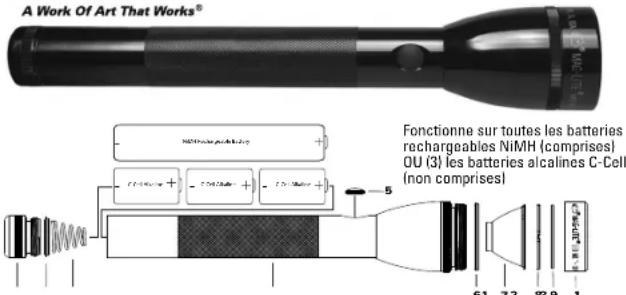
| 1 | Tail cap Achiratsa slutti Cazachon a yas Endkappa Tape postale Tips poster |
| 2 | Lip crest, 1st cap Ungutting, 1st cap slutti Joint, ales Bucurat Amici Uponenitine Endkappa Gumuzne, chusu d过硬 Sole in the tape poster |
| 3 | Barry spruce Brantberry |
| Raspberry pour pie | |
| Branchbutterie | |
| Madelouin babbles | |
| Bacone pâté pie | |
| 4 | Barrel Assamian Dinner: Martañade |
| Taste Assamian | |
| Aztecán Martañade | |
| Beef lasagna | |
| Dóttos Martañade |
| 5 | Sachin seal |
| Schaete al-fuhr | |
| Juni commensal | |
| Schaetcharifugia | |
| Festgeldieck | |
| Salid del tritumatog | |
| 16 | Ust Sta, head |
| Lupfstafel, kap | |
| Jamal a'eva, lbis | |
| Lipendocheng Kajt | |
| Laplondine, lbis | |
| Salid del Latic, obeta |
| ? | Reflector |
| Reflector | |
| Reflector | |
| Reflector | |
| Reflector | |
| ? | Clear sets |
| Transparency/teeth | |
| Lettico stenosis | |
| Klima Locus | |
| Lettico stenosis | |
| Lettico transverse |
| Qing face cap |
| Qing zongtian shi kip |
| Jia, anxiang, saiw |
| Qing Vengkoupe |
| Qing houkou |
| Rondana, hua distanla |
| 10 Face cap |
| Vaccata siliang |
| Aizao xue |
| Jiezhi kaike |
| Jingyuan kui |
| Tips qinrj |
MAGLITE A Work Of Art That Works
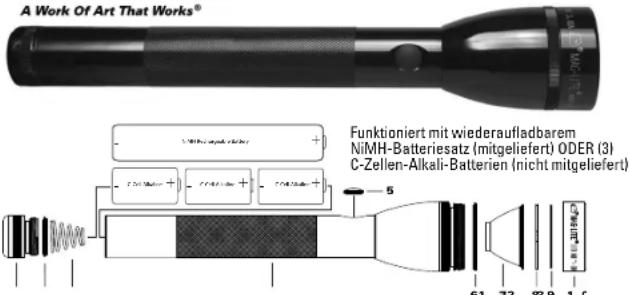
| 1 | Tarl tag |
| 2 | Actuette shirkup |
| 3 | Capacitus a d |
| 4 | Fidakura |
| 5 | Tapar taere |
| 6 | Tapa daqemir |
| 7 | Lip Saa, tal tag |
| 8 | Ulcu'shik, acte sta |
| 9 | shirkup |
| 10 | Jost, a hika |
| 11 | Ari-nite |
| 12 | Ungerdiching. |
A Work Of Art That Works

1
Talap z
Achircha subsp.
Achircha
Achircha subsp.
Achircha
Achircha subsp.
Achircha
Achircha subsp.
Achircha
Achircha subsp.
Achircha
2
Liu Sei, tall cap
Lupiting, athletic
sinecap
Jion, 3rd
Bouchan Airne
lippincering
3 Battery spring? Emanuele1 Rescruit your life2 Emanuele3 Mula della batista Rescruit para pia
Bard Asscssion In* Cinder Mutterage* Tube Asscssion* Cinder Mutterage* Baele Asscssiong* Cinder Mutterage
5 Switch switch Schaltafeldriching Joint commutator Schaltafeldriching Protogelittermethode Schelt de inumprar
Lip Seal, head Lipsoaking Top Joint 1 keel, lid Lipendropment, Kefur Coatings, Tedaie Selit del lah, castra
T Reflector
Pallector
Polarther
Pallector
Pleiotector
Pallector
Deans
Transparency 1
Lons
Leeds
Lois
Transparency
Loins
Transparency
9- 8-ing,face cap
0- eng, vovera suthun
Jen, anteju ancut
3- eng, Vortekapke
Quaternella furcata
Rondins, daftarada
10 Fagus cex
Vorite slutkap
Anima: wust
Vorotkoppe
Anello lumbare
Taga dolatron
GUIDA ALLI RISOLUZIONE DEL PROBLEM If flashlight does not turn on or stay on - 1. Check the batteries. Se si utilizzato batterie alimentare che sono esaurite, sostituiere. Se si usa un gruppo batterie NiMH, ricaricario. 2. Check the tail cap. Assicuracris che si completingamente serrato. The metal surface contacting the barrel, tail cap and spring assembly should be shiny metal without obstruction) them. Any corrosion formed by a foreign substance should be carefully removed. 3. If all of the steps have been followed and the flashlight still does not perform properly, follow the steps in and When to Make a Warranty Claim section, or see the Customer Service Section at www.magite.com or contact our Warranty/Repair facility: Tel: 01 (909)/947-1006, Fax: 01 (909)
A Work Of Art That Works

Tel cap
charrache slutto
caution 1/8
Indapoke
Ippo pesteri
pap posterior
2
Lip Seal 1st cap
Lipsticking, cottonette
sleeve cap
Joint, ailer
Ecoctor Amers
Lipstick/brush
3 Battery up in
Bentrow wee
Bentrow your toe
Bentrow your feet
Mola dole da battery
Rarcra para pls
4 Barreally
Dienr Mortegauge
"Ute Ausleihen"
Dienr Mortegauge
Bie der Rete
Dienr Mortegauge
5 Saatchi seal
Schaete-al-firch
Som commensurate
Sociae of the Progong intertusum
Solideintertusum
6 Lip Sea, head
Lupresting, kip
Jamai kelya, heva
Lengoponti Kapur
Lengoponti Keshavat
Solide intu, calusa
7 Reflector
Reflector
Reflector
Reflectors
Reflectors
Reflector
Clear lens
Transparent parabola
Lateral income
Kline Lens
Lateral income
Lateral transparel
3-1-dig, face cap
10-1-202, zonzo di sbrug
Joint, ante, avant
10-1-202, zonzo di sbrug
Gazionne forone
Rambana, base delanara
10-1-Face cap
Vocera sulba
Anteau avent
Voride-kapac
10-1-202, zonzo di sbrug
Tago sciala