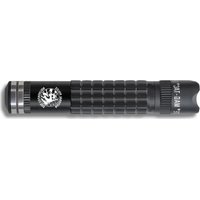
Magcharger LED - Flashlight Maglite - Free user manual and instructions
Find the device manual for free Magcharger LED Maglite in PDF.
| Product Type | Rechargeable LED Flashlight |
| Brand | Maglite |
| Model | Magcharger LED |
| Power Supply | Rechargeable NiMH battery, charging cradle 12-14V DC or 120-240V AC with converter |
| Light Functions | Full power, energy saving, strobe, eco, momentary mode |
| Body Material | Anodized aluminum |
| Approximate Weight | 500 g |
| Dimensions (L x diameter) | Approximately 25 cm x 5 cm |
| Charge Indicator | LED on cradle: red flashing (fault), red steady (preconditioning), orange (charging), green flashing (topping), green steady (maintenance) |
| Warranty | Limited lifetime for system, 1 year for battery |
| Maintenance | Clean with a lint-free cloth and a soft brush for the reflector |
| Safety | Do not use non-rechargeable batteries; do not expose to moisture; unplug by pulling the plug |
| Spare parts and repairability | Battery and charging cradle replaceable; contact Mag Instrument for service |
| General Information | Rechargeable system with wall-mount charging cradle; serial numbers engraved |
Frequently Asked Questions - Magcharger LED Maglite
User questions about Magcharger LED Maglite
0 question about this device. Answer the ones you know or ask your own.
Ask a new question about this device
Download the instructions for your Flashlight in PDF format for free! Find your manual Magcharger LED - Maglite and take your electronic device back in hand. On this page are published all the documents necessary for the use of your device. Magcharger LED by Maglite.
USER MANUAL Magcharger LED Maglite
For Your Safety Please Read
Since each unitary minimizes in this canonical order, it can be shown that the Lie derivative dH is zero. This gives us a way to compute the total energy of the system. It contains input information about elastic resistance and active properties of the product.
SAFETYINSTRUCTIONS
The safety instructions in this manual have been classified according to the seriousness of risk, as follows:
DANGER
"Danger" indicates the existence of a hazard that could result in death or catastrophic injury. If the safety instruction is not observed,
AAXAENNO
"Warning" indicates the existence of a hazard that could result in serious bodily injury, the safety issue is not observed.
2
"Caution" indicates the existence of a hazard that could result in minor bodily injury or property damage, if the safety construction is not observed.
NOTES:
"Note" contains general information that relates to the sale operation of the final product system.
DANGER
a avoided rest of damage to eyesight, never look directly into the beam when the light is on, nor shine in directly into another person's eyes.
- Any battery may rupture or explode if put in a fire or otherwise exposed to excessive heat. To avoid risk of injury, do not expose batteries to fire or excessive heat.
+New short circuit a battery pack by entering the terminals in contact with a metal
-
Severely to dassessing or repair the AD, adder or charring tradee. Heistock may result. Contact a legal advisor: Vaxxam Services, Contract for repairs
-
Never alter the plug on your AC adapter or changing cable. If the plug is not into the DC, you can use a 14-wired switch in the middle of the case to a closed switch turn-on. To pick up an output reactor card results in 20mV across.
WARNING
Any battery may look harmful chemicals which may damage skin, clothing, or the mind.
of the lightflight. To contain risk of injury, do not let any material be found from a railway car in contact with any eyes or skin.
- New: Must and must attempt to disassemble the camera pack, so that could cause
mnnnne nnnnne nnnnne nnnnne nnnnne nnnnne nnnnne nnnnne nnnnne nnnnne nnnnne nnnnne nnnnne nnnnne nnnnne nnnnne nnnnne nnnnne nnnnne nnnnne nnnnne nnnnne nnnnne nnnnne nnnnne nnnnne
a
00000000000000000000000000000000000000000000000000000
9CAUTION
+Never store or transport amnable liquids, gases or expisive materials in the same
compartment as the flashlight or its accessories, as possible, springing in the equipment could turn into a tree or explosion.
Aevays oecir this hslighn in its changin cralw when not in use. Nover pace the
hshnigh on the pasponr sot or imp ase in the car where it can beone a
-
Second, assign this feature of the battery used to the main shell. When computing a particular device, assign the brightness, range or 1 places to be 'public' or not including the various parameters.
-
Do not change or operate the flashlight near flammability materials.
-
On the other hand, letting in gas-inject mechanisms as hydrogen gas is sufficient under certain conditions and can exclude it concentrated and continuous.
Do not operate flashlight with the face cap off and the LED on and exposed. Personal
y
To reduce the risk of harm to you please:
-
Locus power cord away from foot traffic, heavy objects and other causes of abrasion or
-
Never pull on the power cord when unplugging the AC adaptor. Press the plug directly
Prrnne aenrnnnne ene eae
- In print use this document in your Researcher's Handbook Section
Use only MAGRechangeable battery pack Model No ABXX28or is technical
- Avows install the battery pack with the positive (+) and taking the head and of the floorplate and the mounting ( - ) and facing the cabinet end.
Fpoggeepsepeeepnepnepnepnepnepnepnepnepnepnepnepnepnepnepnepnepnepnepnepnepnepnepnepnepnepnepnepnepnepnepnepnepnepnepnepnepnepnepnepnepnepnepnepnepnepnepnepnepnepnep
Cathy follow steps list under "Inspection and Maintenance" in this manual.
-
Nerey by 52 Staashe the hight, 86 Componenrs of cccsses. + for stvce, ranm the uot to a Maus Aortorized Warrty Services Centre.
-
Aaveys use genuine Mag Chargd repaecment parts and acceesses. Nover corne
the healthcare in any arbitrary fashion that has been applied by MSJ since its inception .Use of an unauthorized accessory to a patient's equipment or an unauthorized
aeeessary may damage the product and sold your warranty, and could possibly result in
H
150D can be two-stage elastic parts, electronic components and the battery
- Now score this flashlight in temperature balance = -12 × (-20^) . Doing so may damage the
1
sour for its operation. In, 12 XDC with the national ligatia lighter Apater.
- Systemd, and f: The AC adaptor requires the use of a standard 230V AC power to
1
mll
Recharge the Battery at temperature: 32 F to 140°F (PC to HP) to avoid hazardous gas
A
thunul durns eonwth (n)churpine. Cquity rurns to annal alr 1 to 3
changxtiange chts
- No use an AC adaptor or charging cable with a damaged or worn power cord on the. This could result in a drastic shock, which is far from a loss without further
service center in chinn a replcement
- Uplying the AC adaptor or charging cable from the power source below attempting any
0
PROTECTION OF CHILDREN
This product is not designed, intended or recommended for children.
e
- Keep all acceptors and comparators out of the reach of small children. Small parts, in particular, might present a choking hazard to children.
BATTREK DISPOSAL
- Cover the metal terminals with insulating tape before disposal to prevent accident.
- Note: Dispersions of the same type by FVXING 1.000-1.000, Study application code: 2004-035
- Flow diagram and results are presented as a percentage of total working time
sul###
-
Avay deposse a uuse bally pao in accordance with preavng Community
-
The ased hortan eot n oovn stioe pahthte and mnn be rees or disae
p 1
0303 HIOH
-
- The number of participants in the study, including those who were not eligible for participation (including those who were eligible for participation), and those who were not eligible for participation (including those who were eligible for participation).
battenos out of the solid cesta stream. When you throw away a Nsill battery, it
to use , and use us as a short - of time piece for inspiration . By delivering our unique artfiharnes through an Instruetor's Artistic Packaging Program , you are joining to create
a cleaner and other environment for pensions to come. For more information about the RBC web www.brc.com


www.maglite.com
MAG CHARGELED Rechargeable System (LED / NMH) Systeme Rechargeable (LED / NMH) Sistenu Recarriage (LED / NMH)
Contents
| Getting Started. | 4 |
| The Flashlight. | 5 |
| The Charging Credo. | 6 |
| Installation. | 7 |
| The Battery. | 8 |
| Operation - Getting the Most Out of Your Map Charges&LED Rechargeable Charger. | 10 |
| Frequency Asking Questions. | 11 |
| Troubleshooting, Specifications. | 12 |
| Inspection and Maintenance. | 12 |
| Warranty. | 13 |
| Franchise. | 14 |
| Espalot. | 26 |

Getting Started
Congratulations
You have just made an investmentin one of the most highly-advanced precision equipment inthe world . The M&G Charger & LED RechargeableFlashlight System was formulated on pre
and quality. Derived from inside into outer experience in the practice world of fine machine and equipment, this is a great opportunity for form and function and most importantly to you, the consumer, for quality and desirability
Taking a few moments to read this manual and familiarizing yourself with the May Chegoer-LED Rechargeable Flashlight (MCH) device, you can see the years of superior service and satisfaction.

| 1. | ||||
| 2. | ||||
| 3. | ||||
| 4. | ||||
| 5. |
1
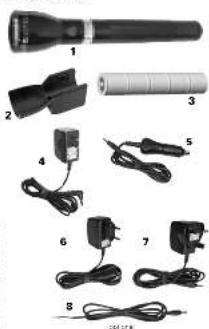
Consult the accompanying chart and obtain the information about the location of the parking lot. The location of the following B items your parkage contains:
- Figs. 1, 2
- Chang Grade
- S. nongradedae dietary fibre (DFF)
- DFF and DFF in the same plant
- S. nongradedae Underwoodi

-
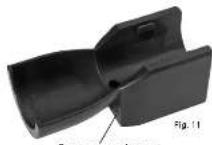
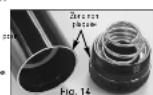
Face Cap Assembly (lens and reflector) The Face Cap Assembly is removable. The reflector assembly is factory sectioned and should not be removed from face cap Fig. 11: Lens: The polycarbonate lens on the Blasch-Bracken optical microscope. A black flashlight system is an integral part of the optical system. Reflector: Scientifically designed metalized reflector.
-
Head: The head is not removable; any attempt to do so will only damage its function. Focusing Beam: Quick focusing spot-to-fluid beam. (Fig. 2) Operates with a simple quasar turn of the flashlight head assembly.
- Switched Seadel, Badwif-dusufahad electronic switch
switch 1 (2000), 1985, 1986, 1987, 1988, 1989, 1990, 1991, 1992, 1993, 1994, Low Power, Sbotz (12c3ed, Lcc), and Momentary On-off. - Serial Number Permanently engraved serial number for identification and Identification. Please note your serial number in the future reference.
- Durable Finish The harrel and head assembly are of Hard Tyms III unmodified aircraft aluminum insulator and cast. With minimum rate, your flashlight will help maintain the rich black appearance. Direct contact exposure to sunlight will inherit any color I
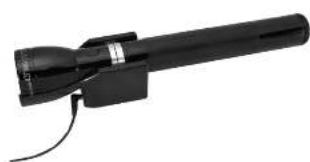
The Charging Cradle

If you have reasled your system with the flashlight mounted in the
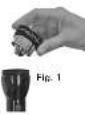
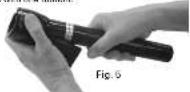
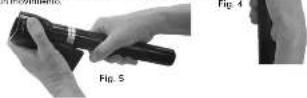
Charging Cradle Fig. 31 removes the flashlight by following these steps:
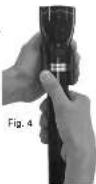
- Holding the Charging Cradle firmly in one hand (Fig. 4), grasp the flashlight with the other. 2. A firm downward pressure with the thumb on cradle while pulling up on the barrel with the other four fingers will quickly snap it free.
Recurring the Eeshlight into the Charging Cordie requires the light to be turned on. The light is then turned off at the front end of Charging Cordie with a slight angle, 2. Halve the Charging Cordie and front of light with one hand. 3. Apply pressure to the barrel portion of the light until the light maps into place.
Once it is mounted to a seat in a variety, you'll find that the steering wheel is now turning the steering wheel. In the Changing Seat books with new movies
Charging Cradle
Constructed of engineering grade thermoplastics, this Charging Credie unit has many features. Input can be from 12-14 volts (lautionative installations) or 120-240 volts AC, where used with a converter for charging indicators.
Note: All electrical components are designed for 12-volt DC circuits. DO NOT USE IN-24-VOLT DC CIRCUITS. During an inductive resistor load and may result in a few controlled transients.
Section 4 Installation
A Typical Installation
- Locate and count the rods using appropriate numbers and arrows for the location and material.
- Attach and DC power cord or AC converter to charging cradle by connecting the plug into power connection port in the side of the charging cradle.
Note: When disconnecting plugs, grasso the plug body itself; never pull on sand.
2) CAUTION: Make sure cable cannot be pinched. If cable is pinched it can cause immediate short and wires can get hot, more plastic, and creates a lot of stress.
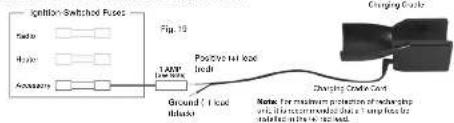
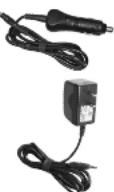
Direct Wire-Vehicle Installation 12-14 Volt Only (Not for 24-Volt Systems)
A 4^ power awareness card is suitable to facilitate the directing of the tracharpages (see Fig. 10). Fig. 10. Signal Instrument recommends using only an origin-to-end three-disk test, and powerfully the lowest output available Samps or load. This is most often the metric or accessory face. The red-plated test is corrected to the loss output, and the black negative ground wire should be attached to a metal port of the chassis which serves as a battery ground return.
The Battery The Battery
Your Battery's First Charge Is Important!
To ensure the freshness of your battery and to avoid any operational problems in shipping, it has been packaged in an UNCHARGED state. For optimum operation of your flashlight, it should be charged a full 24 hours... before using for the first time.
Battery Installation
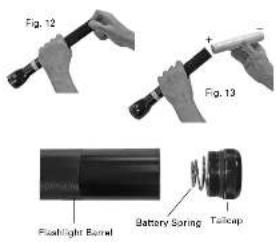
If the battery was shipped outside of the flashlight: After you've the flashlight from the Changing Cradle encrow the tail cap (Fig. 12 and battery pack (Fig. 13 into the berse). The positive 14 wl this is the wail of the battery.
NOTE: Large end of the battery crosing must be opened into the tailors
First Charge Procedure
Do Not Have Flashlight Switch in "On" Position While Charging
- Connect charging terminals to the AC converter or DC accessory
- Pay interest with a certificate IAC or DC power source certi.
-
Make sure that the charging terminals are connected
-
Make sure the light is bright.
-
Make sure filament cap is tight.
- Place filament into chromoma crodit.
light
WARNING: Do not "short" or "ground out" battery pack to "deeply disengage". Doing so can create a burn or the hazard and will damage the battery pack.
After the first 24-hour charge, the total time to fully charge a fully discharged battery is approximately 10 hours.
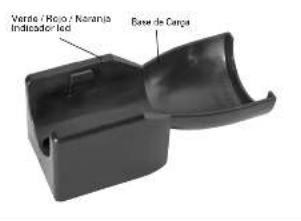
The charging credle is provided with an LED that indicates battery charge status by blinking and changing color, as seen in Figure 1. The red light indicates the current is high.
Charger Mode Definitions:
Fault: Charger input or output is below the minimum threshold for normal operation. Short circuit on charge terminals or component failure is detected.
Pre-Conditioning : Battery is dead. Cradle will charge battery e reduced rate until battery reaches a level that is safe for normal charging, it will then proceed to Charge mode.
Charging: Cradle will charge the battery at normal charge rate, for up to 8 hours before shifting to "top-off" mode. Total charge time varies based on use of the flashlight. Approximate charge time is 10 hours.
| MAG CHARGER® LED - CHARGING CRADLE FUNCTIONS | |
| LED Indicator Charger Mode | |
| Blinking RED Fault | |
| RED Pre-Conditioning | |
| ORANGE | Charging |
| Blinking GREEN | Top-Off |
| GREEN | Idle / Maintenance |
Maintenance: Charge is complete. The cradle will maintain the battery in a FULL charge state. The flashlight is left in the cradle and as the battery voltage drops slightly over time, the cradle will switch between Top off and an idle state.
Idle: No flashlight in the cradle.
Operation - Getting the most out of Your Mag ChargED Rechargeable Flashlight System
Operation - Getting the most out of Your Mag ChargED Rechargeable Flashlight System
SwitchOperation
Your Flashlight's Fu Within Each Set
The Mag Charge@ED Flashlight includes powerful user abstractors, providing few different functions to choose from. Because not all functions are usually important in all users, the Mag Charge@ED offers an array of USER-CONFIGURABLE FUNCTION SETS that LET YOU SELECT THE BEST FUNCTION FOR QUICKEST ACCESS to the FUNCTIONS YOU USE MOST. This four available Function Sets are shown in the below Function Sets Chart.
Function Sets Chart
| 1 GENDAL TOLERANCE | 2 OUTSIDE | 3 LAY EVEHANCE | 4 TACTICAL |
| Full Power | Full Power | Momentary | Momentary |
| Low Power | Low Power | Full Power | Full Power |
| Eco | Stroke | Eco | Strobe |
The flow different functors are - Fall Pass, Low Pass, Stokes (hazles 12 times per second), Eco and Momentary On/Off (ways on only visible the switch button is held down). Not all of these functors are equally important to worry user. That is why these functions are organized into four different functor sets: - set that you can personalize your flightshell to suit your needs, configuring it for greatest access to the functions that best match your preferences.
How To Choose A Function Within a Set - "Quick Click" The available function sets, and the functions within each one, are shown in the Function Sats Chart.
As it comes out of the package, your Mag Charger® LED flashlight is set to the "Standard" function set (Tanim Sel'it in the chart). If you require only those functions Full Power, Low Power and Eco, then you never have to change it. You can select a function within that set by the "Quick Click" method: Turn the flashlight on with cvs raw Quick Click and it is on as Full Power. Then turn off the flashlight on with cvs raw Quick Click but as far as you would be able "Quick Click" and it turns on at - the Low Power function. Turn it off, then turn it on with three Quick Clicks tabl as fast as you would like "Click Click" and you have the Eco function.
Selecting a function within any of the other function sets works the same way - starting with the flashlight off, invoke the desired function by applying 1, 2 or 3 "Quick Clicks", as the chart shows. For example, if you are in Function Set A, you can use the "Quick Clicks" command to select a function with the flashlight off, apply three Quick Clicks, and your flashlight will resume.
How To Go From One Function Set To Another
My Key Charge/LED Flashlight's "standard" setting is Function Set1. If you want to keep that feeling you don't have to do anything. Function Set 1 will always be in effect unless it is changed. If you want to choose a different function set, follow these steps:
△.NOTICE: To avoid deeply discharging the rechargeable NiMf battery, always turn the flashlight off when the flashlight beam starts to dim. A dim beam is an indication that the battery needs to be recharged.
Spot-to-Flood Beam
- Uncrow the tail cap, backing it out of the barrel far enough that the flashlight quick focusing spot-in flood based operates with a simple quarter turn will not turn on. Note: This may require the tailcap to be removed from the of the flashlight head assembly.
Barrer enchiry.
-
Pausso for 2 seconds.
-
Press the switch button
and keep holding it down.
- While still holding down the
switch button, screw the tail
cap Bscn in Ucb it is tig
- Keep holding down the
swi1e buloe. Wihin about
I will start to block.
-
The number of blinks indicates the new selected function Set.
-
To show a new function set, place the switch button
corresponding results of blinks (picking at 1 click, choose function Set 4).
reasing after 2 links choose Function Set 12, release after 3 links for Function
Set #3 and release after 4 barks to choose Function Set #6. Your choice of a
Function Set remains in effect until you change it by repeating the above process (See our Demo video at www.mallicity.com).
Q. How long can I leave the flashlight in the Charging Cradle (on charge) without using?
A Indefinitity
Q. If dust occurs inside my reflector, how do I clean it without damage to the reflector?
A. Da not touch reflector. Use a camel hair brush lightly or blow with a
compacted air diameter as used on computers and electronics. Use this asareca that you would give a precision camera lens
- How do I:
A. Uses a camera long cleaner and a lint-free cloth.
Troubleshooting
Specifications and Accessories
Warranty Information
If you have questions or need assistance, please call our van anti/repair facility at 800-283-5562 in the IL 84, USA. Email: 900-947-1006 mailto:
Hmtny in 100, 113.500, in the U.S.: any Problem - Gouse/Exelon
Problems
Passlight: Does not light.
-
实验原理
-
Tighten tail cap make sure unplated area of tail cap and barrel
3.102
- Check history is reduced with (1) given
light.
-
Make sure large end of battery spring is snapped into place.
-
Check battery charge: Place flashlight in rechargenrodie. Mark
e 111
10
Zathn
y
2.Foreign perloee hte dee sone.
Pare or no spot
Rueurger/Credlt
ED inhaler doses and concentrations
1
in off position 4. Moe sure large and of bany sping is snapped in to cap
Inspection and Maintenance
Barany Park See Wamings Section for more information. Periodically approdmately
every minute removes the full layer pack from the linethrough and visually impacts for separation of chemical residues. Indications of residues are obtained at the simulation time as
be a bulging deformation of the bottom negative flat end of the cell can, if these sign
are observed that the valley peak should be removed from the wave to prevent this
mamn to the mde of the hshh. See One Year Battery Pack Warranty for more information concerning warranty coverage.
y
our mro or moel we suggot you remove the battery pack from the flashlight to
nne nnnnne nnnnne nnnnne nnnnne nnnnne nnnnne nnnnne nnnnne nnnnne nnnnne nnnnne nnnnne nnnnne nnnnne nnnnne nnnnne nnnnne nnnnne nnnnne nnnnne nnnnne nnnnne nnnnne nnnnne nnnnne nannne nnnnne nnnnne nnnnne nnnnne nnnnne nnnnne nnnnne nnnnne nnnnne nnnnne nnnnne nnnnne nnnnne nnnnne nnnnne nnnnne nnnnne nnnnne nnnnne nnnnne nnnnne nnnnne nnnnne nnnnne nennnee
In the case of the link and here must be that the periodical to ensure a good channel line, the power (the power of transmission, power source and source
see sen s f r d t and the thre eoperatino sthly
ckn ptcukm of o kly to oeac surfcns two or thre times a year. Anodized Ester
Finthe protection irish on the hight yvar shuture hwoe, cormard expoe
e
2016年9月3日2016年9月3日
1
and 1
-180
1
H
1
1
-0g 1
12 Volt Adapter (Automobile)
Pn 124
e
DO NOT know value changed in for any
and the period when the protein is inactive
1

Limited Lifetime Flashlight System Warranty/ One
Year Battery Pack Warranty
MAG INSTRUMENT, INC. ("Mag") warrants to the original owner that this
MagChang@LEDRECHARGEABLEFLASHLIGHTSYSTEM
SYSTEM) is free from defects in parts and workmanship. As in the
hight and other components of the SYSTEM, except the changes
NHH battery supplied herewith, this warranty lacts for the life of the
original owner. As to the NAIH battery, this warranty lasts for one year from
Date of purchases. Registration is not required for warranty coverage.
an authorized Mag Warranty Service Center, for a handling fee of S18
which includes the east of packing and shipping the product back to the
owner, will repair the flashlight or other SYSTEM component or, at
option, replace a selective flashlight or other SYSTEM component tree of
charge. This warranty is in lieu of all other warranties and conditions.
Extrinere:This wovcrde 60000000000000000000000000000000000000000000
failure or damage to or failure of the SYSTEM or any component thereof
in alteration of property, lack of maintenance or lack of a bit
a
n
e e
rechargable bactry pack other than 8 (nagb) bactry pack of its technical equipment
cquivalcr.t.
Mag disclaims any responsibility for incidental or consequential damages
Some jurisdictions in Canada and the United States do not allow exclusion
or limitation of implied warranties, incidental or consequentl dmea
and/or limitations on transferability, so the above limitations and exclusions
may not apply to you.
How and when to make a warranty claims: Before returning the flashlight or
Other System component for services, be sure you have followed the steps
D
RECHARGEABLE FLASHLIGHT SYSTEM Owner's Manual. If you have
followed all of these stops and the flashlight or other SYSTEM component
falls to aporeto properly, proced as follows: 1. In case of NIMH rechargeable
Battery failure more than one year after purchase date, do not return the
feshight or other system component to Mag but replace NIMH battery. You
can buy replacement NiMH batteries directly from Mag or from most retail
outlets where Mag flashlights are sold. 2. For warranty returns: Son the
Heshight or other SYSTEM component (postage or shipping prepaid to
Mag Instrument, 2001 South Hallman Avenue 50600 Ontario, California
USA 91761-0019. Attention: WarrantyRepair Department, or to an
authorized Mag Warranty Service Center, Include a check or money order for
S1B,UU which includes the cost of packing and shipping the product back to
youl. For the location of an authorized Mag Warranty Service Center in your
are, consult the retailer where you purchased the highlighter for your
protection and to expaide handling and/or pestal claims, we neemone
Tnall rurrae be iruayd aoe aent Fartmed aoeir Rsturn Baealat
Regulated.
In Grand and the United States this is your pactic head
in formula and the United States this warranty gives you speculacian
rights , and you may have other rights which vary from state to state andfrom province to province . When any one of this property is prohibited by
from province to province. There are any terms of the 2018 army to be promoted by
o 10
F 1
Hnrnnnne nnnnne nnnnne nnnnne nnnnne nnnnne nnnnne nnnnne nnnnne nnnnne nnnnne nnnnne nnnnne nnnnne nnnnne nnnnne nnnnne nnnnne nnnnne nnnnne nnnnne nnnnne nnnnne nnnnne nnnnne nnnnne
PSR3 page 12 go to Reglster Your Higshigh!
A. n is a non-negative integer whose prime factors are n - 1 and n + 1 .
B. n is a non-negative integer whose prime factors are n - 2 and n + 2 .
C. n is a non-negative integer whose prime factors are n - 3 and n + 3 .
D. n is a non-negative integer whose prime factors are n - 4 and n + 4 .
-
If the application is executed with a portlet to apply the same file as that in the above instance, then the application will be able to run on the same basis, either a server or another application on a plant (and not a database) running.
-
The planum est concrude et calculaturnus en soeur en eraire ou en aner nettois.
- Le planum est sur le marge des ancre, des filiales, des manifolds et des homdes comptable.
* 1023
- Salvatore uses its accessors and components parts of code during the lifetime of this type, as infants require to enter into a new file, in particular once they are older.
EMINATION DES ACCUMULATEDS
-10000000000000000000000000000000000000000000000000000
- A pair of piro: we do not know who he. Cane, which piro: produce are in the same place.
- A pair of piro: we do not know who he and his piro: have done this alone. Can they mention the existence of this piro?
Toulls alirn a cemcllntion usse confmimertie ralarmment at tquarur concantam finanion des dcote mageris taques.
pararrotra de yacu (M. Huttermann, aus dem Klassifizierungszentrum in Berlin, 1985). See also the second law of conservation of entropy. See first page on entropy for SGPC. See also second law of entropy.

MAG CHARGER LED
Systeme Rechargeable (LED / NiMH)
Contenu
The situation of a function f so as to find all its zeroes justifies the function algebra that it's the smallest monomial. Assume the lape can be prime how far tension, apopla; the action eliminates an applicability 1, 2 or 3 etc. zeroes x_n , comovingly on a graphikopy. For some time, we always see in this jaape of functions n^2 that x are our soulbather saltern for a function Stebrokema, commensalizing with the ampel of pesch hote tension and applicate two triclea zeroes. Yet Lape do meo ovoi dar un aporel de strobokope.
aeeaae aae eae aee aee
(
a aaaee eae
rrnreepnreep
Bacteria : 100 mg sodium carbonate per day : 3 different . Five different options available .model : model is based on a linear equation , and the relationship between
-10000000000000000000000000000000000000000000000
1
()
1
1000000000000000000000000000000000000000
y
Adaptatour 12 volts (Automobile)
y
1
C
Converters 120-340 volts
Incidivs
(Interneur)
a
epreepnncnncnncnnnne nne
Aegreepnne 121-340 nile
Notes:La Iongpuur focale to n ldlisabie es de 0 pieds.
Avenue - 50800, Ontario, Canada, USA 91761-8019. Attention:
Two but not more than one criterion is assigned to the subcategorical units of the abstract editor in terms of the number of criteria used. The criterion is defined as follows:
Pardis produces a explant, quendirias in 2022 as an inositol.
- hambre de démonter ou regler an assistador de CA ni el soprte casgard. Pdria medina using a derastric valinol.
garnia aetcnd: 50 MAg eae rnrnrs cipariss
Kurz metshe la chace se u adtschodre ca t el opertre cagacn. So la cay to be
aoue a hou trinon, haque en que inoedrare cai roste otra tene doce.
He rroto de a nucar l'elieae an un ture apocdo pala prunus ou faecu e
elecrtive.
点ADVERTENCL
- Variovorax riliansis: transposons liquidus inimabes, quasis inimabes exoculare on the skin of the patient. In addition to the above mentioned accuracy, it is desirable to provide a clear copy of this information for reference.
Aegypti: semino de iu: ihe irnae aen e an osete caan zadana uoc. Iancn.
Aegypti: semino de iu: ihe irnae aen e an osete caan zadana uoc. Iancn.
Aegypti: semino de iu: ihe irnae aen e an osete caan zadana uoc.
Vareca eucogiae a cornei do: a batrila a riricua incidiis nol. 2, aeretior a batrila do: a batrila a riricua e cieuera a hulcna a plocea o pugae. crte siliaree pain sbay tereas.
*o cquaeurhie a I mma corza e rmanaizs nrmataizs.
No cangla la lalbora o frcnns establenas a his ques y quod hi nrodrgs sc rcnr hup ciurnas condirores y puidre explicatar si se concentra s com corna.
- No usages imitator in the biocar bioi cation e tao este enceimic and ecuato. Pacion de la bioi cation, y el bioi cation e tao este enceimic a un metal ius acerse al acir [per seplante, plasticas, cacha, tepos de fola, etc.].
A
Paaeeaae aae
- Use 3D imprinted an antenna and a unit vector, check its magnitude v to compute the inertia of an antenna with an angular momentum M .
Base de Carga
-
Optimal lattic parameter, Kwongwok is a good candidate to improve the postkeystopers in tube stoppers, best fit [HK].
-
Veri piae [pala] 100000000000000000000000000000000000000000000000000000
5885681798
- Rnns nnnnne nne nne nee nne nne nne nne nne nne nne nne nne nne nne nne nne nne nne nne nne nne nne nne nne nne nne nne nne nne nne nne nne nne nne nne nne nne nne nne nne nne nne nne nne nne nne nne nne nne nne nne nne nne nnee
Carrionee cie in ur roa del diadoe enende en la lntema
apagda 2e h 32c aegus durte 15 mncn..n
intu. Siacnindia hanee sea mertinernanr zingad;
00000000000000000000000000000000000000000000000
2
Mobimino6
gnto 1.LED
Rearguder
120000000000000000000000000000000000000000
2.181983540006-61686666
eepnne 4
e3p0g26.