
QS 1800 - Pan FAKIR - Free user manual and instructions
Find the device manual for free QS 1800 FAKIR in PDF.
Frequently Asked Questions - QS 1800 FAKIR
User questions about QS 1800 FAKIR
0 question about this device. Answer the ones you know or ask your own.
Ask a new question about this device
Download the instructions for your Pan in PDF format for free! Find your manual QS 1800 - FAKIR and take your electronic device back in hand. On this page are published all the documents necessary for the use of your device. QS 1800 by FAKIR.
USER MANUAL QS 1800 FAKIR
Instructions for use
Quartz lamp heater
Mode d'emploi
Radiateurs a quartz
Minimum distances 3
Informations for your safety and notes on disposal. 8
Technical Data 9
Mounting and electrical connection 10
Operating and use 11

Table des matieres
$$ \begin{array}{l} 0 = A U S \ 1 = 6 0 0 \text {W a t t} \ 2 = 1 2 0 0 \text {W a t t} \ 3 = 1 8 0 0 \text {W a t t} \ \end{array} $$
Hinweis:
Informations for your safety and notes on disposal
Before use
- Please read the information below with care. This gives important guidance on the safety, use and maintenance of the appliance. Keep this booklet in a safe place and, if appropriate, hand it on to the next owner.
- Fakir appliances comply with recognized technological standards and the current safety regulations for electrical appliances.
- This appliance fulfills the requirements of the Appliance and Product Safety Law (GPSG) and the EU Directives 2004/108/EC "Electromagnetic Compatibility" and 2006/95/EC "Low-Voltage Directive."
- Fakir reserves the right to modify designs and specifications without notice.
Important information
- Do not switch on the appliance if the housing exhibits any evidence of damage (cracks or fractures), if the connecting lead is defective, or if an internal defect is suspected (e.g. if the appliance has been dropped).
- Appliance only to be connected to voltage indicated on the rating plate.
- The appliance is designed exclusively for permanent installation and the power supply line must be protected by a 16 A automatic fuse.
- The appliance must not be installed and operated in a vehicle.
- Heaters should be checked and cleaned before each heating season by a Fakir Service Workshop.
- Fakir does not accept any liability for possible damage resulting from incorrect installation or operation and incompetent repair and maintenance.
- All repairs should be completed by a Fakir Service Workshop (see enclosed list of addresses). Only original Fakir spare parts must be used. Inproper repairs can be hazardous for the user.
Safety precautions
- This appliance must not be used in any kind of vehicle (lifts, motor vehicles, cars, cable cars, etc.). For vehicle safety reasons the appliance may not be installed or operated in vehicles because appliances like these require special components (such as e.g. protected heating elements, more powerful motors, reinforced component attachments to protect against vibration etc.).
- This appliance is not designed to be used by persons (including children) with limited physical, sensory or mental capacities or by persons lacking in experience and/or knowledge, unless they are supervised by someone who is responsible for their safety or have received instructions on how to use the appliance. Children should be supervised to ensure that they do not play with the appliance.
- The frost protector should not be installed in areas which are a fire risk, such as garages stables or wooden sheds. This is applicable also for rooms in which highly inflammable gasses or dust can develop > Danger of fire!
- The room which is to be heated should not contain any easily inflammable materials (e.g. petrol, solvents, spray cannisters etc.) or other easily combustible materials (e.g. wood, paper etc.) Keep such materials away from equipment > Danger of fire!
Informations for your safety and notes on disposal
- The appliance must only be installed by a qualified specialist or an authorized Fakir Service Workshop.
- Do not install the appliance immediately underneath a power socket.
- The appliance must only be installed in a horizontal position.
- Locate the appliance in such a manner that there is a space of at least 30cm to neighbouring objects and that flammable objects cannot be ignited. Avoid installation behind doors.
- CAUTION: Do not operate in the immediate vicinity of a bath, shower or washbasin. Observe the protective distance in conformity with VDE 0100 part 701. It is imperative to ensure that the minimum safety distances are observed when the appliance is installed in a bathroom.
- Install the appliance in such a manner that no-one can touch switches and other controls from the bath, shower or washbasin.
- The appliance must not be covered by towels, curtains or other objects as this will result in overheating and the danger of fire.
- If the appliance is installed in the open air, then care must be taken to ensure that it is not exposed to rain, sun and other weather influences.
- Never touch the quartz heating element when it is switched on. Acute danger of burns an injury!
- Always switch off the appliance / fuse prior to any repairs, maintenance and cleaning.
- Only clean the appliance with a dry or slightly moist cloth. Do not touch the quartz heating element.
Disposal instructions
- Please dispose of packaging materials and, eventually, the appliance itself in accordance with any official regulations or guidelines which may apply.
- If facilities are available in your locality for the recycling of packaging materials, please make use of these accordingly.
- When finally disposing of the appliance itself, please render it unserviceable before taking it to the autorized place of disposal.


Technical data
Voltage 230 V / 50 Hz
Power 1800 W max.
Safety system IP24
Safety class protective conductor
Dimension (HxWxD) approx. 54 × 14 × 10 cm

This appliance is designed for permanent installation. It must only be installed by a qualified specialist.
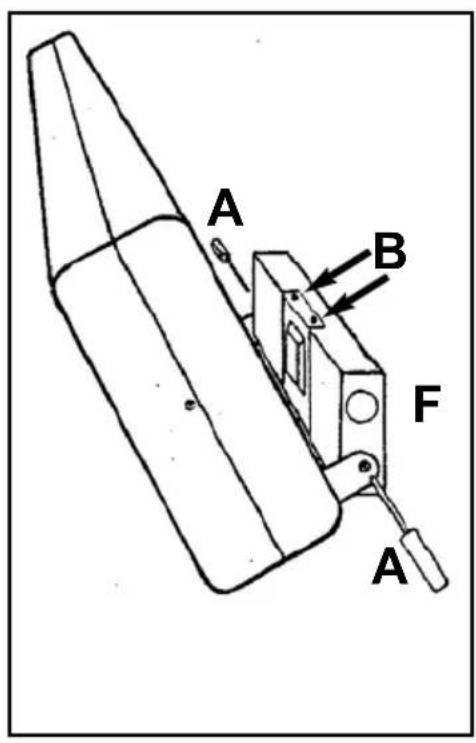
Proceed in the following manner to mount on the wall:
- Remove the two pieces of polystyrene which have been inserted into the front grid for protection during transport.
- Release the two side screws A of the wall bracket and turn the wall bracket around in the indicated manner.
- Release the screws B and remove the cover C of the wall bracket. This releases the swivel limitation and the quartz light can be folded forwards.
- Hold the appliance with the wall bracket horizontally against the wall at the intended point of installation, and mark the two securing points with a suitable object (pencil). Be aware of keeping to the minimum distances specified on page 3!
- Drill two holes at the marked points and insert the dowels.
- Mount the wall bracket on the wall with the two screws and the dowels D.
Electrical connection
- Push the enclosed cable holder into the round opening F on the connection side and then push the enclosed blind plug into the opposite round opening.
- Push the supply cable through the cable opening F in the wall bracket.
- Connect the power supply cable to the cable terminal E in the manner indicated alongside.
Operation und use
- You must connect the earthed conductor.
- Rotate the quartz light to face upwards, place cover C on the wall bracket and secure with screws B. Thus the electrical connection is covered by the cable clip E and the degree of rotation of the quartz light is limited to approx. 30^ .
- Set the required inclination of the quartz radiator and lock into position with the screws A.
WARNING:
Do not touch the quartz heating elements while mounting the appliance. Stains on the heating elements will merely diminish heat radiation.
Release the screws A before changing the slant, otherwise the appliance could be damaged.
Operation
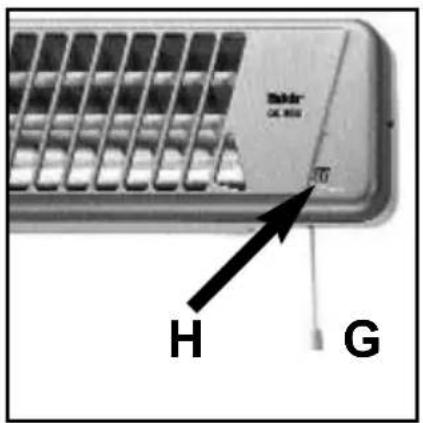
The appliance is fitted with a multi-setting, pull-cord G actuated switch to select the heat settings indicated in the viewing window H.
$$ \begin{array}{l} 0 = O F F \ 1 = 6 0 0 \mathrm {w a t t} \ 2 = 1 2 0 0 \text {w a t t} \ 3 = 1 8 0 0 \mathrm {w a t t} \ \end{array} $$
NOTE: Slight vibrations which gradually die out after the appliance has been switched on are normal.