
Prestige Duo 8504 - Vacuum Cleaner FAKIR - Free user manual and instructions
Find the device manual for free Prestige Duo 8504 FAKIR in PDF.
| Brand | Fakir |
| Model | Prestige Duo 8504 |
| Type | Vacuum cleaner with water filtration and non-woven bag |
| Power supply | 230 V AC / 50 Hz |
| Maximum power | Approx. 1200 W (estimated) |
| Water tank capacity | 0.6 L (MAX level) |
| Number of power levels | 4 (electronic adjustment on handle) |
| Filtration | Pre-filter, main filter, HEPA filter, motor protection filter, exhaust air filter |
| Included accessories | Upholstery brush, crevice tool, upholstery nozzle, articulated floor nozzle, hard floor nozzle, turbo brush |
| Telescopic tube | Yes, adjustable length |
| Blower function | Yes (reverser) |
| Cord rewind | Automatic with pedal |
| Parking position | Side nozzle holder |
| Filter maintenance | Clean with fresh water after each use; replace HEPA filter every 6 to 12 months |
| Repairability | Spare parts available (see list in manual) |
| Safety | Do not vacuum hot, liquid, or explosive substances; use only original accessories |
| Weight | Approx. 7 kg (estimated) |
| Dimensions (L x W x H) | Approx. 40 x 30 x 50 cm (estimated) |
Frequently Asked Questions - Prestige Duo 8504 FAKIR
User questions about Prestige Duo 8504 FAKIR
0 question about this device. Answer the ones you know or ask your own.
Ask a new question about this device
Download the instructions for your Vacuum Cleaner in PDF format for free! Find your manual Prestige Duo 8504 - FAKIR and take your electronic device back in hand. On this page are published all the documents necessary for the use of your device. Prestige Duo 8504 by FAKIR.
USER MANUAL Prestige Duo 8504 FAKIR
Instructions for use
Mode d'emploi
Informations for your safety and notes on disposal page 16 - 17
Technical Data page 17
Standard equipment
page 18
Using with the water filter box
page 19 - 20
Using with the fleece filter box
page 21 - 22
Operation
page 23 - 24
After use
page 25 - 26
Ordering of filters an accessories
page 27
Tables des matieres

Instructions for your safety and disposal information
Before use
- Please read through all the information provided carefully. It contains important instructions for use, safety and maintenance/care of the appliances. Please keep the user manual carefully and pass it on to any subsequent owner.
- Fakir appliances comply with state-of-the-art engineering and the current machine safety legislation.
- This appliance fulfils with the requirements of the EU directives "89/336/EEC Electromagnetic Compatibility" and "73/23/EEC Low Voltage Directive". The appliance bears the CE marking on the nameplate.
- Subject to design and equipment changes by Fakir.
General instructions
- Do not use the appliance if you can see any obvious defects on the housing, the connection lead is defect or you have grounds to suspect a concealed defect (e.g. after a fall).
- Only connect the appliance to the power supply if the voltage stated on the nameplate corresponds with the mains voltage.
- The socket must have an automatic fuse with at least 16 A.
- No liability is assumed for any damage caused if the appliance is used for any other than its proper purpose, incorrect operation or unqualified repairs and maintenance.
- Before starting to use the appliance, check that all filters have been inserted correctly. The appliance must not be used without filters.
- Only use original Fakir filters and Fakir accessories.
- Always switch the appliance off and disconnect from the mains before cleaning and servicing the appliance, replacing any parts or changing over to other functions.
- This vacuum cleaner should not be used by children. Children should only be allowed to use electric appliances if under constant supervision.
- This appliance should not be used for vacuuming harmful substances.
- Repairs must only be carried out by qualified technicians (e.g. Fakir customer service - addresses see list). Only Fakir original parts must be used. Appliances which have not been used properly pose a hazard to the user.
Important service note!
- The water filter box, water filter insert, the pre- and main filters have to be cleaned under running water and dried after each vacuuming.
Failure to do this will lead to obstruction of the filters and overheating of the appliance.
Safety instructions
- Never disconnect the appliance by pulling the lead.
- Ensure that the lead is not pulled over sharp edges or crushed.
- Do not use any damaged extension leads.
- If necessary, the mains lead should only be replaced by a qualified technician together with the cord winding device.
- Always switch the appliance off and disconnect from the mains before any servicing or
Instructions for your safety and disposal information
cleaning work, before replacing the filter and after use.
- Never hold the nozzles and end of the pipe near your eyes and ears.
- Only use the appliance for cleaning in dry conditions. Not suitable for wet vacuuming or for outside use. Do not use on people or animals. The manufacturer is not liable for any damage resulting from use for an improper purpose or incorrect handling.
- Do not use to vacuum hot or glowing substances.
- Do not use to vacuum coarse glass splinters.
- Do not use to vacuum solvents, explosive fluids and gas.
- Do not reach into the turning brush roller while using the turbo brush.
- Do not keep the appliance outside.
- Do not expose the appliance to the elements, moisture and heat sources.
- To clean the appliance, only use a dry or slightly damp cloth. Ensure that the live parts (switch, plug, electronic components) do not come into any contact with water.
Disposal instructions
- Please do not simply discard the packaging, filled filters and, later on, the used appliance, but dispose of all items correctly according to the regulations issued by your local authority or refuse disposal company.
- Fold the packaging material neatly and dispose of it in the waste paper bank so that it can be recycled.
- Bring the used appliance to the intended collection site.
Technical Data
Rated voltage 230 V AC / 50 Hz
Absorbed power IEC / max. 1300 / 1500 W
Protection class II
Measurements 48 × 36 × 30 cm
Weight 8,5 kg
Housing color silver
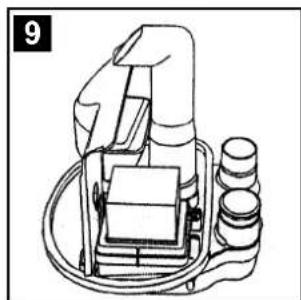
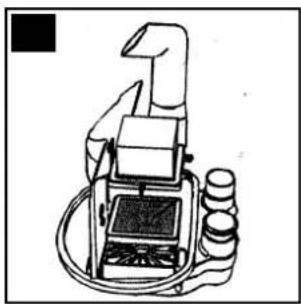
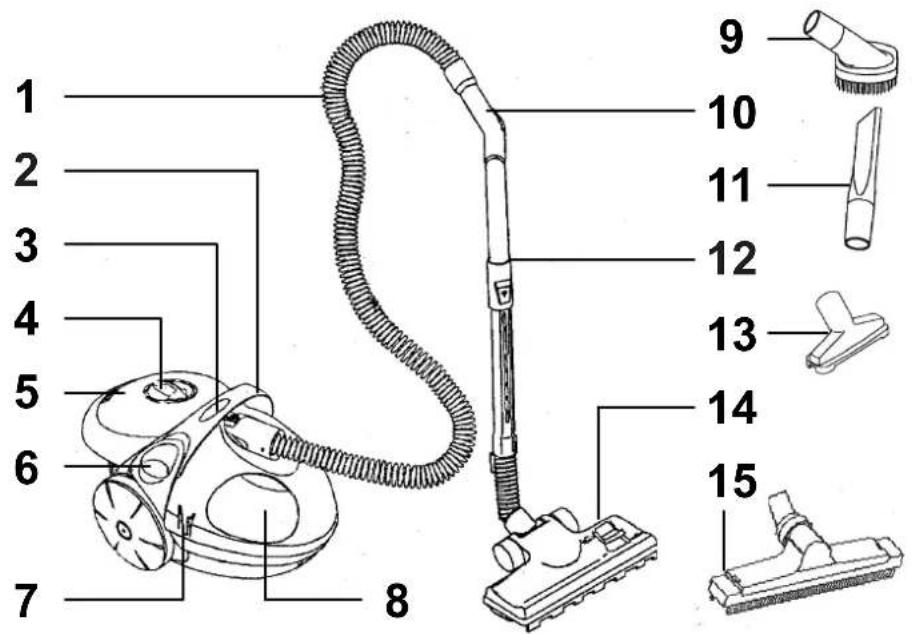
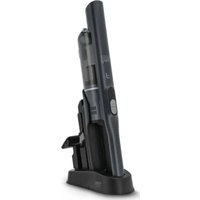
Basic equipment
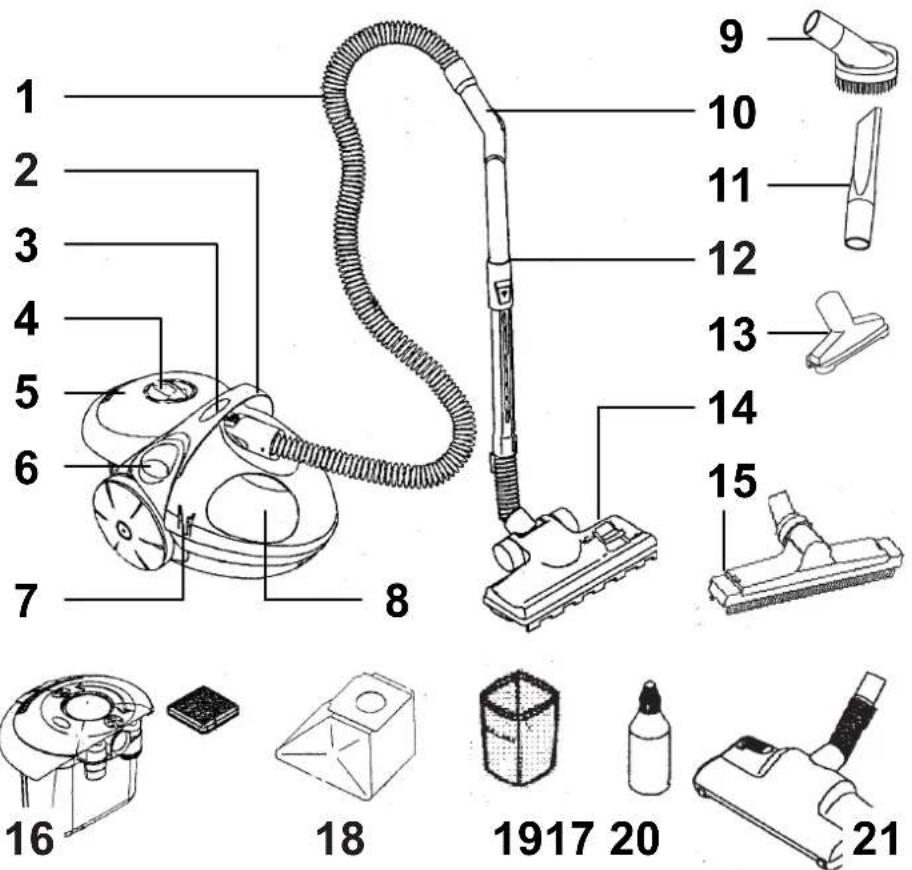
1 Suction hose 11 Crevice nozzle
2 Handle 12 Teleskopic tube
3 Electronic power control
4 Changeover switch vacuum/blowing
5 Water filter box 15 Hard floor nozzle
6 Foot button for cord winding
7 Nozzle holder - parking position
8 Accessories compartment (Pos. 9 + 11 + 13 ) 18 Dust filter bag (micro-fleece)
9 Furniture brush 19 Measuring beaker
10 Handle and suction control
13Upholstery nozzle
14 Floor nozzle
16 Fleece filter box
17 Pre-filter
18 Dust filter bag (micro-fleece)
20 Anti-foam agent
Special accessory
21 Turbo brush
Using with the water filter box
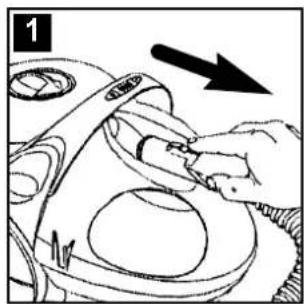
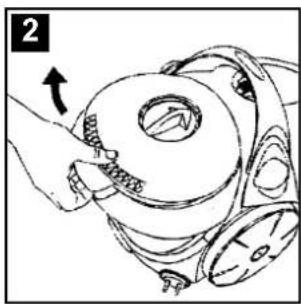
The water filter box consists of the removable tank lid, the water filter insert with prefilter and main filter and the water tank.


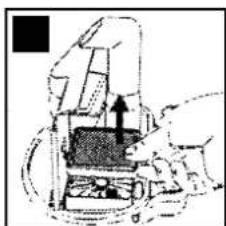
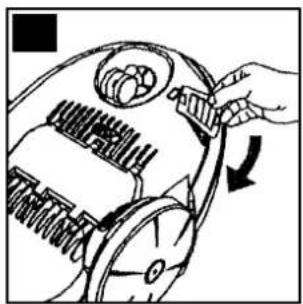
(1) First pull the suction pipe out after releasing the locking device.
- (2) Pull the tank lid using the rear handle and remove.
(3) Pull the water filter insert up and out of the tank.
- (4-9) Check that the prefilter and main filter are inserted correctly.
After opening the pre-filter, you must be able to see

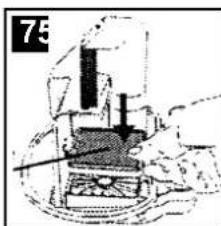
the black side of the main filter.
Caution :
The water filter box and water filter insert can only be taken out of the appliance after removing the suction pipe.
Using with the water filter box


- (10) Fill the water tank with water using the measuring beaker up to the MAX line. This corresponds to a quantity of approx. 0.6 l. If necessary, add approx. 5-10ml anti-foaming agent into the water.
Caution:
Only fill water up to the MAX level line.
Any more water will cause uncontrolled water leaks and clogging of the filter system.
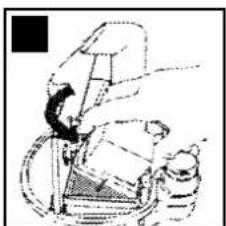
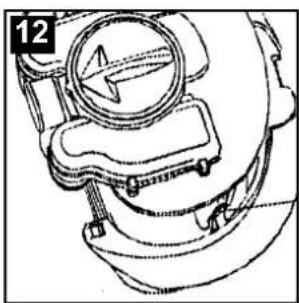
- (11-12) Put the water filter insert back into the appliance, fitting it in correctly and paying attention to the lateral guides.
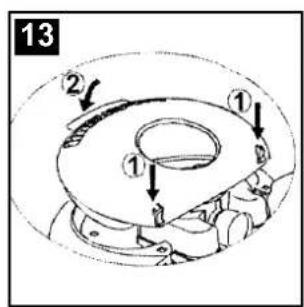
- (13) Insert the tank lid in the tank, firstly fitting the two noses into the corresponding recesses at the back, then press down at the front until it clicks in position.
- (14) Push the suction pipe into the opening until you hear it click in.
(15) Set the changeover switch to Vacuum.
Using with the fleece filter box

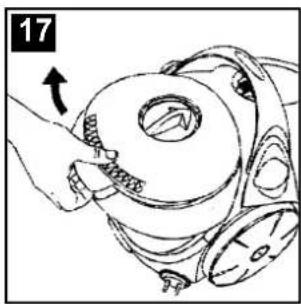
The fleece filter box consists of the removable tank lid, the hinged filter insert with filter cage, dust filter bag (fleece filter) and washable motor protection filter, together with the dust tank.
(16) First pull the suction pipe out after releasing the locking device.
(17) Pull the tank lid up at the rear and remove.
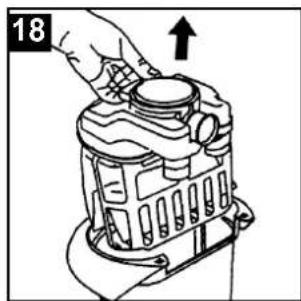
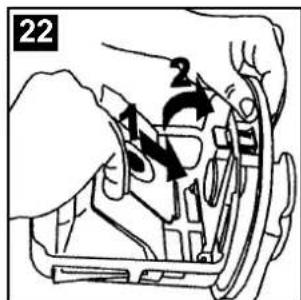
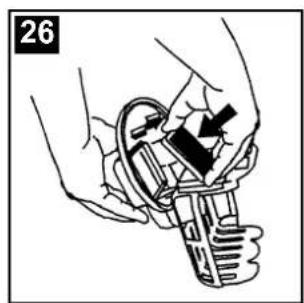
- (18-19) Remove the complete filter insert and ...

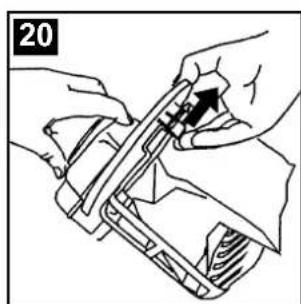
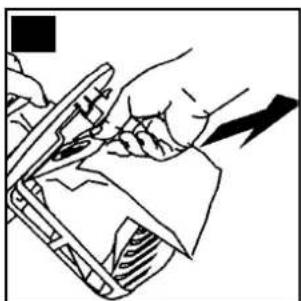
- (20-23)...Check whether the dust filter bag (fleece filter) ...
Using with the fleece filter box
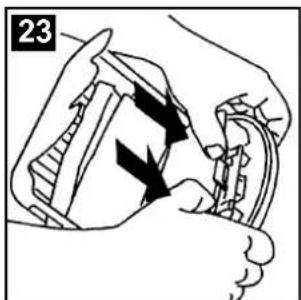
- (24-26)...and motor protection filter are inserted correctly.

- (27-28) Put the filter insert back into the appliance, fitting it in correctly and paying attention to the lateral guides.

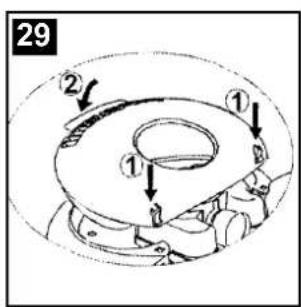
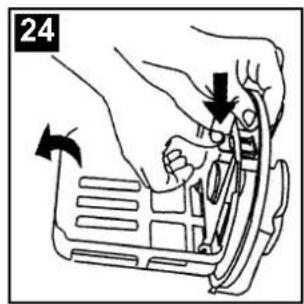
- (29) Insert the tank lid in the tank, firstly fitting the two noses into the corresponding recesses at the back, then press down at the front until it clicks in position.
Take the water filter box out of the appliance and insert the fleece filter box.
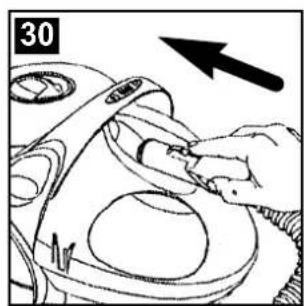
- (30) Push the suction pipe into the opening until you hear it click in.
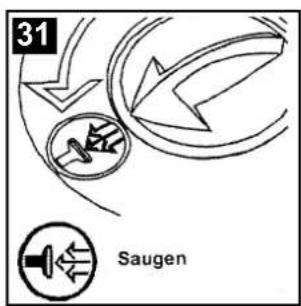
(31) Set the changeover switch to "Vacuum".
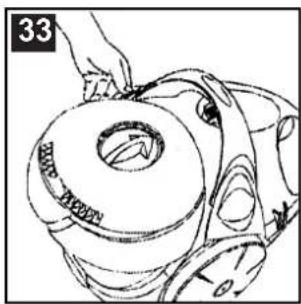
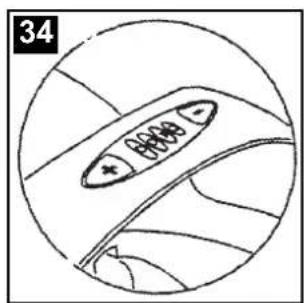
Operation and use
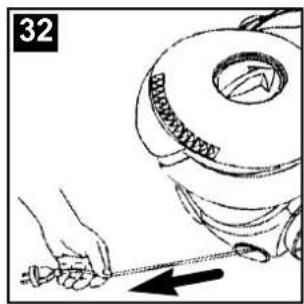

- (32) Pull the mains lead out as far as you need it and plug it into a mains socket.
(33) Switch the appliance on by pressing the ON-OFF switch.
(34) Use the plus button (+) and the minus button (-) on the handle for electronic adjustment of the suction force in four stages, as shown by the LED lamps.
When the appliance is switched on, the electronic control automatically adjusts the highest power setting.
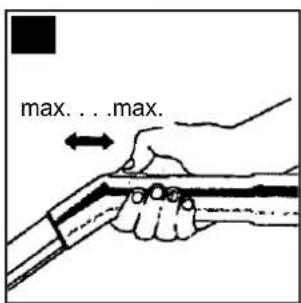
(35) Adjusting the suction force:
max. = slide at the front (opening is closed) min. = slide at the back (opening is visible)
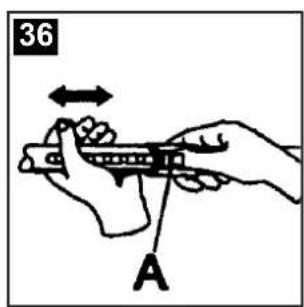
- (36-37) Adjust the telescopic tube to the required length:
Pull the slide back and hold, pull the pipe out, release the slide and engage the pipe firmly in position.
(38) Changeover switch for the floor nozzle between carpet and hard flooring:
Carpet
= brush bar withdrawn
Hard floor
=brush bar extended
Operation and use
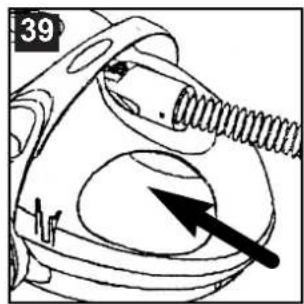
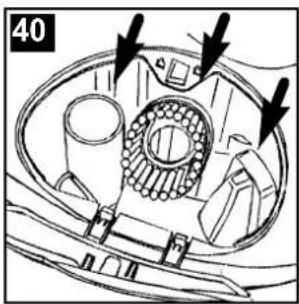
- (39-41) The accessories depot on the side contains the furniture brush, crevice nozzle and upholstery nozzle which can be removed once you have opened the lid.

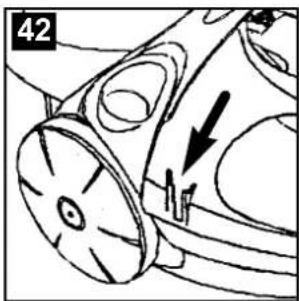
- (42) Nozzle holder parking position: During pauses, the complete suction pipe can be parked on the side of the appliance. Push the fastening bar on the floor suction nozzle into the opening.
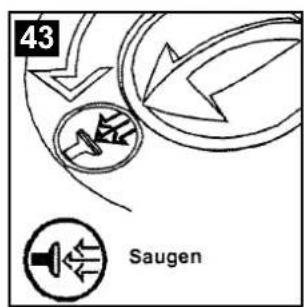

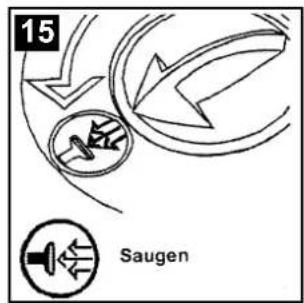
(43-44) Changeover switch:
The "vacuum" position is for vacuuming all kinds of carpet and hard flooring.
The "blowing" position is used to blow the exhaust air out of the suction pipe, e.g. to remove fallen leaves from the patio/balcony, etc.


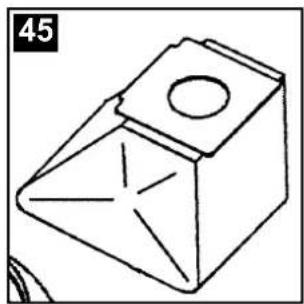
(A) Hard floor nozzle for vacuuming and cleaning floors made of tiles, stonewear, parquet, etc.
(B) Driven by the vacuum flow, the Turbo nozzle brushes the dirt out of the carpet pile and vacuums it up at the same time.
After use


- (45) Changing the: Dust bag (fleece fil and motor protection ter in the fleece fi box.
The motor protection filter is a long-life filter and can be washed when dirty in lukewarm water with a mild detergent. Do not use again until completely dry.
See pages 21 - 22
figs. 16 - 29.
(46) Changing the: Main filter and pre-filter in the water filter box
See pages 19 - 20
figs. 1-9 and 11-13
- (47-50) Changing the: HEPA-filter
The HEPA filter should be replaced after approx. 6 months, but at the latest after twelve months.
To do so, open the compartment on the bottom of the appliance, remove the old filter and insert a new one to fit exactly. Close the compartment and lock firmly.
(51-54) Changing the: Motor exhaust air filter
The exhaust air from the motor cooling system is cleaned by a separate long-life filter which can be washed when dirty in lukewarm water with a mild detergent. Do not use
After use


again until completely dry.
Open the filter compartment by inserting a screwdriver in the opening pointing to the top of the appliance and unlock by pushing downwards (toward the bottom).
Remove the long-life filter and clean it.
Insert the new or cleaned filter and close the filter compartment so that you can hear it click.
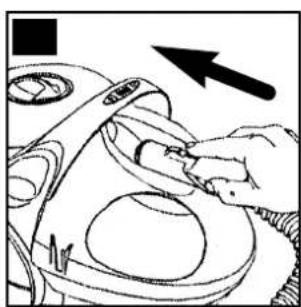
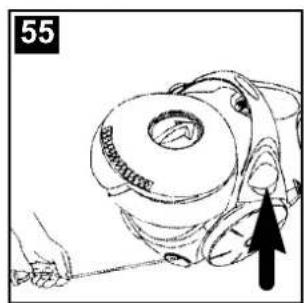
- (55) Press on the button with the plug symbol to rewind the cord automatically.
Please only press the button after the plug has been removed from the mains socket.
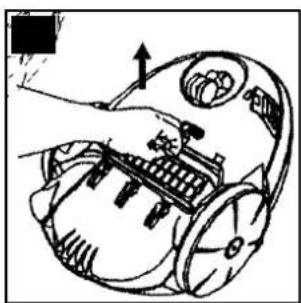
- (56) Remove and clean the water filter box every time after the vacuum cleaner has been used.
Ordering filters and accessories
Designation for Contents Order No.-
Main filter (water filter box) 1 ea 20 22 095
HEPA filter (appliance) 1 ea. 20 22 085
Motor protection filter (fleece filter box) 1 ea 20 22 086
Pack of fleece filters (fleece filter box) 4 fleece filters
Pre-filter (water filter box) 1 ea 20 22 096
Floor nozzle 1ea2018830
Crevicenozzle 1ea2018851
Hard floor nozzle 1 ea 20 18 880
Furniture brush 1 ea 20 18 852
Upholstery nozzle 1 ea 20 18 870
Suction hose complete 1 ea 20 22 360
Telescopic tubo 1 ea 20 18 840
Turbo brush 1ea2018820
Puisance connectee IEC / max. 1300 / 1500 W
Classe de protection II
Dimensions env. 48 × 36 × 30 cm
Poids env. 8,5 kg
Coloris argent
Equipement de base

- Tables des matieres
- Instructions for your safety and disposal information
- Before use
- General instructions
- Important service note!
- Safety instructions
- Disposal instructions
- Technical Data
- Basic equipment
- Using with the water filter box
- Caution :
- Caution:
- Using with the fleece filter box
- Operation and use
- Carpet
- Hard floor
- After use
- Ordering filters and accessories
- Designation for Contents Order No.-
- Equipement de base
Brand : FAKIR
Model : Prestige Duo 8504
Category : Vacuum Cleaner