
IC 1035 - Vacuum Cleaner FAKIR - Free user manual and instructions
Find the device manual for free IC 1035 FAKIR in PDF.
| Product type | Cordless stick vacuum with electric brush |
| Brand | Fakir |
| Model | IC 1035 |
| Category | Vacuum cleaner |
| Battery type | Lead-acid, 5 V, 4.5 Ah, rechargeable up to 1000 cycles |
| Initial charging time | Approximately 24 hours |
| Suction power | Not explicitly specified, but motorized brush for carpets |
| Suction modes | Hard floor (HARDFLOOR) and carpet (CARPET) |
| Main functions | Stick vacuum with removable handheld vacuum base, motorized brush, crevice tool, liquid suction nozzle |
| Included accessories | Electric brush, crevice tool, liquid suction nozzle, large liquid suction nozzle |
| Container capacity | Bag (type not specified, use original FAKIR bags) |
| Runtime | Not specified, but battery 4.5 Ah |
| Dimensions (approx.) | Height adjustable via telescopic tube; brush width not specified |
| Weight | Not specified |
| Maintenance | Empty filter after each use, clean filter and nozzle with mild detergent, clean brush roller regularly |
| Belt replacement | Possible, requires unscrewing the brush housing |
| Battery replacement | Possible, interchangeable battery, recyclable |
| Safety | Automatic shut-off in upright position; do not vacuum hot, flammable or toxic materials; use only original accessories |
| Warranty | 24 months for domestic use, 12 months for professional use (from purchase date) |
| Charger power supply | AC adapter, mains voltage (230 V typical) |
Frequently Asked Questions - IC 1035 FAKIR
User questions about IC 1035 FAKIR
0 question about this device. Answer the ones you know or ask your own.
Ask a new question about this device
Download the instructions for your Vacuum Cleaner in PDF format for free! Find your manual IC 1035 - FAKIR and take your electronic device back in hand. On this page are published all the documents necessary for the use of your device. IC 1035 by FAKIR.
USER MANUAL IC 1035 FAKIR
Instructions for use
Mode d'emploi
Rechargeable multil cleaner
Aspirateur universal rechargeable
Multiaspirador Akku
Universele accustofzuiger
IC 1035
[GB] Table of contents
Fig. 1 page 3
Fig. 2 - 15 page 26
Information for your safety and sinstructions for disposal page 8
Product description / Before use / Charging the battery page 9
Directions for use / After use page 10
Exchange of filter / Cleaning the brush roller page 11
Replacing the drive belt / Changing the battery module page 11
Guarantee page 24
Information for safety and notes on disposal
Before using the appliance
- Please read the information below with care. This gives important guidance on the use, safety and maintenance/care of the appliance. Keep this instruction booklet in a safe place, and if appropriate, pass it on to the next owner.
- FAKIR appliances comply with the recognised technological standards and current safety regulations.
- This appliance meets the requirements of EU guidelines 89/336/EU "Electromagnetic compatibility" and 73/23/EU "Low voltage guideline". This is indicated by the CE mark on the rating plate.
- FAKIR reserves the right to alter designs and specifications without notice.
General instructions
- Do not connect the battery charger to the mains power socket if the voltage given on the rating plate differs from the mains voltage.
- The power socket must be protected by a domestic 10 A automatic circuit-breaker.
- Do not use the battery charger or appliance if it can be seen to be damaged (cracks/fractures), if the connecting lead is defective, or if internal damage is suspected (e.g. after being dropped).
- Do not use the battery charger for any other appliances.
- This appliance is not suitable for vacuuming health-hazardous substances.
- Before use, check to ensure that the filter is correctly installed.
- Do not use the appliance without a filter.
- Use only genuine FAKIR filters and accessories.
- Repairs may only be undertaken by qualified technicians (e.g. at a FAKIR service centre - for addresses, see guarantee card). Only genuine FAKIR replacement parts may be used.
- In expertly repaired appliances put the user at risk.
- The vacuum cleaner should not be used by small children.
- If the appliance is misused, incorrectly serviced or inexpertly repaired, no liability will be accepted for any damage which may occur.
Safety precautions
- Do not pull the battery charger connecting lead over sharp edges or allow it to become jammed.
- Before any maintenance operation or filter replacement, and after use, switch off the appliance.
- Never place the suction nozzle near anyone's eyes or ears.
- Do not use the appliance to pick up hot or glowing substances.
- Do not use the appliance to pick up coarse slivers of glass.
- When using the electric suction brush, keep the hands clear of the rotating brush roller.
- Do not store the appliance in the open air.
- Do not exposure the appliance to weather, humidify nor excessive heat.
- Clean the appliance only with a dry or slightly moist cloth.
Disposal instructions
- Please dispose of the packaging materials and, eventually, the appliance itself in accordance with the official regulations or guidelines which apply.
- If facilities are available in your locality for the recycling of packaging materials, please make use of these accordingly.
- Important: dispose of the battery module separately.
- Before removing the battery, run the appliance until the battery is flat. Then remove the battery module from the time-expired appliance and return it to a collecting point for old batteries. Dispose of all the other parts in accordance with any official regulations which may apply.
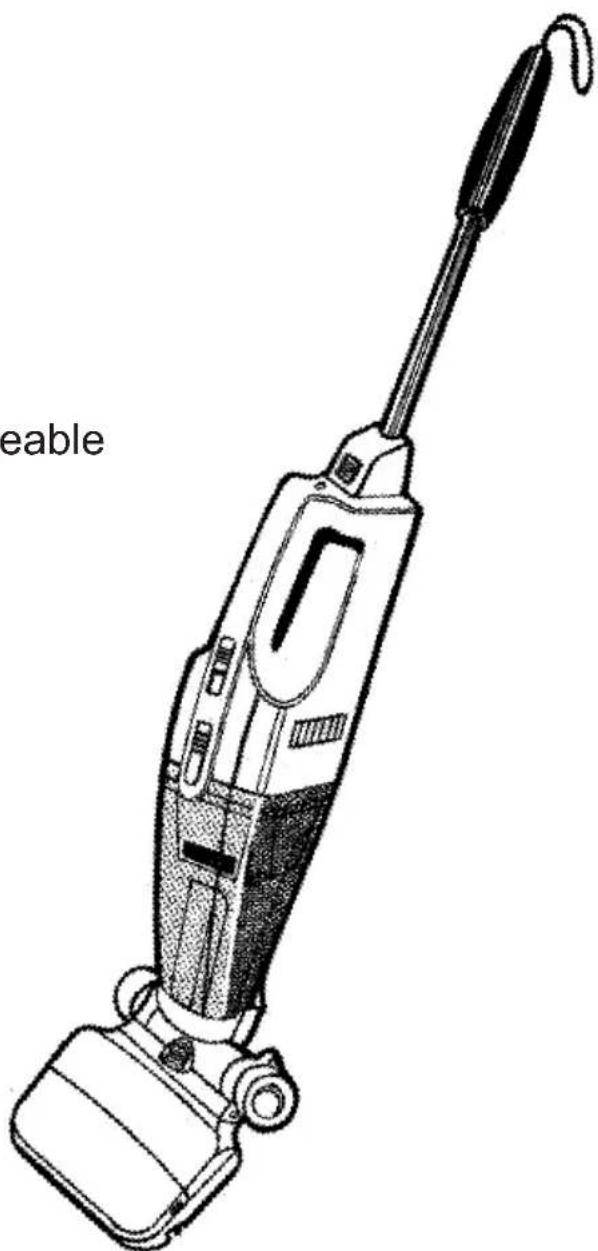
Product description
1
A Power supply/charger I Suspension loop
B Charging plug K Handle, height-adjustable
C Charging socket L Vacuum cleaner release button
D ON/OFF switch M Basic unit
E Release button for suction nozzle N Battery vacuum cleaner
F Suction nozzle O Crevice nozzle
G Electric suction brush, large P Wet nozzle
H Cover, removable Q Wet nozzle, large
Before use
2
Push the electric suction brush into the basic unit until the release buttons on the side snaps in audiably. To remove it press the release buttons and pull the electric suction brush downwards
3
The handle can now be set to the required working height.
Loosen the handle by turning to the left (counter-clockwise), pull it to the required length and secure it again by turning to the right (clockwise).
4
Insert the battery vacuum cleaner in the basic unit with the suction nozzle downwards and push it to the back until it snaps in audiably. To remove it press the release button and using the handle remove the battery vacuum cleaner.
The basic unit can be maneuvered easily with the handle pulled out, while the electric suction brush remains firmly on the floor. The battery vacuum cleaner remains standing independently in the upright position and thus makes working breaks or charging the battery possible without having to place the appliance against a wall or similar.
Charging
The lead-acid battery ( nominal voltage 6 V - charging capacity max. 4.5 Ah ) of the battery vacuum cleaner is charged only partially and must be recharged approx. 24 hours before use.
Plug the charging plug into the charging socket on the battery vacuum cleaner and the power supply/charger into a socket. It is normal for the unit to become warm during charging.
It is advisable to recharge the battery vacuum cleaner after each time it is used so that it is fully charged and ready for the next use.
Avoid a total discharge of the battery. This could damage it and reduce the maximum charging capacity, i.e. shorten the running time.
Note:
The ON / OFF switch must be switched off while charging.
Directions for use
The ON / OFF switch has 3 positions:
OFF = Battery vacuum cleaner switched off
HARDFLOOR = Battery vacuum cleaner switched on
for vacuuming on hard floors and smooth surfaces
CARPET = Battery vacuum cleaner and __ electric suction brush
switched on for vacuuming on textile floors, etc.
Use as floor vacuum cleaner
Battery vacuum cleaner + basic unit with handle + electric suction brush
Vacuuming on hard floors: Switch on only battery vacuum cleaner
Vacuuming on carpets:
Switch in electric suction brush, it has its own drive motor which powerfully rotates the brush roller and releases the dirt from the pile of the carpet.
Use as hand vacuum cleaner
Press the release button and remove the battery vacuum cleaner from the basic unit.
5 a
The crevice nozzle simplifies vacuuming dirt out from deep gaps in upholstered furniture, corners, floor rails and other places difficult to reach.
Plug the crevice nozzle with the wide end up to the stop in the opening of the suction nozzle.
5b
After use it can be kept in the separate accessories depot in the basic unit.
wet nozzle: before vacuuming liquid or wet dust, remove the filter and insert the suction attachment (which permits the vacuuming of liquids) in the aperture in the suction nozzle.
After use
7
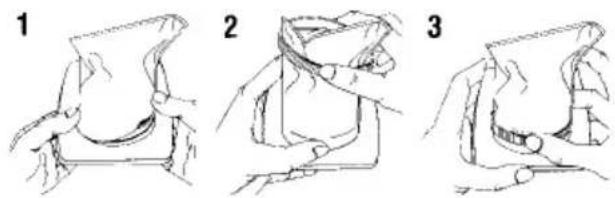
You are recommended to empty the filter after every vacuuming operation.
8
Removing the filter
Press the release button and pull the suction nozzle off downwards while swiveling it.
9
Remove the filter from the suction nozzle.
Shake the dust and dirt of the suction nozzle and of the filter into a refuse bin.
10
In the case of stronger contamination of the filter and of the suction nozzle you can wash this with a mild cleaning agent. Make sure that the filter and suction nozzle are completely dry before renewed use.
Inserting the filter
Insert the filter in the suction nozzle and fit the suction nozzle back on the motor part until it snaps noticeably into place. Your battery vacuum cleaner and now ready again.
Exchange of filter
Cleaning the brush roller Replacing the drive belt
To achieve a high efficiency of the electric suction brushes, you should regularly remove hairs, fibres, threads, etc. from the brush rollers and if necessary from the drive belts.
Always switch the battery vacuum cleaner off before you start cleaning.
Remove the electric suction brush from the basic unit.
Pull the locking slides on both sides of the electric suction brush simultaneously to the front and remove the front cover of the housing.
Hold the brush roller firmly at both ends, lift it up together with the bearings and withdraw it laterally from the drive belt.
13 Remove hair, fibres, threads, etc. which have wound round the brush roller with a knife or scissors. Thoroughly clean the brushes of the roller and the drive belt (brush off and / or vacuum clean)
After cleaning place the drive belt in position, insert the brush roller with bearings accurately, attach and lock the cover.
Note :
Before replacing the drive belt remove the rear housing cover by loosening the five screws on the bottom of the electric suction brush. Take care before screwing together that the new drive belt is located correctly over the drive pinion of the motor.
Changing the battery
The battery vacuum cleaner is equipped with a replaceable battery block which can be recycled. This can be charged up to around 1000 times. After this or in the case of an earlier defect, the battery block must be delivered to a collecting point for used batteries.
Before removing the battery, leave the unit in the switched on condition until the battery is "empty".
Push the two locking catches to the back and remove the battery compartment lid upwards.
Remove the battery black and loosen the two connectors.
Connect the new battery block and pay attention to correct polarity:
Plus pole = red lead to connection marked red
Minus pole = black cable
When inserting the battery block in the motor housing, first insert the side with the connection leads.
We will perform warranty services for this appliance as per the following stipulations:
- We pledge to repair the appliance nonfree of charge when it has been sent postage-paid to our company or one of the Fakir customer service workshops and provided that the damage has been caused by a verifiable material fault or assembly error, and has been notified, within 24 months (within 12 months for commercial use or use of a similar nature) calculated from the purchasing date. A prerequisite for the warranty obligation is that the appliance has been used in an appropriate manner.
- Parts subject to natural wear-and-tear are not covered by the warranty.
- All warranty claims are invalidated when people who have not been authorized by us have tried to make changes or repairs. In addition, third-party supplied replacement parts or accessories may not be used.
- The warranty services generally comprise of maintenance and / or replacement of defective parts. On-site repair services can only be requested for stationary-operated large installations. Please submit a merchant's invoice or cash register receipt with purchasing date for verification of the warranty claim.
- The appliance will be replaced by an equivalent appliance if the repair work was unsuccessful and it was not possible, even after reworking, to correct and / or eliminate the damage or and / or defects. The customer retains the right to return the appliance and to have the purchase price reimbursed if neither repair nor replacement is possible. An invoice for partial-use pertaining to the time period of usage may be presented in the case of a replacement or a reimbursement of the purchasing price.
- Warranty performances effect neither an extension of the guarantee period nor the start of a new guarantee period. The guarantee period for built-in replacement parts ends with the guarantee period for the complete appliance.
Valid as of 1st January, 2002
GARANTIE
- [GB] Table of contents
- Information for safety and notes on disposal
- Before using the appliance
- General instructions
- Safety precautions
- Disposal instructions
- Product description
- Before use
- Charging
- Directions for use
- Use as floor vacuum cleaner
- Use as hand vacuum cleaner
- After use
- Removing the filter
- Inserting the filter
- Exchange of filter
- Cleaning the brush roller Replacing the drive belt
- Note :
- Changing the battery
- GARANTIE
Brand : FAKIR
Model : IC 1035
Category : Vacuum Cleaner