USER MANUAL Easytip Z3 Ruwido
Operating Instructions
Congratulations on purchasing this high performance easytip Z3 universal remote control. Great care has been taken over the design and manufacture of this product and in normal use it will give many years of satisfactory service. The following pages describe how to get the best from your new remote.
Inserting and changing the batteries
Your easytip Z3 is powered by two alkaline 1.5 V batteries (IEC LR 03, AAA). Wherever possible, ensure that new batteries are used. Never mix old and new batteries together as this will effect the performance of the controller and shorten the battery life. Once the batteries have been inserted, check that the red LED flashes when any of the keys of your remote are depressed, this confirms correct installation of the batteries.
Please Note:
Insert batteries following the markings on the inside of the battery compartment.
Immediately dispose of any leaking batteries.
Dispose of old batteries as per manufacturers instructions.
1. Useful Tips before programming your easytip Z3
In the back pages of this manual you will find the 4-digit codes which allow you to set up your easytip Z3 controller. After finding your brand of TV, Satellite or VCR in the back pages of the manual, you will see alongside several 4-digit codes. You should start with the first 4-digit code in the list. If after programming this first 4-digit code your easytip Z3 does not operate correctly, then move to the next 4-digit code in the list until you have tried every code. These code numbers are specific to the Z3 remote and are not a reference to your particular model of TV etc. Each code number in the back of the book performs a particular function when activated. As you progress through the code list against your brand of TV etc. certain controls on the handset may not function correctly, this is perfectly normal and can often be solved by continuing through the other codes in the list. Do not assume that the first number that operates your TV, Satellite or VCR is the correct and final code. You must ensure that before contacting the HELPLINE, you have tried and tested all the codes against your brand of TV, Satellite or Video Recorder.
Function keys explained

ON/OFF Power/Standby

MUTE TV speaker mute

MENUMenu on/off and
VCR: Record (press twice in quick succession)

F Function key for programming
Function keys explained
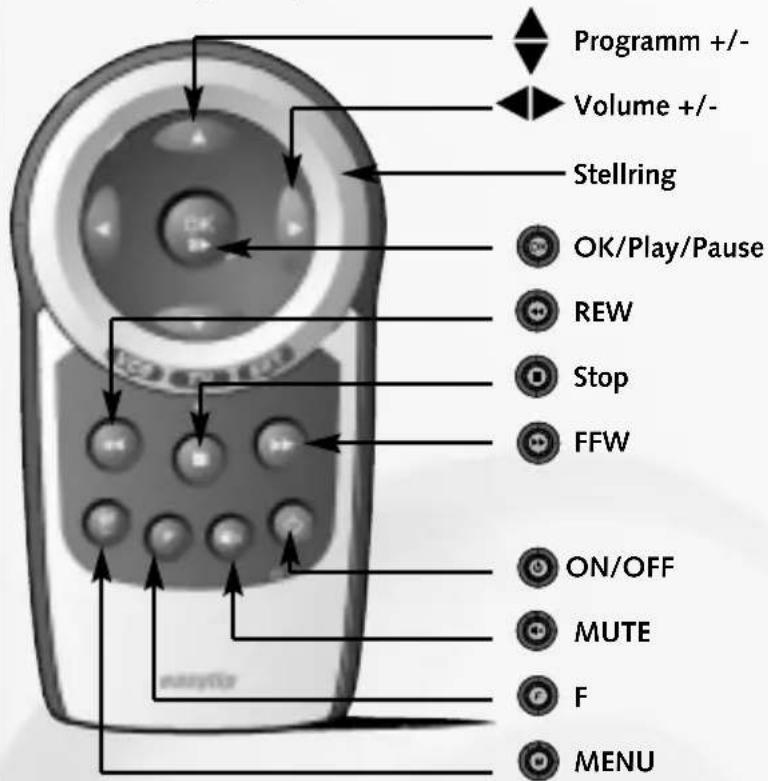

OK/Play/Pause TV: Norm, AV function and confirmation key in the menu SAT: Radio, AV function and confirmation key in the menu VCR: Play, Pause and AV function

Volume +/- Volume up/down and cursor left/right in menu

Programme + / - Channel up/down and cursor up/down in menu

Stop Stop:Video: Stop play, stop rewind, stop fast forward, stop record.

REW Fast rewind of video cassette

FFW Fast forward of video cassette
Stellring Adjusting ring to switch between TV, VCR and SAT.
Please note: Some TVs and SAT receivers may not support all of these functions.
Function keys for programming the 4 Digit Code
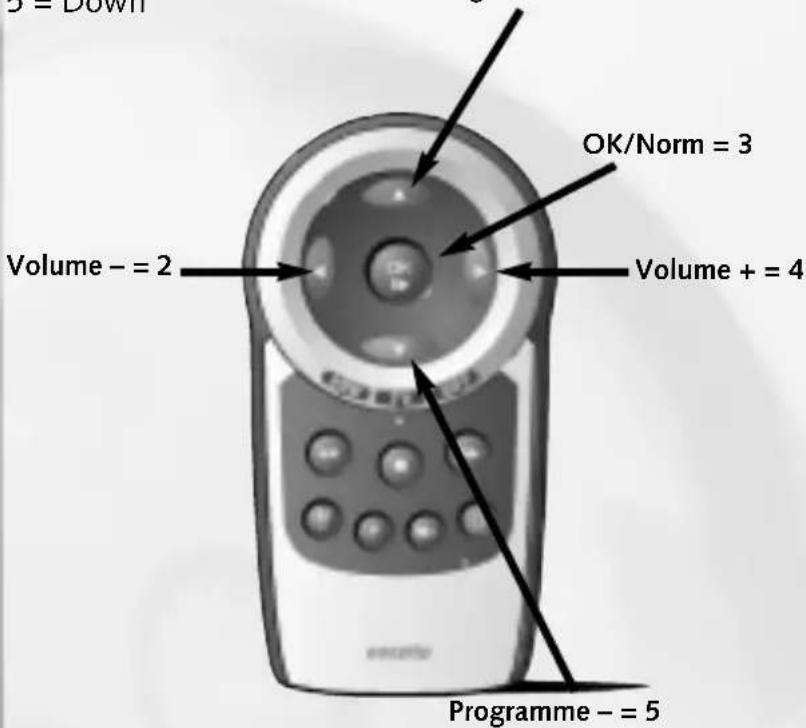
Since the easytip Z3 has not got a numeric keypad, the function keys on your controller are assigned to numbers as follows:
1 = Up
2 = Left
3 = (OK/Norm)
4 = Right
5 = Down
Programme + = 1
e.g.:
To enter the code 1353, press in succession the following keys:
Up for 1
(OK/Norm) for 3
Down for 5
(OK/Norm) for 3
The combination of these keys equals the code 1353.
Two Ways of programming your Z3
- By Direct Code input from codes at the back of the manual (preferred)
- By Search Mode (secondary method)
We would normally recommend using the dedicated code numbers in the back of this booklet to setup your remote. These numbers are particular to your brand of TV and will inevitably give best results. As a secondary setup method, your remote can undertake a complete code search. The code search method is often used when a particular brand is not listed, or when some features are not responding to direct code input. As there are a great number of codes for the unit to select and test, search mode can take up to 15 minutes to complete.
The 5 Second Rule
Your new easytip Z3 needs your help to get started.
We recommend that you study the step by step instructions before programming the codes. The basis of this programming is the 5 Second Rule. Each successive action when programming must be completed within 5 seconds or the unit will revert back to normal operation. This is deliberate so that other users of your remote will not inadvertently reprogram the unit.
Quick Set-up Reference
Step 1 Insert batteries (checking correct polarity)
Step 2 Choose the device you want to control by turning the adjusting ring until the printed "TV", "VCR" or "SAT" is inline with the pointer on the housing of your remote.
Step 3 Switch on the chosen device TV, VCR, SAT. (if setting up for TV, then TV must be fully on with a broadcast picture on the screen)
Step 4 Press and hold the (F) key until the LED flashes twice in quick succession.(approx 2 seconds)
Step 5 After the two flashes, remove your finger from the (F) key and within 5 seconds input the code from the manual.
Step 6 After you have input the code, wait for the LED to flash twice, this confirms that the number you selected has been installed into the unit correctly.
Step 7 Once the code has been installed, press the (ON/OFF) key on the controller. If the (TV etc) responds by going into standby mode then continue to try all the other functions. If some functions do not work correctly then move onto the next code in the list repeating from Step 3.
What to do if the TV does not respond
- Either the 4-digit code, or part of the programming sequence was not completed within 5 seconds or the code was not recognised. Please re-check the 4-digit code in the manual or move onto the next code in the list against your particular brand. Also ensure that the codes entered are from the correct section of the manual.
Programming the easytip Z3 in search mode
Note: it is advised not to use search function before using the direct codes at the back of the manual.
If the listed codes failed to operate the TV, VCR or SAT, or if the manufacturer was not included in the manual, then the search mode should be used. Search mode allows the controller to search and test every code in its memory. During search mode the remote is sending a signal to your device every other second. If the unit finds a compatible signal it will power down the device into standby mode. If this happens then test all the other functions of the remote. If some functions do not work correctly then its possible your remote has found the first of many compatible codes. At this point you should continue the search until a more compatible code is found. As there are many codes for the controller to select and test, search mode takes up to 15 minutes to perform.
How to run the search mode (code 1111)
Step 1 Switch on your TV, Sat, VCR (each unit must be fully on with a broadcast picture on the screen or with a running video tape in the video recorder).
Step 2 Choose the device you want to control by turning the adjusting ring until the printed "TV", "VCR" or "SAT" is inline with the pointer on the housing of your remote.
Step 3 Press and hold the (F) key until the LED flashes twice. (approx 2 seconds)
Step 4 Within 5 seconds input the code 1111 (up, up, up, up). After you have input the code, wait for the LED to flash twice, this confirms that the number you selected has been installed into the unit correctly.
Step 5 Search Mode for TV & Sat
Within 5 seconds after the double flash press and hold the (ON/OFF), this will start the search mode. You must hold this key down continually to enable the search. Confirmation of the search can be noted by the red LED flashing every other second. If the remote finds a compatible code the TV will go into standby mode. After this test all other functions of the remote.
PLEASE DO NOT ASSUME THAT THE FIRST CODE FOUND IS THE CORRECT CODE.
Search Mode for Video Recorders (VCR) When using Search mode for the VCR press and hold the (STOP) key as opposed to (ON/OFF) key. Instead of putting the VCR into standby mode, the search facility will 'park' or 'stop' the tape from playing (before using search the video recorder must have a playing tape in the unit).
Step 6 After your TV, SAT has switched into standby mode, or the video cassette has stopped running, press and hold the (F) key until the LED flashes twice. This will store the code.
IMPORTANT!
Code search begins from the last code number found in the previous search. When the end of the code list is reached the LED flashes 3 times in quick succession and the search restarts from the beginning of the list.
Determining the 4-digit code found by automatic code search (after using search facility)
It is useful to know which code your device responded to in case it is inadvertently changed at any later date.
Step 1 Choose the device you want to control by turning the adjusting ring until the printed "TV", "VCR" or "SAT" is inline with the pointer on the housing of your remote.
Step 2 Press and hold the (F) key until the LED flashes 3 times twice. (approx 2 seconds)
Step 3 After the two flashes and within 5 seconds input the code 1112. After you have input the code, wait for the LED to flash twice, this confirms that the number you selected has been installed into the unit correctly.
Step 4 To determine the stored code press the following keys:
up for the first digit
left for the second digit
(OK/Norm) for the third digit
right for the fourth digit
After pressing one of these keys, count the number of flashes emitted by the LED. As long as you do not exceed 5 seconds between each process you can press any of these keys as often as you want. So you do not have to hurry or panic if you miss a flash.
Make sure that you count the flash that occurs including the initial flash when depressing the key.
Example:
After pressing the (Programme +) key the LED flashes once. So the first digit of your code is 1.
After pressing the (Volume -) key the LED flashes thrice. So the second digit of your code is 3.
After pressing the (OK/Norm) key the LED flashes five times. So the third digit of your code is 5.
After pressing the (Volume +) key the LED flashes thrice. So the fourth digit of your code is 3.
In this example the code is 1353.
Please make a note of the codes in the box below for eventual reprogramming.
Please write down your 4-digit codes here:


2. Special functions of your easytip Z3
To get the maximum out of your easytip Z3 universal remote control some additional functions have been included, however, to maintain the units small profile and to save untidy printing on the remotes surface, some function are operated by multiple key selection.
Switch to AV
To switch to an external device (e.g. VCR, DVD-Player or SAT Receiver) connected to your TV it may be necessary to switch to the dedicated AV channel.
Check, in the manufacturers operating manual, if your TV supports this function.
To switch to the AV channel do as follows.
Step 1 Press the (F) key quickly.
Step 2 Press the (OK/Norm) key quickly. Now your TV should switch to the AV channel.
If your TV does not respond, check if it really supports this function and if you have found the optimal code for your TV.
To be able to change the basic settings of your TV and SAT receiver, the easytip Z3 has an integrated menu control. Check in the manufacturers operating manual, if your device supports this function.
Step 1 Press the (M) key quickly. This opens the menu on your TV.
Step 2 If the menu control works with your stored code, the LED will illuminate continuously.
If, after pressing the (M) key, the LED flashes quickly, then the stored code does not work with the TV menu. However, it is possible to control the brightness and colour with your remote. Please refer to "Controlling the colour and brightness".
If, after pressing the (M) key, the LED does not flash, then the stored code does work with either the TV menu or the colour / brightness functions.
Step 3 Now you can control the menu by using the (Volume +), (Volume -), (Programme +) and (Programme -) keys.
Step 4 To save any changes in the menu press the (OK/Norm) key.
Step 5 To quit the menu press the (M) key.
Step 1 Press the (M) key quickly. This opens the menu on your SAT receiver.
Step 2 If the menu control works with your stored code, the LED will illuminate continuously.
If, after pressing the (M) key, the LED does not flash at all, the stored code does work with your SAT receiver.
Step 3 Now you can control the menu by using the (Volume +), (Volume -), (Programme +) and (Programme -) keys.
Step 4 To confirm any changes in the menu press the (OK/Norm) key and to store any changes press the (F) and (OK/Norm) keys in quick succession..
Step 5 To quit the menu press the (M) key.
If you are sure that your TV or SAT supports these functions but your remote does not control them, maybe the wrong code was programmed. If so try the other codes in the code list or run the code search mode.
Controlling the Colour & Brightness
If the controlling of brightness and colour is not possible in the menu and if your original remote has special function keys for these functions, follow the instructions below.
Step 1 Press the (M) key quickly. The LED must flash once.
If the LED illuminates continuously, the menu control is activated. To control the menu, refer to "Menu control" above.
If, after pressing the (M) key, the LED does not flash at all the stored code does work with neither the TV nor the analog functions.
Step 2 To change the brightness press the (Programme +) key, to change the colour press the (Programme -) key. When pressing these keys, the LED must illuminate continuously confirming that the controlling is possible.
Step 3 Now you can adjust the chosen analog function (brightness or colour) by pressing the (Volume +) and (Volume -) keys.
Step 4 To quit the analog function mode just wait 10 seconds or press the (F) key.
Controlling (Programme +) and (Programme -)
With some, especially older, TV models it may be not possible to switch channels by pressing the (Programme +) and (Programme -) keys. Check the manufacturers operating manual or the original remote of your TV if it supports this function.
In case it does not, the easytip Z3 has an alternative channel select function. It simulates the channel switch function.
Step 1 Press and hold the (F) key until the LED flashes twice.
Step 2 Enter the code 1122 (within 5 seconds). The LED will flash twice to confirm correct input.
You can now switch the channels by pressing the (Programme +) and (Programme -) keys.
If your remote does not work properly with these functions, maybe the wrong code was programmed. If so try the other codes in the code list or run the automatic code search mode.
To deactivate this mode, repeat the two steps above, but enter 1121 instead of 1122.
Controlling (Volume +) and (Volume -)
Since it is not always possible to adjust the volume at your SAT receiver or video recorder, your easytip Z3 always provides the (Volume +) and (Volume -) and Mute functions of your TV, even if you are in the SAT or VCR mode, therefore you don't have to switch between TV, VCR and SAT mode to adjust the volume.
The customer HELPLINE is there to assist you, however, to save making wasted calls most common questions and problems have been addressed in the manual. We strongly recommend you familiarise yourself with the operation of the remote by reading this manual in detail.
Troubleshooting
- LED not illuminating
Check installation of batteries.
Check battery life and replace if necessary.
- TV will not go into standby mode
Wrong code selected.
Search mode not completed.
The unit may not be compatible with your brand/type of TV or your TV is no longer supported because of increasing age. (If in doubt check with the Helpline)
Programme + or - not working
Wrong code selected or not supported by the TV.
AV Key not working
Wrong code selected or not supported by the TV.
- Your TV is not listed
It may still work, try the Search facility.
- Why do some functions work on some codes and then do not on another?
This is because the remote simulates functions from the original item. For example, some of the codes may support Teletext as per the original, however, some original remotes did not have this feature so under certain codes, the Z3 will not support this feature either. If this happens then try the next code in the list
- I found a code which puts my TV in standby mode but some of the functions aren't working correctly
You have found a code which is partially compatible with your TV, this could happen even when using specific code numbers against your particular brand, if so, move to the next code in the list and try again.
I have run through the Search Mode for at least 15 minutes, but my TV/SAT/VCR has not responded at all!
It is very likely that your TV/SAT/VCR is one of the few models that are not compatible with the Easytip Z3.
Please contact our helpline to find out if we can offer an alternative solution.
Bedienungsanleitung
1. Innan programming
Stop VCR: Stop Play, Stop Fast Rewind, Stop Fast Forward, Stop Recording

(OK/Norm) for 3. siffer (ti)
(Volume +) for 4. siffer (en)
Stop Stop:Video: Stop play, stop rewind, stop fast forward, stop record.

1 = (Programm+)
2 = (Volume-)
3 = (OK/Norm)
4 = (Volume +)
5 = (Programm -)
Programm + = 1

Paso 5 (Para TVy SAT)