VARDESATTA - Saucepan IKEA - Free user manual and instructions
Find the device manual for free VARDESATTA IKEA in PDF.
| Product type | Pressure cooker (pressure saucepan) |
| Brand | IKEA |
| Model | VARDESATTA (ref. 00286743, 50286745) |
| Usable capacity | 6 liters or 4 liters depending on model |
| Operating pressure | 0.6 bar (mode 1) / 1.0 bar (mode 2) |
| Steam release pressure | 260 kPa |
| Compatibility | All hob types, including induction |
| Material | Stainless steel |
| Safety | Safety valve, pressure regulator, lock, additional valve |
| Cleaning | Hand wash; lid not dishwasher safe |
| Seal maintenance | Replacement recommended once a year |
| Spare parts available | Seal, pressure regulator, safety valve, key |
| Certifications | GS, CE conformity (97/23/EC) |
| Minimum liquid capacity | 0.25 liter |
| Maximum fill mark | 2/3 of the pot (MAX); 1/2 for foods that swell |
Frequently Asked Questions - VARDESATTA IKEA
User questions about VARDESATTA IKEA
0 question about this device. Answer the ones you know or ask your own.
Ask a new question about this device
Download the instructions for your Saucepan in PDF format for free! Find your manual VARDESATTA - IKEA and take your electronic device back in hand. On this page are published all the documents necessary for the use of your device. VARDESATTA by IKEA.
USER MANUAL VARDESATTA IKEA
Design and Quality
IKEA of Sweden


ENGLISH 4
DEUTSCH 15
FRANÇAIS 26
NEDERLANDS 37
DANSK 48
ISLENSKA 59
NORSK 70
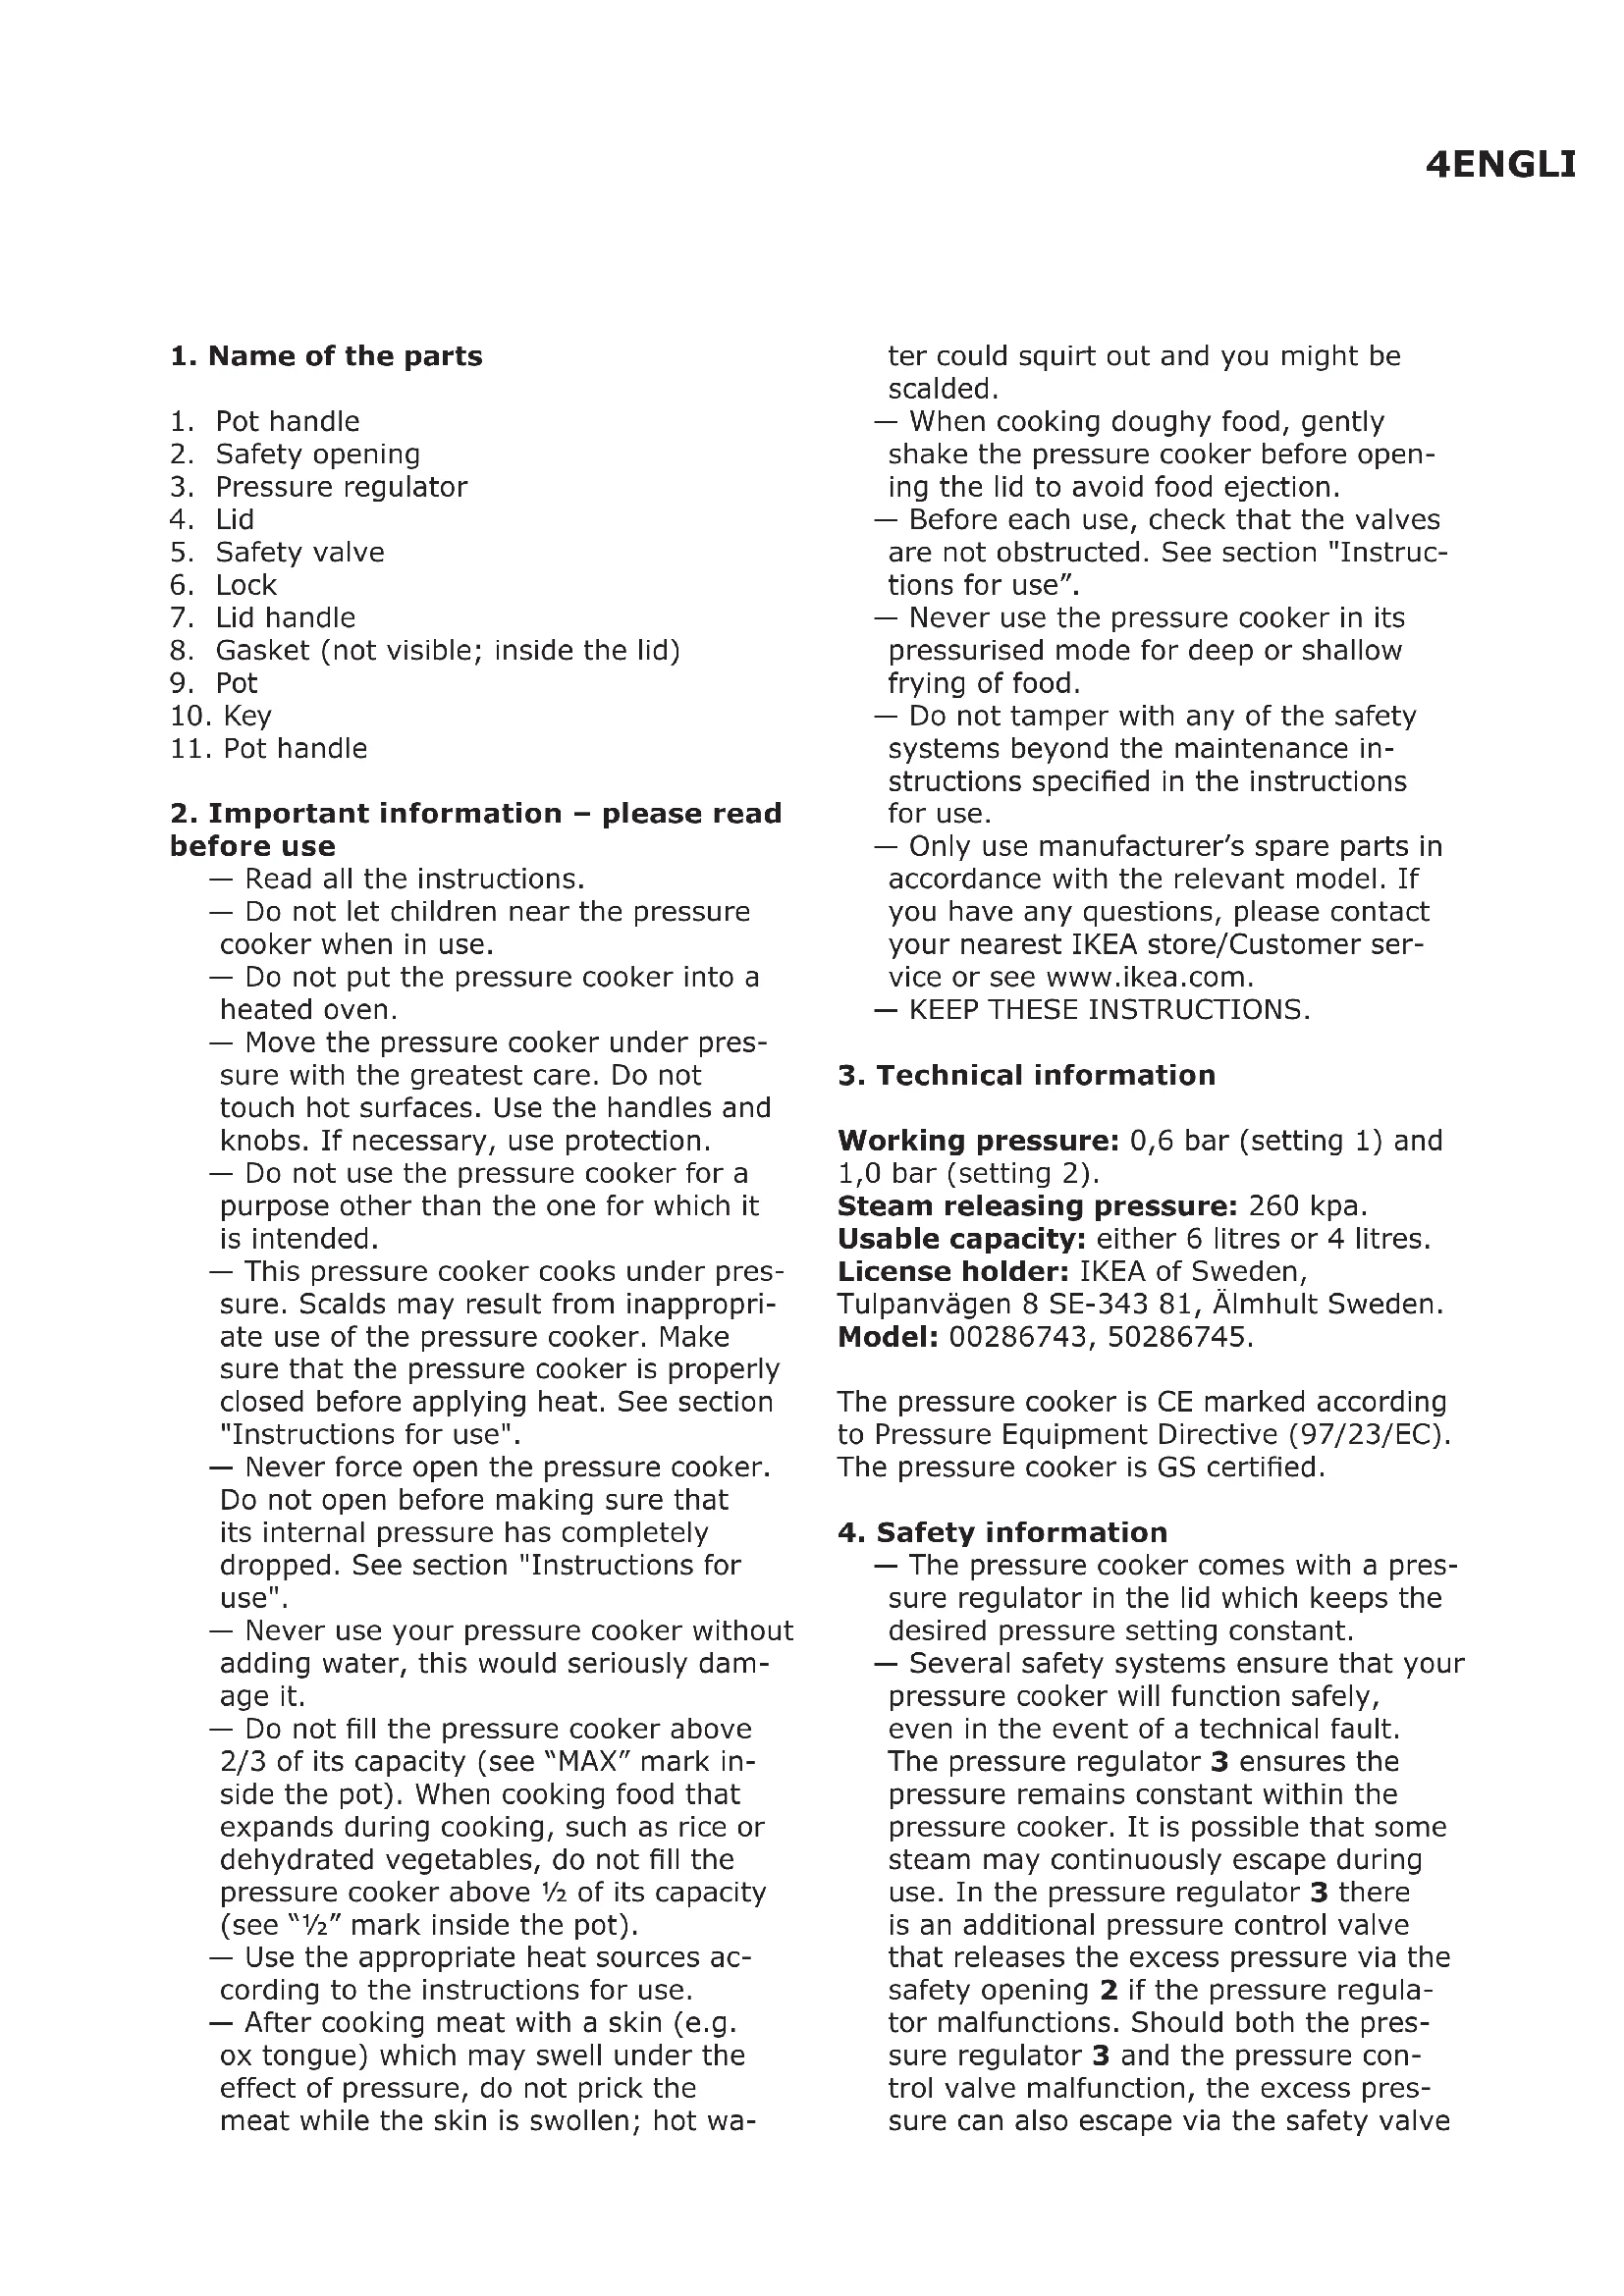
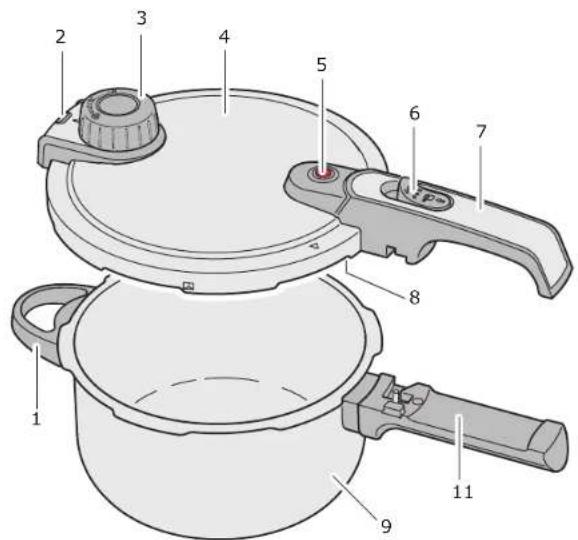
1. Name of the parts
- Pot handle
- Safety opening
- Pressure regulator
- Lid
- Safety valve
- Lock
- Lid handle
- Gasket (not visible; inside the lid)
- Pot
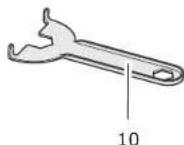
- Key
- Pot handle
2. Important information - please read before use
- Read all the instructions.
- Do not let children near the pressure cooker when in use.
- Do not put the pressure cooker into a heated oven.
Move the pressure cooker under pressure with the greatest care. Do not touch hot surfaces. Use the handles and knobs. If necessary, use protection. - Do not use the pressure cooker for a purpose other than the one for which it is intended.
- This pressure cooker cooks under pressure. Scalds may result from inappropriate use of the pressure cooker. Make sure that the pressure cooker is properly closed before applying heat. See section "Instructions for use".
- Never force open the pressure cooker. Do not open before making sure that its internal pressure has completely dropped. See section "Instructions for use".
- Never use your pressure cooker without adding water, this would seriously damage it.
- Do not fill the pressure cooker above 2/3 of its capacity (see "MAX" mark inside the pot). When cooking food that expands during cooking, such as rice or dehydrated vegetables, do not fill the pressure cooker above 12 of its capacity (see "1/2" mark inside the pot).
- Use the appropriate heat sources according to the instructions for use.
After cooking meat with a skin (e.g. ox tongue) which may swell under the effect of pressure, do not prick the meat while the skin is swollen; hot wa
ter could squirt out and you might be scalded.
- When cooking doughy food, gently shake the pressure cooker before opening the lid to avoid food ejection.
Before each use, check that the valves are not obstructed. See section "Instructions for use". - Never use the pressure cooker in its pressurised mode for deep or shallow frying of food.
- Do not tamper with any of the safety systems beyond the maintenance instructions specified in the instructions for use.
- Only use manufacturer's spare parts in accordance with the relevant model. If you have any questions, please contact your nearest IKEA store/Customer service or see www.ikea.com.
- KEEP THESE INSTRUCTIONS.
3. Technical information
Working pressure: 0,6 bar (setting 1) and 1,0 bar (setting 2).
Steam releasing pressure: 260 kpa.
Usable capacity: either 6 litres or 4 litres.
License holder: IKEA of Sweden, Tulpanvagen 8 SE-343 81, Almhult Sweden.
Model: 00286743, 50286745.
The pressure cooker is CE marked according to Pressure Equipment Directive (97/23/EC). The pressure cooker is GS certified.
4. Safety information
The pressure cooker comes with a pressure regulator in the lid which keeps the desired pressure setting constant.
Several safety systems ensure that your pressure cooker will function safely, even in the event of a technical fault. The pressure regulator 3 ensures the pressure remains constant within the pressure cooker. It is possible that some steam may continuously escape during use. In the pressure regulator 3 there is an additional pressure control valve that releases the excess pressure via the safety opening 2 if the pressure regulator malfunctions. Should both the pressure regulator 3 and the pressure control valve malfunction, the excess pressure can also escape via the safety valve
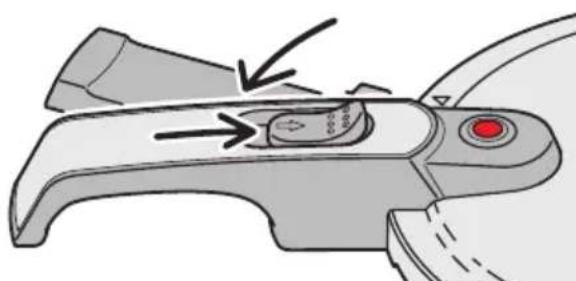
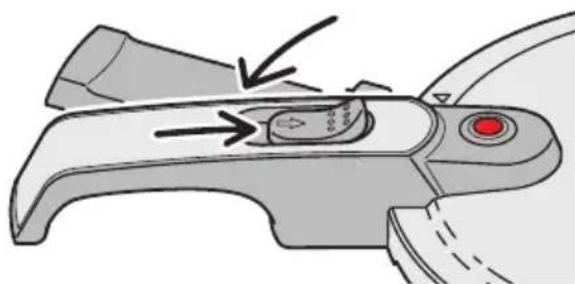
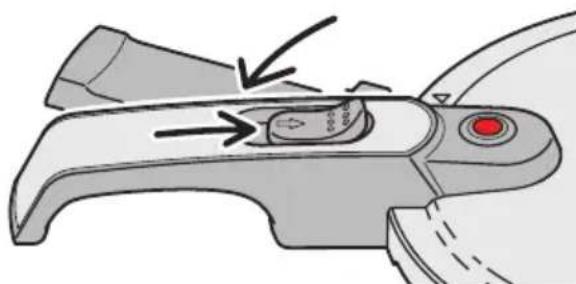
- The lock 6 can only be slid forwards to open the pot when the pressure has been equalised and the red safety valve 5 drops down as a result.
General safety advice
- Be sure to check before every use that the pressure regulator 3 and the safety valve 5 are manoeuvrable and not blocked up (see section "Instructions for use").
- Always ensure that the pressure cooker is closed correctly before putting it on the hob (see section "Instructions for use").
The pressure regulator 3 should never be covered by any objects.
Always ensure the safety opening 2 is facing away from you during use and that it is not facing where others may pass by. In the event of a fault, a lot of steam will escape.
Should steam escape from the safety valve 5 or the safety opening 2, immediately turn off the heat supply as the pressure inside the pressure cooker is too high. Do not continue to use the pressure cooker until the problem has been corrected (see section "Troubleshooting"). - To avoid damaging the pressure cooker, you should ensure that the pot always contains at least 0.25 litres of liquid, so that sufficient steam can be produced and the pressure cooker doesn't overheat and boil dry.
- WARNING: Repairs to the pressure cooker may only be made by an authorised professional.
Good to know
The pressure cooker is suitable for use on all types of hobs, including induction hobs.
The pressure cooker can be used as a traditional pot (without the lid) to brown food before pressure cooking.
- By placing the pressure cooker on a hob with the same or a smaller diameter you can save energy.
- Always lift the pressure cooker when moving it on a glass ceramic hob to avoid the risk of scratching the hob.
— Bear in mind that the pressure cooker
gets hot during use. Always handle with pot holders.
- Never let the pressure cooker boil dry, this would seriously damage it.
The pressure cooker is designed exclusively for cooking, not for storing food. Food that is stored in the pressure cooker for a longer period may affect the surface and take on the taste of metal. - When the pressure cooker is used on a gas hob make certain the flames do not touch the handles.
5. Instructions for use
Before each use
Before cooking with the pressure cooker, you should check all the safety functions to avoid causing any damage to the pressure cooker.
- Check that the openings for the pressure regulator 3 on the inside of the lid are clean.
- Should this not be the case, clean the pressure regulator 3 (see section "Cleaning and storing").
- Check that the safety valve 5 is movable and not stuck.
- Check that the gasket 8 is not damaged in any way, i.e. that it is not split.
Note! Over time the gasket can become hard and will therefore no longer provide an air-tight seal. This will lead to steam escaping from the rim of the lid and the gasket will therefore require replacing. For replacement gaskets, please contact your nearest IKEA Store/ Customer service or visit www.ikea.com.
How to use the pressure cooker
- Fill the pot with food and/or liquid.
Caution! Never fill the pressure cooker with food and liquid above the "MAX" mark on the inside of the pot. This corresponds to a maximum of 4 litres (for pressure cooker with usable capacity of 6 litres) and maximum of 2,5 litres (for pressure cooker with usable capacity of 4 litres). When cooking food that swells, such as rice or pulses, you should never fill the pot above the 1/2 mark on the inside of the pot. This will prevent the food from reaching the lid and potentially blocking the safety valve.
- Place the lid 4 on the pot 9 in such a way that the triangular mark on the lid is pointing to the stud on the pot handle 11.
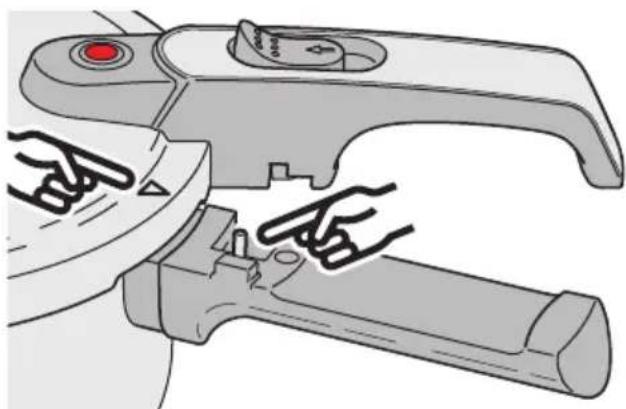
- Turn the lid until the lid handle 7 and the pot handle 11 are aligned and audiably click into place.
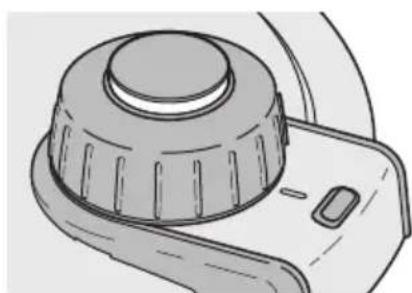
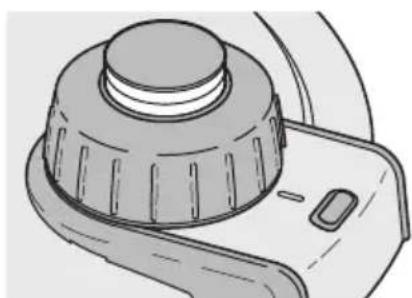
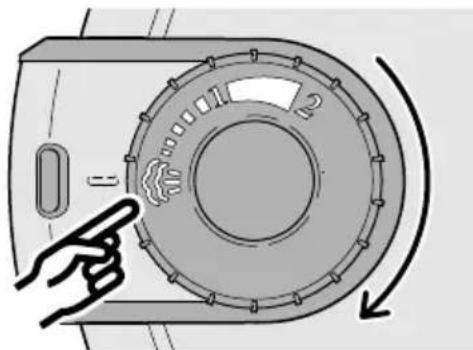
- Choose the desired cooking setting on the pressure regulator 3:
1; Slow cooking: the pressure regulator will display a white ring.
2; Fast cooking: the pressure regulator will display two white rings.
- Place the pressure cooker on a hob which is a similar size to the base of the pressure cooker. Caution! The hob should not be bigger than the base of the pressure cooker. Otherwise this could lead to too much heat rising up
the sides of the base, thereby damaging the plastic handles.
- Turn the hob onto the highest setting. As soon as there is pressure in the pressure cooker, the red safety valve 5 will move upwards thereby locking the lid.
Note! At the beginning of the cooking time, a little steam may emerge from the safety valve.
- As soon as steam starts to come out of the pressure regulator 3, lower the temperature of the hob to around 1 / 2 so that only a small amount of steam comes out. If you have chosen "setting 2^ for fast cooking and there are two white rings displayed on the pressure regulator 3 and little steam coming out, the pressure cooker is cooking food quickly and saving energy.
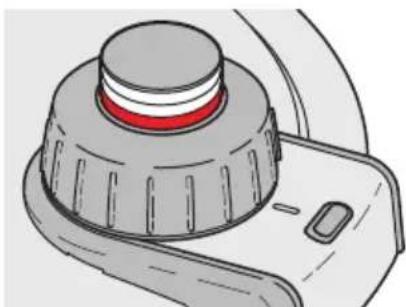
Warning! If the red ring is displayed on the pressure regulator 3 when cooking, the pressure is too high and you must lower the setting on the hob.
Opening the pressure cooker
Caution! If the red safety valve 5 is still raised, the pressure cooker is still pressurised and the lid cannot be opened. Under no circumstances should you attempt to force the lid open, as the sudden release of pressure could result in scalding. The pressure cooker will only open once the red safety valve 5 has dropped down. This can be done either of three ways.
Never entirely immerse the pressure cooker in water. Otherwise the pressure will instantly drop which can lead to the base as well as the food being ruined.
Three ways to open the pressure cooker
There are three methods to reduce pressure in the pressure cooker in order to be able to open it;
Method 1: Releasing steam
This method requires releasing as much steam as possible until the pressure in the pressure cooker has decreased enough to be able to remove the lid.
Warning! Ensure that the safety opening 2 is facing away from you when you open the pressure cooker as this method means that hot steam will escape from the pressure regulator. You should therefore be careful not to scald yourself.
- Remove the pressure cooker from the hob.
- Turn the pressure regulator 3 to the steam releasing setting.
- Wait until the pressure has equalised and the red safety valve 5 falls back down. Note! As soon as the red safety valve 5 falls back down, the temperature inside the pressure cooker is still almost 100^ .
- Slide the lock 6 forwards and turn the lid anticlockwise at the same time, until the triangular mark on the lid is pointing to the stud on the pot handle 11.
Note! As soon as you slide the lock 6 forwards, some residual steam may escape.
- Remove the lid from the pot.
Method 2: Saving energy
Method 2 requires the pressure cooker to be turned off a few minutes before the food has finished cooking, leaving the pressure cooker on the hob. This uses the residual heat optimally and saves energy.
- Wait until the pressure has stabilised and the red safety valve 5 drops down.
Note! When the safety valve 5 drops down, the temperature inside the pressure cooker is still around 100^ .
- Slide the lock 6 forwards and turn the lid anticlockwise at the same time, until the triangular mark on the lid is pointing to the stud on the pot handle 11.
Note: As soon as you slide the lock 6 forwards, some residual steam may escape.
- Remove the lid from the pot.
Method 3: Saving time
Method 3 requires you to remove the pressure cooker from the hob once the food has finished cooking. In order to be able to open the lid straight away, the pressure in the base has to be released manually. This method in particular saves time.
- Hold the pressure cooker under running water until the safety valve 5 drops down (the pressure of the water should not be too high). Caution! Take care to prevent the water jet from hitting the pressure regulator 3 or the safety valve 5, as water might otherwise get inside the pot and dilute your food.
- Slide the lock 6 forwards and turn the lid anticlockwise at the same time, until the triangular mark on the lid is pointing to the stud on the pot handle 11.
Note: As soon as you slide the lock 6 forwards, some residual steam may escape.
- Remove the lid from the pot.
6. Cleaning and storing
Your pressure cooker is easy to clean and maintain. In order to enjoy your pressure cooker for a long time, please ensure you always observe the following cleaning instructions.
Frequency of cleaning:
Activity Frequency
| Clean pot 9 | After each use |
| Clean pressure regulator 3 | When dirty |
| Clean lid 4 | After each use |
| Clean gasket 8 | After each use |
| Replace gasket 8 | When needed. Contact your nearest IKEA store/ Customer service or visit www.ikea.com for support. |
How to clean the pressure cooker
Always wash the pressure cooker after use.
The pressure cooker should always be washed by hand.
- Do not use steel wool or anything that may scratch the surface.
If possible you should clean the pressure cooker directly after use so that any leftovers do not dry and stick to the pot.
How to clean the pot (9)
Clean the pot 9 after each use:
- Wash the pot by hand with hot water and a mild detergent.
- Rinse with clean water.
- Dry the pot with a tea towel to avoid any water marks.
How to clean the pressure regulator (3)
- Unscrew the union nut for the pressure regulator 3 by turning it in an anticlockwise direction. Use the key 10 supplied for this purpose.
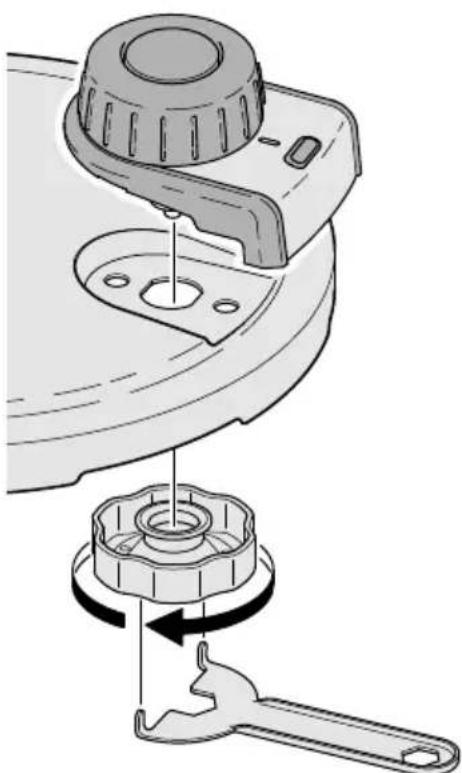
- Lift the pressure regulator 3 up and out.
- Rinse the pressure regulator with hot water. Note! You can also use a small amount of mild detergent and a very soft brush if necessary.
- Clean the lid (see section below).
- Re-insert the pressure regulator into the lid.
- Tighten the union nut for the pressure regulator 3 by screwing it in a clockwise direction. Use the key 10 supplied for this purpose.
Note! If steam is escaping from the safety opening 2 after the pressure regulator 3 has been fitted, check:
-
Whether the union nut for the pressure regulator 3 is properly tightened - the union nut should be tightened firmly by hand using the key 10.
-
Whether the three protective caps in the pressure regulator are defective or not properly fitted - unscrew the pressure regulator and check the fit and integrity of the protective caps.
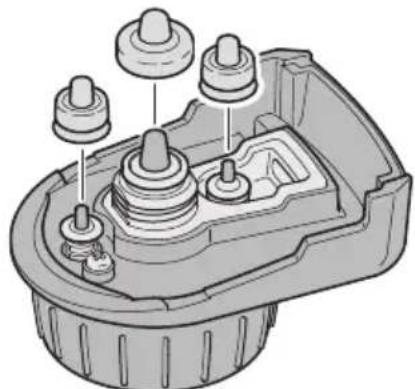
If none of the above measures successfully remedies the malfunction, please contact your nearest IKEA store/Customer service or see www.ikea.com for support.
How to clean the safety valve (5)
- Unscrew the fastening bolt for the safety valve 5 by turning it in an anticlockwise direction. Use the key 10 supplied for this purpose.
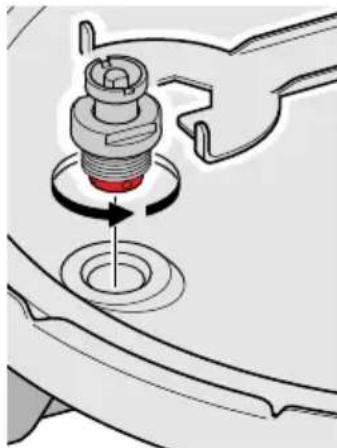
- Lift the safety valve 5 up and out.
- Rinse the safety valve with hot water. Note! You can also use a small amount of mild detergent and a very soft brush if necessary.
- Clean the lid (see section below).
- Re-insert the safety valve into the lid.
- Tighten the fastening bolt for the safety valve 5 by screwing it in a clockwise direction. Use the key 10 supplied for this purpose.
How to clean the lid (4)
Caution! The lid should not be washed in the dishwasher.
- Wash the lid with hot water and a mild detergent. If the lid is particularly dirty, soak it for a little while in water and a mild detergent.
- Rinse the lid under hot water.
- Dry the lid with a tea towel to avoid any water marks.
How to clean the gasket (8)
Note! The gasket should be replaced once a year if you use the pressure cooker regularly. Please contact your nearest IKEA store/ Customer service or see www.ikea.com for support.
- Remove the gasket from the lid.
- Rinse the gasket in clean, hot water.
- Dry the gasket with a tea towel.
Note! The gasket should not be squashed or deformed during storage. It is therefore advisable to place the gasket back into the lid during storage.
Storing the pressure cooker
Caution! The pressure cooker should never be stored with the lid on. If there is no ventilation then condensation may develop which could lead to a build up of bad smells and may even damage the pressure cooker.
- Store the gasket in the lid.
- Store the pot and the lid separately
7. Troubleshooting
Warning! As soon as uncontrolled steam emerges, remove the pressure cooker from the hob. The pressure cooker is not to be used again until the error has been corrected. Only a slight emergence of steam from the pressure regulator 3 is normal.
What to do if:
Problem Possible cause Solution
| Steam is escaping from between the lid and the pot. | 1. Pressure cooker not closed correctly. 2. Gasket is dirty. 3. Gasket is broken/worn away | 1. Close the pressure cooker again correctly. 2. Clean the gasket. 3. Replace the gasket (1 x year). |
| No steam is coming from the pressure regulator. | 1. Steam is escaping from between the lid and the pot. 2. Pressure regulator is dirty. 3. Not enough liquid in the pressure cooker. 4. Heat supply too low. | 1. Replace the gasket (1 x year). 2. Clean the pressure regulator (see section “Cleaning and storing”). 3. Slowly cool down the pressure cooker and fill with at least 0.25 l liquid. 4. Increase the heat supply (turn the hob to a higher setting). |
| Too much steam is coming from the pressure regulator. | 1. Heat supply too high. 2. Pressure regulator is dirty. | 1. Decrease the heat supply (turn the hob to a lower setting). 2. Clean the pressure regulator (see section “Cleaning and storing”). |
| Steam is escaping from the sides of the pressure regulator. | The pressure regulator is not correctly fitted. | Fit the pressure regulator correctly and tighten the union nut on the inside of the lid using the key 10. |
| Steam is escaping from the safety opening. | 1. The protective caps in the pressure regulator are defective or not properly fitted. 2. The pressure regulator is soiled. 3. The pressure regulator is defective. | 1. Check the safety caps (see section “Cleaning and storing”). 2. Clean the pressure regulator (see section “Cleaning and storing”). 3. Contact your nearest IKEA store/Customer service or see www.ikea.com for support. |
| The lid does not open. There is too much pressure in the pressure cooker. | Follow the instructions in section “Opening the pressure cooker”. | |
| The pressure regulator is displaying a red ring underneath the two white rings. | 1. The pressure in the pressure cooker is too high because the heat supply is too high. 2. The pressure regulator is soiled, defective or not correctly fitted. | 1. Reduce the heat supply (turn the hob to a lower setting). 2. Clean the pressure regulator, check whether it is fitted correctly. |
8. Table of cooking times
Food Cooking time Cooking level
| Fish and seafood | ||
| Fishsoup | 16 min | 2 |
| Clams | 2-4 min | 2 |
| Tuna | 4-5 min | 2 |
| Squid | 6-10 min | 2 |
| Conger | 8 min | 2 |
| Lobster | 5-10 min | 2 |
| Prawns | 4-6 min | 2 |
| Sole | 3-7 min | 2 |
| Codfish | 4-8 min | 2 |
| Mussels | 2-3 min | 2 |
| Hake (frozen) | 3-6 min | 2 |
| Hake (fresh) | 3-4 min | 2 |
| Angler fish | 5-8 min | 2 |
| Trout | 4-7 min | 2 |
| Salmon | 5-8 min | 2 |
Food Cooking time Cooking level
| Fruit | ||
| Apricots | 1-4 min | 1 |
| Cherries | 1-2 min | 1 |
| Prunes | 1-3 min | 1 |
| Apples | 2-5 min | 1 |
| Peaches | 2-5 min | 1 |
| Oranges | 4-7 min | 1 |
| Pears | 4-6 min | 1 |
Food Cooking time Cooking level
| Meat | ||
| Knuckle of pork | 30-40 min | 2 |
| Mutton | 15 min | 2 |
| Veal, Schnitzel | 6 min | 2 |
| Rabbit | 15-20 min | 2 |
| Roast beef | 20-25 min | 2 |
| Ham, fried | 20-25 min | 2 |
| Ham, boiled | 30-35 min | 2 |
| Roast pork | 25-30 min | 2 |
| Ox tongue, fresh or smoked | 50-60 min | 2 |
| Pork chop | 10-12 min | 2 |
| Pig's trotters | 25-30 min | 2 |
| Pork loin | 12-16 min | 2 |
| Stewed lamb | 10-14 min | 2 |
| Leg of lamb | 15-20 min | 2 |
| Roast veal | 15-20 min | 2 |
| Stewed veal | 15-20 min | 2 |
| Veal liver | 6-10 min | 2 |
| Veal tongue | 20-25 min | 2 |
Food Cooking time Cooking level
| Poultry and game | ||
| Quail | 10-15 min | 2 |
| Wild rabbit | 20-25 min | 2 |
| Pheasant | 10-15 min | 2 |
| Hare | 25-28 min | 2 |
| Duck | 20-25 min | 2 |
| Turkey | 20-25 min | 2 |
| Partridge | 14-18 min | 2 |
| Pigeon | 12-15 min | 2 |
| Chicken (depending on size and weight) | 20-25 min | 2 |
Food Cooking time Cooking level
| Pulses | ||
| Beans (pre-soaked) | 15-20 min | 1 |
| Peas (not pre-soaked) | 20-25 min | 1 |
| Peas (pre-soaked) | 10-15 min | 1 |
| Peas, green (pre-soaked) | 20-25 min | 1 |
| Lentils (not pre-soaked) | 15-20 min | 1 |
| Lentils (pre-soaked) | 8-10 min | 1 |
| Broad beans | 5-8 min | 1 |
| Chickpeas | 20-27 min | 1 |
Food Cooking time Cooking level
| Soups | ||
| Bean soup (pre-soaked) | 15-20 min | 1 |
| Pea soup (not pre-soaked) | 20-25 min | 1 |
| Pea soup (pre-soaked) | 10-15 min | 1 |
| Vegetable soup | 4-8 min | 1 |
| Pearl barley | 18-20 min | 1 |
| Semolina | 3-5 min | 1 |
| Goulash | 15-20 min | 1 |
| Porridge | 3-4 min | 1 |
| Potato soup | 5-6 min | 1 |
| Bone broth | 20-25 min | 1 |
| Lentils (not pre-soaked) | 15-20 min | 1 |
| Lentils (pre-soaked) | 8-10 min | 1 |
| Minestrone | 6-8 min | 1 |
| Pot-au-Feu | 20-25 min | 1 |
| Beef bouillon (depending on quantity of meat) | 35-40 min (depending of quantity of meat) | 1 |
| Stewing hen | 25-30 min (depending on size and age) | 1 |
| Pasta soup | 3-5 min | 1 |
| Tomato soup | 8-10 min | 1 |
| Onion soup | 2-3 min | 1 |
| Fish soup | 8-10 min | 1 |
Food Cooking time Cooking level
| Vegetables | ||
| Cauliflower | 4-6 min | 1 |
| Cauliflower, whole | 6-8 min | 1 |
| Endive | 6-8 min | 1 |
| Carrots | 5-7 min | 1 |
| Potatoes, in skins | 10-15 min | 1 |
| Potatoes, peeled | 6-8 min | 1 |
| Turnip | 4-6 min | 1 |
| Carrots, chopped | 6 min | 1 |
| Peppers | 6-8 min | 1 |
| Mushrooms | 6-8 min | 1 |
| Brussel sprouts | 4-6 min | 1 |
| Beetroot | 15-25 min | 1 |
| Red cabbage, green cabbage, savoy cabbage | 8-10 min | 1 |
| Black salsa | 5-6 min | 1 |
| Celery | 15-25 min | 1 |
| Asparagus | 7-8 min | 1 |
| Tomatoes | 2-3 min | 1 |
| Artichokes | 5-8 min | 1 |
| Pumpkin | 7-9 min | 1 |
| Onion | 5-7 min | 1 |
| Spinach | 3-5 min | 1 |
| Leek | 3-5 min | 1 |
Food Cooking time Cooking level
| Food other | ||
| Rice | 15-20 min | 1 |
| Pasta | 4-6 min | 1 |
De snelkookpan is GS-gecertificated.
Licensindehaver: IKEA of Sweden,
Tulpanvagen 8 SE-343 81, Almhult, Sverige
Model: 00286743, 50286745.