Comfortcam CC104 - Rear Camera TREBS - Free user manual and instructions
Find the device manual for free Comfortcam CC104 TREBS in PDF.
Frequently Asked Questions - Comfortcam CC104 TREBS
Questions des utilisateurs sur Comfortcam CC104 TREBS
0 question sur cet appareil. Repondez a celles que vous connaissez ou posez la votre.
Poser une nouvelle question sur cet appareil
Download the instructions for your Rear Camera in PDF format for free! Find your manual Comfortcam CC104 - TREBS and take your electronic device back in hand. On this page are published all the documents necessary for the use of your device. Comfortcam CC104 by TREBS.
USER MANUAL Comfortcam CC104 TREBS
Declaration of Conformity:
We, Trebs BV, declare under our sole responsibility that this product is in conformity with the essential requirements and other relevant requirements of the R&TTE Directive (1999/5/EC).
The product is compliant with the following standards and/ or other normative documents:
EN 50371:2002
EN 60065:2002 + A1:2006
EN301 489-1 v1.8.1 (2008-04)
EN301 489-3 v1.4.1 (2002-08)
EN300 440 -2 vl. 2.1 (2008-05)
Trebs BV
Thermiekstraat 1
6361 HB Nuth
The Netherlands
Website: www.trebs.nl
email: info@trebs.nl
C∈0168
EU milieubescherming
2.4GHz Wireless Rearview Parking System with Color LCD Monitor
Model No.: CC-104

CONTENTS
- Foreword 1
2.Packing List 1
3.Structure 2
4.Installation 4 - Specifications 9
6.FCC Information 10
*Trebs is not responsible for any damage resulting from installation and use of this product.
*2.4 GHz devices as e.g. cell phones, navigation, bluetooth and Wi-Fi system scan have influence on the performance of this product.
FOREWORD
CONGRATULATIONS. CC-104 is careway system
3.6" TFT-LCD monitor . The system provide you more recognition of backside image display.The Rearview Camera, when used as described, will give you years of dependable service in your car, truck, RV, or mini-van. We have taken numerous measures in quality control to ensure that your product arrives in top condition, and will perform to your satisfaction.
PACKING LIST
①
②
③

④

(5)
⑥

⑦
8
① Rearview Camera: Wired Camera with Night Vision.
② Monitor: 2.4GHz Wireless 3.6 inch TFT-LCD, with 960^*240 resolution
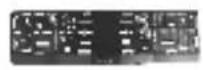
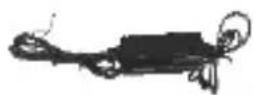
③ Wireless Transmission Box : Connected to wired camera, car power wire. It transmits signals to monitor.
④ Sheet Metal Screws: To install camera.
In-Line Wire Connectors: To expose reverse light wires.
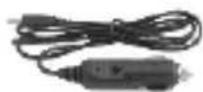
⑥ Power Adapter: +12/+24 Volt Car Power Adapter
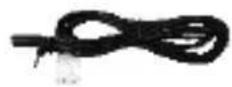
(7) Extension cable power supply voltage mirror
⑧ Connection cable for fixed power supply mirror
STRUCTURE
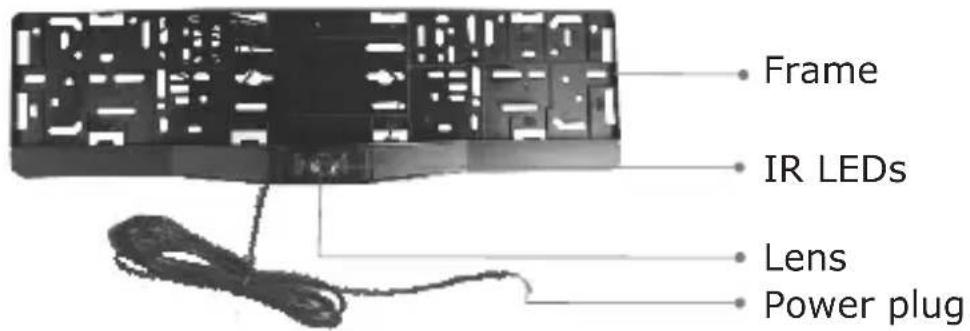
Rearview Camera
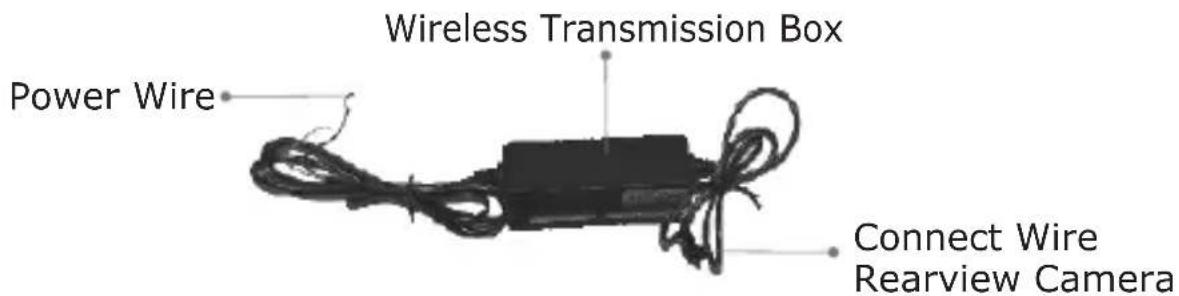
Wireless Transmission Box
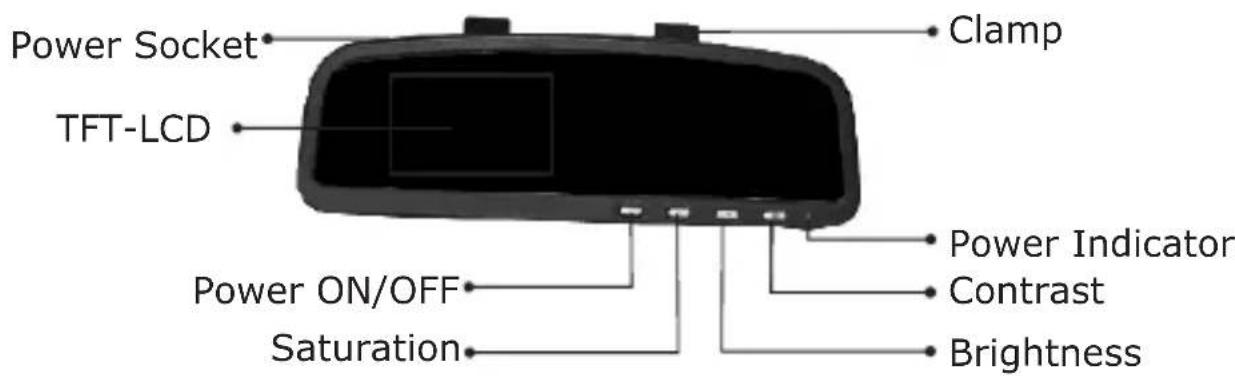
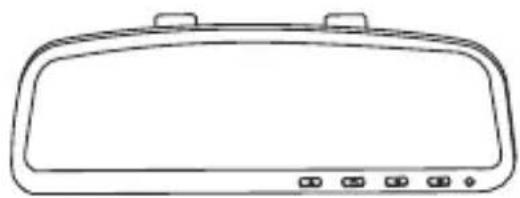
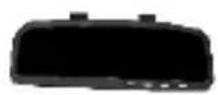
TFT-LCD Monitor
Press the Saturation button and Brightness button of the monitor at the same time to implement mirror image.
Press the Contrast button and Brightness button of the monitor at the same time to restore the originally settings.
Installation
We advise to test the system before installation to prevent any damage on the vehicle. Follow the steps mentioned below precisely to test the system.
1.Insert the 12 Volt connector in the cigarette lighter socket of the vehicle and place the other end of the cable in the monitor. It's also possible to extend the power cable or connect to another 12 Volt terminal with the supplied cables. Note: there should not be 12 volt on this terminal when the ignition switch of the car is off.
2. Search for the reverse light on the back of your car.
3. Guide the wiring of the camera through the inside of the vehicle to the wireless transmitter and secure the cable.
4.Splice the red wire of the Transmission Box power cable to the reverse light'spositive (+) wire of the vehicle.
5.Splice the black wire of the Transmission Box power cable to the reverse light's negative (-) wire of the vehicle.
6. Replace the reverse light bulb, then re-install the light socket. Re-attach the negative battery cable to the battery.
7.Engage the parking brake and turn the ignition key to the ON position. DO NOT start the vehicle. Put the gear shift into reverse.
8. The camera will start broadcasting, and the monitor will detect the signal and turn itself ON. If the monitor does not come ON press the ON/OFF button.
9.If the image does not match your rear view mirror, press the top button on the monitor to change the image until it matches your rear view mirror.
10. When you take the gear shift out of reverse the camera will turn OFF, and the monitor will turn black.
11. When the system works, you can install the camera. Please follow below steps precisely.
INSTALLATION
Installation of the camera:
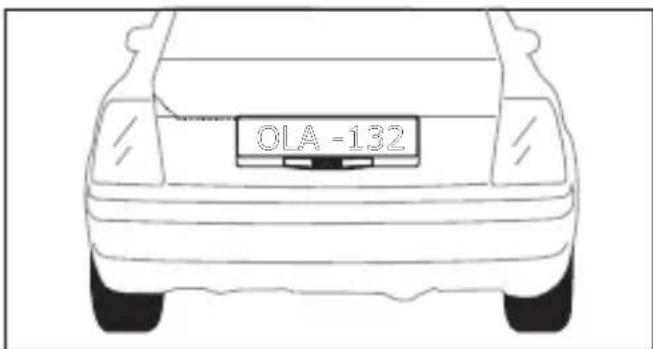
- Loosen the license plate bolt or screw, and then remove the license plate on the rear of your car.
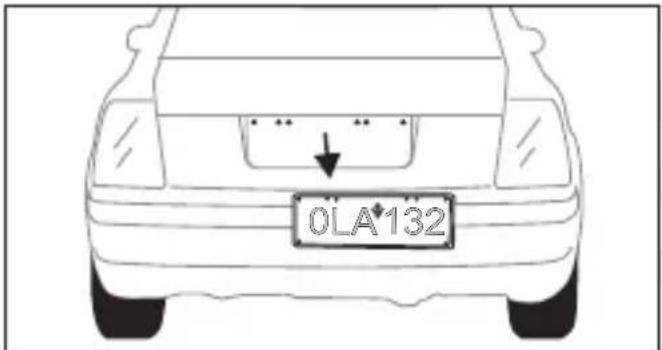
- Drill one hole for power cable in the middle of below license plate, where the camera will exist.
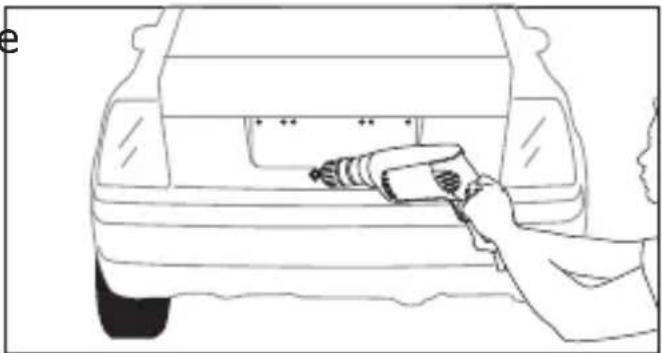
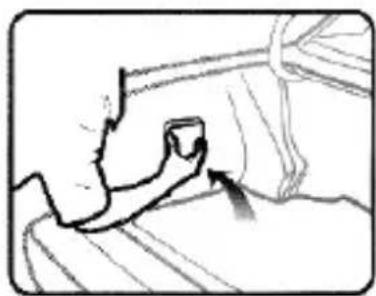
- Install the frame camera with bolt/screw, and adjust the camera to a suitable angle. Tow the power wire into the car through the interstices of the car.
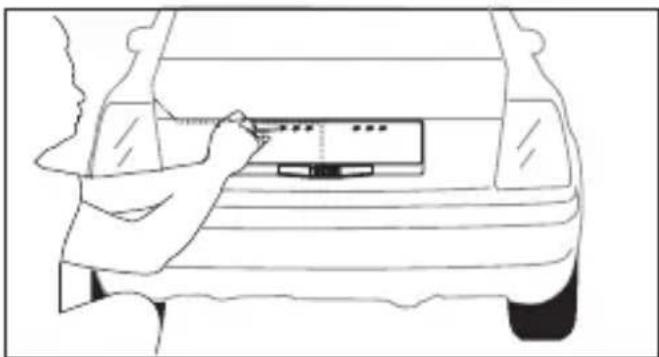
- Install the license plate to the frame.
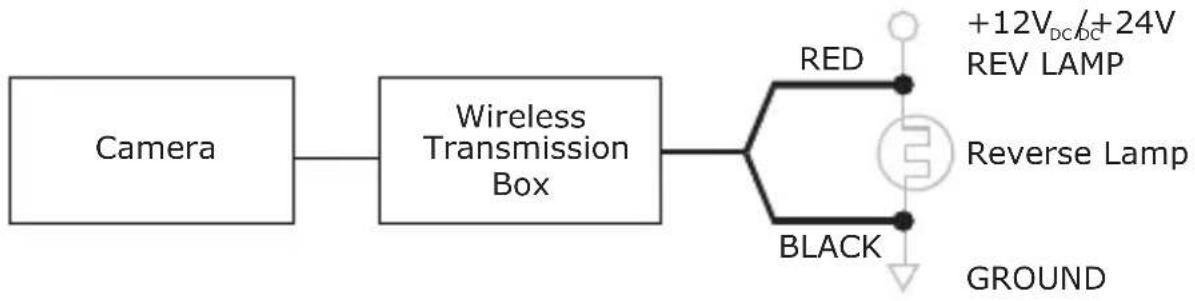
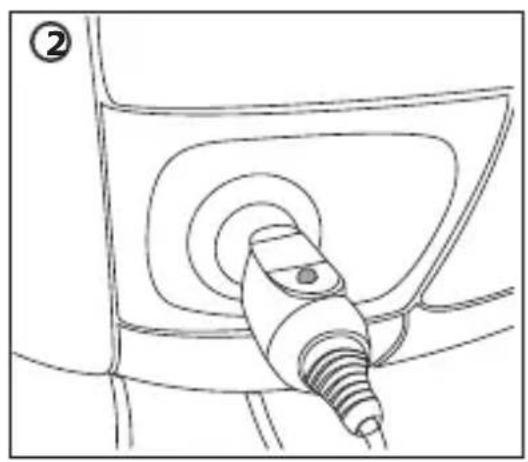
Wireless Transmission Box Installation
1. Wiring Connector Diagram
2. Basic Installation
1) Find proper spaces for install the transmission box.
2) Connect the camera's connector to the wireless transmitter
3) Connect the red wire of the wireless transmitter to the positive power cable of the reversing lamp. Connect the black wire to the negative power cable of the vehicle.
4) In-Line wire connectors instructions
In-Line wire connectors can be used for the connection of the wireless transmitter.
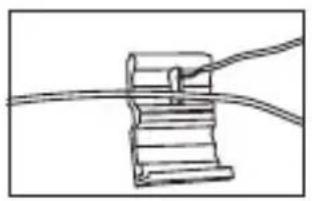
Insert the existing wire to be tapped.
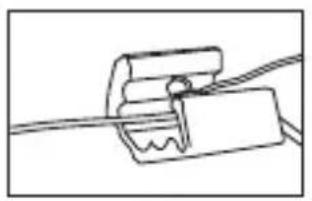
Insert the wire to be attached.
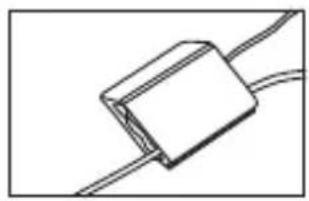
Crimp tap then close lock
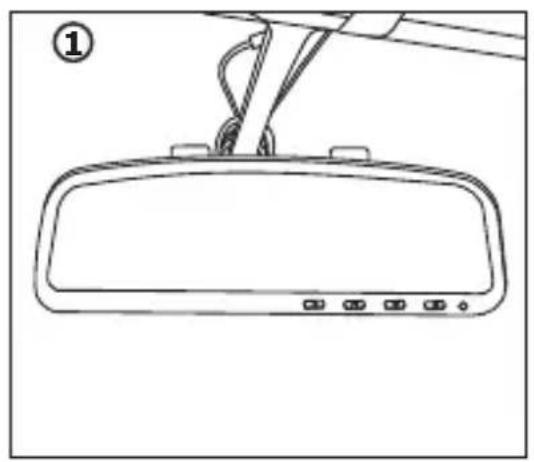
Installation of the monitor:
- Camera is be attached the front rearview mirror instead of the front rearview mirror.
- Connect power of the monitor, there are two methods as following:
A: Search a 12 Volt terminal and connect the supplied power cable to this terminal. The red wire should be connected to the positive voltage connection. The black cable should be connected to the negative voltage connection. Note: there should not be any voltage on this 12 volt connection when the ignition switch of the car is off. This powers off the mirror when the car is turned off.
B: Use the supplied power adapter to supply power to the mirror.
3. Power ON and adjust brightness, contrast, orientation for better image effect.
4. The monitor will be automatically activated when you backup the car. The monitor will be automatically shut when the car goes forward.
Test The System
- Engage the parking brake and turn the ignition key to the ON position.
DO NOT start the vehicle. Put the gear shift into reverse. - The camera will start sending signal, and the monitor will detect the signal and turn itself ON. If the monitor does not come ON press the ON/OFF button.
- When you take the gear shift out of reverse, the camera will automatically turn OFF, and the monitor will shut down.
Route all wire behind interior panels or under carpeting so they are hidden.
Use supplied cable ties to neatly gather any excess wire.
Keep camera lens and minotor clean to ensure optimum picture quality.
SPECIFICATIONS
| Items | CC-104 | |
| Camera | Imaging Sensor | CMOS |
| Total Pixels | 720×480(NTSC) 720×576(PAL) | |
| Horizontal View Angle | 80 degree | |
| Transmission Power | 2mW/FCC,10wm/CE | |
| Minimum Illumination | 0 Lux (IR ON) | |
| IR Night Range | 4m | |
| Power Supply | Supplied By Transmission Box | |
| Consumption Current(Max.) | 120mA | |
| Dimensions(W D H)×× | 525×148×45(mm) | |
| Weight(about) | 264g | |
| Receiver | LCD Screen Type | 3.6" TFT-LCD |
| Effective Pixels | 960×240 | |
| Video System | NTSC/PAL | |
| Color Configuration | R.G.B.delta | |
| Received Sensitivity | ≤-85dBm | |
| Power Supply Voltage | +12/+24VDC | |
| Consumption Current (Max.) | 280mA | |
| Unobstructed Effective Range(Min.) | 50m | |
| Dimensions(W×D×H) | 240×25×80(mm) | |
| Weight(about) | 266g | |
| Operating Temperature | -10°C - + 50°C / +14°F - +122°F | |
| Operating Humidity(Max.) | 85%RH | |
| Transmission Frequency | ISM 2,400~2,483 MHz |
Actual transmission range may vary according to the weather, location, interference and building construction.
All the specifications are subject to minor change without prior notice.
CAUTIONS
- The apparatus shall not be exposed to dripping or splashing and that no objects filled with liquids, such as vases, shall be placed on the apparatus.
- Turn off the camera/receiver if the system is not in use.
- Do not cut the DC power cable of the apparatus to fit with another power source.
- Attention should be drawn to the environment aspects of battery disposal.
FCC INFORMATION
This device complies with part15 of the FCC Rules. Operation is subject to the following two conditions:
(1) this device may not cause harmful interference,
(2) this device must accept any interference received, including interference that may cause undesired operation.
Changes or modifications not expressly approved by the party responsible for compliance could void the user's authority to operate the equipment.
The graphics included are subject to minor change without notice.
Declaration of Conformity:
We, Trebs BV, declare under our sole responsibility that this product is in conformity with the essential requirements and other relevant requirements of the R&TTE Directive (1999/5/EC). The product is compliant with the following standards and/or other normative documents:
EN 50371:2002
EN 60065:2002+A1:2006
EN301 489-1 v1.8.1 (2008-04)
EN301 489-3 v1.4.1 (2002-08)
EN300 440 -2 vl. 2.1 (2008-05)
Trebs BV
Thermiekstraat 1
6361 HB Nuth
The Netherlands
Website: www.trebs.nl
email: info@trebs.nl
C∈0168
EU Environmental Protection
Waste electrical products should not be disposed of with household waste. Please recycle where facilities exist. Check with your Local Authority or retailer for recycling advice.
TREBS
Benutzerhandbuch
Declaration of Conformity:
We, Trebs BV, declare under our sole responsibility that this product is in conformity with the essential requirements and other relevant requirements of the R&TTE Directive (1999/5/EC). The product is compliant with the following standards and/or other normative documents:
EN 50371:2002
EN 60065:2002 + A1:2006
EN 301 489-1 v1. 8.1 (2008-04)
EN301 489-3 v1.4.1 (2002-08)
EN300 440 -2 vl. 2.1 (2008-05)
Trebs BV
Thermiekstraat 1
6361 HB Nuth
The Netherlands
Website: www.trebs.nl
email: info@trebs.nl
C∈0168
Declaration of Conformity:
We, Trebs BV, declare under our sole responsibility that this product is in conformity with the essential requirements and other relevant requirements of the R&TTE Directive (1999/5/EC). The product is compliant with the following standards and/or other normative documents:
EN 50371:2002
EN 60065:2002 + A1:2006
EN301 489-1 v1. 8.1 (2008-04)
EN301 489-3 v1.4.1 (2002-08)
EN300 440 -2 vl. 2.1 (2008-05)
Trebs BV
Thermiekstraat 1
6361 HB Nuth
The Netherlands
Website: www.trebs.nl
email: info@trebs.nl
C∈0168