FlipOut - Screwdriver Batavia - Free user manual and instructions
Find the device manual for free FlipOut Batavia in PDF.
Frequently Asked Questions - FlipOut Batavia
User questions about FlipOut Batavia
0 question about this device. Answer the ones you know or ask your own.
Ask a new question about this device
Download the instructions for your Screwdriver in PDF format for free! Find your manual FlipOut - Batavia and take your electronic device back in hand. On this page are published all the documents necessary for the use of your device. FlipOut by Batavia.
USER MANUAL FlipOut Batavia
Operating instructions
Gebruiksaanwijzing
Mode d'emploi
Modelnr. BT-TS001
Art.Nr. 7062267
FLIPOUT
7,2V


2
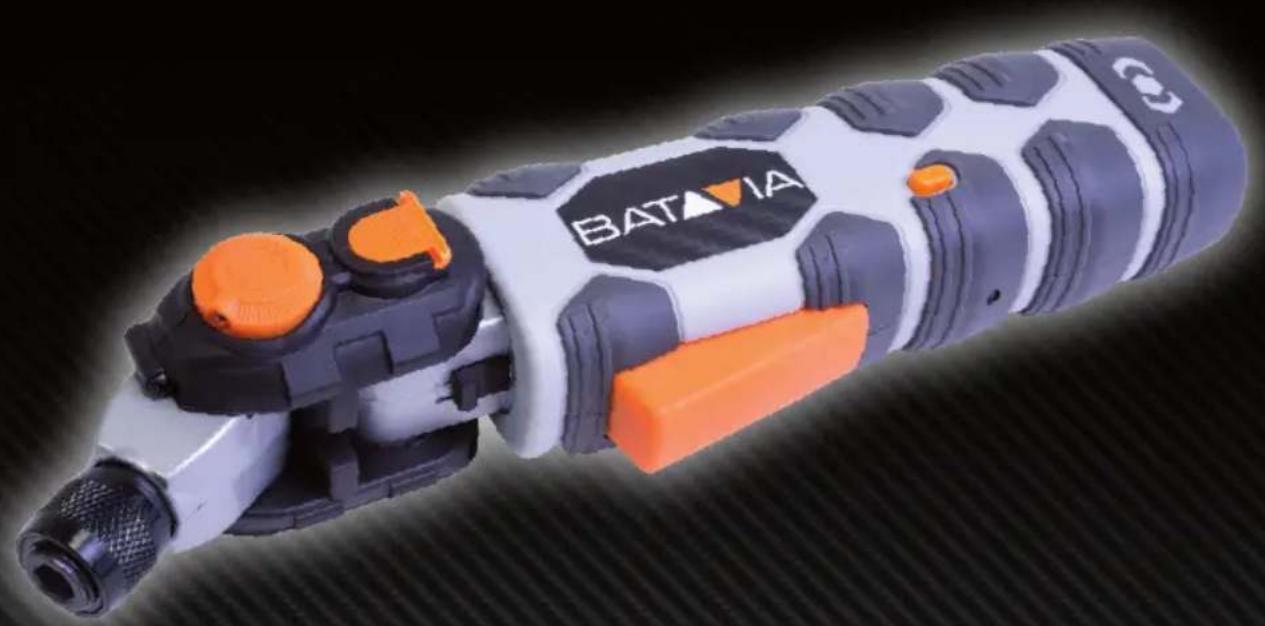
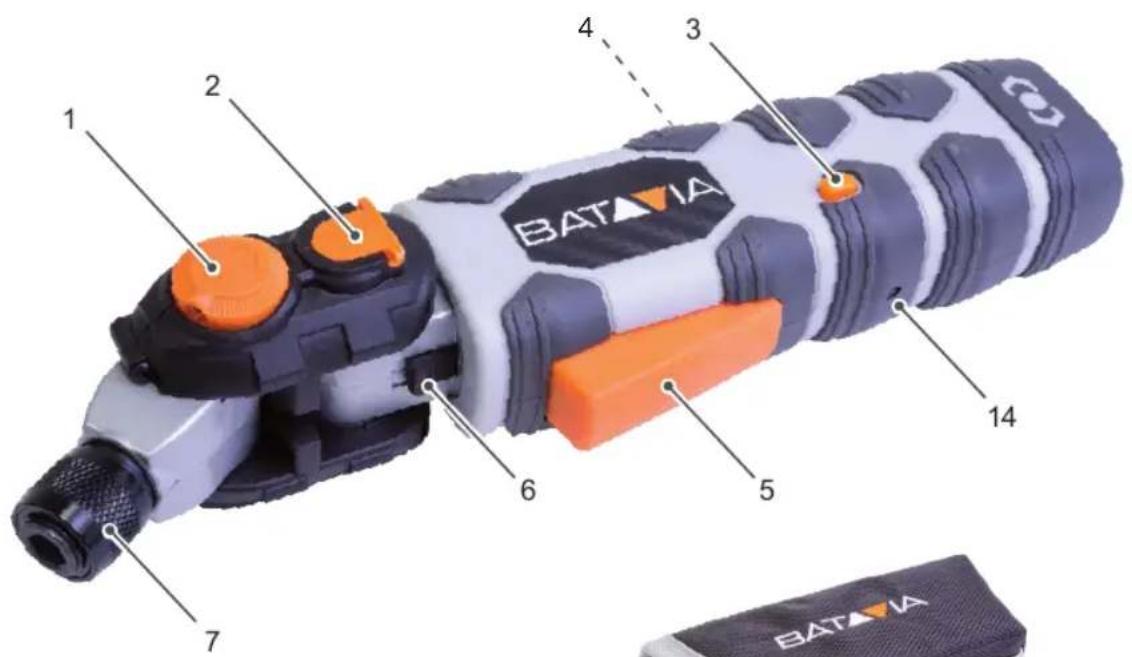
UBERSICHT
- LED worklight
- Battery compartment/battery cover
- Forward/Reverse Switch
- Receptacle
- On / off switch (Trigger switch)
- Switch to rotate the head 360^
- Bit Connector
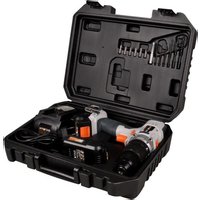
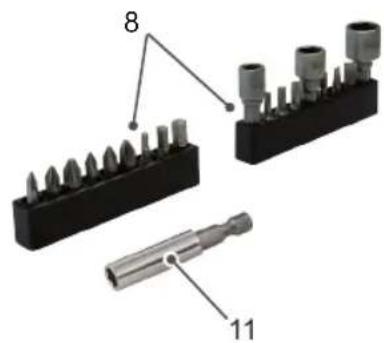
- Accessories
- Holster
- Battery charger
- Bitholder
- Button to change the angle of the connector
- Button to change the angle of the driver head
- Charging indicator LED
APERCU
Safety instructions 11
Operation. 13
Maintenance and Cleaning 14
Technical data 15
EC-Declaration of conformity 15
TABLE DES MATIÈRES
Instruction manuals provide valuable hints for using your new device. They enable you to use all functions, and they help you avoid misunderstandings and prevent damage. Please take the time to read this manual carefully and keep it for future reference.
EXPLANATION OF THE SYMBOLS

Warning! To reduce the risk of injury, the user must read the instruction manual.

Denotes risk of personal injury, loss of life or damage to the tool in case of non-observation of the instructions in this manual.

Electric power tool, protection class II. This sign symbolises that this unit corresponds to Protection Class II. This means that the unit is equipped with either reinforced or double insulation between the mains circuit and output voltage or metal housing respectively.

CE stands for "Conformité Européenne", which means "In accordance with EU Regulations". With the CE marking, the manufacturer confirms that this Electric tool complies with the applicable European directives.
Do not dispose of electric power tools with domestic refuse!
GENERAL SAFETY INSTRUCTIONS FOR POWER TOOLS

WARNING! Read all instructions
WARNING: Always switch off the appliance when non-working.
Failure to follow all instructions listed below may result in electric shock, fire and/or serious injury.
The term "power tool" in all of the warnings listed below refers to your mains operated (corded) power tool or battery operated (cordless) power tool.
Save these instructions for future reference!
-
Work area
a. Keep work area clean and well lit. Cluttered and dark areas invite accidents.
b. Do not operate power tools in explosive atmospheres, such as in the presence of flammable liquids, gasses or dust. Power tools create sparks which may ignite the dust of fumes.
c. Keep children and bystanders away while operating a power tool. Distractions can cause you to lose control. -
Electrical safety
a. Power tool plugs must match the outlet. Never modify the plug in any way. Do not use any adapter plugs which earthed (grounded) power tools. Unmodified plugs and matching outlets will reduce risk of electric shock.
b. Avoid body contact with earthed or grounded surfaces such as pipes, radiators, ranges and refrigerators. There is an increased risk of electric shock if your body is earthed or grounded.
c. Do not expose power tools to rain or wet conditions. Water entering a power tool will increase the risk of electric shock.
d. Do not abuse the cord. Never use the cord for carrying, pulling or unplugging the power tool. Keep cord away from heat, oil, sharp edges or moving parts. Damaged or entangled cords increase the risk of electric shock.
e. When operating a power tool outdoors, use an extension cord suitable for outdoor use. Use of a cord suitable for outdoor use reduces the risk of electric shock.
f. Always use tool in conjunction with a residual circuit breaker device. The use of a residual circuit breaker device reduces the risk of electric shock.
3. Personal safety
a. Stay alert, watch what you are doing and use common sense when operating a power tool. Do not use a power tool while you are tired or under the influence of drugs, alcohol or medication.
English
A moment of inattention while operating power tools may result in serious personal injury.
b. Use safety equipment. Always wear eye protection.
Safety equipment such as dust mask, non-skid safety shoes, hard hat, or hearing protection used for appropriate conditions will reduce personal injuries.
c. Avoid accidental starting. Ensure the switch is in the off position before plugging in.
Carrying power tools with your finger on the switch or plugging in power tools that have the switch on invites accidents.
d. Remove any adjusting key or wrench before turning the power tool on.
A wrench or a key left attached to a rotating part of the power tool may result in personal injury.
e. Do not overreach. Keep proper footing and balance at all times.
This enables better control of the power tool in unexpected situations.
f. Dress properly. Do not wear loose clothing or jewellery. Keep your hair, clothing and gloves away from moving parts.
Loose clothes, jewellery or long hair can be caught in moving parts.
g. If devices are provided for the connection of dust extraction and collection facilities, ensure these are connected and properly used.
The use of these pieces of equipment reduce hazards caused by dust.
- Power tool use and care
a. Do not force the power tool. Use the correct power tool for your application. The correct power tool will do the job better and safer at the rate for which it was designed.
b. Do not use the power tool if the switch does not turn it on and off.
Any power tool that cannot be controlled with the switch is dangerous and must be repaired.
c. Disconnect the plug from the power source before making any adjustments,
changing accessories, or storing power tools.
Such preventive safety measures reduce the risk of starting the power tool accidentally.
d. Store idle power tools out of the reach of children and do not allow persons unfamiliar with the power tool or these instructions to operate the power tool.
Power tools are dangerous in the hands of untrained users.
e. Maintain power tools. Check for misalignment or binding of moving parts, breakage of parts and any other condition that may affect the power tools operation. If damaged, have the power tool repaired before use.
Many accidents are caused by poorly maintained power tools.
f. Keep cutting tools sharp and clean.
Properly maintained cutting tools with sharp cutting edges are less likely to bind and are easier to control.
g. Use the power tool, accessories and tool bits etc., in accordance with these instructions and in the manner intended for the particular type of power tool, taking into account the working conditions and the work to be performed.
Use of the power tool for operations different from intended could result in a hazardous situation.
- Service
a. Please use a qualified expert who uses original replacement parts to repair your power tool.
This will ensure proper functioning of the power tool.
ADDITIONAL SAFETY INSTRUCTIONS FOR BATTERIES AND CHARGERS

Please note the included General Safety Notes and the following safety notes to avoid malfunctions, damage or physical injury:
Batteries
- Never attempt to open for any reason.
- Do not expose the battery to water.
-
Do not expose the battery to heat.
-
Do not store in locations where the temperature may exceed 40^ .
- Charge only at ambient temperatures between 10^ and 40^ .
- Charge only using the charger provided with the appliance/tool.
- When disposing of batteries, follow the instructions given in the section "Disposal".
- Do not damage/deform the battery pack either by puncture or impact, as this may create a risk of injury and fire.
- Do not charge damaged batteries.
- Take special care of the battery. Avoid dropping it onto any hard surface and do not subject it to pressure or any other form of mechanical stress. Keep the battery away from extreme heat and cold.
- Important Danger! Never short-circuit the battery or expose it to moisture. Do not store it together with any metal parts which could short-circuit the contacts. The battery could overheat, start burning or explode.
Under extreme conditions, battery leakage may occur. When you notice liquid on the batteries, proceed as follows: Carefully wipe the liquid off using a cloth. Avoid skin contact. In case of skin or eye contact, follow the instructions below.
Warning!
The battery fluid may cause personal injury or damage to property.
In case of skin contact, immediately rinse with water. If redness, pain or irritation occurs seek medical attention. In case of eye contact, rinse immediately with clean water and seek medical attention.
Chargers
Your charger has been designed for a specific voltage. Always check that the mains voltage corresponds to the voltage on the rating plate.
Warning!
- When not in use and before cleaning and servicing, disconnect the battery charger from the power supply.
- Never attempt to replace the charger unit with a regular mains plug.
- Use your charger only to charge the battery in the appliance/tool with which it was
supplied. Other batteries could burst, causing personal injury and damage.
- Never attempt to charge non-rechargeable batteries.
- If the supply cord is damaged, it must be replaced by the manufacturer or an authorized Service Centre in order to avoid a hazard.
- Do not expose the charger to water.
- Do not open the charger.
- Do not probe the charger.
- The appliance/tool/battery must be placed in a well ventilated area when charging.
OPERATION
Operation of Lithium-Ion Batteries
Lithium-ion batteries share many characteristics with conventional batteries.
The major difference is that Lithium-ion batteries do not have a "memory" and do not require to be completely discharged periodically. It is recommended to charge Lithium-ion batteries after each use so they will be fully charged when needed.
Lithium-ion batteries perform best and deliver peak output power at room temperature. When operated in lower temperatures, the battery output will be reduced.
NOTE: A fully charged battery will loose about 2% of its charge per month during storage.
ASSEMBLY AND OPERATION
Charging the Battery
- Insert the charger plug into the receptacle (4) in the side of the driver.
- Plug the battery charger (10) into a 120 V, 60 Hz wall receptacle.
Notes:
a. Make sure the charger plug is fully inserted into the matching receptacle at the side of the driver handle.
b. A new battery or one that is completely exhausted should be charged for one hour or until the red charging indicator LED turns OFF. After normal use, a battery should be fully charged in one hour.
c. If the battery does not charge properly, check to make sure the electrical outlet is "live" and that the temperature range in the work area is between 0 - 40^ .
English
Warning: Do NOT leave the charger plugged in for longer than 5 hours. The battery will be fully charged within one hour. Leaving the charger plugged in for longer than 5 hours may damage the battery.
Inserting a Bit into the Bit Connector:
Push forward metal collar and insert any 1/4 in.
hex shank accessory. Release the collar to lock the accessory in the bit connector (7).
Removing a Bit from the Bit Connector:
Push forward the metal collar to release the accessory from the bit connector.
LED Worklight
This driver has a LED worklight (1) built into the head of the tool. Turn the LED bulb towards the direction of the connector to turn on. The light will remain on while it is in the same direction as the connector. To turn off the light, turn the LED bulb towards the battery compartment (2).
Replacing the Worklight Battery
Remove the battery cover (2) and replace the battery with a new one (CR927). Please observe correct polarity, the positive pole (+) of the battery must point to the battery compartment cover.
Forward/Reverse Switch
The forward/reverse switch (3) is conveniently mounted below the trigger switch (5). To make the driver rotate clockwise for driving screws, push the forward/reverse switch to the left. To make the driver rotate counter clockwise for removing screws, push the forward/reverse switch to the right.
Notes:
a. Never change the position of the forward/ reverse switch while the driver is turning.
b. The trigger switch will NOT function with the forward/reverse switch in the middle/neutral position.
Variable Speed Trigger Switch
The cordless driver is equipped with a variable-speed trigger switch.
- To start the driver, gently squeeze the trigger switch (5).
NOTE: The driver will turn at its slowest speed when the trigger switch is squeezed lightly. The driver will turn at its fastest speed when the trigger switch is squeezed firmly.
- To stop the cordless driver, release the trigger switch.
NOTE: Operating the driver at a slow speed for an extended period of time may cause the driver motor or the battery to overheat. If the driver gets hot, stop operating it and allow it to cool for at least 15 minutes.
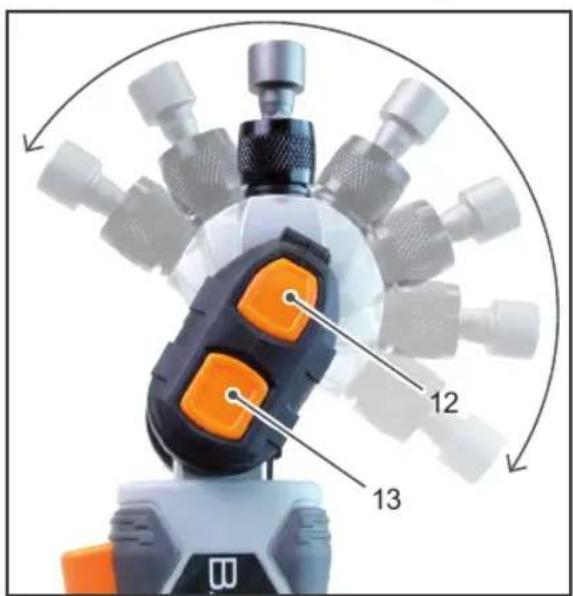
Multi-Position Driver Head
The cordless driver has a multi-position head. This allows the connector to move in any direction required.
- To rotate the head 360^ , push the switch (6) towards the connector and freely rotate the head.
- To change the angle of the driver head push button (13) and rotate the angle of the head.
- To change the angle of the connector push button (12) and rotate the head.
MAINTENANCE AND CLEANING
Maintenance
There are no inner parts of the tool which need maintenance.
Cleaning
- Keep safety devices, ventilation openings and the motor housing as free as possible from dirt and dust. Rub the electric power tool with a clean cloth or blow over it with low pressure compressed air.
- We recommend that you clean your electric power tool immediately after each use.
- Clean the electric power tool regularly with a damp cloth and somewhat soft soap. Do not use any cleaning or solvent materials; these can attack the device's plastic components. Make sure that no water can get inside the electric power tool.
TECHNICAL DATA
Speed 0-175 min
Sound Pressure Level L_pA 50 dB(A)
Uncertainty K_pA 3 dB
Sound Power Level L_WA 61 dB(A)
Uncertainty K_WA 3 dB
Hand Arm Vibration. <2,5 m/s²
Uncertainty K. 1,5m/s²
Dimensions 225 x 58 x 34 mm
Weight .450 g
Battery 700 mAh
Rated Voltage 7.2 V
Charging Time 1 h
Charger
Input 230 V~ 50 Hz, 0,35 A
Output .8,6 V=1 A
Protection Class II
DISPOSAL

Do not dispose of electric power tools with domestic refuse.
The electric power tool is shipped in packaging to reduce transport damage. This packaging is a raw material and as such can either be reused or can
be fed back into the raw material cycle. The electric power tool and its accessories are made from various materials such as metals and plastics. Take defective components to a special refuse collection point. Ask about these at your specialist shop or local council. The product and the user manual may be subject to changes. Technical data may be changed without prior notice.
Batteries
Think of the environment when disposing of batteries. Contact your local authorities to find out where your nearest disposal area is. Do not dispose of batteries with domestic refuse. Do not dispose of by burning, risk of explosion
EC-DECLARATION OF CONFORMITY
We, the Batavia GmbH, Weth. Buitenhuisstraat 2a, NL-7951 SM Staphorst, declare by our own responsibility that the product Flip Out, Model BT-TS001, Item-No 7062267 is according to the basic requirements, which are defined in the European Directives Electromagnetic Compatibility 2004/108/EC; 2014/30/EU (EMC), 2006/42/EC (Machinery), 2006/95/EG and their amendments. For the evaluation of conformity, the following harmonized standards were consulted:
EN 55014-1,
EN 55014-2,
EN 60745-1,
EN 60745-2-2,
EN 61000-3-2,
EN 61000-3-3,
EN 60335-1;
EN 60335-2-29;
EN 62233
Staphorst, 15 February 2015

Meino Seinen, QA Representative Batavia GmbH, Weth. Buitenhuisstraat 2a, 7951 SM Staphorst, Netherlands
François
CHER CLIENT
CE-DECLARATION DE CONFORMITÉ
This product has got a 2 year warranty
Dear Client, if for any reason this product is not working, please ensure you contact our Client Service Centre. Ensure you have your original receipt of purchase. This warranty covers all defects in workmanship or materials in this Batavia product for a two year period from the date of purchase. The warranty does not cover any malfunction, or defect resulting from misuse, neglect, alteration, or repair.
Other European countries | Customer Services
Monday till Friday from 8 am until 4 pm
0080066477400
Overige landen Europa | Klantenservice