
AMW55EU - Mouse TARGUS - Free user manual and instructions
Find the device manual for free AMW55EU TARGUS in PDF.
| Product Type | Compact Wireless Laser Mouse |
| Brand | Targus |
| Model | AMW55EU |
| Technology | Optical Laser |
| Connectivity | Wireless (micro USB receiver) |
| Power Source | 2 AA batteries (1.5 V) |
| Battery Type | AA Alkaline |
| Batteries Included | Yes (2 AA batteries) |
| Supported Operating Systems | Windows 2000, XP, Vista, 7; Mac OS X 10.4 or higher |
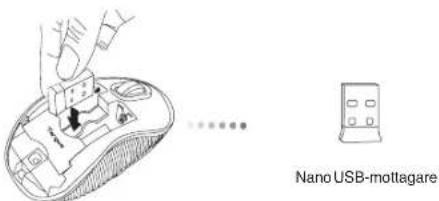
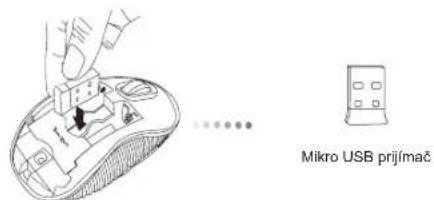
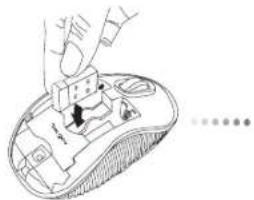
| Receiver | Micro USB, stores inside the mouse |
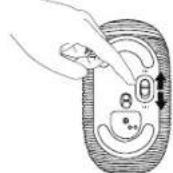
| On/Off Switch | Yes, located under the mouse |
| Battery Level Indicator | Flashing LED every 3 seconds (less than 5% charge) |
| Power Saving Mode | Automatic after inactivity; reactivation by click or movement |
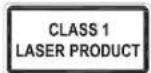
| Laser Class | Class I |
| Laser Warning | Do not stare into the beam or view with optical instruments; hazardous exposure to eyes |
| Detection | Plug & Play (no driver required) |
| Box Contents | Mouse, micro USB receiver, 2 AA batteries, user manual |
| Mouse Type | Compact |
| Usage | Desktop or laptop computer |
Frequently Asked Questions - AMW55EU TARGUS
User questions about AMW55EU TARGUS
0 question about this device. Answer the ones you know or ask your own.
Ask a new question about this device
Download the instructions for your Mouse in PDF format for free! Find your manual AMW55EU - TARGUS and take your electronic device back in hand. On this page are published all the documents necessary for the use of your device. AMW55EU by TARGUS.
USER MANUAL AMW55EU TARGUS
Tegus is a registered trademark or trademark of Tegus Group International, Inc. in the United States and/or other countries. Features and specifications are subject to change without notice. All trademarks and registered trademarks are the property of their respective owners.

N2953

CC
User Guide
Targus Wireless Compact Laser Mouse
Table of Contents
GB-English
Targus Wireless Compact Laser Mouse 6
BG-BbIrapckn(e3NK)
BesKnHa KOMNaKTHa NaepHa MUska Targus 14
CZ-Cestina
Targus Wireless Compact Laser Mouse
FI-Suomi
Mouse Laser Wireless compatto Targus 102
LT-Lietuviskai
Belaide kompaktiska lazerine pele "Targus" 110
LV-Latviešu
Targus kompakta bezvadu lazerpele 118
Targus Wireless Compact Laser Mouse
Targus Wireless Compact Laser Mouse
NL - Nederlands
Targusdraadloze compacte lasermuis 126
NO-Norsk
Targus trdloe kompakt lasermus 134
PL-Polski
Targus Wireless Compact Laser Mouse
GB-Introduction
Thank you for your purchase of the Targus Wireless Compact Laser Mouse. The accompanying micro USB receiver is small enough to leave plugged into your computer or simply store it inside the mouse when travelling. This is a plug and play device so no additional software is required.
Contents
Targus Wireless Compact Laser Mouse
-2x AAA Energizer MAX Batteries
- Micro USB Receiver
-User Guide
System Requirements
Hardware
-USBport
Operating System
Microsoft Windows*2000
Microsoft WindowsXP
Microsoft Windows Vista
Microsoft Windows7
MacOSX 10.4 or later
Targus Wireless Compact Laser Mouse
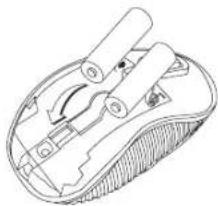
Installing the Batteries
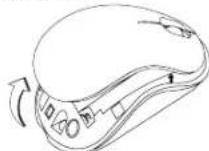
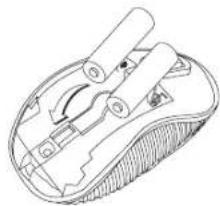
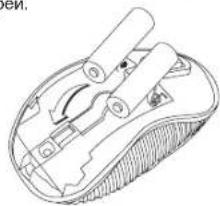
- Remove the battery cover from the top of the mouse by using the notch on the back. Carefully lift the cover up as shown in the diagram.

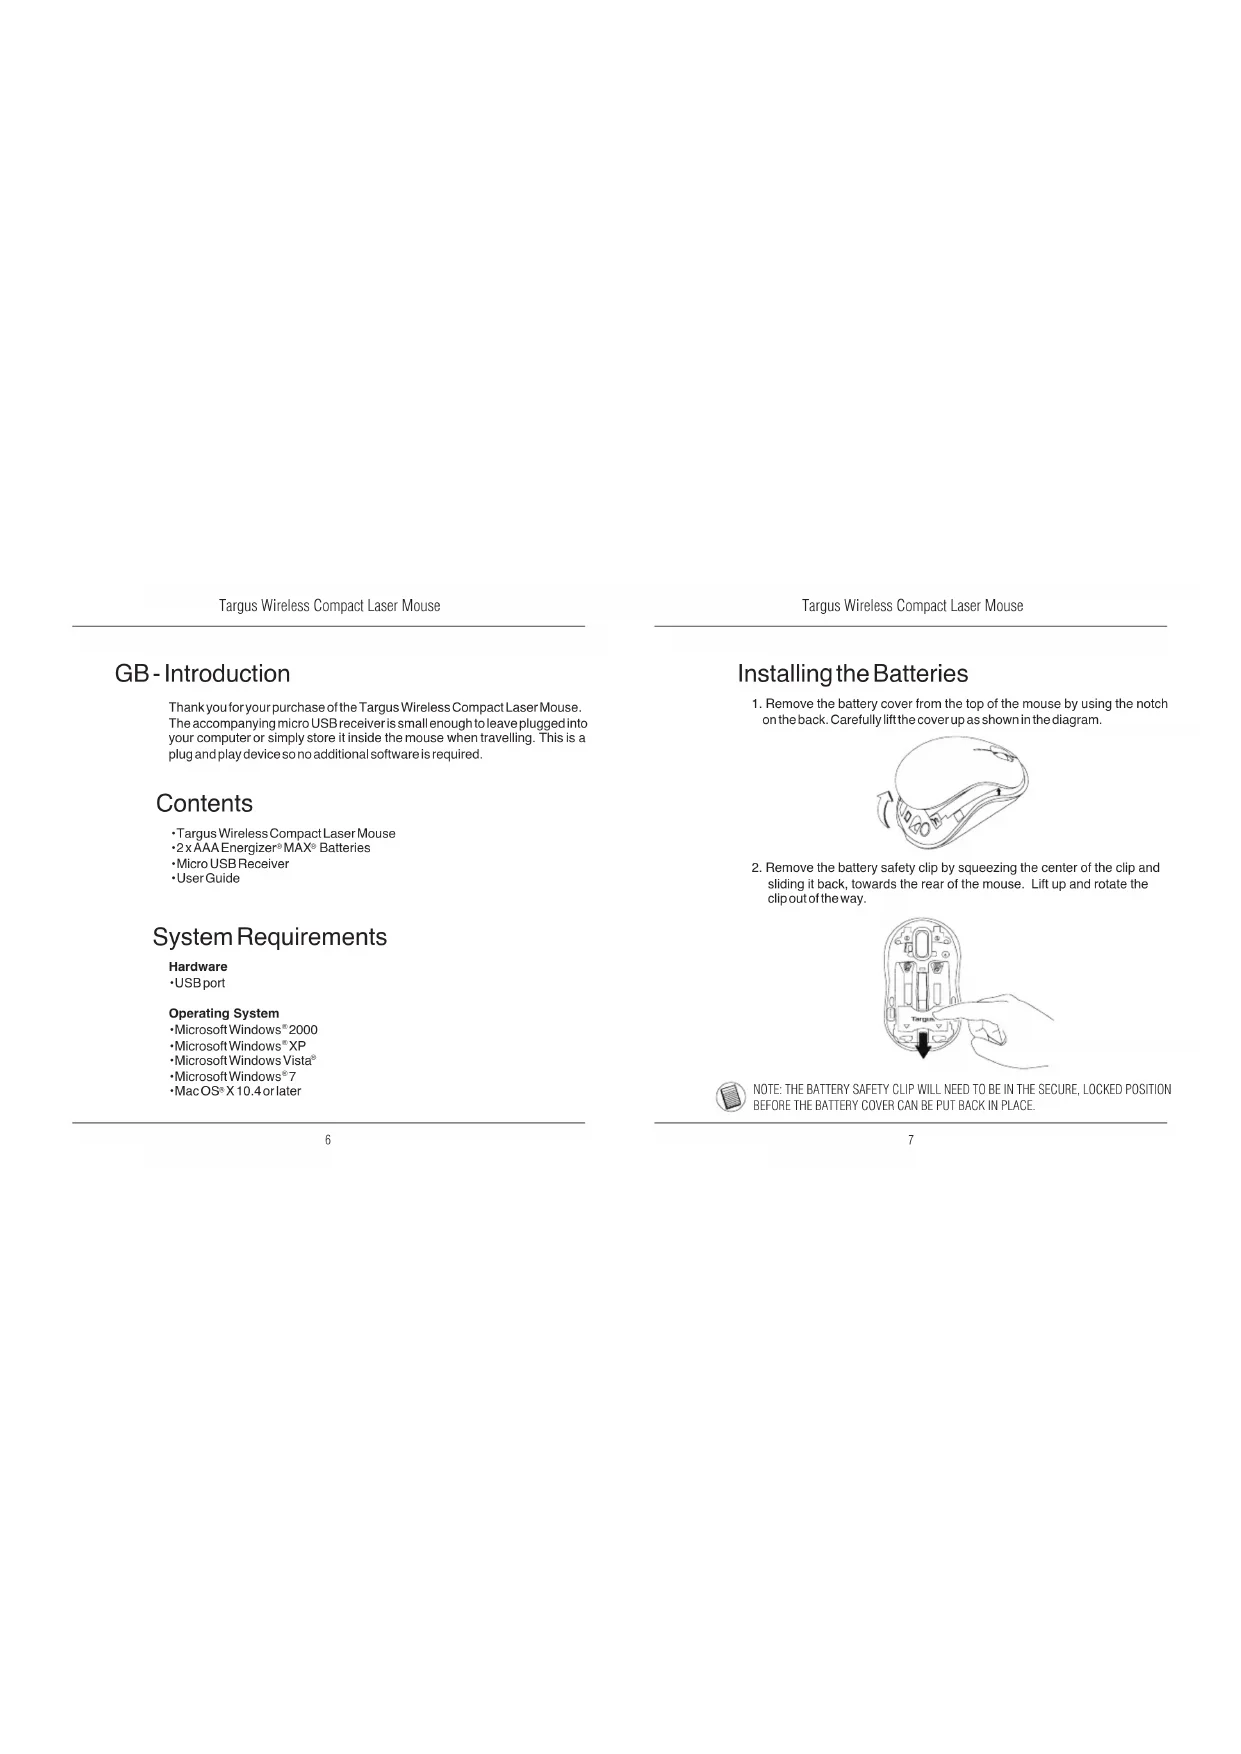
- Remove the battery safety clip by squeezing the center of the clip and sliding it back, towards the rear of the mouse. Lift up and rotate the clip out of the way.

NOTE: THE BATTERY SAFETY CLIP WILL NEED TO BE IN THE SECURE. LOCKED POSITION BEFORE THE BATTERY COVER CAN BE PUT BACK IN PLACE.
Targus Wireless Compact Laser Mouse
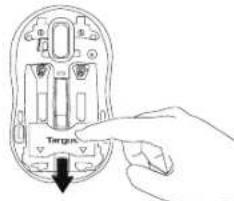
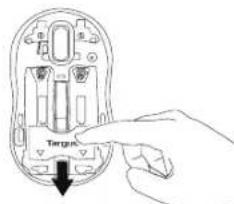
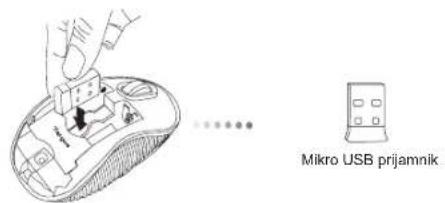
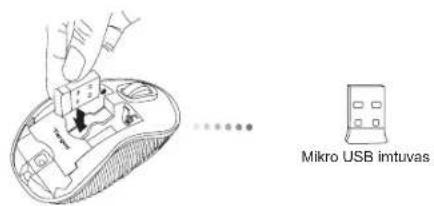
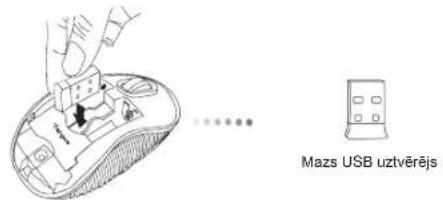
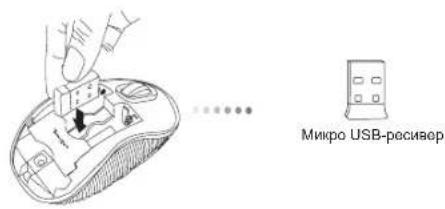
- Remove the micro USB receiver stored inside the center compartment.
- Insert the two AAA batteries, making sure that the positive (+) and negative (-) ends of each battery match the polarity indicators inside the battery compartment.
Targus Wireless Compact Laser Mouse
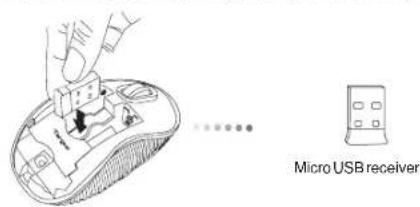
- Replace the battery safety clip by sliding it forward until it clicks into place and then replace the battery cover.
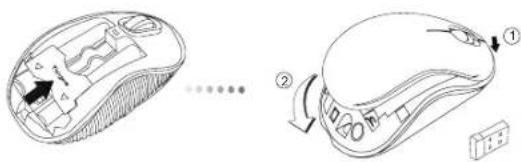

NOTE: THE FRONT OF THE LID SHOULD BE INSERTED FIRST BEFORE SNAPPING THE BACK OF THE LID DOWN.
Targus Wireless Compact Laser Mouse
Establishing the Connection
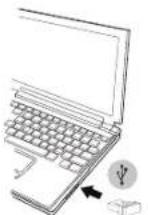
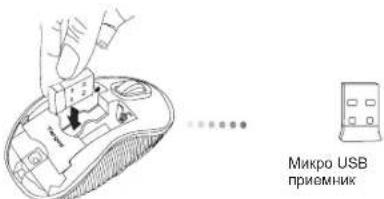
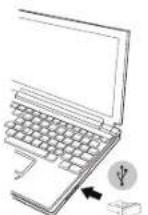
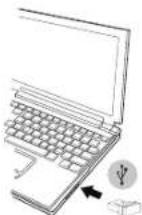
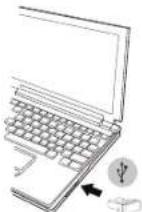
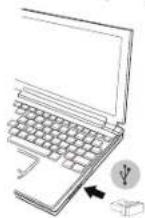
(A) Plug the USB receiver into an available USB port on your computer.
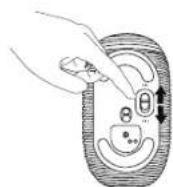
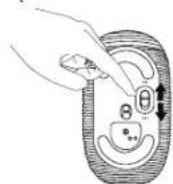
(B) Turn on the mouse by sliding the power switch to the ON position, located on the bottom of the mouse.
This mouse is a plug and play device. It will automatically operate when the USB receiver is connected to the computer.
Targus Wireless Compact Laser Mouse
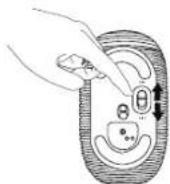
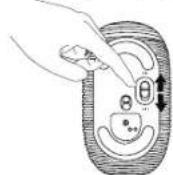
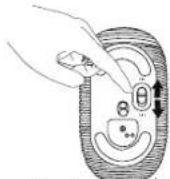
Power On:
Slide the power switch to the ON position.
Power Off:
Slide the power switch to the OFF position.
Power Saving mode:
After an extended period of time, if the mouse is not used, it will automatically enter power saving mode to conserve power and increase battery life. Click on any mouse button or simply move the mouse to resume the normal operation. The mouse may take a few seconds to reconnect with your computer.
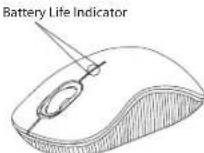
Battery Life Indicator
- When the mouse is turned on, the LED illuminates for 3 seconds and then fades out
The low power light will start flashing every 3 seconds when less than 5% of the battery power remains. Replace the batteries as soon as possible
Power Management
To extend the life of your battery, turn off the mouse while travelling or when you're not using it.
Targus Wireless Compact Laser Mouse
Targus Wireless Compact Laser Mouse

CAUTION
LASER RADIATION. DO NOT STARE INTO THE BEAM OR VIEW DIRECTLY WITH OPTICAL INSTRUMENTS. CLASSILASERPRODUCT.
NEVER POINT A LASER BEAM INTO A PERSON'S EYES OR VIEW A LASER BEAM DIRECTLY, AS PROLONGED EXPOSURE CAN BE HAZARDOUS TO THE EYES.
MOMENTARY EXPOSURE FROM ALASER POINTER, SUCH AS AN INADVERTENT SWEEP OF THE LIGHT ACROSS A PERSON'S EYES, MAY CAUSE TEMPORARY FLASH BLINDNESS SIMILAR TO THE EFFECT OF A CAMERA FLASH BULB,
ALTOUGH THIS CONDITION IS TEMPORARY, IT CAN BECOME MORE DANGEROUS IF THE EXPOSED PERSON IS ENGAGED IN A VISION-CRITICAL ACTIVITY SUCH AS DRIVING.
BG-BbBedeHne
Bnaqapn 3a noynkata Ha Be3xHn KaMnKaTHa Na3epHa Mmka Targus. Pnpdykabuaa MHKO USP npneMHK e doctabno MNHaTOpEn, 3a da ro octabTe BKnOeH KbM KomNtbpa. MnKaTa e yctpoIcBO OT BnDa 'plug-n-play' n He ce HyKdae OTO DOnbNHteneo codTyep .
CbDpbXaHne
-БezКИЧа KMнАТHA Na3epHa MIIka Targus
BaTeepn2xAAA
MnkpO USB npHemHnK
PbkoBODCTBO HA noTpeBHTeIa
CNCTeMHN N3NCKBaHn
Xapnyebp
- USB nHTepfenc
Operating System
Microsoft Windows® 2000
Microsoft WindowsXP
Microsoft Windows Vista®
Microsoft Windows® 7
Mac OS® X 10.4 no no-hoBA
Инстанные на заступ
- OtctpaHETe Kanaka Ha 6atepHATA OT rohpata CTpHa HA MMukata, KATO H3nONBATE bTyOHa OT3aD. BHMMATENHO NOBdHETe Kanaka, KAKTO e NOKa3Ha HO CXeMaTa.
- Otctpahe Ckobata Ha Batepna Tape3 nptnckha He Ha Uehtbpa H, Hnbl3heKb M3aHATA cHt HA MNkwata. NOBHNHTe H 3abBpTe Ckobata, 3a Da nBdNTe

3AESEJENKKA:OESE0IACHTENHATACKOBAHA MATEPINTA TPRBBA DA BbDE B3AXBAHATO.BOKIPAHO NOJIOKEHNE,IPNEDA BA BPHETE KANAKA HA MRTO KANAKA HA OTJEIEHEMETO 3A BATEPM.
Targus Wireless Compact Laser Mouse
3.OTcTaHete MmKpo USB npneMHnka,cbxpaHbAH B cpeHTo OTdeneHHe.
Targus Wireless Compact Laser Mouse
- OCTPahETe IpeIa3HATA CKo6a Ha 6ateprrA, IIb3raKn HAnpei, DOKATO UpaKHe HA McTo IOTCTPahETe KaNaka Ha 6ateprrA.

3A6EJIEXKKA: NOCTABETE INPEHATA YACT HA KAIKA, INPEI DA INPTUCHETE 3AHATA, 3A DA UPAKHE HA MRCTO.
YcTaHOBRAHe Ha Bpb3Ka
(A) BkHouTe USB npHemnHa B CBO6oJeH USB nopT Ha KOMnToBpa

(B)BKnIOHcTe MMnKata Ype3 NnB3BaHe Ha npeBknIOHbATEeTOnHATA ⅢCTPana B No3uON (BKJ.).
MmKkatae yctpoiCtBO OT TnN 'plug-n-play'. To TpR6Ba Da 3a0nOHe Da pa6oTn ABOTOMAtHNO npn BKNIOHbAhe Ha USB npneMHnKa KbM KOMNIOTpa,
BkiHIOHaBe:
Pb3Hete 6yToHa Ha 3axpaHbAHeTO B No3nue 3a BkIouBaHe.
M3KnOvBaHe:
Pb3HeTe 6yToHa Ha 3axpaHbHeTo B nO3nua 3a nKIOuBaHe.
Targus Wireless Compact Laser Mouse
Targus Wireless Compact Laser Mouse
BHIMAHNE
IA3EPHA PAADNALI. HE CE 3BVPATEB BbNA H HE IIEDAIATE INPEKTHO COTNVAH NHTPYMEHTNAEPEPH PNDKT KNTIHKORAHE HACOBAITE NA3EPHE BbH OHTHE HA DPTY, KAKTO H NEJDAITE INPEKTHO B N3EPHE bHbTbKATO PNOBJNKTEHOTHO N3AFAHE MOKE DA E BPEHDHO AOTHNE MOMEHTHOTO IN3AIAGAFEHA HB CEBTNATAOT IA N3APINATOA OT IA3EPHA NOKA3ALKA, KATO HAPIMEMC CIVVAHOTO PEMPHHABAHAE HA NbTA IPNE3 OHTHE PIPN VITOTE5A,MOKE DA PIMHHBIPEMHEHO 3ACJENBAHAE, NODOHO HA EFEKTA OCTCBKAKHBAHA H ATOFANAPAT. BbPENKIE TOBA CbCTOHME BPEMEHNO, TO MOKE IA E ONACHO, AKO MIJIETO IN3IOKEHO HA NbTA INBbPUBA DEHOCT, 3A KORTOPONITA HA 3PEHNETEO E KPRTHINA, KATO HAPIMEP YIPABINEHAA HB ABTOMOSNI.
CZ- Uvod
Targus Wireless Compact Laser Mouse
Targus Wireless Compact Laser Mouse
Targus Wireless Compact Laser Mouse
Targus Wireless Compact Laser Mouse
Targus Wireless Compact Laser Mouse
Targus Wireless Compact Laser Mouse
Targus Wireless Compact Laser Mouse
Targus Wireless Compact Laser Mouse
Taend:
Stil knappen pa ON (taend).
Sluk:
Stil knappen på OFF (sluk).
Targus Wireless Compact Laser Mouse
3.VotkevaljakeskmisespesasauvmikroUSBvastuvotja.
- Pange oma kohale kaks kaasas olevat AA pataireid jalgides, et iga patarei pluss (+) ja miinus (-)otsad langeks kokku patarei pesas olevate margistega.
Targus Wireless Compact Laser Mouse
Targus Wireless Compact Laser Mouse
Uhenduse loomine
Targus Wireless Compact Laser Mouse
Sisse lullamine:
Lukake toiteluliti asendisse ON (sees).
Välja tūlitamine:
Targus Wireless Compact Laser Mouse
Targus Wireless Compact Laser Mouse

ETTEVAATUST!
LASERKIIRGUS. ARGE VAADAKE LASERKIIRT EGA VAADAKE OTSE OPTILISTE INSTRUMENTIDEGA. KLASS 1 LASERTOODE. ARGE SUUNAKE LASERKIIRT TEISE INIMESE SILMA EGA VAADAKE LASERKIIRT OTSE, SEST PIKEM KOKKUPUUE VOIB SILMI KAHJUSTADA. HETKELINE KOKKUPUUE LASEROSUTAJAGA, NAGU TAHTMATU VALGUSE SUUNAMINE ULE TEISE INIMESE SILMADE, VOIB POHJUSTADA AJUTIST PIMEDUST SARNASELT FOTOAPARAADI VALGUE. KUIIG SEE SEISUND ON AJUTINE, VOIB SEE MUUTUDA OHTLIKUMAKS, KUI PIMESTATUD INIMENE TEGELEB NAGEMISVAJADUSEGA TEGEVUSEGA NAGU AUTOGA SOITMINE.
ES - Introduccion
Targus Wireless Compact Laser Mouse
Targus Wireless Compact Laser Mouse
Targus Wireless Compact Laser Mouse
Targus Wireless Compact Laser Mouse
Encender:
Targus Wireless Compact Laser Mouse
Targus Wireless Compact Laser Mouse
Targus Wireless Compact Laser Mouse
Targus Wireless Compact Laser Mouse
Virta pälle:
Liu'utavirtakytkinasentoON(paall).
Virta pois pälta:
Liu'utavirtakytkin asentoon OFF(pois pälta)
Virransaatotila:
Targus Wireless Compact Laser Mouse
FR - Introduction
Targus Wireless Compact Laser Mouse
Installation des piles
Targus Wireless Compact Laser Mouse
Targus Wireless Compact Laser Mouse
Targus Wireless Compact Laser Mouse
Targus Wireless Compact Laser Mouse
Mise en route :
Targus Wireless Compact Laser Mouse
3.ApaipoeTo mikpOekIN USB Tnou evai quayevos mea oTO KEVPiKO diapeipua.
- TOTAOETHATE TIO DU OTATAPIEA, APOVITICOVTAO a BETIKOS (+) KAI apovtIKOS (-) Toaos ts Kaeimic va avntoxouv ME Tc oxETIKES evdeiei eiao taiaeipiaouc
Targus Wireless Compact Laser Mouse
- EtnavatoTOnToEtnote to auDertnpa aopaleiac tou mntapaw ouovrac tou mptooa wotou kouuTTwee oTn Oeon Tou kai akouatei o xapaktniptiakosxoc. Tn auVexia, EtnavatoTOnToEtnote To kalmu taowmataipwv.


SHMEIOH:NPENEI NA NEPAETE MEZA IPOTA THN MNPOETINH PA TOY KAI YTEPANA NIEZETE IPOTOKATQTHN NIIAEYPA TIA NA KOYMNIQEII.
Anioupyia Tns ouvdo
(A) TOTIOEETIOTe BOUOa Tou EKIN USB OE KANOIA diaTeoiu OUPA USB TOU UTOAOYiOTn OAS.
Targus Wireless Compact Laser Mouse
- Izvadite mikro USB prijamnik spremljen u sredijsnej pretincu.
Targus Wireless Compact Laser Mouse
- Vrataile natrag sigumosni drza tako da ga pogurnete prema naprijed sve dok ne cujete skljocaj, a zatim zatvoritePoklopac pretinca za baterjie.

bilejsk: Prije zatvaranja poklopca pritiskom na strznji dio, prednji dio poklopca treba bit umetnut u predvi eni utor.
Targus Wireless Compact Laser Mouse
Uspostavljanje veze
(A) Ukluçite USBPRIJAMNIK u slobodan USB prikljucak na vasem račanu.

(B) Uklučite mis tako da prekidač za napajanje, smješten s donje strane misa, pogurnete u poziciju ON (uklučeno).
Mis fungcionira na principu ukljuci-i-radi. Cim se USB prijamnik prikljuci na raucunalo, mis je automatiski u funkciji.
Targus Wireless Compact Laser Mouse
Ukjučivanje:
Pogurnite gumb za napajanje u ON (ukljuceno) poziciju.
Isklučivanje:
Pogurnite gumb za napajanje u OFF (isključeno) poziciju.
Stedni nacin rada:
Ako se mi ne koristi dulje vrijeme, automatski ce prijeci u stedin niacin rada radi stednje energije i duzeg tragjana baterje.
Targus Wireless Compact Laser Mouse
Targus Wireless Compact Laser Mouse
Targus Wireless Compact Laser Mouse
Targus Wireless Compact Laser Mouse
Bekapcsolas:
Targus Wireless Compact Laser Mouse
Targus Wireless Compact Laser Mouse
Targus Wireless Compact Laser Mouse
Targus Wireless Compact Laser Mouse
Accensione:
Targus Wireless Compact Laser Mouse
- Pasalinkite mikro USB imtuva, esant skyrelio viduje.
Targus Wireless Compact Laser Mouse
- Apsaugin baterjos gnybta uzdesite algal pastumdami jj pirmyn, kol spragteles, o tuomet atgal uzdesite bateriju skyrelio dangteli.


PASTABA: PIRMA STATYKITE DANGTELIO PRIEK, O TADA SPUSTEL KITE JO GAL, KOL PASIGIRS SPRAGTEL JIMAS.
Kaip sujungti
a) Junkite USB imtuva esama kompiuterio USB preevada.

b) Pele jungsite paslinkdami peles pagrinde esanti jungikli ON (jungimo) padeti.
Targus Wireless Compact Laser Mouse
- Iznemiet mazo USB uztvereju, kas atrodas peles centralaja nodalljuma.
- levietojet divas AA baterijas, parliecinoties, ka positivais (+) un negativais (-) baterijas gals leviTots atbilstosi polaritates radilajiem nodalljuma iekspuse.
Targus Wireless Compact Laser Mouse
Targus Wireless Compact Laser Mouse
Savienojuma izveide
(A) lespraudiet USB uztvereju briva datora pieslegvieta.

(B) lesledziet peli, parsledzot ieslegsanas sledzi, kas atrodas peles apaksejda dala, pozicija ON (iesegt).
Sai pelei ir standards plug-n-play. Ta automatiski sakks darboties, tiklidz USB uztverejs tiks savienots ar datoru.
Targus Wireless Compact Laser Mouse
leslegt:
Pavirziet ieslegsanas pogu poZcijAN.
Izslegt:
Pavirziet ieslegsanas pogu pozicijA OFF.
Jaudas taupisanas rezims:
Targus Wireless Compact Laser Mouse
Targus Wireless Compact Laser Mouse

UZMANIBU
LAZERA RADIACIJA. NESKATIETIES TIEs STARVAI IZMANTOJOT OPTISKOS INSTRUMENTUS.1.KLASES LAZERA PRODUKTS. NEKAD NESPIDINET LAZERI CITA CILVEKA ACIS UN NESKATIETIES TIEs UZ STARU, JO ILGSTOsa SKATISANAS VAR BUT KAITIGA ACIM. GAISMAS SPIDINA SANA CITU CILVEKU ACIS VAR IZRAISIT PAGAIDU AKLUMU, LIDZIGU FOTOKAMERAS ZIBSPULDZES RADITAJAM.LAI GAN TAS IR PAGAIDU, TAS VAR BUT VEL BISTAMAKS, JA IESPINDATS ACIS CILVEKAM,KAS TAJABRIDI,PIEMERAM,VADA MASINU.
NL - Introductie
Targus Wireless Compact Laser Mouse
Targus Wireless Compact Laser Mouse
Targus Wireless Compact Laser Mouse
Deverbinding tot stand brengen
Targus Wireless Compact Laser Mouse
Inschakelen:
Targus Wireless Compact Laser Mouse
Targus Wireless Compact Laser Mouse
Targus Wireless Compact Laser Mouse
Oppreteforbindelse
(A)Koble USB-mottakeren til en tilgengelig USB-port pa datamaskinen din.

Targus Wireless Compact Laser Mouse
Inschakelen:
Targus Wireless Compact Laser Mouse
Targus Wireless Compact Laser Mouse
Targus Wireless Compact Laser Mouse
Targus Wireless Compact Laser Mouse
Targus Wireless Compact Laser Mouse
Targus Wireless Compact Laser Mouse
Targus Wireless Compact Laser Mouse
Fazeraligacao
(A)Ligue o receptor USBnaporta USBdisponivel dosue computador.
Targus Wireless Compact Laser Mouse
Ligado: (ON)
Targus Wireless Compact Laser Mouse
Targus Wireless Compact Laser Mouse
- Puneti la loc clerna de siguranta glisand inainte pana face "clic" si puneti la loc carcasa baterilior.


OBSERVATIE: PARTEADINFA A CAPACULUI TREBUIE S FIE INTRODUS INAINTE DE A AP SAIN JOS CAPACUL.
Targus Wireless Compact Laser Mouse
Stabilirea conexiunii
Targus Wireless Compact Laser Mouse
Pornit:
Targus Wireless Compact Laser Mouse
3.BbHbTe MmKPO USB-pecNep, KOtOpBx XpaHHTcB HHTpN UeHTpAIBHOOTdeneHH.
4BCTaBte DBe 6atapen TnA AA, y6eDITEbc, YTO KONTAKTbI NnOc (+) INMHyC(-) KaOND 6atapen COOTBETCTBYOT 3HAKAM NOJPHOCN B OTCKe IIN 6atapen.
Targus Wireless Compact Laser Mouse
- yctahOBHTe Ma MeTO npEOxPAHHTENbHbI 3aXIM IINB Gatape, 3aDbHyB ERO BnepE Do QENTKc, 3aTEM yCTAHOBHTe KpblkUy OTCeKa dNBApatep.


PIMMEUHHE: IPEDE TEM, KAK 3AADBHYTb BHN3 TbIbHyO YACTb KpblKn, CNEYET NOMECTNTb IPEEDHO YACTb KpblKn.
YCTAHOBKa COeINHeHnA
(A)Поdkнючte USB-рсиьерк дocунomy USB-nopTy kOMnIbTope.

(B)BKNIOHTbMbUByCTAHOBIBBkNHOATeNBNTAHINpaCNOJOEHHbHaTbIbHOJCAHcKpOlyCaMbUH,BNOIOXeHNE"BKn"

Данань Мьшь pa60aet no npHnHny plug-n-play ("BKnHOn n Wpain).Она дднka abTOMaTHneckn HactponIbca Ha pa6Oу nocle NOdknoHneu USB-peceBepa K komboTepy.
BknquHHe:
BbCTaBtB KONkYynpaBHeHn NITaHnEM B noNoKeHne "Bkn."
BbIKIOyHHe:
BbCTaBtB KhONk ynpabNeHn nTuHaHm B noOnKeHne "BbIK."
3Hepro6eperaoounpeXm:
ECINMbHHeNCHON3OanacBTeYHeNE DnITeNBHO rpoMekyTKBaPemEH,ABOTaMArHEcKBYedTbIbpaHAneproc6peRaOHmpeKMnDIA KCHOHMN 3HePRnN YBcHMeHHc PcoKa PaBtO bAkkpyMnTHPOB. DnB8OBaPATA BpOAOHPEKMM CnDEyET npOCTo UENHYtNbNo IIO60N H3 KHONOKMbHn INPnOTO pNOBArTaMbH. NOBTOPHe NOCoeDNHeHMeMBHJIKOMbHTOpEy MoKeT 3aHRb HECKONBOeKUYHd.
Hndkatop 3apraa akkymyjTOpOB
-Пи ВКIOЧЕМьИн Ha 3 ckyHdIaarOpaetcCIV, KOTOpBn NOTOMrachET.
-ECN octanoBmHbIe 5 % OT 3HepnA kkyMTOIpa, HNIkATOp 10HOHXEHNO MOUHOCT NAHET MMfATc CHTEPBAnOM B3 cekyHdb. CneJyT KAKMO HO bICTpee 3aEMHNT AKKMYIANTOPb.
Targus Wireless Compact Laser Mouse
SE - Introduktion
Targus Wireless Compact Laser Mouse
Targus Wireless Compact Laser Mouse
- Avlagsnamicro USB-mottagaren som forvaras inutid mittersta jacket
Targus Wireless Compact Laser Mouse
Targus Wireless Compact Laser Mouse
Targus Wireless Compact Laser Mouse
Satt pa:
Slapa stromknappen till position ON (PA).
Stanga av:
Stang avstromnappen till position OFF (AV).
Energisparlage:
Targus Wireless Compact Laser Mouse
Targus Wireless Compact Laser Mouse
- Varnostno zaponko baterije pomaknite nazaj na svoje mesto, takao da jo potisnete naprej, dokler se ne zaskovi,Pokrov baterij pa namestite nazaj.


OPOMBA: PREDEN ZADNJ DEL POKROVA POTISNETE NAVZDOL IN GA ZAPRETE, JE TREBA SE PREJ NAMESTITI SPRENDNJ DEL POKROVA.
Targus Wireless Compact Laser Mouse
Targus Wireless Compact Laser Mouse
Vklop:
Targus Wireless Compact Laser Mouse
- Vyberte mikro USB prijima ulozeny vo vnutri stredneho priestoru.
- Vlozte dye batiere typu AA uistile sa, ze kladna (+) a zaporná (-) polarita každej batiere zoqnoveda oznaceni polarit vo vnutri priestorupre batiere.

Targus Wireless Compact Laser Mouse
- Znova nasadte bezpečnostnu svorku posunutim dopredu, kym sa neozve cvakrutie a nebude na svojom mieste, potom znova nasadte kryt batérië.


POZNAMKA: NAJPRV ZASU TE PREDNU AS KRYTU, AZ POTOM ZATLA TE JEHO ZADNU AS NADOL.
Nadviazanie spojenia
(A) Pripoje USB prijima do vofnhe USB portu na poctatai.
(B) Zapnite my's prepnutim prepina cnapajania na spodnej strane mysid o polohy ON (Zap.).

Toto zariadenie je typu plug-n-play. Zariadenie bude fungovaf automaticky po pripojeni USB prijima k poCiTaCu.
Zapnutie:
Prepnite prepinaac napajania do polohy ON (Zap.).
Vypnutie:
Prepnite prepina napajania do polohy OFF (Vyp.).
Targus Wireless Compact Laser Mouse
Targus Wireless Compact Laser Mouse
Targus Wireless Compact Laser Mouse
Baglanti Kurma
Targus Wireless Compact Laser Mouse
Gug Aig:
Targus Wireless Compact Laser Mouse
sJusal 1:2 jssu, u USB 3

(+)a#d#s#A#aa#AAe#y#y#y#y#y

Targus Wireless Compact Laser Mouse
aaiy 1 aaiy 1 ay jaiy ai yaiy 5


Jaaa aaii jaae gaa Jaa Jaa Jaa aae aae
Targus Wireless Compact Laser Mouse
J_L = a^2b^2 + 1
10.2.1.1 USB USB USB
(j)ON 8
0jai jai 2
J 1
USB
Targus Wireless Compact Laser Mouse
:
1
:
1
i#
jgl 10
1
j
-
(LED)3
.
(1) 通顺)
y
aBb
y
1


j 2 a 1 j 3 j 3 j 3 j 3 j 3 j 3 j 3 j 3 j 3 j 3 j 3 j 3 j 3 j 3 j 3 j 3 j 3 j 3 j 3 j 3 j 3 j 3 j 3 j 3 j 3 j 3 j 3 j 3 j 3 j 3 j 3 j 3 j 3 j 3
a a a a a a a a a a a a a a a a a a a
J 15
3.5.11