D 4500 - Flash CULLMANN - Free user manual and instructions
Find the device manual for free D 4500 CULLMANN in PDF.

| Product type | Electronic flash |
| Brand | CULLMANN |
| Model | D 4500 |
| Dimensions | approx. 175 × 74 × 59 mm |
| Weight (without batteries) | approx. 270 g |
| Power supply | 4 x 1.5 V NiCd or NiMH batteries (AA type) |
| Guide number (ISO 100) | 36 to 85 mm |
| Motorized zoom reflector | 24-28-35-50-70-85 mm (auto and manual) |
| Flash duration | 1/1000 to 1/20,000 second |
| Recharging time | 0.5 to 9 seconds |
| Number of flashes (fresh batteries) | approx. 80 |
| Color temperature | Daylight (5500 K) |
| Flash modes | TTL, Manual (M) with 5 power levels (1/1 to 1/16) |
| Slave function | Yes, built-in |
| Red-eye reduction | For Nikon and Olympus |
| Autofocus assist (AF) | Built-in red light beam |
| Sync | Front and rear curtain (front/rear) |
| LCD screen | With illumination (5 seconds) |
| Power saving | Auto power off after 3 min |
| Update | Free (except type P) |
| Maintenance and cleaning | Wipe with a dry cloth; remove batteries for prolonged storage |
| Safety | Do not look directly at the flash; use recommended batteries; do not open |
Frequently Asked Questions - D 4500 CULLMANN
User questions about D 4500 CULLMANN
0 question about this device. Answer the ones you know or ask your own.
Ask a new question about this device
Download the instructions for your Flash in PDF format for free! Find your manual D 4500 - CULLMANN and take your electronic device back in hand. On this page are published all the documents necessary for the use of your device. D 4500 by CULLMANN.
USER MANUAL D 4500 CULLMANN
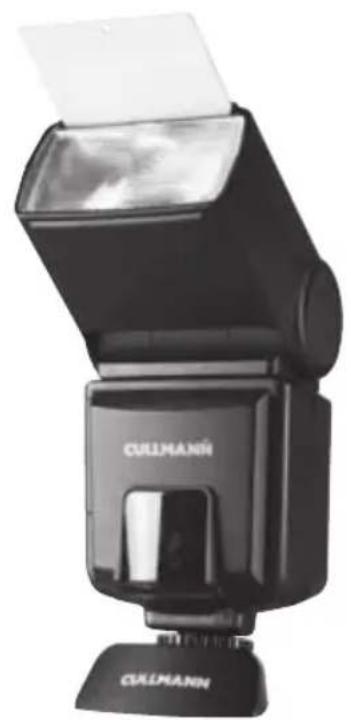
Congratulations on purchasing your CULLMANN flash unit.
This D 4500 electronic flash unit has been manufactured for digital and analog cameras using the latest technology in accordance with the high quality standards of CULLMANN products.
Please read the instructions carefully and follow their guidelines so that you can enjoy the full range of possibilities of your flash unit.
We would like to ask you to do your part in protecting the environment by refraining from throwing used batteries or rechargeable batteries into normal household trash; instead please dispose of them at your photographic equipment dealership or in specially designated waste.
Auto Focus/TTL Flash Unit for:
C - Canon SLR & digital cameras (E-TTL)
N - Nikon auto focus SLR & digital cameras (TTL and i-TTL)
O/P - Olympus auto focus digital & digital single-lens reflex cameras & Panasonic digital single-lens reflex cameras
S - Sony Alpha digital single-lens reflex (DSLR) cameras/ Konica Minolta auto focus SLR and digital cameras (ADI and D lenses)
P - Pentax digital single-lens reflex (DSLR) cameras (TTL and P-TTL)


Mounting foot type S Mounting foot type O/P
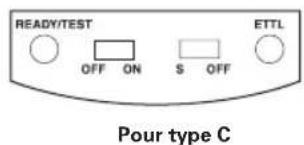
For type C
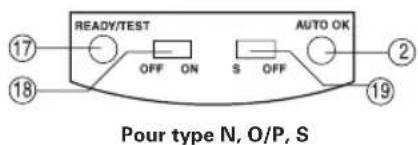
For type N, O/P, S
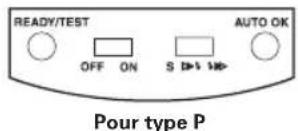
For type P

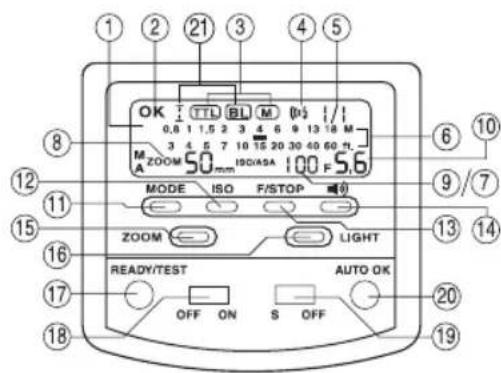
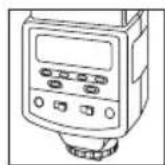
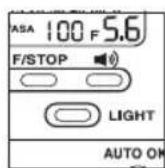
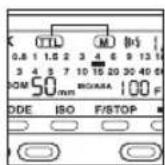
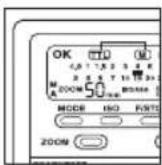
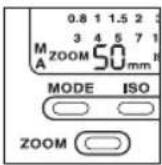
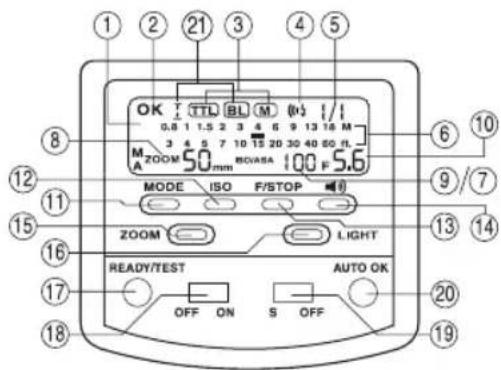
Legende:
- LCD display
- F-Stop Indicator
- Auto Check Indicator
- Mode button
- Mode setting display
- Film sensitivity button
- Beeper display
- F-Stop Selector
- Energy level setting
- Beeper on/off
- Removal display for the flash area
- Zoom button
- Circuit off display
- LCD light
- Zoom position
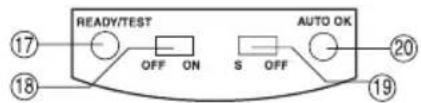
- Ready/ Test light
- Film sensitivity display
- Electricity ON/OFF switch
- Slave on/off
- Auto OK
- Mode indicator (N only)
Nikon i-TTL only: When you are using the option "3D-Matrix", the information "BL" will be displayed on the LCD screen
Special Features
LCD display
Automatic and manual zoom of 24-28-35-50-70-85 mm
Red light ray as a focusing aid for setting the AF in low light
- TTL measurement
Automatic speed setting for the shutter
- 5 energy levels, ratios 1/1, 1/2, 1/4, 1/8 and 1/16
- Readiness display for the flash in the seeker
- Synchronization of the foreground and background light
- Reduction of the red-eye effect (for Nikon and Olympus)
- Integrated slave function
- Integrated reflection plate and diffuser
Energy-saving function
Can be updated (except type P)
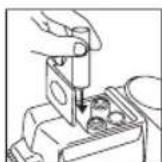
Inserting the Batteries
Ensure that the main switch is in the "OFF" position. Push the lid of the battery compartment forwards and swing it upwards. Insert the batteries according to the corresponding symbols for +/- .
Close the battery compartment lid and push it back into its place until it clicks. Ensure that all batteries are of the same type and are equally charged; NiCd or NiMh rechargeable batteries are preferable.
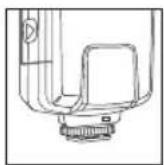
Mounting the Flash Unit onto the Camera
Switch off both the flash unit and the camera. Turn the knurled screw of the flash unit upwards toward the flash unit. Push the flash unit into the camera's device shoe. Turn the flash unit's knurled screw toward the camera, clamping the flash unit to the camera.
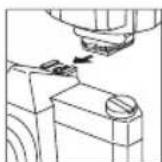
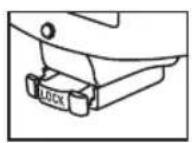
For type S: Insert the mounting foot of the flash unit into the device shoe of the camera. This clicks the flash unit into place.
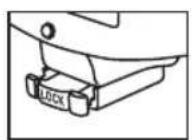
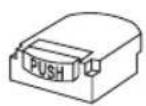
For type O/P: Insert the mounting foot of the flash unit into the device shoe of the camera and press onto "LOCK" in order to click the flash unit into place.
Removing the Flash Unit from the Camera
Switch off both the flash unit and the camera.
Turn the knurled screw of the flash unit upwards toward the flash unit. Remove the flash unit from the device shoe of the camera.
For type S: Press the button that releases the device shoe and remove the flash unit, pulling it toward the rear.
For type O/P: Push both side of the lock/release button in the directions specified and remove the flash unit, pulling it toward the rear.
Activating the ON/OFF switch and Conducting a Flash Test
In order to switch on the flash unit, push the main switch into the "ON" position. As soon as the camera is ready to be used, "READY" illuminates on the readiness display.
Press the test button in order to check whether the flash unit is operating correctly. If the flash unit has lost its charge, wait until the "READY" display illuminates again.
Push the main switch into the "OFF" position in order to turn off the device.
LC Display Illumination
The LCD display serves in providing general information about the camera and the current state of the flash unit; every time the "LIGHT" button is pressed, the LCD display will illuminate for around 5 seconds.
Photographng, AF / TTL Operation Automatic control of the flash synchronization speed
When the flash unit is ready, the camera automatically switches into the flash mode synchronization speed. The synchronization speed depends upon the camera model and is generally between 1/30 seconds and 1/250 seconds. If a photo has been taken with the flash, the LCD display briefly illuminates the "OK" symbol to confirm the correct lighting.
"AF" Measurement Flash for Auto Focus
The red "AF" light ray integrated into the flash unit supports the automatic focus setting of the auto focus TTL cameras. When the lighting conditions on hand are insufficient for the automatic setting of the focal width, the flash unit projects a red light ray onto the object as soon as the camera shutter is touched slightly. Then the auto focus of the camera adjusts to the object with the help of the red light ray.
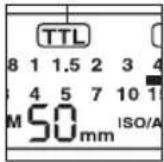
TTL (Through the lens) Flash Control
The flash unit receives its information solely from the connected TTL-controlled camera. The measurement of the lighting in TTL mode (TTL = 'through the lens') is conducted by the camera sensor.
This sensor measures the light that reaches the camera. An electronic control circuit inside the camera forwards a stop signal to the camera as soon as the light is received; TTL mode means that all factors influencing the exposure (such as filters, changes in the shutter or zooms with a variable shutter) are taken into consideration. You don't have to concern yourself with the setting of the light emission. The camera's electronic system automatically guides the necessary light quantity. Additionally, you can use measurement devices (e.g., spot, matrix or centered lighting measurement) that are provided in some cameras. To activate the TTL flash mode, gently tap the mode selector into the TTL position. The LCD display then shows "TTL".
For Type C flash: The ETTL indicator will light while connected to a ETTL camera. For Type N flash: The LC Display will show TTL, ITTL or BL in different way while connected to different camera models. Please refer to the camera's manual.
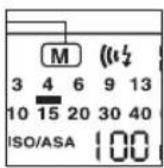
Manual Flash Mode with Full Light Emission
In order to use the flash unit with the full light emission, the mode selector must be placed into the M position (Manual). Then, every time the flash unit is activated, a flash with full energy takes place. The LCD display automatically provides the distance necessary for the correct lighting
between the flash and the object. Adjustment to the individual shooting situation can be done by resetting the lens shutter or the focal width (on the camera). 5 levels can be selected for the "Energy Ratio", 1/1, 1/2, 1/4, 1/8 and 1/16 , by lightly tapping the mode selector when it is in the "M" position.
Synchronization of the Foreground and Background Lighting
The flash unit supports the synchronization of foreground and background lighting: Simply activate the Front or Rear mode.
Canon, Nikon, Olympus, Panasonic and Sony Alpha cameras control the synchronization of the foreground and background lighting automatically, making it unnecessary to adjust the settings on the flash unit.
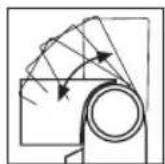
Swiveling Vertical/Horizontal Flash
Photos to be taken with a full flash are easily recognizable due to their hard, dense shadows. This is often accompanied by a sharp decline of the foreground in the direction of the background. This phenomenon can be prevented with a swiveling flash. Because the diffused light creates a soft, equally distributed reproduction sharpness, the reflector is turned upwards by up to 90^ so that the flash is returned by an appropriate reflection surface. For color shots, the reflection surface must be white or have a neutral color and be unstructured. When swiveling the reflector, ensure that no light falls directly from the reflector onto the object. When you use the swiveling flash, the zoom position clicks onto 50mm , except in Manual mode.
In order to have your pictures correctly exposed using bounce or swivel flash, the following is recommended to users:
(1) Select white or reflective surfaces to bounce the light off. Otherwise your pictures will come with an unnatural color cast similar to that of the reflecting surface.
(2) Set the camera's exposure mod to Aperture Priority Auto ("A") or Manual ("M").
(3) Use a wider aperture than normally do, as 2 or 3 stops of light can be lost when using bounce or swivel flash.
Power-Zoom Automatic control of the motorized zoom
When using zoom lenses that transmit their focal widths to the camera, the camera forwards this information to the flash unit. Then the flash unit automatically adjusts its zoom position. The automatic reflector control of the motorized zoom is possible with cameras that permit the digital transmission to the flash unit.
The LCD display on the flash unit indicates zoom positions of 24-28-35-50-70-85 mm. When the flash unit is switched on, the zoom is activated and the position is set at 35mm . As soon as the camera's release is touched only slightly, the focal width of the flash unit is automatically adapted to the focal width of the lens.
Whenever the flash head is not at the normal setting (pointing forwards) whereby it is in another position, the zoom position clicks to 50~mm and is indicated in the LCD display by a short flash in the Auto mode.
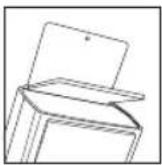
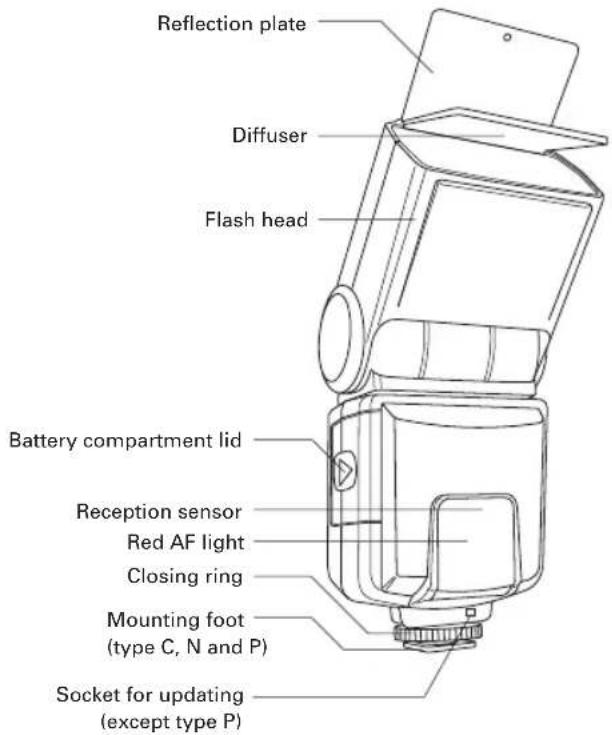
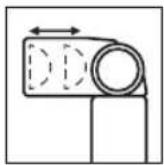
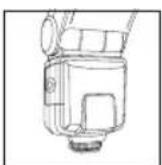
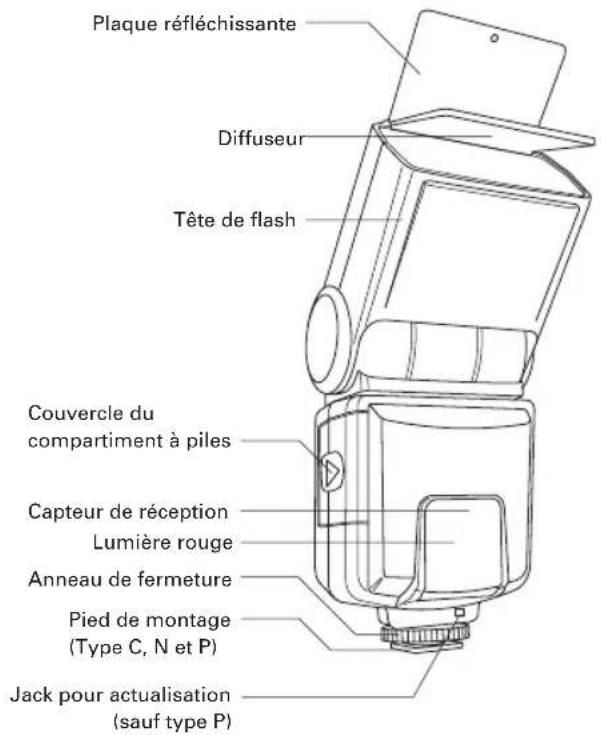
Reflection Plate and Diffuser
The flash unit has an integrated reflection plate and a diffuser. You can slide out the reflection plate or the diffuser on the upper side, swivel the flash head and use the reflection plate to shoot photos with a heavy effect. The diffuser can reduce the strong light, creating soft effects. Using the diffuser is recommended to achieve ideal results at close proximity (1-3 yards).
Energy-Saving Function
To save electricity, the flash unit automatically switches off approximately 3 minutes after it has been switched on or since the most recent flash was released. The LCD display indicates the "OFF" signal. To reactivate the flash unit, simply press any button switch below the LCD display table or switch the main switch off and back on. The flash unit is not full switched off in the energy-saving function setting, but its energy use is drastically reduced. When you are no longer using the flash unit, set the main switch to "OFF".

Manual Control of the Motorized Zoom
With the "Zoom" button, you can alter the reflector position of the zoom independently of the focal width of the lens. The LCD display then indicates "M" and the current setting of the reflector's zoom position.
Light tapping of the "Zoom" button changes the zoom position in this order: 24-28-35-50-70-85 mm.
Receiver Function
This flash unit can be operated as a wireless receiver by setting the switch "Slave Mode" to the S position. The flash unit switches automatically to the M mode with an energy ration of 1:1 and a focal width of 24mm . When the sensor discovers the release of an extreme flash, the flash is released simultaneously. The quantity of the light emission can be selected by setting the energy ration from 1/1 to 1/8. If several flash units are used as receivers, then the corresponding quantity of light must be taken into consideration in order to calculate the correct lighting. If the reception mode is activated, the energy-saving mode does not operate.

Update for the D 4500
To maintain your flash unit always in line with the state of the art, you can update your CULLMANN D 4500 to the current state (except type P).
As the update concerned can only be carried out at our service department, please send your flash unit to:
CULLMANN GmbH
Service Blitzgeräte
Waldstraße 12
90579 Langenzenn, Germany
The update for the D 4500 is free of charge.
If you require more information on the possibility of updating the D 4500 flash unit, please send an email to: service@cullmann-foto.de
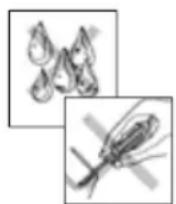
Safety Instructions
- Never use a flash in direct proximity to the eyes of people or animals. This can damage the retina and even lead to blindness.
- Only use energy sources specified in the usage instructions.
- Never attempt to open or short-circuit batteries.
- Never expose batteries or rechargeable batteries to increased temperatures such as intensive sunlight or fire.
- Always switch off the flash unit before changing the batteries.
- Do not attempt to open the flash unit, as it is under high voltage. There are not parts inside the flash unit that can be repaired by the user.
- In the event that the flash unit is damaged to the extent that internal parts are exposed, then the flash unit may only be used again after it has been repaired. Remove the batteries so that it cannot be used unintentionally.
- Never attempt to repair the flash unit yourself. In the event of problems, contact our Customer Service.
Technical Data
Guide number (ISO 100) 36 at 85 mm
Reflector with motorized zoom 24-28-35-50-70-85 mm
Energy supply 4 × 1.5 ~V NiCd or NiMh batteries
Flash times 1/1,000 - 1/20,000 seconds
Charging Time 0,5-9 seconds
Number of flashes approximately 80 times with new
NiCd or NiMh batteries (according
to the battery performance)
Color temperature Daylight
Dimensions approximately 175× 74× 59mm
Net weight approximately 270 grams
(without batteries)
Technical alterations reserved.
- With Minolta Dynax 3 and 5, switch the WL setting on
the function selector to the ON position prior to using the D 4500.
C - Canon auto focus SLR & digital cameras (E-TTL)
N - Nikon auto focus SLR & digital cameras (TTL and I-TTL)
O/P - Olympus & Panasonic DSLR
S - Sony Alpha DSLR/ Konica Minolta auto focus SLR and digital cameras (ADI and D lenses)
P-Pentax DSLR

Pied de fixation type S Pied de fixation type O/P
Legende:
Autofocus/Supporto Flash TTL per:
C - Canon Autofokus SLR & fotocamere digitali (E-TTL)
N - Nicon Autofokus SLR & fotocamere digitali (TTL e i-TTL)
O/P - Olympus & Panasonic DSLR
S - Sony Alpha DSLR/ Konica Minolta Auto Focus SLR - e fotocamere digitali (lenti ADI e D)
P-Pentax DSLR