 — Flash — Mode d'emploi PDF")
EM140 DG Macro (Pentax) - Flash SIGMA - Free user manual and instructions
Find the device manual for free EM140 DG Macro (Pentax) SIGMA in PDF.
| Product Type | Macro electronic flash |
| Brand | Sigma |
| Model | EM-140 DG Macro (Pentax) |
| Compatibility | Pentax AF SLR cameras (P-TTL) |
| Guide Number | 14 (100 ISO/m) |
| Power Supply | 4 AA batteries (alkaline, Ni-Cd or Ni-MH) |
| Recycling Time | Approx. 4 s (alkaline), 3 s (Ni-Cd/Ni-MH) |
| Auto Power Off | Yes, after approx. 180 s |
| Color Temperature | Daylight |
| Dimensions (Control Unit) | 76.7 x 136.2 x 82.4 mm (W x H x D) |
| Dimensions (Flash Unit) | 126.6 x 128.8 x 30.5 mm (W x H x D) |
| Weight | 430 g (total) |
| Main Functions | TTL, P-TTL, Manual, Stroboscopic, Wireless, Ratio, FP Sync, 2nd Curtain, Predictive Flash, Exposure Compensation |
| AF Assist Lamp | Yes |
| LCD Backlight | Yes (LIGHT button) |
| Maintenance and Cleaning | Soft damp cloth; avoid solvents and benzene |
| Safety | Do not disassemble; avoid shocks, humidity and high temperatures; store in dry place |
| Included Accessories | Macro adapters Ø55mm and Ø58mm |
| Spare Parts | Optional adapters (Ø52, 62, 67, 72, 77 mm) |
Frequently Asked Questions - EM140 DG Macro (Pentax) SIGMA
User questions about EM140 DG Macro (Pentax) SIGMA
0 question about this device. Answer the ones you know or ask your own.
Ask a new question about this device
Download the instructions for your Flash in PDF format for free! Find your manual EM140 DG Macro (Pentax) - SIGMA and take your electronic device back in hand. On this page are published all the documents necessary for the use of your device. EM140 DG Macro (Pentax) by SIGMA.
USER MANUAL EM140 DG Macro (Pentax) SIGMA
The CE Mark is a Directive conformity mark of the European Community (EC).
DEUTSCH
fla shu is 1 1 1 1 1 1 1 1 1 1 1 1 1 1 1 1
癸光部
Thank you for purchasing the Sigma Electronic FlashMacro EM-140 DG. The advanced features of this flashgun allow you to enjoy AF Macro photography. Depending on the camera model, functions and operation may vary. Please read this instruction booklet carefully. To add to your enjoyment of photography, the flash has a variety of features. To make the most of all these features, and to get the maximum performance and enjoyment from your flash, please read this instruction booklet, together with your camera's instruction manual, before using the flash, and keep it handy for future reference. (This Flashgun is exclusive to PENTAX AF SLR cameras)
PRECAUTIONS
In order to avoid causing any damage or injury, please read this instruction manual very carefully, paying attention to the cautionary signs below, before using the flash. Please take special note of the two cautionary signs below.

Warning !!
Using the product disregarding this warning sign might cause serious injury or other dangerous results.

Caution!!
Using the product disregarding this caution sign might cause injury or damage.

Symbol denotes the important points, where warning and caution are required.
Symbol contains information regarding the actions that must be avoided.

Warning !!

This flash contains high voltage circuits. To avoid electric shock or burns, do not attempt to disassemble the flash. If the outside shell of the unit is broken or cracked, do not touch the mechanism inside.

Do not fire the flash close to eyes. Otherwise the bright light could damage the eyes. Keep at least 1m/3feet distance between face and the flash unit, when taking a picture with flash.

Do not touch the synchro terminal of your camera when the flash is attached to hot shoe. High voltage circuitry could cause electric shock.

Never use your camera in an environment where flammable, burnable, gas, liquids or chemicals, etc, exist. Otherwise, it might cause fire or explosion.

Caution !!

Do not use this flash unit on any camera other than the PENTAX AF cameras; otherwise the flash may damage the circuitry of these cameras.

This flash unit is not waterproof. When using the flash and camera in the rain or snow or near water, keep it from getting wet. It is often impractical to repair internal electrical components damaged by water.

Never subject the flash and camera to shock, dust, high temperature or humidity. These factors might cause fire or malfunctioning of your equipment.

When the flash is subjected to sudden temperature change, as when the flash unit is brought from a cold exterior to warm interior, condensation might form inside. In such a case, place your equipment in a sealed plastic bag before such a change, and do not use the flash unit, until it reaches room temperature.

Do not store your flash in a drawer or cupboard etc., containing naphthalene, camphor or other insecticides. These chemicals will have negative effects on the flash unit.

Do not use a thinner, Benzene or other cleaning agents to remove dirt or finger prints from the component. Clean with a soft, moistened cloth.

For extended storage, choose a cool dry place, preferably with good ventilation. It is recommended that the flash be charged and fired several times a month, to maintain proper capacitor functioning.
Flash Unit
1.Left Flashtube 2-right Flashtube 3. Auxiliary Light 4. Release Tab 5.MacroFlash Adapter
Controller Unit
6LCD Panel 7.Battery Cover 8.Shoe Ring 9.Shoe 10 MODE Button 11.SEL SELECT Button
-
- Increment Button 13. - Decrement Button 14. LAMP Button 15. TEST Button
16.LIGHT Button 17.Ready Light 18.Power Switch
LENS USABILITY
Although this Flash is designed specifically for Macro lenses (MACRO 50mm F2.8 EX DG, MACRO 105mm F2.8 EX DG, etc.) it is also possible to use it with other lens types, however please pay attention to the following points.
Front part or other parts of some lenses rotate while focusing, and also attaching the ring flash to such lenses would affect focusing mechanism of your camera, possibly resulting in malfunction. Please use Manual Focus only with such lenses.
055mm, and 058mm filter MacroFlash Adapters are bundled with your flashgun. If you want to attach your flashgun to a lens which has a different filter size then please purchase separately a MacroFlash Adapter. (Only 052mm, 062mm, 067mm, 072mm, 077mm macroflash adapters are available).
Depending on the lens' focal length or the distance to subject or another reason, it is possible that your image might be affected by vignetting. Please take some test shoots first to be sure that your setting is not causing vignetting.
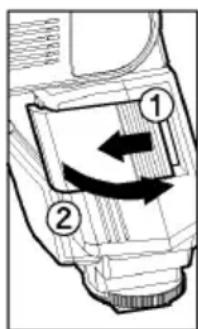
ABOUT THE BATTERY
This flash unit uses four "AA" type Alkaline dry cell batteries or Ni-Cad, Ni-MH, rechargeable batteries. Manganese batteries can also be used but as they have a shorter life than Alkaline batteries, we do not recommend using them. Please replace batteries if it takes more than 30 seconds to light the Ready Lamp.
To assure proper electrical contact, clean the battery terminals before installing the batteries
NiCad batteries do not have standardized contacts. If you use NiCad batteries, please confirm that the battery contacts touch the battery compartment properly.
To prevent battery explosion, leakage or overheating, use four new AA batteries of the same type and brand. Do not mix the type or new and used batteries.
Do not disassemble or short-circuit batteries, or expose them fire or water; they may explode. Also, do not recharge the batteries other than Ni-Cd rechargeable batteries.
When the flash will not be used for an extended period of time, remove the batteries from the flash, to avoid the possibility of damage from leakage.
Battery performance decreases at low temperatures. Keep batteries insulated when using the flash in cold weather.
As with any flash, it is recommended you carry spare batteries when on a long trip, or when photographing outdoors in cold weather.
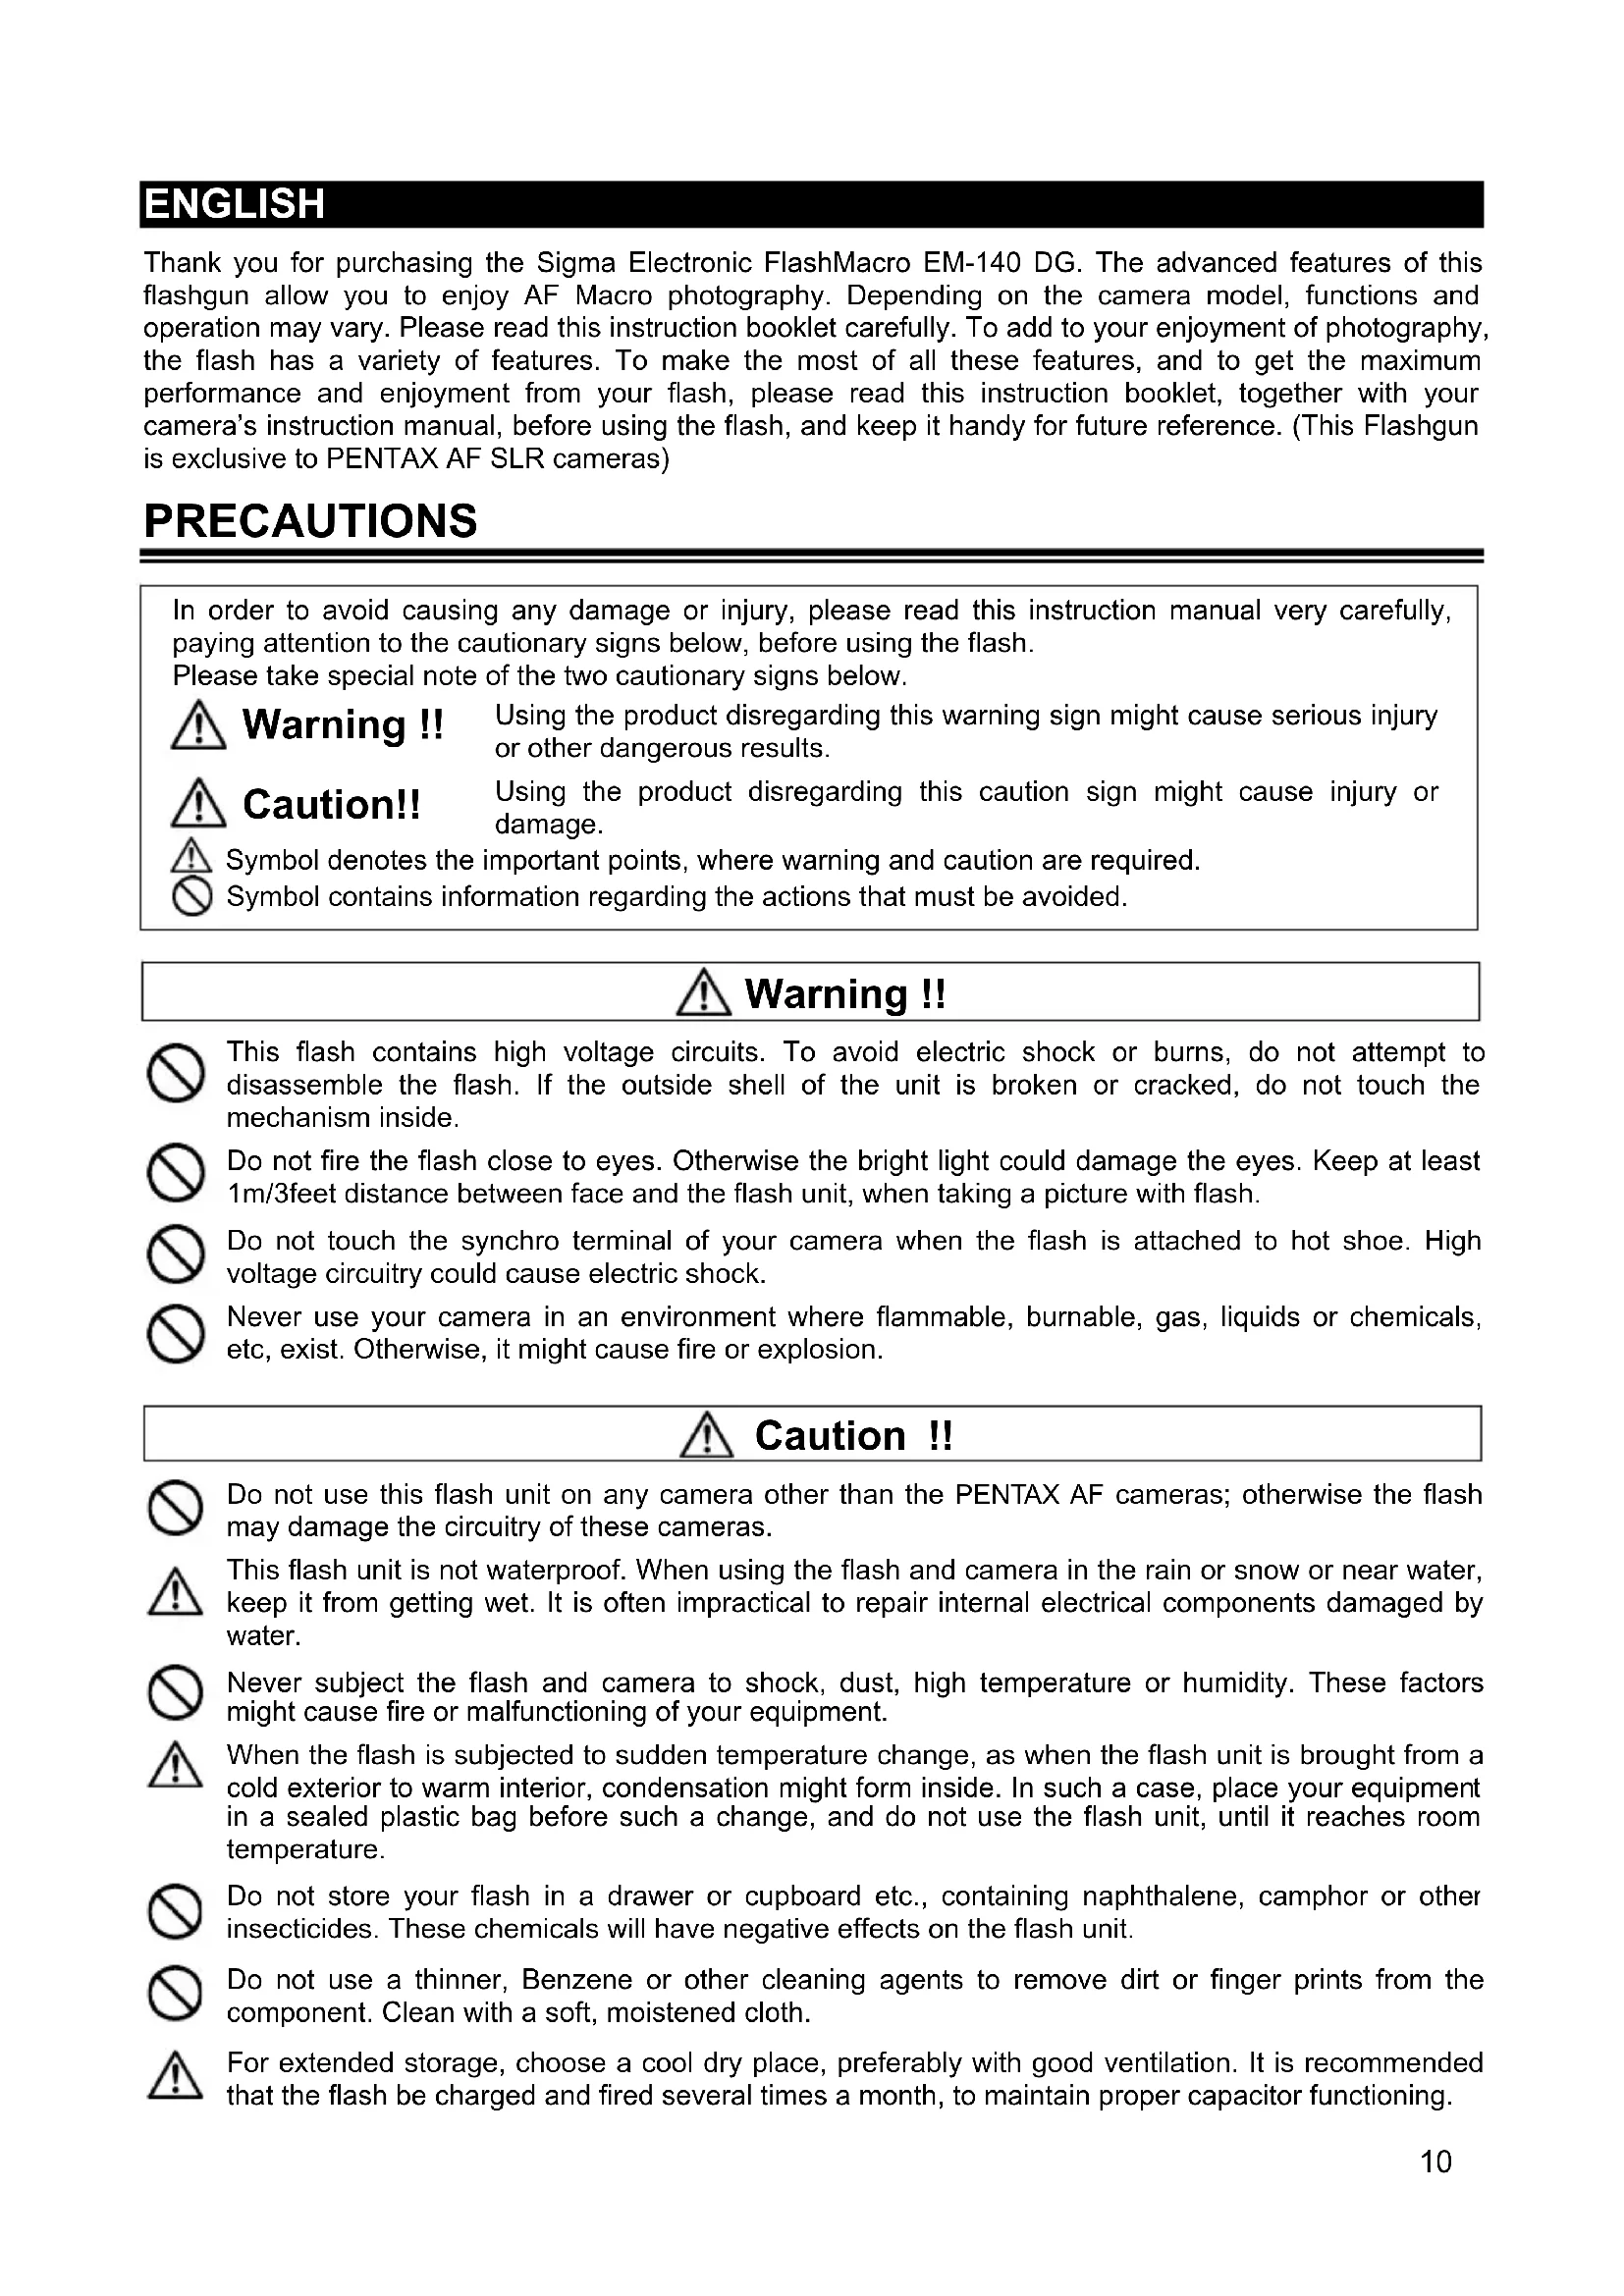
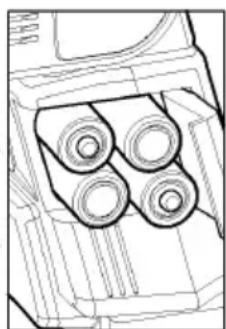
BATTERY LOADING
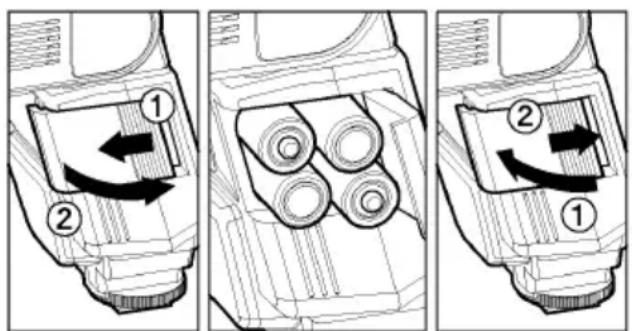
- Be sure to set the Power Switch to the off position then slide, the battery cover in the direction of the arrow to open.
- Insert four AA size batteries into the battery chamber. Be sure the + and - ends of the batteries are aligned according to the diagram in the chamber.
- Close the cover.
- Slide the Power Switch to the ON position. After few seconds, the Ready Lamp will light, indicating that the flash unit can be fired.
- Please press the "Test Button" to be sure that the flash is working properly.
AUTO POWER OFF
To conserve battery power, the flash unit automatically turns itself off when the flash is not used within approximately 3 minutes. To turn the flash on again, depress the TEST button or the camera shutter button, halfway. Please note that, "Auto Power Off" mechanism does not work with wireless TTL flash mode, normal slave flash, and designated slave flash modes.
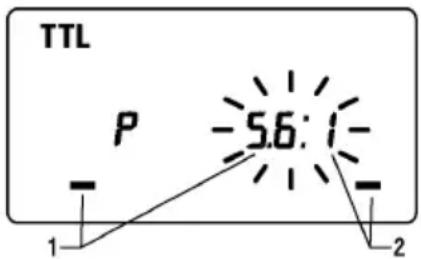
ERROR INDICATION
If the battery power is not sufficient or there is electric information error between the camera and flash unit, the "Flash Coverage Angle" will blink on the LCD panel. When this occurs, turn the power switch off and on. If it still blinks, after this procedure, check the battery power.
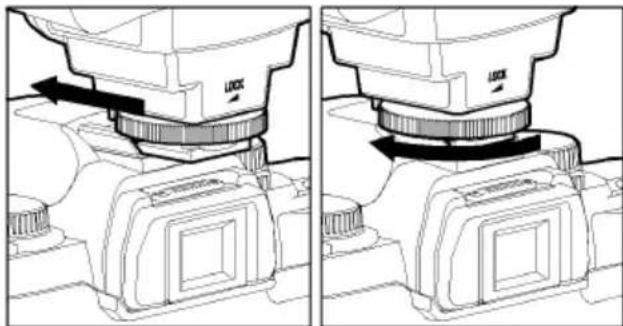
ATTACHING THE CONTROLLER UNIT
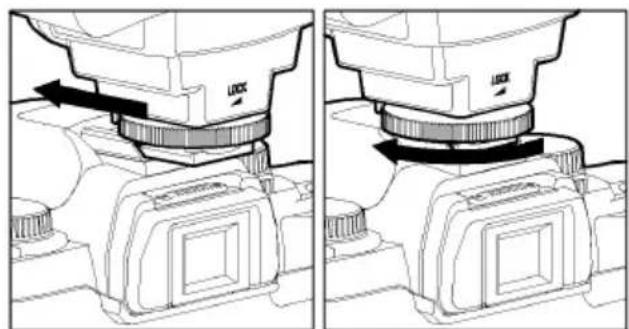
Be sure turn off the Power Switch. Then insert the Shoe Base into the hot shoe on the camera and turn the Shoe Locking Ring until it is tight.
When you attach or remove the flash, grasp the bottom of the flash to prevent damage to the shoe foot and camera's hot shoe.
If the camera's built-in flash is set in up position, please close it before you attach the flash unit.
To remove the flash, rotate the shoe-locking ring in the opposite direction of LOCK mark, until it stops.
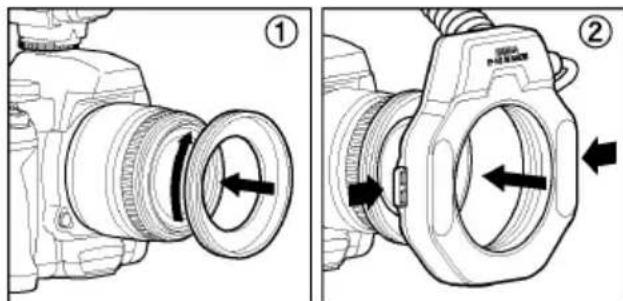
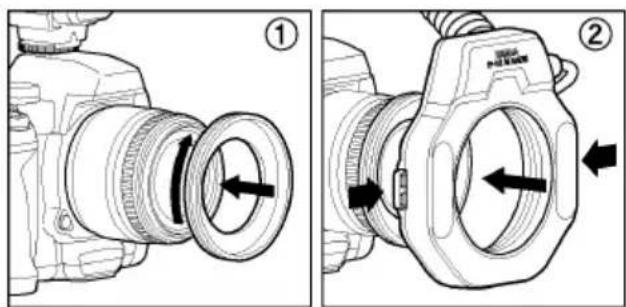
ATTACHING THE FLASH UNIT
- Attach the MacroFlash adapter to the lens' filter tread.
- While pressing the left and right release tabs on both sides of the holder, place the flash unit over the adapter, then release both tabs.
You can adjust the position by rotating the flash unit.
Press the release tab when you detach the unit from the lens.
LCD PANEL ILLUMINATION
When you press the LIGHT button, the LCD panel will illuminate for about 8 seconds. The illumination stays on longer than 8sec, if you press the LIGHT button once again.
AUXILIARY LIGHT
If LAMP button on the Flash Units is pushed, the auxiliary light will emit for 20 seconds. In a dark place, it will be easy to focus by using the auxiliary light. This fuction is very convenient when composing pictures where auto focus does not operate well or where focus adjustment in manual is difficult.
If the shutter button is depressed it will stop working.
TTL AUTO FLASH
In the TTL AUTO Mode, the camera will control the amount of flash lighting to provide the appropriate exposure for the subject.
- Set the camera's exposure mode to P (PICT) Mode.
- Turn on the power switch of the flash, the TTL mark will appear on the LCD panel and flash will start charging. (If TTL mark does not appear, depress the MODE button several times to select the TTL mode).
-
Focus on your subject.
-
Press the shutter button, after the flash is fully charged.
When the flash is fully charged, the ready light in the viewfinder, and appears on the flash unit.
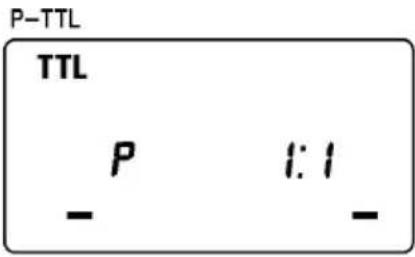
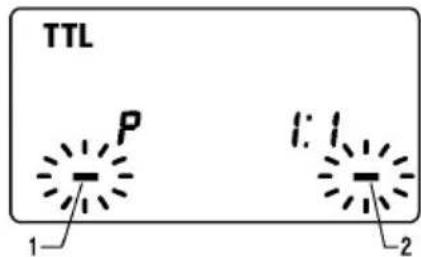
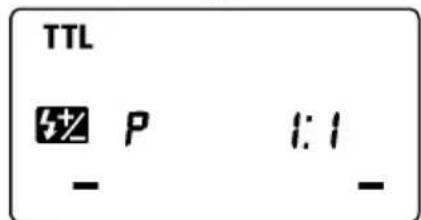
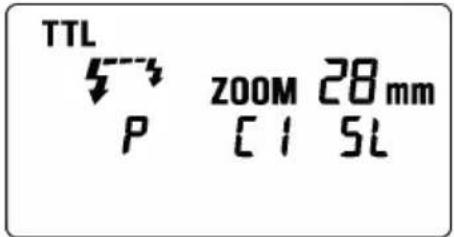
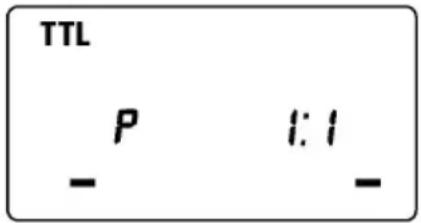
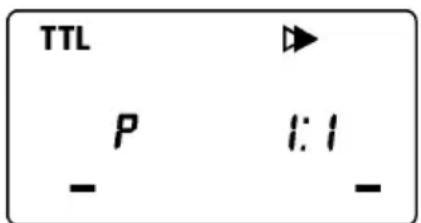
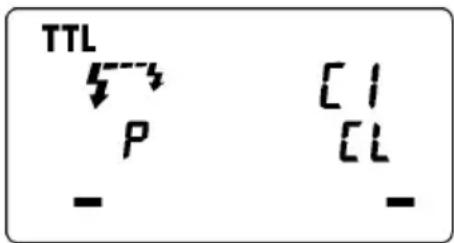
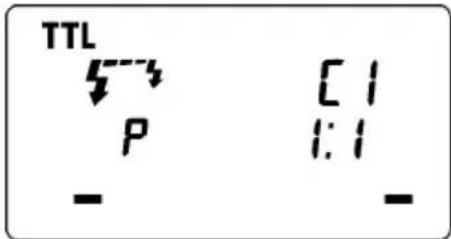
If flashgun is used with a P-TTL compatible camera, TTL will be controlled by the P-TTL system. If the flash is set as TTL, "P" will be displayed on the liquid crystal display.
When the camera receives the appropriate exposure, the TTL icon on the LCD panel will appear for 5 seconds. If this indication does not appear, the flash illumination is not enough for that particular situation. Please re-take the picture, at a closer distance. (In the case of digital SLR cameras, "Flash Exposure Level" cannot be confirmed from the camera's viewfinder display or from the blinking display indicator of the flash's LCD panel. Please confirm the Flash Exposure Level visually from the image that you capture.)
When the flash is fully charged, the flash mark will appear in the finder. If the shutter is released before the flash is fully charged, the flash will not fire, and the camera will take the picture at a slow shutter speed.

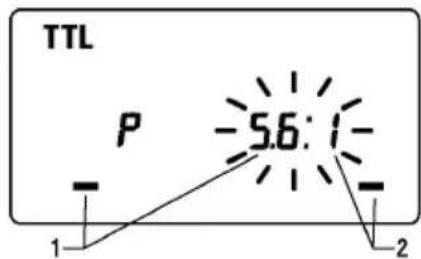
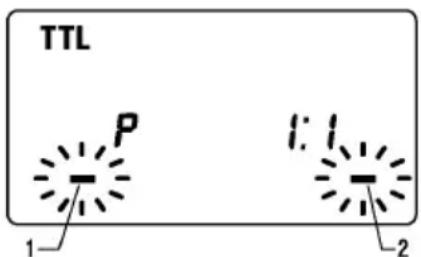
It is possible to give the three dimensional effect to your pictures by adjusting the flash ratio of left or right flash tube or by firing only one side of the flash.
For P-TTL compatible cameras
-
In the S-TTL mode, the flash ratio blinks when you press SEL button.
-
Press the + or - button to set the flash ratio.
Pressing + button will increase the left flashtube and pressing - button will increase the power amount of the right flashtube. The ratio can be set up among 8:1~1:8.
- Press the SEL button several times to stop the blinking.
If the flash ratio is set to 1:1 or the mode is changed, this function will be cancelled.
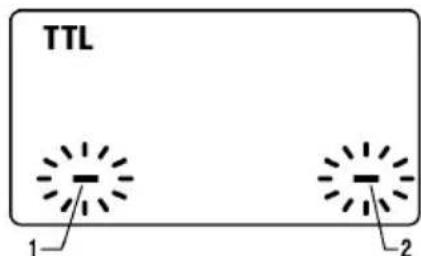
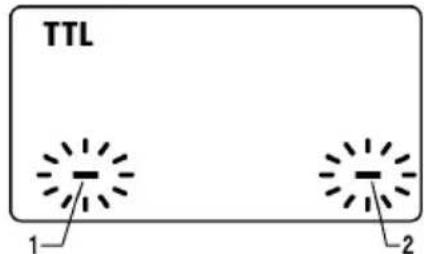
How to fire only one flashtube
-
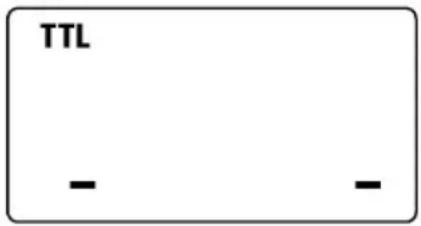
In the TTL mode, press the SEL button to make the Flash Unit display blink.
-
By pressing the + button, the left flashtube will fire, and by pressing the - button, the right flashtube will fire. (Only the firing side will blink on the flash unit display)
-
Press the SEL button several times to stop the blinking.
After shooting please press button and then the ^+ or - button. By doing this flash unit will be set to default mode, display will show both sides.
For P-TTL incompatible cameras
Flash ratio cannot be set. Only one side can be set.
-
In the TTL mode, press the SEL button to make the Flash Unit display blink.
-
By pressing the + button, the left flashtube will fire, and by pressing the - button, the right flashtube will fire. (Only the firing side will blink on the flash unit display)
-
Press the SEL button several times to stop the blinking.
After shooting please press button and then the ^+ or - button. By doing this flash unit will be set to default mode, display will show both sides.
USING FLASH IN OTHER CAMERA MODES Shutter Speed Priority Setting
When you set the desired shutter speed, the camera will select the appropriate aperture value. You cannot choose shutter a speed faster than the camera's sync speed.
Aperture Priority Setting
By selecting the Av mode, after you select the desired aperture the camera will set the appropriate shutter speed for the background exposure.
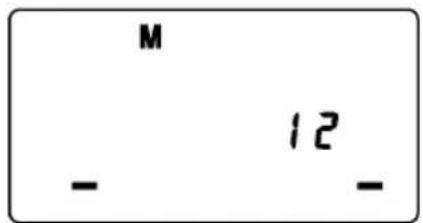
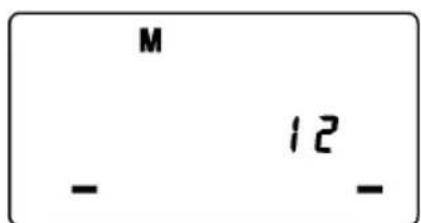
When used with M Mode
You can set the desired shutter speed and aperture value. You can set the shutter speed from top sync speed to bulb.
LIMITS OF CONTINUOUS SHOOTING
To prevent overheating of the flash's circuitry, please do not use your Flash unit for at least 10minutes after using the number of flash exposures, shown in the below table have been made in quick succession.
| Mode Number of Flash Exposures | |
| TTL, M(1/1,1/2) 15 Continuous Flash Shots | |
| M(1/4, 1/8) 20 Continuous Flash Shots | |
| M(1/16-1/32) 40 Continuous Flash Shots | |
| Multi | 10 |
Manual flash provides adjustment of desired flash intensity (flash output level).
The shooting in Manual Mode requires a very advanced technique. We recommend you use the Auto mode. When using Manual Flash photography, first take some test shots. It will be beneficial to use a flash meter device for determining the exposure.
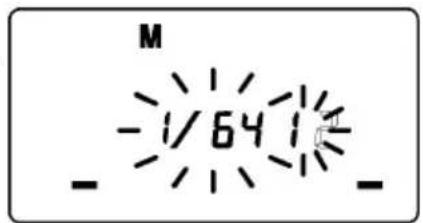
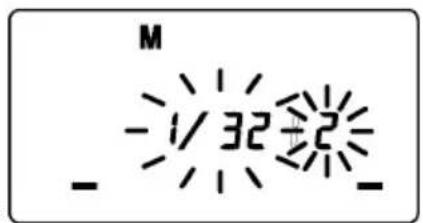
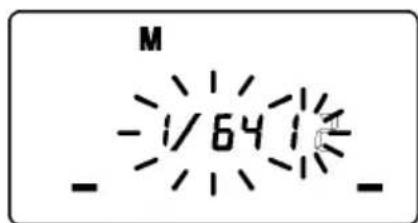
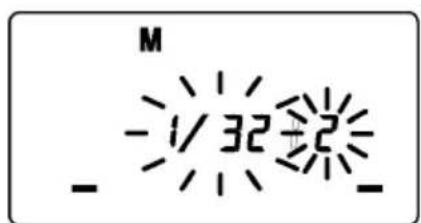
Flash intensity of left and right tubes can be set between 1/1 1/64 . It is also possible to set without firing one of them.
1. Set the camera's exposure mode to M.
2. Press the MODE button on the flash unit to select M.
3. Press the SEL button. (The flash intensity display of the left flashtube blinks).
4. Press the + or - button to set the left flashtube output level. (If " -- " is displayed, the left flashtube will not fire).
5. Press the SEL button. (The flash intensity display of right flashtube will blink).
6. Press the + or - button to set the right flashtube output level. (If " -- " is displayed, the right flashtube will not fire).
7. Press the SEL button to stop the indicator blinking.
If the flash output level values of both tubes are the same, the flash output level will be displayed. When the different flash intensity is set, the flash output level will not be displayed on the LCD.
Regarding Guide Number, please refer to the [Table.1] on the last page.
You can calculate the correct exposure by using the following formula: Guide Number "GN" / Flash to Subject Distance = F-stop
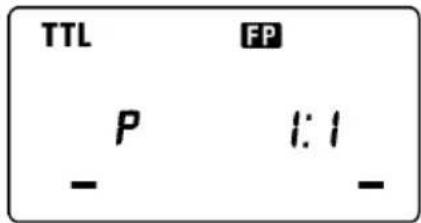
HIGH SPEED SYNC FLASH(FP) (Only for P-TTL compatible cameras)
When you take a picture with an ordinary flash, you cannot use a shutter speed faster than the camera's synchronized speed because the flash must fire when the shutter curtain is fully open. The FP flash keeps firing, while the shutter curtain is running. Thus you can use a shutter speed faster than the synchronized speed.
-
Set the mode of camera. (The exposure mode changes by each camera models.) Please confirm it with the instruction manual of the camera in use.
-
Choose the Flash Mode by using MODE button (P-TTL, WIRELESS FLASH can be used).
-
Press the + or - button and make the indicate FCD indicator appear on the LCD panel.
-
Focus on the subject
-
When the Ready Light of the flash is illuminated, the unit is ready for use.
If the camera's synchronized speed is slower than the camera's shutter speed, it switches to ordinary flash.
Depending on the shutter speed, the Guide Number will be changed.(Please refer to table2 on the last page)
If you want to cancel the FP Flash mode, please follow the FP flash procedure to make the FP indicator display from the LCD panel.
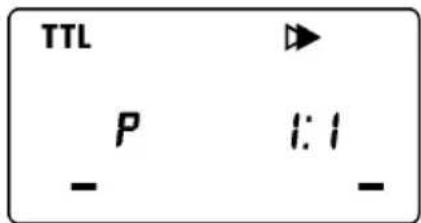
SECOND CURTAIN SYNCHRONIZATION
When you photograph a moving subject with slow synchronization, usually the furrow of the subject will be exposed in front of the subject. The ordinary flash light will fire when the first shutter curtain is fully opened, thus the subject will be exposed from the time flash is fired to the time the shutter is closed (This is called First Curtain Synchronization). When you use second curtain synchronization, the flash will fire just before the second curtain begins to closes, and the subject will be exposed by ambient light from the time the shutter opens until the flash fires. The furrow of the subject will therefore be exposed behind the subject, creating a more natural effect.
- Set the desired picture-taking mode of the camera
- Select the Mode of the flash. (TTL mode)
- Press + or -, button mark will be displayed on the LCD panel.
- Adjust the focus, and take the picture after confirming the ready light is lit.
First curtain synchronization will be set, if mark is not displayed.
To cancel second -curtain synchronization, turn off the mark on the LCD panel.
MODELING FLASH
If you use the Modeling flash, you can check the lighting and shadow effects, before you take the picture.
- Press the MODE button and select the mode.
- Press the + button or - button several times to make the Model the LCD panel appear.
- Confirm that the flash is charged, then press the TEST button to fire.
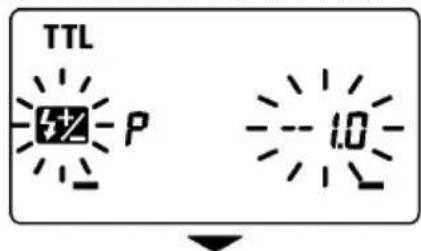
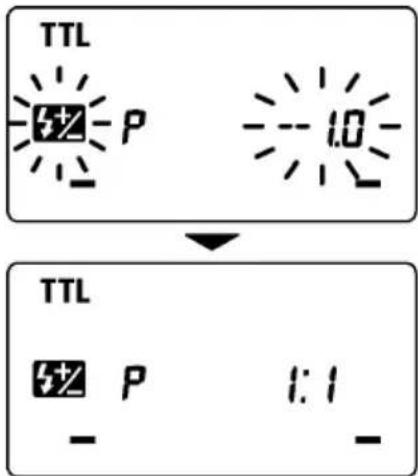
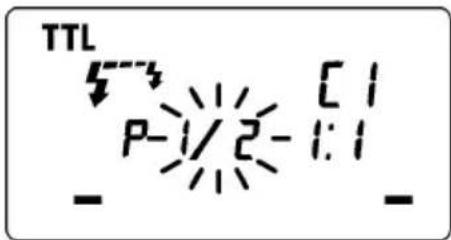
EXPOSURE COMPENSATION (Only for P-TTL compatible cameras)
You can use flash exposure compensation in combination with normal exposure compensation (to control the background exposure level) in flash picture. Flash exposure compensation can be set 1/2 stops in -3 +1 stop increments.
- Choose the Flash Mode by using MODE button (P-TTL, HIGH SPEED SYNC FLASH, WIRELESS FLASH can be used).
- Press theSEL button to make the indicator of 5 mark blink.
- Press the + button or - button to set the compensation amount.
- Press the SEL button to make compensation amount indicator stop blinking.
- Focus on the subject.
- You can take the picture after confirming that the Ready Light of the flash is illuminated.
To cancel exposure compensation, please start from step 2 and choose 0.0 on display.
In wireless photography, setting is possible for each master side and slave side.
If two or more flashguns will be compensated at the same time, please use exposure compensation of camera.
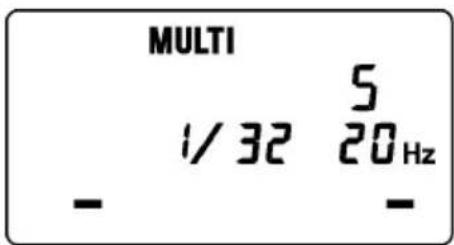
MULTI FLASH MODE
While the shutter is open, the flash will fire repeatedly. By doing so a series of images of the subject will be exposed in one frame. A dark background with a bright subject shows more effectively in this mode. It is possible to set the firing frequency between 1Hz and 100Hz. Up to 90 flashes can be fired continuously. The maximum number of flashes varies, depending on the flash guide number and firing frequency settings. (Please refer to table3 on the last page).
- Set the camera's exposure mode to M mode, and set the F number
- Press the MODE button until the Multi-flash mode appears
- Press the SEL button until the flash firing frequency starts to blink.
- Press the + or - button to set the desired flash frequency value.
- After pressing the SEL button again, the flash power level will blink.
- Press the + or - button to set the desired power level.
- Press the [SEL] button again, the number of flashes will blink.
- Press the + or - button to set the desired number of flashes.
- Press the SEL button again, the display will stop blinking.
- When the ready light of the flash is illuminated, the unit is ready to use.
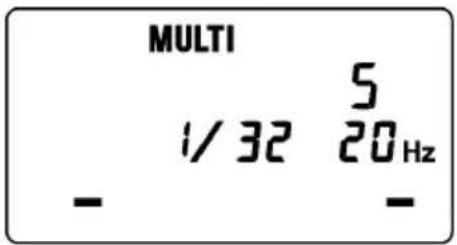
Note: Please set the shutter speed longer than; Number of Flashes you want ÷ Firing Frequency
WIRELESS FLASH
(Only for P-TTL compatible cameras)
When this flashgun is used as the controller, it is possible to operate the EF-530 (EF-500) DG SUPER PA-PTTL at a remote position from the camera body.
Make sure not to position the flash your picture area.
Place the flash approximately between 0.5m-5m (1.5-5.6ft) range, and camera approximately 1m-5m (3-16ft) range from the subject.
In case of other people using Wireless Flash mode near you, your flash may be influenced by the other person's flash and your flash may fire. In this circumstance, please set your flash to a different channel; from that of the other person's flash. Please refer to above settings.
In this instruction, we call a flash unit, which is attached to the camera body the "Controller", and we call a flash unit at a remote position the "off-camera flash".
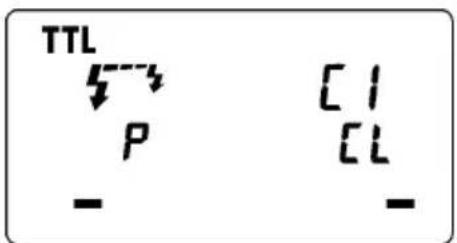
When only OFF-CAMERA FLASH is triggered
Controller Setting
- Attach the flash unit to the camera.
- Press the MODE button to select the /mark.
- Press SEL button, to make the channel indicator blink on the display.
- Press + or button to set the desired channel number.
- Press the SEL button several times until the display stops blinking.
Off-Camera Flash Setting
- Press the MODE button to Select the 74 SL mark.
- Press SEL button, to make the channel indicator blink, on the display.
- Press + or - button to choose the same channel number as set on the controller.
- Press the SEL button several times until the indicator stops blinking.
- Place the off-camera flash at the desired position.
- Check that both flashes are fully charged.
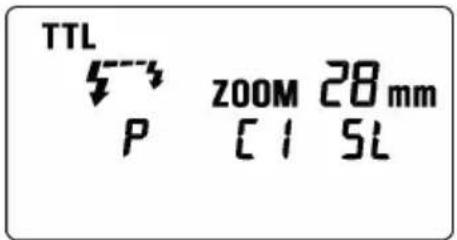
Ready light lamp will light, and the AF Auxiliary lamp will blink to indicate that the flash is ready for shooting.
- Adjust the focus on the subject, and take the picture.
It is also possible to use High Speed Synchro photography. After the above-mentioned setting please set flash of controller as High Speed Synchro. Please refer to High Speed Synchro photography section for more details.
When triggering both CONTROLLER and OFF-CAMERA FLASH.
Controller Setting
- Attach the Flash to the camera.
- Press the MODE button to select the mark.
- Press SELECT button, to make the channel indicator blink on the display.
- Press + or - button to set the desired channel number.
- Press button to make the indicator stop blinking.

Off-Camera Flash Setting
- Press the MODE button to Select the 573 51 mark.
- Press SEL button, to make the channel indicator blink on the display.
- Press + or - button to choose the same channel number as on the controller.
- Press the SEL button several times until blinking stops.
- Place the off-camera flash at the desired position.
- Check that both flashes are fully charged.
Ready lights will be lit and the AF Auxiliary lamp will blink, to indicate that the flash is ready for shooting.
12. Adjust the focus on the subject and take the picture.
It is also possible to use High Speed Synchro photography. After the above-mentioned setting please set flash of controller as High Speed Synchro. Please refer to High Speed Synchro photography section for more details.
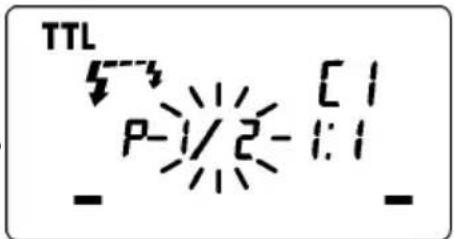
It is also possible to set the maximum flash output amount of the controller by 1/2, 1/4 or 1/8.
- Press the SE button several times to make the flash output amount indicator blink.
- Press the + button or - button to set the flash output amount.
- Press the SE button several times to make the display stop blinking.
SPECIFICATIONS
Guide Number : 14 ISO 100/m (when the flash is fired at full power)
Power Source : AA Alkaline Battery or AA NiCd Battery or AA Ni-Mh Battery x 4pcs
Recycling Time: about 6.0 sec. (Alkaline batteries)
: about 4.0 sec. (Ni-Cd, Ni-MH Nickel-Metal Hydride)
Angle of Coverage : Vertical / Horizontal 80 degrees
Weight : 430g (without batteries)
Dimensions (Controller): 76.7mm×136.2mm×82.4mm
Dimensions (Flash Unit): 126.6mm×128.8mm×30.5mm
DEUTSCH
That is, the four-dimensional space of all 3-dimensional manifolds.
哉TtSⅡD
哉T 1
扎拉国末
Av moDre 1 1, 1 1 1 1 1 1 1 1 1 1 1 1 1 1 1 1 1 1 1 1 1 1 1 1 1 1 1 1 1 1 1 1 1 1 1
M 乌德 陆
S313 5
対人
轟原社,日。
He nCnoJIb3yIte BCnblkUy Ha kamepax OTnHbIX OT PENTAX AF. IcnoJIb3ObaHne Ha npyrnx kamepax MoKet IOBpeDITb 3NeKtpnueckne cenN 3Tnx KaMep.

Bcblka He BODocToKa. Pn nCnoIb3OBAHm BCblkN KamepbB yCIOBnx DoJx, CHERa nn OKONO BObl, CTapaNTecb DePkaTb nx cyXIMN. YactbIM RBLneHnEM RBLnEeTcpeMOHT BHYTpEHNX 3JIeKTPnuecknx cenei nobpeKdEHHbx BOdoi.

HnkOrda He noDbEprAte BCnbIuKy I KaMepy yJapam, Bo3JeNCTBnIO nbIN, BbICOKo TempeaTpybl IN BnaXHOCTN. 3TN foAKTopbl MOrY npNBODNTK BO3ROPaHNO n OTKa3Am B pa6Ote o6OpydoBaHn.

Korda BCnblka noDBepraetc pe3komy BO3deICTBIO n3MeHHeNr TEMnepaTpybl, Hapnpmep, npn BHeceHn ee n3 XoJIOHO MeCTa B TeNpyo KOMHaTy, BHyTpNi MoXeT o6pa3OBaTbCra KOHDeHCat. B 3tOM Cnyae nepeD TaKIM N3MeHHeNem, NOJoxNte O6OpyIDoBaHne B 3akPbI TYO INaCTIKOBYIO EMKocTb, IN He IcNoJIb3yIte BCnblkU, NOKA OHa He DOCTURHT KOMHaTHOH TEMnepaTpybl.

He xpaHnTe BCnbIuKy B uKafoy Hn rapdepo6, nckoJbky TaM MoKet 6bITb HaΦTaINH, KaMΦopa N dpyrne IHcEKTnUdbl. 3TN XIMNkaTbI OTPuCaTeNbHO BInraHOT Ha BCnbIuKy.

He nCnoJb3yIte pactBopnten, 6eH30n I npyrne uNCTaIe NBeIecTBA dJa yDaneHn rpa3n nn OTneuATKOB naJIbcE. YIcTKy npOn3BODITe MmKoYyBnaXHHoTKaHbIO.

IyHKUHOHOBHO XpAHENr IcNoB3yIte npOxJaHoe cyXoe MeCTo IpeNIOHTeJIbHO C xopoUe BeHTnlaue. PekomeHdyETc, YTO6bl BCbIuKa 6bIa 3apJxHa n IINr IPOBepKn npABUNbHoro fYHKUHOHPOBaHNA HeCKoBko pa3 B MeCzI npOBepAIOCb Ha cpa6aTbIBaHne.
Bcnbikka
- JIeBaI mNpybchAЯ lamna 2. IpaBaI mNpybchAЯ lamna 3. lamna noCBeTkn 4.ФИKcaTop aanTepa 5.AanTePdIy yCTaHOBKn MaKpOBcbluKn Ha obEeKtNB
Блok ураленя
- JKK dncnne 7.KpbuKa oTceKa 6aTapei 8.KoNbO 6JIOKnpOBKn 9.Pa3bEe 10.KHOpKa MODE
11.Khonka Bb6opa SEL 12.Khonka + 13.Khonka - 14.Khonka AMP 15.Khonka TEST - Khonka [LIGHT] 17. Иndикатop rotobhoctn 18.БыклочаTeьптаня
NCIOJIb3OBAHNE BCIIShKIC OBeKTHBOM
Hecmotpna To, yTo 3Ta BCnblka npedHa3NaueHa cneuaJIbHO dIy MaKPOo6BeKTHOB (MACRO 50mm F2.8 EX DG, MACRO 105mm F2.8 EX DG n T.D.), TaKHe BO3MOxHO NcNoJIb3OBA Tb BCnblkky C obBeKtNBAMn Dpynx TINOB, Ondako, NoKaJyNCTa, Obpatnte BHNMaHHe Ha cNe dyUoJe:
IpeHna YacTb HnI dpyrHe qactn HeKOTOpbIX o6BeKTHOB BpaUaHTcB O BpeM OKycuPOBKn, n IOdcoeDInHeHne KOnbueBOB BCbIwKn K TaKIM O6BeKTHBaM MoXeT NOBnraTb Ha pa6Ory MexaHn3Ma OKycuPobKn BaJero OToaannapaTa n npVBecTn K BO3MOxHOH eHnpaBnHbHO ero pa6Ote. C TAKmN o6BeKTHBaMn NCNoJIb3yIte TOnbKO pyHyIO OKycuPobKy.
B KOMNJIeK T NOCTABKN BCNBIUKN BXOJrT aIaNTepbI DnE eKpeJIeHnK O6BeKTNBAM C DNAmETpOM 055 MM N 058 MM EcIN Bbl XOTnTE NODCOEINHITb BCNBIUKNY K O6BeKTNUBY C DpyrIM DNAmETpOM HacAdKn DnR CBToOpHnBtpa, PnIObPeTnTe aIaNTep DnA DpyrO DNAmETpa, PPODAIOuHnCt ONDeJIbHO (B npOdaKeEcTB aIaNTepbI DnA MaKPOBCNBIUKN C DNAmETpAMTOJbKO 052MM, 062MM, 067 MM, 072MM, 077 MM).
B 3aBnCmOCTn OT fokycHOro pacctOHHra ObekTnBa, pacctOHHra Do obekTa CbEMKn NIN INhbx npuHH qactb KaIpa MoKet OKa3aTbcra 3akpbIToN Kopnycom BCnbIuKN. CdeNaTe HeckoJIbKO KOHTpONbHbIX CHIMKOB, YTO6bl y6eINTbcra, YTO yCTaHOBka BCnbIuKN He Bb3bIAeT 3akpbITnq aCTn NOJa KaIpa.
BATAPEN
3Ta BCnblka nCnoJb3yET yeIbepe 9eNochbIX 6bapen Tnna «AA» nn Ni-Cd, Ni-MH aKKymjraTopbi. TaKke MOryt 6bITb NcNoJIb3OBAHbI MapranueBbie 6bapen, Ho OHN mMeOT MehBmI pecypc, Yem 9eNoCHbI e N03TOMy Mbl He peKomeHdyEM nCNOJIb3OBAtB nx. IoxaJyIcTa, 3ameHnte 6bapen, ecnn INDnKATOP rOtOBHOCTn He 3aropaeTc 6oJee 30 cekynd npn BkIIOUeHHoB BCblIwKe.
Дя уBEReHNOCTN B XOPOUEM 3JIeKTPnueeCKOM KOHTaKTe NOuHCTIte KJIeMMbI 6aTapei npeD INx yCTaHOBKOJ.
Ni-Cd 6atapen He ImeIOT cTaNapTn3npoBaHHbIX KOHTaKToB. Ecnn Bbl nCnoJb3yeTe Ni-Cd 6atapeu, noXaNyucta, y6eNTecb, YTO eCTb KOHTaKT C 6atapeaMn.
Дя п徴дотвашия разрыа 6atapeи, Teу Илп полььшупе чтбipe HOьх 6atapeи Tuna AA ODHон Марк. He npimehite odHOBpeMeHHO pa3HbIe Мapkn 6atapeи IIN HOBbie nCNoJIb3OBAHHbIe 6atapeи.
He pa3bpaate He 3aMbkaite KOHTaKtbl 6aTapei. He noDBeprAte INX BO3deNCTBIO ORHn IIN BOdbl, BO n36ekahne B3pbIbA. He nepe3apjkaite 6aTapei, ecn OHn He YBJIOTc pepe3apjkaemblm.
Korda BCnblka He nCNOJb3yeTcDnITeJbHbI nepNoB BpeMeHN, BBHbTe 6aTapen n3 BCnbIuKN dIra TORO, UTO6bl N36exKaTb BO3MOXHOCTN NOBpeJdeHna OT TeH.
XapakTePncn6aTpeu yxduoTc npn cHKeHH Tempeatpybl. DePKTe 6aTapeo otJeBHO npn nepepbax B cbEmke co BCnbko npn H3KoTemepaType.
KaK IJIaJIIO6oB BCbIbIKn peKOMeHdyETcN IMTe 3aIaCHOI KOMJIeKT CBexNX 6aTapei npu IJIInTeHOM nyTeWeCTBUN INI pN CbEMKaX B XOJOnHyIO NOrOy.
YCTAHOBKA BATAPEI
- YIOCTOBePbTEcB yTO NITaHHe BbIKNoyeHo. 3aTeM CDBINbTe KpbIiKy OTCeKa 6aTapeN B HAnpaBneHn CTpeKN.
2.YctahOBHTe Yetbipe 6atapeu Tuna AA B OTCek 6atapei. PpOBepbTe, yTO KOHTaKTbI + n - cTOrT B COOTBETCTBn C yKa3aHnMa Hn KpbIiKe OTceKa. - 3akpoTe KpbIuKy.
- CmeTe BbIKIOHateB B NOIOKeHne ON (BKn).Yepe3 HeCKoJIbKO cekyHd JAmnOuKa rTOBHOCTN 3aROpNTc, YTO yKa3bIbAeT Ha To, YTO BCnblKra rTOBa K pa6ote.
- Haxmte KhoNky Test nna npoBepkn paobtbl BcnbluKn.
ABTOMATUQUECKOE BbIKJIIOUeyHNE NITAHNIA
Дя coхраненя emKocTи 6aTapeB BCNbIuKa aBTOMaTHueCKn BbIKHouaetcR, KOrda OHa He NcNoJIb3yETcR B TeueHne npimepno 3 MInHyT.ДЯ BKIHOeHnRA BCNbIuKN HaxMITE KHOJky TEST nIN HaxMITE HAnOIOBHy KHOJky cnycka kamepbI.Obpatnte BHMaHne, YTO npi pa6ote B dNCTaHcuHHom pexmme BCnbIuKn TTL, B HopMaJIbHOM pexmme DOONHHTeJIbHOH BCNbIuKN I B pInHydnteJIbHOM pexmme DOONHHTeJIbHOH BCNbIuKN aBTOMaTHueCKoe BbIKHoueHne He pa6oTaet.
INHDAKAUO WUNBKN
Ecnn emkoctn 6atapen HeoctatoHNO nIe ctb Oun6ka B o6meHe HnOpMaune Mekdy kamepon I BCbIuKo, Ha KK naHEn 6ydet MrraTb INDnKaTop yrna OXBata BCnbIuKn. Pp nOraBneHn 3Toi HaDnncn BBKJIIOHTe N BKHOHTe NITAHNE BCNbIuKn.
YCTAHOBKA IOTCOEINHEHNE BCnblkN
YIOCTOBePbTecb, YTO NITaHHe BCnblIck BbIKJIIOueHO. BcTaBbTe noNo3bHa BCnblIke B OTBeTHyO qAcTb Ha KaMepe I NOBepHHTe KOJECO 6NOKIpOBaHHN NOI03beB Do ynpa.
Korda Bby CTaBnTe NIN CHNMaTe BCbIuKy, 6epnte ee 3a HIXHIOU Yactb IJIpyedOTBpaueHn NOBpeXdEHHO OCHOBaHn INo03beB n pa3bema Ha KaMepe.
Ecnn BCTpoeHHaB BCnblska KamepbHaxOHTcB B cepxHem NIOJKeHN, NOKaIyIcTa, ONyCTnte ee nepeD yCTaHOBKO BHeUHeB BCnblsKn.
Дя сягия BCnbIuKи NOBepHnTe 6NOKpyUoOe KONEOBINpOTNBONIOXHOM HAnpaBJIeHIM OT 3HaYKa LOCK (6NOKnpOBaHne)doTexnop, noka OHO He octaHOBUTc.
ПРИСОЕДИНЕSBLOKA BCПьIlKIN
1.ПпсоeДинHTe aадаNTep ДЯ уctaHOBKN OБьeКТиBa K pe3b6e CBetoФиNbTpHa HoobekTnBe.
2. OndOBpeMeHNO Haxmam Ha JEBYIO npaByIO 3aueKn Ha o6eHX CTOpOHAX KOpnyCa, yCTaHOBnTe 6IOK BCbIiKn NOBepx aanTepa, a 3aTEM OTnycTne 06e 3aueKn.
Bb MoKeTe OtperynipoBaTb noJoxeHne 6noka BcNblkN erO BpaueHnem.
Пи OTcoeINHeHn 6JOKa BCNbIuKn OT OBeKTnBa HaxMITE Ha 3aUeNkY.
ПОДСВETКАЖКДИСПЛЕ
Ipn Haxatnn Ha KhoNkY Light, noCBeTka KK DnCnner BcNbIuKn BKnIOuaeTcna 8 ceKyHd np6n3ntbHo. PocBETka 6ydt ocuyecTBnIbTcra 60Jee 8 cekyHd, ecn Bbl 6ydeTe haxmAtb KhoNkY LIGHT NOBTOPO.
BCNOMORATEJIbHЯ NOIDCBETKA
Ecnn Ha 6noke BCbIiKn HaxaTaNonKa LAMP, B TeueHne 20 cekynd 6ydt BKIOUeHa dONHNHTBna NoDCBETka. B yCNoBnJx HeOCTaTOHOro OCBeUeHnca DOnONHtEnbHO NODCBETKO YDO6Hee npOn3BOINTb fokycnpOBky Ha oBeKeTe. 3Ta 7yHKmry OeyHb yO6Ha pR KOMNOHOBKe CHIMKOB, KOrda aBTOfOKcnpOBka pa6otaet He yDObJIeTBOpNTbHO mN KOrDa TpydHO CfokycnpBaTbCByHyIO.
Ecnn KhoNka 3aTbopa 6ydet Haxata, NOcCBETKa aBTOMaTHueCKN BblKJIIOHTcra.
Bpejme TTL AUTO kamepa 6ydet ynpabnTb MOHocTbIO BCnbIuKn dny o6ecneueHna COOTBeTCTByoUeey 3Kcno3uyn O6beKeTa.
1.YctaHOBInTe Ha KaMepe B pexm P (PICT).
2.BKIOHHTe NITaHHe BCbIuKn. Ha KK NaHei NOBHTc3HaOk TTL n BCbIuKa HauHET 3apXaTbcra. (Ecnn 3HaOcK TTL He NoBJIeTc, HeCKoJIbKO pa3 HaxMnte KhoNky MODE dJa BbIbopa peXmMa TTL.)
3. CφokycnpyTecb Ha o6bekt.
4. Haxmte KhoNky cnycka noCne noHno 3apAkn BCnblkN.
Pn noHOn 3apAnke BCnbIuKn 3arOpntc NaMNoUka rTOBHOCTN B BuOncKaTeNe n Ha BCnbIuKe.
Ecnn BCnblska HcnoJb3yeTc C kamepo CoBmecTmoCpeXMMOM P-TTL, TTL 3Kcno3uua 6ydt KOHTpOIpObaTbcra CnCTeMoP-P-TTL. Ecnn BCnblska yctahOBnHeHa B peXIM TTL, cMBOI "P" 6ydt OTO6paKaTbca Ha KK nAHeNn BCblsKn.
Korda KaMepa NMeET COOTBETCTByUOyU OKcNo3uHIO DnIe CbEMKn OBeKta, NocIe CbEMKn Ha KK NaHeN Ha 5 cekyHd NOBNTc8 3HaOOK TTL. Ecnn 3Ta Hndkaun He NoRbIeTc8, B 3ToI CHTyaUN MOUHOCTN BCNbIHKN HeoCTaTOUHO. IoxaynCTa, NOBnHbTEcb 6bnke K OBeKty. (Ppn NcNoJb3OBaHN UdpOBoBix 3epKaJIbHbIX KaMep, NOITBepXDeHne 3KcNo3uHIN He OTobpaXaeTc8 B BVIOICkATEne KaMepbl n Ha KK NaHeN BCNbIHKn. PpOBepntb npabInbHOCTb 3KcNo3uHIN MOxHO nO CHUMky, OTobpaXaeMOMy Ha DnCnIIee KaMepbl.)
Korda BCnbIwka NOHOCbIO 3apJxHa, B BuOnCKaTeNe NOBJIaETc3HaQOK BCnbIwKn. EcIn 3aTBOp cpa6aTbIBaET nepeD Tem, KaK BCnbIwka NOHOCbIO 3apJNTcR, Kamepa 6yDeT CHImaTb KaPc 60JIbwo BBdEppKoK k6e3 BCnbIwKn.
P-TTL
TTL
CHMkam MoxHo npHaTaB obemHocTb, yCTaHaBnBaar COOTHOseHne MOsHcTH npaBOr IeBOH mnylbCHOJ lamblI Hn yCTaHaBnBaar cpaTaBtBAHne TOnbKO ODHo IMnybCHOJ lamblI.
Для камер, coBmecTnMbIx c P-TTL
1.B pexnme P-TTL,ecnnaTb Ha Ha KhoNky SEL COOTHOseHne MOUHOCTn IMnyJbChbIX JAMn HauHET MngTaB.
2. HaxmTe KhoNky + nIIN -ДЯ BbIbopa COOTHOseHn MOUHOCr NmnybcHbIX NaAMn.
Пи Нжати Na KhoNky + 6ydeT yBENHnBaTbC MOnHocTb JeBOI MMnylbCHOI NaMnbl, a Pn HxKATNI Ha KHOkY - 6ydet yBeHNUBaTbcr MOUHOCtB npaBoi MMnylbCHOI NaMnbl. CoOTHOseHne MoUHOCtN MoKeT 6bItB NpeDeJax 3HaueHn 8:1~1:8.
3. Haxmnte KhoNky SEL HeckoJbKO pa3, YTo6bI npeKpaTntb MInaHne.
Ecnn COOTHOWeHne MOUHOCTn NMnybChbIX lamn yctaHOBeHo KaK 1:1 nnn ecnn peXm6bl cMeHEn, 3ta pynkua 6ydet OTmeHeHa.
Cpa6aTbIbAHHe TOJIbKO OJHOI MMnyJbCHO JAMNbI
1.B pexime TTL haxmte KhoNky SEL ,yTo6bl 3HaueHna Ha KK DnCnlee Haayan MuraTb.
2. HaxmajTe KONky +ДЯ yCTaHOBKn Cpa6aTbIBaHnra TOnbKO JneBOI NMnybcHoi NaMnbl N KONky -ДЯ Cpa6aTbIBaHnra TOnbKO npabOIMNpybcHoi NaMnbl. (ToNbKO INdIKaTOP BKIOUeHHoIN MmNybcHoi NaMnbl 6ydet Mrratb)
3. Haxmnte KhoNky [SEL HeckoIbko pa3, YTo6bI npeKpaTntb MInaHne.
Nocne OKOHuaHnBaEMKn HaxMMTe KHOKNy SEL, a 3aTEM KHOKNI + nIN -. 3Ta onepaun npNBedet K yctaHOBKe BCnbIuIKN B peKIM nOka3aHb INdNKaTOPbl OeHX NMnybChbIX lam.
Для камер, He COBmecTnMbIX c pexHmOM P-TTL
COOTHOJEHNE MOUHOCTN He MoKET 6bITb yCTaHOBJEHO. Bo3MOXHa yCTaHOBka cpa6aTbIBaHnra ToJIbKO OdHoi (NJIN 06eNx) NMnyJbCHbIX JAMn.
1.BpeKmE TTL,HaKMITE KHONky SEL,3HaueHnHa KK DnCnnee BCnblIKn HaCyHT MuraTb.
2.C NOMOJIbIO KHOJKN + , yCTaHOBtE Cpa6aTbIBaHne TOnbKO JIeBOH, IIN, C NOMOJIbIO KHOJKN - , yCTaHOBtE Cpa6aTbIBaHne TOJbKO npABOIMNpyJbCHOJ lamMbI. (ToJbKO INHdNKATOp BKHQUeHHoJ mNpyJbCHOJ lamMbI byET MIRaTb)
- Haxmnte KhoNky SEL HeckoJbKO pa3, YTo6bl ppeKpaNTb MmraHne.
Nocne OKOHuaHnCbEeMKn HaxMnte KhONky SEL, a 3aTeM KHONKu +nn. 3Ta onepaun npBBeT K yCTaHOBKe BCnblkN B peXm No yMOJuaHnO, Ha dncnnee 6ydyT nokaahbI INdNKatOpbl oBeNX mnylbChbIX lam.
NCHIOJIb3OBAHNE BCnblIUKB IN DpyrNX PEXKIMAX KAMEPbI
PpnoopntTe BbIepeKKn
Ipn yctahOBKe HxHcH Bam BbIepKKn, KaMepa Bbl6epet COOTBeTCTByIOuee 3HaueHne DnaΦpaRmbI. IcnoB3OBAHHe BblepKKn KopoYe, Yem BblIepKKa CnHXPOHNaCIN KaMepbl, HeBO3MOXHO.
PnpOpntT dnaΦparMbI
B pexime Av, npu yctaHOBe HxKHO 3HaueHnnaΦpaMbl, kamepa yCTaHOBT COOTBEcTByIOU bIdepkky dny npabunbHo nKcno3nnc foHa.
IcnoJb3ObaHne BpyHOM pexmMe M
Bbl mokeTe yctahOBnTB hyxHbIe Bam bbldepKky n 3HaueHne dnaΦpaMbl. BbldepxKa moKeT 6blb YcTaHOBnHea OT MInHMaJIbHO KOpOTKO, COOTBeTCTByIOUeBbldepxKce CnHXPOHn3aCmN Do pyHOn bulb.
OgPAHnueHnI JIe HENPEPBIBHOJ CbEMKn
IyTOBOIpeoTbPntb nepepeB 3neKtpuecknx ceene BCnblkN, noKaJyNCTa, He nCnoJIb3yInTe BCblkiKy, no KpaHne Mepe. 10 MHyT NocJe NCNoJIb3OBaHnE ee dJa CbEMKn 6bICTpoi NOcNeIOBaTeJIbHOCTn KaDPOB NOKa3AHhIX B Ta6JInce HIXe.
PyHOn peKIM BCnblIaKN o6ecneuBaet pyHyIO peryInpOBky INHTeHCNBHOCTN BCnblIaKN (ypoBHeMoIHOCTN BCnblIaKN).
Cbemka co BCnblkO B pyHOM pexKIMe Tpe6yET BlaJeHNr cNoXHOI TexHKn CbEMKn. N03TOMy peKOMeHdyET NcNOJb3OBaTb ABTomatNueckn pexKIM. FOTOrpaΦnpyra Co BCnblkO B pyHOM pexKIMe, cDenaiTe Chauana HeCKoJIbKO KOHTpOJIbHbIX CHMkOB. Ipy ONpeDeHEnHa 3KcNO3uCIN NOE3HO NcNOJb3OBaTb ΦNeWMetp.
INHTeHCNBHOCtB BCNbIuKn IeBOy n npaBOu NMnylbcHOJ lambl MoXeT yCTaHaBnBaTbcra B npedeJax MExdy 1/1 n 1/64 MoUHocTn. TaKKe BO3MOxH0 OTKnIOUHeHne OOnHOJ N3 IMEIoUHXcNIMNyIbChbIX lamn.
-
YctaHOBInTe Ha KaMepe pexm 3KcNo3nM M.
-
Haxmte KhoNky MODE Ha 6nOke BCnblkN N BbIepeNTe CNMBOJ peKIma M.
-
HaxmTe KhONky SEL (3HaueHne INHTeHCNBHOCTN JeBOI NMnyIbCHOJAMnbl HaHET MIRaTb).
4.HaXMMTe KHOKNy + nIN -,YTO6bI yCTaHOBnTB yPOBeHb HHTeHCNBHOCTN JEBOHNMnyJbCHOJAMNbI (ecnHa DnCnJIee BBICBETNUOCb 工 --》,JIeBAHmnyJbCHa JAMna pa6oTaTb Ha 6yJeT).
- HaxmTe KhoNky SEL (3HaueHne INHTeHCNBHOCTn npaBOI MMnyJIbCHOJAMNbI HaHHeT MMRtB).
- Haxmte KhoNky + nnn - yTo6bI yCTaHOBnTb ypoBeH bHTeHCNBHOCTn npaBoi mnybcHoi lambl (ecnHa dncnnee BbICBeTINOCb « -- », npaBaJ mnybcHaj lamna pa6oTaTb Ha 6ydet).
- Haxmte KhoNky SEL Heckonbko pa3, YTo6bl npeKpaNTb MURaHne.
EcIn 3NaueHn INTeHCNBHOCTN BCbIuKn OBeHX NMnyIbChbIX JaMn OOnHaKOBbl, ypoBeHb INTeHCNBHOCTn 6yDet noka3an Ha dncJIpe. EcIn yctaHOBJe pa3hbl ypoBeHb INTEHCNBHOCTn dJa IeBOi n npaBOJ lambl, ypoBeHb INTeHCNBHOCTn Ha KK dncJIpe noka3an He 6yDet.
Beyuune YnCJa BCnbIkw DaHbI Ta6nue 1 Ha nocJeHne cTpaHnue.
Bb moKeTe paCCHTaTb npabnIbHyIO 3Kcno3nUIO nCNoIb3yra CneDyIOUio fOpMyny:
Beyuee Yncno (B4)/pacctoHne oT BCnblkN do obkeTa cbemK = Daaparma
BbICOKOCKOPOCTHA CnHXPOH3AUJRA (FP) (ToIbKO dIy KaMep, noIepeKNaIOx pexm P-TTL)
Pn CbEMKe C 06bIcHOB BCbIiKo, HeIb3a NcNoJIb3OBAbT BbldepKky MeHwe BbldepKKn CNHXPOHN3aun, NOckOJIbKy BCbIiKa DOJXHa Cpa6aTbIBaT B TOT MOMENT BpeMeHN, KOrda 3aTBOP NOnHOCTbIO OTKpbIT. BCbIiKa Pn BBICOKOCKOPocTHoN CnHXPOHN3aun FP OcBeuaet ObEKT NocToRHO BO BpeMЯ DBNXeHNA WTOPOK 3aTbopa. TaKIM 06pa3OM, MoXHO NcNoJIb3OBAbT MeHbUyIO BbldepKky, Yem CTaHdAPTHaB BbldepKKa CnHXPOHN3aun.
1.BbIbepnte Ha KaMepe HuyHbI peXIM 3KcNo3uINn. (HaHnuepeXIMoB 3KcNo3uINn INx BbIbOp 3aBnCrt OT KOHKpeTHoM OdeJIINKaMEpbI.) O6paTntEcB K INHCTpyKuINn NO 3KcNpyaTuINn KaMEpbI dJaNOJyEHn Heo6XoDMoN nHΦopMaUIN.
2.C NOMOJIbIO KHOJKN MODE BbI6epNTe peXIM pa6oTBI BCNbIuKIN (MOKeT IcNoJIb3OBaTbcrapeXIM P-TTL npeXIM 6ecnpoBodHoi BCnbluKIN).
3.HaKMaTe KHOKN +Hn -,YTo6bHa KK DnCnpee BCnbluKn OTo6pa3nncn HndkaTOp BBICOKOCKOPoCTHO CNHXPOHn3aun FP
4.CpokcnpyTe kamepy Ha o6bekTe cbEMKn.
5. Korda J lamna roTOBHOCTn AKTINBUPyETCA, BCNbIka 6yDet roTOBA K cbEMke.

При Вьборе Вьдержки 6олee корOTКОй стандapTHЯ Вьдержka снхронзauи, ржIM FP OTKЛюаETСИ BCпБИшka HaunHaET pa6OTy B obbyHOM pexKIMe.
Пи ИСПОЛБ3OBAHIN BbICOKOCKOPOCTHON CINHXPOHn3aUNB EByuue YnCIO BCnblkN 3MeHЯETcB 3aBnCIMOCTN OT BbIePxK. Yem Kopoue 6ydt BbIePxxKa, TeM Mehwe 6ydt 3ΦΦeKTHBbI dNaJana30H DeIcTBnBcNbIshK (Bedyuue uCNo Mehwe). 3HaueHnB EByuux uCne B 3aBNCIMOCTN OT BbIePxxKn noka3aHbI B Ta6nue 2 Na noCneDne CTpaHnue.
Дя OTMeHbI peKIMa BbICOKOCKOPoCTHOc HxPOHn3aUN FP, cNeyIe DeIcTBnM, ONNCAHHbIM B 3TOM pa3dJe, BBKJIOnHTe OTO6paXeHne CmMBOJa FP Ha KK ducnnee BCnbuikn.
CINHXPOHn3AUJNIO BTOPOI 山TOPKE
Pn foToocbEke DBrHaOuIero oBekTa npn CnHxpoHn3aunC 6oJbwo BblepKko, ObchyNo neped oBekTom 6ydet 3KcnoHnpoBaTbcra cIeI erO dBXKeHna. Obchna BcNbIka 6ydet cpaBaTbBaTb, KOrda nepBa7tOpKa 3aTBopa NOnHocTbIO OTkPoETcN TAKIM oBpazom oBekT 6ydet 3KcnoHnpoBaTbcra OT BpeMeHH cpaBaTbBAHn BCnblIKN i Do 3akpytna 3aTBopa (CnHxpoHn3aunr no nepBoi wTOpKe). Pn nCNOBJ3OBAHnn CnHxpoHn3aunn NO BTOPO WToPKe 3aTBopa, BCnblIKa 6ydet cpaBaTbBaTb ToIbKO neped NaJOM 3akpytna BTOPO WToPkn 3aTBopa n oBekT 6ydet npo3KnOHnpoBaHn OkpykaUOUM CBETOM B
TeueHn BpeMeHn OT OTKpbTnra 3aTBopa n DO cpa6aTaBbAHn BCnbIuKn. B pe3yIbTaTe CneD OT o6beKtHa CHmKe 6yDet NORBnTbcr 3a o6BeKToM, yTO BBJIpyNT 60onee eCTeCTBeHHO.
1.YctaHOBInTe XeJaembI peXIM 3KcNo3nUHa KaMepe
2. BbI6epntepexkIM BCnbliKu (TTL).
3.HaHIMaTe KhoNk + nnn -, YTO6bHa XK dncnnee BCnbIuKNOTo6pa3nncn HnDnKaTOp CnHXPOHn3aunn NO BTOPOJ WTOpe
4. Nocne Toro, KaK 3aRopntc NaMna roTOBHOCTN BCnblIKN, CpOKycnpyTe Kamepy Ha oBeKeT e n cJeNaIe CHIMOK.
Ecnn cunboi He oTo6paKaetcna Ha dinCnnee, 6ydt yHKUHOHPOBaTb peKIM CInxpoHn3aun nno nepBoi wTOPke.
Дя OTMeHbI pexima BbICOKOCKOPoCTHOc cHxpoHn3aun FP, cneyTe DeiCTBnA M, ONcaHHbIM B 3TOM pa3deNe, BbIKNoHTe OTo6paXeHne CmMBOna Ha KK dinCnnee BCnbIwKn.
PEKIM MODEJIINPYUOUI BCNbIiKNI
Pexm Moe npoue BcblknoBnreT npOBepntb pacnpedeHne CBeta n TeHn Ha NobepxHOCTN o6bekTa do cbemkn kaipa.
- Haxmnte KhoNky MODE IJIy BbI6opa HyxHoro pexIma BCnbluKn.
- HaxmaTe KONKn + nnn - do Tex nop, noka cunBOn MODEL He noRButcHa KK dinCnnee BCnbluKn.
3.Поспе тoro,кak Загорпся пamna roTOBHOCTN BCnbliKIn,нжмITE KhoNky TEST ДЯ ИПИOMHauCIMMOdeлруоцero CBeta.
KOMPHEHCAURA 3Kcno3uIN (ToIbko Ira KaMep, noIepeXnBaIOux peXm P-TTL)
Bo3MOxHIO nCnOJIb3OBaHHe KOMNeHCAuIN 3KcNo3uIN BCnbIuKN C O6bIyHOJ KOMpeHCAuNE J3KcNO3uIN (ДЯ KOHTpOJa IpkocTn foHa). BeJIuHHa KOMneHCAuIN 3KcNo3uIN BCnbIuKN MoXeT 6bITb yCTaHOBJIeHa B npEdeJax -3~+1 cTypeHn c WaROM B 1/2.
1.C nOMOHTbIO KHOJKN MODE Bbl6epnte pejIM BCnblIKN (BO3MOXHO NcnoJIb3OBaHne pejIMoB P-TTL, BblCOKOCKOPOCTHA CINHXPOHN3ALI, BECNPPOBOHOI PEKIM).
2.HaKMaIe KHONky SEL do Tex nop, noka Ha dncnnee He hauhET MURATb CnMBOJ
3.C NOMOUIKHOJOK +IIN - yCTaHOBNTe HxHoe 3HaueHne KOMNEHCauIN 3Kcno3nuiN.
4.CmBONbl Ha dncnnee nepectaHT MraTb Nocne NOBTOPO HaxaTHN KHOKN SEL.
5.CfokucpyTe KaempeHa oBekeTe.
6.BcnbIka roTOBa KcbEMke, Korda lamma roTOBHOCTn ropnt.
Дя OTMeHbI KOMNeHCAuN 3KcNo3nU, CJeDyTe DeJCTBnM C nyHKta 2, OINcaHHbIM B 3TOM pa3dJe N Bbl6epnte 3HaueHne 0.0 Ha KK DInCnIee BCnBikn.
B 6ecnpoBOHOM pexKHe HAcTpoKa KOMneHcaUN 3Kcno3nUdoCTyHb KaDnBeDuJe, TaN dNBAEDOMOB BCnbIuKN.
PnOdHOBpeMeHHoYcTaHOBKe 3KcNtOKOppeKuHnHa DByx n60Jee BCbIiKax peKOMeHdyeTcNcONb3OBaTb YcPeDHeHHyIO KOMneHcaUIO Ha KaMepe.
PEXKIM MULTI (MHOROKPATHB)
Korda nCnoJb3yIOTc DnHHbIe BbIepxKn, BCblska MoXeT cpa6aTBiBaTb MHOrOKpAHTO, NOKa 3aTBoP KaMepbI OTkpBt. B pe3yIbTaTe cepna H3o6paXeHn ObekTa bYedT npO3KcNoHnpOBaHa Ha OAnH KaDp. Ira TaKOro poDa CHIMKOB Hau6OJeepdnoCTteJIbHO BbIbpaTb APKN ObEKT Ha TEmHom fOHe. Yactota HmnyIbCOB MoXeT 6bITb BbIbpaHa n3 DnAna3OHa ot 1 do 100 Tc. Bo3MOxHO rHepePiPoBAHne Do 90 NocNeIOBATEhBbIX NMNyIbCOB. MaKcImaIbHOe KOJIueCTBO IMNpyIbCOB 3aBNCIT OT MOUHOCTHn UCACTOTbl. (O3NaKOMbTEcB c Ta6IInce 3 Ha NocLeDHei CTPaHInze 3TOr pyKOBoIDCTBa.)
1.YcTaHOBInTe KaMepy B 3KcNo3nUoHHbI peXm M N BBi6epnte dnaΦparMy
2. Haximai Te KhoKy MODE do Tex nop, noka Ha dincnnee He OTO6pa3ntcra CNMBOJ MULTI
3.HaKMaTe KhoNky SEL do Tex nop, noka He HaHcET MnraTb 3HaueHne YactOTbl MMnyIbCOB.
4.C NOMOUIKHOHONOK +yCTaHOBNTe XeHaemoe 3HaueHne YactOTbl.
- NOBTOPHoe HaxaTne KhoNkx SEL No3BOJNT npOn3BecTN yCTaHOBky 3HaueHHe MOUHOCTN BCnblIKN, COOTBeTcTByIOoee 3HaueHne Ha KK DnCpJIeE BcNbIiKn HaHET MInrA Tb.
6.C NOMOJIbIO KHOIOK + IIN - yCTaHOBNTe XeJIaEMoe 3HaueHne MOUHOCTN BCMbIILKNI. - Cneyuouee HaxaTne KHONKn SEL no3BOJNT npOn3BecTN yCTaHOBky 3NaueHnKoJIuYeCTBa IMNyIbCOB.
8.C NOMOJIbIO KHOJOK +IIN -CTaHOBNTe JKeJIaEMOE 3HaueHHe KOJIuYeCTBa IMNpyIbCOB. - Cnéduoüee HaxaTne KhoNkn SEL BepHéT BCbIshky n3 pexmHa HacToPkn Ba6ouh peXmM.
- Korda namna roTOBHOCTn AKTNBUPyETc, BCbIuKa 6ydt roTOBa K cbEMeK.
PpimueaHHe: YcTaHaBnBaIe BbIepKky 6OJee IInTeIbHyIO, Yem 3HaueHne, NOnyueHHoe Bpe3yIbTaTe DeJeHnKa KOnuEcTba HmNyIbCoB Ha YaCTOTy.
HacTroponKa BeDyuSeB CnblIskN
1.YcTaHOBnTe BCnblkY Ha KaMepy.
2.HaKMaIte KhoNky MODE noka Ha KK dinCnJee BCnbIuKn He oTo6pa3ntcra CmB0n
3.HakimaiTe KhoNky [SEL, do Tex nop, noka Ha KK dinnnee BCbIiHK He HauHET MInaTb INdikatop KaHaJa.
4.Haxmaite KhoNk + nnn - dIy Bbl6opa HxHoro Homepa KaHaJa.
5.HaKmMaTe KOnKy SEL do Tex nop, noka cMBoJIbI Ha Ha KK dncnnee BCnbIuIK He nepeTaHyT MuraTb.
HacTpoiKa BeDOMO BcNbIuKn
6.HaKMaIte KhoNky MODE noka Ha KK dinCnJee BCnbUkHe OTo6pa3ntcA CmB0l
7. HaximaiTe KhoNky SEL do Tex nop, noka Ha KK dinCnnee BCnbikn He HauHET MURATb INHdNKaTOp KaHaJa.
8.C NOMOJIbIO KHOJOK +IIN BbI6epNTe TOT JKe HOMep, KOToPbI 6bln yCTaHOBNeH Ha BeNyUeBcNbiUke.
9.HaKMaIe KHOkky SEL Do Tex nop, noka cMBOJbHa Ha Ka KK DnCJIee BCblIKHe nepeCTaHT MIRaTb.
10.YctaHOBInTe BeDMyIO BCnblkky B HyxHoi N03nuiN.
11. Y6eIntecb INoHNo3apAKe BeNyUeN BeDOMO BcPiWeK.

ZOOM 28mm
C15c
Iamna roTOBHOCTN BeDyueB BCnblkN DoJXHa ropeTb, a lamna NOcBETKn ABToOkoYCa BeDomOn BcblIKN DOJXHa MrraTb, NoTBePjDaar rTOBHOCTb BCnblweK pa6ote B 3tOM peXime.
12. Cφokycnpy Te kamepy Ha oBekTe n cdeNaTe CHIMOK.
TaK JHe, B 6ecnpoBODHom peXnme BO3MOxHa BbICOKOCKOCTHae CnHXPOHN3aun. Iocne HAcTpoEk, ONHCANbIX BblIe, yCTaHOBnTE Ha BeDOMO BcNbIuKe peXnM BbICOKOCKOPCTHO CnHXPOHN3aun. HAcTPOJka peXnMa BbICOKOCKOPCTHO CnHXPOHN3aun OINCAHa B COOTBeTCTByIOUeM pa3JeIe 3Toi INCHTpukun.
HactpoynIgna cpa6aTbIBaHHn BeDyuee N BeDoMoB BCnbIuKN.
HacTpoiKa BeDyuee BcNbIuKN
1.YctaHOBnTe BCnbILkY Ha KaMepy.
2.Haxmte KhoNky MODE do tex nop, noka Ha KK dincnnee BCnblkHe OTo6pa3ntcra CnMBoI
3.Haxmte KhoKy SEL do Tex nop, noka Ha KK dincnnee BCbIuKHe HaHcET MIRaTb INDkaTOP KaHaJa.
4.C NOMOJIbIO KHOIOK +N BbI6epNTe HOpE KaHaJa.
5. Haxmaite KhoNky SEL do tex nop, noka cmbolbHa Ha KK dncnne BCbluKHe nepectaHyT MraTb.
HacTpoNka BeDOMO BcNbIuKn
6.Haxmte KhoNk y MODE noka Ha KK dncnnee BCbIshKn He oTo6pa3ntcra CMBON /SL.
7.Haxmaite KhoNky SEL do Tex nop, noka Ha KK dincnnee BCbIuKHe HauHET MInraTb INDkaTOP KaHaJa.
8.C NOMOJIIO KHOJOK +I BbI6epNTe TOT Xe HOpE, KOToPbI 6bl yCTaHOBJIeH Ha BeDyUeBcNbIuKe.
9.HaKMaIe KhoNky SEL do Tex nop, noka CmBOnbl Ha Ha KK DnCnnee BCnbIuKHe nepeCTaHT MItaTb.
10.YcTaHOBInTe BeLOMyIO BCnblkU B HyKHOI No3NUIN.
11. Y6eHITecb B NOHON 3apAKe BeNuEi N BeDOMOB BCnblweK.
lamna roTOBHOCTn Beyuue BcNbIuKN DoJXHa rOpTe, a lamna nOICCBETKn aBTOOKyCa BeDMOn BCbIuKN DOJIxHa MrraTb, NOITBepKdA rTOBHOCTb BCbIuWeK pa6ote B 3tOM peXmme.
12. Cφokycnpynte kamepy Ha oBekTe n cdeNaTc CHMOK.
TaK JHe, B 6ecnpoBOHOM peXnme BO3MOxHa BbICOKOcPOcTHa CnHXPOH3aUa. Iocne HacTpoeK, ONcaHHbIX BblIe, ycTaHOBnTe Ha BeIOMOB BCnblIepe Xm BBICOKOcPOcTHOH CNHXPOH3aUu. HAcTpoiKa peXnMa BbICOKOcPOcTHOH CnHXPOH3aUuONcaHa B COOTBeTCTByIOUeM pa3dene 3ToN INCTpykUuN.
Tak JKe, B 6ecnpoBOdHOM peKmE BO3MOxHa yCTaHOBka ypoBHr MOUHOCTn BeDyueB CnbluKN B 3NaueHn 1/2, 1/4 nJIn 1/8.
1.HaXMMTe KHOKky SEL HeCKOJIbKO pa3, NOKa Ha KK DnCnJee BCNbIuKN He HauHET MIRATb CUMBOJ yPOBHA MOUHOCTN.
2.C NOMOUIKHOHONOK +N -yCTaHOBNTe XeJaEMbI ypoBeHb MOUHOCTN.
3. Haxmaite KhoNky o tex nop, noka cMBOJbHa Ha Ka KK DnCnnee BCnblkHe nepeCTaHyT MraTb.

TEXHNUECKNEXAPAKTEPNCN
Bényüee Yncno : 14 (ISO 100/m, nonha MoUHocTb)
Disposal of Electric and Electronic Equipment in Private Households
ENGLISH
Disposal of used Electrical & Electronic Equipment (Applicable in the European Union and other European countries with separate collection systems)
This symbol on the product, in the manual/warranty, and/or on the packaging indicates that this product must not be treated as household waste. Instead it should be handed over to the appropriate collection point for the recycling of electrical and electronic equipment. If your equipment contains easy removable batteries, please dispose of these separately according to your local legislation. It is your responsibility to ensure that this product is recycled correctly. In doing so you will help conserve natural resources, protect the environment and human health. For more detailed information about recycling this product, please contact your local city office, your household waste disposal service or the shop where you purchased the product.