
Neptune 2 A3 - Laminating machine FELLOWES - Free user manual and instructions
Find the device manual for free Neptune 2 A3 FELLOWES in PDF.
| Product Type | Laminating Machine |
| Brand | Fellowes |
| Model | Neptune 2 A3 |
| Entry Width | 12.5 in (317.5 mm) |
| Pouch Thickness (min.) | 3 mm per side (3 mil) |
| Pouch Thickness (max.) | 7 mm per side (7 mil) |
| Warm-up Time | 1 minute |
| Laminating Speed | Up to 24 in/min (609 mm/min) |
| Number of Rolls | 4 |
| AutoSense Function | Yes, automatic thickness detection and optimal adjustment |
| Automatic Reverse Function | Yes |
| Manual Reverse Function | Yes |
| Sleep Mode | Yes (30 min inactivity) |
| Cold Lamination | Yes |
| Compatible with Photos | Yes |
| Output Tray | Yes, adjustable at the back |
| Dimensions (H x W x D) | 4.5 in x 20 in x 6.75 in (114 x 508 x 171 mm) |
| Net Weight | 4.6 kg |
| Power Supply | 120 V, 60 Hz, 10 A, 1200 W |
| Maximum Document Thickness | 0.03 in (0.7 mm) |
| Roller Cleaning | Fellowes Cleaning Sheets (ref. 5320603) to insert when hot |
| Safety Instructions | Do not use near water, remove staples, do not leave unattended |
| Warranty / Service | Contact Fellowes before the store, registration possible at fellowes.com/register |
Frequently Asked Questions - Neptune 2 A3 FELLOWES
User questions about Neptune 2 A3 FELLOWES
0 question about this device. Answer the ones you know or ask your own.
Ask a new question about this device
Download the instructions for your Laminating machine in PDF format for free! Find your manual Neptune 2 A3 - FELLOWES and take your electronic device back in hand. On this page are published all the documents necessary for the use of your device. Neptune 2 A3 by FELLOWES.
USER MANUAL Neptune 2 A3 FELLOWES
PLEASE READ THESE INSTRUCTIONS BEFORE USE. DO NOT DISCARD: KEEP FOR FUTURE REFERENCE.
VEUILLEZ LIRE CES INSTRUCTIONS AVANT D'UTILISER L'APPAREIL.
NE PAS JETER : CONSERVER AFI N DE CONSULTER LES DIRECTIVES ULTÉRIÉTUREMENT, EN CAS DE BESOIN.
Thank you for purchasing a Fellowes product. Please visit www.fellowes.com/register to register your product and benefit from product news, feedback and offers. Product details can be found listed on the rating plate positioned on the rear side or underside of the machine.
Fellows warrants all parts of the laminator to be free of defects in material and workmanship for 2 years from the date of purchase by the original consumer. If any part is found to be defective during warranty period, your sole and exclusive remedy will be repair or replacement, at Fellowes' option and expense, of the defective part. This warranty does not apply in cases of abuse, mishandling or unauthorized repair. Any implied warranty, including that of merchantability or fitness for particular purpose, is hereby limited in duration to the appropriate warranty period set forth above. In no event shall Fellowes be liable for any consequential damages attributable to this product. This warranty gives you specific legal rights. You may have other legal rights that vary from this warranty. The duration, terms and conditions of this warranty are valid worldwide, except where different limitations, restrictions or conditions may be required by local law. For more details or to obtain services under this warranty, please contact Fellowes or your dealer.
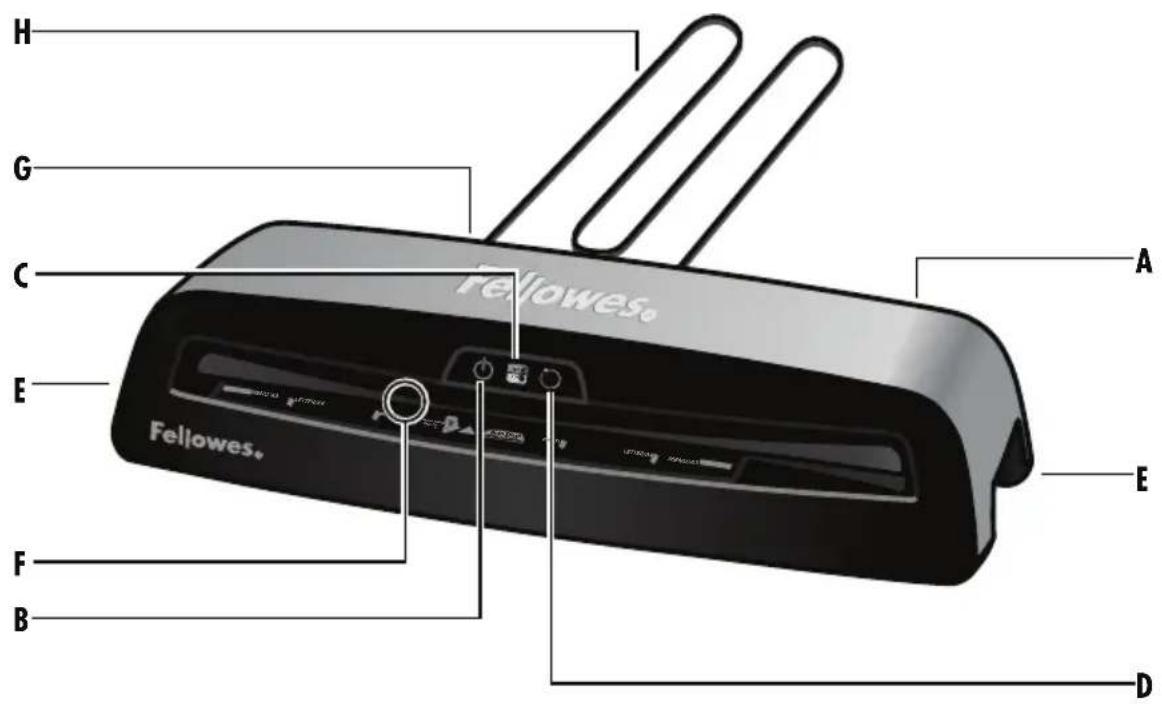
LAMINATOR CONTROLS
QUICK START GUIDE


LAMINATOR CONTROLS
A On/off switch
B Standby / Power on button
C Auto (hot) / cold button
D Reverse button
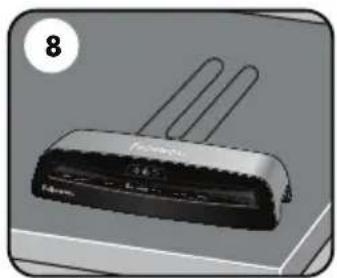
E Carry handles
F Pouch / document entry slot
G Pouch / document exit
H Exit tray
CAPABILITIES
Performance
Entry width 12.5"
Pouch thickness (min.) 3 mil (per side)
Pouch thickness (max.) 7 mil (per side)
Estimated heat-up time 1 minute
Cool down time 30-60 minutes
Lamination speed up to 24^ / min
Number of rollers 4
Ready indication Light & beep
Manual reverse function Yes
Clear Path / Anti-jam engine Yes
LED interface Yes
Sleep Mode Yes (30 mins)
Photo-capable Yes
Carrier-free Yes
Exit tray Yes
Technical Data
Voltage 120V AC
Frequency 60Hz
Wattage 1200 Watts
Amps 10 Amps
Dimensions (HxWxD) 4.5"x20"x6.75"
Net weight 10.1lb
Max document thickness .03"/0.7mm

IMPORTANT SAFETY INSTRUCTIONS - KEEP FOR FUTURE USE
- The machine is for indoor use only. Plug the machine into an easily accessible outlet.
- To prevent electrical shock - do not use the appliance close to water, do not spill water on to the appliance, power cord or wall socket.
DO always insert sealed edge of pouch first into laminator.
DO ensure the machine is on a stable surface.
DO test laminate scrap sheets and set the machine before final laminations.
DO remove staples and other metal articles prior to laminating.
DO keep the machine away from heat and water sources.
DO turn off the machine after each use.
DO unplug the machine when not in use for an extended period.
DO use pouches designed for use at the appropriate settings.
DO keep away from pets, while in use.
DO NOT leave the power cord in contact with hot surfaces.
DO NOT leave power cord hanging from cupboards or shelves.
DO NOT use appliance if the power cord is damaged.
DO NOT attempt to open or otherwise repair the machine.
DO NOT exceed the machines quoted performance.
DO NOT allow minors to use this machine.
DO NOT laminate sharp or metal objects (eg: staples, paper clips).
DO NOT laminate heat-sensitive documents (eg: tickets, ultrasounds etc) on hot settings.
DO NOT laminate an empty pouch.
FEATURES & TIPS

AutoSense
Unique system detects pouch thickness and self-adjusts to optimal lamination setting.
Lamination Feed Sensor
When the machine senses a pouch has been mis-fed or has not gone completely through the machine in normal operating time, the machine will stop the lamination process, the Reverse button LED will blink, and a beep will sound. Press and hold the reverse button on the front of the machine to remove the laminate.

'Reverse' function
To eject the laminating pouch during use, press and hold down the reverse button until the pouch has ejected from the machine.

'Sleep Mode' function
If the machine is not active for 30 minutes, the 'Sleep Mode' function will place the machine into standby mode. To operate the machine, press the 'Power On' button on the control panel.

Auto (Hot)/Cold
The Auto (hot)/cold button is used to toggle back and forth between hot and cold laminating.
- For best results, use Fellowes® brand pouches: 3, 5 or 7 mil pouches.
This machine does not need a carrier to laminate. It is a carrier-free mechanism.
Always put the item to be laminated into the appropriate sized pouch.
Always test laminate with a similar size and thickness before final process.
Prepare pouch and item for lamination. Place item within pouch centered and touching the leading sealed edge. Ensure the pouch is not too large for the item.
If required, trim excess material from around the item after lamination and cooling.
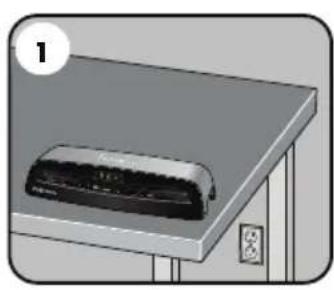
BEFORE LAMINATING
- Ensure the machine is on a stable surface.
-
Check there is enough clear space (min 20^ ) behind the machine to allow items to pass through freely.
-
Plug the machine into an easily accessible main outlet.
- Fit the Exit Tray to the rear of the machine.
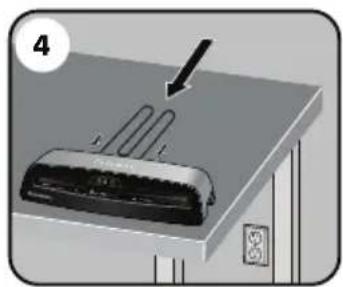
STEPS TO LAMINATE
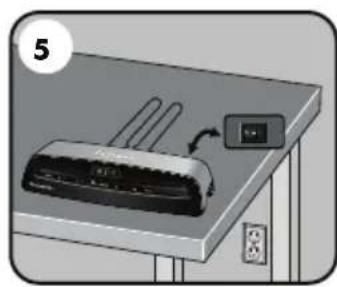
- Switch the power on (located at the rear right side of the machine).
- The Standby button will remain on with a soft blue glow.
- Press the 'Standby' button on the control panel. The Auto display will flash. The auto display will turn solid and a beep will sound when the laminator is ready.
- The machine will automatically warm-up to the hot pouch (auto) setting. Note: the laminator features AutoSense which automatically recognizes the pouch thickness you insert into the laminator. The laminator automatically adjusts for hot pouches from 3 mil to 7 mil.
-
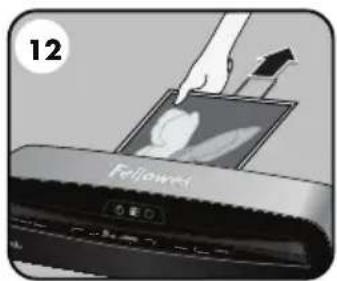
When the machine has indicated it's ready, place the pouch, sealed edge first, into the pouch / document entry. Keep the pouch straight and central within the document entry, not on an angle. Use the entry markings as a guide.
-
If cold lamination is desired, press the cold button at any time and the cold button will blink blue. When the laminator is ready for cold lamination the cold button will turn solid blue and a beep will sound. Note: to use the cold setting after hot lamination you may have to wait for the laminator to cool down for 30 - 60 minutes.
- To switch back to hot pouch laminating after cold laminating, press the auto (hot)/cold button.
- Upon exit, the laminated pouch is hot and soft. Remove the pouch immediately. Place pouch onto a flat surface to cool. This helps prevent any jamming.
TROUBLESHOOTING
| Problem Possible cause Solution | ||
| No glowing 'blue' Power on LED Machine not switched on | Switch on machine at right side and at wall socket. Press power standby button | |
| Pouch does not completely seal the item | Item may be too thick to laminate | Maximum document thickness equals .025". Pass through laminator a second time |
| Pouch is lost in the machine | Pouch is jammed | Select the reverse button and pull out the pouch by hand |
| Pouch was inserted open end first | ||
| Pouch was not centered on entry | ||
| Pouch was not straight upon entry | ||
| Empty pouch was used | ||
| Damaged rollers or adhesive on rollers | ||
| The reverse button LED is blinking and a beep is sounding | Pouch is mis-fed or jammed | Press and hold the reverse button on the front of the machine to remove the laminate |
| Pouch is damaged after lamination | Damaged rollers or adhesive on rollers | Pass cleaning sheets through the machine to test and clean rollers |
NEED HELP?
Let our experts help you with a solution.
Customer Service... www.fellowes.com
Always call Fellowes before contacting your place of purchase, see the rear cover for contact details.
Consider registering your machine at www.fellowes.com/register to receive updates and additional information.
STORAGE & CLEANING
Switch the power off located at the rear side of machine. Unplug the machine at the wall. Allow the machine to cool. The outside of the machine can be cleaned with a damp cloth. Do not use solvents or flammable materials to polish the machine. Cleaning sheets can be purchased for use with the machine. When the machine is warm - run the sheets through the machine to clean any residue off the rollers. For optimum performance, it is recommended that cleaning sheets are used with the machine regularly. (Cleaning sheet order code #5320603).
LES COMMANDES DE LA PLASTIFIEUSE
Specifications techniques
Tension 120VCA
Note: This equipment has been tested and found to comply with the limits for a Class B digital device, pursuant to part 15 of the FCC Rules. These limits are designed to provide reasonable protection against harmful interference in a residential installation. This equipment generates, uses and can radiate radio frequency energy and, if not installed and used in accordance with the instructions, may cause harmful interference to radio communications. However, there is no guarantee that interference will not occur in a particular installation. If this equipment does cause harmful interference to radio or television reception, which can be determined by turning the equipment off and on, the user is encouraged to try to correct the interference by one or more of the following measures:
- Reorient or relocate the receiving antenna.
- Increase the separation between the equipment and receiver.
- Connect the equipment into an outlet on a circuit different from that to which the receiver is connected.
- Consult the dealer or an experienced radio/TV technician for help.
CANADA CLASS B NOTICE - AVIS CANADA, CLASSE B
This Class B digital apparatus complies with Canadian ICES-003.
Any modifications made to this device that are not approved by Fellowes may void the authority granted to the user by the FCC and/or by Industry Canada to operate this equipment.