Living LVHub - Media player AUDIO PRO - Free user manual and instructions
Find the device manual for free Living LVHub AUDIO PRO in PDF.
Frequently Asked Questions - Living LVHub AUDIO PRO
User questions about Living LVHub AUDIO PRO
0 question about this device. Answer the ones you know or ask your own.
Ask a new question about this device
Download the instructions for your Media player in PDF format for free! Find your manual Living LVHub - AUDIO PRO and take your electronic device back in hand. On this page are published all the documents necessary for the use of your device. Living LVHub by AUDIO PRO.
USER MANUAL Living LVHub AUDIO PRO
© Audio Pro AB Sweden
Audio Pro ^® , the Audio Pro logotype, the 'a' symbol, and ace-bass ^® are all registered trademarks of Audio Pro AB, Sweden. All rights reserved. Audio Pro follows a policy of continuous advancement in development. Specifications may be charged without notice.
AirPort Express, Apple TV, the Apple logo, iPhone, iPod, iPod classic, iPod nano, iPod shuffle, iPod touch, iPad and Safari are trademarks of Apple Inc., registered in the U.S. and other countries.


The lightning flash with arrowhead symbol, within an equilateral triangle, is intended to alert the user to the presence of uninsulated "dangerous voltage" within the product's enclosure that may be of sufficient magnitude to constitute a risk of electric shock to persons.

The exclamation point within an equilateral triangle is intended to alert the user to the presence of important operating and maintenance (servicing) instructions in the literature accompanying the appliance.
WARNING:
TO REDUCE THE RISK OF FIRE OR ELECTRIC SHOCK, DO NOT EXPOSE THIS APPARATUS TO RAIN OR MOISTURE.
CAUTION:
TO REDUCE THE RISK OF ELECTRIC SHOCK, DO NOT REMOVE COVER (OR BACK). NO USER-SERVICEABLE PARTS INSIDE. REFER SERVICING TO QUALIFIED SERVICE PERSONNEL.
IMPORTANT SAFETY INSTRUCTIONS
- Read these instructions.
- Keep these instruct
- Hood all warnings.
- Follow all instructions.
- Follow all instructions.
- Suppose
- Do not use this apparatus near water.
-
Clean only with dry cloth
-
Do not block any ventilation openings. Install in accordance with the manufacturer's instructions.
- Do not install near any heat sources such as radiators, heat registers, stoves, or other apparatus (including amplifiers) that produce heat.
- Protect the power cord from being walked on or pinched particularly at plugs, convenience receptacles, and the point where they exit from the apparatus.
- Only use attachments/accessories specified by the manufacturer.
- Unplug this apparatus during lightning storms or when unused for long periods of time.
- Refer all servicing to qualified service personnel. Servicing is required when the apparatus has been damaged in any way, such as power-supply cord or plug is damaged, liquid has been spilled or objects have fallen into the apparatus, the apparatus has been exposed to rain or moisture, does not operate normally, or has been dropped.
- Damage Requiring Service Unplug the apparatus from the wall outlet and refer servicing to qualified service personnel under thee following conditions: A. When the power-supply cord or plug is damaged, B. If liquid has been spilled, or objects have fallen into the apparatus, C. If the apparatus has been exposed to rain or water,
D. If the apparatus does not operate normally by following the operating instructions, Adjust only those controls that are covered by the operating instructions as an improper adjustment of other controls may result in damage and will often require extensive work by a qualified technician to restore the apparatus to its normal operation,
E. If the apparatus has been dropped or damaged in any way, and
F. When the apparatus exhibits a distinct change in performance this indicates a need for service.
14. Object and Liquid Entry
Never push objects of any kind into the apparatus through openings as they may touch dangerous voltage points or short-out parts that could result in a fire or electric shock. The apparatus shall not be exposed to dripping or splashing and no objects filled with liquids, such as vases shall be placed on the apparatus. Don't put candles or other burning objects on top of this unit.
15. Batteries
Always consider the environmental issues and follow local regulations when disposing of batteries.
16. If you install the apparatus in a built-in installation, such as a bookcase or rack, ensure that there is adequate ventilation. Leave 20 cm [8"] of free space at the top and sides and 10 cm [4"] at the rear. The rear edge of the shelf or board above the apparatus shall be set 10 cm [4"] away from the rear panel or wall, creating a flue-like gap for warm air to escape.
17. The power supply and power cord for this apparatus is intended for indoor use only.
ENGLISH
SPECIFICATIONS
Type:
Remote controlled wireless transmitter
Inputs:
1 x 3.5mm stereo
2 x optical input
1 x mini USB (for Power supply)
1 x USB "B" for PC/MAC connection
Weight: 0.45kg
Dimensions HxWxD:
32×180×130 mm
NETWORK FEATURES
- Wireless full CD quality audio
- Wireless range room to room: Up to 20 meters
- Wireless range same room: Up to 50 meters
- Wireless range open field: Up to 100 meters
- Works with both Mac and PC
- RF band: 2.4GHz
- Sample rate: 48 KHz
- Dedicated proprietary protocol
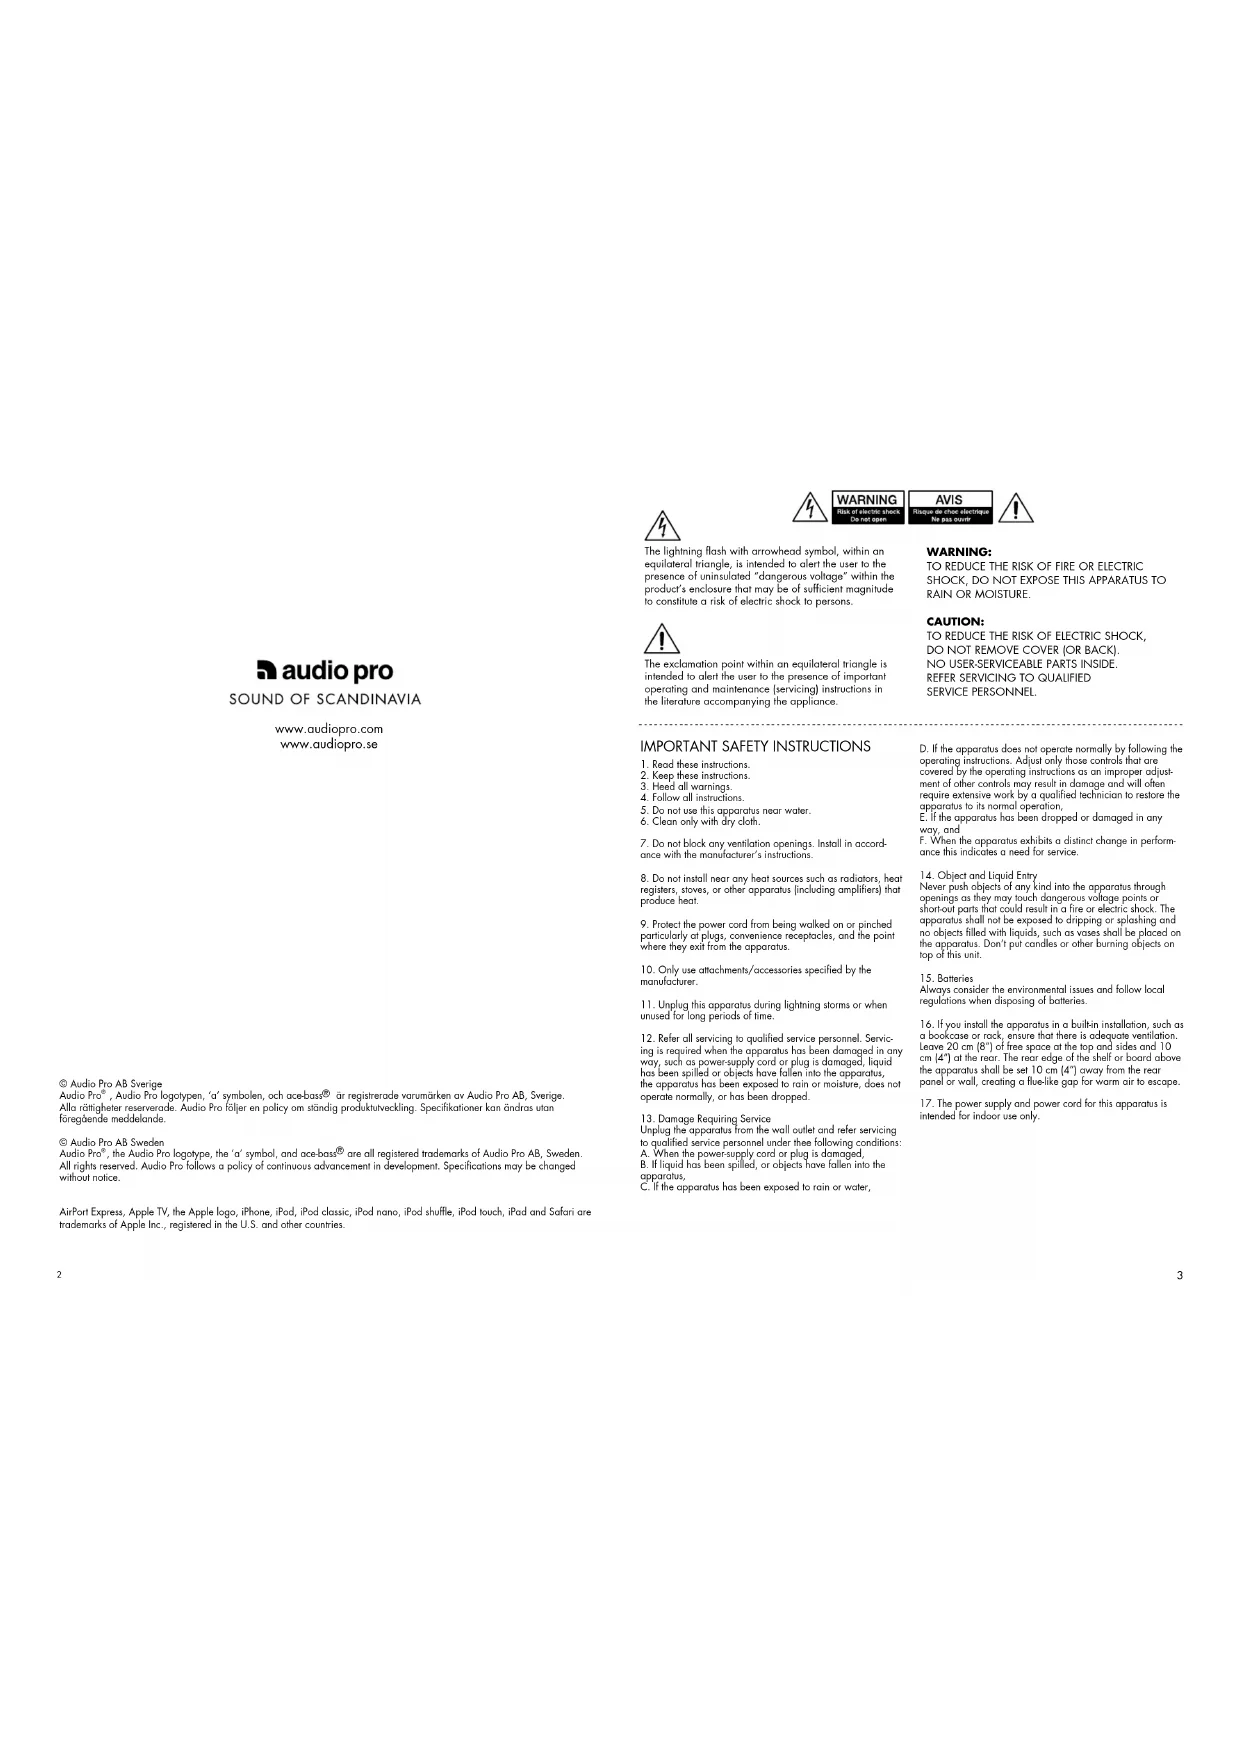
IN THE BOX
text_image
1 x LV-HUB 1 x remote 1 x USB to USB "B", 1.5m 1 x 3.5mm stereo, 0.8m 1 x 3.5mm to RCA, 0.8m 1 x USB to mini USB, 2m. (For power supply.) 1 x power supplyOVERVIEW
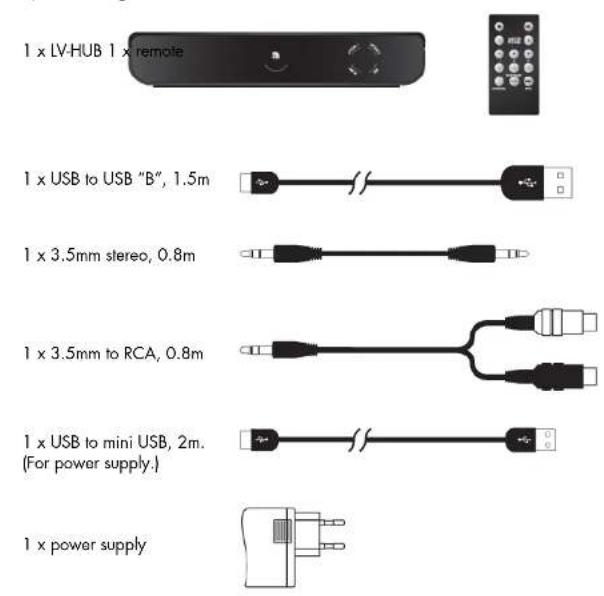
FRONT
text_image
IR receiver for remote LED, steady blue for established wireless connection. Flashing blue if wireless connection is lost. Red for no wireless connection or no transmission. Source indicatorREAR
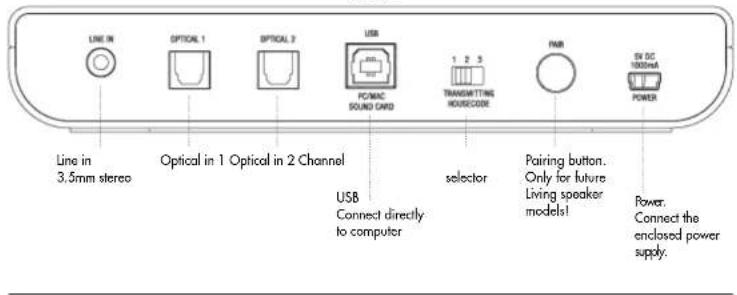
text_image
LINE IN OPTICAL 1 OPTICAL 2 USB FC/MAC SOUND CARD 1 2 3 TRANSMITTING HORECIDE PAR SW DC 100mA POWER Line in 3.5mm stereo Optical in 1 Optical in 2 Channel USB Connect directly to computer selector Pairing button. Only for future Living speaker models! Power. Connect the enclosed power supply.USING THE LV-HUB REMOTE
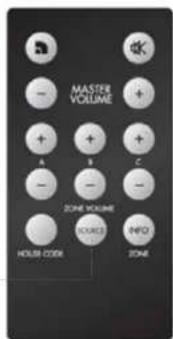
All adjustments are done with the remote aimed at speakers (right speaker) to which you want to adjust. The only functionality which remote adjust on the LV-HUB is changing source.
text_image
MASTER VOLUME A B C ZONE VOLUME HOLD CODE INFO ZONESource Push to toggle between sources connected to LV-HUB.
CONNECTING LV-HUB TO COMPUTER CONNECTING LV-HUB TO OTHER AUDIO SOURCES
text_image
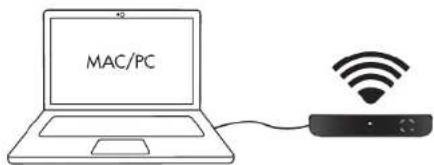
MAC/PCBefore connecting to computer, see Mac or PC setup.
- Connect the LV-HUB transmitter to the computer with enclosed USB cable.
- Connect the LV-HUB to the enclosed power supply and then to 230V outlet.
- Connect your Living speakers to 230V outlet.
Done! Play your music on your computer.
WIRELESS STATUS:
LED lights up blue on speakers and transmitters when wireless connection is established.
LED lights up red on speakers and transmitters when no wireless connection is established.
LED lights up green on speakers and transmitters when paired wireless connection is established.
Note:
- Make sure that both speakers and transmitter are using same House Code (channel 1, 2 or 3).
- If speakers are in automatic standby mode, LED is red even though wireless connection is
established. Turns blue when speakers receive audio signal.
MAC SETUP
- Connect LV-HUB transmitter to a free USB socket.
- Go to System Preferences, choose Sound under Hardware.
- Click Output in menu, choose "USB Headset".
Done! You can now send audio from your computer.
PC SETUP
Please do following setup before using music playing software (for example iTunes or Spotify).
- Connect LV-HUB transmitter to a free USB socket. Wait until software has been installed.
(See lower right hand corner, message window will open when sound device is ready to use.)
Done! You can now send audio from your computer.
For some PC computers (i e Windows 7) you may need to perform these settings:
2. Click Start button, go to Control Panel and choose Sound & Sound devices.
3. Under playback of audio, default unit, choose "USB Headset".
Done! You can now send audio from your computer.
text_image
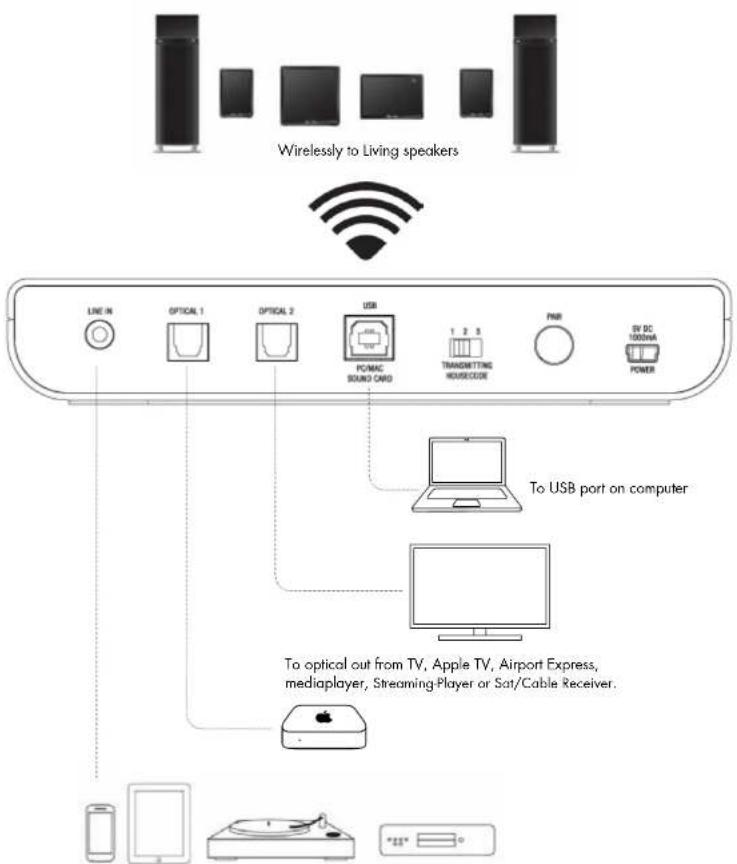
Wirelessly to Living speakers LINE IN OPTICAL 1 OPTICAL 2 USB P/MAC SOUND CARD TRANMITTING HORSEONE FNB EV DC 1000mA POWER To USB port on computer To optical out from TV, Apple TV, Airport Express, mediaplayer, Streaming-Player or Sat/Cable Receiver. *25*To audio out from smartphone, tablet, Airport Express, turntable (RIAA), MP3-player or CD-player
OPERATIONS
text_image
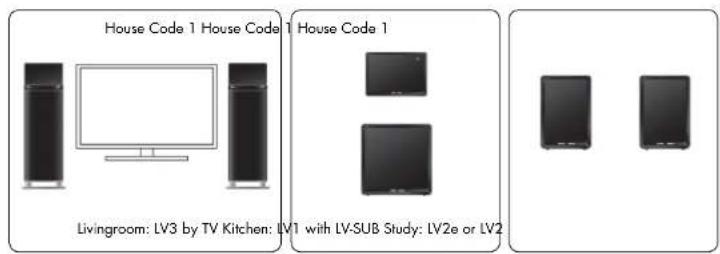
House Code 1 House Code 1 House Code 1 Livingroom: LV3 by TV Kitchen: LV1 with LV-SUB Study: LV2e or LV2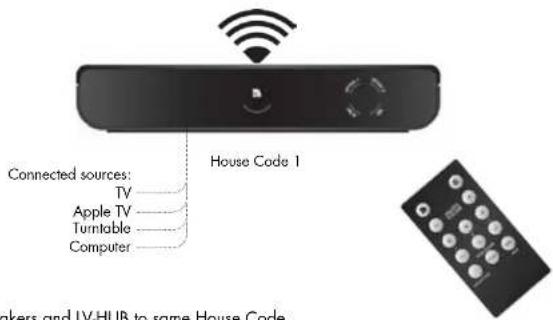
text_image
Connected sources: TV Apple TV Turntable Computer House Code 1 makers and IV-HUB to same House Code- Set all speakers and LV-HUB to same House Code.
- Connect up to 4 sources to LV-HUB.
Now you can play from any source connected to LV-HUB to all your LV speakers.
Change source on LV-HUB by pressing the SOURCE button on the remote.
LED at source on LV-HUB lights up when chosen.
Note:
- Volume for each speaker pair (Master and Zone) is controlled on speakers, not on LV-HUB.
The LV-HUB remote can be used to control volumes, aim at the speakers to adjust volume.
LV-HUB WITH FUTURE LIVING SPEAKER MODELS
With new pairing feature, operations and multiroom handling are developed. Sources connected to LV-HUB can be chosen on each speaker. Please read manual for Living speaker model with Pairing feature to learn more.
USE MULTIPLE TRANSMITTERS AND SPEAKERS SIMULTANEOUSLY WITH THE HOUSE CODE 1, 2 OR 3
text_image
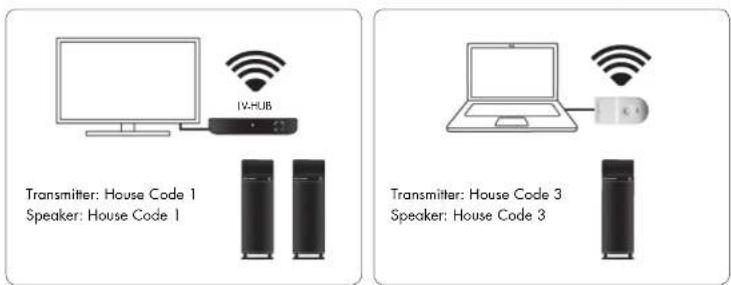
IV-HUB Transmitter: House Code 1 Speaker: House Code 1 Transmitter: House Code 3 Speaker: House Code 3By using the House Codes (channels) you can share the wireless network for up to two separate networks. Then you can simultaneously play music from various audio sources (from two different transmitters) to different pairs of LIVING speakers.
ADJUST VOLUME SEPARATELY IN THREE DIFFERENT ZONES
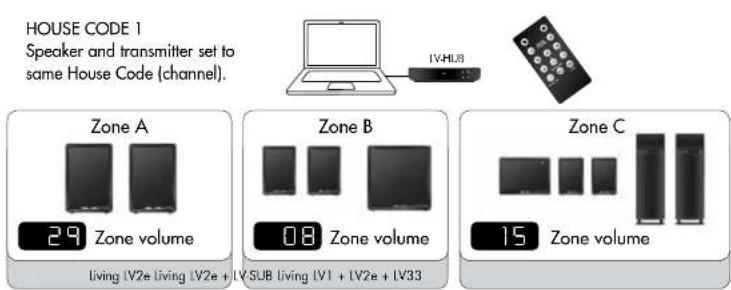
In order to be able to have the same music at different volumes in different rooms/areas, you can divide each House Code into 3 different volume zones. Each zone can have a different volume. This is very handy if, for example, you want to have one volume level in the living room and a lower volume in the kitchen. You can have as many LIVING speakers in each zone as you want, or just one pair. The zone volume is easily controlled with the remote unit.
text_image
HOUSE CODE 1 Speaker and transmitter set to same House Code (channel). Zone A 29 Zone volume 08 Zone volume Zone B Living IV2e Living IV2e + IVSUB Living IV1 + IV2e + IV33 Zone C 15 Zone volumeNote:
- All LIVING speakers are default Zone A, and volume level 17.
- Each House Code (1, 2 and 3) can be split into up to 3 zones (A, B and C).
- You can have as many speakers you like on each House Code, and as many as you want in each zone.
A zone does not have to be one room, can be whole floor in house.
TROUBLESHOOTING
Is the LED light on the LV-HUB blue?
If light is red, try moving the LV-HUB and receiving speakers closer together. Does this turn the LED blue?
Are you using more than one Audio Pro transmitter (TX100, TXD200 or LV-HUB) ^4
Make sure that the transmitters aren't running on the same House Code. If more than one transmitter uses the same House Code, interference may occur. Disconnect one, or change House Code.
Are you using the same House Code on both transmitter and receiving speakers?
Make sure the same House Code is set on both the transmitter and the speakers.
How far apart are the transmitter and receiver?
If distance between the transmitter and receiver is too far, the, connection might be lost.
Try placing the transmitter and receiver in closer proximity, does this help?
Are there walls between the transmitter and receiver?
If your home has thick concrete walls, or walls of plaster with wire lath, the wireless range will decrease. Try placing transmitter and receiver in the same room, does this help?
Are there more wireless networks in the area?
If there are many wifi networks running in the area, wireless range can decrease. Try to change the channel on your wireless router to improve Audio Pro network range and your own home network wifi performance. (Audio Pro network transmits on channel 1, 6 or 11.)
Is your computer connected to the internet via cable or wifi?
The Audio Pro network can weaken a local wifi network (but not weaken itself). If possible, you should change channel on your wireless router, the Audio Pro network transmits on channel 1, 6, or 11. Choose a new channel on your router, for example 3, 8 or 13. (in total there are 13 channels on the 2.4 GHz band.) If you cannot change the channel on your wireless router, try connecting computer via Ethernet cable instead. Does this help?
Are there Bluetooth units active in the area?
Shut down all active Bluetooth devices. Does this help?
Windows 7 and Mac OS, sound output
When connecting Audio Pro transmitter to a computer using Windows 7 or Mac OS, you need to select the sound output. Go to: System settings, find sound settings, and select USB HEADSET as your sound output. (In older Windows OS there is no need for this, transmitters will take over automatically as the sound output device.)
PAIRING LV-HUB, ONLY WITH FUTURE LIVING SPEAKERS
On LV speakers
Rear on LV-HUB
By pairing, you lock your Audio Pro network from other near by Audio Pro Wireless networks. Features like changing source in different rooms are available. Pairing feature is only available on newer Living speakers, not IV1, IV2, IV2e, IV3 or IVSUB.
PAIR YOUR LIVING SPEAKERS WITH LV-HUB TRANSMITTER
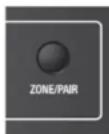
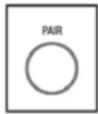
- Press Pairing button on LV-HUB for 2 seconds. LED starts to flash Green.
- Press and hold ZONE/PAIR button on Living speaker for 3 seconds.
LED starts to flash Green. (See manual for specific LV speaker.) - When LEDs on both transmitter and speaker goes to steady green, the system is paired.
Note:
- Pairing will not work with older Living speakers (LV1, LV2, LV2E, LV3 or LV-SUB).
- To unpair system [all speakers in same volume zone will be unpaired]:
- Disconnect LV-HUB from power.
- While pressing the pairing button, reconnect LV-HUB to power, and hold pairing button for 6 seconds. All speakers with same House Code will now be unpaired.

- Ablastrate: 48 KHz
text_image
MASTER VOLUME ZONE VOLUME SOURCE INFO HOUSE CODE ZONEtext_image
MASTER VOLUME A B C ZONE VOLUME SOURCE INFO HOLD CODE ZONEnatural_image
Pure diagram of a rectangular device with internal curved and circular components, no text or symbols present.This device meets government requirements for exposure to radio waves. This device is a radio transmitter and receiver. It is designed and manufactured not to exceed limits for exposure to radio frequency (RF) energy. These limits are part of comprehensive guidelines and establish permitted levels of RF energy for the population. The guidelines were developed and confirmed by independent scientific organizations through periodic and thorough evaluation of scientific studies. The limits include a substantial safety margin designed to assure the safety of all persons, regardless of age and health. The exposure standard for device employs a unit of measurement known as the Specific Absorption Rate, or SAR. Under the guidelines for your device, the CE SAR limit is 2.0W/kg. The highest SAR value for this device when tested for use at the body is 0.141 W/kg (for CE SAR).
audio pro
SOUND OF SCANDINAVIA