
LC 8110 PYR - Oven CATA - Free user manual and instructions
Find the device manual for free LC 8110 PYR CATA in PDF.
| Product type | Built-in oven |
| Brand | CATA |
| Model | LC 8110 PYR |
| Usable volume | 70 liters |
| Rated voltage | 220-240 V ~ 50 Hz |
| Maximum power | 3000 W |
| Cooking functions | Convection, Top element, Bottom element, Fan-assisted convection, Grill, Maxi-grill, Fan grill, Defrosting, Pyrolysis |
| Interior lighting | Yes, 25 W |
| Child safety | Simultaneous button lock |
| Cleaning | Pyrolysis (cycles 1h30 or 2h00) |
| Included accessories | 1 rack, 1 drip tray |
| Control type | Rotary knobs and electronic touch control |
| Display | Digital LED |
| Door | Quadruple glazing |
| Top element power | 950 W |
| Grill element power | 2000 W |
| Bottom element power | 1100 W |
| Convection element power | 2000 W |
| Convection motor | 33 W |
| Cooling fan | 23 W |
| Bulb type | E-14, 15-25 W, 300 °C |
Frequently Asked Questions - LC 8110 PYR CATA
User questions about LC 8110 PYR CATA
0 question about this device. Answer the ones you know or ask your own.
Ask a new question about this device
Download the instructions for your Oven in PDF format for free! Find your manual LC 8110 PYR - CATA and take your electronic device back in hand. On this page are published all the documents necessary for the use of your device. LC 8110 PYR by CATA.
USER MANUAL LC 8110 PYR CATA
Operating and maintenance instructions for built-in ovens

REEMPLACEMENT DE L'AMPOULE DU FOUR
DIMENSIONS INTÉRIÉURES
Hauteur:346,5mm
Largeur:457mm
Profondeur:410mm
Thank you for choosing one of our products. We hope this household appliance provides you with the best service. Therefore, we suggest you read the instructions and suggestions contained in this manual carefully in order to use our products correctly.
The specific cations plate for this oven is available on this appliance. This plate, visible by opening the door, displays all the necessary identifi cateon information for this appliance for ordering replacement parts.
GENERAL INFORMATION
Please read this manual carefully before using the appliance. It is important that all the control functions are understood before beginning to cook with this appliance.
Heed the advice and warnings included under the title "IMPORTANT - Safety advice and instructions".
- This appliance has been designed for private domestic use and can be integrated into standard kitchen furnishings or similar.
- In order to use in caravan-type vehicles, the suitable indications included in the Installation Instructions should be borne in mind.
- Use of this appliance for any other purpose or in any other environment without the manufacturer's express agreement will invalidate any guarantee or liability.
- This new appliance is guaranteed against electrical or mechanical defects, subject to certain exclusions indicated in the Manufacturer's Terms and Conditions of the Guarantee.
- The above does not affect your statutory rights.
Ensure that all protective packaging and covering has been removed before using this appliance.
To collaborate in protecting the environment, separate the packaging materials into the different types and dispose of them according to local waste disposal regulations.
The packaging is designed so as not to harm the environment; it can be recovered or recycled as it is an ecological product. By recycling the packaging, you will contribute to saving raw materials and reducing the volume of industrial and domestic waste.
Any additional information on waste disposal may be requested from your local environmental agency.
When used for the first time, a slight smell from the protective covering or damp may be noticeable, which will disappear after a short time.
The symbol on the product or its packaging indicates that this product cannot be treated as normal household waste. This product must be handed over to an electric and electronic equipment collection point for recycling. On ensuring that this product is disposed of correctly, you will help to avoid possible negative consequences for the environment and public health,
which could occur if this product is not handled correctly. To receive more detailed information about recycling this product, contact your local government, domestic waste disposal services or the outlet where the product was bought.
This appliance has been built and distributed in compliance with the essential requirements of the following EEC EUROPEAN LAWS AND DIRECTIVES:
EC Symbol - 93/68 Low voltage - 73/23 CEM-89/336
Safety Rules - EN 60 335-1, EN 60 335 - 2 - 6.
This appliance respects laws of the suppression of radio-interference.
As the Manufacturer has a policy of continuous product improvement, it reserves the right to adapt and carry out any modification considered necessary without prior warning.
IMPORTANT NOTICE SAFETY INSTRUCTIONS AND WARNING
- The appliance and its accessible parts become hot during use.
- Children less than 8 years of age shall be kept away unless continuously supervised.
- This appliance can be used by children aged from 8 years and above and persons with reduced physical, sensory or mental capabilities or lack of experience and knowledge if they have been given supervision or instruction concerning use of the appliance in a safe way and understand the hazards involved. Children shall not play with the appliance. Cleaning and user maintenance shall not be made by children without supervision.
- This appliance complies with all current European safety legislation, however, the Manufacturer must emphasise that this compliance does not prevent the surfaces of the appliance from heating up during use and remaining hot during its operation.
- Therefore, the Manufacturer highly recommends that this appliance is kept out of the reach of babies and small children.
- If children cannot be kept out of the kitchen, they must be watched at all times.
- We also recommend that great care is taken during use and cleaning. Read the cleaning and maintenance sections for this appliance carefully.
- Do not place heavy objects on this oven or lean on the door when opening it, as this may damage the hinges.
- Do not leave hot oil or fats unattended as they may catch light.
- Do not place oven dishes or trays of the lower part of the oven or cover it in aluminium foil.
- Never store flammable objects inside the oven as they may catch light.
- Do not allow the accessories or electric cables to touch the hot parts of the appliance.
- Do not use the appliance for special heating or drying clothes.
-
Do not install the appliance near curtains or upholstered furniture.
-
Do not try to lift or move kitchen appliances by pulling any door or handle as this may cause damage.
- If the oven join is very dirty, the door will not close properly when the oven is working. The fronts of neighbouring furniture may be damaged. Keep the oven join clean.
- During operation the appliance will heat up. Care must be taken to avoid touching heating elements inside the oven.
- Open the oven carefully. Steam may escape and burn anyone nearby.
- Do not pour water inside a very hot oven. The enamel may be damaged.
- This appliance must be installed correctly by a suitably qualified person, strictly following the manufacturer's instructions.
- The Manufacturer declines all liability for personal or material damage as a result of misuse or incorrect installation of this appliance.
- Heat, vapour and humidity are produced during use, avoid all kinds of personal damage and ensure that the room is suitably ventilated. If used for a prolonged period of time, additional ventilation may be necessary - consult a qualified installer if you have any doubts about the necessary volume.
INSTRUCTIONS
This User Manual must be kept for future reference and use by someone who is not familiar with the appliance.
Before using the oven, carefully clean the inside with a non-abrasive detergent and warm water. Introduce the grill and tray in their respective runners. Once the operation is complete, turn the oven on to the maximum temperature for approximately 20 minutes to remove any traces of manufacturing grease, oil or resins which may cause unpleasant odours when cooking.
WARNING: During this first heating some smoke or unpleasant odours may appear. Should this happen ventilate the room suitably until the first operation is finally.
Once this simple operation has been carried out the oven is ready to use for cooking.
This appliance is exclusively for domestic use.
Use the oven to cook food only.
USING THE OVEN
The oven is controlled by a thermostat between 50^ and 250 ^ C , depending on the temperature required. The thermostat pilot light turns on and off to indicate the temperature control during use.
The required cooking mode is selected using the multi-functional control button. The functions that may be selected are:

A. OVEN LIGHT. Automatic when selecting the cooking mode for all models. The oven light remains on when using the oven.

B.CONVECTION MODE. Provides traditional cooking with heat from the upper and lower elements.

C. UPPER ELEMENT MODE. For gentle cooking, browning or keeping cooked dishes warm.

D.LOWER ELEMENT MODE. For slow cooking and heating food.

E. FAN-ASSISTED CONVECTION MODE. This provides convection heating of the upper and lower elements for uniform cooking.

F. GRILL. For gratinating and browning food.

G. MAXI-GRILL. As above, but the grill element provides a larger area for roasting.

H. FAN-ASSISTED GRILL. This provides fast browning so that food remains juicy. For convection baking, this is the most energy-efficient function.

I. THAWING MODE.
The fan works without heat to reduce the thawing time for frozen food.

J. Pyrolytic function:
When the function set to prolytic mode, LED display "PYA".
The default temperature is 450^ . The timer can be set 1:30 or 2:00 hours.
PRODUCT DESCRIPTION
Kindly reminder: To open the oven door, always use one hand to hold the handle in the centre and do ot touching the child lock stud.
OPERATION INSTRUCTIONS
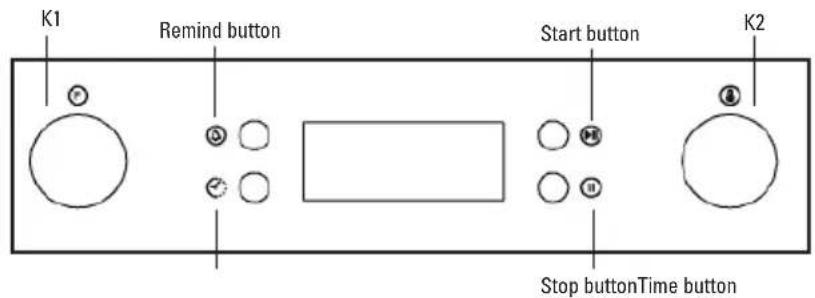
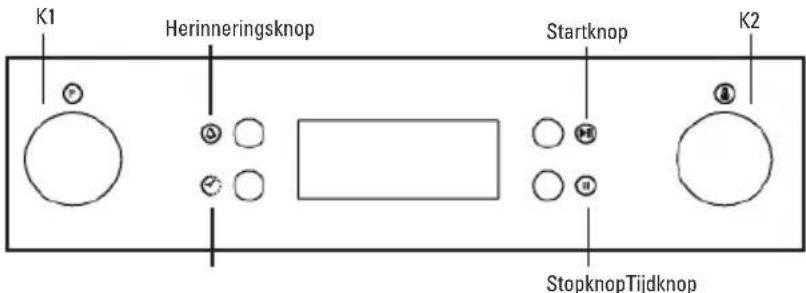
1. Clock Setting
After connection the unit to the power, the symbols 00:00 will be visible on the display.
1) Press the hour figures will flash.
2) Rotate "K2" to adjust the hour fi gures, (Time should be within 0--23).
3) Press " ",the minutes will flash.
4) Rotate "K2" to adjust the minutes setting, (time should be within 0-59).
5) Press to finish the clock settings. "will flash, and the time will be illuminated.
Note: The clock is 24 hours. After connected to the mains power, the clock will untimed.
2. Function Setting
1) Rotate "K1" to choose the cooking function you require. The related indicator will illuminated.
2) Rotate "K2" to adjust the temperature.
3) Press to confirm the start of cooking. The corresponding icon for temperature "C" will be on.
4) If step 2 is ignored, Press "to confirm the start of cooking. and the default time is 9 hours, the default temperature will display on the LED.
NOTE:
1) The step quantities for the adjustment time of the coding switch are as follow: 0-0:30min: step 1 minute 0:30--9:00hour: step 5 minutes
2) The step quantities for the adjustment of temperature is 5^ , and the radiant grilling function is 30^ .
3) Rotate "K1" to adjust the cooking time when cooking begins. Then press "to start cooking. If not pressed within 3 seconds, the oven will revert back to the previous time to continue cooking.
4) Rotate "K2" to adjust the temperature when cooking begins. The related indicator will be illuminated. Then press "to start cooking. If not pressed in 3 seconds, the oven will revert back to the previous temperatue to continue cooking.
3. Lamp Setting
1) Rotate "K1" to select the relevant function, then the corresponding icon will be on.
2) Press "按钮 to start cooking. Lamp icon" " " will flash.
4. Inquiring function
During cooking process, you can use inquiring function, after 3 seconds return to the current working state.
1) During cooking mode, press "m" button to see the current time.
2) If the clock was set, press " 空 button to ask for cooking time.
5. Child lock function
To Lock: press "and " simultaneously for 3 seconds, there will be a long "beeping" sound indicating the children-lock is on and the "will be illuminated.
Lock quitting: press "and" simultaneously for 3 seconds, there will be a long "beeping" sound indicating the child-lock is released.
Note: During working mode, if you want to stop cooking,press stop button quickly. Do not need to long pressing on stop button.it is invalid.
6. Reminder Function:
The oven has 9 hours reminder, this function will help to remind you to start cooking in a certain time from 1 minute to 9 hours. Only when oven in standby mode, the reminder can be set. Follow below to set the reminder:
1) Press reminder setting button
2) Rotate "K2" to set the hour time of reminder. (Time should be within 0--9).
3) Press reminder setting button again;
4) Rotate "K2" to set minute time of reminder. (Time should be within 0--59).
5) Press "to confirm setting. :will be fl ash and the indicator for reminder " will light.The time counts down.
Note: The oven buzzer will sound for 10 times after the time back to the zero hour. " ⑥ symbol disappears on the screen to remind you to start cooking. You can cancel the reminder during setting by pressing the stop button; After the reminder has been set, you can cancel it by pressing stop button twice.
7. Start/Pause/Cancel Function
1) If the cooking time has been set, press to start cooking. If the cooking is paused, press to resume cooking.
2) During cooking process, press " " once to pause the cooking. Press " " twice to cancel the cooking.
8. Energy-Saving Function
1) During in waiting state and reminding state, press for three seconds, the LED display will go off and set to energy-saving mode.
2) If no operation in10 minutes under waiting state, the LED display will go off and go into energy-saving mode.
3) Under the energy-saving mode, press any key or rotate any encoder can quit the energy-saving mode.
9. Pyrolytic Function(only some modles)
This function allows you to clean thoroughly the oven cavity.
1) Rotate "K1" to select the pyrolytic function. LED will display "PYA".
2) Press "▶" to confirm the cooking. And the default time is 2 hours, "PYA" will display on the LED.
3) Rotate "K1" to change the pyrolytic time. There have two levers time can be selected "1:30 or 2:00".
Note:
A) When the oven door is not closed, press start button will be invalid, LED display "DOOR", "PYA."
B) When the oven center temperature is higher than 200^ , Press cancel button can return to waiting state directly and the oven center temperature is higher than 300^ , press start button, LED display "COOL".
C) When open the door in normal working condition, the relay for heater will stop working, LED display "DOOR", the buzzer will beep continuously until the door closed or press the cancel button.
D) When the pyrolytic function fi nished working and oven center temperature is lower than 300^ . LED display will go off.
E) Before activating the pyrolytic cleaning function, remove any excessive spillage and make sure that oven is empty. Do not leave anything inside it (e.g. pans, baking tray, dripping pan, slider bracket etc.) as this could heavily damage them.
10. Note
1) The oven lamp will be on for all functions.(except pyrolytic function)
2) Once the cooking programme has been set and the "0" button is not pressed within 5 minutes, the current time will be displayed or turn back to waiting state. The setting program will be invalid.
3) The buzzer sounds when effectively pressed, if effectively pressed there will be no response.
4) The buzzer will sound five times to remind you when cooking has finished.
USEFUL ADVICE
- Before cooking, make sure all oven accessories that are not required are removed from the oven.
- Pre-heat the oven to the cooking temperature before using it.
- Place the cooking trays in the centre of the oven and leave space in between when using more than one, so that the air can circulate.
- Do not fi ll the tray to full when preparing a juicy, fruit cake. Any fruit juice that drips from the tray will produce stains that cannot be removed.
- Do not put oven trays on the base of the oven or cover it with aluminium foil. This will cause thermal accumulation. The cooking and roasting times will not coincide and the enamel may be damaged.
- Try to open the oven door as little as possible to see the food (the oven light remains on during cooking).
Take care when opening the door to avoid contact with hot parts and steam.
PYROLYTIC FUNCTION
The oven is designed to be highly functional and extremely easy to clean by its Pyrolytic automatic cleaning function. Pyrolytic models feature an automatic cleaning function which means no detergents need to be used in the oven cavity. The inside of the oven is heated and reaches maximum 500^ , at which temperature any grease stuck to the walls is simply burned off. However, the quadruple glazing ensures that the outer door will become no hotter than 55^ . The Pyrolytic cycle is carried out in total safety as a special safety device locks the door for the duration of the process. The cleaning cycle can be programmed between a minimum of 1 hour 30 minutes and a maximum of 2 hours depending on the level of dirt. This helps keep oven cooking times at optimum levels.
Warning:
Since Pyrolytic cleaning it's running at extremely high temperature, for durable use, it's strongly recommended to take all accessories inside cavity out before use Pyrolytic cleaning function (depends on different models, these accessories include but not limit to baking pan, chromed baking rack, chromed rack support, rotisserie fork, meat probe, Pizza knife, Pizza stone, chromed baking pan handle).
Please follow below instructions when removing the accessories from the cavity:
- Take out all accessories out of cavity;
- Disassemble rack support (if there is a telescopic runner fi xed to rack support, no need to disassemble it from the rack support) from cavity. Please put the accessories to a safe place, so that after pyrolytic cleaning, you can easily find them.
1) As shown in figure 1, loosen the screw in order to fix rack support with a screwdriver.
2) As shown in figure2, raise the rack support to an angle about 30^ with cavity, then pull it out from cavity the other side plate in the same way. - After finishing pyrolytic cleaning, pass 1 hour, assemble the rack support back to cavity, as follows below:
1) As shown in figure2, insert the rack into assembly hole of main chasis side plate side plate.
As shown in figure 1, tighten the screw with a screwdriver, and then complete the assembly of the other side plate in the same way.
2) As shown in figure 3 and 4, pull the slide rail on both sides, and install the grill rack on the slide rail.
4. Assemble baking rack and other accessories inside cavity, then the assembly is fi nished as fi gure 5.
Note: The oven cavity and baking pan it's enamele d, please be care ful when disassemble or assemble to avoid broken it.
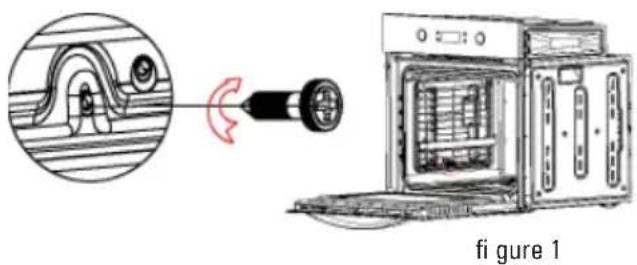
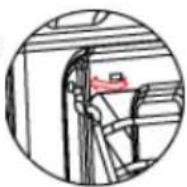
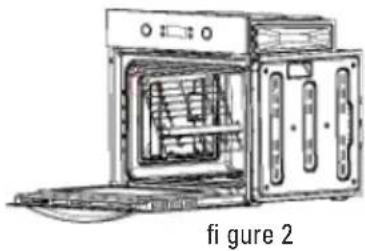

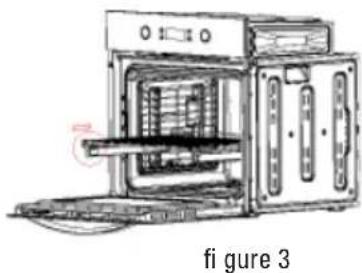
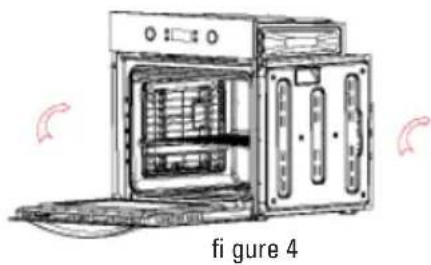
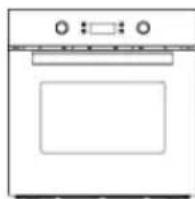
figure 5
COOKING INSTRUCTIONS
Read the information of the food packaging for the cooking temperatures and times. Once familiar with the performance of the appliance, the temperatures and times may be varied to adapt them to your personal tastes.
Check that frozen food is completely thawed before cooking, unless indicated otherwise.
| Type of food Temp. | C Runners | Cooking time | in minutes Suggested | Personal |
| Cake mixture desserts in moulds | ||||
| Sponges or buns 175 2 55-65 | ||||
| Cake 175 3 60-70 | ||||
| Short pastry desserts in moulds | ||||
| Pie base 200 3 08-10 | ||||
| Cheesecake pie base 200 3 25-35 | ||||
| Fruit pie base 200 3 25-35 | ||||
| Raised dough desserts in moulds | ||||
| Pie base 180 3 30-45 | ||||
| Soft bread 1 kg of fl our 200 3 25-35 | ||||
| Small pastries | ||||
| Short pastry 200 3 10-15 | ||||
| Doughnut dough 200 2 35-45 | ||||
| Biscuit dough 200 3 15-20 | ||||
| Lasagne 225 2 40-50 | ||||
| Meats (Cooking time per cm of thickness) | ||||
| Long roasts | 200 2 | 120-150 | ||
| Short roasts 200 2 60-90 | ||||
| Meatballs | 200 2 30-40 | |||
| Poultry | ||||
| Duck 1 1/2 Kg 200 2 | 120-180 | |||
| Goose 3 Kg | 200 2 | 150-210 | ||
| Roast chicken | 200 2 60-90 | |||
| Turkey 5Kg | 175 2 | 240-260 | ||
| Game | ||||
| Hare | 200 2 60-90 | |||
| Leg of venison | 200 2 | 90-150 | ||
| Vegetables | ||||
| Oven-baked potatoes 220 2 30-40 | ||||
| Cooked vegetable fl an | 200 2 40-50 | |||
| Fish | ||||
| Trout 200 | 2 40-50 | |||
| Sea Bream | 200 2 40-50 | |||
| Pizza | 240 3 10-20 | |||
| Grill | ||||
| Chops | 4 | 8-12 | ||
| Sausages | 4 10-12 | |||
| Grilled chicken | 2 25-35 | |||
| Spit-roasted veal 0,6Kg | 50-60 | |||
- The runner number is counted from the bottom of the oven up (Excluding the base of the oven as trays cannot be placed on it)
THE POSITION INFORMATION IS INDICATIVE BECAUSE THE COOKING TYPE AND TIMES CHANGE DEPENDING ON THE QUANTITY AND QUALITY OF THE FOOD.
HOW TO USE THE GRILL
Place the food to be browned on the grid or in the shallow tray. The grid has to be placed on the highest runner, whilst the tray for collecting fat should be on the lower runner. Connect the grill using the following positions of fan-assisted oven selector knob , or in the position , of the multi-function oven selection knob.
Depending on the type of food (meat, fish, poultry, etc.) it will be necessary to turn it over to expose both sides to the infra-red rays of the grill. For guidance only, we indicate some cooking times below:
| Food to be grilled | Cooking times in minutes Suggested |
| Lean or thin meat | 4-6 |
| Normal meat | 5-8 |
| Fish without scales | 8-10 |
| Fish (e.g. Trout, salmon) | 12-15 |
| Sausages | 10-12 |
| Sandwiches | 2-5 |
WARNING
- Do not use aluminium foil to cover the grill tray or heat.
- Do not wrap elements in aluminium foil or place them under the grill - the great reflective quality of aluminium may damage the grill element.
CLEANING THE APPLIANCE
IMPORTANT
As a safety precaution, before beginning to clean the oven always unplug it from the power supply or remove the appliance power lead.
Cleaning an oven that does not self-cleaning panels must be done after use, when it is switched off but still warm, not hot, so that the film of grease produced by the cooking vapours on the walls is still easy to remove, as well as the drips and splashes of fat that are not yet hard and dry.
Remove the chrome-plated wire side supports; pull the front part upwards to unattach them from the wall and remove them from the rear orifices. Clean the oven with a soft cloth soaked in a diluted ammoniac solution; rinse and dry. If there are still stains and splashes, place a damp cloth soaked in ammoniac at the back, close the door and, after a few hours, wash the oven with warm water and liquid detergent, rinse and dry carefully. To clean the shiny metal outside doors, use a soft cloth with soap and water; do not use any powdered products that contain abrasive substances.
Also avoid the use of acid or alkaline substances (lemon juice, vinegar, salt, tomatoes, etc.). Avoid using products containing chlorine, acid or abrasive substances specially for cleaning the varnished walls. Do not use thick steel wool or hard utensils, as they can damage the surface finishes.
Do not use high pressure cleaners or steam appliances for cleaning the oven.
Normally, wiping with a damp soft cloth and warm detergent is enough, but for stubborn stains the following is recommended:
VITRIFIED ENAMELLED PARTS
Only use a recommended cleaner for this type of material - avoid chloride-based products such as bleach.
INSTRUCTIONS FOR INSTALLATION
This appliance must be installed by a competent person, in accordance with the current version of the UK Safety Rules and Regulations or their European equivalent:
Urban development regulations (published by the Department of Environment).
Urban development laws (published by the Scottish Executive Development Department).
IEE wiring regulations.
Electricity in labour regulations.
PRIOR START-UP OF THE APPLIANCE
When it is unpacked, check that the following parts are with the oven:
- Instructions and Installation Manual
oven grid
1 tray - Screws and stoppers for fitting the appliance in the housing
FITTING THE APPLIANCE (see Fig. 5)
These appliances are classified as Class I.
The earth is obligatory as provided for by law. The manufacturer declines all liability in the event that the accident prevention rules have not been followed.
IMPORTANT
The adjacent piece or furniture or cupboard and all the materials used in the installation must resist a minimum temperature increase of 85^ above the ambient temperature during use of the appliance.
Certain types of vinyl or laminated kitchen furniture are particularly susceptible to damage due to decolouration at temperatures below those indicated.
If the appliance is installed without paying attention to this temperature limit or if it is placed less than 4mm from the adjacent cupboards, liability will belong to the owner.
INSTALLATION NOTES
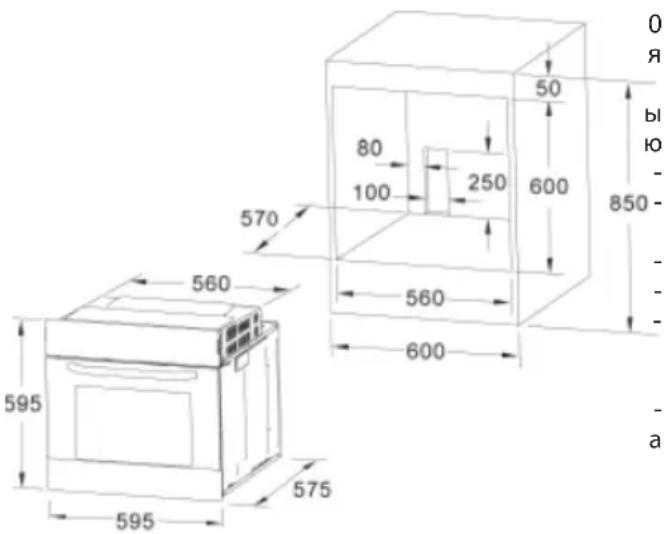
- The oven has to be installed in a standard gap of 600mm as indicated in Fig. 5, whether under a hob or in a column.
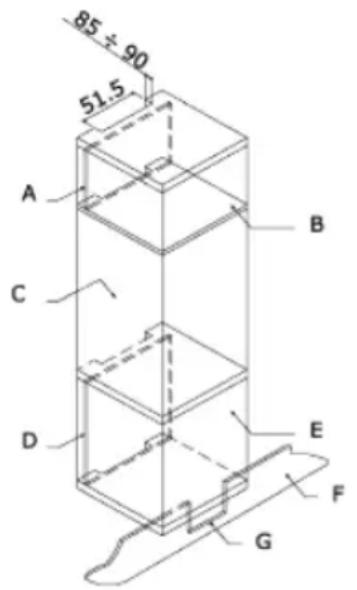
- On inserting the oven in a column, it is essential in order to ensure there is enough ventilation, to remove the rear panel of the furniture and have an opening of at least 85 - 90mm as indicated in Fig. 5.
- Check that the oven has been fixe d securely in the housing. Fixing the oven into the cupboard is done using 4 screws "A" Fig.5.One in each corner of the oven door frame.
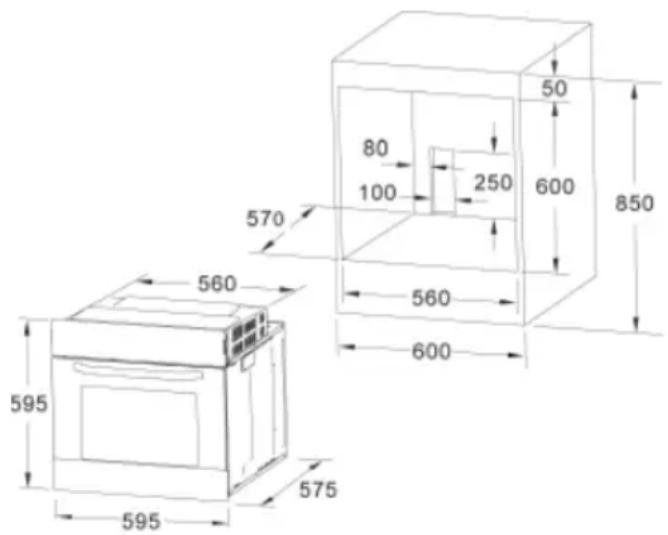
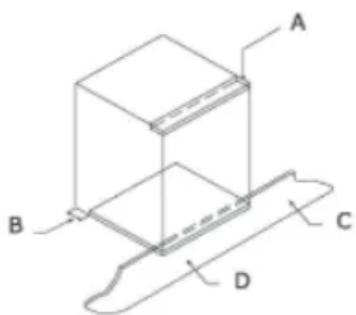
Fig. 5: Installation distanced for simple electric ovens of 60 cms wide (the shape of the upper casing may vary) and attachment to the cupboard.
A. The support runner must be removed
B. Spacing of 75 - 90mm between the wall and the rear part of the support shelf and the base of the cupboard
C. Base
D. False box front to be assembled
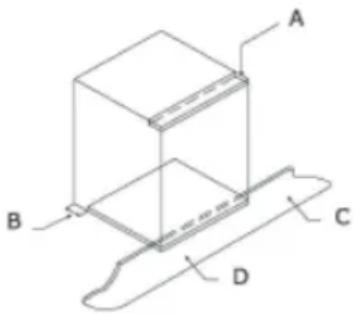
Fig. 7: Ventilation and gap requirements for the installation of e simple electric oven in a standard cooking unit. Minimum ventilation requirements for upper, base and support shelves for the rear part of the unit.
A. Rear panel
B. Storage space
C. Remove the rear part of this section
D. Real panel
E. Storage space
F. Base
G. Minimum ventilation gap 80 cm2
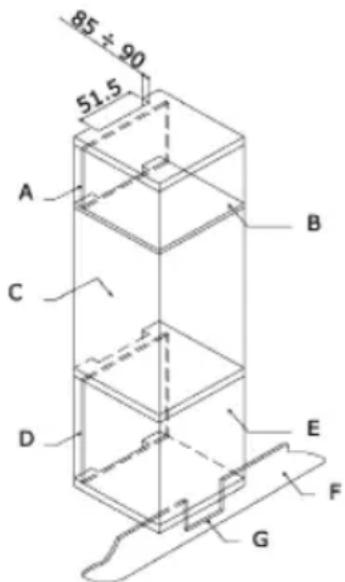
Fig. 8: Ventilation and gap requirements for the installation of a simple electric oven in an upper cupboard.
ELECTRICAL CONNECTION
Before connecting the appliance, check that the voltage marked on the specifi cations plate coincides with the voltage of the electricity network.
The NICEIC register is recommended for electrical installations.
WARNING - THIS APPLIANCE MUST BE EARTHED
This appliance must be wired to a 13 A bipolar automatic switch with protected socket, which has a 3mm separation between contacts and is placed in an easily accessible place next to the appliance.
IMPORTANT
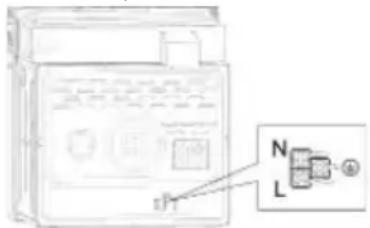
The conductors of the network power supply lead are coded by colours are follows:
Green and yellow -Earth Blue - Neutral Brown -Live
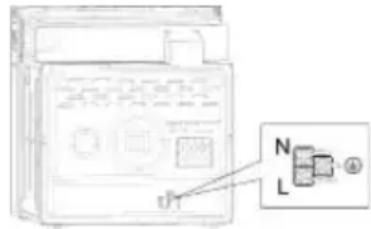
- The green and yellow conductor must be connected to the terminal marked "E" or with the symbol of the earth or which is green and yellow.
- The blue conductor must be connected to the terminal marked "N".
- The brown conductor must be connected to the terminal marked "L".
The lead must not reach a temperature higher than 50^ above the ambient temperature at any point. - If the power lead is damaged, it must be replaced by a special lead or unit supplied by the manufacturer or it after-sales service.
REPLACEMENT OF THE NETWORK POWER SUPPLY LEAD
If it is necessary to replace the network power supply lead, proceed as follows:
- Disconnect the appliance from the power supply, unscrews the fastening screws and remove the rear panel.
- Unscrew the fastening screws and those of the terminals to free the existing lead.
- Assemble the replacement lead which must comply with the information listed in the Specific cations, ensuring the correct connection of the colour codes and that all the screws are correctly tightened.
MAINTENANCE
Before carrying out maintenance, disconnect the appliance from the power supply.
During the guarantee period, if necessary all services should be commissioned to the Manufacturer's Technical Assistance Service Department. Bear in mind that intervention or repair by unauthorised personnel will invalidate this guarantee.
REPLACEMENT OF THE OVEN LIGHTBULB
Not covered by the appliance guarantee.)
The oven has a light with the following characteristics: 15 W or 25 W, 300^ and type E-14
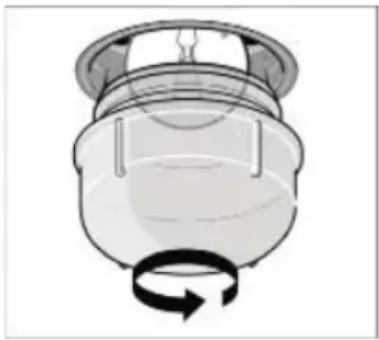
WARNING: Disconnect the appliance from the electricity supply, remove the oven door (as described above), as well as the oven shelves.
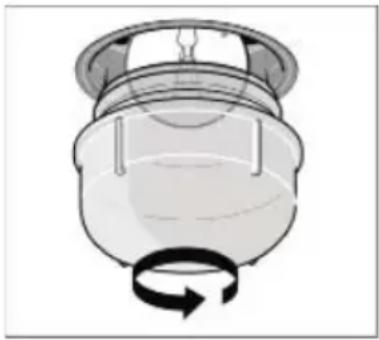
Remove the glass cover that protects the light bulb by turning it anti-clockwise. Fig. 9 (A)
Unscrew the old light bulb and dispose of it safely and ecologically, change it for one as specified in the Specifications and replace the cover.
NOTE - The glass cover may be tight and, therefore, may need a grip to release it.
CARE AND REPLACEMENT OF THE CATALYTIC COVERING
(When assembled, the covering is not covered by the appliance guarantee).
In order to keep the covering "always clean" effi ciently, the oven must be heated to a minimum of 200^ whenever there are stubborn stains, so that they do not become permanent.
If the covering becomes black and shiny, they must be replaced. Remove all the internal accessories to facilitate the replacement of the covering.
The replacement covering may be bought directly from the Manufacturer's Replacement Part Department (see details included in the cover). Indicate the reference numbers of the product type described in the specific cations plate and/or the series number of the appliance on ordering.
SPECIFICATIONS
INTERIOR DIMENSIONS
Height: 346.5mm
Width: 457 mm
Depth: 410 mm
Useful volume: 70 litres
ELECTRICAL INFORMATION
Nominal voltage:
220V-240V\~50Hz
Power connection: 13A (automatic bipolar switch with protected socket, with 3mm separation between contacts)
POWER ABSORPTION
Top heating element 950 W
Grill heating element 2000 W
Bottom heating element 1100 W
Convection heating element 2000 W
Convection motor 33 W
Rotisserie motor 4.1 W
Cooling fan 23 W
Oven lamp 25 W
Max. power 2100W/3000 W
Network power cable:
3×1.5mm² type H07RN-F
Oven light bulb:
15 W - 25 W / 300 °C screw type E-14
The Manufacturer declines all liability for damage caused to persons and objects due to incorrect or improper installation of the appliance.
The Manufacturer reserves the right to make any modification it believes necessary and useful to the products, without prior warning.
ISTRUZIONI PER L'UTENTE
Volume utile: 70 litri
DATI ELETTRICI
Tensione nominale:
220V-240V\~50Hz
WAARSCHUWING en VEILIGHEIDSVOORSCHRIFTEN
OMSCHRIJVING VAN HET PRODUCT
WAARSCHUWING-DIT APPARAAT MOET GEAARD WORDEN
CnHn6yDenBbIaBaTbcra, noka Bbl He 3akpoete DBepuu HHe HaXMeTe KONky OTMeHbl.
Γ)KordaBbIIOJIHeHneNipOJIITnueCKoYHKcUN3aBepuHo, a TemnepaTypa BHyTpN dYXOBOrO WkaΦa ONyCTITcHnKe 300^ ,CBTeODNoHbI DNcNnei NoracheT.
Д) ПекдуемakTNBnPOBaTирОЛTNueckyOуФнкИю, ydaJIte n3nnIshKn pa3NHBweCЯнКоCTn u6eJIntecb, yTO dYxOBoH WkaΦ nyct. He octabJrTe BHyTp n dYxOBOrO WkaΦa NOcTOpOHHne npEmdetbl (HapnpMep, cKObopoDbI, npOTNBHn, noDIOHbI, caJa3Kn I T.Д.), NOCKoJIbKy B npOTNBHom Clyuae OHn MOryt 6bITb cepbe3HO NOBpeXKeHbI.
10.ПиMuMeuHne:
1)Bo BpemBbINOJIHeHnBcEx ΦyHKn(KpOMe)Fe npoJInTnueckOn ΦyHKn) lamna DuyXOBOro ShkaΦa6ydet OCTaBaTbCBAKIOUeHHoH.
2) KOrda nporpamma npriroTOBHeHn 3aHa, Ho KNOpKa «He 6bIa Haxata B TeueHne 5 MInHT, Ha DncPiee 6yDet OTo6paKeHO Tekyuee BpeM, a 3JIeKTPoPnp6Op BepHETcB PexkM OxNiDaHn. B 3TOM Cnyaae HactpoiKa nporpAmMb6yDet HeJeCTBNTeJbHOH.
3) 3BykoBoi CnHaB BbIaTeC npn CBOeBpeMeHHOM HaxaTIN KHOKN, B nPOTuBHom Cnyuae CnHana He NocJeNyET.
4) Iocne 3aBepueHn nprirotOBJIeHn 3ByKOBo nIrhAn np03ByuHT nIb pa3.
NOLE3HbIE COBETbl
- PpexKe Yem rTOBnTb, 6o3aTeJbHO n3BNeKIne BCE HeHyXHbIe PpuHaJIeXHIOCTn I3 dyXOBKn.
- Ппждуем пистуNTь к pa6оTe,прдвapnteьнho pa3orpeiTe duXOBky Do hyxHoi TemnepaTypbI TeNIOBoi 6pa6OTkn.
- UctaHOBnTe npOTNBn B ceHTpe duyxOBKn n IyI npKpyIaun BO3dyxa. EcnncnObl3yeTe 6oJIee Ondoro npOTBnH, OCTaBBte MeKJy HmN pOcTpaHCTBO.
He hanoHnIte npOTnbH doBepx npnpiroTOBJeHN coHoro pyKTOBOrO KeKca. Kaiaoune c npOTNB H pyKTOBbIE COKN OCTaJIOT HeBbIOHMbIe PAHTHa.
He KlaaTe npOTnBn Ha dHO dYxOBKn n He HAcKpbBaIte DHO aIIOHMnHneBOI oJbROI. 3TO npNBeTe K hakoJIpeHIO TeIIa. Bpemr roTobKn n JapeHnre H coBnaTe, n MoKeT 6bITb NobpeXDeHa mAlb. - NocTapaItec b KaK MoXHO MeHbIe npNtKpbIbTaB DBepu DxyOBKn, YTo6bl NOCMOTpeTb Ha NiuY (OCEeHHe DxyOBKn BO Bpemr rTOBKn He BbIKnOuaTcra).
BybTe octopoxHbI, OTKpbIBaI Bepu, To6bl n36e
MЯKaTb KOHTaKTA C TROPaYIMN DeTaIaMn N napOM.
PpoDyKTbI DnB BpeMa roTOBKn B 06pa6OToKn Ha rpnJe MmHytax PpeDlaeraMoe
Hexnuphoe nHn TohKoe mco 4-6 O6bHoe mco 5-8
Pb6a 6e3 ueyn 8-10
Pb6a (Hanpimep, fopejb, nococb) 12-15
KoI6acbl 10-12
C3HDbuyn 2-5
PNEyNPEXKDEHNE
He noIb3yItecb aIOMnHneBOI oJIbROI nIPOKpbITn npOTNBra rPnJr nnNCTOCHNkA Tennla
He 3abopauuBaIte 3neMeHTbB aIIOHMnHBeByo fOJIbry n pa3meaIte nx IOJ rPunem -6OJIbwaI OTPaKaTeJBHaA cNoC06HocTb aIIOUMHnMoKeT NOBpeIITb 3neMeHT rPUN.
OuHCTKA DyXOBK
BAXKHOE 3AMEYAHNE:
B KaueCTBe MepbI PpeIOctOpOxHocTn, npexJe Yem UcNTb DyXOBky, HxJHO 6o3aTeJIbHO OTKIouHTb ee OT 3NeKTponITaHn, ININOTCOeINHtB OT DxyOBKn CInNOBoi Ka6JIb.
OuNTKa dYxOBKn, He cHa6XeHHo CamOoHuaOUMnca NaHeJAMn, HxKHO BbINONHrTb NocNe pa60TbI, KOrDa OHa OTKIOUeHa, Ho eSe TeNnA, He rOpAa, C TeM, QTO6bl MoXHo 6bIIO JERKO YdaJIaTB XUnHyIO PIIeHKy, O6pa3OBaHNyO napAmn OTeNtIOBOOIBO6pABOTkn Ha CTeHKax, N KOrDa eEe He 3aCTbIIN Hc 3acoXIn NOdTeKN i KaIIN Jnpa. ChIMITE xpOMIPOBAHhble 6OKOBBe IPOBOLOHbte ONOpBbl; NotAHHTe NpeEDHIO YacTB BBePxDn OTeJeHnO TcEHKn IN CHIMITE IN N3 3aDHNX OTBepCTNI. OOnCTNTe DxyOBky MfIKo TKaHbO, CMouEHHO B pa36abneHHom pACTBOpe xNOPICTORo AMMOHn; IpOMOIte N BbICyWnte. EcNl eEe OCTaIINCB NpTaHa N 6pbI3rN, NIOXnTE C3aDn BlaXHyIO TKAHb, CMOeHHyIO B pAcTBope XNOPICTORo AMMOHn, ZAKPoITe DBePuy N Upe3 HeCKoJIbKO aCob BBIMOnTe DxyOBKy TEIIO BOOIC XNIDKM MOIOUM
CpeCTBOM, nPOMOte ee n OCTOPOKHO BbicyuWite.ДЯ YnCTKN HApyKbIX DBePOK C NOBepXHOCTbIO N3 6JeCTa UeRO MetaIINa BOCNoJIb3yITeCB MArKO TKaHbIO CMbIOM N BOIO; He NOLb3yITeCB NOpOswKOBbIMN CpeCTBaM, Tak KaK B HNX CoepKaTcra abpa3nHBhle BeueCTBa.
Kpome toro, He noJb3yItecb KNCOTAMN u IeNoOaAMN (NJMOHbIM COKOM, YKCycOM, COJBIO, TOMaTMN T.D.). He noJb3yItecb npOdyKTAMN, coDEpKaUIMN XLOP, KNCOTbI Nn a6pa3NBHbIE BeIecCTBa, npeHa3NaHeHHbIMn CneuNaBHo dnnuCTKn NaKIpOBaHHbIX NOBepXHOCTeN. He noJb3yItecb MetaNNueckO BATOIN TBepDbIM NnHCTpyMeHTAMN, NOTOMY UTO OHN MOrT NOBpeDNTb OTdEJIky NOBepXHOCTN.
He nolb3yIeTcB ouHCTnTeJAMN IOB BBICOKIM daBLeHN- em nnnapoOBou NCTKOn dJe ONUCTKN DyXOBKn.
06bHNO DOCTaTOUHO 6bIbae TPOTnpAHN BnJXHO MAnKoTKaHbIO N TeJIbIM MOIOUM CpeDCTBOM, a dJa TpyHOBbIOHMbIX IaTeH peKOMeHdyETc CneJeUooee:
DETAJI,3MAJIPOBAHHbieVITRIFIED
ДяЗTORA TINa MaTePnana BOCNoB3yInTecb ToJIbKO peKOMeHIOBaHHbIM OUHCTNteIeM - N36eRaIte PpOdyKTOB Ha OCHOBE XlOpa, TaKnx KaK OT6eINBaTeIi.
HHTPYKUNI NOYCTAHOBKE
DyXOBKa DOnJxHa yCTaHaBnBaTbcg KBAJInΦnIpObaH HbIM CNEuaJIncTOM B COOTBeTcBm C TeKyuSei BepCnei HopM n npabIN TexHKn 6e3oNaChocTn CoeHNHeHHoro KoponeBCTBa nn IN x EbponeNcknx aHaIorOB:
HopMbI rpaIOCTPOINTEbCTBa (Ony6NIKOBaHbI denaPtaMeHTOM OKpykaIOUeI cpebl)
3aKoHbI rpaOIOCTpOINbCTBa (ONy6NIKObaHbI 10TNaHdCKIM NCNOHHTeBbHM DeapTaMeHTOM pa3BHTNA)
3NeKtpotexHnueckne npabuna HcTntyTa HxHepeOB nO 3NeKtpnke N3NeKtpoHnke
3NeKtpnueCTBO B TpyoBOM 3aKOHOaTeJIbCTBe
NEPEI BKJIIOUcHHeM DUXOBKn
Pn pacnakobke npoBepbTe, haojTcB B dYxOBKe cneDyUOuNe DeTani:
- INHCTpyKcunn npyKOBOCTBO NO yCTaHOBKe.
- NeuHbIe peWTeKn NIN
1 npoTnBeHb
BnHTbI n CTOnOpbl DJIa BCTpaBbHn AynOBKn B HnUy.
MOHTAX dyxOBKn (CMOTpn pnc.5)
3Tu dyXOBKn KlaaccnphiunpyoTcno knaccy I.
3aemne Hn 6b3aTeJbHo, KaToro Tpe6yET 3aKOH. N3- roTOBNTJIb CHIMaET C Ce6Ba BCIO OTBeCTBeHHOCTb npN Heco6IIOHeHn IpaBn IpeD0TBpaUeHn Hecuacthblx cnUyaeB.
BAXHOE 3AMEYAHNE:
PnmbkaioaMe6eJb nnu kKaΦ, a TaKke Bce MaTepeaIaIb, nCNoB3yEmbIe npu yCTaHOBKe, DOJXHbI BbIepKINBaTb, KaK MUNHMym, NOBbIeHne TemnpaTypbHa 85°C Bblwe TemnpaTypb OkpykaIOSe Cpebl BO Bpempa
60TbI DxyxOBKn.
OnpeHHeHHbI TUNbI KxOHHO Me6eNn I3 BHNHa IIN cONCTORO nlaCTNkA OCO6O yBCTBnTeNbHbI K NOBpeKDeHNM B CBA3n C ObecuBeuBaHnem npu TempeaTpyax Hnke yka3aHNo. EcnnyOBKa YcTaHabNBaETc8e3 yeta TOro TEMnepaTpHoro ppeJea, nn eCn OHa yCTaHabNBaETcHa paCtOAHm Mehee 4 MM OT npmbkaKaiounx WkaΦOB, OTBeTCTBeHHOCb 3a 3TO 6yET HeCTN BlaJeue.
3AMEUAHNIOYCTAHOBKE
A. Onophyu HappaBnaIou HxKHO CHrTb
B. PacctoHnne 75-90 MM MExdy CTeHKo N 3aHeN qactbIO ONOPHOI NOKN I OCHOBAHm Wka
C. OCHOBAHHe
D. YcTaHaBnBaETcIeKOpaTnBHaN HaKnlaJaKa
Pnc.7: Tpe6oBaHnK BeHTnlaUm n 3a3Opam npu yctaHOBKe npocToI eNeKTpnuyeckOy dYXOBKn B CtaHdapTHoN KxyOHHO Me6eHN.
MunHmAbhble Tpe6ObaHn K BeHTnlaCn nIaBepxHe, 6a3oBoi nOnOpHO nnONok dnn 3aDHe qactn DyXOBKn.
A.3aHnnaHnB
B. MecToДЯхpaHEnHa
C. CHIMITE 3aHIOU Yactb 3TOI CEKUN
D.3aHnaHnB
E. Meço干什么xpaHenn
F.OCHOBAHHe
G. MnHmAlbHbI 3aOp dIy BeHTnlaCIN 80 cm2
Pnc.8: Tpe6oBaHnK BeHTnlaCnN 3a3Opam npu yCTaHOBKe npocToI 3JneKTpueeCKO DyXOBKn B BepxHem Wka-phi.
3NEKTPNUECKNE COEINHEHNA
Ipejke yem nooknouatb dxyOBky, npoBepbTe, yTo6bl HanpajKeHne, yka3aHHoe Ha nacnopThon Ta6nueKe, CObnadaLo c HanpajKeHne 3JeKtpnueckOc cetn.
Дялэнкгчecknx yctahOBOK pekomehdyetcnoIb30BaTbca pernctpom NICEIC (Cobet haunohabhoHnHcneKUnIЯ NOprayuKOB, BblONHryUOux 3JektpotexHnueckne pa60TbI).
PNEyPExKDeHne -DAHHOE YCTPOIcTBO NOJLEXKUT 3A3EMJIeHIO
IpoBoJa daHHoro yCTpOuCTBa DOJXHa OcyueCTBnTbCra uepe3 DByxNIOCHbI aBTOMaTNUeCKN BblKlnOuataJIb Ha 13 amnepc 3aunuieHHo P03eTKo, B KOTOPm npedYcmotpeH 3a3Op 3 MM MExJy KOHTaKTamn, N KOTOpbI yCTaHaBnBaETcB IerKO DOCTynHom MecTe pAnOM C yCTpOuCTBOM.
BAXHOE 3AMEYAHNE
PpOBoJaUe JxNbI ceTeBOro Ka6JI NITaHn O6O3Ha-ueHbI CBETOBOM MapKnOpOBKo CneDyUOUM 6pa3OM:
3eJeHo-JeENTbI-3emn
Tny6oH-HeuTpalb
KopnHeBbIn - Φa3a
3eHeHO-JeENTbI npOBoHNK DoJxHc H 6bITb npicoeHNHeK KJIeMMe, o6O3HaueHHoN "E" nII N KJIeMMe CnMBOJOM 3a3eMJeHnI, nII K KJIeMMe, o6O3HaueHHoN 3eHeHO-JeNTbIM UBeTOM.
- Tony60I npOboHnK dOJxhen 6bITb npCooeHnHe K KJIemme, o6o3HaueHHoN "N".
KopnueHbI npOBODNk DOJXeH 6bITb npcoeHNHe K KJIemme, o6o3HaueHHoH "L".
TemnepaIpya npoBOnHnka Hn B kaKo erO toUke He DOnJxHa DoCTnRaTb TemnepaTypbI Bblwe 50^ NaTempepaTypoi OkpyKaIOuSei Cpebl.
- Ecnn cnnoBoi Ka6eBn nobpeKdeH, erO hyXHo 3aMeHHTb CneuaJbHbIM Ka6eEm nn Ka6eEm, noCTabIeMbIM n3rTOBnteEm nn npn nocenepoJaXHom o6CnyxNBAHnn.
3AMEHA CETEBOTO KABENI NITAHNIA
Pn Heo6xOaUMOCt 3aMeHntb ceTeBOI Ka6eJIb NITAHN NOCTynTe CNeDyUcIMM O6pa3OM:
- OToCoeINHInTe DxyOBky OT3JIeKTPoNITaHnry,OTBnHTnTe BnHTbI KpeJIeHnY n CHmMtE 3aDHIO IaHeJb.
- OTBnHTnte BnHTbI KpeNJIeHnI IN BnHTbIKJIeMM, YTO6bl OCBO6OJNTb CTapBI KabeJIb.
3.ПрсоeннTe HOBькбь,КOTobиДОЛжЕн COOTBeTCTBOBaTb INHΦOpMaци,уka3aHHOВТexHnuecknxYcNoBnIX,CNEЯЗБeTOBOmMapKnIPOBKOИЗaTЯнВBar BnHTbl COOTBeTCTByIOUIM yCUNIeM.
TEXHNUECKOE O6CJYKUBAHNE
PpeXde yem BbINOHNrTb TexHueckoe 6cnyKNaB Hne,OTcoeINHnTe dYxOBky OT aJeKTPoNtAHn. B TeueHne rapaHTnHoro nepnoJa BCE Heo6xoJnMoe 6cnyKNaBHe DOJXHO NOpyatbcra OTdEny TexHueckoro 6cnyKNaBHa N3ROTOBnTeJI. POMHnTe, TTO BMeSaTeNbCTBO Mn peMOHT CO CTOPOHbI HeyNoIhOMOeHHOr Ha 3TOro nepcoHana npuBoNT K aHHynpOBaHIO NaCTOaue J rapaHTnN.
3AMEHA JAMNOUCKI OCBUEHIN AYXOBKN
(Ha lamnoky rapaHTna Ha duyxOBky He pacnpoctpaHeryetc)
B DuxOBke npeducMOptepHa lamnoUka co cneDyUuMN xapaKTepeNtukAmn: 15 BaTT nnn 25 BaTT, 300^, Tnnpe3b6bl E-14
PNEyPExKHeHMe:OTcoeINHnTe DxyOBky OT CeTN 3JIeKtpuueckoro NHTaHn, CHMnTe DBepuy DxyOBKn (kak ONUcaHO BbIwe), a TaKke NOJKN DxyOBKn.
Chmnte cTeKnHHyo KpbIshky, 3aunuOuSyIO lamnoKy, nobepHyB ee npotnb yacoboi cTpekn. Pnc.9 (A)
BbInHTte CTapyIO lamnoky u yTuIN3npyIte ee 6e3- onaChbIM o6pa3OM n 6e3 Bpea OkpykaIoSei cpeE, BBInHTte HObyIO, KaK yKa3aHO B TexHnuecknx ycNoBnAx, I NOCTaBBTe Ha MeCTo KpbIuKy.
PIMMEUHNE - CTeKnHaHn Ka MoKeT cnDeTb Tyro, n dA ChTnMoKeT notpe6oBaTbca ycunne.
YxOa 3a KaTaNtNuecknM NOKpbITnem n ero 3ameHa
(Ecn npedycmTopeHO 3TO NOKpbITNe, rapaHTnHa dxyOBky Ha NOKpbITNe He pacnpocTpahreTc).
ДяТOrOуTO6bI NOKpbITNe Bcerda OUnuAnocb 3ΦΦeKTHBHO,DyXOBKa DOJIKHa HArpeBaTbcr,NO KpaHHeMpe,Do 200^ BInIO6OM Cnyuae,KOrDa BO3HnKaIoT TpydHOBbIOBDOIMMbIE PRTHa CTEm,UTO6bI OH He OCTaINCb HaBCERda.
Ecnn nokpbitne ctaHOBITcA cepHbIM n 3epKaJIbHbIM,ero HxKHO 3aMeHHTb. N3BLeKeNTe BCE BHyTpEHnne npHaJIeXHOCTN, yTO6bl 6blIO Jere npOn3BOIDtB 3aMeHy NOKpbITn.
IokpbItne Ha 3aMeHy MoKHO npno6peCTn HenocpeCTBeHHBO OTdene 3aNaChbIX qAcTeu N3rTOBnteJe (CMOTpn NOpO6HyIO INHOpMaUIO, yKa3aHHyIO Ha NOKpbITn).Pnp 3aKa3e yKaXnTe CnpaBOUHbE Homepa Tnna npOdykTA, yKa3aHHbIe Ha nacnopTHoT a6nUKe I (nn) cepInHbI HOMep dYxOBKn.
TEXHINYECKNE YCIOBNA
BHYTPEHHNE PA3MEPbl:
BbICota:346,5 MM
UnpHa:457MM
Tny6nHa:410MM
3NEKTPUQUECKNE DAHHbIE
HomHaIbHoe HappXeHne:
220-240 BoIbT, 50 repu
IodKIOUeHne NITaHn: 13-amNepHbI aBToMaTnueckn BblKIOuHaTeNb C 3aunuEHHo pO3eTKoB, B KOTOpOM npedycmOTpeH 3a3Op 3 MM MeJdy KOHTaKTamn
3HEPronOTPE6JIeHNE:
BepxHn HarpeBaTeIbHbI 3JIeMeHT 950 Bt
HarpeBaTeBHyI ΘeMeHrT rpn2000 Bt
HnKnn HaraeBaTeBbHbN 3JIeMeHT 1100 Bt
KOHBeKUHNoHHbI HArpeBaTeNbHbI 3NeMeHT 2000 Bt
KoHBeKUHOHHb IDbIraTeIb 33BT
Bnrgateb BepTeJa 4,1BT
OxnaJdaiouBn BENTINrTop 23BT
Jamna dyxoboro ukafoa 25 Bt
MaKc.MoUHOCtB 2100BT/3000BT
CeteBoi Ka6eIb NHTaHnJ:
3×1,5MM²,TnH07RN-F
JaMnoKa OcBeueHnA dyXOBKn:
15-25BaTT,300oC,Tinpe3b6blE-14
N3ROTOBNTeIb He Hecet HnKaKo OTBeTCTBeHHOCTb 3a yueep6, npuunHennbl IIOJam n MaTePuaNbHOMy Nmy- uectBy n3-3a HenpaBnBHO yCTaHOBN dyXOBKn.
N3rotOBnteB coxpaHReT 3a c6oB npaBO BHocuTb B n3dennn N3MeHeHH, KOtOpBle, NO erO MHeHHIO, RAJIOTc HEO6XoDnMbIMn NNn NOE3HbIMn 6e3 npedBapNTeBHorO yBeDOMHeHH.
用户手册

- REEMPLACEMENT DE L'AMPOULE DU FOUR
- DIMENSIONS INTÉRIÉURES
- GENERAL INFORMATION
- IMPORTANT NOTICE SAFETY INSTRUCTIONS AND WARNING
- INSTRUCTIONS
- USING THE OVEN
- PRODUCT DESCRIPTION
- OPERATION INSTRUCTIONS
- Clock Setting
- Function Setting
- NOTE:
- Lamp Setting
- Inquiring function
- Child lock function
- Reminder Function:
- Start/Pause/Cancel Function
- Energy-Saving Function
- Pyrolytic Function(only some modles)
- Note
- USEFUL ADVICE
- PYROLYTIC FUNCTION
- Warning:
- Please follow below instructions when removing the accessories from the cavity:
- COOKING INSTRUCTIONS
- HOW TO USE THE GRILL
- WARNING
- CLEANING THE APPLIANCE
- IMPORTANT
- VITRIFIED ENAMELLED PARTS
- INSTRUCTIONS FOR INSTALLATION
- PRIOR START-UP OF THE APPLIANCE
- FITTING THE APPLIANCE (see Fig. 5)
- INSTALLATION NOTES
- ELECTRICAL CONNECTION
- WARNING - THIS APPLIANCE MUST BE EARTHED
- REPLACEMENT OF THE NETWORK POWER SUPPLY LEAD
- MAINTENANCE
- REPLACEMENT OF THE OVEN LIGHTBULB
- CARE AND REPLACEMENT OF THE CATALYTIC COVERING
- SPECIFICATIONS
- INTERIOR DIMENSIONS
- ELECTRICAL INFORMATION
- ISTRUZIONI PER L'UTENTE
- DATI ELETTRICI
- WAARSCHUWING en VEILIGHEIDSVOORSCHRIFTEN
- OMSCHRIJVING VAN HET PRODUCT
- WAARSCHUWING-DIT APPARAAT MOET GEAARD WORDEN
- 10.ПиMuMeuHne:
- NOLE3HbIE COBETbl
- PpoDyKTbI DnB BpeMa roTOBKn B 06pa6OToKn Ha rpnJe MmHytax PpeDlaeraMoe
- PNEyNPEXKDEHNE
- OuHCTKA DyXOBK
- BAXKHOE 3AMEYAHNE:
- DETAJI,3MAJIPOBAHHbieVITRIFIED
- HHTPYKUNI NOYCTAHOBKE
- NEPEI BKJIIOUcHHeM DUXOBKn
- MOHTAX dyxOBKn (CMOTpn pnc.5)
- BAXHOE 3AMEYAHNE:
- 3AMEUAHNIOYCTAHOBKE
- 3NEKTPNUECKNE COEINHEHNA
- PNEyPExKDeHne -DAHHOE YCTPOIcTBO NOJLEXKUT 3A3EMJIeHIO
- BAXHOE 3AMEYAHNE
- 3AMEHA CETEBOTO KABENI NITAHNIA
- TEXHNUECKOE O6CJYKUBAHNE
- 3AMEHA JAMNOUCKI OCBUEHIN AYXOBKN
- PIMMEUHNE - CTeKnHaHn Ka MoKeT cnDeTb Tyro, n dA ChTnMoKeT notpe6oBaTbca ycunne.
- YxOa 3a KaTaNtNuecknM NOKpbITnem n ero 3ameHa
- TEXHINYECKNE YCIOBNA
- BHYTPEHHNE PA3MEPbl:
- 3NEKTPUQUECKNE DAHHbIE
- HomHaIbHoe HappXeHne:
- 3HEPronOTPE6JIeHNE:
- CeteBoi Ka6eIb NHTaHnJ:
- JaMnoKa OcBeueHnA dyXOBKn:
- 用户手册
Brand : CATA
Model : LC 8110 PYR
Category : Oven