Zensor 1 AX - Speaker Dali - Free user manual and instructions
Find the device manual for free Zensor 1 AX Dali in PDF.

Frequently Asked Questions - Zensor 1 AX Dali
User questions about Zensor 1 AX Dali
0 question about this device. Answer the ones you know or ask your own.
Ask a new question about this device
Download the instructions for your Speaker in PDF format for free! Find your manual Zensor 1 AX - Dali and take your electronic device back in hand. On this page are published all the documents necessary for the use of your device. Zensor 1 AX by Dali.
USER MANUAL Zensor 1 AX Dali
- Connect the speakers with the included speaker cable (see part 4.0 - 4).
- Connect the left speaker to mains power and turn on the power switch on the back.
- Change to Bluetooth mode using the remote control, or source select on the back of the left speaker.
- Locate DALI ZENSOR AX in your playback device's Bluetooth device list and establish the connection.
- Start playback on your playback device.
- To achieve optimal audio quality, set the playback device's volume to maximum and use the speaker volume buttons to control the volume.
- The ZENSOR AX will automatically reconnect to the last connected devices.
- Any existing connection must be disconnected before a new connection can be made.
- To disconnect a Bluetooth connection, use the Release button on the remote or the Release combination on the back of the left speaker.
- Read more about ZENSOR AX Bluetooth mode in part 5.2
FCC Statement
This device complies with part 15 of the FCC Rules. Operation is subject to the following two conditions: (1) This device may not cause harmful interference, and (2) this device must accept any interference received, including interference that may cause undesired operation.
Any Changes or modifications not expressly approved by the party responsible for compliance could void the user's authority to operate the equipment.
Note: This equipment has been tested and found to comply with the limits for a Class B digital device, pursuant to part 15 of the FCC Rules. These limits are designed to provide reasonable protection against harmful interference in a residential installation. This equipment generates uses and can radiate radio frequency energy and, if not installed and used in accordance with the instructions, may cause harmful interference to radio communications. However, there is no guarantee that interference will not occur in a particular installation. If this equipment does cause harmful interference to radio or television reception, which can be determined by turning the equipment off and on, the user is encouraged to try to correct the interference by one or more of the following measures:
- Reorient or relocate the receiving antenna.
- Increase the separation between the equipment and receiver.
- Connect the equipment into an outlet on a circuit different from that to which the receiver is connected.
- Consult the dealer or an experienced radio/TV technician for help.
IC Caution
This device complies with Industry Canada license-exempt RSS standard(s).
Operation is subject to the following two conditions: (1) This device may not cause interference, and (2) This device must accept any interference, including interference that may cause undesired operation of the device.
This equipment should be installed and operated with a minimum distance of 20cm between the radiator and your body.
CANICES-3(B)/NMB-3(B)

CAUTION
RISK OF ELECTRIC SHOCK DO NOT OPEN
ATTENTION
RISQUE D'ÉLECTROCUTION NE PAS OUVRIR

ImPortaNt SaFety INStruCtoiNS
- Read instructions - all the safety and operating instructions should be read before the appliance is operated.
- Retain instructions - the safety and operating instructions should be retained for future reference.
- Heed warnings - all warnings on the appliance and in the operating instructions should be adhered to.
- Follow instructions - all operating and use instructions should be followed.
- Water and moisture - the appliance should not be used near water - for example, near a bathtub, washbowl, kitchen sink, laundry tub, in a wet basement, or near a swimming pool and the like. To reduce the risk of fire or electric shock, do not expose this apparatus to rain or moisture. The apparatus should not be exposed to dripping or splashing. Objects filled with liquids, such as vases should not be placed on the apparatus. Wall or ceiling
- Carts and stands - the appliance should be used only with a cart or stand if recommended by the manufacturer. When a cart is used, use caution when moving the cart/apparatus combination to avoid injury from tip-over.

Wall or ceiling mounting - if the appliance includes options for wall or ceiling mounting, it should be mounted only as recommended by the manufacturer.
Ventilation - the appliance should be situated so that its location or position does not interfere with proper ventilation. For example, the appliance should not be situated on a bed, sofa, rug, or similar surface that may block the ventilation openings; or placed in a built-in installation, such as a bookcase or cabinet, that may impede the flow of air through the ventilation openings.
Heat - the appliance should be situated away from heat sources such as radiators, heat registers, stoves, or other appliances (including amplifiers) that produce heat.
Power sources - the appliance should be connected to a power supply only of the type described in the operating instructions or as marked on the appliance.
Power cord protection - power-supply cords should be routed so that they are not likely to be walked on or pinched by items placed on or against them, paying particular attention to cords at plugs, convenience receptacles and the point where they exit from appliance.
- Cleaning - do not use any liquid cleaners. Use only a dry cloth to wipe off dust and grease.
- Non-use periods - the power cord of the appliance should be unplugged from the outlet when left unused for a long period of time and during lightning storms.
- Object and liquid entry - care should be taken so that objects do not fall and liquids are not spilled into the enclosure through openings.
- Servicing - the user should not attempt to service the appliance beyond that described in the operating instructions. All other servicing should be referred to qualified service personnel. To reduce the risk of electric shock, do not remove cover (or back) as there are no user-serviceable parts inside.
- Damage requiring service - the appliance should be serviced by qualified personnel when:
a) The power-supply cord or the plug has been damaged; or
b) Objects have fallen, or liquid has been spilled into the appliance; or
c) The appliance has been exposed to rain; or
d) The appliance does not appear to operate normally, or exhibits a marked change in performance; or
e) The appliance has been dropped, or the enclosure damaged.
17. Battery heat - do not expose the battery or battery pack to excessive heat such as sunshine, fire or the like.
18. Battery replacement - danger of explosion if battery is incorrectly replaced. Replace only with the same or equivalent type.
19. Battery storing - keep new and used batteries away from children. If the battery compartment does not close securely, stop using the product and keep it away from children.

- Isolation - this equipment is a Class II or double insulated electrical appliance. It has been designed in such a way that it does not require a safety connection to electrical earth.
- Mains disconnection - Mains plug is used as disconnect device and it should remain readily operable during intended use. In order to disconnect the apparatus from the mains completely, the mains plug should be disconnected from the mains socket outlet completely.

This product contains electrical or electronic materials. The presence of these materials may, if not disposed of properly, have potential adverse effects on the environment and human health.
Presence of this label on the product means it should not be disposed of as unsorted waste and must be collected separately. As a consumer, you are responsible for ensuring that this product is disposed of properly.
CONTENTS
1.0 INTRODUCTION 8
2.0 UNPACKING 8
3.0 POSITIONING 8
4.0 CONNECTION 9
5.0 USAGE 9
6.0 RUNNING-IN 11
7.0 CLEANING AND MAINTENANCE 11
8.0 DISPOSAL 11
9.0 THE LISTENING ROOM 12
10.0 TECHNICAL SPECIFICATIONS 12
1.0 INTRODUCTION
Congratulations with your new DALI ZENSOR AX loudspeaker. It is important to us that your new DALI loudspeakers are set up and connected optimally. For this reason, we recommend that you read this manual and follow its recommendations. The manual contains instructions for setup and connection, as well as tips and advice on how to get the most out of your new loudspeakers. DALI is acclaimed around the world for unique loudspeakers built to our uncompromising standards for design and performance. The goal for every single DALI loudspeaker is always our foremost commitment: To create a listening experience in your home that will make you forget time and place.
Remember to sign up for the DALI newsletter at www.dali-speakers.com.
Enjoy!
2.0 UNPACKING
Be careful not to damage the contents when you unpack the parts. Depending on which DALI ZENSOR AX model you have bought, different accessories come with the loudspeaker. Check that all parts are contained in the cardboard box (see Table 1). Keep the packaging materials should your speaker need to be relocated or serviced.
3.0 POSITIONING
To achieve the best results, the loudspeaker setup should be symmetrical round your favourite listening position, see Figure 1. We recommend that you experiment with the position of your loudspeakers – the sound quality will change depending on the loudspeaker position. Objects positioned between the speaker and the listening position might negatively affect sound quality. The speakers are designed to meet our wide dispersion principle, so they should NOT be angled towards the listening position, but be positioned parallel with the rear wall, see Figure 2. By parallel positioning, the distortion in the main listening area will be lowered and the room integration will be improved. The wide dispersion principle will ensure that sound is spread evenly within a large area in the listening room.
3.1 DaLI ZeNSor 1 aX
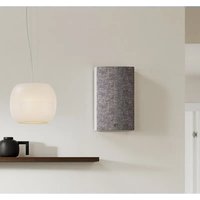
ZENSOR 1 AX is designed to be positioned close to the wall. The speaker can be positioned on a stand/shelf or hung on a wall using the integrated wall bracket. If positioned on a stand or shelf, the enclosed small rubber bumpers can be mounted under the speaker for stable and vibration free positioning, see Figure 3A. If hung on a wall, mount the larger bumpers on the rear edges of the speakers. The speakers are hung on a wall using one screw (be sure to use a screw appropriate for the wall type) mounted in the wall. The screw must fit the wall bracket on the rear side of the speaker, see Figure 3B.
The ZENSOR 1 AX should ideally be positioned, so that the height of the tweeter is approximately at ear height when seated in your favourite listening position.
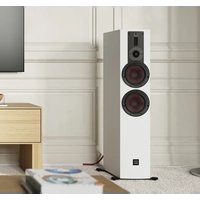
3.2 DaLI ZeNSor 5 aX
ZENSOR 5 AX is designed as a floor standing speaker. ZENSOR 5 AX can be used with spikes or rubber bumpers under the speaker, see Figure 3C/D. Be careful not to over tighten the locking nuts. Spikes or rubber bumpers can improve the sound quality. You can try both to hear what gives the best sound quality in your setup. Please be aware, that spikes may damage the floor, if it is not protected by e.g. coins under the spikes. They should be positioned minimum 10 - 20 cm (4 - 8^ ) from the rear wall.
4.0 CONNECTION
The main connections is located on the back of the left ZENSOR AX speaker (see Figure 5)
1) Mains connector. Connect the supplied power cord to the mains connector and your mains outlet.
2) Main power switch. "ON" powers up the ZENSOR AX. "OFF" turns the ZENSOR AX off completely.
3) Fuse compartment. If the ZENSOR AX fails to power up when connected to the mains and the POWER switch is set to ON, the fuse may have blown or be faulty. Replace the fuse with the same type as originally supplied - see fuse type on the amplifier back plate. If the fuse blows repeatedly, have the ZENSOR AX checked at an authorised service centre - contact your authorised dealer.
4) Right speaker output. The red (+) terminal of the right speaker must be connected to the red (+) terminal of the left speaker. The black (-) terminal of the right speaker must be connected to the black (-) terminal of the left speaker (see Figure 6).
5) Volume down.
6) Volume up.
7) Source select. Press to toggle between AUX IN (Front LED = Green), OPTICAL IN (Front LED = Yellow) and Bluetooth input (Front LED = Blue).
8) AUX IN. Analogue input via stereo mini-jack.
9) SUB OUT. Output to an active subwoofer. Works with any active subwoofer. DALI SUB E-9 F or SUB E-12 F is a perfect match for the ZENSOR AX series. Ask your local DALI dealer for further advice.
10) OPTICAL IN. Optical input via TOSLink.
11) Bluetooth release. Disconnects the current Bluetooth connection and readies the ZENSOR AX for a new pairing/connection.
Note: Before connecting cables or changing any connections, ALWAYS turn off your ZENSOR AX speaker.
Note: Make sure that the bare conductors are tightly gripped by the terminals with no loose wires which could cause a short circuit and damage the ZENSOR AX speaker (see Figure 4).
5.0 USAGE
When powered on for the first time the ZENSOR AX will start in Bluetooth mode. Use the Source button on the back of the left speaker or the dedicated button on the remote to change input.
5.1 remote CoNtroL
Use the included remote control (see Figure 6) to easily control power, volume and input on the ZENSOR AX. It is also possible to use the DALI REMOTE (Not included, contact your local DALI dealer) with the ZENSOR AX system.
1) Power. Toggle power On/Off
2) Mute. Mute and un-mute the sound
3) Optical In. Selects the optical input
4) AUX In. Selects the AUX input
5) Bluetooth. Select the Bluetooth input
6) Volume up
7) Volume down
8) Release. Disconnects the current Bluetooth connection and readies the ZENSOR AX for a new pairing/connection
5.2 Bluetooth
When put in Bluetooth mode the ZENSOR AX automatically tries to re-connect to the latest used device. If the ZENSOR AX has never been connected to a Bluetooth device before, the ZENSOR AX will enter pairing mode and be ready to pair with a new device.
To pair/connect your device look for ZENSOR AX on your Bluetooth device list and establish the connection.
If the connected device is brought out of range, the ZENSOR AX will try to re-connect to the device.
To release a current Bluetooth connection or establish a new connection press the Release button on the remote control (see 5.1)
The ZENSOR AX supports Bluetooth Apt-X connections from Apt-X approved devices.
Note: Only one device can be connected to the ZENSOR AX at a time
5.3 oPtICal IN
Use this input to connect devices with optical output, like TV's, CD players or streaming devices.
Note: The ZENSOR AX only plays back a stereo signal. If your TV outputs a surround signal via the optical out, please change this to stereo in the TV's audio settings.
5.4 auX IN
Use this input to connect any analogue device.
5.5 SuB out
Use this output to connect a subwoofer to the ZENSOR AX system. Any active subwoofer works with the ZENSOR AX, but DALI SUB E-9 F or SUB E-12 F is a perfect match for the ZENSOR AX series. Ask your local DALI dealer for further advice.
5.6 FroNt LeD
The LED on the front of the left speaker indicates the state of the ZENSOR AX system
RED System off
GREEN System on, AUX IN selected
YELLOW System on, OPTICAL IN selected
BLUE System on, Bluetooth selected, device connected
BLUE blink (fast) System on, Bluetooth selected, no device connected
BLUE blink (short) System on, Bluetooth selected, device paired not connected
Any colour blink (slow) Mute
5.7 auto PoWer oFF
The ZENSOR AX will automatically power off if no signal has been detected for 15 minutes. To power on the ZENSOR AX again either activate a signal on any input, select an input on the remote control, use the source button on the back of the left speaker or press the power button on the remote control.
Note: Auto power off on OPTICAL IN is controlled by the carrier light. If your optical device does not disable the red carrier light when turned off the ZENSOR AX will not auto power off if OPTICAL IN is selected.
6.0 RUNNING-IN
Like any mechanical system, a loudspeaker requires a "running-in" period to perform at its best. You will experience a gradual increase in sound quality during the first period of use. The break-in period will vary depending on use and playback volume. You should expect up to 100 hours of playback until maximum performance is reached. Unlike other mechanical systems, the life-span of a loudspeaker is increased by normal, regular playback of music.
7.0 CLEANING AND MAINTENANCE
Clean the cabinets with a soft, dry cloth. If the cabinets are dirty, wipe with a soft cloth dipped in all-purpose cleaner and then well wrung out. Be very careful when wiping the speaker cones, as they are very fragile. Front grilles can be cleaned with a clothes brush and wiped with a well wrung, lint-free cloth and mild all-purpose cleaner.
7.1 aVoid DireCt SuNLIGHT
The surfaces of the speakers may fade or become discoloured over time when exposed to direct sunlight. Therefore avoid positioning the speakers in direct sunlight.
8.0 DISPOSAL
If you want to dispose of this product, do not mix it with general household waste. There is a separate collection system for used electronic products in accordance with legislation that requires proper treatment, recovery and recycling. Private households in the EU member states, Switzerland, Liechtenstein and Norway may return their used electronic products free of charge to designated collection facilities or to a retailer (if you purchase a similar new one). If you reside in countries not mentioned above, please contact your local authorities for the correct method of disposal. By following this process, you will ensure that your disposed product undergoes the necessary treatment, recovery and recycling and thus prevent potential negative effects on the environment and human health.
9.0 THE LISTENING ROOM
Every room has its own distinctive acoustics, which influence the way we experience sound from a speaker. The sound you hear consists of direct sound from the speakers and reflected sound from the floor, ceiling and walls. The latter will affect how you experience the sound.
As a basic rule, try to avoid large, hard and reflective areas in the immediate vicinity of your loudspeakers as it will typically cause strong reflections, which might disturb the precision and spatial effect of the sound reproduction. Reflection might be suppressed by positioning e.g. a plant between the speaker and the reflecting surface. Soft items such as carpets, curtains etc. might help if the sound is too bright. Both the amount and quality of the deep bass depend on the size and shape of the room, and the position of the speakers. Positioning the speakers near a side or back wall will accentuate the bass.
A corner location will accentuate it even more, but will also increase the reflections.
10.0 TECHNICAL SPECIFICATIONS
In Table 2 you will find the most common specifications for our speakers. Please have in mind that there are countless methods for measuring speakers. However, none of them tell you anything useful about how a speaker really sounds. Only your ears can decide whether one speaker sounds better than another. Like all our speakers, the DALI ZENSOR AX series is designed to reproduce music as honestly as possible.
Enjoy your new DALI ZENSOR AX!

CAUTION
RISK OF ELECTRIC SHOCK
DO NOT OPEN
ATTENTION
RISQUE D'ÉLECTROCUTION
NE PAS OUVRIR

WICHtIGe SICHerHeltSHINWeISE
RISQUE D' ELECTROCUTION NE PAS OUVRIR

VIGtIGe SIKKerHeDSForaNStaLtNINGER
DALI dealer) with the ZENSOR AX system.
1) Power. Toggle power On/Off
2) Mute. Mute and un-mute the sound
3) Optical In. Selects the optical input
4) AUX In. Selects the AUX input
5) Bluetooth. Select the Bluetooth input
6) Volume up
7) Volume down