RUBIKORE 8 - Speaker Dali - Free user manual and instructions
Find the device manual for free RUBIKORE 8 Dali in PDF.

User questions about RUBIKORE 8 Dali
0 question about this device. Answer the ones you know or ask your own.
Ask a new question about this device
Download the instructions for your Speaker in PDF format for free! Find your manual RUBIKORE 8 - Dali and take your electronic device back in hand. On this page are published all the documents necessary for the use of your device. RUBIKORE 8 by Dali.
USER MANUAL RUBIKORE 8 Dali
FIGURE 1A FIGURE 1B FIGURE 1C

flowchart
graph TD
    A["Object 1"] <--> B["Object 2"]
    C["Object 3"] <--> D["Object 4"]
    E["Human Figure"] --> F["Object 5"]
    style A fill:#999,stroke:#333
    style B fill:#999,stroke:#333
    style C fill:#999,stroke:#333
    style D fill:#999,stroke:#333
    style E fill:#ccc,stroke:#333
    style F fill:#ccc,stroke:#333
flowchart
graph TD
    A["Block A"] -->|m| Center
    B["Block B"] -->|m| Center
    C["Block C"] -->|m| Center
    D["Block D"] -->|m| Center
    Center -->|A| Block1
    Center -->|B| Block2
    Center -->|C| Block3
    Block1 -->|D| Block4
    Block2 -->|D| Block5
    Block3 -->|C| Block6
    Block4 -->|D| Block7
    Block5 -->|D| Block8
    Block6 -->|C| Block9
    Block7 -->|D| Block10
    Block8 -->|D| Block11
    Block9 -->|C| Block12
    Block10 -->|D| Block13
    Block11 -->|D| Block14
    Block12 -->|C| Block15
    Block13 -->|D| Block16
    Block14 -->|D| Block17
    Block15 -->|C| Block18
    Block16 -->|D| Block19
    Block17 -->|D| Block20
    Block18 -->|C| Block21
    Block19 -->|D| Block22
    Block20 -->|D| Block23
    Block21 -->|C| Block24
    Block22 -->|D| Block25
    Block23 -->|D| Block26
    Block24 -->|C| Block27
    Block25 -->|D| Block28
    Block26 -->|D| Block29
    Block27 -->|C| Block30
    Block28 -->|D| Block31
    Block29 -->|D| Block32
    Block30 -->|C| Block33
    Block31 -->|D| Block34
    Block32 -->|D| Block35
    Block33 -->|C| Block36
    Block34 -->|D| Block37
    Block35 -->|D| Block38
    Block36 -->|C| Block39
    Block37 -->|D| Block40
    Block38 -->|D| Block41
    Block39 -->|C| Block42
    Block40 -->|D| Block43
    Block41 -->|D| Block44
    Block42 -->|C| Block45
    Block43 -->|D| Block46
    Block44 -->|D| Block47
    Block45 -->|C| Block48
    Block46 -->|D| Block49
    Block47 -->|D| Block50
    Block48 -->|C| Block51
    Block49 -->|D| Block52
    Block50 -->|D| Block53
    Block51 -->|C| Block54
    Block52 -->|D| Block55
    Block53 -->|D| Block56
    Block54 -->|C| Block57
    Block55 -->|D| Block58
    Block56 -->|D| Block59
    Block57 -->|C| Block60
    Block58 -->|D| Block61
    Block59 -->|D| Block62
    Block60 -->|C| Block63
    Block61 -->|D| Block64
    Block62 -->|D| Block65
    Block63 -->|C| Block66
    Block64 -->|D| Block67
    Block65 -->|D| Block68
    Block66 -->|C| Block69
    Block67 -->|D| Block70
    Block68 -->|D| Block71
    Block69 -->|C| Block72
    Block70 -->|D| Block73
    Block71 -->|D| Block74
    Block72 -->|C| Block75
    Block73 -->|D| Block76
    Block74 -->|D| Block77
    Block75 -->|C| Block78
    Block76 -->|D| Block79
    Block77 -->|D| Block80
    Block78 -->|C| Block81
    Block79 -->|D| Block82
    Block80 -->|D/ m|
    style Center fill:#f9f,stroke:#333,stroke-width:2px
text_image
A D D x x C CFIGURE 3 FIGURE 2 FIGURE
flowchart
graph TD
    A["Step 1"] --> B["Step 2"]
    B --> C["Checkmark ✓"]
    C --> D["Step 3"]
    D --> E["Checkmark %"]
natural_image
Technical line drawing of a mechanical assembly with mounting brackets and a close-up view of internal components (no text or symbols)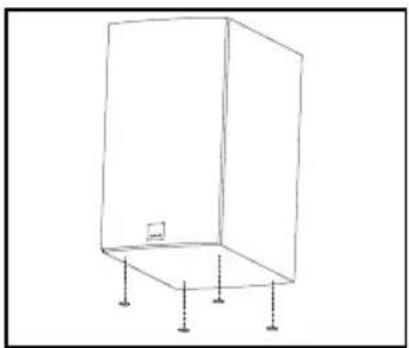
natural_image
Simple line drawing of a 3D rectangular box with four vertical supports at the base (no text or symbols)FIGURE 5
text_image
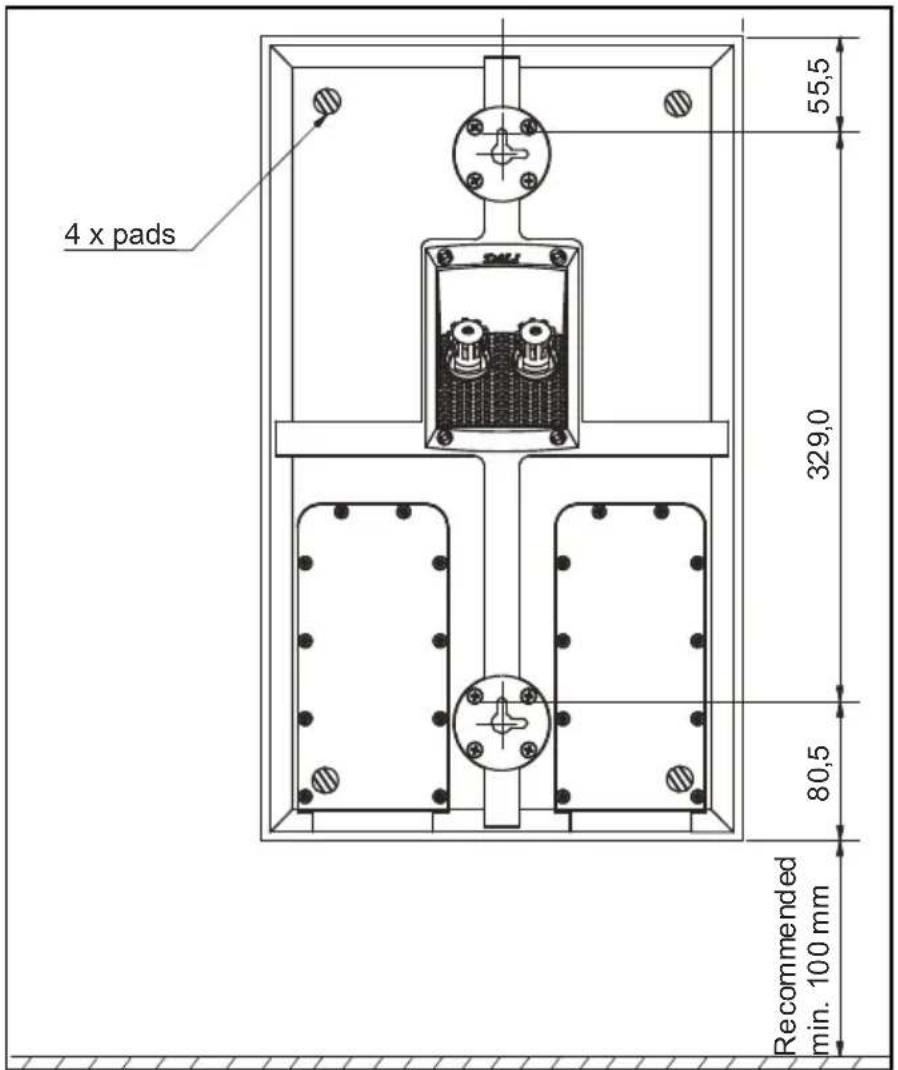
4 x pads 55,5 329,0 80,5 Recommended min. 100 mmFIGURE 6
flowchart
graph TD
    A["DAU"] --> B["Speaker"]
    B --> C["DAU"]
    C --> D["Connection Point"]
    D --> E["DAU"]
FIGURE 7
natural_image
Diagram of a laboratory setup with two circular chambers and a rotating test tube, no text or symbols present.FIGURE 8
text_image
Diagram showing correct and incorrect cable termination methods for a switch, with checkmark indicating failure and percentage symbol.FIGURE 9BFIGURE 9C
text_image
Right loudspeaker Left loudspeaker AmplifierRight
loudspeaker
Le
loudspeaker

text_image
AmplifierRight
loudspeaker
Left
loudspeaker
text_image
AmplifierFIGURE 9D
text_image
Right loudspeaker Left loudspeaker Amplifier AmplifierTABLE 2 - TECHNICAL SPECIFICATIONS
| RUBIKORE 268 ON-WALL CINEMA | |||||
| Frequency Range 50 - 26,000 Hz ±3 dB 38 - 34,000 Hz ±3 dB 38 - 34,000 Hz ±3 dB 59 - 34,000 Hz ±3 dB 49 - 34,000 Hz ±3 dB | |||||
| Sensitivity | 87 dB @ 1 m for 2.83 V | 88.5 dB @ 1 m for 2.83 V | 90.5 dB @ 1 m for 2.83 V | 88.5 dB @ 1 m for 2.83 V | 89 dB @ 1 m for 2.83 V |
| Nominal impedance 4 ohm 4 ohm 4 ohm 4 ohm | |||||
| Maximum SPL | 107 dB | 110dB | 112 dB | 108 dB | 111 dB |
| Crossover frequency | 2,800 Hz | 800 / 2,600 / 14,000 Hz | 500 / 800 / 2,400 / 14,000 Hz | 2,900 / 14,000 Hz | 2,800 / 14,000 Hz |
| Crossover principle | 2-way | 21⁄2 + 1⁄2-way | 21⁄2 + 1⁄2 + 1⁄2-way | 2 + 1⁄2-way | 2 + 1⁄2-way |
| Recommended amplifier power | 40 - 150 Watt | 40 - 200 Watt | 40 - 250 Watt | 20 - 150 Watt | 40 - 200 Watt |
| High frequency driver(s) | 1 x 29 mm low loss soft dome | 17 x 45 mm planar magneto static tweeter1 x 29 mm low loss soft dome | 17 x 45 mm planar magneto static tweeter1 x 29 mm low loss soft dome | 17 x 45 mm planar magneto static tweeter1 x 29 mm low loss soft dome | 17 x 45 mm planar magneto static tweeter1 x 29 mm soft dome |
| High frequency diaphragm Soft woven fabric | Planar magnetostaticSoft woven fabric | Planar magnetostaticSoft woven fabric | Planar magnetostaticSoft woven fabric | Planar magnetostaticSoft woven fabric | |
| Low/Mid frequency driver(s) | 1 x 61⁄2 inch | 2 x 61⁄2 inch | 3 x 61⁄2 inch | 1 x 61⁄2 inch | 2 x 61⁄2 inch |
| Low/Mid frequency diaphragm | Clarity Cone paper and wood fibre | Clarity Cone paper and wood fibre | Clarity Cone paper and wood fibre | Clarity Cone paper and wood fibre | Clarity Cone paper and wood fibre |
| Connection input(s) | Bi-wire / Bi-amp | Bi-wire / Bi-amp | Bi-wire / Bi-amp | Single wire | Bi-wire / Bi-amp |
| Enclosure type | Bass reflex | Bass reflex | Bass reflex | Bass reflex | Bass reflex |
| Bass reflex tuning frequency | 44 Hz | 34 Hz 33 Hz | 49 Hz | 36 Hz | |
| Other features | N/A | N/A | N/A | Rotatable Hybrid Tweeter module | Rotatable Hybrid Tweeter module |
| Recommended placement | Stand / Shelf | Floor | Floor | On-wall / Shelf | Stand / Shelf |
| Recommended distance from rear wall | 20 - 120 cm | 20 - 180 cm | 25 - 180 cm | 0 - 30 cm | 5 - 100 cm |
| Dimensions (H x W x D) | 350 x 195 x 335 mm13.9 x 7.7 x 13.3 inches | 990 x 200 x 380 mm39.1 x 7.9 x 15.0 inches | 1100 x 220 x 444 mm43.5 x 8.7 x 17.6 inches | 465 x 278 x 142 mm18.4 x 11.0 x 5.6 inches | 197 x 581 x 400 mm7.7 x 22.8 x 15.7 inches |
| Weight incl. grille | 9.5 kg20.9 lb | 23 kg50.7 lb | 30 kg66.1 lb | 8.5 kg18.7 lb | 16 kg35.2 lb |
| Shipping weight | 10.5 kg23.1 lb | 25 kg55.1 lb | 33 kg72.7 lb | 9.5 kg20.9 lb | 17.5 kg38.5 lb |
| Finishes | High Gloss Black(Shadow Black grille)High Gloss Maroon(Shadow Black grille)Natural Walnut(Smokey Brown grille)High Gloss White(Mountain Grey grille) | High Gloss Black(Shadow Black grille)High Gloss Maroon(Shadow Black grille)Natural Walnut(Smokey Brown grille)High Gloss White(Mountain Grey grille) | High Gloss Black(Shadow Black grille)High Gloss Maroon(Shadow Black grille)Natural Walnut(Smokey Brown grille)High Gloss White(Mountain Grey grille) | High Gloss Black(Shadow Black grille)Natural Walnut(Smokey Brown grille)High Gloss White(Mountain Grey grille) | High Gloss Black(Shadow Black grille)Natural Walnut(Smokey Brown grille)High Gloss White(Mountain Grey grille) |
| Accessories | ManualRubber FeetPolishing cloth (high gloss finish only)Front Grille | ManualPolishing cloth (high gloss finish only)Front GrillePremium Spike Set | ManualPolishing cloth (high gloss finish only)Front GrillePremium Spike Set | ManualRubber FeetPolishing cloth (high gloss finish only)Front Grille | ManualRubber FeetPolishing cloth (high gloss finish only)Front Grille |
| Spike thread size | M8 | M8 | M8 | N/A | N/A |
All technical specifications are subject to change without notice.
Congratulations on your new DALI RUBIKORE loudspeakers. It is important to us that your new DALI loudspeakers are set up and connected correctly. For this reason, we recommend that you read this manual and follow the instructions.
The manual contains instructions for setup and connection, as well as tips and advice on how to get the most out of your new loudspeakers. DALI is acclaimed around the world for unique loudspeakers built to our uncompromising standards for design and performance. The goal for every single DALI loudspeaker is always our foremost commitment: To create a listening experience in your home that will make you forget time and place.
Remember to sign up for the DALI newsletter at www.dali-speakers.com.
Enjoy!
2.0 UNPACKING
Be careful not to damage the contents when you unpack the parts. Depending on which DALI RUBIKORE model you have bought, different accessories come with the loudspeaker. Check that all parts are contained in the cardboard box (see Table 1). Keep the packaging materials in case your loudspeakers need to be relocated or serviced.
2.1 GRILLES
The loudspeakers are delivered with the grille fronts already mounted when you unpack them. If you wish to remove the grille front, loosen it by gradually tugging at the pins that hold it in place. It is important that all pins are loosened evenly before removing the grille. Otherwise the grille may be damaged.
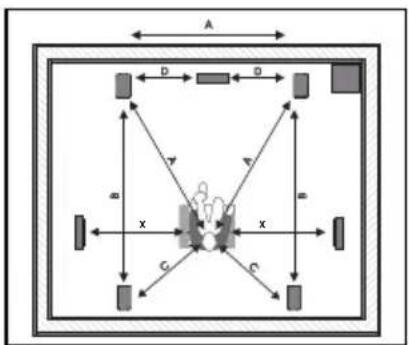
3.0 POSITIONING
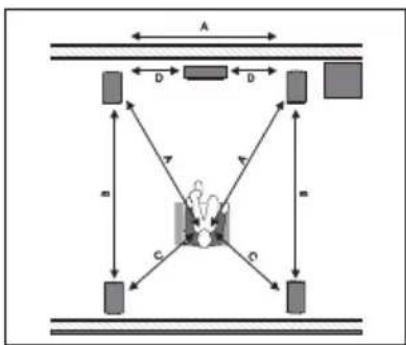
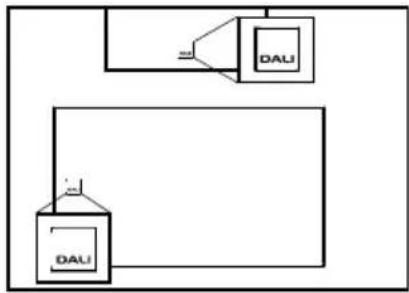
To achieve the best results, the loudspeaker setup should be symmetrical around your favourite listening position, (see Figures 1A – 1C). We recommend that you experiment with the positions of your loudspeakers – the sound quality will change depending on the loudspeaker position. For DALI RUBIKORE 2, RUBIKORE CINEMA and RUBIKORE ON-WALL, the loudspeakers should ideally be positioned so that the tweeters are approximately at ear height when seated in your favourite listening position. DALI RUBIKORE 6 and 8 are designed as floor standing loudspeakers. They should be positioned at least 20 cm (8 inches) from the rear wall. DALI RUBIKORE 2 and RUBIKORE CINEMA should likewise be positioned at least 20 cm (8 inches) from the rear wall. DALI RUBIKORE ON-WALL is optimised for wall-mounting, but will also work well on a shelf. If mounted on a wall, there should be at least 10 cm (4 inches) from any surface underneath the loudspeaker, and if placed on a shelf there should be at least 10 cm (4 inches) distance from the wall.
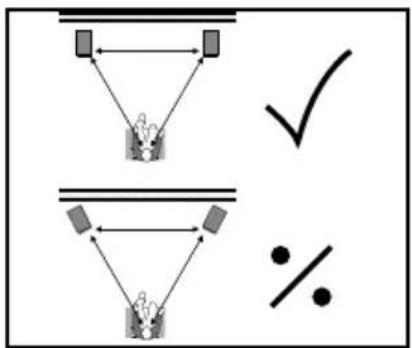
Objects placed between the loudspeakers and the listening position might negatively affect sound quality. All DALI RUBIKORE loudspeakers are designed to follow our wide dispersion principle, so they should not be angled towards the listening position,
but be positioned parallel with the rear wall (see Figure 2). Parallel positioning reduces distortion in the main listening area and improves room integration. The wide dispersion principle also ensures that the sound is spread evenly within a large area in the listening room.
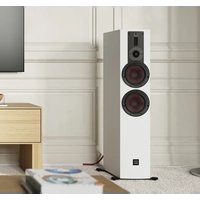
3.1 DALI RUBIKORE 6 and 8
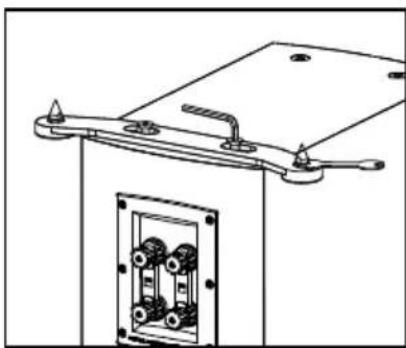
These loudspeakers are designed to stand on the floor, using the supplied Premium Spike Set or rubber bumpers under the loudspeakers (see Figures 3 and 4). Be careful not to overtighten the contra nuts. Spikes or rubber bumpers can improve the sound quality. You can try both to hear what gives the best sound quality in your setup. Please note that spikes may damage the floor if it is not protected.
NOTE: On some floors and in some rooms, the use of spikes is a crucial aspect in obtaining the best result. The spikes (included) should be fastened loosely in the aluminium feet, leaving the spikes' nuts only slightly tightened. Using the screws, mount the aluminium feet in the threaded holes on the bottom of the loudspeaker. Push the feet against the loudspeaker cabinet before tightening the screws. Place the loudspeaker with the mounted spikes upright on the floor, so that it stands steadily without rocking. Tighten the nuts, so that the four spikes sit tightly in the aluminium feet. These assembly and setup steps ensure stable mechanical coupling to the surface beneath (see Figure 3).
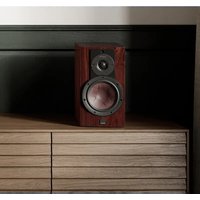
3.2 DALI RUBIKORE 2
DALI RUBIKORE 2 is optimised for stand mounting, but will also work well on a shelf. If positioned on a stand or shelf, the enclosed bumpers can be placed under the loudspeaker for stable and vibration-free positioning (see Figure 4).
For the best possible sound, we recommend placing the loudspeakers with the tweeter modules at approximately the same height as your ears when you are seated in your favourite listening position.
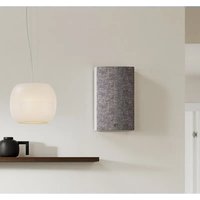
3.3 DALI RUBIKORE ON-WALL and RUBIKORE CINEMA
DALI RUBIKORE ON-WALL is optimised for wall-mounting (see Figure 5) but can also be used on a shelf or on a TV furniture. DALI RUBIKORE ON-WALL can be used as a left, right, centre or surround loudspeaker in either horizontal or vertical position.
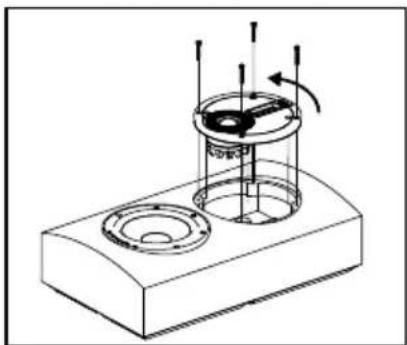
The rotatable DALI Hybrid Tweeter allows the RUBIKORE CINEMA and RUBIKORE ON-WALL to be installed in either horizontal or vertical orientation, making it possible to use the exact same loudspeaker for front and centre applications – just like in the mixing studio.
The Hybrid Tweeter module should be rotated so that the planar tweeter unit stays vertical (upright), which is important to preserve the wide horizontal dispersion and fine detail of the high frequencies.
The RUBIKORE CINEMA is designed for home theatre front and centre channel roles, either stand mounted or sitting on a shelf.
Your authorised dealer or service facili can help rotate the Hybrid Tweeter for you. To remove the Hybrid Tweeter module from the loudspeaker cabinet, use a 3 mm Allen key (not included) to remove the four screws. When disassembled, rotate the Hybrid Tweeter by 90 degrees.
Insert the rotated Hybrid Tweeter and install it using the four screws (Figure 7). Be careful not to overtighten the screws when reassembling the loudspeaker.
If positioned on a shelf or TV furniture, the enclosed bumpers can be placed under the loudspeaker (in both the vertical or horizontal position) for stable and vibration-free positioning (see Figure 4).
The DALI logo on the front grille can be rotated by liing it up slightly and rotating it into the desired position (see Figure 6).
4.0 CONNECTIONS
Correct, tight connections to your amplifier are extremely important for your listening experience. Always use cables of the same pe and preferably the same length for the le and right channels. We recommend using DALI CONNECT loudspeaker cable, available from your dealer.
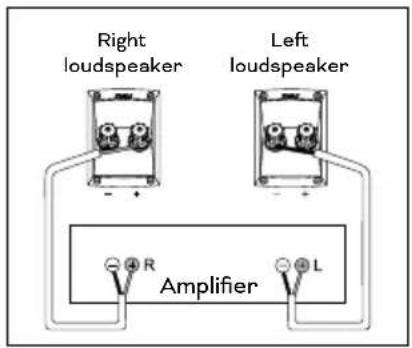
Correct polari is a detail that is o en overlooked when connecting loudspeakers. The red (+) terminal of the amplifier must be connected to the red (+) terminal of the loudspeaker. The black (-) terminal of the amplifier must be connected to the black (-) terminal of the loudspeaker (see Figure 9A). In a stereo or surround installation, even a single loudspeaker connected in reverse polari will make the bass weaker and the stereo image unfocused.
For the optimal listening experience, the right loudspeaker (as seen from the listening position) must be connected to the amplifier output terminals marked "R" or "Right". The le loudspeaker must be connected to the amplifier output terminals marked "L" or "Le".
NOTE: Before connecting cables or changing any connections, ALWAYS turn of your amplifier.
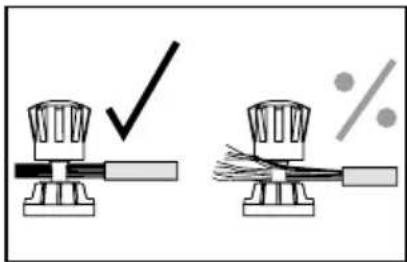
NOTE: Make sure that bare conductors are tightly gripped by the terminals with no loose wires that could cause a short circuit and damage the amplifier (see Figure 8).
NOTE: If you are using DALI RUBIKORE in a surround system, follow the instructions included with your surround amplifier.
4.1 SINGLE-WIRING versus BI-WIRING/BI-AMPING
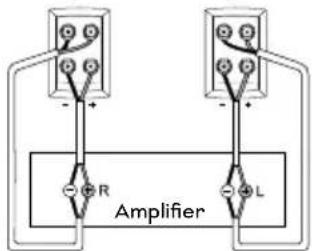
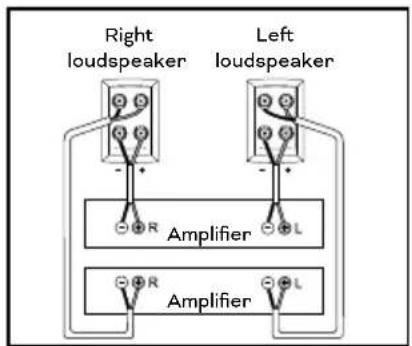
All DALI RUBIKORE loudspeakers can be connected using a single loudspeaker cable (see Figures 9A and 9B). However, DALI RUBIKORE 2, 6 and 8 are equipped with two pairs of terminals, allowing you the option of running two sets of cables to each loudspeaker. The top terminal pair is internally connected to the crossover network's high frequency section. The bottom terminal pair is internally connected to the crossover network's bass section.
NOTE: When bi-wiring or bi-amping, ALWAYS remove the metal jumpers between the terminals before connecting cables (see Figures 9C and 9D).
For bi-wiring, connect two sets of loudspeaker cables, one to the top terminals and one to the bottom terminals of the loudspeakers. At the amplifier end, connect both sets of loudspeaker cables to the same pair of terminals on the amplifier (see Figure 9C).
For bi-amping, connect two sets of loudspeaker cables, one to the top terminals and one to the bottom terminals of the loudspeakers. At the amplifier end, connect one set of loudspeaker cables to one amplifier, and connect the other set of cables to the second amplifier (see Figure 9D).
5.0 RUNNING-IN
Like any mechanical system, a loudspeaker requires a “running-in” period to perform at its best. You will experience a gradual increase in sound quality during the first period of use. The break-in period will vary depending on use and playback volume. You should expect up to 100 hours of playback until maximum performance is reached. Unlike other mechanical systems, the life span of a loudspeaker is increased by normal, regular playback of music.
6.0 CLEANING & MAINTENANCE
If the loudspeaker cabinets are dirty, wipe them with a damp and well-wrung soft cloth. Avoid touching the loudspeaker cones, as they are very fragile. If the cones need cleaning, use only a dry, soft cloth and be very careful. Avoid touching the tweeter domes. The loudspeaker grilles can be cleaned with a clothes brush and wiped with a well wrung, lint-free cloth and mild all-purpose cleaner.
6.1 AVOID DIRECT SUNLIGHT
The surfaces of the loudspeakers may fade or become discoloured over time when exposed to direct sunlight. Therefore avoid positioning the loudspeakers in direct sunlight.
7.0 DISPOSAL
If you want to dispose of this product, do not mix it with general household waste. There is a separate collection system for used electronic products in accordance with legislation that requires proper treatment, recovery and recycling. Private households in the EU member states, Switzerland, Liechtenstein and Norway may return their used electronic products free of charge to designated collection facilities or to a retailer (if you purchase a similar new one). If you reside in countries not mentioned above, please contact your local authorities for the correct method of disposal. By following this process, you will ensure that your disposed product undergoes the necessary treatment, recovery and recycling and thus prevent potential negative effects on the environment and human health.
8.0 POWER AND SOUND PRESSURE
How loud a loudspeaker can play and still sound good depends entirely on the signal it has to reproduce. This means that it is not possible to define a specific signal level to use when comparing different speakers.
Processing a pure, undistorted signal from a powerful amplifier is easier than processing a distorted signal from a low-power amplifier pushed beyond its capacity. The signal from a distorting (clipping) amplifier contains much more high-frequency information than an undistorted signal, and therefore puts a heavy strain on the tweeters. As a result, loudspeakers are often damaged by low-power amplifiers that are forced to work too hard – and very rarely by powerful amplifiers, which are practically running idle most of the time.
It is also worth noting that turning tone controls on your amplifier above the neutral setting significantly burdens both loudspeakers and amplifier. On a good sound system, tone controls should only be used to compensate for poor recordings and not to permanently compensate for weaknesses elsewhere in the system.
For this reason, DALI recommends that the tone controls are generally set to the neutral position. You can achieve your desired sound image by positioning the loudspeakers correctly. Keep the volume low enough to keep the sound clear and undistorted. This will minimise the load on the speakers and amplifier.
All DALI loudspeakers are designed with linear impedance for an optimal amplifier load. The result is a significantly more open and detailed sonic image.
9.0 THE LISTENING ROOM
Every room has its own distinctive acoustics. These affect the way we experience sound from a loudspeaker. The sound you hear is made up of direct sound from the loudspeakers and reflected sound from the floor, ceiling and walls. The latter affects the way you experience the sound. As a general rule, try to avoid large, hard, reflective surfaces in the immediate vicinity of your loudspeakers, as these tend to cause strong reflections that can affect the accuracy and spaciousness of the sound reproduction. Reflections can be reduced by placing a plant between the loudspeaker and the reflective surface. Soft objects such as carpets, curtains, etc. may help if the sound is too bright. The amount and quality of deep bass depend on the size and shape of the room and the position of the loudspeakers. Placing the loudspeakers close to a side or back wall will emphasise the bass. Placing them in corners will accentuate the bass even more, but will also increase reflections.
10.0 SAFETY PRECAUTIONS
• Always follow all safety guidelines.
• DALI RUBIKORE loudspeakers are intended for indoor use.
- The loudspeakers must only be used indoors and never in extreme hot or cold temperatures.
• DALI RUBIKORE loudspeakers must not be exposed to direct sunlight.
- Power off the amplifier when connecting the loudspeaker cables to the loudspeaker and the amplifier.
- Extended use of loudspeakers at high volume levels may cause hearing damage. Do not raise the volume beyond comfortable levels.
11.0 TECHNICAL SPECIFICATIONS
In Table 2 you will find the most common specifications for our loudspeakers. Please keep in mind that there are countless methods for measuring loudspeakers. However, none of them tell you anything useful about how a loudspeaker really sounds. Only your ears can decide whether one loudspeaker sounds better than another. Like all our loudspeakers, the DALI RUBIKORE series is designed to reproduce music as honestly as possible.
Enjoy your new DALI RUBIKORE!