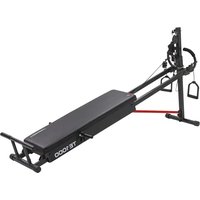
WALKER de Luxe - Fitness Equipment Christopeit - Free user manual and instructions
Find the device manual for free WALKER de Luxe Christopeit in PDF.
| Product type | Foldable treadmill with magnetic braking |
| Brand | Christopeit |
| Model | WALKER de Luxe |
| Assembled dimensions (L x W x H) | 138 x 70 x 150 cm |
| Folded dimensions (L x W x H) | 65 x 70 x 150 cm |
| Running surface (L x W) | 110 x 35 cm |
| Maximum user weight | 120 kg |
| Flywheel weight | Approximately 5 kg |
| Braking system | Magnetic, 8 resistance levels |
| Inclination | Manual, 3 positions |
| Power supply | 2 AA batteries (1.5 V) |
| Computer display | Speed, time, distance, calories, pulse, scan, total mileage |
| Main functions | Heart rate measurement via handlebars, foldable with safety handle, transport wheels, bottle holder |
| Safety standards | Certified EN 957-1-6, class H/C |
| Maintenance and cleaning | Clean with non-aggressive detergents; lubricate the belt with silicone spray; check screws every 1-2 months |
| Spare parts | Complete list with ET numbers in the manual; Christopeit after-sales service |
| Included accessories | Tool set, bottle, bottle holder, treadmill |
Frequently Asked Questions - WALKER de Luxe Christopeit
User questions about WALKER de Luxe Christopeit
0 question about this device. Answer the ones you know or ask your own.
Ask a new question about this device
Download the instructions for your Fitness Equipment in PDF format for free! Find your manual WALKER de Luxe - Christopeit and take your electronic device back in hand. On this page are published all the documents necessary for the use of your device. WALKER de Luxe by Christopeit.
USER MANUAL WALKER de Luxe Christopeit
Assembly and exercise instructions for Order No. 98294

- Summary of Parts Page 3 - 4
- Important Recommendations and Safety Information Page 12
- Parts List Page 13 - 14
- Assembly Instructions With Exploded Diagrams Page 15-17
- Computer instructions Page 18
- Training Instructions Page 19
Dear customer,
We congratulate you on your purchase of this home training sports unit and hope that we will have a great deal of pleasure with it. Please take heed of the enclosed notes and instructions and follow them closely concerning assembly and use.
Please do not hesitate to contact us at any time if you should have any questions.
Important Recommendations and Safety Instructions
Our products are all GS tested and therefore represent the highest current safety standards. However, this fact does not make it unnecessary to observe the following principles strictly.
- Assembly the machine exactly as described in the installation instructions and use only the enclosed, specific parts of the machine contained in the parts list. Before assembling, verify the completeness of the delivery against the delivery notice and the completeness of the carton against the parts list in the installation and operating instructions. In case of repair please ask your dealer for advice.
- Check the firm seating off all screws, nuts and other connections before using the machine for the first time and at regular intervals (every 1-2 months) to ensure that the trainer is in a safe condition. Replace defective components immediately and/or keep the equipment put of the use until repair.
- Set up the machine in a dry, level place and protect it from moisture and water. Uneven parts of the floor must be compensated by suitable measures and by the provided adjustable parts of the machine if such are installed. Ensure that no contact occurs with moisture or water.
- Place a suitable base (e.g. rubber mat, wooden board etc.) beneath the machine if the area of the machine must be specially protected against indentations, dirt etc.
- Before beginning training, remove all objects within a radius of 2 metres from the machine.
- Do not use aggressive cleaning agents to clean the machine and employ only the supplied tools or suitable tools of your own to assemble the machine and for any necessary repairs. Remove drops of sweat from the machine immediately after finishing training.
- Your health can be impaired by incorrect or excessive training. Consult a doctor before beginning a planned training programme. He can define the maximum exertion (pulse, Watts, duration of training etc.) to which you may expose yourself and can give you precise information on the correct posture during training, the targets of your training and your diet. Never train after eating large meals. Observe that this machine is not suitable for therapeutic purposes.
- Only train on the machine when it is in correct working order. Use original spare parts only for any necessary repairs.
- When setting the adjustable parts, observe the correct position and the marked, maximum setting positions and ensure that the newly adjusted position is correctly secured. Please remove the Tools you need to adjust after adjusting a new position.
-
Unless otherwise described in the instructions, the machine must only be used for training by one person at a time.
-
Wear training clothes and shoes which are suitable for fitness training with the machine. Your clothes must be such that they cannot catch during training due to their shape (e.g. length). Your training shoes should be appropriate for the trainer, must support your feet firmly and must have non-slip soles.
-
If you notice a feeling of dizziness, sickness, chest pain or other abnormal symptoms, stop training and consult a doctor.
-
Never forget that sports machines are not toys. They must therefore only be used according to their purpose and by suitably informed and instructed persons.
- People such as children, invalids and handicapped persons should only use the machine in the presence of another person who can give aid and advice. Take suitable measures to ensure that children never use the machine without supervision.
-
Ensure that the person conducting training and other people never move or hold any parts of their body into the vicinity of moving parts.
-
At the end of its life span this product is not allowed to dispose over the normal household waste, but it must be given to an assembly point for the recycling of electric and electronic components. You may find the symbol on the product, on the instructions or on the packing.
The materials are reusable in accordance with their marking. With the re-use, the material utilization or the protection of our environment. Please ask the local administration for the responsible disposal place.
- To protect the environment, do not dispose of the packaging materials, used batteries or parts of the machine as household waste. Put these in the appropriate collection bins or bring them to a suitable collection point.
- This machine is a speed-dependant machine, i.e. the power increases with increasing speed, and the reverse.
The machine is equipped with 8-speed resistance which allows the braking resistance and thereby the training exertion to be reduced or increased. Turning the adjusting knob for the resistance setting towards stage 1 reduces the braking resistance and thereby the training exertion. Turning the adjusting knob for the resistance setting towards stage 8 increases the braking resistance and thereby the training exertion.
- This machine has been tested and certified in compliance with EN 957-1-6 und H,C^ . The maximum permissible load (body weight) is specified as 120~kg Evaluate your body weight before you starting the exercise.
Parts List - Spare Parts List
WALKER Order No.: 98294
Magnetically braked runner with very good rotational behaviour
Technical data: Issue: 01.02.2009
- Magnetically braked belt jogger with excellent rotation characteristics and walking sticks.
Magnetic brake system
Flywheel approx. 5 kg
8-stage gear shift - Manual incline
- Hand pulse measurement
- Foldable for space - saving storage
Transport rollers
Incl. drink bottle
Computer showing: time, distance, speed, approx calories, heart rate and Scan
Inputs of limits for time, distance and approx calories
Announcement of higher limits
Max. body weight 120 kg - Walking surface approx L 110, W 35 cm
Space requirement approx L 138, W 70, H 150 cm
Space requirement foldble approx L 65, W 70, H 150 cm
Please check after opening the packing that all the parts shown in the following parts lists are there. Once you are sure that this is the case, you can start assembly.
Please contact us if any components are defective or missing, or if you need any spare parts or replacements in future:
Assembly Instructions
Before beginning assembly, be sure to observe our recommendations and safety instructions.
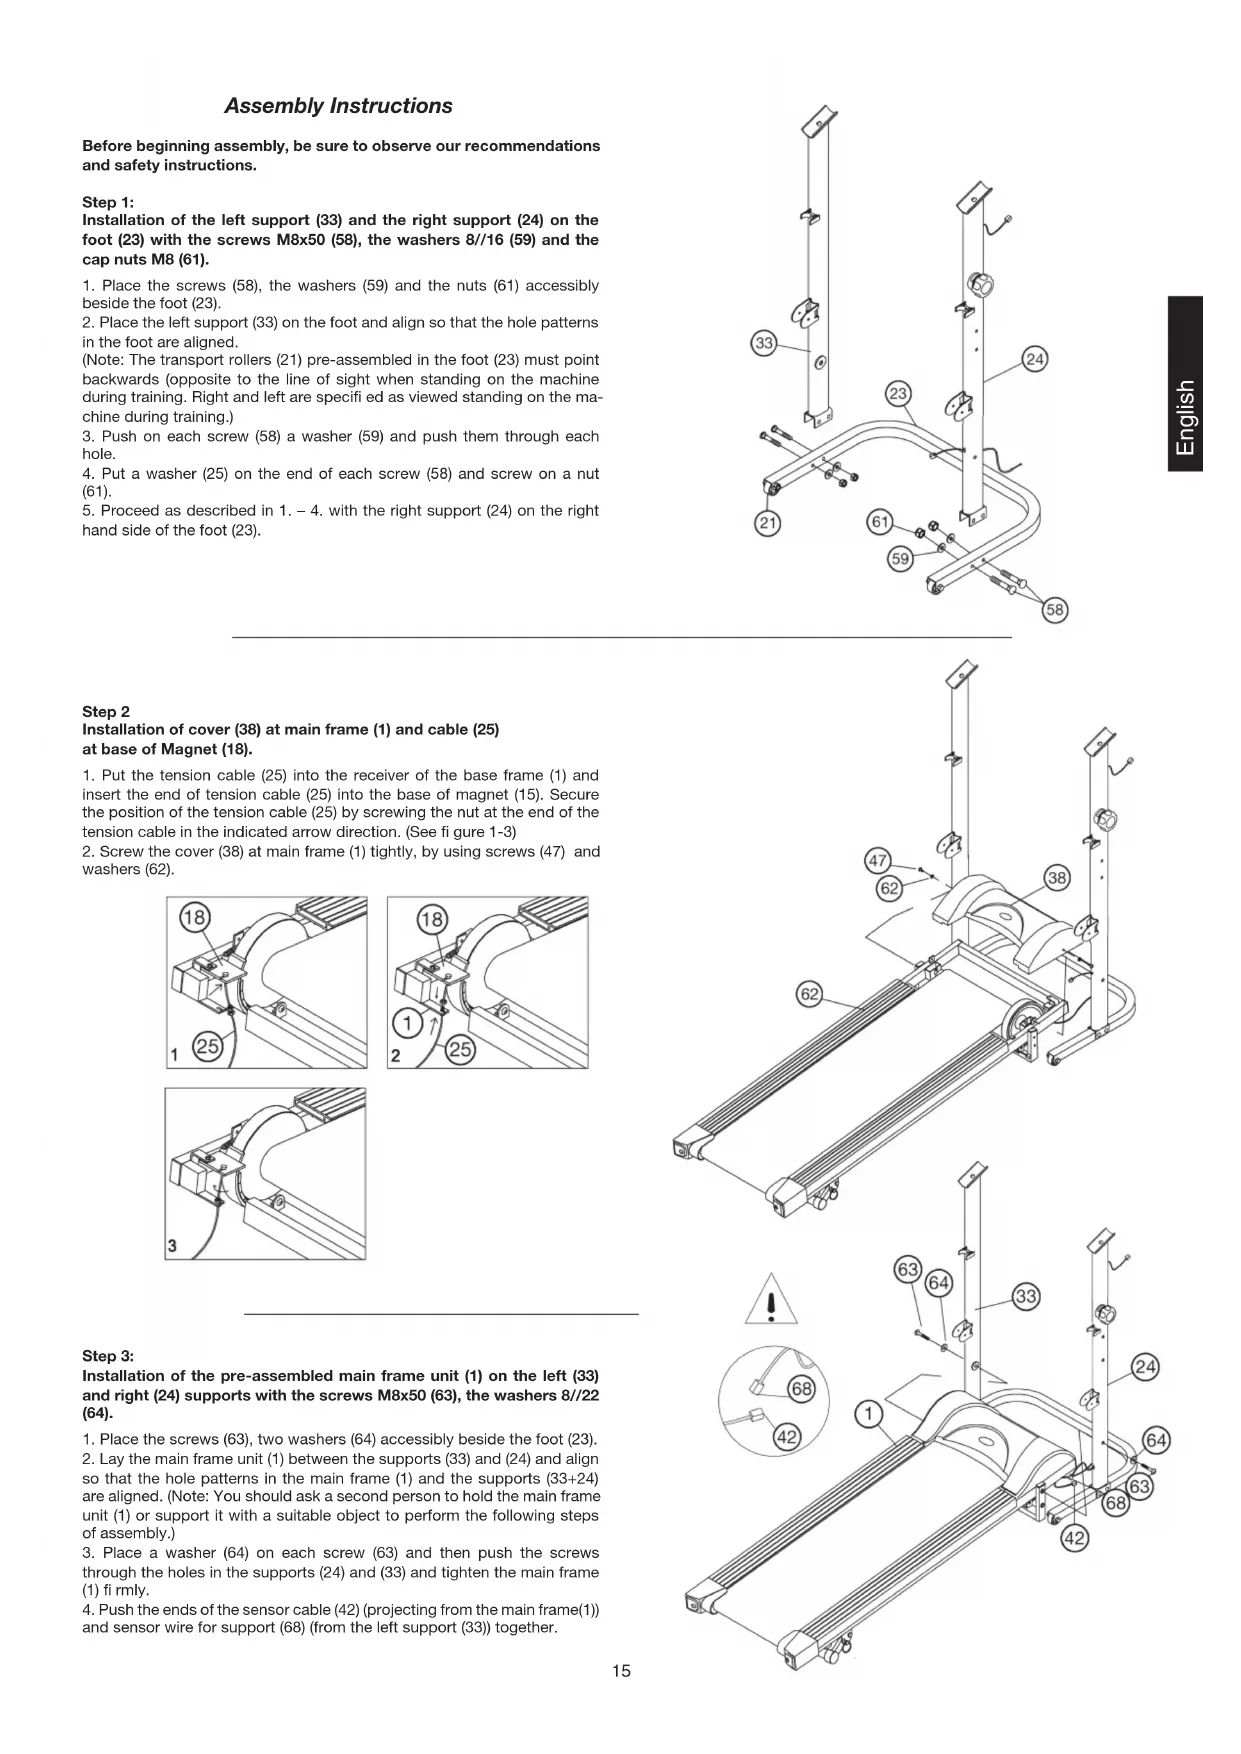
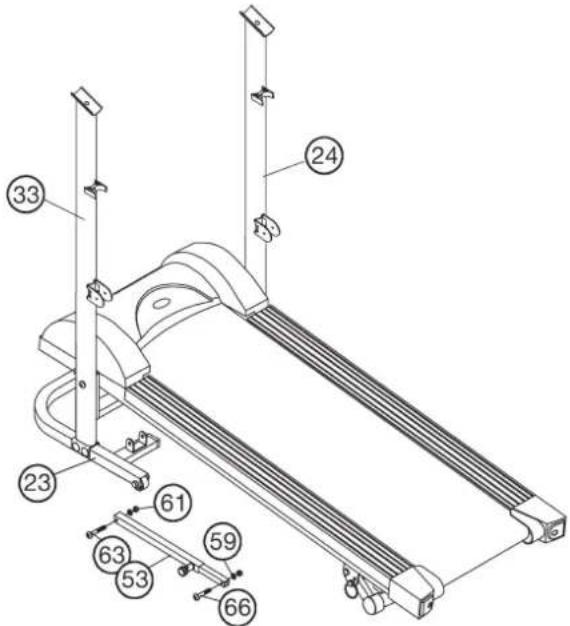
Step 1:
Installation of the left support (33) and the right support (24) on the foot (23) with the screws M8x50 (58), the washers 8//16 (59) and the cap nuts M8 (61).
- Place the screws (58), the washers (59) and the nuts (61) accessibly beside the foot (23).
- Place the left support (33) on the foot and align so that the hole patterns in the foot are aligned.
(Note: The transport rollers (21) pre-assembled in the foot (23) must point backwards (opposite to the line of sight when standing on the machine during training. Right and left are specified as viewed standing on the machine during training.) - Push on each screw (58) a washer (59) and push them through each hole.
- Put a washer (25) on the end of each screw (58) and screw on a nut (61).
- Proceed as described in 1. - 4. with the right support (24) on the right hand side of the foot (23).
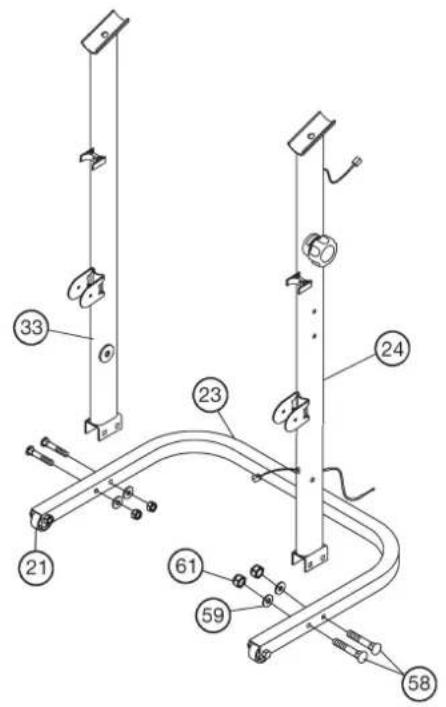
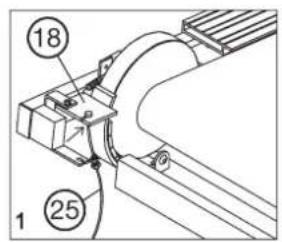
Step 2
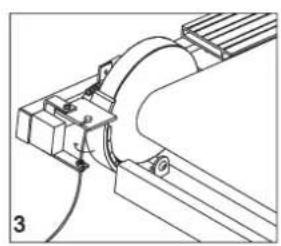
Installation of cover (38) at main frame (1) and cable (25) at base of Magnet (18).
-
Put the tension cable (25) into the receiver of the base frame (1) and insert the end of tension cable (25) into the base of magnet (15). Secure the position of the tension cable (25) by screwing the nut at the end of the tension cable in the indicated arrow direction. (See figure 1-3)
-
Screw the cover (38) at main frame (1) tightly, by using screws (47) and washers (62).
Step 3:
Installation of the pre-assembled main frame unit (1) on the left (33) and right (24) supports with the screws M8x50 (63), the washers 8//22 (64).
- Place the screws (63), two washers (64) accessibly beside the foot (23).
- Lay the main frame unit (1) between the supports (33) and (24) and align so that the hole patterns in the main frame (1) and the supports (33 + 24) are aligned. (Note: You should ask a second person to hold the main frame unit (1) or support it with a suitable object to perform the following steps of assembly.)
- Place a washer (64) on each screw (63) and then push the screws through the holes in the supports (24) and (33) and tighten the main frame (1) firmly.
- Push the ends of the sensor cable (42) (projecting from the main frame(1)) and sensor wire for support (68) (from the left support (33)) together.
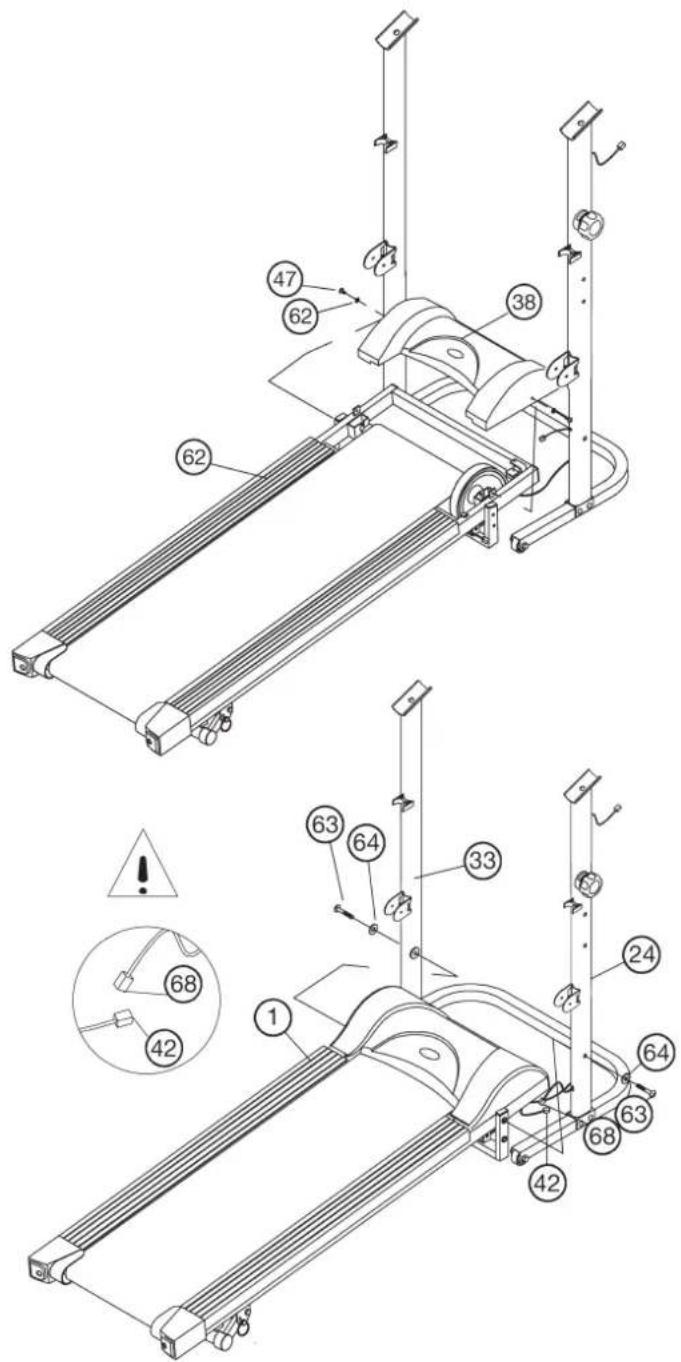
Step 4: Installation if the extension tube (53) at foot (23) and main frame (1).
- Put the extension tube (53) with bottom part into appropriate holder of foot (23) and screw it tightly by using screw M8x50 (63), washer (59) and self locking nut (61).
- Fold up the main frame (1) vertically and insert the extension tube's top side into the appropriate holder at main frame (1). Screw it tightly by using screw M8x40 (66), washer (59) and self locking nut (61).
(Note: The connection points shouldn't tighten too much, so that the extension tube (53) can move easily during fold up and down the main frame (1).)
Step 5: Installation of the handrail (29) on the left (33) and right (24) support with screws M8x45 (65) and curved washers 8//22 (60).
- Put one curved washer (60) on each screw (65).
- Place the hand rail (29) to the upper ends of the supporting pipe (33) and (24) and bring the above mentioned borings in (29) to rest above the borings in (33) and (24).
- Push the screws (65) with washers (60) through the holes and screw in firmly.

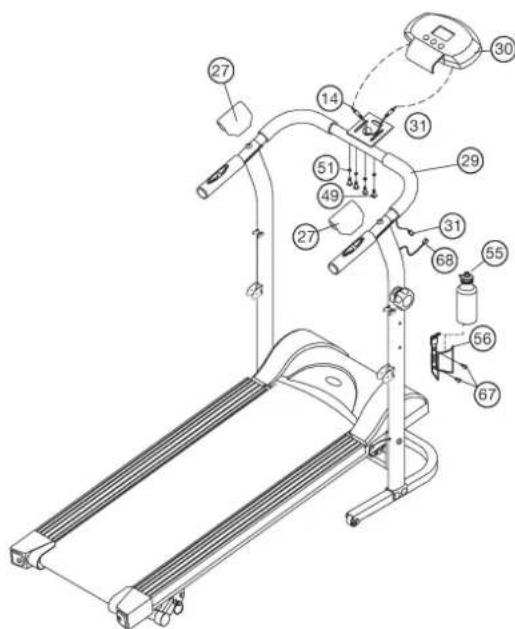
Step 6: Installation of the computer (30) at handrail (29) and drink bottle holder (56) at support (24).
- Push the ends of the sensor cable (68) (projecting from the support (24)) and sensor wire (31) (from handrail (29)) together
- Insert the necessary batteries (2xMignon AA 1.5V) in the computer.
- Place the computer (30) on the computer bracket at the middle of the handrail (29) and align the holes in the computer with the holes in the bracket.
- Screw the screws (49) with washers (51) through the holes and tighten firmly.
- Plug the end of the sensor wire of handrail (31) into the associated socket of the computer (30).
- Insert the plug of the hand pulse (14) in the likewise corresponding socket of the computer (30).
- Put the bottle holder (56) at the handlebar support (24); fi x it with two screws (67) at appropriate position and insert the bottle (55) into the bottle holder (67).
- Place the handle cover (27) onto the screw connection of hand rail (29).
Step 7: Installation of Walking sticks (69) at supports (24 + 33) with the screws (78), washers (77) and self-ocking nut (76).
- Place the screws (78), washers (77) and nuts (76) beside the foot (23).
- Put the walking stick (69) with walking stick holder (71) into appropriate holder at the supports (24+33) so that the holes align.
- Push the screws (78) through the holes and put on each screw end one washer (77) and a nut (76). Screw it tightly, so that the walking sticks can move in an easy way.
- Finally, cover the self-ocking nuts (76) with a screw cap (75).

Step 8: Checks
- Check the correct installation and function of all screwed and plug connections.
- When everything is in order, familiarise yourself with the machine at a low resistance setting.
Note:
Please keep the tool set and the instructions in a safe place as these may be required for repairs or spare parts orders becoming necessary later.
How to move/store your treadmill:
- Pull the locking Knop (54) and place your hand on the end cap of the system frame then folding the system frame up and lock it with locking knob.
- Place your hands on top of the handrails, than lean the machine toward your body sideways, this way you can move it easily.
- Pull out the locking knob (54) and fold down slowly the main frame (1) to the floor and ensure that the locking knob (54) secures this position.

Possible faults and their remedies
Most faults which can occur can be rectified by the following, simple steps.
- The computer no longer operates correctly
a) Check that all plugged connections are made correctly.
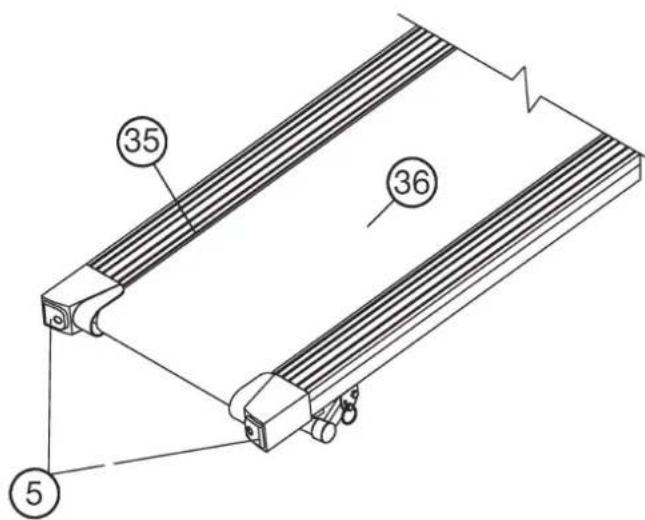
b) Check whether the batteries still have sufficient capacity/power. - The belt (36) no longer runs evenly
To achieve even running and to reduce the friction between the belt (36) and the board (35), you should apply a silicone-based lubricant occasionally on the slip surface beneath the belt (36). Ensure that the lubricant is not based on an oil or petroleum compound. - The belt (36) no longer runs centrally or slides
a) If the belt (36) has run to the left of the direction of running, turn the left screw (5) clockwise and the right screw (5) anticlockwise by a quarter of a revolution each. Run briefly on the belt.
If the belt still does not run centrally, repeat the above procedure.
b) If the belt (36) has run to the right of the direction of running, turn the left screw (5) anticlockwise and the right screw (5) clockwise by a quarter of a revolution each. Run briefly on the belt. If the belt still does not run centrally, repeat the above procedure.
c) If the belt (36) slips, turn both screws (5) clockwise by a quarter of a revolution. Run briefy on the belt. If the belt (36) still slips, repeat the above procedure.
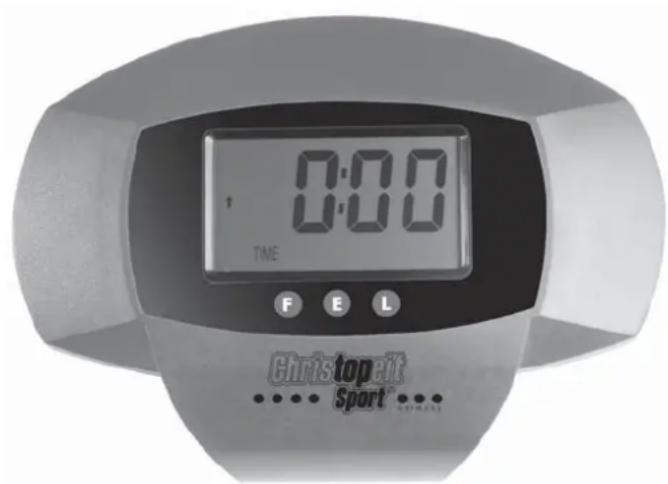
Computer instructions for 98294
The enclosed training computer provides high convenience in training. All values relevant to the training are displayed in a corresponding window.
From the beginning of the training session onwards, the required time, the current speed, the approximate energy consumption, the travelled distance and the current pulse rate are displayed. All values are recorded incrementally for zero upwards. If the training session is to last for a particular period, a particular number of calories is to be consumed, a particular distance travelled and a particular pulse rate not exceeded, these values can be entered individually or as combinations.
The computer is switched on by briefly pressing one of the buttons or simply by beginning a training session. Select the desired function for input by pressing the "F" button. The function which can be changed is displayed.
Each desired value can be entered by pressing the two arrow buttons. The "E" button stand for an increasing value starting from zero and also for a decreasing value starting from the maximum value.
To start the computer, simply begin your training session. The computer then begins to measure and display all values.
To stop the computer, simply end the training session. The computer stops all measurements and holds the last achieved values. The last reached values in the functions TIME, CALORIES, ODO and KM are stored and training can proceed with these values when the training session is resumed.
The computer switches off automatically approx. 4 minutes after the training session has ended. All values reached by then are erased.
Displays:
1. TIME" - display:
Usually, the currently required time is displayed in minutes and seconds. A particular value can be specified using the "E" button. If a particular time has been specified, the remaining time is displayed. When the specified time has elapsed, this is indicated by an acoustic signal. In this function, the last reached time is stored until the computer switches off. (Maximum limit of the display is 99.59 minutes.)
2. "SPEED" - display:
The current speed is displayed n kilometres per hour. A particular value cannot be specified with the "E" button. The last achieved value is not stored in this function.
(Upper limit of the display is 99.9km / h
3. "CAL" display:
The current amount of consumed calories is displayed. A particular value can be specified with the E^ button. If a particular consumed amount is specified, the amount of calories remaining to be consumed is displayed. When the specified value is reached, this is indicated by an acoustic signal.
In this function, the last reached time is stored until the computer switches off. (Upper limit of the display is 9:999 calories)
4. DISTANCE display:
The current value of the travelled kilometres is displayed. A particular value can be specified with the "E" button. If a particular distance is specified, the distance remaining to be travelled is displayed. When the specified value is reached, this is indicated by an acoustic signal. In this function, the last reached time is stored until the computer switches off. (Upper limit of the display is 99,99 km)
5. "PULSE" display:
The current pulse rate is displayed in beats per minute (bpm). A particular value can not be specified with the "E" button. (Upper limit of the display is 90-220 pulse beats per minute)
6. "ODO TOTALDISTANCE - display:
The current status of the travelled kilometres of all previous training sessions including current training session is displayed. A particular value cannot be specified. The values last attained by this function are stored. (Limit of the display: 9.999km .)
7. "SCAN" function
If this function is selected, the current values of all functions are displayed successively in a constant sequence approx. every 5 seconds.
Buttons:
1. E^ enter-key:
The specified values of the individual functions can be entered in steps by each pressing of these buttons. The desired function must firstly be selected using the "F" button.
After training has begun, the display counts down from the specified value to zero.
2. F^ function-key:
Pressing this key once briefly makes it possible to change from one function to another, i.e. the respective functions can be selected for which entries can be made using the "E" key. The currently selected function is indicated by an icon in the respective window.
Holding the key pressed (approx. 2 seconds) allows all last attained values to be deleted. All values of all displays are then set to zero except the Totaldistance "ODO".
3. L^ = Delete -key:
When this key is pressed briefly, the values chosen with the E^ key are reset to zero.
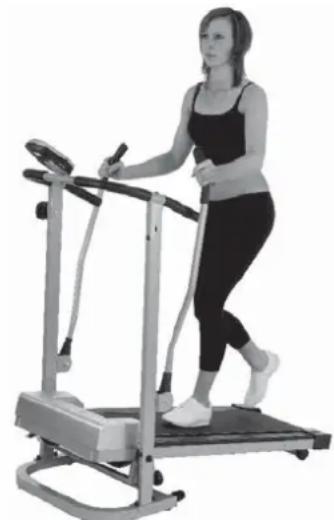
Instruction for a mechanical treadmill, slowed down magnetically.
Settle the treadmill on an even ground and lock it with the safety knob (54) for the training start.
And also lock it with the safety knob (54) for the fold up position.
The stability of the piece of apparatus is not to be endangered by putting something under the treadmill like a piece of wood or something similar. Guarantee before starting the training that treadmill is not loaded higher than with the maximum permissible weight of body and that there is enough space for security of 2000mm× 1000mm
Run in the middle of the running surface, hold yourself tight and don't step on the slip board (35) or on the foot mats (10). Only run in increasing with look at the Computer on the treadmill during the running. In emergency step of the treadmill lateral and hold on to the handle (29).
When nobody is on the treadmill it will stop automatically.
Training instructions
You must consider the following factors in determining the amount of training effort required in order to attain tangible physical and health benefits:
1. Intensity:
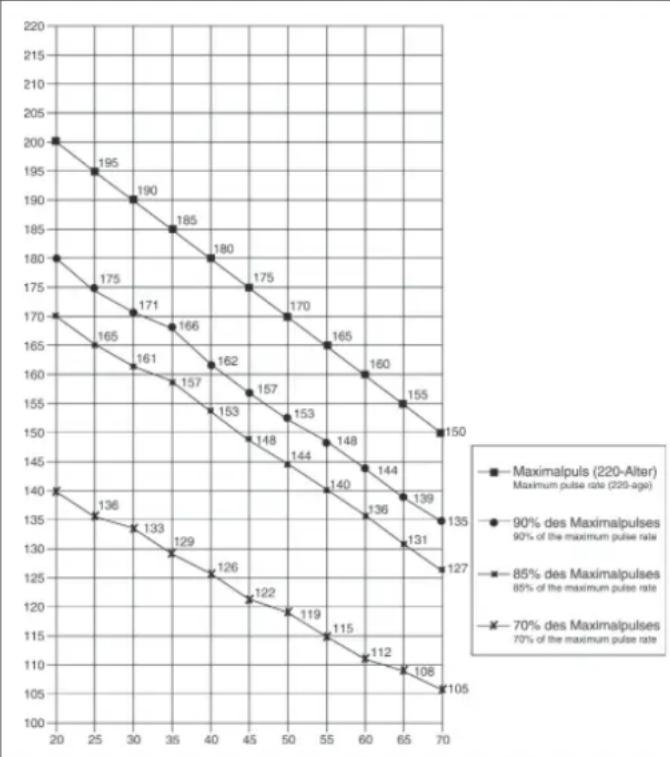
The level of physical exertion in training must exceed the level of normal exertion without reaching the point of breathlessness and / or exhaustion. A suitable guideline for effective training can be taken from the pulse rate. During training this should rise to the region of between 70% to 85% of the maximum pulse rate (see the table and formular for determination and calculation of this).
During the first weeks, the pulse rate should remain at the lower end of this region, at around 70% of the maximum pulse rate. In the course of the following weeks and months, the pulse rate should be slowly raised to the upper limit of 85% of the maximum pulse rate. The better the physical condition of the person doing the exercise, the more the level of training should be increased to remain in the region of between 70% to 85% of the maximum pulse rate. This should be done by lengthening the time for the training and / or increasing the level of diffi culty.
If the pulse rate is not shown on the computer display or if for safety reasons you wish to check your pulse rate, which could have been displayed wrongly due to error in use, etc., you can do the following:
a. Pulse rate measurement in the conventional way (feeling the pulse at the wrist, for example, and counting the number of beats in one minute).
b. Pulse rate measurement with a suitable specialised device (available from dealers specialising in health-related equipment).
2.Frequency
Most experts recommend a combination of health-conscious nutrition, which must be determined on the basis of your training goal, and physical training three times a week. A normal adult must train twice a week to maintain his current level of condition. At least three training sessions a week are required to improve one's condition and reduce one's weight. Of course the ideal frequency of training is five sessions a week.
3. Planning the training
Each training session should consist of three phases: the warm-up phase, the training phase, and the cool-down phase. The body temperature and oxygen intake should be raised slowly in the warm-up phase. This can be done with gymnastic exercises lasting five to ten minutes.
Then the actual training (training phase) should begin. The training exertion should be relatively low for the first few minutes and then raised over a period of 15 to 30 minutes such that the pulse rate reaches the region of between 70% to 85% of the maximum pulse rate.
In order to support the circulation after the training phase and to prevent aching or strained muscles later, it is necessary to follow the training phase with a cool-down phase. This should be consist of stretching exercises and / or light gymnastic exercises for a period of five to ten minutes.
4. Motivation
The key to a successful program is regular training. You should set a fixed time and place for each day of training and prepare yourself mentally for the training. Only train when you are in the mood for it and always have your goal in view. With continuous training you will be able to see how you are progressing day by day and are approaching your personal training goal bit by bit.
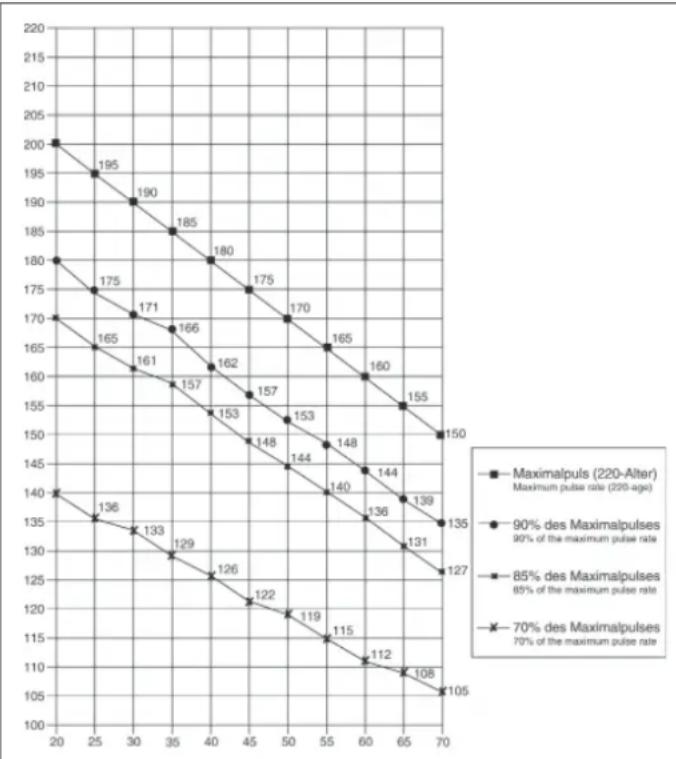
Calculation formula: Maximum pulse rate = 220 - age (220 minus your age)
90% of the maximum pulse rate = (220 - age) x 0.9
85% of the maximum pulse rate = (220 - age) x 0.85
70% of the maximum pulse rate = (220 - age) x 0.7
Chere cliente, cher client,
3. Affi chage „CAL“ (affi chage des calories):
3. Touche ^ = effacement:
2. "SPEED"-Km/h-weergave:
3. Planning van de training
BbdoJXhblyHtBtBaTcNeIyoUne fakToPbI, YTO6bI ONpeJeNTb BepHbI npaMeTpbl TpeHnPoBOK dIra DOCTNXKeHn OuyTMbIX qN3Hecknx pe3ynbTaTOB INo1b3bldN 3DopOBBA.
1. HHTeHCMBHOCTb
YpOBeHb Hn3nuecknx Harpy30k npn TpeHnpOBkax DoJnKe HneBbIaTb ypOBeHb HopMaIbHbIx Hn3nuecknx Harpy30K, HO BbI He DOJNKhbl 3aDbXaTcR nCnIbHO nepeyTomIbcr. Yo6HOm Mepo 3ofokeKTNBHOCTn TpeHnpOBKn MoXET CnyKnTB cactota nyIbca. Bo BpEMr TpeHnpOBKn cactota nyIbca moXet doCTnRa70-85% OT MAKcIMaNbHO (CMOTPN Tabmuy and pOpmynp IIN ONpeDeneHH naPacTeA).B nepByIO HeDeIIO qACTota nyIbca DOJXHA OCTaBaTcBA HAHXHeN OTMeTKE 3ToI ObNAcTI, T.e. OKono 70% OT MAKcIMaNbHO. B NocNe dyUOuNE HeDENI MecraCb TaCtO TY nIbca cneYer noCTeNEHNO HapaunBaTb do 85% OT MAKcIMaNbHO. JyUwe BCero dno Fn3nueckoro COCTONH YOeBOEKA, BInONHIOUeRO ynpaxHeHn, ecn Yactota NyIbca BO3pactaeT, OCTabarCB b PpeJenax 70-85% OT MAKcIMaNbHO. 3To DOCTnRAeTCB YEbnueHem BpeMeHN TpeHnpOBKn mYPOBHR CNOXHOCTN.
Ecni yactota nybca He noka3aHa Ha dncnnee KOMnbIOTepa nn BbixoTne npOBepntb yactOy nybca, KOtopa, Bo3MOXHO, NOKa3aHaHeBepHO, BCNECTBne KaKo-1n60 Oun6Kn. Bbl MoXe TpePnHrtb cJeDyUoee:
A) IN3MepNTb YactOTy NylbCa O6bHbIM CnOCo6OM (NODCHNTaTB KOINueCTBO yIapOB NylbCa B MINHy Ta Ha 3anAcTbe)
B) n3Mepntb Yactoty npIbca c nOmoIbco CneuaIbHoro yctpoCTBa (KOTOPOE MOXHO KynITb y npOdaBoc CneuaIaNImNoPObaHORo o6OpydoBaHnR)
2. Yactota
BolbHnHCTBO 3KcneptOB peKOMeHdyOT KOM6HaUIO 3dOpOB O nTebl, KOtpora ochoBaHa Ha CEIN BaWix TpeHnpOk, INI3NueCKNe 3aHrTn 3 pa3a B HeJeIO. HopMaIbHbI B3pOcNb IeNoBek MOxET TpeHnpOBA tCBs DbaJbI B HeJeIO IIN NOIepXaHnEero HopMaIbHO Hn3NueCKo fopMbI. TpeXpa3OBBe ItePHeuPOBKn Heo6xoIMbl IyUyWeHHaBaWe IInuueckOfopMbI yMeHbHnEHHBaCe.IDeaJIbHa YactOTa TpeHnpOBOK -5 pa3 B HeJeIO.
3. Плануроваиме Tpeнровok
KaxdanytpenpoBkaDolnKacocToBn3Tpexpa3:pa3orpeB(pa3mnHka), HneOpceCTBeHHo TpeHPOBkaNocTbBaHne Nocne TpeHPOBkn, 3akOnHTeBnaPaa3a.TemepaTypaTeNaNocTynnene KncnopoDa B opraHNoDLoXHeMeJeHHo BO3pactaTB BoBpeM pa3bl pa3orpeBa BboInHnTe nHMactnueckne ynpaxHeHHn BteChene5-10 MMHT.
3aTeM npctynaTe K OCHOBHO pae TpeHnpOBKn. Harpy3ka DoJnxHa 6bItb OTHCHTeBHO HN3KoB INepBbIE HECKONbKO MNHyT, a 3aTeM BO3pactaTb B TeueHne 15-30 MNHyT, YTO6bI YaNbca 6bIna B npedeJax 70-85% OT MAkCmAmJIbHOi.
TTO, TTo6bI NODEPkaTb UPKyIaIIO KPOBn NocNe OCHBOHΦa3bl TpeHnPOBKn, PneynpeNTb BO3HNKHOBEHe 6oJe nIN HAnpXeHn B MbUax Heo6xOIMa 3aKJIIOHTeJIbHa 4a3a TpeHnpOBKn: BbINOJIHeHn B TeueHne 5-10 MmHy typaxHeHn Ha pactkky nIN neRknx rImhactnecKn ynpaxHeHn.
4. MOTUBAUIN
KIOUeBIM MOMHTOM ycHexa nporpaMMbI ABNIOrCperynRPhIe TpeHPOBKn. Bam CneDyET yCTAHOBITb KOHKpETHoe BPEM N MecTo Ha KaJDbI DeH IIN TpeHPOBOK IN BYTpeHNE NOIOTOBITc68 K HIM. TpeHpyIEcB ToJIbKO ToIgDA, KOrJaY BaC eBt HAcTPOEHNE HBCdA NOMHITc CBOIO cENb. Ecnbl npOONJaeTe CBOIN 3aHHTNTo Cepe3 kAKOE-TO BPEMA CMXOTE YBNDEb CBOIN PORpeCC DEh OTO Hn 6yDeTe np6bnkTaCB K NoCTABNeHHo CEH WArOM.
ΦOPMЛA PACHTA YACTOTbl NJIbCA
MaKc. yactota nylbca = 220 - Bo3pact
(220-Bau Bo3pact)
90% ot MaKc. yAcToTbI NyIbCa = (220 - Bo3pact) x 0.9
85% OT MaKc. YacToTb NylbCa = (220 - Bo3pact) x 0.85
70% OT MaKc. qactotbl nyIbca = (220 - Bo3pact) x 0.7

© by Top-Sports Gilles GmbH
D-42551 Velbert (Germany)