WGR8031 - Router LEVELONE - Free user manual and instructions
Find the device manual for free WGR8031 LEVELONE in PDF.
User questions about WGR8031 LEVELONE
0 question about this device. Answer the ones you know or ask your own.
Ask a new question about this device
Download the instructions for your Router in PDF format for free! Find your manual WGR8031 - LEVELONE and take your electronic device back in hand. On this page are published all the documents necessary for the use of your device. WGR8031 by LEVELONE.
USER MANUAL WGR8031 LEVELONE
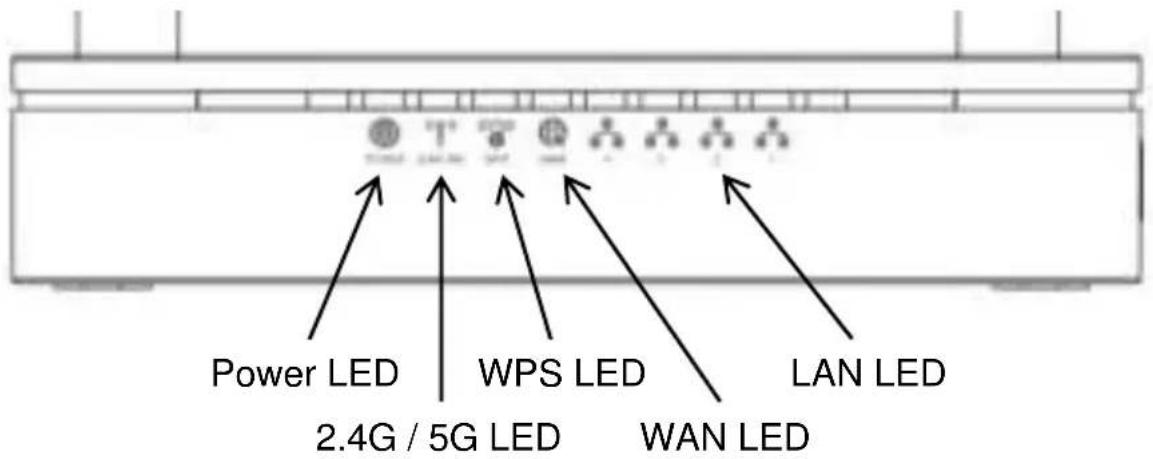
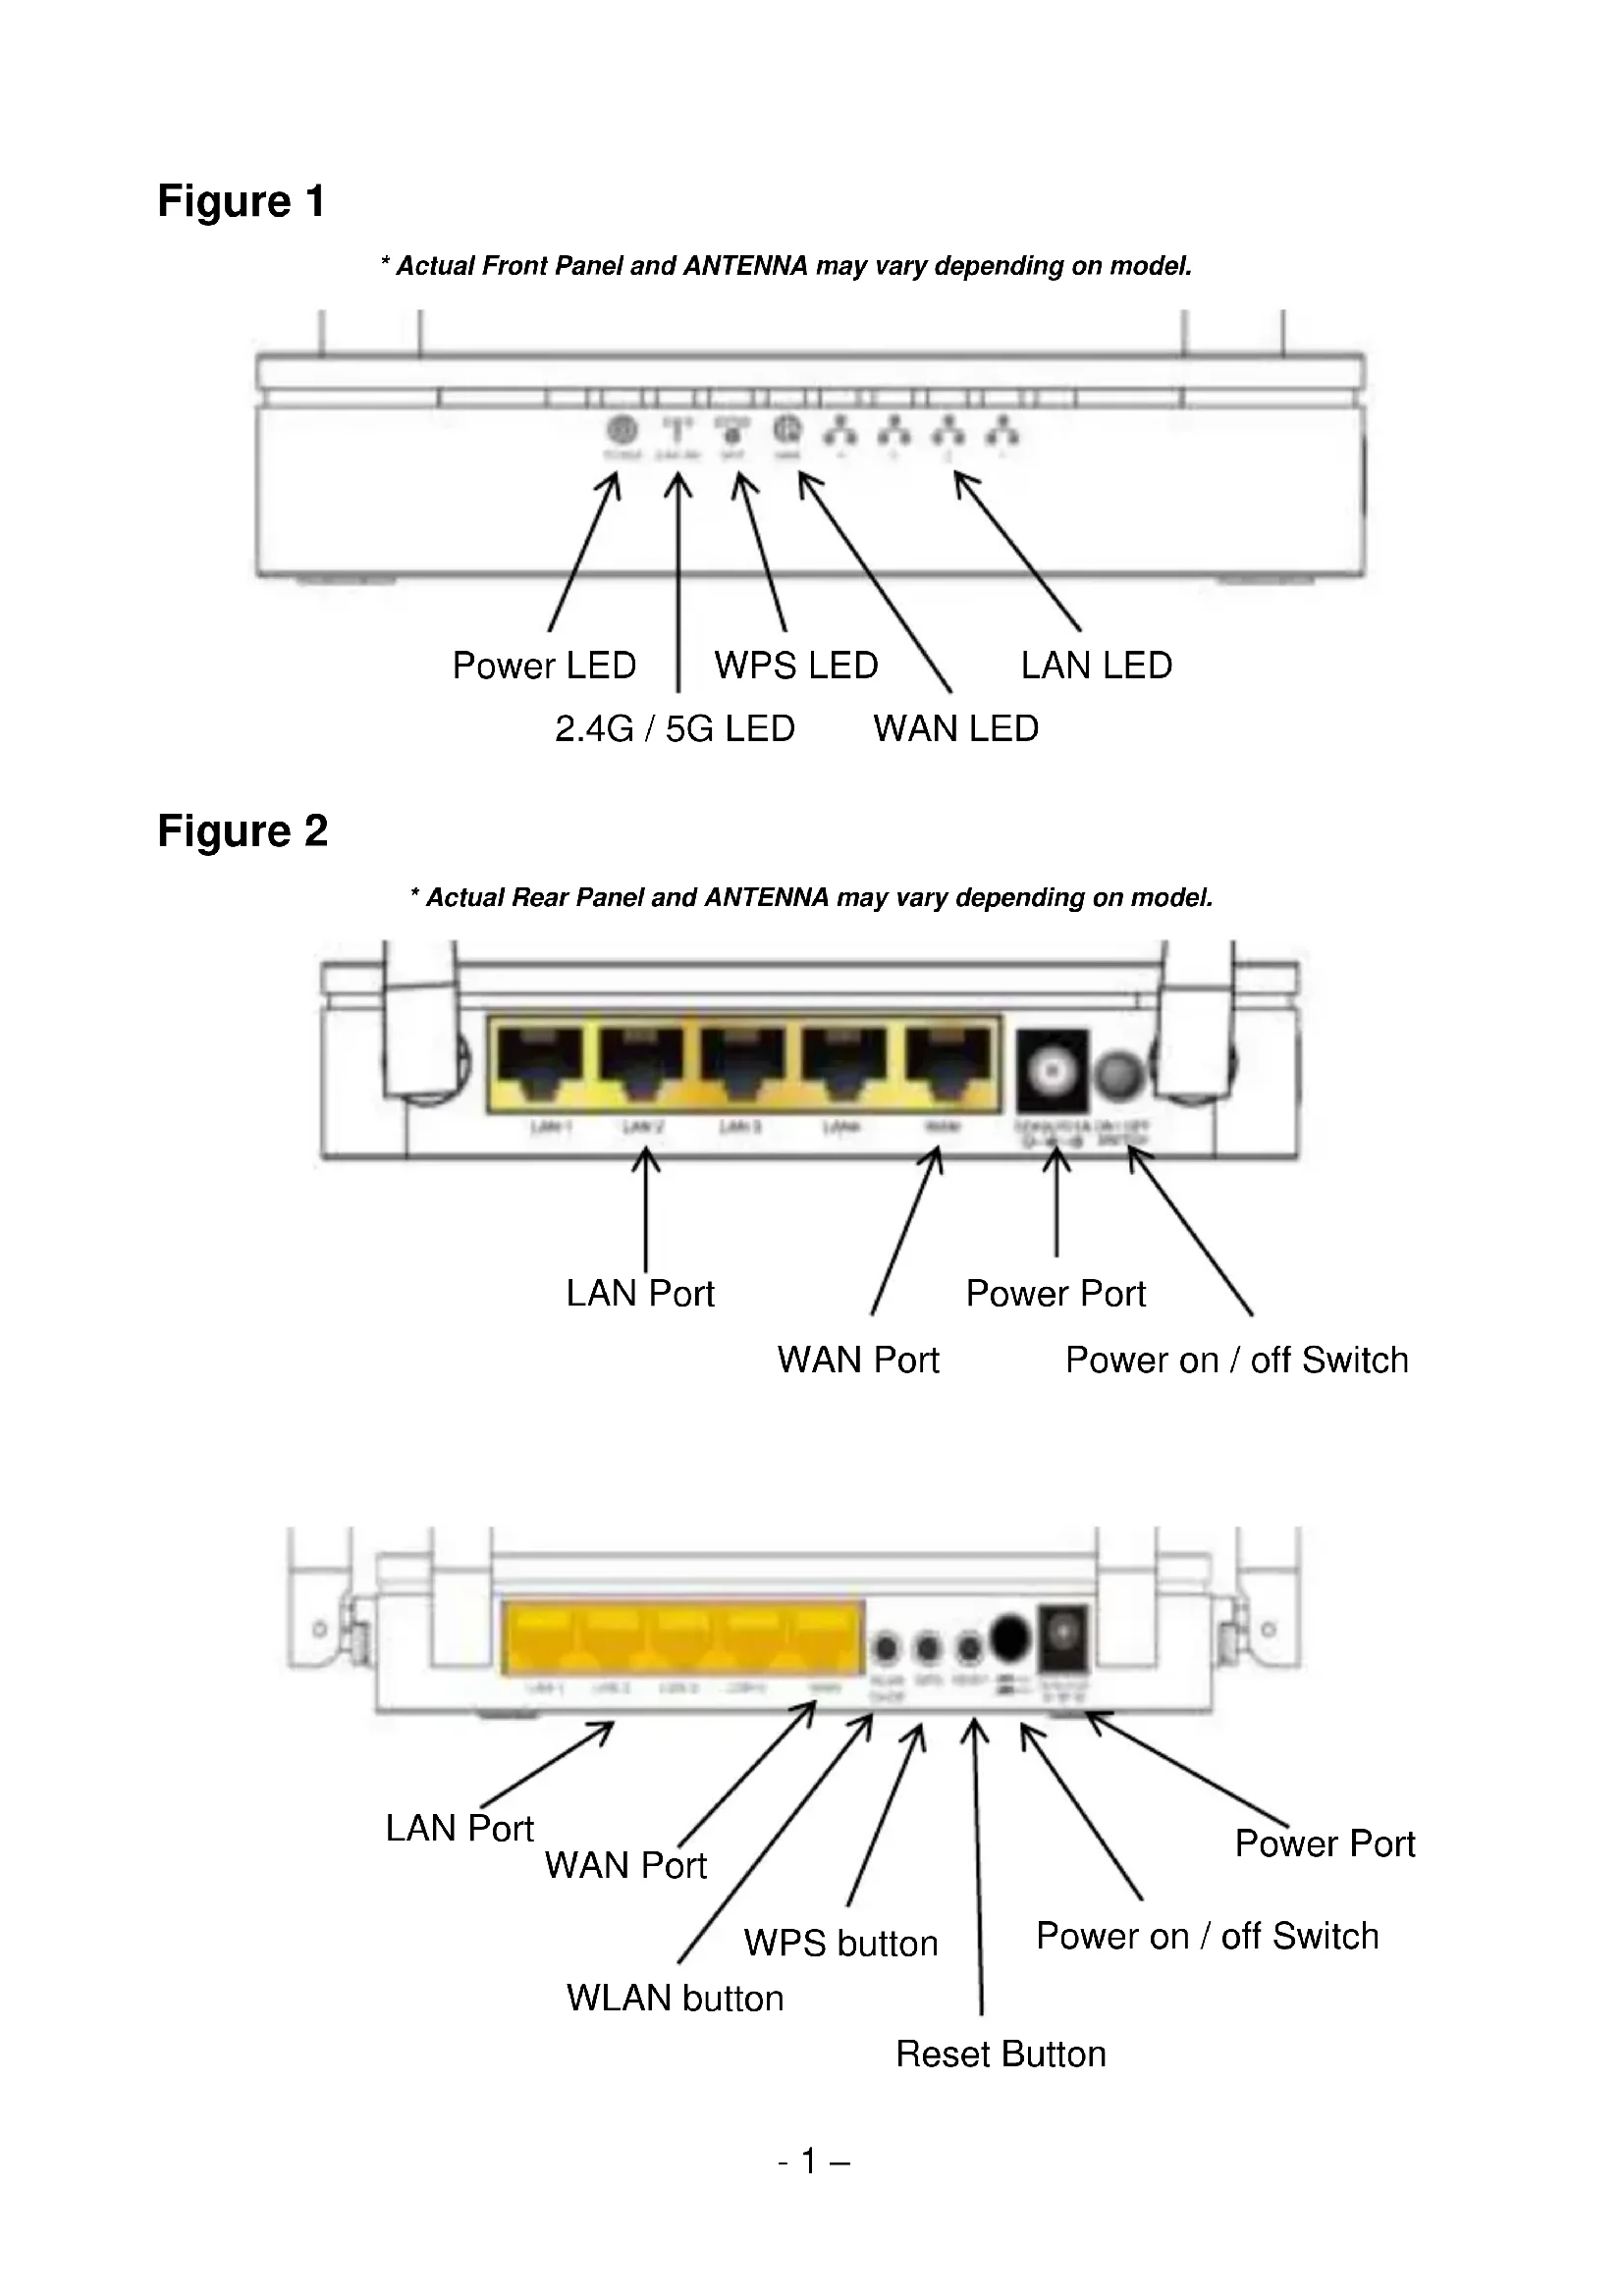
Figure 1
* Actual Front Panel and ANTENNA may vary depending on model.
Figure 2
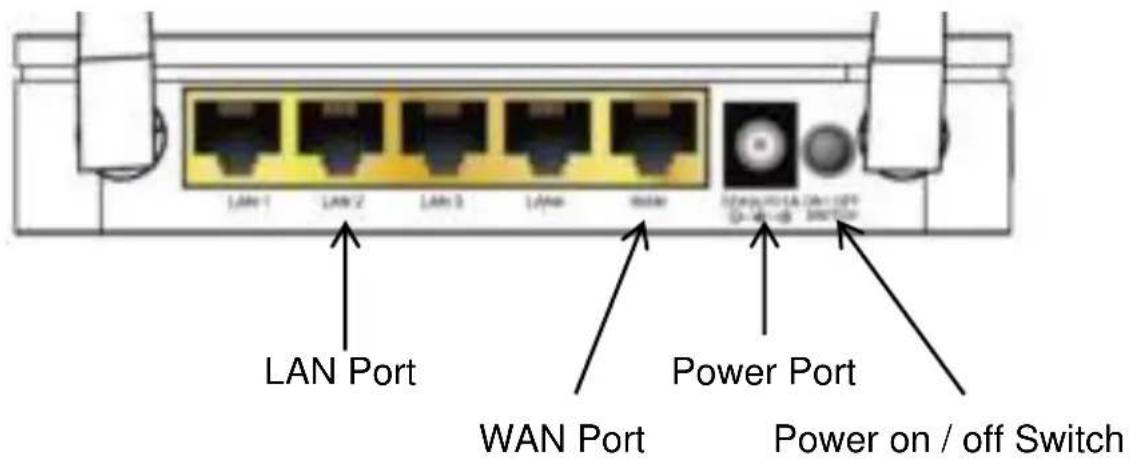
* Actual Rear Panel and ANTENNA may vary depending on model.
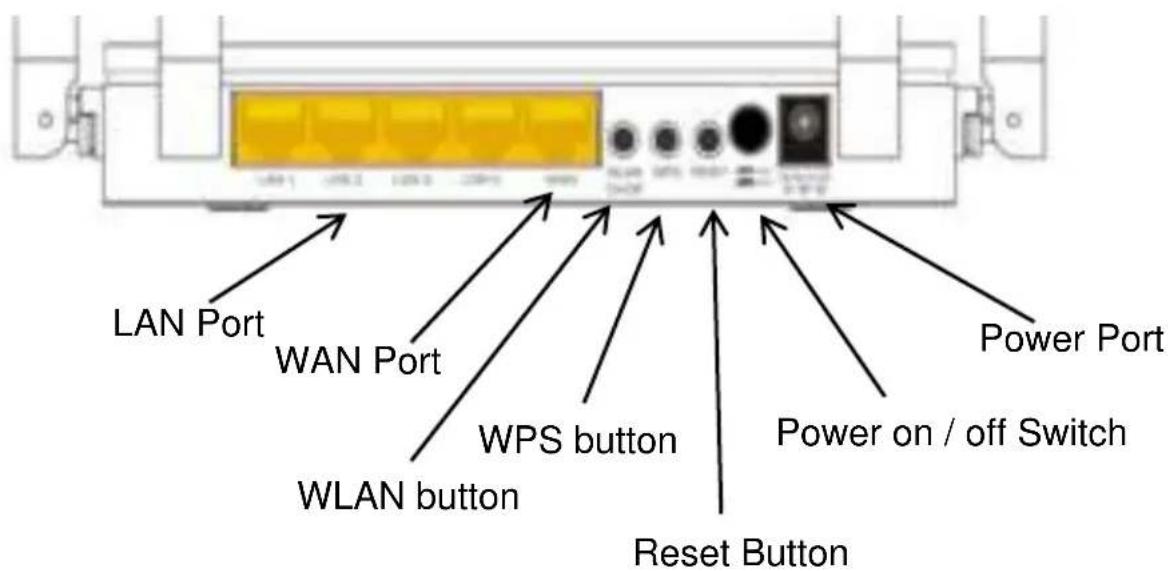
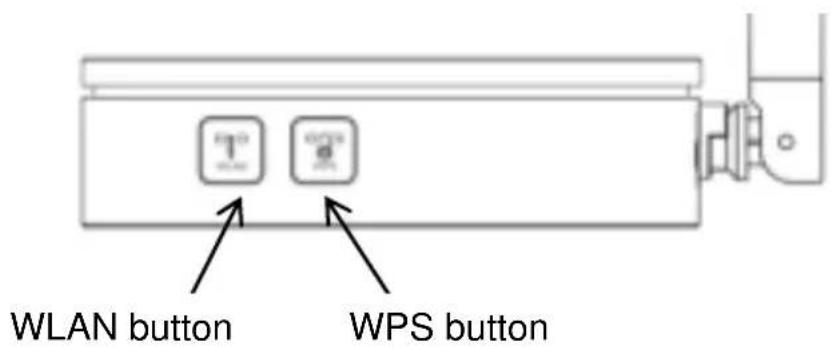

Figure 3

* Actual Rear Panel and ANTENNA may vary depending on model.
Table1. LED function
| Label | Color | On | Flash | Off |
| Green | Ready | Waiting for device ready | Power Off | |
| Green | The device has a WAN IP address from xDSL/Cable Modem | Transmit / Receive Data | Ethernet Disconnected(No WAN IP address from xDSL/Cable Modem) | |
| Green | WLAN Ready | Transmit / Receive Data | WLAN Off | |
| Green | N/A | Start WPS pairing within 2 minutes | WPS Idle | |
| Green | Ethernet Connected | Transmit / Receive Data | Ethernet Disconnected |
The icons appear on the products are for application indication only.
The trademark or intellectual property is belonging to their respective owners.
Table 2. Function / Description of Connectors
| Connector | Description |
| ANTENNA | fixed ANTENNA |
| ON/OFF SWITCH | Power on / off the device |
| POWER | Connects to the supplied power adaptor |
| LAN 4/3/2/1 | Connects the device via LAN Ethernet to up to 4 PCs |
| WAN | Connects the device via WAN Ethernet to xDSL / Cable Modem |
| WPS | Press this button for at least 3 full seconds and the WPS LED will flash to start WPS. Now go to the wireless adapter or device and press its WPS button. Make sure to press the button within 120 seconds (2 minutes) after pressing the router's WPS button. |
| WLAN | Press this button for at least 3 full second to turn off/on wireless signals |
| RESET | Reset button. RESET the router to its default settings. Press this button for at least 6 full seconds to RESET device to its default settings. |
Note :
if you need user manual, please download from Levelone website:
http://global.level1.com/downloads.php
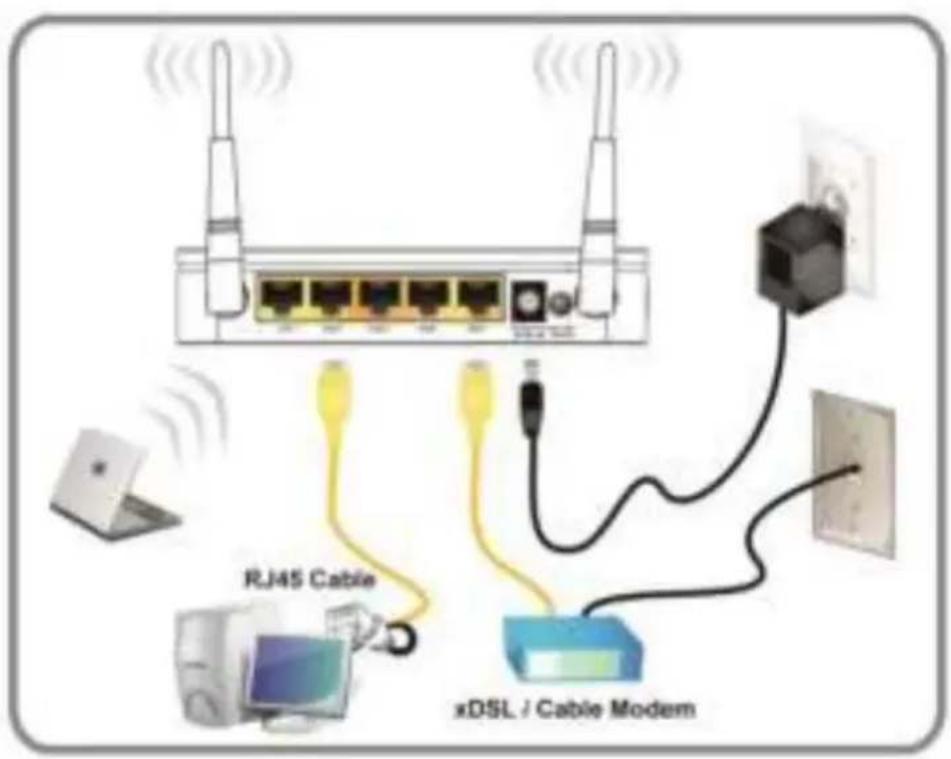
Figure 4
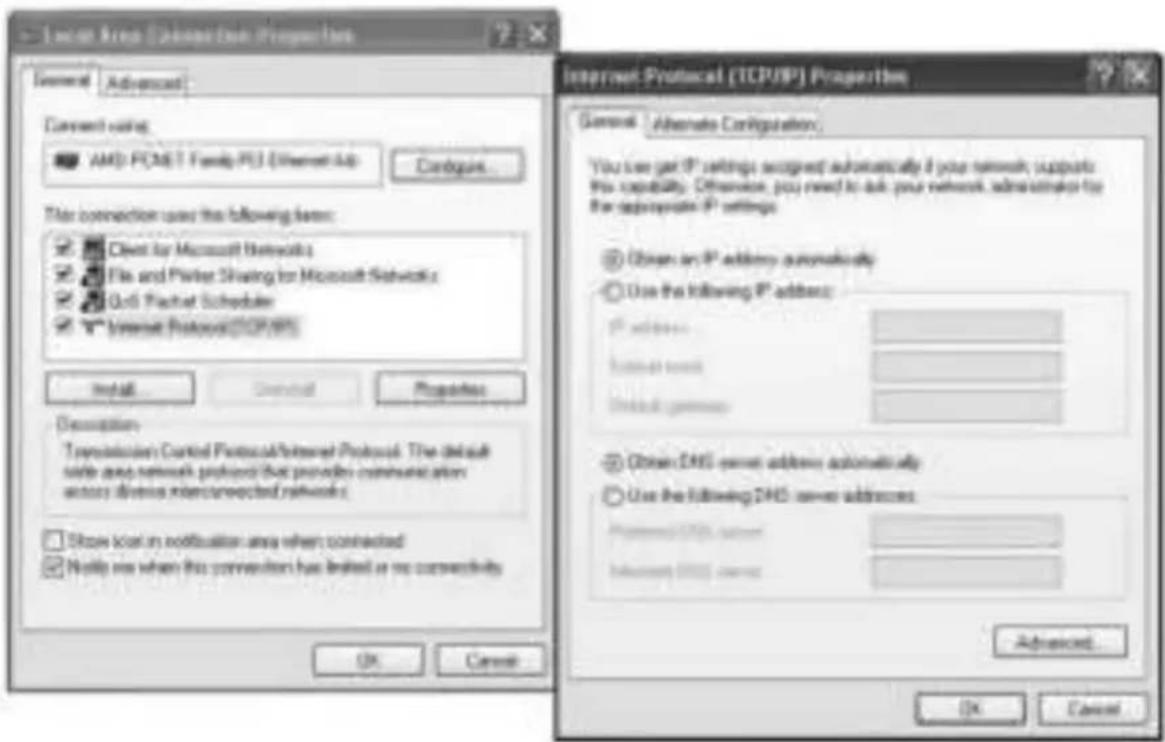
Figure 5

Figure 6
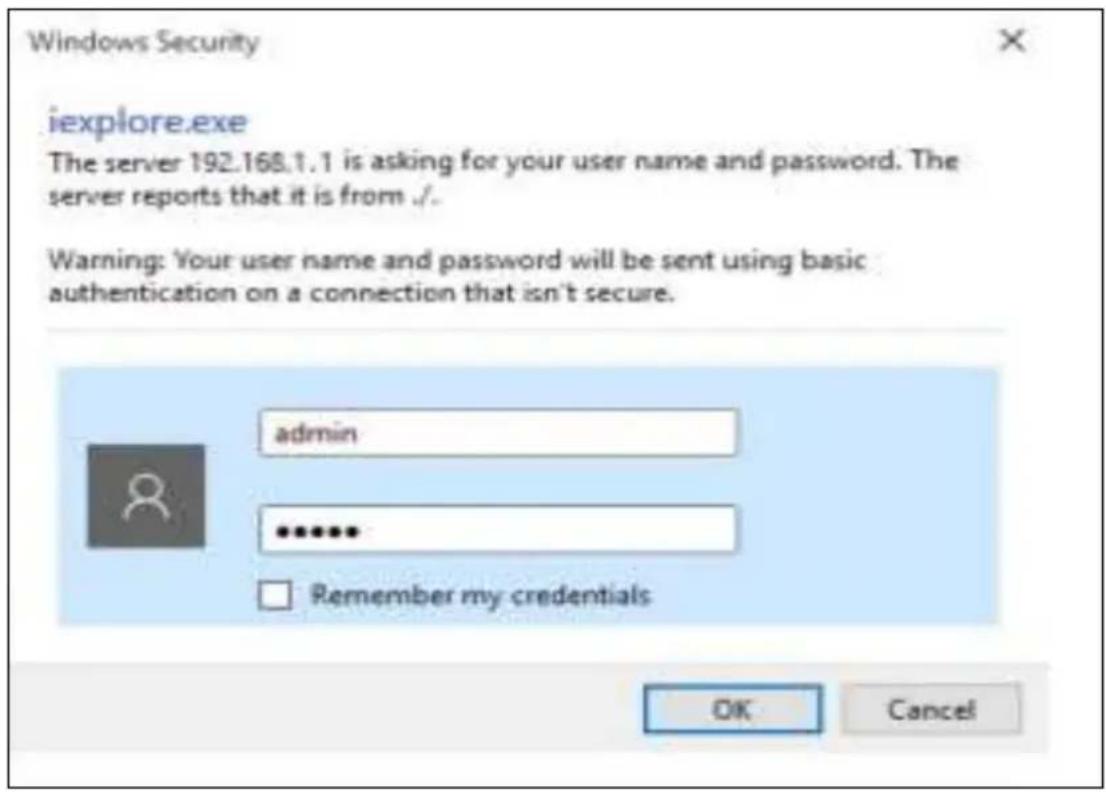
Figure 7
Figure 8

Figure 9
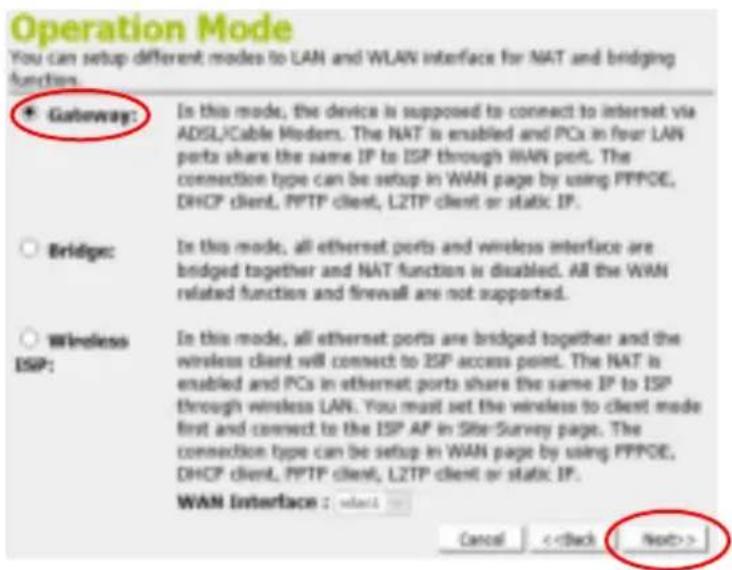
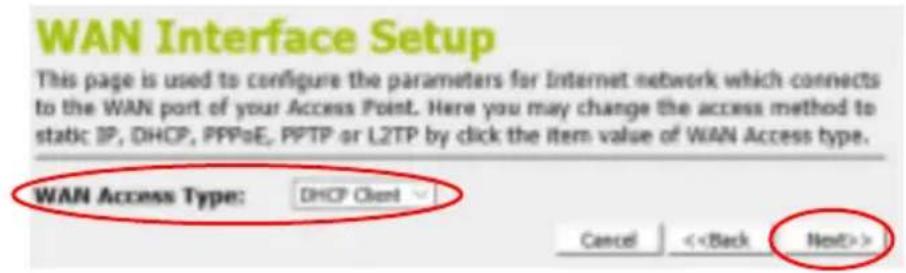
Figure 10
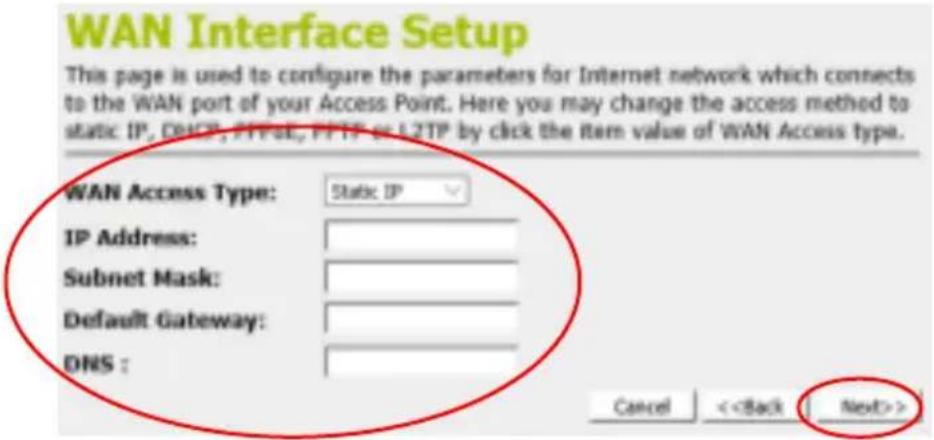
Figure 11
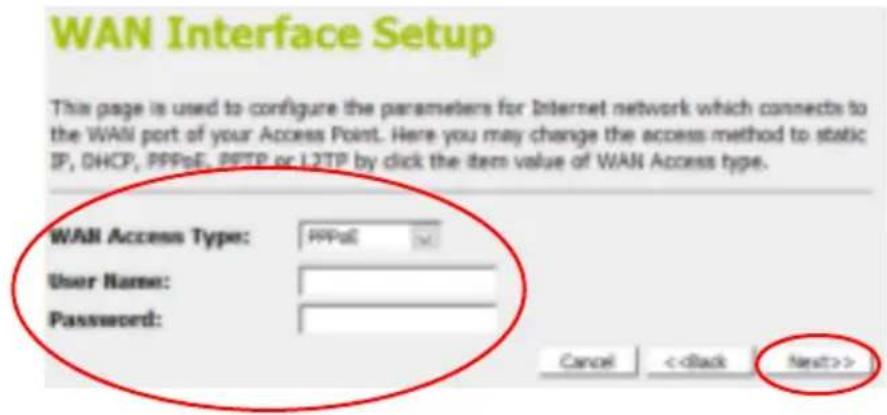
Figure 12
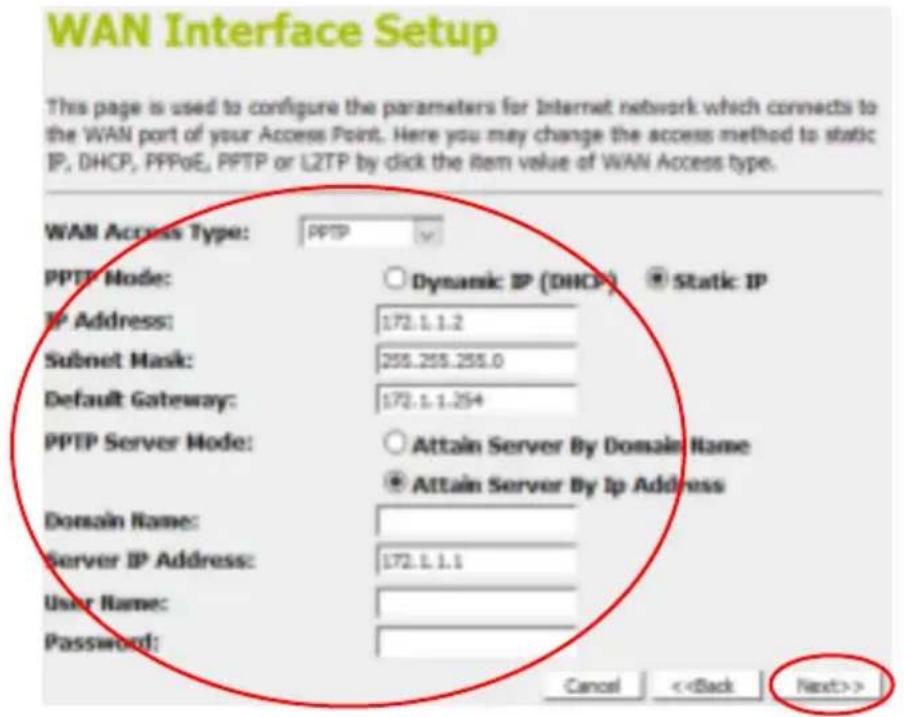
Figure 13
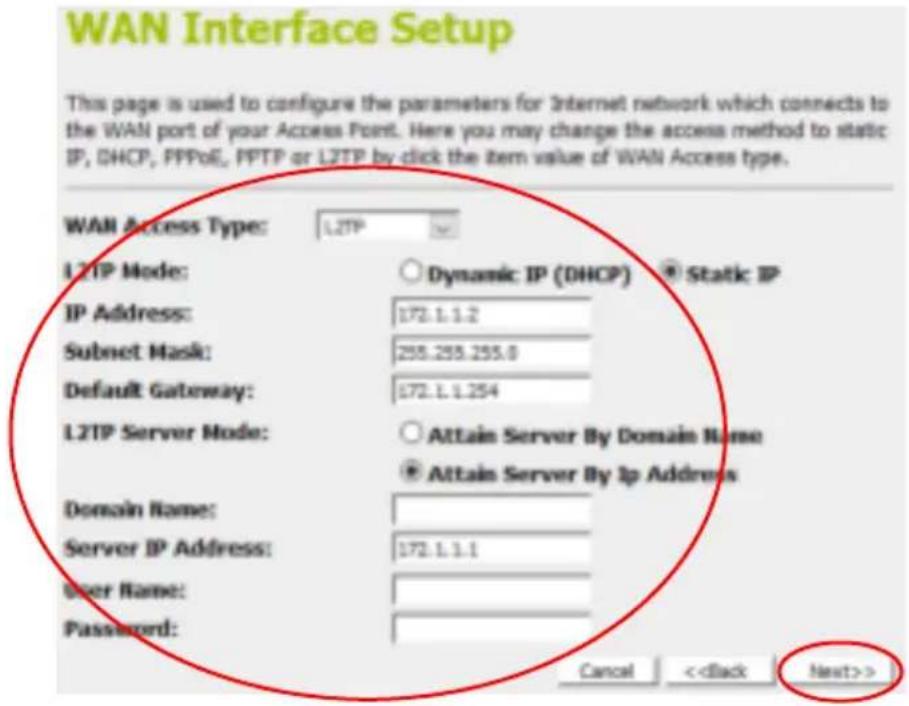
Figure 14

Figure 15
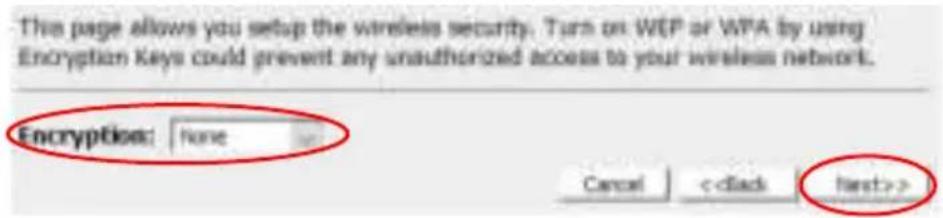
Figure 16
English
Hardware Installation
- Actual housing may vary depending on model.
- Actual ANTENNA may vary depending on model.
Step 1. Connect the Ethernet cable to WAN Port
Connect the RJ45 Ethernet cable from your xDSL/Cable Modem's
Ethernet port to Router's WAN Port.
Step 2. Connect the Ethernet cable to LAN Port
Connect the supplied RJ45 Ethernet cable from your PC's Ethernet port to any of the Router's LAN Ports.
Step 3. Attach the power connector
Connect the power adapter to the power inlet "POWER" of the 802.11ac
WLAN Router and turn the power switch“ON/OFF SWITCH”of your
Router on. (Figure 4)
Software Installation
To login to the Router, please perform the following steps:
- Check Your Network Settings to login web UI.
Please make sure your PC can get IP address automatically, so the router can communicate with your PC during configuration. - Select "Control Panel" > "Network Connections".
- Right click the "Local Area Connection" and choose "Properties".
- Select the TCP/IP protocol for your network card.
- Click on the Properties button. You should then see the following screen and make sure you have selected "Obtain IP address automatically".
(Figure 5)
- Launch a Web browser (Microsoft Internet Explorer 11 for example), enter the Router, default LAN IP address 192.168.1.1 in the address bar, and then press Enter, as shown in the following picture. (Figure 6)
- Then enter the default user name of admin and password of admin in the User Name and Password fields, click "OK" to access the AP's Web GUI. (Figure 7)
- From the head menu, click on SETUP. (Figure 8)
- Click on Gateway and then click on Next.. (Figure 9)
WAN Interface Setup
DHCP
From the WAN Access Type drop-down list, select DHCP Client setting.
If you are happy with your settings, click on Next. (Figure 10)
Static IP
From the WAN Access Type drop-down list, select Static IP setting.
Enter Local IP Address, Subnet Mask, Default Gateway and DNS which was given by Telecom or by your Internet Service Provider (ISP).
If you are happy with your settings, click on Next. (Figure 11)
PPPoE
From the WAN Access Type drop-down list, select PPPoE setting.
Enter User Name/Password provided by your ISP. Type them in the relevant boxes.
If you are happy with your settings, click on Next. (Figure 12)
PPTP
From the WAN Access Type drop-down list, select PPTP setting provided by your Network Administrator or ISP.
Click on the ratio of Dynamic IP (DHCP) or Static IP.
Enter IP Address for example 172.1.1.1 provided by your Network
Administrator or ISP. (for Static IP only)
Enter Subnet Mask for example 255.255.0.0 provided by your Network
Administrator or ISP. (for Static IP only)
Enter Default Gateway for example 172.1.1.254 provided by your Network
Administrator or ISP. (for Static IP only)
Enter Server Domain Address for example 222.222.222.222 or
www.example.com provided by your Network Administrator or ISP.
Enter User Name for example 1234 provided by your Network Administrator or ISP.
Enter Password for example 1234 provided by your Network Administrator or ISP.
If you are happy with your settings, click Next. (Figure 13)
L2TP
From the WAN Access Type drop-down list, select L2TP setting provided by your Network Administrator or ISP.
Click on the ratio of Dynamic IP (DHCP) or Static IP.
Enter IP Address for example 172.1.1.1 provided by your Network
Administrator or ISP. (for Static IP only)
Enter Subnet Mask for example 255.255.0.0 provided by your Network
Administrator or ISP. (for Static IP only)
Enter Default Gateway for example 172.1.1.254 provided by your Network
Administrator or ISP. (for Static IP only)
Enter Server Domain Address for example 222.222.222.222 or
www.example.com provided by your Network Administrator or ISP.
Enter User Name for example 1234 provided by your Network Administrator or ISP.
Enter Password for example 1234 provided by your Network Administrator
or ISP.
If you are happy with your settings, click Next. (Figure 14)
Wireless Configuration - 5GHz / 2.4GHz
- Enter SSID.
- Click on Next. (Figure 15)
-
- From the Encryption list, choose the Encryption type and enter related parameters if necessary, as None / WEP / WPA2(AES) and WPA2 Mixed Mode(the default settings Security Mode = WPA2 Mixed and passphrase isxxxxxxxxxx which could be found on the sticker of the bottom side of the device). For example, the Encryption you choose is None. Click on Next. (Figure 16)
- Change setting successfully! Do not turn off or reboot the Device during this time.
- Now, the Router has been configured completely, and suitable for Wireless and Internet Connections.
Deutsch
Hardwareinstallation
"ON/OFF SWITCH" del router. (Figure 4)