
WBR-6804 - Router LEVELONE - Free user manual and instructions
Find the device manual for free WBR-6804 LEVELONE in PDF.


| Product Type | Wireless Router |
| Brand | LevelOne |
| Model | WBR-6804 |
| Wireless Standard | IEEE 802.11n (up to 300 Mbps) |
| Frequency Band | 2.4 GHz |
| LAN Ports | 4 x 10/100 Mbps |
| WAN Port | 1 x 10/100 Mbps |
| Antenna | 2 x External 5 dBi |
| Security | WEP, WPA/WPA2, SPI Firewall |
| Dimensions (W x D x H) | 190 x 130 x 35 mm |
| Weight | 0.45 kg |
| Power Supply | 12V DC, 1A |
| Power Consumption | Max 10W |
| Operating Temperature | 0°C to 40°C |
| Humidity | 10% to 90% (non-condensing) |
| Main Functions | Wireless AP, Router, DHCP, NAT, QoS, VPN Pass-through, WDS |
| Maintenance | Clean with a soft, dry cloth; avoid liquids |
| Safety | Do not expose to water or moisture; disconnect during storms |
| Spare Parts | Power adapter, antennas (if detachable) |
| Repairability | No user-serviceable parts; contact support |
Frequently Asked Questions - WBR-6804 LEVELONE
User questions about WBR-6804 LEVELONE
0 question about this device. Answer the ones you know or ask your own.
Ask a new question about this device
Download the instructions for your Router in PDF format for free! Find your manual WBR-6804 - LEVELONE and take your electronic device back in hand. On this page are published all the documents necessary for the use of your device. WBR-6804 by LEVELONE.
USER MANUAL WBR-6804 LEVELONE
LevelOne User Manual
WBR-6804
150Mbps Wireless Dual-WAN 3G Router
Ver. 1.0
Safety
FCC WARNING
This equipment may generate or use radio frequency energy. Changes or modifications to this equipment may cause harmful interference unless the modifications are expressly approved in the instruction manual. The user could lose the authority to operate this equipment if an unauthorized change or modification is made.
This equipment has been tested and found to comply with the limits for a Class B digital device, pursuant to Part 15 of the FCC Rules. These limits are designed to provide reasonable protection against harmful interference in a residential installation. This equipment generates, uses, and can radiate radio frequency energy and, if not installed and used in accordance with the instructions, may cause harmful interference to radio communications. However, there is no guarantee that interference will not occur in a particular installation. If this equipment does cause harmful interference to radio or television reception, which can be determined by turning the equipment off and on, the user is encouraged to try to correct the interference by one or more of the following measures:
1) Reorient or relocate the receiving antenna.
2) Increase the separation between the equipment and receiver.
3) Connect the equipment into an outlet on a circuit different from that to which the receiver is connected.
4) Consult the dealer or an experienced radio/TV technician for help.
CE Declaration of conformity
This equipment complies with the requirements relating to electromagnetic compatibility, EN 55022 class B for ITE, the essential protection requirement of Council Directive 89/336/EEC on the approximation of the laws of the Member States relating to electromagnetic compatibility.
CE Marking Warning
Hereby, Digital Data Communications, declares that this product is in compliance with the essential requirements and other relevant provisions of Directive 1999/5/EC.
The CE-Declaration of Conformity can be downloaded at: http://www.levelone.eu/support.php

General Public License
This product incorporates open source code into the software and therefore falls under the guidelines governed by the General Public License (GPL) agreement.
Adhering to the GPL requirements, the open source code and open source license for the source code are available for free download at http://global.level1.com.
If you would like a copy of the GPL or other open source code in this software on a physical CD medium, LevelOne (Digital Data Communications) offers to mail this CD to you upon request, for a price of US\$9.99 plus the cost of shipping.
Table of contents
CHAPTER 1 INTRODUCTION....5
1.1 PACKAGE LIST....5
1.2 HARDWARE INSTALLATION....5
CHAPTER 2 GETTING STARTED WITH EASY SETUP UTILITY....8
2.1 EASY SETUP BY WINDOWS UTILITY....8
2.2 EASY SETUP BY CONFIGURING WEB PAGES.... 13
YOU CAN ALSO BROWSE WEB UI TO CONFIGURE THE DEVICE.... 13
CHAPTER 3 MAKING CONFIGURATION ...... 17
3.1 BASIC SETTING.... 17
3.2 FORWARDING RULES 35
3.2.1 VIRTUAL SERVER 36
3.2.2 SPECIAL AP 38
3.2.3 MISCELLANEOUS 39
3.3 SECURITY SETTING.... 40
3.4 ADVANCED SETTING.... 47
3.5 TOOL BOX.... 56
CHAPTER 4 . TROUBLESHOOTING....61
APPENDIX A. SPEC SUMMARY TABLE....65
APPENDIX B. LICENSING INFORMATION 66
Default Settings
| IP Address | 192.168.1.1 |
| Password | admin |
| Wireless Mode | Enable |
| Wireless SSID | LevelOne |
| Wireless Security | None |
Chapter 1 Introduction
The Wi-Fi Combo Router is a high-performance tool that supports wireless networking at home, work, or in a public place. The Wi-Fi Combo Router supports a USB 3G modem card, either WCDMA or EVDO and even HSDPA as well, and supports wireless data transfers up to 150M bps, and wired data transfers up to 100 Mbps. The WiFi Combo Router is compatible with industry security features.
1.1 Package List
WBR-6804
Power Adapter
RJ-45 LAN Cable
Quick Installation Guide
CD Manual/QIG
Antenna
1.2 Hardware Installation
A. Hardware configuration
Antenna
Reset Button
Mobile LED
WAN LED
WiFi LED
LAN LED
WPS Button

B. LED indicators
| LED Indicator Description | ||
| USB 3G | Green and Steady On | JSB 3G connection is established |
| Green and Blinking | Data packet transferred via USB 3G | |
| Ethernet WAN | Green and Steady On | Ethernet WAN connection is established |
| Green and Blinking | Data packet transferred via Ethernet WAN | |
| WiFi/WPS | Green and Blinking | Data packet transferred via WiFi |
| Green and Blinking In WPS PBC mode | ||
| OFF WiFi radio is disabled | ||
| Ethernet LAN 1~4 | Green and Steady On | Ethernet LAN connection is established |
| Green and Blinking | Data packet transferred via Ethernet LAN | |
C. Installation Steps

Note: DO NOT connect the router to power before performing the installation steps below.
Step 1.
Plug a USB modem into USB port.

Step 2.
Insert RJ45 cable into LAN Port on the back panel of the router. Then plug the other end of into computer.

Step 3.
Plug the power jack into the receptor on the back panel of the router. Then plug the other end into a wall outlet or power strip.

Chapter 2 Getting Started with Easy Setup Utility
There are two approaches for you to set up the Wi-Fi Combo Router quickly and easily. One is through executing the provided Windows Easy Setup Utility on your PC, and the other is through browsing the device web pages and configuration.
2.1 Easy Setup by Windows Utility
Step 1 :
Install the Easy Setup Utility from the provided CD then follow the steps to configure the device.
Step 2 :
Select Language then click "Next" to continue.

Step 3 :
Then click the "Wizard" to continue.

Step 4 :
Click "Next" to continue.

Step 5 :
Select Wireless Enable, and then click "Next" to continue.

Step 6 :
Enter SSID, Channel and Security options, and then click "Next" to continue.

Step 7 :
Click" Let me select WAN service by myself" to select WAN service manually.

Step 8 :
Select 3G Service by clicking 3G icon to continue.

Step 9-1 :
Select "Auto-Detection" and the Utility will try to detect and configure the required 3G service settings automatically. Click "Next" to continue.

Step 9-2 :
Or you can select "Manual" and manually fill in the required 3G service settings provided by your ISP. Click "Next" to continue.

Step 10:
Click "Next" to save your setting.

Step 11 :
The Wi-Fi Combo Router is rebooted to make your entire configuration take effect.

Step 12 :
Click "Next" to test the Internet connection or you can ignore test.

Step 13 :
Click "Next" to test WAN Networking service.

Step 14 :
Setup is completed.

2.2 Easy Setup by Configuring Web Pages
You can also browse web UI to configure the device.
Browse to Activate the Setup Wizard
Type in the IP Address (http://192.168.1.1)
Type in the default password "admin" in the System Password and then click 'login' button.
Select your language.
Select "Wizard" for basic settings with simple way.
Press "Next" to start the Setup Wizard.

Configure with the Setup Wizard
Step 1: Change System Password.
Set up your system password.
(Default : admin)
![ADMINISTRATOR's MAIN MENU Status Wizard Advanced Logout Setup Wizard - Setup Login Password [EXIT] Old Password New Password Reconfirm < Back [ Start > Password > Time > LAN/WAN > Wireless > Summary > Finish! ] Next >](/content/2026/05/988421/images/a78ba93406603440abd1629aac912e665efbe6c62c8e427990a01d90148ca4df.jpg)
Step 2: Select Time Zone.
![ADMINISTRATOR's MAIN MENU Status Wizard Advanced Logout Setup Wizard - Setup Time Zone [EXIT] (GMT+08:00) Beijing, Chongqing, Hong Kong, Ukumqi Detected Again < Back [ Start > Password > Time > | AM/WAN > Wireless > Summary > Finish? ] Next >](/content/2026/05/988421/images/9ac389d2eadc2194dc3917a0c1abe455dd255e71a575658d179e0929ca496405.jpg)
Step 3: Select WAN Type. Choose Auto-Detecting or Manually to set WAN Type.
![ADMINISTRATOR'S MAIN MENU Status Wizard Advanced Logout Setup Wizard - Select WAN Type [EXIT] • Auto Defecting WAN Type □ Setup WAN Type Manually < Back | Start > Password > Time > LAN/WAN > Wireless > Summary > Finish! > Next >](/content/2026/05/988421/images/fad857ba60fd0d2b793edc78fc9d1ce5f56dbac615fd2bda97e65613f2282e8b.jpg)
Step 4: Select Wan Type. If you want to use 3G service as the main internet access, please set the WAN interface as "Wireless WAN" and the WAN type as "3G".
![ADMINISTRATOR's MAIN MENU Status Wizard Advanced Logout Setup Wizard - Select WAN Type [EXIT] LAN IP Address 192.166.1.1 WAN Interface Wireless WAN WAN Type 3G < Back [ Start > Password > Time > LAN/WAN > Wireless > Summary > Finish! ] Next >](/content/2026/05/988421/images/c4c190210067f11ee30effc8a881a37e7c1523709bf07379ce8e60224001bb2f.jpg)
Step 5: 3G Mode. Select Auto-Detection then click "Next" to continue.
![ADMINISTRATOR'S MAIN MENU Status Wizard Advanced Logout Setup Wizard - 36 [EXIT] • Dial-Up Profile Auto-Detection Manual • PIN Code (optional) < Back [ Start > Password > Time > LAN/WAN > Wireless > Summary > Finish ] Next >](/content/2026/05/988421/images/509a5c90d681cdfe73d7faaec01e714b53ddb55fdfc6df8259737f7e3a316891.jpg)
Step 6: Set up your Wireless Network. Set up your SSID.
![ADMINISTRATOR'S MAIN MENU Status Wizard Advanced Setup Wizard - Wireless settings [ EXIT ] Wireless Module Enable Disable Network ID(SSID) LevelOne Channel Auto < Back [ Start > Password > Time > LAN/WAN > Wireless > Summary > Finish! ] Next >](/content/2026/05/988421/images/96a56e9cf19ee8ab2255aa79f07a0a404296527621d03fe71e62297e7d65630d.jpg)
Step 7: Setup your Encryption Key here, then click "Next" to continue.
Step 8: Apply your Setting. Then click Apply Setting.
Step 9: Click Finish to complete it.
![Setup Wizard - Wireless settings • Authentication • Encryption • Prosharo Key WPA-PSK / WPA2-PSK TKIP 1234567890 < Back | Start > Password > Time > LAN/WAN > Wireless > Summary > Finish! Next > Setup Wizard - Summary [ EXIT ] Please confirm the information below [WAN Setting] WAN Type 3G APN - PIN C…](/content/2026/05/988421/images/49c22c9180748d50c9dfbe4a8ea43d1bb1490697d11c1f21bd8fd612f83d6356.jpg)
Chapter 3 Making Configuration
Whenever you want to configure your network or this device, you can access the Configuration Menu by opening the web-browser and typing in the IP Address of the device. The default IP Address is: 192.168.1.1

Enter the default password "admin" in the System Password and then click 'login' button.

Then, you can browse the "Advanced" configuration pages for configuring this device.
3.1 Basic Setting

3.1.1. Network Setup
| □ LAN Setup | |
| Item | Setting |
| ▸ LAN IP Address | 192.168.1.1 |
| ▸ Subnet Mask | 255.255.255.0 |
| □ Internet Setup [HELP] | |
| ▸ Combo WAN Status | Disable Settings... |
| ▸ WAN Interface | Wireless WAN ▼ |
| ▸ WAN Type | 3G ▼ |
- LAN IP Address: The local IP address of this device. The computers on your network must use the LAN IP address of this device as their Default Gateway. You can change it if necessary.
- Subnet Mask: Input your Subnet mask. (All devices in the network must have the same subnet mask.) The default subnet mask is 255.255.255.0.
- Combo WAN Status: Display status of combo WAN. With Combo WAN feature, you can choose one primary WAN connection, and set another WAN connection for backup. The combo WAN status will be showed here. Press "Settings" button to configure this feature.
- WAN Interface: Select Ethernet WAN or Wireless WAN to continue.
- WAN Type: WAN type of your Internet connection. You can choose a correct one from the following options.
| WAN Interface | Ethernet WAN |
| WAN Type | Dynamic IP Address |
| Host Name | Dynamic IP AddressStatic IP AddressPPP over EthernetPPTPL2TP |
| ISP registered MAC Address |
| WAN Interface | Wireless WAN |
| WAN Type | 3G |
| Dial-Up Profile | 3GiBurst detection Manual |
A. 3G
| Internet Setup [HELP] | |
| Combo WAN Status | Disable Settings... |
| WAN Interface | Wireless WAN ▼ |
| WAN Type | 3G ▼ |
| Dial-Up Profile | Auto-Detection Manual |
| Country | Albania ▼ |
| Telecom | Vodafone ▼ |
| 3G Network | WCDMA/HSPA ▼ |
| APN | (optional) |
| PIN Code | (optional) |
| Dialed Number | |
| Account | (optional) |
| Password | (optional) |
| Authentication | Auto PAP CHAP |
| Primary DNS | (optional) |
| Secondary DNS | (optional) |
| Connection Control | Auto Reconnect (always-on) ▼ |
| Allowed Connection Time | Always By Schedule |
| MTU | 0 (0 is auto) |
| Keep Alive | Disable LCP Echo Request Interval 10 seconds Max Failure Time 3 times Ping Remote Host Host IP Interval 80 seconds |
| NAT disable | Enable |
| Save Undo | |
- WAN Type: Choose 3G for WAN connection.
- Dial-Up Profile: Please select Auto-Detection or Manual. You can choose "Auto-Detection", and the router will try to detect and configure the required 3G service settings automatically. Otherwise, you can select "Manual", and manually fill in the required 3G service settings provided by your carrier or ISP.
- Country*: select your country.
- Telecom*: select your telecom.
- 3G Network*: select the 3G network
- APN*: APN information for your 3G data card. It will show a value after you choose country and telecom. You can also change it manually.
- PIN Code: Enter the PIN Code for your SIM card if required. (Optional)
- Dialed Number*: It will show a value after you choose country and telecom. You can also change it manually.
- Account*: The user name for 3G connection. It will show a value after you choose country and telecom. You can also change it manually.
- Password*: The password for 3G connection. It will show a value after you choose country and telecom. You can also change it manually.
- Authentication*: Choose authentication of 3G connection. You can leave it as "Auto" if you are not sure.
- Primary DNS*: You can assign a Primary DNS server if required. (Optional)
- Secondary DNS*: You can assign a Secondary DNS server if required. (Optional)
- Connection Control: There are 3 options to start connection:
■ Auto Reconnect (Always-on): The device will always try to link to Internet.
■ Connect-on-demand: The device won't try to connect to Internet until LAN PCs or devices try to go to Internet. Once Internet connection is established, this device will drop the connection if maximum idle time is reached.
■ Manually: The device won't try to connect to Internet until users press "connect" button at Status page. Once Internet connection is established, this device will drop the connection if maximum idle time is reached. -
Keep Alive: There are three options for keep alive feature as below.
■ Disable: Disable keep alive feature.
■ LCP Echo Request: The device will constantly send LCP packets for keeping alive. Enter the time interval and the maximum failure count.
■ Ping Remote Host: Enter the Remote host IP address and the time interval to send the ping packets for keeping alive. -
NAT Disable: You can disable NAT feature if required.
Note. The items with * above are only available when choosing Manual for Dial-up Profile.
B. iBurst
![Internet Setup [HELP] ► Combo WAN Status Disable Settings... ► WAN Interface Wireless WAN ► WAN Type iBurst ► Account ► Password ► Primary DNS ► Secondary DNS ► Connection Control Connect-on-Demand ► Maximum Idle Time 600 seconds ► Service Name (optional) ► Assigned IP Address (optional) ► MTU 0 (0…](/content/2026/05/988421/images/50d67b404787dc4963cfb3fac403638feb25362a8fca036d33676d79f3596b20.jpg)
- WAN Type: Choose iBurst for WAN connection.
- Account: Enter the User Name for iBurst connection.
- Password: Enter new Password for iBurst connection.
- Primary DNS: You can assign a Primary DNS server if required. (Optional)
- Secondary DNS: You can assign a Secondary DNS server if required. (Optional)
- Connection Control: There are 3 options to start connection:
■ Auto Reconnect (Always-on): The device will always try to link to Internet.
■ Connect-on-demand: The device won't try to connect to Internet until LAN PCs or devices try to go to Internet. Once Internet connection is established, this device will drop the connection if maximum idle time is reached.
■ Manually: The device won't try to connect to Internet until users press "connect" button at Status page. Once Internet connection is established, this device will drop the connection if maximum idle time is reached.
-
Maximum Idle Time: The amount of time of inactivity before disconnecting Internet connection. Set it to zero, or choosing "Auto-reconnect" mode to disable this feature.
-
Service Name: Input the service name if your ISP requires it. (Optional)
-
Assigned IP Address: Input a IP address if your ISP requires it. (Optional)
-
Maximum Transmission Unit (MTU): You can change MTU value if required. The default MTU value is set to 0 (auto).
- NAT disable: You can disable NAT feature if required.
C. Static IP Address
![Internet Setup [ HELP ] ► Combo WAN Status Disable Settings... ► WAN Interface Ethernet WAN ► WAN Type Static IP Address ► WAN IP Address ► WAN Subnet Mask ► WAN Gateway ► Primary DNS ► Secondary DNS ► NAT disable Enable Save Undo](/content/2026/05/988421/images/ef3cbd7bea542f92b8d1916a1a59cdc9f13562edf324de51fd95339180164763.jpg)
- WAN Type: Choose Static IP Address.
- WAN IP Address: Input the IP address you got from ISP.
- Subnet Mask: Input the subnet mask of IP address you got from ISP.
- WAN Gateway: Input the IP address of WAN gateway you got from ISP.
- Primary DNS: Input the IP address of primary DNS you got from ISP.
- Secondary DNS: Input the IP address of secondary DNS you got from ISP.
- NAT disable: You can disable NAT feature if required.
D. Dynamic IP Address
![Internet Setup [ HELP ] ► Combo WAN Status Disable Settings... ► WAN Interface Ethernet WAN ► WAN Type Dynamic IP Address ► Host Name WBR-6804 (optional) ► ISP registered MAC Address Clone ► Maximum Idle Time 600 seconds ► Connection Control Connect-on-Demand ► NAT disable Enable Save Undo](/content/2026/05/988421/images/d9d61176484978af1be748a0c9eb0e45713f53f3f266254d0119d6ac56a395a4.jpg)
- WAN Type: Choose Dynamic IP Address.
- Host Name: Optional, required by some ISPs, for example, @Home.
- ISP registered MAC Address: Some ISP (Cable company) will record your MAC address on PC. You can press "Clone" button to copy the MAC address on your PC here, or you can input it manually.
- Maximum Idle Time: The amount of time of inactivity before disconnecting Internet connection. Set it to zero, or choosing "Auto-reconnect" mode to disable this feature.
- Connection Control: There are 3 options to start connection:
■ Auto Reconnect (Always-on): The device will always try to link to Internet.
- Connect-on-demand: The device won't try to connect to Internet until LAN PCs or devices try to go to Internet. Once Internet connection is established, this device will drop the connection if maximum idle time is reached.
■ Manually: The device won't try to connect to Internet until users press "connect" button at Status page. Once Internet connection is established, this device will drop the connection if maximum idle time is reached.
- NAT disable: You can disable NAT feature if required.
E. PPP over Ethernet
![Internet Setup [ HELP ] ► Combo WAN Status Disable Settings... ► WAN Interface Ethernet WAN ► WAN Type PPP over Ethernet ► PPPoE Account ► PPPoE Password ► Primary DNS ► Secondary DNS ► Connection Control Connect-on-Demand ► Maximum Idle Time 600 seconds ► PPPoE Service Name (optional) ► Assigned IP…](/content/2026/05/988421/images/b74ba8f305f53003c5f80fee4114dcd9914d8cf496006a0af16f0651b7c98287.jpg)
- WAN Type: Choose PPP over Ethernet.
- PPPoE Account and Password: The account and password your ISP assigned to you.
- Primary DNS: You can indicate IP address of primary DNS if required.
- Secondary DNS: You can indicate IP address of secondary DNS if required.
- Connection Control: There are 3 options to start connection:
■ Auto Reconnect (Always-on): The device will always try to link to Internet.
■ Connect-on-demand: The device won't try to connect to Internet until LAN PCs or devices try to go to Internet. Once Internet connection is established, this device will drop the connection if maximum idle time is reached.
■ Manually: The device won't try to connect to Internet until users press "connect" button at Status page. Once Internet connection is established, this device will drop the connection if maximum idle time is reached.
- Maximum Idle Time: the amount of time of inactivity before disconnecting your PPPoE session. Set it to zero or enable "Auto-reconnect" to disable this feature.
- PPPoE Service Name: Optional. Input the service name if your ISP requires it.
- Assigned IP Address: You can input a IP address if you got a fix IP address from ISP.
- Maximum Transmission Unit (MTU): Most ISP offers MTU value to users. The default MTU value is 0 (auto).
- NAT disable: You can disable NAT feature if required.
F. PPTP
![Internet Setup [HELP] ► Combo WAN Status Disable Settings... ► WAN Interface Ethernet WAN ► WAN Type PPTP ► IP Mode Dynamic IP Address ► My IP Address ► My Subnet Mask ► Gateway IP ► Server IP Address/Name ► PPTP Account ► PPTP Password ► Connection ID (optional) ► Maximum Idle Time 600 seconds ► Co…](/content/2026/05/988421/images/80a4a61c9a9681c4e895d97936b473e9ac9ffa8b73b4395176de9b8ffe503a72.jpg)
- WAN Type: Choose PPTP.
- IP Mode: You can select "Static IP Address" or "Dynamic IP Address".
- My IP Address*, My Subnet Mask*, and Gateway IP*: The IP address, subnet mask, and IP address of gateway your ISP assigned to you.
- Server IP Address/Name: The IP address of the PPTP server.
- PPTP Account and Password: The account and password your ISP assigned to you.
- Connection ID: Optional. Input the connection ID if your ISP requires it.
- Connection Control: There are 3 options to start connection:
■ Auto Reconnect (Always-on): The device will always try to link to Internet.
■ Connect-on-demand: The device won't try to connect to Internet until LAN PCs or devices try to go to Internet. Once Internet connection is established, this device will drop the connection if maximum idle time is reached.
■ Manually: The device won't try to connect to Internet until users press "connect" button at Status page. Once Internet connection is established, this device will drop the connection if maximum idle time is reached.
-
Maximum Idle Time: the time of no activity to disconnect your PPTP session. Set it to zero or enable "Auto-reconnect" to disable this feature.
-
Maximum Transmission Unit (MTU): Most ISP offers MTU value to users. The default MTU value is 0 (auto).
Note. The items with * above are only available when choosing Static IP Address in IP mode.
G. L2TP
![Internet Setup [ HELP ] ► Combo WAN Status Disable Settings... ► WAN Interface Ethernet WAN ► WAN Type L2TP ► IP Mode Dynamic IP Address ► IP Address ► Subnet Mask ► WAN Gateway IP ► Server IP Address/Name ► L2TP Account ► L2TP Password ► Maximum Idle Time 600 seconds ► Connection Control Connect-on…](/content/2026/05/988421/images/388dd4a10e56212955a35ca60e8b47ed04ae581c0fea59afbe509e6094ed78ec.jpg)
- WAN Type: Choose L2TP.
- IP Mode: You can select "Static IP Address" or "Dynamic IP Address".
- My IP Address*, My Subnet Mask*, and Gateway IP*: The IP address, subnet mask, and IP address of gateway your ISP assigned to you.
- Server IP Address/Name: The IP address of the L2TP server.
- L2TP Account and Password: The account and password your ISP assigned to you.
- Connection ID: Optional. Input the connection ID if your ISP requires it.
- Connection Control: There are 3 options to start connection:
■ Auto Reconnect (Always-on): The device will always try to link to Internet.
■ Connect-on-demand: The device won't try to connect to Internet until LAN PCs or devices try to go to Internet. Once Internet connection is established, this device will drop the connection if maximum idle time is reached.
■ Manually: The device won't try to connect to Internet until users press "connect" button at Status page. Once Internet connection is established, this device will drop the connection if maximum idle time is reached.
-
Maximum Idle Time: the time of no activity to disconnect your L2TP session. Set it to zero or enable "Auto-reconnect" to disable this feature.
-
Maximum Transmission Unit (MTU): Most ISP offers MTU value to users. The default MTU value is 0 (auto).
Note. The items with * above are only available when choosing Static IP Address in IP mode.
H. Combo WAN Setting
With Combo WAN feature, you can choose one primary WAN connection, and set another WAN connection for backup. The combo WAN status will be showed at Internet Setup page. Press "Settings" button to configure this feature.
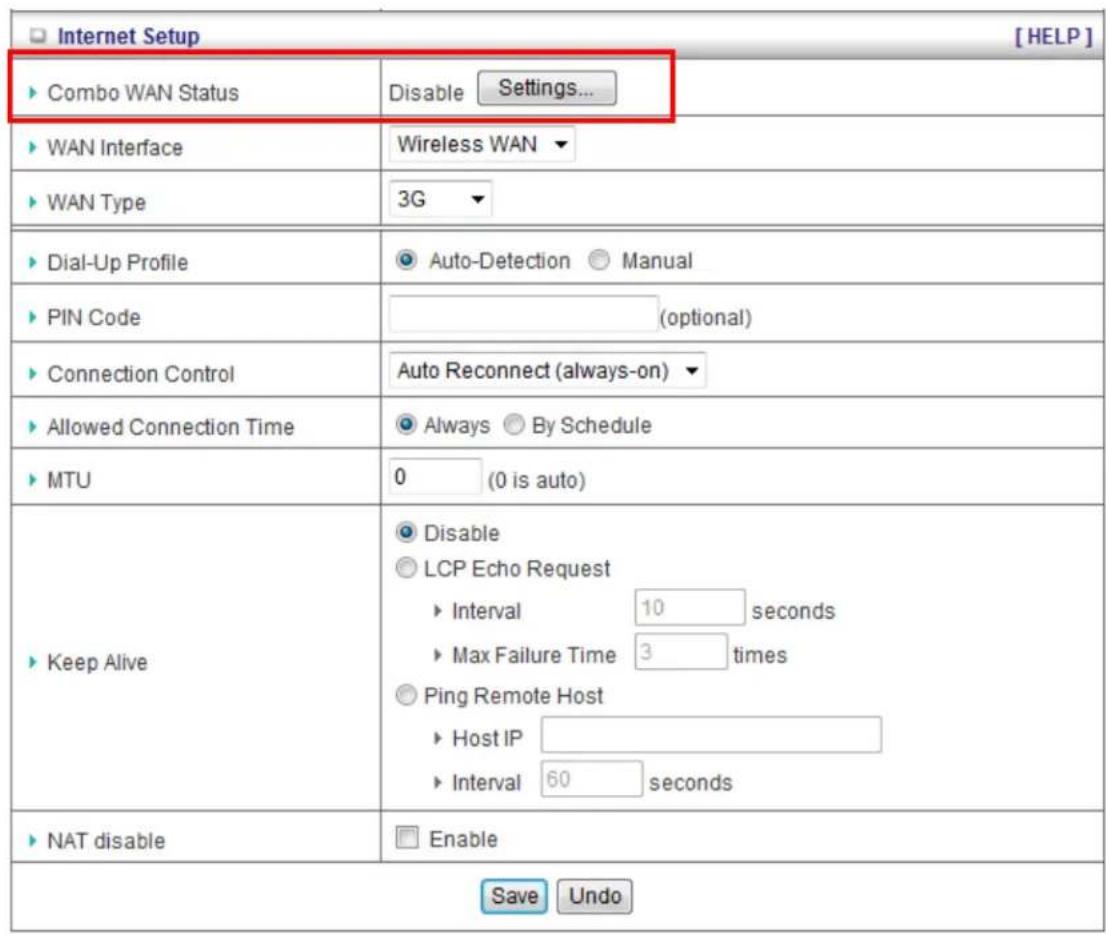
At Combo WAN setting page, you can choose Disable, or Failover options.
This Combo WAN feature will be deactivated if you select "Disable" from the list.

Failover
With this function enabled, when the primary WAN connection is broken, the device will automatically switch to secondary WAN connection and keep you connected to Internet. Meanwhile, if the device detects that the primary WAN connection is recovered, your Internet connection will be switched from secondary WAN back to primary WAN.

- Combo WAN Mode: Choose Failover mode.
- Remote Host for Keep Alive: Type an IP address or domain name of remote host to detect if Internet connection is alive.
-
Primary WAN: The primary WAN is the WAN type you set at Internet Setup page.
-
Secondary WAN: Press "New Add" button to add the secondary WAN. If the primary WAN is 3G or iBurst, then you can choose one of Static IP, Dynamic IP, and PPPoE as the secondary WAN. However, 3G can be the secondary WAN if primary WAN is Static IP, Dynamic IP, or PPPoE.
3.1.2. DHCP Server
![DHCP Server [ HELP ] Item Setting ► DHCP Server ○ Disable ○ Enable ► IP Pool Starting Address 50 ► IP Pool Ending Address 200 ► Lease Time 86400 Seconds ► Domain Name Save Undo More... Clients List... Fixed Mapping...](/content/2026/05/988421/images/bcde5ee4f4c41ce76debf303afe766685fd2ad734dca02e63daef135577eed56.jpg)
- DHCP Server: Choose either Disable or Enable. If you enable the DHCP Server function, the following settings will be effective.
- IP Pool Starting/Ending Address: Whenever there is a request, the DHCP server will automatically allocate an unused IP address from the IP address pool to the requesting computer. You must specify the starting / ending address of the IP address pool.
- Lease Time: DHCP lease time to the DHCP client.
- Domain Name: Optional, this information will be passed to the clients. Press "More>>" and you can find more settings
- Primary DNS/Secondary DNS: Optional. This feature allows you to assign a DNS Servers
- Primary WINS/Secondary WINS: Optional. This feature allows you to assign a WINS Servers
- Gateway: Optional. Gateway Address would be the IP address of an alternate Gateway. This function enables you to assign another gateway to your PC, when DHCP server offers an IP to your PC.
Click on "Save" to store your settings or click "Undo" to give up the changes.
Press "Clients List" and the list of DHCP clients will be shown consequently.

Press "Fixed Mapping" and the DHCP Server will reserve the special IP for designated MAC address.

3.1.3. Wireless Settings
![Wireless Setting [ HELP ] Item Setting ► Wireless Module ● Enable ○ Disable ► Wireless Schedule (0) Always ▼ ► Network ID(SSID) LevelOne ► SSID Broadcast ● Enable ○ Disable ► WMM ● Enable ○ Disable ► Channel Auto ▼ ► Wireless Mode B/G/N mixed ▼ ► Authentication Auto ▼ ► Encryption None ▼ Save Undo W…](/content/2026/05/988421/images/a628f7c949b040a2f774de282b2b32b49ea335791dfdf4a805449411e2f048ad.jpg)
Wireless settings allow you to set the wireless configuration items.
- Wireless Module: You can enable or disable wireless function.
- Network ID (SSID): Network ID is used for identifying the Wireless LAN (WLAN). Client stations can roam freely over this device and other Access Points that have the same Network ID. (The factory default setting is "default")
- SSID Broadcast: The router will broadcast beacons that have some information, including SSID so that wireless clients can know how many AP devices by scanning the network. Therefore, if this setting is configured as "Disable", the wireless clients can not find the device from beacons.
- Channel: The radio channel number. The permissible channels depend on the Regulatory Domain. The factory default setting is as follow: channel 1\~11 for North America. (Channel 1\~13 for European (ETSI); channel1\~14 for Japan).
- Wireless Mode: Choose "B/G mixed", "B only", "G only", "N only", "G/N mixed" or "B/G/N mixed". The factory default setting is "B/G/N mixed".
- Authentication mode: You may select one of authentication to secure your wireless network: Open Shared, Auto, WPA-PSK, WPA, WPA2-PSK, WPA2, WPA-PSK/WPA2-PSK, or WPA/WPA2.
Open
Open system authentication simply consists of two communications. The first is an authentication request by the client that contains the station ID (typically the MAC address). This is followed by an authentication response from the AP/router containing a success or failure message. An example of when a failure may occur is if the client's MAC address is explicitly excluded in the AP/router configuration.
Shared
Shared key authentication relies on the fact that both stations taking part in the authentication process have the same "shared" key or passphrase. The shared key is manually set on both the client station and the AP/router. Three types of shared key authentication are available today for home or small office WLAN environments.
Auto
The AP will Select the Open or Shared by the client's request automatically.
WPA-PSK
Select Encryption and Pre-share Key Mode
If you select HEX, you have to fill in 64 hexadecimal (0, 1, 2...8, 9, A, B...F) digits.
If you select ASCII, the length of pre-share key is from 8 to 63.
Fill in the key, Ex 12345678
WPA
Check Box was used to switch the function of the WPA. When the WPA function is enabled, the Wireless user must authenticate to this router first to use the Network service. RADIUS Server IP address or the 802.1X server's domain-name.
Select Encryption and RADIUS Shared Key
If you select HEX, you have to fill in 64 hexadecimal (0, 1, 2...8, 9, A, B...F) digits
If you select ASCII, the length of pre-share key is from 8 to 63.
Key value shared by the RADIUS server and this router. This key value is consistent with the key value in the RADIUS server.
WPA-PSK2
WPA-PSK2 user AES and TKIP for Same the encryption, the others are same the WPA-PSK.
WPA2
WPA2 add uses AES and TKIP for encryption, the others are same the WPA.
WPA-PSK/WPA-PSK2
Another encryption options for WPA-PSK-TKIP and WPA-PSK2-AES, the others are same the WPA-PSK.
WPA/WPA2
Another encryption options for WPA-TKIP and WPA2-AES, the others are same the WPA.
By pressing "WPS Setup", you can configure and enable the easy setup feature WPS (Wi-Fi Protection Setup) for your wireless network.

- WPS: You can enable this function by selecting "Enable". WPS offers a safe and easy way to allow the wireless clients connected to your wireless network.
- AP PIN: You can press Generate New Pin to get an AP PIN.
- Config Mode: Select your config Mode from "Registrar" or "Enrollee".
- Config Status: It shows the status of your configuration.
- Config Method: You can select the Config Method here from "Pin Code" or "Push Button".
- WPS status: According to your setting, the status will show "Start Process" or "No used"
Press "Wireless Clients List" and the list of wireless clients will be shown consequently.

3.1.4. Change Password
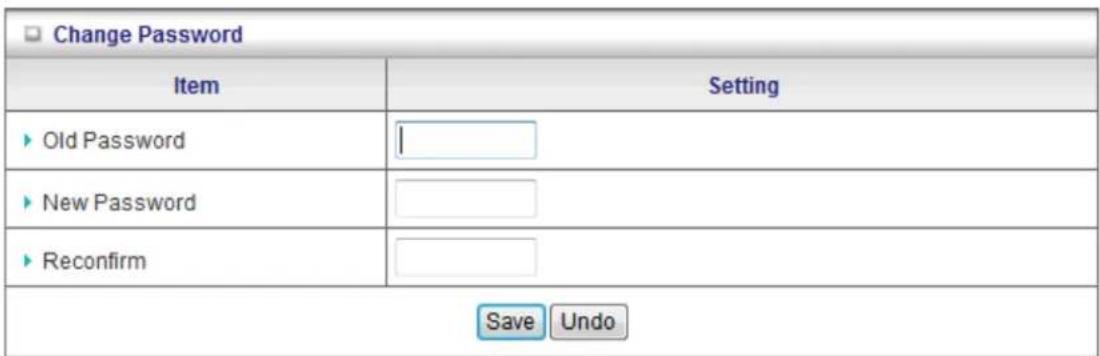
You can change the System Password here. We strongly recommend you to change the system password for security reason.
Click on "Save" to store your settings or click "Undo" to give up the changes.
3.2 Forwarding Rules

3.2.1 Virtual Server
This product's NAT firewall filters out unrecognized packets to protect your Intranet, so all hosts behind this product are invisible to the outside world. If you wish, you can make some of them accessible by enabling the Virtual Server Mapping.
A virtual server is defined as a Service Port, and all requests to this port will be redirected to the computer specified by the Server IP. Virtual Server can work with Scheduling Rules, and give user more flexibility on Access control. For the details, please refer to Scheduling Rule.
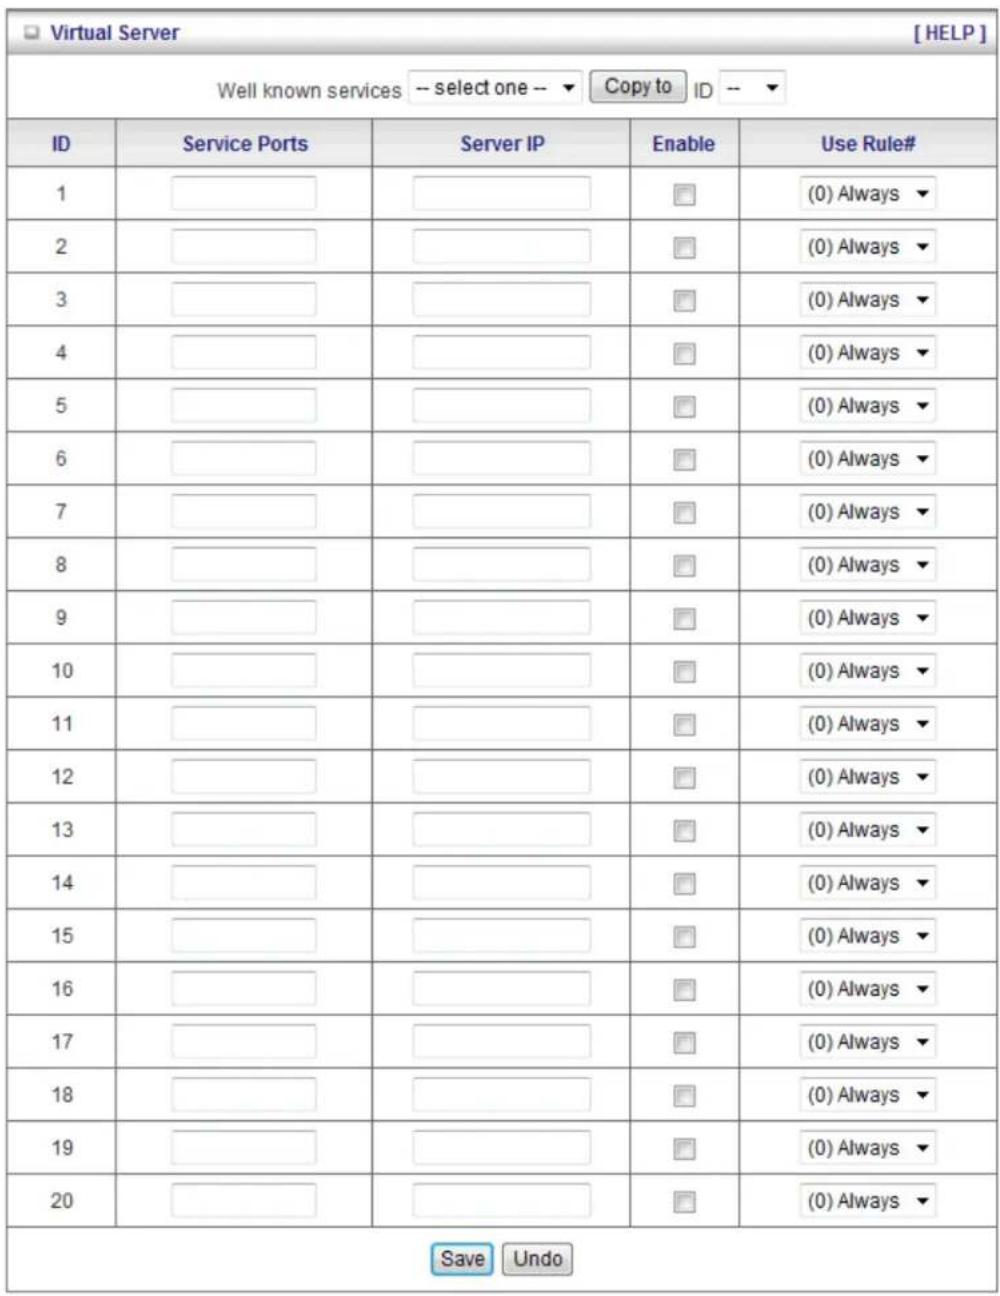
For example, if you have an FTP server (port 21) at 192.168.1.2, a Web server (port 80) at 192.168.1.4, and a VPN server at 192.168.1.6, then you need to specify the following virtual server mapping table:
| Service Port | Server IP | Enable |
| 21 | 192.168.1.2 | V |
| 80 19 | 2.168.1.4 V | |
| 1723 | 192.168.1.6 | V |
Click on “Save” to store your settings or click “Undo” to give up the changes.
3.2.2 Special AP
Some applications require multiple connections, like Internet games, Video conferencing, Internet telephony, etc. Because of the firewall function, these applications cannot work with a pure NAT router. The Special Applications feature allows some of these applications to work with this product. If the mechanism of Special Applications fails to make an application work, try setting your computer as the DMZ host instead.

- Trigger: The outbound port number issued by the application.
- Incoming Ports: When the trigger packet is detected, the inbound packets sent to the specified port numbers are allowed to pass through the firewall.
This device provides some predefined settings. Select your application and click "Copy to" to add the predefined setting to your list.
Click on "Save" to store your settings or click "Undo" to give up the changes.
3.2.3 Miscellaneous
![Miscellaneous Items [HELP] Item Setting Enable ► IP Address of DMZ Host ► UPnP setting Save Undo](/content/2026/05/988421/images/5adc0104b891b82523190775e7f4483df6feada250556311283af579087b4507.jpg)
1. IP Address of DMZ Host
DMZ (Demilitarized Zone) Host is a host without the protection of firewall. It allows a computer to be exposed to unrestricted 2-way communication for Internet games, Video conferencing, Internet telephony and other special applications.
2. UPnP Setting
The device supports the UPnP function. If the OS of your client computer supports this function, and you enabled it, like Windows XP, you can see the following icon when the client computer gets IP from the device.

Click on "Save" to store your settings or click "Undo" to give up the changes.
3.3 Security Setting

3.3.1 Packet Filters
Packet Filter includes both outbound filter and inbound filter. And they have same way to setting.
Packet Filter enables you to control what packets are allowed to pass the router. Outbound filter applies on all outbound packets. However, inbound filter applies on packets that destined to Virtual Servers or DMZ host only. You can select one of the two filtering policies:
- Allow all to pass except those match the specified rules
- Deny all to pass except those match the specified rules
| Outbound Packet Filter [HELP] | ||||
| Item | Setting | |||
| Outbound Filter | Enable | |||
| Allow all to pass except those match the following rules.Deny all to pass except those match the following rules. | ||||
| ID | Source IP | Destination IP:Ports | Enable | Use rule# |
| 1 | (0) Always ▼ | |||
| 2 | (0) Always ▼ | |||
| 3 | (0) Always ▼ | |||
| 4 | (0) Always ▼ | |||
| 5 | (0) Always ▼ | |||
| 6 | (0) Always ▼ | |||
| 7 | (0) Always ▼ | |||
| 8 | (0) Always ▼ | |||
| Save Undo Inbound Filter... MAC Level... | ||||
You can specify 8 rules for each direction: inbound or outbound. For each rule, you can define the following:
- Source IP address
- Source port
- Destination IP address
- Destination port
- Protocol: TCP or UDP or both.
- Use Rule#
For source or destination IP address, you can define a single IP address (4.3.2.1) or a range of IP addresses (4.3.2.1-4.3.2.254). An empty implies all IP addresses.
For source or destination port, you can define a single port (80) or a range of ports (1000-1999). Add prefix "T" or "U" to specify TCP or UDP protocol. For example, T80, U53, U2000-2999, No prefix indicates both TCP and UDP are defined. An empty implies all port addresses. Packet Filter can work with Scheduling Rules, and give user more flexibility on Access control. For Detail, please refer to Scheduling Rule.
Each rule can be enabled or disabled individually.
Click on "Save" to store your settings or click "Undo" to give up the changes.
3.3.2 Domain Filters
| □ Domain Filter | ||||||||||||
| Item | Setting | |||||||||||
| ▸ Domain Filter | □ Enable | |||||||||||
| ▸ Log DNS Query | □ Enable | |||||||||||
| ▸ Privilege IP Addresses Range | From To | |||||||||||
| ID | Domain Suffix | Action | Enable | |||||||||
| 1 | □ Drop □ Log | □ | ||||||||||
| 2 | □ Drop □ Log | □ | ||||||||||
| 3 | □ Drop □ Log | □ | ||||||||||
| 4 | □ Drop □ Log | □ | ||||||||||
| 5 | □ Drop □ Log | □ | ||||||||||
| 6 | □ Drop □ Log | □ | ||||||||||
| 7 | □ Drop □ Log | □ | ||||||||||
| 8 | □ Drop □ Log | □ | ||||||||||
| 9 | □ Drop □ Log | □ | ||||||||||
| 10 | *(all others) | □ Drop □ Log | - | |||||||||
| 4 Save Undo | ||||||||||||
Domain Filter prevents users under this device from accessing specific URLs.
- Domain Filter: Check if you want to enable Domain Filter.
- Log DNS Query: Check if you want to log the action when someone accesses the specific URLs.
- Privilege IP Address Range: Setting a group of hosts and privilege these hosts to access network without restriction.
- Domain Suffix: A suffix of URL can be restricted, for example, ".com", "xxx.com".
- Action: When someone is accessing the URL met the domain-suffix, what kind of action you want.
Check "Drop" to block the access. Check "Log" to log this access. - Enable: Check to enable each rule.
Click on "Save" to store your settings or click "Undo" to give up the changes.
3.3.3 URL Blocking
URL Blocking will block LAN computers to connect with pre-define Websites. The major difference between "Domain filter" and "URL Blocking" is Domain filter require user to input suffix (like .com or .org, etc), while URL Blocking require user to input a keyword only. In other words, Domain filter can block specific website, while URL Blocking can block hundreds of websites by simply a keyword.
| URL Blocking [HELP] | |||
| Item | Setting | ||
| URL Blocking | Enable | ||
| ID | URL | Enable | Use Rule# |
| 1 | (0) Always ▼ | ||
| 2 | (0) Always ▼ | ||
| 3 | (0) Always ▼ | ||
| 4 | (0) Always ▼ | ||
| 5 | (0) Always ▼ | ||
| 6 | (0) Always ▼ | ||
| 7 | (0) Always ▼ | ||
| 8 | (0) Always ▼ | ||
| 9 | (0) Always ▼ | ||
| 10 | (0) Always ▼ | ||
| Save Undo | |||
- URL Blocking: Check if you want to enable URL Blocking.
- URL: If any part of the Website's URL matches the pre-defined word, the connection will be blocked.
For example, you can use pre-defined word "sex" to block all websites if their URLs contain pre-defined word "sex".
- Enable: Check to enable each rule.
Click on "Save" to store your settings or click "Undo" to give up the changes.
3.3.4 MAC Control
MAC Address Control allows you to assign different access right for different users and to assign a specific IP address to a certain MAC address.
| □ MAC Address Control [HELP] | ||||
| Item | Setting | |||
| ▶ MAC Address Control | Enable | |||
| □ Connection control | Wireless and wired clients with C checked can connect to this device; and allow ▼ unspecified MAC addresses to connect. | |||
| □ Association control | Wireless clients with A checked can associate to the wireless LAN; and allow ▼ unspecified MAC addresses to associate. | |||
| DHCP clients -- select one -- ▼ Copy to ID -- ▼ | ||||
| ID | MAC Address | C | A | Use Rule# |
| 1 | □ | □ | (0) Always ▼ | |
| 2 | □ | □ | (0) Always ▼ | |
| 3 | □ | □ | (0) Always ▼ | |
| 4 | □ | □ | (0) Always ▼ | |
| 5 | □ | □ | (0) Always ▼ | |
- MAC Address Control: Check "Enable" to enable the "MAC Address Control". All of the settings in this page will take effect only when "Enable" is checked.
- Connection control: Check "Connection control" to enable the controlling of which wired and wireless clients can connect with this device. If a client is denied to connect with this device, it means the client can't access to the Internet either. Choose "allow" or "deny" to allow or deny the clients, whose MAC addresses are not in the "Control table" (please see below), to connect with this device.
- Association control: Check "Association control" to enable the controlling of which wireless client can associate to the wireless LAN. If a client is denied to associate to the wireless LAN, it means the client can't send or receive any data via this device. Choose "allow" or "deny" to allow or deny the clients, whose MAC addresses are not in the "Control table", to associate to the wireless LAN.
Click on "Save" to store your settings or click "Undo" to give up the changes.
3.3.5 Miscellaneous
| Miscellaneous Items [HELP] | ||
| Item | Setting | Enable |
| Administrator Time-out | 300 seconds (0 to disable) | |
| Remote Administrator Host: Port | 0.0.0.0 / 0 :8080 | |
| Discard PING from WAN side | ||
| DoS Attack Detection | ||
| Disable PPTP Passthrough | ||
| Disable L2TP Passthrough | ||
| Disable IPSec Passthrough | ||
| Save Undo | ||
- Administrator Time-out: The time of no activity to logout automatically, you may set it to zero to disable this feature.
2. Remote Administrator Host/Port
In general, only Intranet user can browse the built-in web pages to perform administration task. This feature enables you to perform administration task from remote host. If this feature is enabled, only the specified IP address can perform remote administration. If the specified IP address is 0.0.0.0, any host can connect with this product to perform administration task. You can use subnet mask bits "/nn" notation to specified a group of trusted IP addresses for example, "10.1.2.0/24".
NOTE: When Remote Administration is enabled, the web server port will be shifted to 80. You can change web server port to other port, too.
- Discard PING from WAN side: When this feature is enabled, any host on the WAN cannot ping this product.
- DoS Attack Detection: When this feature is enabled, the router will detect and log the DoS attack comes from the Internet. Currently, the router can detect the following DoS attack: SYN Attack, WinNuke, Port Scan, Ping of Death, Land Attack etc.
Click on "Save" to store your settings or click "Undo" to give up the changes.
3.4 Advanced Setting

3.4.1 System Log
![System Log [HELP] Item Setting Enable ► IP address for syslogd ► Setting of Email alert • SMTP Server : port • SMTP Username • SMTP Password • E-mail addresses • E-mail subject Save Undo View Log... Email Log Now](/content/2026/05/988421/images/7bb0d16fdcbbdaaee8c0ca4fc724fba097277bc0e9321f90d7d66955ed87b212.jpg)
This page supports two methods to export system logs to specific destination by means of syslog (UDP) and SMTP(TCP). The items you have to setup including:
- IP Address for Sys log: Host IP of destination where sys log will be sent to. Check Enable to enable this function.
- E-mail Alert Enable: Check if you want to enable Email alert (send syslog via email).
- SMTP Server IP and Port: Input the SMTP server IP and port, which are connected with ‘’. If you do not specify port number, the default value is 25.
For example, "mail.your_url.com" or "192.168.1.100:26". - Send E-mail alert to: The recipients who will receive these logs, you can assign more than 1 recipient, using ';' or ',' to separate these email addresses.
- E-mail Subject: The subject of email alert, this setting is optional.
Click on "Save" to store your settings or click "Undo" to give up the changes.
3.4.2 Dynamic DNS
To host your server on a changing IP address, you have to use dynamic domain name service (DDNS). So that anyone wishing to reach your host only needs to know the name of it.
Dynamic DNS will map the name of your host to your current IP address, which changes each time you connect your Internet service provider.
Before you enable Dynamic DNS, you need to register an account on one of these Dynamic DNS servers that we list in Provider field.
| ☐ Dynamic DNS [HELP] | |
| Item | Setting |
| ▶ DDNS | ○ Disable ○ Enable |
| ▶ Provider | DynDNS.org(Dynamic) ▼ |
| ▶ Host Name | |
| ▶ Username / E-mail | |
| ▶ Password / Key | |
| Save Undo | |
To enable Dynamic DNS click the check box next to Enable in the DDNS field. Next you have to enter the appropriate information about your Dynamic DNS Serve .Provider, Host Name, Username/E-mail, and Password/Key. You can get this information when you register an account on a Dynamic DNS server.
Click on "Save" to store your settings or click "Undo" to give up the changes.
3.4.3 QOS
| QoS Rule | |||||
| Item | Setting | ||||
| QoS Control | Enable | ||||
| Bandwidth of Upstream | kbps (Kilobits per second) | ||||
| ID | Local IP:Ports | Remote IP:Ports | QoS Priority | Enable | Use rule# |
| 1 | : | : | High ▼ | □ | (0) Always ▼ |
| 2 | : | : | High ▼ | □ | (0) Always ▼ |
| 3 | : | : | High ▼ | □ | (0) Always ▼ |
| 4 | : | : | High ▼ | □ | (0) Always ▼ |
| 5 | : | : | High ▼ | □ | (0) Always ▼ |
| 6 | : | : | High ▼ | □ | (0) Always ▼ |
| 7 | : | : | High ▼ | □ | (0) Always ▼ |
| 8 | : | : | High ▼ | □ | (0) Always ▼ |
Provide different priority to different users or data flows, or guarantee a certain level of performance.
- QOS Control: Check Enable to enable this function.
- Bandwidth of Upstream: Set the limitation of upstream bandwidth
- Local IP : Ports: Define the Local IP address and ports of packets
- Remote IP: Ports: Define the Remote IP address and ports of packets
- QoS Priority: This defines the priority level of the current Policy Configuration. Packets associated with this policy will be serviced based upon the priority level set. For critical applications High or Normal level is recommended. For non-critical applications select a Low level.
- Enable: Check to enable the corresponding QOS rule.
- User Rule#: The QoS rule can work with Scheduling Rule number#. Please refer to the Section 3.1.4.7 Schedule Rule.
Click on "Save" to store your settings or click "Undo" to give up the changes.
3.4.4 SNMP
In brief, SNMP, the Simple Network Management Protocol, is a protocol designed to give a user the capability to remotely manage a computer network by polling and setting terminal values and monitoring network events.
| SNMP Setting [HELP] | |
| Item | Setting |
| Enable SNMP | □ Local □ Remote |
| Get Community | |
| Set Community | |
| IP 1 | |
| IP 2 | |
| IP 3 | |
| IP 4 | |
| SNMP Version | ○ V1 ○ V2c |
| WAN Access IP Address | |
| Save Undo | |
- Enable SNMP: You must check "Local", "Remote" or both to enable SNMP function. If "Local" is checked, this device will response request from LAN. If "Remote" is checked, this device will response request from WAN.
- Get Community: The community of GetRequest that this device will respond.
- Set Community: The community of SetRequest that this device will accept.
- IP 1, IP 2, IP 3, IP 4: Enter the IP addresses of your SNMP Management PCs. User has to configure to where this device should send SNMP Trap message.
- SNMP Version: Select proper SNMP Version that your SNMP Management software supports.
- WAN Access IP Address: If you want to limit the remote SNMP access to specific computer, please enter the PC's IP address. The default value is 0.0.0.0, and it means that any internet connected computer can get some information of the device with SNMP protocol.
Click on "Save" to store your settings or click "Undo" to give up the changes.
3.4.5 Routing
If you have more than one routers and subnets, you will need to enable routing table to allow packets to find proper routing path and allow different subnets to communicate with each other. The routing table allows you to determine which physical interface address to use for outgoing IP data grams.
| Routing Table [HELP] | |||||
| Item | Setting | ||||
| Dynamic Routing | DisableRIPv1RIPv2 | ||||
| Static Routing | DisableEnable | ||||
| ID | Destination | Subnet Mask | Gateway | Hop | Enable |
| 1 | |||||
| 2 | |||||
| 3 | |||||
| 4 | |||||
| 5 | |||||
| 6 | |||||
| 7 | |||||
| 8 | |||||
| Save Undo | |||||
- Dynamic Routing: Routing Information Protocol (RIP) will exchange information about destinations for computing routes throughout the network. Please select RIPv2 only if you have different subnet in your network. Otherwise, please select RIPv1 if you need this protocol.
- Static Routing: For static routing, you can specify up to 8 routing rules. You can enter the destination IP address, subnet mask, gateway, and hop for each routing rule, and then enable or disable the rule by checking or un-checking the Enable checkbox.
Click on "Save" to store your settings or click "Undo" to give up the changes.
3.4.6 System Time
![System Time [ HELP ] Item Setting ► Time Zone * Not yet configured! The default is GMT+00:00 ► Auto- Synchronization ✓ Enable Time Server (RFC-868): Auto ► Daylight saving time □ Save Undo Sync Result Sync with Time Server Sync with my PC (Wednesday December 07, 2011 18:16:10)](/content/2026/05/988421/images/0c84a3354bbc353f84b8f1fc16dd25be2e78979b647efcbd3789a0c2c5ea96de.jpg)
- Time Zone: Select a time zone where this device locates.
- Auto-Synchronization: Check the "Enable" checkbox to enable this function. Besides, you can select a NTP time server to consult UTC time.
- Sync with Time Server: Click on the button if you want to set Date and Time by NTP Protocol manually.
- Sync with my PC: Click on the button if you want to set Date and Time using PC's Date and Time manually.
Click on "Save" to store your settings or click "Undo" to give up the changes.
3.4.7 Scheduling
You can set the schedule time to decide which service will be turned on or off.
| Schedule Rule [HELP] | |||
| Item | Setting | ||
| Schedule | Enable | ||
| Rule# | Rule Name | Action | |
| 1 | New Add | ||
| 2 | New Add | ||
| 3 | New Add | ||
| 4 | New Add | ||
| 5 | New Add | ||
| 6 | New Add | ||
| 7 | New Add | ||
| 8 | New Add | ||
| 9 | New Add | ||
| 10 | New Add | ||
| <<Previous Next>> Save Add New Rule... | |||
- Schedule: Check to enable the schedule rule settings.
- Add New Rule: To create a schedule rule, click the "Add New Rule" button. You can edit the Name of Rule, Policy, and set the schedule time (Week day, Start Time, and End Time). The following example configures "ftp time" as everyday 14:10 to 16:20.
| Schedule Rule Setting [HELP] | |||
| Item | Setting | ||
| Name of Rule 11 | ftp time | ||
| Policy | Inactivate ▼ except the selected days and hours below. | ||
| ID | Week Day | Start Time (hh:mm) | End Time (hh:mm) |
| 1 | Every Day ▼ | 14:10 | 16:20 |
| 2 | -- choose one -- ▼ | ||
| 3 | -- choose one -- ▼ | ||
| 4 | -- choose one -- ▼ | ||
| 5 | -- choose one -- ▼ | ||
| 6 | -- choose one -- ▼ | ||
| 7 | -- choose one -- ▼ | ||
| 8 | -- choose one -- ▼ | ||
| Save Undo Back | |||
Click on "Save" to store your settings or click "Undo" to give up the changes.
3.5 Tool Box

3.5.1 System Info
You can view the System Information and System log, and download/clear the System log, in this page.
| System Information | |
| Item | Setting |
| WAN Type | 3G |
| Display time | Wed, 07 Dec 2011 10:11:27 +0000 |
| System Log | |
| Time | Log |
| Dec 7 05:18:31 | kernel: klogd started: BusyBox v1.3.2 (2011-07-08 18:34:05 CST) |
| Dec 7 05:18:41 | commander: Init NAT Server ... |
| Dec 7 05:18:43 | nat: Using the packet filter which support IP range (DDC) |
| Dec 7 05:18:45 | syslog: Unable to open /var/run/udhcpd.leases for reading |
| Dec 7 05:18:46 | commander: Init UPNP Daemon !! |
| Dec 7 05:18:48 | commander: STOP WANTYPE 3G |
| Dec 7 05:18:50 | commander: Start/Restart httpd ! |
| Dec 7 10:04:13 | O3G/modem_switch: MODEM_SWITCH [0x12d1] [0x1446] |
| Dec 7 10:04:14 | mmand successfully sent. Box probably switched. |
| Dec 7 10:04:25 | O3G/hotplug: 3G modem VendorID=12d1 ProductID=1001 |
| Dec 7 10:04:30 | O3G/hotplug: link device node (/dev/ttyXXXooo) to /dev/modem |
| Dec 7 10:04:49 | commander: START WANTYPE 3G |
| Dec 7 10:04:50 | commander: START WANTYPE 3G AUTOAPN |
| Dec 7 10:05:01 | O3G/3g-status: 3G is connected and running on interface ppp0 |
| Dec 7 10:05:02 | O3G/3g-status: IP address :42.70.19.228 |
| Page: 1/2 (Log Number:23) | |
3.5.2 Firmware Upgrade

You can upgrade firmware by clicking "Upgrade" button.
3.5.3 Backup Setting

You can backup your settings by clicking the "Backup Setting" function item and save it as a bin file. Once you want to restore these settings, please click Firmware Upgrade button and
use the bin file you saved.
3.5.4 Reset to Default

You can also reset this device to factory default settings by clicking the Reset to default function item.
3.5.5 Reboot
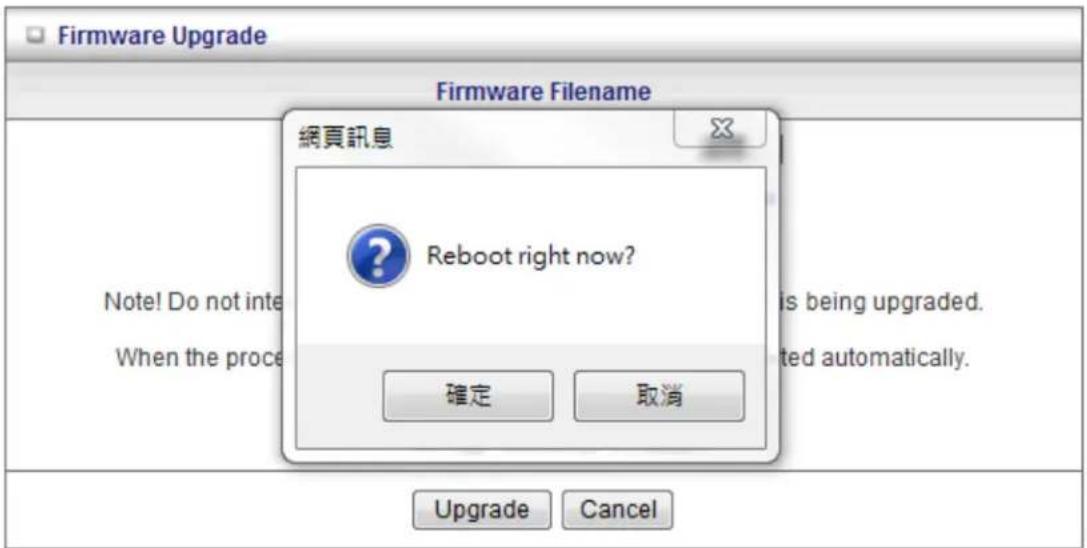
You can also reboot this device by clicking the Reboot function item.
3.5.6 Miscellaneous
![Miscellaneous Items [ HELP ] Item Setting ► MAC Address for Wake-on-LAN Wake up ► Domain Name or IP address for Ping Test Ping Save Undo](/content/2026/05/988421/images/51701b5f4e2b2ba0284f2534d8dcc10aa3aeaa36f238f50791e75e878ed718d1.jpg)
- MAC Address for Wake-on-LAN: Enter the MAC address of a local PC, and press "Wake Up" button to turn it on. Please note the local PC needs to support Wake-on-LAN to make this feature work.
- Domain Name or IP address for Ping Test: Allow you to configure an IP, and ping the device. You can ping a specific IP to test whether it is alive.
Click on "Save" to store your settings or click "Undo" to give up the changes.
Chapter 4. Troubleshooting
This Chapter provides solutions to problems for the installation and operation of the WiFi Combo Router. You can refer to the following if you are having problems.
1 Why can't I configure the router even the cable is plugged and the LED is lit?
Do a Ping test to make sure that the WiFi Combo Router is responding.
Note: It is recommended that you use an Ethernet connection to configure it.
Go to Start > Run.
- Type cmd.

- Press OK.
- Type ipconfig to get the IP of default gateway.
- Type "ping 192.168.1.1". Assure that you ping the correct IP Address assigned to the WiFi Combo Router. It will show four replies if you ping correctly.

Ensure that your Ethernet Adapter is working, and that all network drivers are installed properly. Network adapter names will vary depending on your specific adapter. The installation steps listed below are applicable for all network adapters.
- Go to Start > Right click on "My Computer" > Properties.
- Select the Hardware Tab.
- Click Device Manager.
-
Double-click on "Network Adapters".
-
Right-click on Wireless Card bus Adapter or your specific network adapter.
- Select Properties to ensure that all drivers are installed properly.
- Look under Device Status to see if the device is working properly.
- Click "OK".
9.
2 What can I do if my Ethernet connection does not work properly?
A. Make sure the RJ45 cable connect with the router.
B. Ensure that the setting on your Network Interface Card adapter is "Enabled".
C. If settings are correct, ensure that you are not using a crossover Ethernet cable, not all Network Interface Cards are MDI/MDIX compatible, and use a patch cable is recommended.
D. If the connection still doesn't work properly, then you can reset it to default.
3 Problems with 3G connection?
A. What can I do if the 3G connection is failed by Auto detection?
Maybe the device can't recognize your ISP automatically. Please select "Manual" mode, and filling in dial-up settings manually.
B. What can I do if my country and ISP are not in the list?
Please choose "Others" item from the list, and filling in dial-up settings manually.
C. What can I do if my 3G connection is failed even the dongle is plugged?
Please check the following items:
I. Make sure you have inserted a validated SIM card in the 3G data card, and the subscription from ISP is still available
II. If you activate PIN code check feature in SIM card, making sure the PIN code you fill in dial-up page is correct
III. Checking with your ISP to see all dial-up settings are correct
IV. Make sure 3G signal from your ISP is available in your environment
D. What can I do if my router can't recognize my 3G data card even it is plugged?
There might be compatibility issue with some certain 3G cards. Please check the latest compatibility list to see if your 3G card is already supported.
E. What should I insert in APN, PIN Code, Account, Password, Primary DNS, and Secondary DNS?
The device will show this information after you choose country and Telcom. You can also check these values with your ISP.
F. Which 3G network should I select?
It depends on what service your ISP provide. Please check your ISP to know this
information.
G. Why my 3G connection is keep dropping?
Please check 3G signal strength from your ISP in your environment is above middle level.
4 Something wrong with the wireless connection?
A. Can't setup a wireless connection?
I. Ensure that the SSID and the encryption settings are exactly the same to the Clients.
II. Move the WiFi Combo Router and the wireless client into the same room, and then test the wireless connection.
III. Disable all security settings such as WEP, and MAC Address Control.
IV. Turn off the WiFi Combo Router and the client, then restart it and then turn on the client again.
V. Ensure that the LEDs are indicating normally. If no, make sure that the AC power and Ethernet cables are firmly connected.
VI. Ensure that the IP Address, subnet mask, gateway and DNS settings are correctly entered for the network.
VII. If you are using other wireless device, home security systems or ceiling fans, lights in your home, your wireless connection may degrade dramatically. Keep your product away from electrical devices that generate RF noise such as microwaves, monitors, electric motors...
B. What can I do if my wireless client can not access the Internet?
I. Out of range: Put the router closer to your client.
II. Wrong SSID or Encryption Key: Check the SSID or Encryption setting.
III. Connect with wrong AP: Ensure that the client is connected with the correct Access Point.
i. Right-click on the Local Area Connection icon in the taskbar.
ii. Select View Available Wireless Networks in Wireless Configure. Ensure you have selected the correct available network.
iii. Reset the WiFi Combo Router to default setting
C. Why does my wireless connection keep dropping?
I. Antenna Orientation.
i. Try different antenna orientations for the WiFi Combo Router.
ii. Try to keep the antenna at least 6 inches away from the wall or other objects.
II. Try changing the channel on the WiFi Combo Router, and your Access Point and Wireless adapter to a different channel to avoid interference.
III. Keep your product away from electrical devices that generate RF noise, like
microwaves, monitors, electric motors, etc.
5 What to do if I forgot my encryption key?
- Go back to advanced setting to set up your Encryption key again.
- Reset the WiFi Combo Router to default setting
6 How to reset to default?
- Ensure the WiFi Combo Router is powered on
- Find the Reset button on the right side
- Press the Reset button for 8 seconds and then release.
- After the WiFi Combo Router reboots, it has back to the factory default settings.
Appendix A. Spec Summary Table
| 3G Access | USB port |
| Standards | IEEE 802.11b/gIEEE 802.3IEEE 802.3u |
| Wireless | |
| Standard | IEEE 802.11 B\G\N |
| Data Rate | 11B: 11, 5.5, 2, 1 Mbps11G: 54, 48, 36, 24, 18, 12, 9, and 6 Mbps11N: Max physical rate up to 150Mbps |
| Frequency | 2.4 – 2.462 GHz, CCK / OFDM modulation |
| Range Coverage | Indoors approx. 30-50 meters;Outdoors up to 80-100 meters |
| # of Channels | 1-11 for N. America (FCC);1-11 for Canada (DOC)1-13 Europe (Except Spain and France) (ETSI)1-14 Japan (TELEC); |
| Security | 64-bit and 128-bit WEP Encryption; WPA encryption |
| Antenna | External 1.8dBi Antenna. |
| Firewall | IP FilteringNAT (Network Address Translation) with VPN Pass through MAC Filtering |
| Supported WAN type | 3G,Static IP, Dynamic IP, PPPoE,PPTP,L2TP |
| Connection Scheme | Connect-on-demand, Auto-Disconnect |
| NAT function | Class C ;One-to-Many; Max 253 Users; Virtual Server; DMZ Host |
| VPN | PPTP, L2TP and IPSec Pass Through |
| Config.& Management | Web-Based IE, Navigator browser and SNMP |
| IP assignment | DHCP Server and Client |
| Working Environment | Temperature: 0~40°C, Humidity 10%~90% non-condensing |
| OS supported | Windows 95/98/ME/NT/2000/XP; Linux |
| Power | Full range(100-240V), Switching 5V 1.2A |
Appendix B. Licensing information
This product includes copyrighted third-party software licensed under the terms of the GNU General Public License. Please refer to the GNU General Public License below to check the detailed terms of this license.
The following parts of this product are subject to the GNU GPL, and those software packages are copyright by their respective authors.
Linux-2.4.28 system kernel
busybox_1_00_rc2
bridge-utils 0.9.5
dhcpcd-1.3
ISC DHCP V2 P5
util-linux 2.12b for fdisk application
e2fsprogs 1.27
mini-lpd
samba 2.2.7a
syslogd spread from busybox
wireless tools
ntpclient of NTP client implementation
RT61apd for 802.1X application
vsftpd-2.0.3
quota-tools 3.13
GNU Wget
Availability of source code
Please visit our web site or contact us to obtain more information.
GNU GENERAL PUBLIC LICENSE
Version 2, June 1991
Copyright (C) 1989, 1991 Free Software Foundation, Inc. 59 Temple Place, Suite 330, Boston, MA 02111-1307 USA
Everyone is permitted to copy and distribute verbatim copies of this license document, but changing it is not allowed.
Preamble
The licenses for most software are designed to take away your freedom to share and change it. By contrast, the GNU General Public License is intended to guarantee your freedom to share and change free software--to make sure the software is free for all its users. This General Public License applies to most of the Free Software Foundation's software and to any other program whose authors commit to using it. (Some other Free Software Foundation software is covered by the GNU Library General Public License instead.) You can apply it to your programs, too.
When we speak of free software, we are referring to freedom, not price. Our General Public Licenses are designed to make sure that you have the freedom to distribute copies of free software (and charge for this service if you wish), that you receive source code or can get it if you want it, that you can change the software or use pieces of it in new free programs; and that you know you can do these things.
To protect your rights, we need to make restrictions that forbid anyone to deny you these rights or to ask you to surrender the rights. These restrictions translate to certain responsibilities for you if you distribute copies of the software, or if you modify it.
For example, if you distribute copies of such a program, whether gratis or for a fee, you must give the recipients all the rights that you have. You must make sure that they, too, receive or can get the source code. And you must show them these terms so they know their rights.
We protect your rights with two steps: (1) copyright the software, and (2) offer you this license which gives you legal permission to copy, distribute and/or modify the software.
Also, for each author's protection and ours, we want to make certain that everyone understands that there is no warranty for this free software. If the software is modified by someone else and passed on, we want its recipients to know that what they have is not the original, so that any problems introduced by others will not reflect on the original authors' reputations.
Finally, any free program is threatened constantly by software patents. We wish to avoid the danger that redistributors of a free program will individually obtain patent licenses, in effect making the program proprietary. To prevent this, we have made it clear that any patent must be licensed for everyone's free use or not licensed at all.
The precise terms and conditions for copying, distribution and modification follow.
GNU GENERAL PUBLIC LICENSE
TERMS AND CONDITIONS FOR COPYING, DISTRIBUTION AND MODIFICATION
- This License applies to any program or other work which contains a notice placed by the copyright holder saying it may be distributed under the terms of this General Public License. The "Program", below, refers to any such program or work, and a "work based on the Program" means either the Program or any derivative work under copyright law: that is to say, a work containing the Program or a portion of it, either verbatim or with modifications and/or translated into another language. (Hereinafter, translation is included without limitation in the term "modification".) Each licensee is addressed as "you".
Activities other than copying, distribution and modification are not covered by this License; they are outside its scope. The act of running the Program is not restricted, and the output from the Program is covered only if its contents constitute a work based on the Program (independent of having been made by running the Program). Whether that is true depends on what the Program does.
- You may copy and distribute verbatim copies of the Program's source code as you receive it, in any medium, provided that you conspicuously and appropriately publish on each copy an appropriate copyright notice and disclaimer of warranty; keep intact all the notices that refer to this License and to the absence of any warranty; and give any other recipients of the Program a copy of this License along with the Program.
You may charge a fee for the physical act of transferring a copy, and you may at your option offer warranty protection in exchange for a fee.
- You may modify your copy or copies of the Program or any portion of it, thus forming a work based on the Program, and copy and distribute such modifications or work under the terms of Section 1 above, provided that you also meet all of these conditions:
a) You must cause the modified files to carry prominent notices stating that you changed the files and the date of any change.
b) You must cause any work that you distribute or publish, that in whole or in part contains or is derived from the Program or any part thereof, to be licensed as a whole at no charge to all third parties under the terms of this License.
c) If the modified program normally reads commands interactively when run, you must cause it, when started running for such interactive use in the most ordinary way, to print or display an announcement including an appropriate copyright notice and a notice that there is no warranty (or else, saying that you provide a warranty) and that users may redistribute the program under these conditions, and telling the user how to view a copy of this License. (Exception: if the Program itself is interactive but does not normally print such an announcement, your work based on the Program is not required to print an announcement.)
These requirements apply to the modified work as a whole. If identifiable sections of that work are not derived from the Program, and can be reasonably considered independent and separate works in themselves, then this License, and its terms, do not apply to those sections when you distribute them as separate works. But when you distribute the same sections as part of a whole which is a work based on the Program, the distribution of the whole must be on the terms of this License, whose permissions for other licensees extend to the entire whole, and thus to each and every part regardless of who wrote it.
Thus, it is not the intent of this section to claim rights or contest your rights to work written entirely by you; rather, the intent is to exercise the right to control the distribution of derivative or collective works based on the Program.
In addition, mere aggregation of another work not based on the Program with the Program (or with a work based on the Program) on a volume of a storage or distribution medium does not bring the other work under the scope of this License.
- You may copy and distribute the Program (or a work based on it, under Section 2) in object code or executable form under the terms of Sections 1 and 2 above provided that you also do one of the following:
a) Accompany it with the complete corresponding machine-readable source code, which must be distributed under the terms of Sections 1 and 2 above on a medium customarily used for software interchange; or,
b) Accompany it with a written offer, valid for at least three years, to give any third party, for a charge no more than your cost of physically performing source distribution, a complete machine-readable copy of the corresponding source code, to be distributed under the terms of Sections 1 and 2 above on a medium customarily used for software interchange; or,
c) Accompany it with the information you received as to the offer to distribute corresponding source code. (This alternative is allowed only for noncommercial distribution and only if you received the program in object code or executable form with such an offer, in accord with Subsection b above.)
The source code for a work means the preferred form of the work for making modifications to it. For an executable work, complete source code means all the source code for all modules it contains, plus any associated interface definition files, plus the scripts used to control compilation and installation of the executable. However, as a special exception, the source code distributed need not include anything that is normally distributed (in either source or binary form) with the major components (compiler, kernel, and so on) of the operating system on which the executable runs, unless that component itself accompanies the executable.
If distribution of executable or object code is made by offering access to copy from a designated place, then offering equivalent access to copy the source code from the same place counts as distribution of the source code, even though third parties are not compelled to copy the source along with the object code.
-
You may not copy, modify, sublicense, or distribute the Program except as expressly provided under this License. Any attempt otherwise to copy, modify, sublicense or distribute the Program is void, and will automatically terminate your rights under this License. However, parties who have received copies, or rights, from you under this License will not have their licenses terminated so long as such parties remain in full compliance.
-
You are not required to accept this License, since you have not signed it. However, nothing else grants you permission to modify or distribute the Program or its derivative works. These actions are prohibited by law if you do not accept this License. Therefore, by modifying or distributing the Program (or any work based on the Program), you indicate your acceptance of this License to do so, and all its terms and conditions for copying, distributing or modifying the Program or works based on it.
-
Each time you redistribute the Program (or any work based on the Program), the recipient automatically receives a license from the original licensor to copy, distribute or modify the Program subject to these terms and conditions. You may not impose any further restrictions on the recipients' exercise of the rights granted herein. You are not responsible for enforcing compliance by third parties to this License.
-
If, as a consequence of a court judgment or allegation of patent infringement or for any other reason (not limited to patent issues), conditions are imposed on you (whether by court order, agreement or otherwise) that contradict the conditions of this License, they do not excuse you from the conditions of this License. If you cannot distribute so as to satisfy simultaneously your obligations under this License and any other pertinent obligations, then as a consequence you may not distribute the Program at all. For example, if a patent license would not permit royalty-free redistribution of the Program by all those who receive copies directly or indirectly through you, then the only way you could satisfy both it and this License would be to refrain entirely from distribution of the Program.
If any portion of this section is held invalid or unenforceable under any particular circumstance, the balance of the section is intended to apply and the section as a whole is intended to apply in other circumstances.
It is not the purpose of this section to induce you to infringe any patents or other property right claims or to contest validity of any such claims; this section has the sole purpose of protecting the
integrity of the free software distribution system, which is implemented by public license practices. Many people have made generous contributions to the wide range of software distributed through that system in reliance on consistent application of that system; it is up to the author/donor to decide if he or she is willing to distribute software through any other system and a licensee cannot impose that choice.
This section is intended to make thoroughly clear what is believed to be a consequence of the rest of this License.
-
If the distribution and/or use of the Program is restricted in certain countries either by patents or by copyrighted interfaces, the original copyright holder who places the Program under this License may add an explicit geographical distribution limitation excluding those countries, so that distribution is permitted only in or among countries not thus excluded. In such case, this License incorporates the limitation as if written in the body of this License.
-
The Free Software Foundation may publish revised and/or new versions of the General Public License from time to time. Such new versions will be similar in spirit to the present version, but may differ in detail to address new problems or concerns.
Each version is given a distinguishing version number. If the Program specifies a version number of this License which applies to it and "any later version", you have the option of following the terms and conditions either of that version or of any later version published by the Free Software Foundation. If the Program does not specify a version number of this License, you may choose any version ever published by the Free Software Foundation.
- If you wish to incorporate parts of the Program into other free programs whose distribution conditions are different, write to the author to ask for permission. For software which is copyrighted by the Free Software Foundation, write to the Free Software Foundation; we sometimes make exceptions for this. Our decision will be guided by the two goals of preserving the free status of all derivatives of our free software and of promoting the sharing and reuse of software generally.
NO WARRANTY
-
BECAUSE THE PROGRAM IS LICENSED FREE OF CHARGE, THERE IS NO WARRANTY FOR THE PROGRAM, TO THE EXTENT PERMITTED BY APPLICABLE LAW. EXCEPT WHEN OTHERWISE STATED IN WRITING THE COPYRIGHT HOLDERS AND/OR OTHER PARTIES PROVIDE THE PROGRAM "AS IS" WITHOUT WARRANTY OF ANY KIND, EITHER EXPRESSED OR IMPLIED, INCLUDING, BUT NOT LIMITED TO, THE IMPLIED WARRANTIES OF MERCHANTABILITY AND FITNESS FOR A PARTICULAR PURPOSE. THE ENTIRE RISK AS TO THE QUALITY AND PERFORMANCE OF THE PROGRAM IS WITH YOU. SHOULD THE PROGRAM PROVE DEFECTIVE, YOU ASSUME THE COST OF ALL NECESSARY SERVICING, REPAIR OR CORRECTION.
-
IN NO EVENT UNLESS REQUIRED BY APPLICABLE LAW OR AGREED TO IN WRITING WILL ANY COPYRIGHT HOLDER, OR ANY OTHER PARTY WHO MAY MODIFY AND/OR REDISTRIBUTE THE PROGRAM AS PERMITTED ABOVE, BE LIABLE TO YOU FOR DAMAGES.
INCLUDING ANY GENERAL, SPECIAL, INCIDENTAL OR CONSEQUENTIAL DAMAGES ARISING OUT OF THE USE OR INABILITY TO USE THE PROGRAM (INCLUDING BUT NOT LIMITED TO LOSS OF DATA OR DATA BEING RENDERED INACCURATE OR LOSSES SUSTAINED BY YOU OR THIRD PARTIES OR A FAILURE OF THE PROGRAM TO OPERATE WITH ANY OTHER PROGRAMS), EVEN IF SUCH HOLDER OR OTHER PARTY HAS BEEN ADVISED OF THE POSSIBILITY OF SUCH DAMAGES.
END OF TERMS AND CONDITIONS
- LEVELONE USER MANUAL
- SAFETY
- FCC WARNING
- CE DECLARATION OF CONFORMITY
- CE MARKING WARNING
- GENERAL PUBLIC LICENSE
- TABLE OF CONTENTS
- CHAPTER 1 INTRODUCTION....5
- DEFAULT SETTINGS
- CHAPTER 1 INTRODUCTION
- 1.1 PACKAGE LIST
- 1.2 HARDWARE INSTALLATION
- INSTALLATION STEPS
- STEP 1
- STEP 2
- STEP 3
- CHAPTER 2 GETTING STARTED WITH EASY SETUP UTILITY
- 2.1 EASY SETUP BY WINDOWS UTILITY
- STEP 4
- STEP 5
- STEP 6
- STEP 7
- STEP 8
- STEP 9-1
- STEP 9-2
- STEP 10
- STEP 11
- STEP 12
- STEP 13
- STEP 14
- 2.2 EASY SETUP BY CONFIGURING WEB PAGES
- BROWSE TO ACTIVATE THE SETUP WIZARD
- CONFIGURE WITH THE SETUP WIZARD
- CHAPTER 3 MAKING CONFIGURATION
- 3.1 BASIC SETTING
- NETWORK SETUP
- IBURST
- STATIC IP ADDRESS
- DYNAMIC IP ADDRESS
- PPP OVER ETHERNET
- PPTP
- L2TP
- COMBO WAN SETTING
- FAILOVER
- DHCP SERVER
- WIRELESS SETTINGS
- SHARED
- AUTO
- WPA-PSK
- WPA
- WPA-PSK2
- WPA2
- WPA-PSK/WPA-PSK2
- WPA/WPA2
- CHANGE PASSWORD
- 3.2 FORWARDING RULES
- 3.2.1 VIRTUAL SERVER
- 3.2.2 SPECIAL AP
- 3.2.3 MISCELLANEOUS
- IP ADDRESS OF DMZ HOST
- UPNP SETTING
- 3.3 SECURITY SETTING
- 3.3.1 PACKET FILTERS
- 3.3.2 DOMAIN FILTERS
- 3.3.3 URL BLOCKING
- 3.3.4 MAC CONTROL
- 3.3.5 MISCELLANEOUS
- REMOTE ADMINISTRATOR HOST/PORT
- 3.4 ADVANCED SETTING
- 3.4.1 SYSTEM LOG
- 3.4.2 DYNAMIC DNS
- 3.4.3 QOS
- 3.4.4 SNMP
- 3.4.5 ROUTING
- 3.4.6 SYSTEM TIME
- 3.4.7 SCHEDULING
- 3.5 TOOL BOX
- 3.5.1 SYSTEM INFO
- 3.5.2 FIRMWARE UPGRADE
- 3.5.3 BACKUP SETTING
- 3.5.4 RESET TO DEFAULT
- 3.5.5 REBOOT
- 3.5.6 MISCELLANEOUS
- CHAPTER 4. TROUBLESHOOTING
- 1 WHY CAN'T I CONFIGURE THE ROUTER EVEN THE CABLE IS PLUGGED AND THE LED IS LIT
- 2 WHAT CAN I DO IF MY ETHERNET CONNECTION DOES NOT WORK PROPERLY
- 3 PROBLEMS WITH 3G CONNECTION
- WHY MY 3G CONNECTION IS KEEP DROPPING
- 4 SOMETHING WRONG WITH THE WIRELESS CONNECTION
- CAN'T SETUP A WIRELESS CONNECTION
- WHAT CAN I DO IF MY WIRELESS CLIENT CAN NOT ACCESS THE INTERNET
- WHY DOES MY WIRELESS CONNECTION KEEP DROPPING
- 5 WHAT TO DO IF I FORGOT MY ENCRYPTION KEY
- 6 HOW TO RESET TO DEFAULT
- APPENDIX A. SPEC SUMMARY TABLE
- APPENDIX B. LICENSING INFORMATION
- GNU GENERAL PUBLIC LICENSE
- PREAMBLE
- TERMS AND CONDITIONS FOR COPYING, DISTRIBUTION AND MODIFICATION
- NO WARRANTY
Brand : LEVELONE
Model : WBR-6804
Category : Router