PAC 7.2 - Air Conditioning Eurom - Free user manual and instructions
Find the device manual for free PAC 7.2 Eurom in PDF.

| Brand | Eurom |
| Model | PAC 7.2 |
| Product type | Monoblock portable air conditioner |
| Cooling capacity | 7000 BTU/h (2050 W) |
| Maximum power consumption | 785 W |
| Connection voltage | 220-240 V / 50 Hz |
| Maximum air flow | 320 m³/h |
| Dimensions (W x D x H) | 33 x 28 x 68 cm |
| Net weight | 18 kg |
| Refrigerant | R290 (140 g) |
| Sound level (acoustic power) | 65 dB(A) | Sound level (sound pressure) | 55 dB(A) |
| Protection | IP20 |
| Fuse | F, 250 V AC, 2A |
| Refrigerant type | R290 (flammable) |
| Main functions | Cooling, dehumidification, ventilation |
| Number of fan speeds | 2 (Low, High) |
| Operating temperature range | 18 °C to 35 °C |
| Exhaust hose diameter | 150 mm x 1500 mm |
| Programmable timer | Yes (1-24 hours) |
| Remote control | Yes (AAA 2x batteries) |
| Filtration | Washable filter (clean every 2 weeks) |
| Condensation water tank | With full tank indicator (W.F.) |
| Thermal safety | Automatic shut-off in case of overheating |
| Maintenance and cleaning | Clean the filter regularly; exterior with a soft cloth |
| Spare parts and repairability | Repairs by a professional only (R290 circuit) |
| General information | Domestic use; requires room ventilation |
Frequently Asked Questions - PAC 7.2 Eurom
User questions about PAC 7.2 Eurom
0 question about this device. Answer the ones you know or ask your own.
Ask a new question about this device
Download the instructions for your Air Conditioning in PDF format for free! Find your manual PAC 7.2 - Eurom and take your electronic device back in hand. On this page are published all the documents necessary for the use of your device. PAC 7.2 by Eurom.
USER MANUAL PAC 7.2 Eurom
natural_image
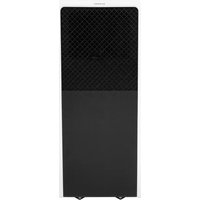
White industrial air conditioner unit with visible ventilation slots and brand logo (no text or symbols on device body)PAC 7.2 & PAC 9.2
380378
380453 (Swiss plug)
380385
380460 (Swiss plug)
Hartelijk dank!
natural_image
Three icon set: open book, open book with 'i' symbol, and open notebook with wrench (no text or symbols)Installatie
natural_image
Diagram showing airflow or movement between two rectangular chambers, one with internal flow arrows and the other with directional arrows (no text or symbols)natural_image
Close-up of a white air conditioner fan with mesh grille and small white connectors on the floor (no text or symbols visible)natural_image
Symbol of a trash bin with no text or numbers presentMany thanks for choosing this EUROM equipment: you have chosen an excellent device that you will be able to enjoy for many years to come! In order to ensure it works as efficiently as possible, we advise you to read these instructions carefully before using; the leaflet contains important safety information, recommendations etc. and will help you get the very best from your equipment! We recommend that you keep the instruction manual and the packaging in a safe place; the leaflet can then be used as reference material and the packaging can be used to store your equipment at the end of the season.
Finally, we hope your air conditioner / dehumidifier perfectly meets your requirements!
Explanation of symbols
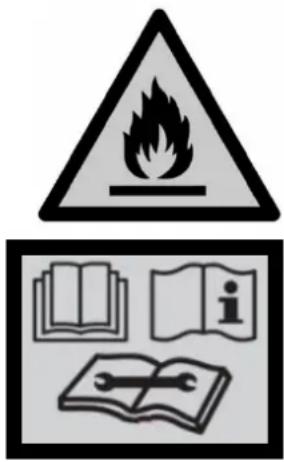
- This appliance is filled with Propane gas R 290. Follow strictly the manufacturer's instruction concerning use and repairs!
- Before using the machine, carefully read this entire instruction manual.
- Do not install, operate or store the device in a room smaller than 4 m^2 (PAC 7.2) / 12 m^2 (PAC 9.2).
Technical specifications
| MODEL | EUROM PAC 7.2 | EUROM PAC 9.2 |
| Cooling capacity | 7000 BTU/hour2050 Watt | 9000 BTU/hour2600 Watt |
| Max. power usage | 785 Watt | 1000 Watt |
| Air displacement max. | 320 m3 / hour | |
| Connected power | 220-240V / 50Hz | |
| Noise level | Sound Power Level 65 dB(A)Sound Pressure Level 55 dB(A) | |
| Cooling fluid | R290/140g | R290/160g |
| Class of insulation | IP20 | |
| Fan settings | 2 | |
| Operating temperature | 18 - 35°C | |
| Waste pipe | ∅ 150 mm x 1500 mm | |
| Fuse | F, 250V AC, 2A | |
| Net weight | 18 kg | 19 kg |
| Dimensions | 33 x 28 x 68 cm (lxwxh) | |
Safety Warnings
Read all safety warnings and other instructions. Failure to follow all instructions can cause injury or material damage.
General safety warnings
- This unit is exclusively intended for household use.
- A mobile air conditioner needs air to be able to discharge heat to the outside!
Therefore, never use a mobile air conditioner in an airproof room. Always make sure there is sufficient ventilation. Without sufficient ventilation, a vacuum is created in an airproof room, while a mobile air conditioner is operating, and this vacuum can disrupt the safe operation of geysers, extractors, mechanical ventilation systems, ovens, fireplaces and gas heaters. The vacuum can cause the exhaust gases, which these appliances usually discharge to the outside, to wind up either partially or entirely in the room.
- Always ensure (even during transport!) that the unit remains upright. If the unit has been lying on its side, wait 2 hours before using. This time is required in order for the compressor to function correctly.
- Ensure that the unit is always placed on a sturdy, flat and horizontal surface.
- Ensure that the unit has a free space of at least 30 cm on each side.
- Make sure that the plug and socket remain visible and accessible at all times.
- Do not place any objects in front of the air conditioning unit.
- Never leave a functioning device unsupervised, not even for a moment!
- Do not use the air conditioning unit in the vicinity of flammable or explosive substances or fuels. Never use any paint, cleaning sprays, anti-insect sprays or similar near the unit; this could deform the plastic or cause electrical damage.
-
Do not use the appliance:
-
close to a fire source;
- close to splashing oil;
- in direct sunlight;
- with splashing water;
-
in a bathroom or at a swimming pool.
-
Never block the grilles for incoming or outgoing air (not even partially). In order to prevent over-heating, never cover the device!
- Never insert fingers or objects such as pens into the device via the grilles and ensure that the ventilator does not become blocked.
- Children, incapacitated persons and pets should be supervised.
- This appliance is not a toy, so children should not play with the appliance.
- This appliance can be used by children aged from 8 years and above and persons with reduced physical, sensory or mental capabilities or lack of experience and knowledge if they have been given supervision or instruction concerning use of the appliance in a safe way and understand the hazards involved. Children shall not play with the appliance. Cleaning and user maintenance shall not be made by children without supervision. Avoid children coming into contact or playing with the device.
- Cleaning and user maintenance shall not be made by children without supervision.
- Remove the plug from the socket when you hear strange noises, smell a strange smell, when there is smoke.
- Do not turn on the appliance if you have discovered damage to the appliance, cord or plug, if the appliance is malfunctioning, if it has been dropped or if there are signs of any other defect. Return the complete product to the vendor or to a certified electrician for inspection and/or repair. Always ask for original parts.
- The appliance (incl. cord and plug) may only be opened and/or repaired by properly authorised and qualified persons.
Electrical safety
- The air conditioning unit is only suitable for indoor use.
- Only use the plug that is installed on the device in the factory and no other form of connector!
- The appliance shall be installed in accordance with national wiring.
- Before use, check that the electrical outlet you want to use is earthed, has no defects, and that the power supply to the electrical outlet corresponds to that on the rating plate of the appliance. Damage caused by a faulty voltage is not covered by the warranty!
-
If the appliance is not being used, or if you are cleaning, servicing or moving it, switch it off first and then unplug the appliance. Always move and / or move the device quietly!
-
Even when you start using the appliance: firstly plug in the mains, then the switch to the ON position and only then use the control button!
- Do not use the device in a damp or wet environment, near a bath, shower or swimming pool and do not splash water, oil or any liquid on or in the appliance.
- Avoid using extension cords as much as possible. If this is unavoidable, use a cord with sufficient capacity (at least 3 × 1.5 mm^2 ) and keep it outside the walking route!
- Do not move the appliance by pulling on the electrical cable and take the plug in your hand if you want to take it out of the socket.
- Do not pull on, deform or modify the electrical cable or immerse it in water. Pulling or misuse of the electrical cable will cause damage to the device and cause an electric shock
- If the electrical cable, plug or the appliance itself is damaged, broken, or malfunctions, do not use it or switch it off immediately and remove the plug from the socket. Device, plug and / or cable must be repaired/replaced by an electrician or similarly qualified person. Repairs by inexperienced people will invalidate the warranty and can cause dangerous situations!
Safety in relation to coolant R290
- This device contains the coolant R290. R290 is a coolant that complies with the relevant European Directives. Never perforate the coolant circuit. R290 is flammable (GWP 3)!
- Never use substances other than those recommended by the manufacturer for the defrosting process.
- This device must be used and stored in a room that does not contain sources of ignition, such as open flames or gas and electrical devices in operation.
- Do not perforate any of the components of the cooling circuit and do not set light to the device
- If the device is installed, working or stored in an un-ventilated you must take measures to prevent fire or explosions caused by leaked coolant. Ensure that there are absolutely no sources of ignition (such as fire, heaters, sparking electrical equipment, lit cigarettes, etc.) in the same room!
- The device must be stored in such a way that mechanical defects are prevented.
-
Do not install, operate or store the device in a room smaller than 4m^2 (PAC 7.2) / 12 m^2 (PAC 9.2).
-
R290 is odourless, which means that you cannot smell leaks!
- Persons working on the cooling circuit must be in possession of the correct qualifications that state the person in question is competent to use coolant in accordance with a special evaluation that is recognised by the sector association.
- The repairs must be executed on the grounds of the recommendations of the manufacturer of the device. Maintenance and repairs that require the assistance of other qualified persons must be executed under supervision of someone who is specialised in the use of flammable coolant.
Maximum effect
The maximum surface area, which this air conditioner can cool, depends on various conditions. Conditions that cause the air conditioner to cool smaller spaces are, for example:
- Higher outdoor temperature
- Many and/or large windows
- Flat roof
- Many people in the room
- Many electrical appliances in the room
If these conditions are present to a lesser extent (i.e. lower heat loads), the air conditioner can cool a larger surface area better than if more of these conditions are present (i.e. higher heat loads).
| PAC 7.2 | PAC 9.2 | |
| Lower heat loads | 22 m^2 | 29 m^2 |
| 60 m^3 | 80 m^3 | |
| Higher heat loads | 14 m^2 | 18 m^2 |
| 40 m^3 | 50 m^3 |
- Do not place the unit in the vicinity of a heat source or in direct sunlight.
- Close windows and doors and keep curtains or hatches closed during the sunniest hours in the day
- Keep filters clean
- Modify temperature and ventilation settings once the area has reached the required condition.
Description
- rear panel
- air inlet
- front panel
- operating panel (top)
- air inlet
- electrical cable with plug
- wheels
- waste pipe connection hot air
- water drainage point
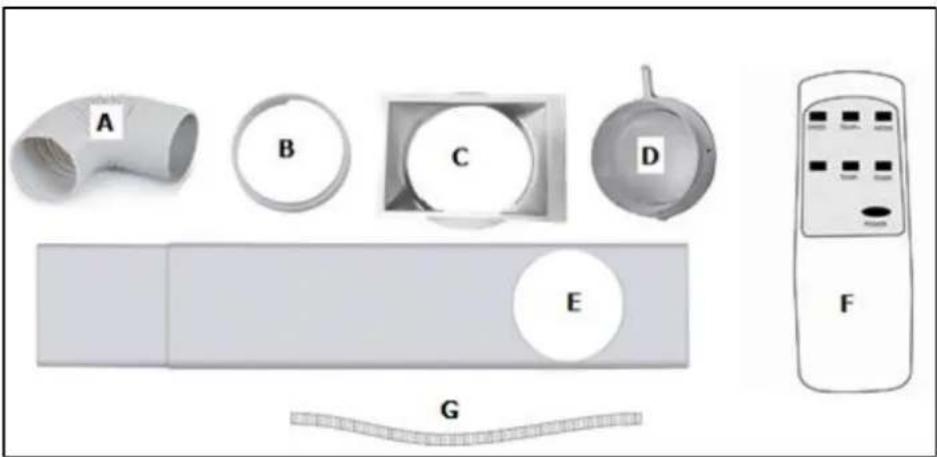
Accessories
A. Outlet hose hot air
B. Connector window kit
C. Connector air conditioner
D. Wall connector
E. Window kit
F. Remote control
G. Water drain hose
Installation
The EUROM PAC 7.2 and PAC 9.2 are mobile air conditioning/ dehumidifying units that can be moved from room to room. Install as follows:
- Remove all packaging material, keep it away from children and ensure that the unit remains in an upright position.
- Before use, check that all accessories are present and that there is no damage to the accessories or the unit itself. Do not use a damaged unit; take it back to your supplier!
- Place the unit on a sturdy, flat, dry and
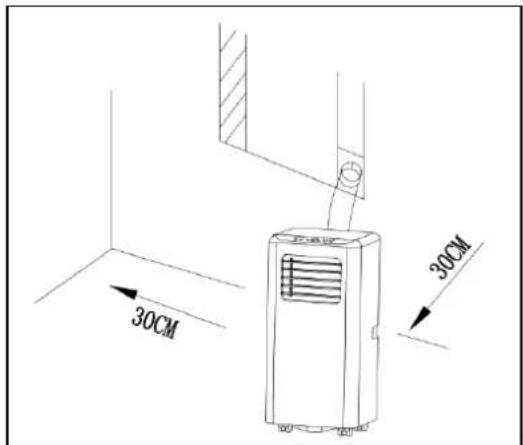
horizontal base near an electrical socket and a discharge point for hot air, e.g. a window that can be opened slightly. Make sure that the unit has at least 30 cm of free space on all sides and take all safety instructions into account.
Dehumidification
- To use the dehumidification function, connect the water drain hose to the water drainage point (9). This hose should lead to a bucket or drain. The hose should not run upwards! Your unit is now ready for use.
Caution: When using dehumidifier mode, the outlet hose hot air also needs to be placed outside. The moisture the device extracts from the air inside the room is pulled outside through the air drain hose. The remaining moisture is only drained using the drainage valve if not all of the moisture can be led outside through the drainage hose.
Cooling
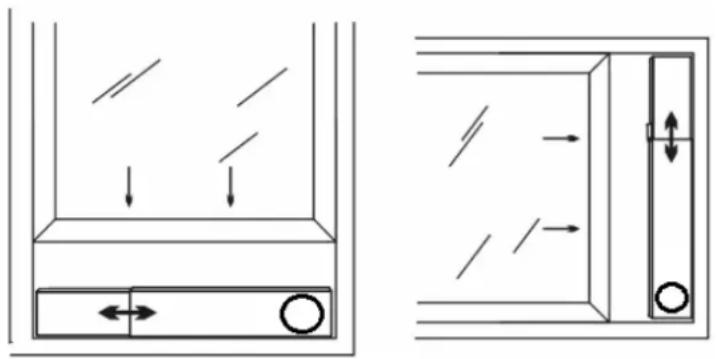
- In order to use the cooling function, you do not need to connect the water drainage hose. Place window kit in the window opening, see diagram. The length of the window kit can be adjusted from 67.5 to 123 cm.
natural_image
Diagram showing airflow or fluid flow between two storage compartments with directional arrows (no text or symbols)- Screw on the connector for the air conditioner on one end and the connector for the window panel on the other end of the outlet hose.
- Slide the connector for the air conditioner into the appropriate slot on the rear of the unit.
- Secure the other end of the outlet hose in the window panel opening so that it can remove hot air outside.
- You can also hang the outlet hose out of an open window; this method is less efficient however.
- Avoid bends or pinches in the pipe. These will lead to a build-up of damp, waste air which can cause leaks, overheating or lead to the air conditioning unit switching off.
- Don't forget about preventing access to burglars!
Operation
Operation panel
Remote control
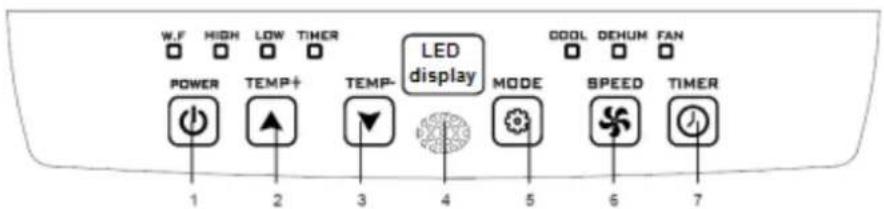
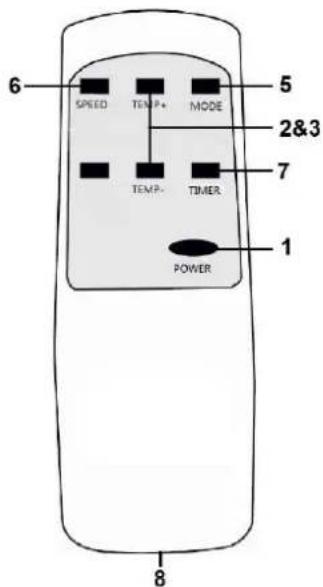
The operational panel and the remote control have the same buttons
- ON/OFF button (Power)
- Temperature up button
- Temperature down button
- Receiver remote control (only on operational panel)
- Function selector button
- Fan speed button
- Timer button
- Battery cavity (AAA-1,5V 2x) (only in remote control)
W.F - 'Tank full' light, see page 23 (only on operational panel)
The operational panel also has 7 indicator lights that show which settings are active and a display (Led display) that shows any values set.
Before using the air conditioner, check:
• That it has been installed according to safety instructions
• That it is not damaged or broken
- That the electrical socket that you wish to use has the same voltage as is given on the unit's specification plate (220-240V / 50Hz)
- That no other devices are connected to the same socket
If this has all been checked, you can insert the plug into the socket. Start the unit by pressing on the ON/OFF button.
Use the Function selector button to choose a specific function: cool, dehumidify or fan. Every time you press the button, the function changes. The lights show which function is active. If you are cooling or dehumidifying, wait for up to 3 minutes after switching on or off before switching the unit on or off again. The compressor needs this time to recover.
Use the Fan speed button to set the fan to high or low.
If you wish to cool, you can use increase or decrease the temperature using the Temperature up/down buttons. Every time you press these buttons, the set
temperature will increase or decrease by one degree. The display shows the value set. The temperature can be set to between 16 and 31°C.
If you wish to dehumidify, press the function selector button until the 'dehum' light comes on. Check that the water outlet hose is correctly connected, see page 23! The temperature will be automatically set to 2 degrees below room temperature (16°C to 31°C).
The fan speed will be automatically set to 'LOW'.
Caution: Because the temperature in the dehumidifier setting is set automatically to 2 degrees below room temperature, the device will cool down the room.
Using the functions 'cooling' and 'dehumidifying', the apparatus will occasionally stop in order to protect the compressor. The apparatus will restart after approx. 3 minutes. Do NOT change any settings in the meantime!
If you set the apparatus to 'cooling' or 'dehumidifying', it will continuously operate unless:
- The room temperature becomes lower than the set temperature.
- The timer is set to a final time.
If you wish to ventilate, use the function selector button to choose 'fan'; you can then set fan speed to high or low using the fan speed button.
The Timer button allows you to automatically start or stop the air conditioner at a set time.
Automatic start:
First set at which temperature and in which mode (cooling, dehumidifying or heating) you want the air conditioner to start.
Switch off the air conditioner using the
Press the
Using the
Press the
The air conditioner will automatically start with the entered settings after the lapsing of the set number of hours.
Automatic stop:
Press the
Using the
Press the
The air conditioner will automatically stop after the lapsing of the set number of hours.
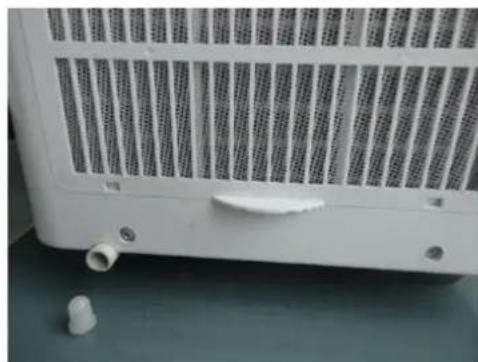
Water outlet
During the cooling process, the device removes water from the air. This largely evaporates but any excess water is collected in the water reservoir. If the water reservoir in the device is full, the compressor and the motor will stop automatically and the 'water tank full' light (W.F.) will come on. In this event, switch the air conditioning unit off and remove the plug from the socket. Empty the water tank by removing the cap from the water drainage point (see picture) and draining the tank into a drain or receptacle. Do not forget to replace the cap again afterwards! You can then switch the air conditioning unit back on.
natural_image
Close-up of a white air conditioner fan with ventilation grilles and a small white plastic component on the floor (no text or symbols visible)When dehumidifying, more water is removed from the air. This is why you must connect a hose to the water drainage hose during dehumidifying and run this to a drain (at a lower point).
Safety
The PAC 7.2 and PAC 9.2 are fitted with an overheating safeguard that switches the unit off if it overheats. If this should occur, you must remove the plug from the socket and leave the equipment to cool for at least 30 minutes. Remove the cause of overheating - has the device been (partially) covered? Is it too close to a wall or another obstacle, preventing it sucking in or dispelling sufficient air?
You can then use the device normally again but keep an eye on it for the first 30 minutes to ensure there are no further problems. If the device is showing signs of problems or the overheating recurs, even though there is no obvious assignable cause, ask your supplier or a recognised electrician to check/repair the unit.
Cleaning and maintenance
Note! Before cleaning or carrying out maintenance work on the air conditioning unit, always switch off and remove the plug from the socket! Regular cleaning is vital in order to keep the unit in good working order!
Cleaning the housing
Use a soft, damp cloth to wipe the housing.
Never use aggressive cleaning products, petrol, detergent, chemically-impregnated cloths or other cleaning solutions. These could damage the housing. Never spray the unit and ensure that water never penetrates the device! Dry the unit with a soft cloth.
Cleaning the filter
Clean the filter once every two weeks; a unit with a dirty filter will never work properly. The filter can be found behind the air inlet grilles on the side. You can easily open these grilles and remove the filter. Use a vacuum cleaner or gently beat the filter to remove loose dust and dirt. Rinse the filter with tepid water (not hotter than 40^ C) with a mild, neutral cleaning product. Let the filter dry thoroughly in the shade before replacing in the unit. Take care! Never use the air conditioning unit without the filter!
End of season cleaning
If the device is to be stored for a long period, you must take the following measures!
- Remove the condensed water. Run the unit for a few hours on fan function so that the unit is completely dry inside.
- Then switch the air conditioning unit off and remove the plug from the socket.
- Clean the filter and reposition them or replace with a new one.
- Unscrew the waste pipe from the device in order to prevent damage.
- Pack the air conditioning unit in its original packaging or in a plastic bag and place in a dry place for storage. Place a heavy object on the unit.
- Remove the batteries from the remote control.
- Store the device in a room smaller than 4m^2 (PAC 7.2) / 12m^2 (PAC 9.2).
Trouble shooting
The unit does not start if I press the ON/OFF button
- Is the plug in the socket?
- Is the earth leakage circuit breaker engaged? No power?
- Is the water tank full? Empty it.
- The room temperature is lower than the set temperature; amend the set temperature.
The unit doesn't seem to be very effective
- Measure the outlet temperature; this must be approx. 10° cooler than room temperature.
- Is there direct sunlight? Shut the curtains.
- Are windows or doors open? Shut them.
- Are there too many people in the room? They produce heat!
- Is the space too big?
- Is there an object in the room that is generating (a great deal of) heat? Switch it off or remove it.
- Is the filter dusty or covered in dirt? Clean it.
- Is the air inlet or outlet (hose) blocked? Make sure there is free air flow.
The unit is making a noise
- Is the surface underneath the machine sturdy and even?
- The flow of coolant in the unit also produces a little noise. This is perfectly normal.
The unit switches itself off
- The overheating safeguard may have switched the unit off. See 'Safety'.
Error code E0
- The temperature sensor is broken. Have it replaced. The unit works without temperature setting.
Error code E2
- The water tank is full. Switch the unit off and empty it manually. Switch it on again.
NEVER ATTEMPT TO REPAIR THE DEVICE YOURSELF!
Removal
natural_image
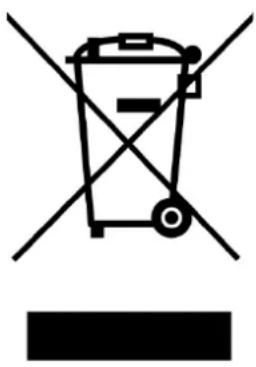
Symbol of a trash bin with crossed lines indicating no waste or discharge, and a solid black rectangle below (no text or labels)In the EU this symbol indicates that this product may not be disposed of as ordinary household waste. Old equipment contains valuable materials, suitable for recycling. These materials should be made suitable for reuse in order to prevent any adverse effects to health and the environment caused by unregulated waste collection. Therefore, please make sure that you bring old equipment to a designated collection point. Alternatively, contact the original supplier, who can make sure that as many of the components as possible can be recycled.
CE Conformity statement
See page 78.
Danke!
Installation
natural_image
Diagram showing two views of a storage unit with internal flow arrows and directional arrows (no text or symbols)natural_image
Close-up of a white air conditioner fan with ventilation grilles and a small white plastic component on the floor (no text or symbols visible)Sicherheit
natural_image
Symbol of a trash bin with crossed lines indicating no waste or discharge, and a solid black rectangle below (no text or labels)
natural_image
Three black-and-white icons: open book, open map with 'i' symbol, and open notebook with wrench (no text or symbols)côté
avant
arrière
Accessoires
Installation
natural_image
Diagram showing airflow or fluid flow between a container and a door, with no text or symbols present.natural_image
Close-up of a white air conditioner fan with ventilation grilles and a small plastic component on the floor (no text or symbols visible)natural_image
Symbol of a trash bin with crossed lines indicating no waste or discharge, and a solid black rectangle below (no text or labels)
natural_image
Three icon set: open book, open book with 'i' symbol, and open book with wrench (no text or symbols)lato fronte retro
Accessori
natural_image
Illustration of various household appliances and a remote control device (no text or symbols present)Installazione
natural_image
Diagram showing airflow or movement between a container and a door, with no visible text or symbols.natural_image
Close-up of a white air conditioner unit with ventilation grilles and a small white plastic component on the floor (no text or symbols visible)natural_image
Symbol of a trash bin with crossed lines indicating no waste or discharge, and a solid black rectangle below (no text or labels)
natural_image
Three icon set: open book, open book with 'i' symbol, and open notebook with wrench (no text or symbols)Installation
natural_image
Diagram showing airflow or fluid flow between a container and a cabinet, with no text or symbols present.natural_image
Close-up of a white air conditioner panel with ventilation grilles and a small plastic pipe on the floor (no text or symbols visible)natural_image
Symbol of a trash bin crossed with a diagonal line, representing no waste or discharge (no text or labels)
declares the following device in sole responsibility:
Product: Mobile airconditioner / dehumidifier
Brand name: EUROM
Model: PAC 7.2 / PAC 9.2
Item number: 380378 - 380453 (Swiss plug) / 380385 - 380460 (Swiss plug)
Complies with the following harmonization rules:
Low Voltage Directive: LVD 2014/35/EU
Electromagnetic compatibility Directive: EMC 2014/30/EU
Restriction of Hazardous Substances RoHS Directive: 2011/65/EU&(EU)2015/863
Framework Directive Ecodesign requirements: ERP 2009/125/EC
Applied harmonized standards:
EN 60335-1:2012+A11:2014
EN 60335-2-40:2003+A11:2004+A12:2004+A1:2006+A2:2009+A13:2012
EN 62233:2008
EN 55014-1:2006+A1:2009+A2:2011
EN 55014-2:2015
EN 61000-3-2:2014
EN 61000-3-3:2013
EN 61000-3-11:2000
EN 62311:2008
Genemuiden, 26-10-2020
W.J. Bakker, Alg. Dir.
Eurom
Kokosstraat 20
8281 JC Genemuiden
The Netherlands
info@eurom.nl
www.eurom.nl
261020