DeepMind 12 - Synthesizer BEHRINGER - Free user manual and instructions
Find the device manual for free DeepMind 12 BEHRINGER in PDF.

User questions about DeepMind 12 BEHRINGER
0 question about this device. Answer the ones you know or ask your own.
Ask a new question about this device
Download the instructions for your Synthesizer in PDF format for free! Find your manual DeepMind 12 - BEHRINGER and take your electronic device back in hand. On this page are published all the documents necessary for the use of your device. DeepMind 12 by BEHRINGER.
USER MANUAL DeepMind 12 BEHRINGER
text_image
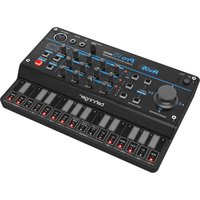
DeepMind 12 ARP / SEQ LF01 LFD 2 OSC 1&2 # I soundetic sound EN ES FR DE PT RADIO TO-VIDE POLYME SYNTHESIS Quick Start GuideDeepMind 12
True Analog 12-Voice Polyphonic Synthesizer with
4 FX Engines, 2 OSCs and LFOs per Voice, 3 ADSR Generators,
8-Channel Modulation Matrix, 32-Step Sequencer,
Tablet Remote Control and Built-In Wifi
-
Do not defeat the safety purpose of the polarized or grounding-type plug. A polarized plug has two blades with one wider than the other. A grounding-type plug has two blades and a third grounding prong. The wide blade or the third prong are provided for your safety. If the provided plug does not fit into your outlet, consult an electrician for replacement of the obsolete outlet.
-
Protect the power card from being walked on or pinched particularly at plugs, convenience receptacles, and the point where they eat from the apparatus.
- Use only attachments/accessories specified by the manufacturer.

- Use only with the cart, stand, tripod, bracket, or table specified by the manufacturer, or sold with the apparatus. When a cart is used, use caution when moving the cart/apparatus combination to avoid
injury from tip-over
-
Unplug the apparatus during lightning storms or when unused for long periods of time.
-
Refer all servicing to qualified service personnel. Servicing is required when the apparatus has been damaged in any way, such as power supply cord or plug in damaged, liquid has been spilled or objects have fallen into the apparatus, the apparatus has been exposed to rain or moisture, does not operate normally, or has been dropped.
-
The apparatus shall be connected to a MNG socket outlet with a protective earthing connection.
-
Where the MAINS plug or an appliance coupler is used as the disconnect device, the disconnect device shall remain nearly operable.

- Correct disposal of this product: This symbol indicates that this product must not be disposed of with household waste, according to the IEEE Directive (2012/19/EU) and your national law. This product should be taken
In a collection center licensed for the recycling or waste electrical and electronic equipment (EET). The maintaining of the type of waste could have a possible negative impact on the environment and human health due to potentially hazardous substances that are generally associated with EET. At the same time, your cooperation is in the correct disposal of this product will contribute to the efficient use of natural resources. For more information about where you can take your waste equipment for recycling, please contact your local city office, or your household waste collection service.
-
Do not install in a confined space, such as a book case or similar unit.
-
Do not place naked flame sources, such as lighted candles, on the apparatus.
-
Please keep the environmental aspects of battery disposal in mind. Batteries must be disposed of at a battery collection point.
- Use the apparatus in tropical and/or moderate climates.
LEGAL DISCLAIMER
MUSIC Group accepts no liability for any loss which may be suffered by any person who relies on other wholly or in part upon any description, photograph, or statements contained herein. Technical specific claims, appearances and other information are subject to change without notice. All trademarks are the property of their respective owners. MIDAS, KLARK TERNIK, LAB GRUPPEN, LAKE, TANKHY, TURBOSOUNO, TC ELECTRONIC, TC HELLOON, BENJINGER, BUGERA and DOA are trademarks or registered trademarks of MUSIC Group IP Ltd. 92 MUSIC Group IP Ltd. 2016 All rights reserved.
LIMITED WARRANTY
For the applicable warranty terms and conditions and additional information regarding MUSIC Group's Limited Warranty, please see complete details online at music-group.com/warranty.
BESCHRÄNKTE GARANTIE
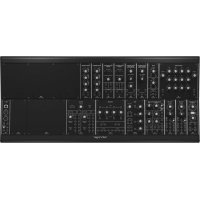
1 DISPLAY - this large backlit LCD screen shows the synthesizer status, parameters, and the five main menus. The contrast and brightness are adjustable on the SYSTEM SETTINGS page of the GLOBAL menu.
[1] NAVIGATION - navigate within the display menus using the UP, DOWN, +/YES and -/NO buttons.
☐ MENUS - these switches allow access to the display menus.
PROG MENU- the main display of the synthesizer. Shows the current program, the currently adjusted parameter and a visual representation of the parameter and the three envelopes.
FX MENU add up to four effects from the list available. Change the effects routing by selecting one of the ten MODEs available. Each of the effects has individual controls for all parameters.
GLOBAL MENU - view and adjust settings for the synthesizer. There are five pages, CONNECTIVITY, KEYBOARD, PEDAL, FADER and SYSTEM.
COMPARE MENU - in this menu, you can compare the current program with the stored program and see the difference in physical fader positions.
WRITE MENU - in this menu, you can write the current program settings to the program library. You can also rename the program and set its category type.
DATA ENTRY - selected parameters on the display are adjusted using the rotary knob or the fader. The rotary knob has a click which allows very accurate control. The fader allows rapid adjustment across the full range.
MOD- this switch opens the modulation matrix on the display and allows up to 8 modulations to be created from the list of sources and destinations.
[3] ARP/SEQ - this area controls the arpeggiator and the control sequencer.
ON/OFF - when activated, this generates an arpoggin based on pressed keys. Note - the control sequencer is turned on from its edit page only.
RATE - adjusts the rate of the arpeggiator / sequencer in beats per minute (BPM).
GATE TIME - adjusts the duration of the note played based on a percentage of the time between triggered notes.
CHORD - allows you to play any chord with a single key. The chord is given a root note and mapped across the keyboard.
POLY CHORD - allows you to play multiple chords from multiple keys. The chords are mapped to individual keys.
TAP/HOLD - tap this button in time with your performance to set the rate/BPM, or press and hold to engage the HOLD function.
EDIT - this allows additional arpeggator/control sequencer parameters to be edited from the main display.
LFO 1 and 2-low frequency oscillators used to modulate or control other parameters.
RATE- this sets the rate, or speed of the LFO.
DELAY TIME - the duration of time which will elapse before the LFO starts.
EDIT - this allows additional LFO parameters to be edited from the main display.
LFO WAVEFORMs - these LEDs indicate the type and status of the waveforms produced by each LFO.
DC0 1 & 2 - These analog full range oscillators create waveforms which are the sound source of the synthesizer.
DCO 1 & 2 PITCH MOD - amount of pitch modulation applied to respective DCO.
DC0 1 SQUAREWAVE - this switch turns the square wave output for DCD 1 on/off.
DCO 1 PWM - amount of pulse width modulation applied to the DCO 1 square-wave.
DC0 1 SAWTOOTH- this switch turns the sawtooth output for DCD 1 on/off.
DCO 2 TONE MOD - amount of tone modulation applied to DCO 2.
DCO 2 PITCH- controls the base pitch of DCO 2.
DCO 2 LEVEL- controls the level of DCD 2.
NOISE LEVEL - controls the amount of white noise added to the oscillators.
EDIT - this allows additional DCO parameters to be edited from the main display.
POLY - this area is used to control the polyphony of the synthesizer.
UNISON DETUNE - 'when voices are playing in unison, this adjusts the amount of detuning between the voices.
EDIT- this allows additional POLY parameters to be edited from the main display.
③ VCF - the voltage controlled low pass filter used to filter high frequencies from the sound of the synthesizer.
FREQ - adjusts the cut-off frequency of the filter.
2-POLE - changes the roll off slope of the filter from the default 4-POLE mode to a 2-POLE mode.
RES - adjusts the resonance of the filter cut-off point.
EDIT - allows additional VCF parameters to be edited from the main display.
ENV - adjusts the level of the VCF ENVELOPE which controls the filter cut-off frequency.
INVERT - used to invert the polarity of the VCF envelope applied to the filter cut-off frequency.
LFD - adjusts the depth of the selected LFD waveform applied to the filter out-off frequency.
KYBD - adjusts the amount of keyboard tracking to be applied to the filter cut-off frequency.
18 VCA - the voltage controlled amplifier used to control the output level.
LEVEL - controls the output level of the VCA. EDIT - this allows additional VCA parameters to be edited from the main display.
[11] HPF - the voltage controlled high pass filter used to filter low frequencies from the sound of the synthesizer.
FREQ - used to adjust the frequency of the high pass filter.
BOOST - this switch applies a +12 dB bass boost to the signal path
12 DaeoMind 12
DeepMind 12 Controls
FN Step 2: Controls
text_image
DeepMi behringer nd1213 Quick Star Guide
☐ ENVELOPE - these are the three envelopes used to modulate other parameters.
A [ATTACK]- controls the attack time of the envelope.
D [DECAY] controls the decay time of the envelope.
S [SUSTAIN] - controls the sustain level of the envelope.
R [RELEASE] - controls the release time of the envelope.
VCA - selects the envelope used to control the voltage controlled amplifier.
VCF - selects the envelope used to control the voltage controlled filter.
MOD - selects the envelope used for user specific modulation.
CURVES - changes the ADSR controls to affect the associated curves for each stage of the envelope.
☐ VOICES - these LEDs show which voices are active as keys are played.
(2) OCTAVE - these LEDs show the octave shift applied to the keyboard.
PORTAMENTO - changes the slide time between played notes.
VOLUME - controls the output level of the synthesizer.
(1) OCTAVE UP/DOWN - raise or lower the keyboard's pitch range in steps of an octave.
PITCH BEND WHEEL - this spring loaded wheel allows you to lower / raise the pitch expressly.
[8] MOD WHEEL - used for expressive modulation of parameters.
(20) KEYS - 49 semi-weighted full-size keys featuring expressive velocity and after-touch.
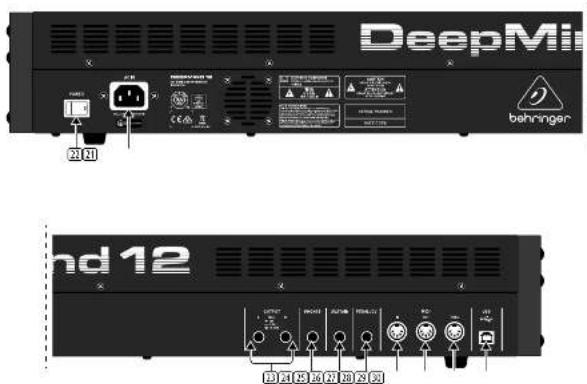
Rear Panel
[2] POWER INPUT - connect using the supplied power cable only.
32 POWER SWITCH - use this to turn the synthesizer on and off. Only turn it on after all connections have been made.
[3] OUTPUT L/R - this is the main output of the synthesizer. It should be connected to your audio interface or sound system. Remember to turn your monitors / loudspeakers on last when turning on your system and turn your monitors / loudspeakers off first when turning your system off.
[14] PHONES - the headphones output of the synthesizer follows the main output. Connect your headphones here. Ensure the volume control is at minimum when putting on headphones or when turning the synthesizer on or off.
[16] SUSTAIN - this '4' TS jack allows you to connect a sustain pedal, such as a normally-open switch.
The operation of this pedal can be customized using the GLOBAL / PEDAL SETTINGS menu.
26 PEDAL/CV - this 14" TRS jack allows you to connect an expression pedal. The operation of this pedal can be customized using the GLOBAL / PEDAL SETTINGS menu.
MIDI IN - this 5-pin DIN jack receives MIDI data from an external source. This will commonly be an external hardware sequencer, a computer equipped with a MIDI interface, etc.
[26] MIDI OUT - this 5-pin DIN jack sends MIDI data to an external source. This will commonly be an external hardware sequencer, a computer equipped with a MIDI interface, etc.
MIDI THRU - this 5-pin DIN jack is used to pass through MIDI data received at the MIDI INPUT. This will commonly be sent to another synthesizer or drum machine assigned to a different DEVICE ID, or MIDI Channel.
USB PORT - this USB type B jack allows connection to a computer. The DeepMind 12 will show up as a class-compliant USB MIDI device, capable of supporting MIDI in and out. The DeepMind 12 does not require any additional drivers to work with Windows, Android, MacOS and iOS devices.
USB MIDI IN - accepts incoming MIDI data from an application.
USB MIDI OUT - sends MIDI data to an application.
DeepMind 12 Controles
FS Paso 2: Controles
DeepMind 12 Getting started
Step 3: Getting started
OVERVIEW
This 'Getting Started Guide' will help you set up the DeepMind 12 analog polyphonic synthesizer and briefly introduce its capabilities.
CONNECTION
To connect the DeepMind 12 to your system please consult the connection guide earlier in this document.
BROWSING PROGRAMS
To change programs, use the -NO and +/YES switches. To access the program browser press and hold the PROG switch, then press the GLOBAL switch, or move the rotary knob. For more information on program management please consult the product manual.
PROGRAMMING
The DeepMind 12 programming techniques are described in detail in the product manual.
RECORD, EDIT and PLAYBACK AUTOMATION
When using the analog engine of the synthesizer with a Digital Audio Workstation (DAW) you can record and playback any automatable parameter. This allows you to record expressive automation and playback or edit that automation in your DAW.
USING AS A CONTROLLER
When using the synthesizer features as a controller you can control your virtual instruments and Digital Audio Workstation (DAW) with the accurate touch and feel of a high quality keyboard, 1 rotary potentiometer, 25 slide faders, and 11 backlit switches. For mapping please consult the product manual.
SOFTWARE SET-UP
The DeepMind 12 is a USB Class Compliant MIDI device, and some driver installation is required. The DeepMind 12 does not require any additional drivers to work with Windows, Android, MacOS and iOS devices.
HARDWARE SETUP
Make all the connections in your system. Apply power to the DeepMind 12 using the supplied power cable only. Ensure your sound system is turned down. Turn on the power switch.
DAW SETTINGS
In your DAV, create a new channel and select the DeepWind 12 as the MIDI input device. On the same channel ensure that recorded MIDI is also sent back by making the DeepWind 12 the same channel's MIDI output device.
If you can't see the DeepWind 12 in your DAW channel options please consult your DAW documentation to ensure you have enabled the DeepWind 12 as a MIDI device.
GLOBAL SETTINGS
The GLOBAL menus allow you to customize the DeepMind 12 analog polyphonic synthesizer to your specific workflow / requirements. For more information on the GLOBAL settings, please consult the product manual.
FIRMWARE UPDATE
Check that the latest firmware in your unit is up to date (see the GLOBAL/SYSTEM SETTINGS menu of the display). If not, then updating the firmware will give you the latest enhancements. Visit our website behninger.com, and download the latest firmware from the DeepMind 12 analog polyphonic synthesizer product page.
IMPORTANT NOTE: Updating the firmware may affect your programs, please ensure you make a full back up. For detailed instructions please consult the product manual.
23 Quick Start Guide
| Display | Backlit LCD |
| Main Nenus | PROG, FX, GLOBAL, COMPARE, WRITE |
| Edit Nenus | ARPS20, LFO5, DOD5, POLY, VCF, VCA, VCA ERY, VCF ERY, MOD ERY, MOD MATRIX |
| Presets | 8 bits each with 128 programs |
| Fador/Modes | MIX CC, ARPU, OFF |
Controls
| Keyboard | 49 semi-weighted, full size keys |
| Keyboard sensing | Aftertouch and note onroll velocity |
| Encoders | 1 rotary knob |
| Faders | 26 slide leaders (35 mm) |
| Switches | 33 backlit switches |
| Modulation | Free moving wheel |
| Pitch Bend | Spring-loaded wheel |
Connecti
| MIDI In/Out/Thru | 5-pin DIN / 16 channels |
| PedalACV | N° TRS |
| Sustam | N° TS |
| USB | USB 2.0, type B |
| Output LVR | N° TRS, balanced, max. +18 dBu |
| Headphones | N° TRS, unbalanced, max. +21 dBu |
Synthesizer Architecture
| Number of voices | 12 analog |
| DCO | 2 per voice |
| LTO | 2 per voice |
| VCF | 2 pole/4 pole |
| HFF (Common to all voices) | 6 dB per octave |
| Envelopes | VCF, VCF, MOD |
| Mod Matrix | 22 sources / 130 destinations |
Digital Effect
| FX Slots | 4 per Program |
| FX Types | 32 Algorithms |
| Internal effects engines | 1 true stereo SIMR DSP |
| Effects signal processing | 32×10-bit floating polar @ 48 kHz |
| A/D-DIA performance | 24-bit 48 kHz, 114 dB dynamic range |
| Bypass | True hard bypass |
USB
| Type | Class compliant USB 2.0, type B |
| Supported operating systems | Windows 7 or higher* *Mac OS X 10.6.8 or higheriOS 8 or higher (iPad)Android 6.0 or higher |
WI-FI
| Antenna | Internal |
| Access Point, number of clients | Krac. 1 |
| IEEE 802.11 low standard | 2.4 GHz |
| Frequency Range | 3,412 - 3,462 MHz |
| VLAN channels | 11 |
| Max Output Power | 20.3 dBm (802.110) / 25.0 dBm (802.11 g/t / 22.7 dBm (802.11m)) |
Power
| Mains connector | Standard IEC receptacle |
| Power consumption | 37 V max. |
| Fuse | T3.154/4250 V |
| Internal Switch mode PSU | Autorange 100, 240 V, (50/60 Hz) |
Environmental
| Operating temperature range | 5°C - 40°C (41°F - 104°F) |
| Physical (Packaged) | |
| Dimensions (H x W x D) | 10.5 x 82.2 x 25.7 mm (43 x 32.4 x 10.1") |
| Weight | 6.4 kg (18.5 lbs) |
| Shipping Weight | 10.5 kg (23.1 lbs) |
Other important information

Important information
- Register online. Please register your new MUSIC Group equipment right after you purchase it by visiting behringer.com. Registering your purchase using our simple online form helps us to process your repair claims more quickly and efficiently. Also, read the terms and conditions of our warranty, if applicable.
- Malfunction. Should your MUSIC Group Authorized Reveller not be listed in your vicinity, you may contact the MUSIC Group Authorized Fuller for your country listed under "Support" at behringer.com. Should your country not be listed, please check if your problem can be dealt with by our "Online Support" which may also be found under "Support" at behringer.com. Alternatively, please submit an online warranty claim at behringer.com BEFORE returning the product.
- Power Connections. Before plugging the unit into a power socket, please make sure you are using the correct mains voltage for your particular model. Equity lines must be replaced with fuses of the same type and rating without exception.

Responsible Party Name:
MUSIC Group Services NV Inc.
Address: 5270 Procyon Street
Las Vegas, NV 89118
USA
Phone Number:
+1 702 800 8290
DEEPMIND 12
complies with the FCC rules as mentioned in the following paragraph:
This equipment has been tested and found to comply with the limits for a Class B digital device, pursuant to part 15 of the FCC Rules. These limits are designed to provide reasonable protection against harmful interference in a residential installation. This equipment is not yet clearly labeled.
Installation. This equipment generates, uses and can facilitate radio frequency energy and, if not installed and used in accordance with the instructions, may cause harmful interference to radio communications. However, there is no guarantee that interference will not occur in a particular installation. If this equipment does cause harmful interference to radio or television reception, which can be determined by turning the equipment off and on, the user is encouraged to try to correct the interference by one or more of the following measures:
- Reorient or relocate the receiving antenna
- Increase the separation between the equipment and receivers
- Connect the equipment into an outlet on a circuit different from that to which the receiver is connected
- Consult the dealer or an experienced radio/TV technician for help
This device complies with Part 15 of the FCC rules. Operation is subject to the following two conditions:
[1] this device may not cause harmful interference, and
(2) this device must accept any interference received, including interference that may cause undesired operation.
Important information:
Changes or modifications to the equipment not expressly approved by MUSIC Group can void the user's authority to use the equipment.
FCC RF Radiation Exposure Statement:
-
This Transmitter must not be co-located or operating in conjunction with any other antenna or transmitter.
-
This equipment complies with FCC RF radiation exposure limits set forth for an uncontrolled environment. This equipment should be installed and operated with a minimum distance of 20 centimeters between the radiator and your body.
Dedicate Your Life to MUSIC