TEC 070 - DJ Equipment Skytec - Free user manual and instructions
Find the device manual for free TEC 070 Skytec in PDF.

| Product Type | Karaoke set with amplifier and DVD player |
| Brand | Skytec |
| Model | TEC 070 |
| Category | DJ Equipment |
| Maximum output power | 70 W RMS (4 Ω impedance) |
| Total harmonic distortion (THD) | <0.1% |
| Bandwidth | 50 Hz - 20 kHz ±3 dB |
| Speakers | 20 cm woofer and 25 mm tweeter |
| Mains power supply | AC 220 V, 50 Hz |
| Battery power supply | 2 rechargeable batteries 12 V / 5 Ah |
| Battery life (voice only) | 10 hours |
| Battery life (DVD playback) | 5 hours |
| Dimensions (W x H x D) | 540 x 330 x 290 mm |
| Audio inputs | DVD, wired microphones, external source |
| Audio outputs | Surround (AC-3, DTS), optical, coaxial, VGA, S-Video, mix, Super Bass |
| Disc compatibility | DVD, CD, CD-G, CD-R, MP3, KODAK Picture CD |
| Special features | Serial connection up to 10 amplifiers, dual AC/DC power supply, smart charger, remote control |
| Safety instructions | Do not open the housing, do not expose to moisture, unplug during storms |
| Maintenance | Clean with a dry cloth, do not use chemical products |
Frequently Asked Questions - TEC 070 Skytec
User questions about TEC 070 Skytec
0 question about this device. Answer the ones you know or ask your own.
Ask a new question about this device
Download the instructions for your DJ Equipment in PDF format for free! Find your manual TEC 070 - Skytec and take your electronic device back in hand. On this page are published all the documents necessary for the use of your device. TEC 070 by Skytec.
USER MANUAL TEC 070 Skytec
natural_image
Black portable audio amplifier with external microphone and control panel (no visible text or symbols on main body)TEC 070 PORTABLE DVD KARAOKE SYSTEM
170.127
Instruction Manual
Gebruiksaanwijzing
Mode d'Emploi
Gebrauchsanleitung
Brugsanvisning
GB
Congratulations on the purchase of this SkyTec Karaoke set.
Please read this manual carefully prior to using the unit.
Warning:
- Read the manual prior to using the unit.
- Keep the manual for future reference.
- Keep the packaging for safer transport in its original packaging
- Prior to the first use, have the unit checked by a qualified person.
- The unit contains voltage carrying parts. DO NOT open the unit.
- When you unplug the unit from the mains always pull the plug, never the lead.
- Never plug or unplug the unit with wet hands.
- If the plug and/or mains lead are damaged, they need to be repaired by a qualified technician.
- If the unit is damaged to an extent that you can see internal parts, do not plug the unit into a mains outlet.
- Repairs have to be carried out by a qualified technician.
- Only connect this unit to an earthed mains outlet of 230Vac/50Hz and 10-16A.
- Do no place the unit near heat sources.
- Always unplug the unit during a thunderstorm or when it is not in use.
- If the unit has not been used for a longer period of time, condensation can occur inside the housing. Please let the unit reach room temperature prior to use.
- To avoid accidents in public premises, the legal requirements must be fulfilled and instructions/warnings must be adhered to.
- Keep out of the reach of children.
- All volume controls must be set to zero prior to switching the unit on.
- Do not use cleaning sprays for the slider controls. The residues of these spray cause dust deposits in the controls. If a problem occurs, please consult a specialist.
- Always handle CDs with clean hands. Do not insert a damaged CD.
- Always close the CD tray to keep the laser eye clean.
- Do not clean the unit with chemical solutions. This might damage the finish. Only use a dry cloth for cleaning.
text_image
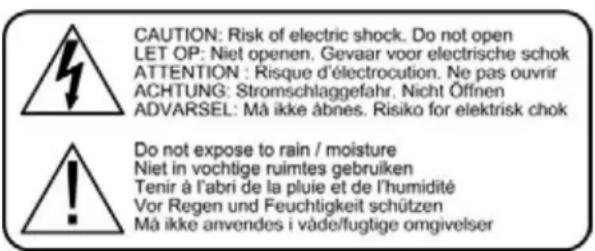
CAUTION: Risk of electric shock. Do not open LET OP: Niet openen. Gevaar voor electrische schok ATTENTION : Risque d'électrocution. Ne pas ouvrir ACHTUNG: Stromschlaggefahr. Nicht Öffinen ADVARSEL: Må ikke åbnes. Risiko for elektrisk chok Do not expose to rain / moisture Niet in vochtige ruimtes gebruiken Tenir à l'abri de la pluie et de l'humidité Vor Regen und Feuchtigkeit schützen Må ikke anvendes i våde/fugtige omgivelserPARTS DESCRIPTION
Thanks you for choosing our products.
Please take a few moments to read these instructions carefully, as we want you to enjoy your new products quickly and to the full. The series of amplifier with new design of model and nice looking, can suit different occasions, especially for office, meeting, exhibition, outside party, teaching etc. The series is provided with wired, amplifying and amusement; fully embody high quality, low price, portability and convenience. We believe firmly that the series of amplifier will become your good assistant and friend because of its advantages.
MAIN FEATURES OF THE AMPLIFIER
- Excellent quality achieved by adopting SANYO dustproof digital chips and intelligent fan.
- Assemble with advanced wired microphones.
- 70W high power output to make your voice loud and clear.
- With AC-3, DTS etc. surround output.
- With fiber, coaxial, VGA and high distinct image output sockets.
• Function of connecting to outer speakers. - Distinctive series connection of the system makes it suit for big speech occasion.
• Built-in sound source equipment: DVD - Built-in AC-DC serving dual purposes power supply system with intelligence: auto check the capacity of the battery, auto charge the battery, AC auto change to DC, it makes you more convenient.
- The system can use wired microphone, DVD etc. different sound sources mixed-amplifying.
- Special protection circuitry can effectively protect your amplifier.
SPECIFICATION
MAX Output power: 70W (RMS) / 4 Ω load impedance T.H.D.: <0.1%
Frequency Response: 50Hz-20kHz ± 3dB
Input Sound Source: ...... DVD / wired mics/ external input sound source Speaker: ...... Built-in 8 inch bass speaker and 1 inch tweeter
Power supply: .. AC 220V at 50Hz, auto power source management system, ..... intelligent battery charger and two pieces of 12V/5AH .... rechargeable batteries.
Battery life: ...... Voice-amplifying for 10 hours and DVD-playing for 5 hours.
Wired microphone: ....Match different kinds of wired microphones. Dimensions: ....540 x 330 x 290mm
FEATURES OF DVD PLAYER:
- With AC-3, DTS, PCM, MPEG etc. digital audio decoding output.
- With the quality of Hi-Fi, 96kHz/24bit audio digital processing.
- High definition of image details output, it can apply to the future display equipment.
- Fiber / coaxial audio output.
- With high stability and auto correction.
- Compatible with DVD, CD, CD-G, CD-R, MP3, KODAK Picture CD
ENTIRETY DESIGN:
(1) Protect net
(2) Front panel
(3) Telescopic Handle
(4) Trolley
(5) Back Panel
(6) Watch Case

text_image
(1) (2) (3) (4)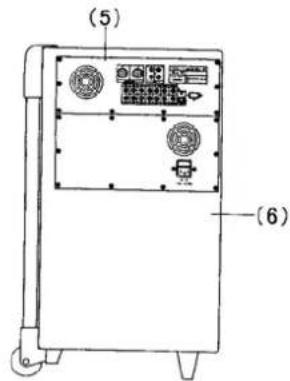
text_image
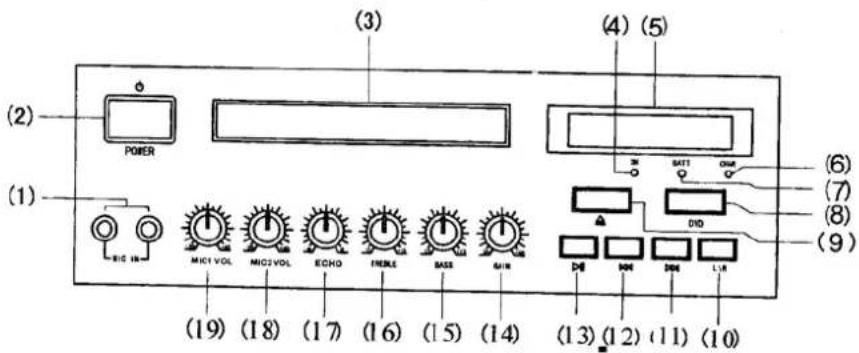
(5) (6)FRONT PPANEL OF THE AMPLIIFER:
text_image
(2) POWER (1) BIG IN (19) MICI VOL MIC2 VOL ECHO IRENE BASE MAIN (3) (4) (5) SATT CMM DIG (6) (7) (8) (9) (13) (12) (11) (10)- Microphone Input Socket
- Power Switch
- DVD room
- Power Source Indicator
- DVD LCD Display panel
- Battery-charge indicator
- Battery Capacity indicator
- DVD ON/OFF
- DVD IN/OUT Button
-
DVD channel sound switch
-
Upper button
- Next button
- Play button
- Overall volume
- Bass knob
- Treble knob
- Mixed Sound knob
18, 19. Wired microphone Volume knob
BACK PANEL OF THE AMPLIFIER:
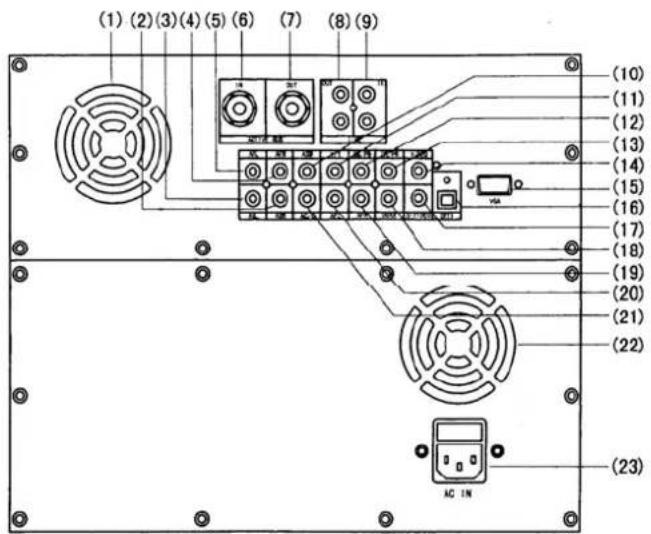
- The system has five patterns on output: standard video, S-Output, VGA socket, chromatism, and PR PB PY output.
- The video connection is chosen according to the input socket of your TV/monitor.
- Remember that the five patterns of output cannot be connected at the same time, to avoid affecting result of image output.
Audio Connection:
- The audio output of the system is divided into two kinds: simulated audio and digital audio. Simulated audio has two sound channels of stereo audio, 5.1 channel audio of AC-3, digital audio has fiber and coaxial output.
- Chose pattern according to your outer equipment. If your outer equipment is an ordinary TV, you can only choose stereo output; if your outer equipment is an amplifier with 5.1 sound channel input, you can watch the effect of AC-3 home cinema.
- The DVD output has wide dynamic range, so the volume of the amplifier must be moderate, or the speaker would be destroyed by the sudden produced super high volume.
SYSTEM SETTING:
- Press the SETUP button, the panel displays the menu.
- Use the direction keys ( ) to move to corresponding item, then press the SETUP button again to exit the setup menu.
• Sound / Subtitle / Language setup of disc menu needs support of the disc. - When you setup the grade of disc play, you need to input the secret code of the system, the preset of the company is 0000.
BASIC PLAY:
- EJECT: Press the POWER key to put trough the power supply. Press the EJECT key to open the disc room, put in the disc, and press the EJECT key again to close the DVD room. When the DVD amplifier finished reading the disc, it will display the disc type on the TV screen and auto-play.
- PROG key: Press the PROG key and the TV screen displays the program menu. Then you can use the number keys and the direction keys to adjust the play order of the songs in the disc.
- SYSTEM TYPE key: According to the system of your TV, use the SYSTEM TYPE key to adjust the output system type.
- SUBTITLE key: Press the SUBTITLE key, you can choose one kind of subtitle display from your disc. (Your DVD disc must support this function)
- LANGUAGE key: Use the LANGUAGE key to choose the language you need when playing multi-language disc.
- ANGLE key: If your DVD disc includes multi-scene taking, you can use the ANGLE key to change from one angle to another.
- ZOOM key: With the ZOOM key, you can magnify or zoom the picture. You can use the direction keys to change the position of the picture in the status of magnifying.
- SOUND CHANNEL key: When you are playing multi-channel VCD or CD, you can use the SOUND CHANNEL key to choose output from the left sound channel or the right sound channel and select stereo or mixed sound output.
- SLOW key: With the SLOW key, you can watch the slow down motion pictures in the process of disc playing. But the DVD player mutes when you press the SLOW key.
- STEP key: Press the STEP key, the DVD player plays step by step. Press the PLAY key to return to normal mode.
- A-B key: When playing DVD, VCD, CD, you can use the A-B key to watch any part in the discs. When the DVD player is playing a disc, you can press the A-B key to choose the start point (refer to Point A) of the part you want to repeat and press the A-B key again to choose the end point (mend by Point B). Then the DVD player repeats the part between A and B. Press the A-B key for the third time, you can cancel the preset part repeat and return back to normal play.
- REPEAT key: With the repeat key, you can repeat to play any title, paragraph, song or all the disc.
- TITLE key: When the DVD player is playing DVD disc, use the TITLE key to return to the first class title to play.
- MENU key: When the DVD player is playing DVD disc, press the MENU key to change subordinate menu, and press the MENU key again to return to the main menu.
- PSCAN / NORMAL key: With the PSCAN / NORMAL key, you can adjust the video output mode in cycle.
- VIDEO MODE key: With this key you can adjust the brightness, contrast, and hue of the state of your screen. The DVD player provides four states: memory, standard, dynamic and soft.
- STANDBY key: With the STANDBY key you can control the power switch of the DVD player.
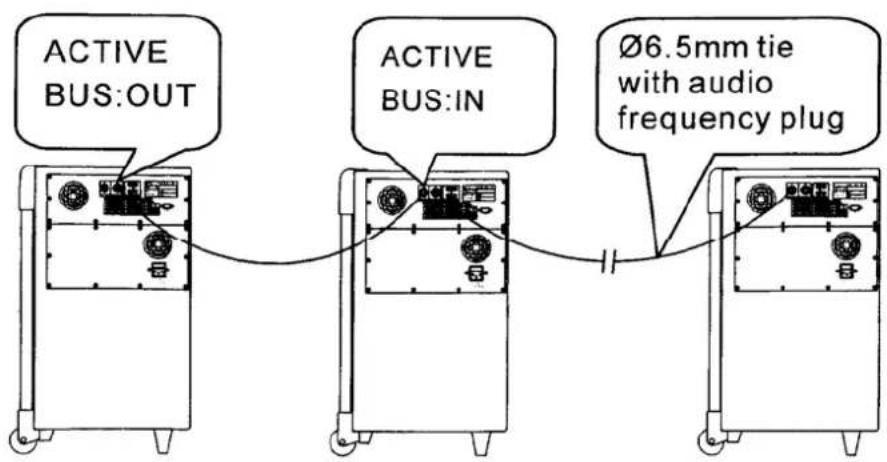
SERIES ONNECTION OF THE AMPLIFIER:
- In order to suit larger area, we can use series connection of the system. The amount of amplifiers can be up to ten. The connection way is as the attached figure.
- In the attached figure, (1) means the main control amplifier (2\~10) mean the controlled amplifiers. The controlled amplifier's input sound source, volume and tone are controlled by the main control amplifier.
- When the system is in series connection, the output power of the main control amplifier auto reduces to suit for monitoring.
NOTE: When the system is in series connection, you should connect the amplifier correctly, or it will possibly cause damage to the amplifier.
text_image
ACTIVE BUS:OUT ACTIVE BUS:IN Ø6.5mm tie with audio frequency plugDo not attempt to make any repairs yourself. This would invalid your warranty.
Do not make any changes to the unit. This would also invalid your warranty.
The warranty is not applicable in case of accidents or damages caused by inappropriate use or disrespect of the warnings contained in this manual.
SkyTronic UK cannot be held responsible for personal injuries caused by a disrespect of the safety recommendations and warnings. This is also applicable to all damages in whatever form.