
STX-110 - DJ Equipment Skytec - Free user manual and instructions
Find the device manual for free STX-110 Skytec in PDF.


| Product Type | DJ Controller |
| Brand | Skytec |
| Model | STX-110 |
| Dimensions (L x W x H) | 240 x 180 x 50 mm |
| Weight | 1.2 kg |
| Power Supply | USB 5V DC, 500 mA |
| Inputs | 1x USB (for software control) |
| Outputs | 1x 3.5 mm headphone jack |
| Main Function | Play, pause, cue, pitch fader, jog wheel, hot cues, loop, effects |
| Compatibility | Virtual DJ, rekordbox, Serato DJ Lite |
| USB Connection | USB 2.0 (plug-and-play) |
| Display | LED indicators for play, cue, loop |
| Jog Wheel | Touch-sensitive, 100 mm |
| Pitch Fader Range | ±10% |
| Cleaning | Wipe with soft dry cloth; avoid solvents |
| Safety | Keep away from moisture, do not disassemble |
| Spare Parts / Repairability | Contact authorized service center |
| General Information | Entry-level DJ controller for beginners |
Frequently Asked Questions - STX-110 Skytec
User questions about STX-110 Skytec
0 question about this device. Answer the ones you know or ask your own.
Ask a new question about this device
Download the instructions for your DJ Equipment in PDF format for free! Find your manual STX-110 - Skytec and take your electronic device back in hand. On this page are published all the documents necessary for the use of your device. STX-110 by Skytec.
USER MANUAL STX-110 Skytec
172.809
USER'S MANUAL
HANDLEIDING
GEBRAUCHSANLEITUNG
skytec

CAUTION:
TO REDUCE THE RISK OF ELECTRIC SHOCK DO NOT REMOVE THE COVER (OR BACK) THERE ARE NO SERVICEABLE PARTSINSIDE. REFER SERVICING TO QUALIFIED SERVICE PERSONNEL.
The lighting flash with arrowhead symbol, within an equilateral triangle is intended to alert the user to the presence of un insulated “dangerous voltage” within the products enclosure that may be of sufficient magnitude to constitute a risk of electric shock to persons.
The exclamation point within an equilateral triangle is intended to alert the user to the presence of important operating and maintenance (servicing) instructions in the literature accompanying the appliance.
WARNING:
To reduce the risk of fire or electrical shock, do not expose this appliance to rain or moisture. Electrical equipment should NEVER be kept or stored in damp environments.
DANGER:
Invisible laser radiation when open and interlock failed or defeated. avoid direct exposure to beam.
CAUTION:
This product utilizes a laser. use of controls or adjustments other than those specified herein may result in hazardous radiation exposure.
skytec

![graph TD A["1"] --> B["27"] C["DISC"] --> D["DISC"] E["HOSEPHYSA"] --> F["HOSEPHYSA"]](/content/2026/05/778127/images/fd2894220318a41faba48a029c9920ab8d0511022cff910e870fde6fc37f7752.jpg)
IMPORTANT
Use of controls or adjustments or performance of procedures other than those specified herein may result in hazardous radiation exposure.
CD Player Function :
1. HEADPHONE JACKS
Used to connect for audio monitoring with headphones.
2. USB PORT
Support USB playing and you may also connect the computer with the USB cable but only when enter into USB work mode.
skytec
3. TIME BUTTON
Used this knob to choose the time mode : Elapsed time, remaining time or total remaining time.
4. REPEAT BUTTON
Use this button to repeat one track or all the track of the CD.
5. IN BUTTON ( LOOP SYSTEM )
This button sets the beginning of the loop. The Loop indicator on the display flashes.
6. CONTINU / SINGLE BUTTON
Press these to switch between the SINGLE and CONTINUOUS play mode. The selected mode is indicated on the LCD. In SINGLE mode, after each track, the unit stops the reading. In CONTINUOUS mode, the unit read all track and stops.
7. PROG BUTTON
In STOP mode, you can program several tracks (20 tracks max.) :
- Press the STOP button to enter in the stop mode
- Press the PROG button to enter in the program mode
- Use the skip track buttons to choose the track you want to listen then press the PROG button to enter your choice.
- Use one more time the skip track buttons to choose the track you want to listen then press the PROG button to enter your choice.
- Repeat the operation to select all the track you want to listen
- Press the PLAY / PAUSE button to start the playback
8. OUT BUTTON
When you press this button, you set the end point of the seamless loop and you start the loop. To finish the loop, press again this button.
9. SD CARD PORT
Slot for inserting 3 IN 1 card. The contacts of the card must point downwards. The unit cannot read cards with a capacity of more than 4GB. The unit is not compatible to SDHC cards and only supports the MP3 format.
10. SKIP I<< BUTTON
use this switch to re-strart the track or to select the last track.
11. CUE BUTTON
Pressing the CUE button during play provides a return to the position at which play was started
12. +10 BUTTON
Use this button to jump of 10 tracks in one press.
13. PLAY / PAUSE BUTTON
Each time you press the PLAY/PAUSE button, the operation changes from play to pause or from pause to play.
14. SKIP >>I BUTTON
Used this knob to select the next track.
15. PITCH CONTROL
use this fader to increase or decrease the speed of the track.
16. PITCH BEND + BUTTON
The pitch will automatically rise when the + button is pressed and return to the original pitch when it is released.
skytec
17. PITCH BUTTON
If you push this button, the adjustment of the pitch potentiometer is available.
18. DISPLAY
LCD Display Indicate the Track/Numbers/Time/Remain/Pitch/Continue/Single.
pitch button
19. PITCH BEND - BUTTON
The pitch will drop while the - button is pressed and return to the original pitch when it is released.
20. EJECT BUTTON
Press to load or eject disk. Each press will open or close the disk tray.
NOTE: disc holder will not open unless stop or pause button has been pushed fir
21. EJECT BUTTON
Press to load or eject disk. Each press will open or close the disk tray.
NOTE: disc holder will not open unless stop or pause button has been pushed fir
22. SEARCH BUTTON
Pressed the button to switch the function of jog dial between SEARCH and PITCH BEND, when the indicator LED is light, dial the jog for quick search forward and backward, when the indicator LED is off, dial the jog for pitch bend function, If the jog is unmoved for 8 seconds, the indicator is off, and the jog is for pitch bend function.
search button
Pressed the button to switch the function of jog dial between SEARCH and PITCH BEND, when the indicator LED is light, dial the jog for quick search forward and backward, when the indicator LED is off, dial the jog for pitch bend function, If the jog is unmoved for 8 seconds, the indicator is off, and the jog is for pitch bend function.
23. TRACK SELECT BUTTONS
Pressing 0-9 buttons, allow you to select tracks from the CD.
24. SCRATCH BUTTON
When the LED indicator is flashed the dual wheel is in SCRATCH mode, you may press the SCRATCH button to exit SCRATCH mode.
25. JOG & SHUTTLE WHEELS
Shuttle: Use the dial to select the scanning direction and speed. The disc is scanned in the forward direction when the shuttle dial is turned clockwise from the neutral position, in the reverse direction when the shuttle dial is turned counterclockwise. The scanning speeds up when the shuttle dial is turned faster.
Jog: In pause mode, if you turn the jog, the point at which the sound is being produced moves by a number of frames corresponding to the number of clicks. Clockwise moves the point forward; counterclockwise moves the point backward. In play mode, the jog increases or decreases the speed of the song. (Clockwise: increase, counterclockwise: decrease).
26. DISC-TRAY
To enter the disc, please refer to the explanations under 6.2 CD-tray.
skytec
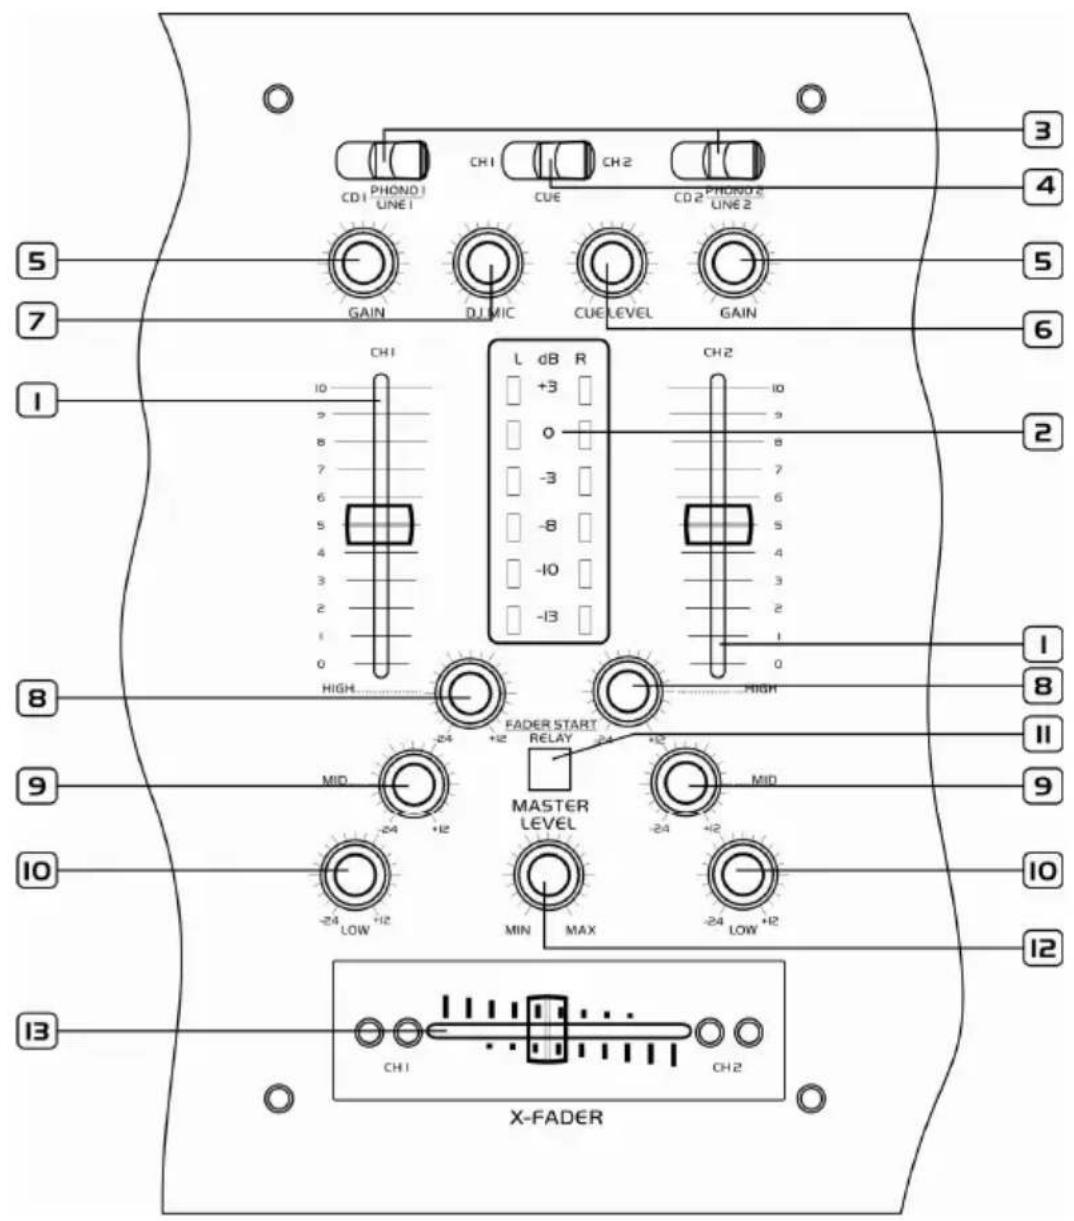
MIXER
CONSOLE
skytec
Mixing Console Function :
1. INPUT FADER
Controls individual source levels for CH1-2 in the mix
2. LED METER
Indicates the master output level
3. INPUT TOGGLE SWITCH
Selects which source will be live to that channel based on what you have connected to the rear panel input section. In CD1-2 position the internal CD units are active
4. CUE FOR CH1-2
Selects which source will be live to that channel for CH1 &CH2
5. CH1&CH2 GAIN CONTROL
Adjusts CH1&CH2 level
6. CUE LEVEL CONTROL
Adjusts cue volume
7. DJ MIC
Adjust microphone level
8. HIGH FADER 1-2
Adjust CH1&CH2 equalization of high
9. MID FADER 1-2
Adjust CH1&CH2 equalization of mid
10. LOW FADER 1-2
Adjust CH1&CH2 equalization of low
11. FADER START
Activation allows you to start the CD players from you crossfader. Travel from left to right will start the right CD player and pause the left CD player.
12. MASTER LEVEL
Adjust master level output.
13. REPLACEABLE CROSSFADER
Achieves clean segues between the two input channels. Hard left selects channel 1."Hard right" selects channel 2.with the crossfader centered, both assigned channels are live Use the crossfader for fast and seamless segues from one selected channel to the other.
skytec

Connection:
1. AC CORD
Used this cable to connect the AC mains power to the unit
2. POWER BUTTON
Press the power switch to turn the unit on. To switch the POWER off press the POWER switch again.
3. GND
Grounding lug for turntable connection. Always use this connection when using turntables.(your turntable cable should have a grounding wire)
4. LINE/PHONO INPUT SWITCH
Use this to allow either line level or phono level equipment to be plugged into your channel inputs. when phono input is selected, your signal is fed directly to the high-quality RIAA phono pre-amplifiers. Line level sources will overload the sensitive phono pre-amps and will sound very bad, so always be sure to toggle the line/phono switch over to line before connection of line sources.
5. INPUT
Plug in the line level device such as tape deck or additional CD player here.
6. DJ MIC
Plug XLR type microphone plug in here.
7. MIC INPUT
Plug 1/4" microphone plug in here.
8. STEREO MAIN OUTPUT
Unbalanced RCA connectors controlled by the master fader.
skytec
WARRANTY CONDITIONS
The date the product leaves the importer is considered to be the date the warranty begins. The law obliges the retailer to offer a two year guarantee to the enduser.
Only companies approved by Tronios are allowed to work on the equipment.
During warranty period (defective) equipment must be returned by pre-paid mail in the original box.
Potentiometers have a limited lifetime and are not covered by the manufacturer for more than normal use.
For all service enquiries, refer to your local distributor, as he is best able to help you.
SPECIFICATIONS :
Anti-Shock Buffer Memory : 40 seconds
Power supply : \~100-240V,60/50Hz,
Dimensions : 482x260x122mm
Electric products must not be put into household waste. Please bring them to a recycling centre. Ask your local authorities or your dealer about the way to proceed.
The specifications are typical. The actual values can slightly change from one unit to the other. Specifications can be changed without prior notice.
skytec
Nederlands
172.809
- NETENTREE
230Vac/50Hz aansluiting - NETSCHAKELAAR
- GND
Copyright © 2010 by TRONIOS the Netherlands

tronios
Sound & Light
CE Declaration of Conformity
Importer: TRONIOS BV
Product Description: Skytec, STX-110 CD/USB/SD Mixing Console
Regulatory Requirement: EN 60065
EN 55013
EN 55020
EN 61000-3-2/-3-3
The product met the requirements stated in the above mentioned Declaration(s).
This certificate does not cover the aspects that may be relevant such as performance and fitness for purpose.
Signature,

A L
08-12-2010
- SKYTEC
- CAUTION
- WARNING
- DANGER
- IMPORTANT
- CD PLAYER FUNCTION
- HEADPHONE JACKS
- USB PORT
- TIME BUTTON
- REPEAT BUTTON
- IN BUTTON ( LOOP SYSTEM )
- CONTINU / SINGLE BUTTON
- PROG BUTTON
- OUT BUTTON
- SD CARD PORT
- SKIP I
- CUE BUTTON
- 10 BUTTON
- PLAY / PAUSE BUTTON
- SKIP >>I BUTTON
- PITCH CONTROL
- PITCH BEND + BUTTON
- PITCH BUTTON
- DISPLAY
- PITCH BEND - BUTTON
- EJECT BUTTON
- SEARCH BUTTON
- TRACK SELECT BUTTONS
- SCRATCH BUTTON
- JOG & SHUTTLE WHEELS
- DISC-TRAY
- MIXING CONSOLE FUNCTION
- INPUT FADER
- LED METER
- INPUT TOGGLE SWITCH
- CUE FOR CH1-2
- CH1&CH2 GAIN CONTROL
- CUE LEVEL CONTROL
- DJ MIC
- HIGH FADER 1-2
- MID FADER 1-2
- LOW FADER 1-2
- FADER START
- MASTER LEVEL
- REPLACEABLE CROSSFADER
- CONNECTION
- AC CORD
- POWER BUTTON
- GND
- LINE/PHONO INPUT SWITCH
- INPUT
- MIC INPUT
- STEREO MAIN OUTPUT
- WARRANTY CONDITIONS
- SPECIFICATIONS
- NEDERLANDS
- 172.809
- TRONIOS
- SOUND & LIGHT
- CE DECLARATION OF CONFORMITY
Brand : Skytec
Model : STX-110
Category : DJ Equipment