
NASCZ1 - Hi-Fi System SONY - Free user manual and instructions
Find the device manual for free NASCZ1 SONY in PDF.
| Product type | Hi-Fi system |
| Brand | Sony |
| Model | NASCZ1 |
| Power supply | Mains |
| Main unit dimensions (approx.) | 430 x 140 x 380 mm (W x H x D) |
| Main unit weight (approx.) | 8 kg |
| Output power | 2 x 50 W RMS (into 6 ohms) |
| Connectivity | USB (type B), optical digital audio input/output, analog audio input/output (RCA), FM/AM antenna, headphone jack |
| Supported audio formats | Audio CD, CD-R/RW, MD, MP3 (via PC) |
| Main functions | CD/MD playback, FM/AM tuner, MD recording, PC control via M-crew software, track programming, timers |
| Included accessories | PC adaptor CAV-MN10, USB cable, optical digital audio cable, M-crew software CD-ROM, user manual, warranty card |
| Care and cleaning | Unplug the device before cleaning. Use a soft, dry cloth. Do not use solvents or abrasive products. |
| Safety | Do not expose to moisture, excessive heat, or shocks. Use only the supplied mains adaptor. Have repairs carried out by a qualified professional. |
| Spare parts and repairability | Contact Sony after-sales service or an authorized dealer for spare parts and repairs. |
| General information | The Sony NASCZ1 Hi-Fi system allows advanced PC control via M-crew software. Compatible with Windows 98/2000/Me. |
Frequently Asked Questions - NASCZ1 SONY
User questions about NASCZ1 SONY
0 question about this device. Answer the ones you know or ask your own.
Ask a new question about this device
Download the instructions for your Hi-Fi System in PDF format for free! Find your manual NASCZ1 - SONY and take your electronic device back in hand. On this page are published all the documents necessary for the use of your device. NASCZ1 by SONY.
USER MANUAL NASCZ1 SONY
Operating Instructions GB
Mode d'emploi FR
- Duplication of any or all of the contents of this software and instruction manual or lending of this software to third parties without the express permission of the copyright holder is strictly prohibited by copyright law.
- Sony cannot be held liable in any way for monetary losses, lost profits or claims from third parties arising from the use of this software.
- Should any manufacturing defects occur, Sony's responsibility shall be limited solely to replacing said defective merchandise.
- This software is approved for use only with the specified equipment.
- Sony reserves the right to change software specifications without prior notice.
Program 1997-2001 Sony Corporation Documentation 2001 Sony Corporation
2001 Sony Corporation All rights reserved.
- M-crew, PictureGear and VAIO are the registered trademarks of Sony Corporation.
- Microsoft, MS-DOS and Windows are the registered trademarks of Microsoft Corporation.
- IBM and PC/AT are the registered trademarks of International Business Machines Corporation.
• Macintosh is the registered trademark of Apple Computer Inc. - Adobe ^1 and Adobe ^2 Acrobat ^3 Reader are the trademarks of Adobe Systems Incorporated.
- Other companies and product names are the trademarks or the registered trademarks of each company.
Table of contents
Getting started
Overview 4
System requirements .... 5
Preparation
Checking the supplied items...... 6
Connections 7
Setup procedure for your computer's system ...... 9
Installing the software 22
Installing M-crew 22
Installing PictureGear Label Maker .... 24
Installing Acrobat Reader 4.05 25
Uninstalling the software ..... 26
Starting up the software 27
Starting up the software ...... 27
Quitting the software 27
Additional Information
Using the on-line manual 28
Using Help.... 29
Troubleshooting.... 30
Specifications of CAV-MN10 ...... 32
About this manual
This manual shows how to install the M-crew software and how to use the online manual and helps.
For the latest information, refer to the
"Readme.txt" file on the supplied CD-ROM.
Overview
M-crew (ver. 1.05E) allows you to control Sony system stereo components equipped with a PC LINK jack. Through M-crew, you can perform the functions listed below.
Playback
- Use the computer to operate the playback function on CD and MD decks.
- Enjoy audio files stored on the computer.
- Play a CD in the CD-ROM drive (only when the connected system stereo does not have any controls for the CD player).
- Tune in radio stations using the computer.
Recording/editing
- Input disc and track names from the computer keyboard.
- Edit MDs on the computer screen.
- Record from a CD to an MD through easy drag-and-drop operations.
- Record easily from a radio to an MD.
Other operations
- Create virtual media for the management of audio files.
- Keep track of played and recorded tracks through a Disc Library.
- Access related websites while enjoying tracks.
- Access related websites while enjoying radio programs.
- Set playback and recording timers.
- Print out MD labels.
Notes
- In this manual, the term “system stereo component” refers specifically to component stereo systems (incorporating CD and MD decks) and discrete MD decks that support PC-LINK connections.
- The M-crew functions that operate on your computer will depend on the system stereo components connected to your computer.
- You can use this software to operate only system stereo components connected directly to the computer.
System requirements
The following hardware and software are necessary to use the M-crew (ver. 1.05E) software.
☐IBM PC/AT or compatible (This software does not run on the Apple Macintosh.)
☐CPU* ^1 : Intel Pentium II 233 MHz/Celeron 300A or higher
☐Video board and display driver:
VGA (800 · 600 pixels), 65,536 colors or more.
☐Hard disk space: 20 MB ^* ^2 or more (When installing both M-crew and on-line manual.)
□CD-ROM drive* 3
□USB port: 1 or more
☐OS: Windows 98/Windows 98SE/Windows 2000/ Windows Me (This software does not run on Microsoft Windows 3.1, Windows 95 or Windows NT.)
☐Media player: Windows Media Player (Before you can use the M-crew software, you must first install Windows Media Player (version 6.4 or higher) into your computer.)
☐ Video monitor: VGA (800 · 600 pixels), 65,536 colors or more.
*1 The operation of M-crew is not guaranteed on some computers with Pentium-compatible CPU chips, such as the AMD K6 (e.g., sound skipping may occur during playing of an audio file).
*2 Another 15 MB of hard disk space is required to install PictureGear Label Maker.
*3 If your CD-ROM drive is connected to your computer through a SCSI controller (including PCMCIA card type), you will be able to install the M-crew software, but you will not be able to play an audio CD in the CD-ROM drive.
Note
The PC LINK connector is not compatible with a CONTROL A 1 or A 1 II, or CONTROL I connector. If your system stereo has a CONTROL A 1 or A 1 II connector, you must use the PCLK-MD2 Connecting Kit (not supplied).
Checking the supplied items
Make sure all of the following items are included with your M-crew. If anything is missing, please contact the shop where you made your purchase or your nearest Sony dealer.
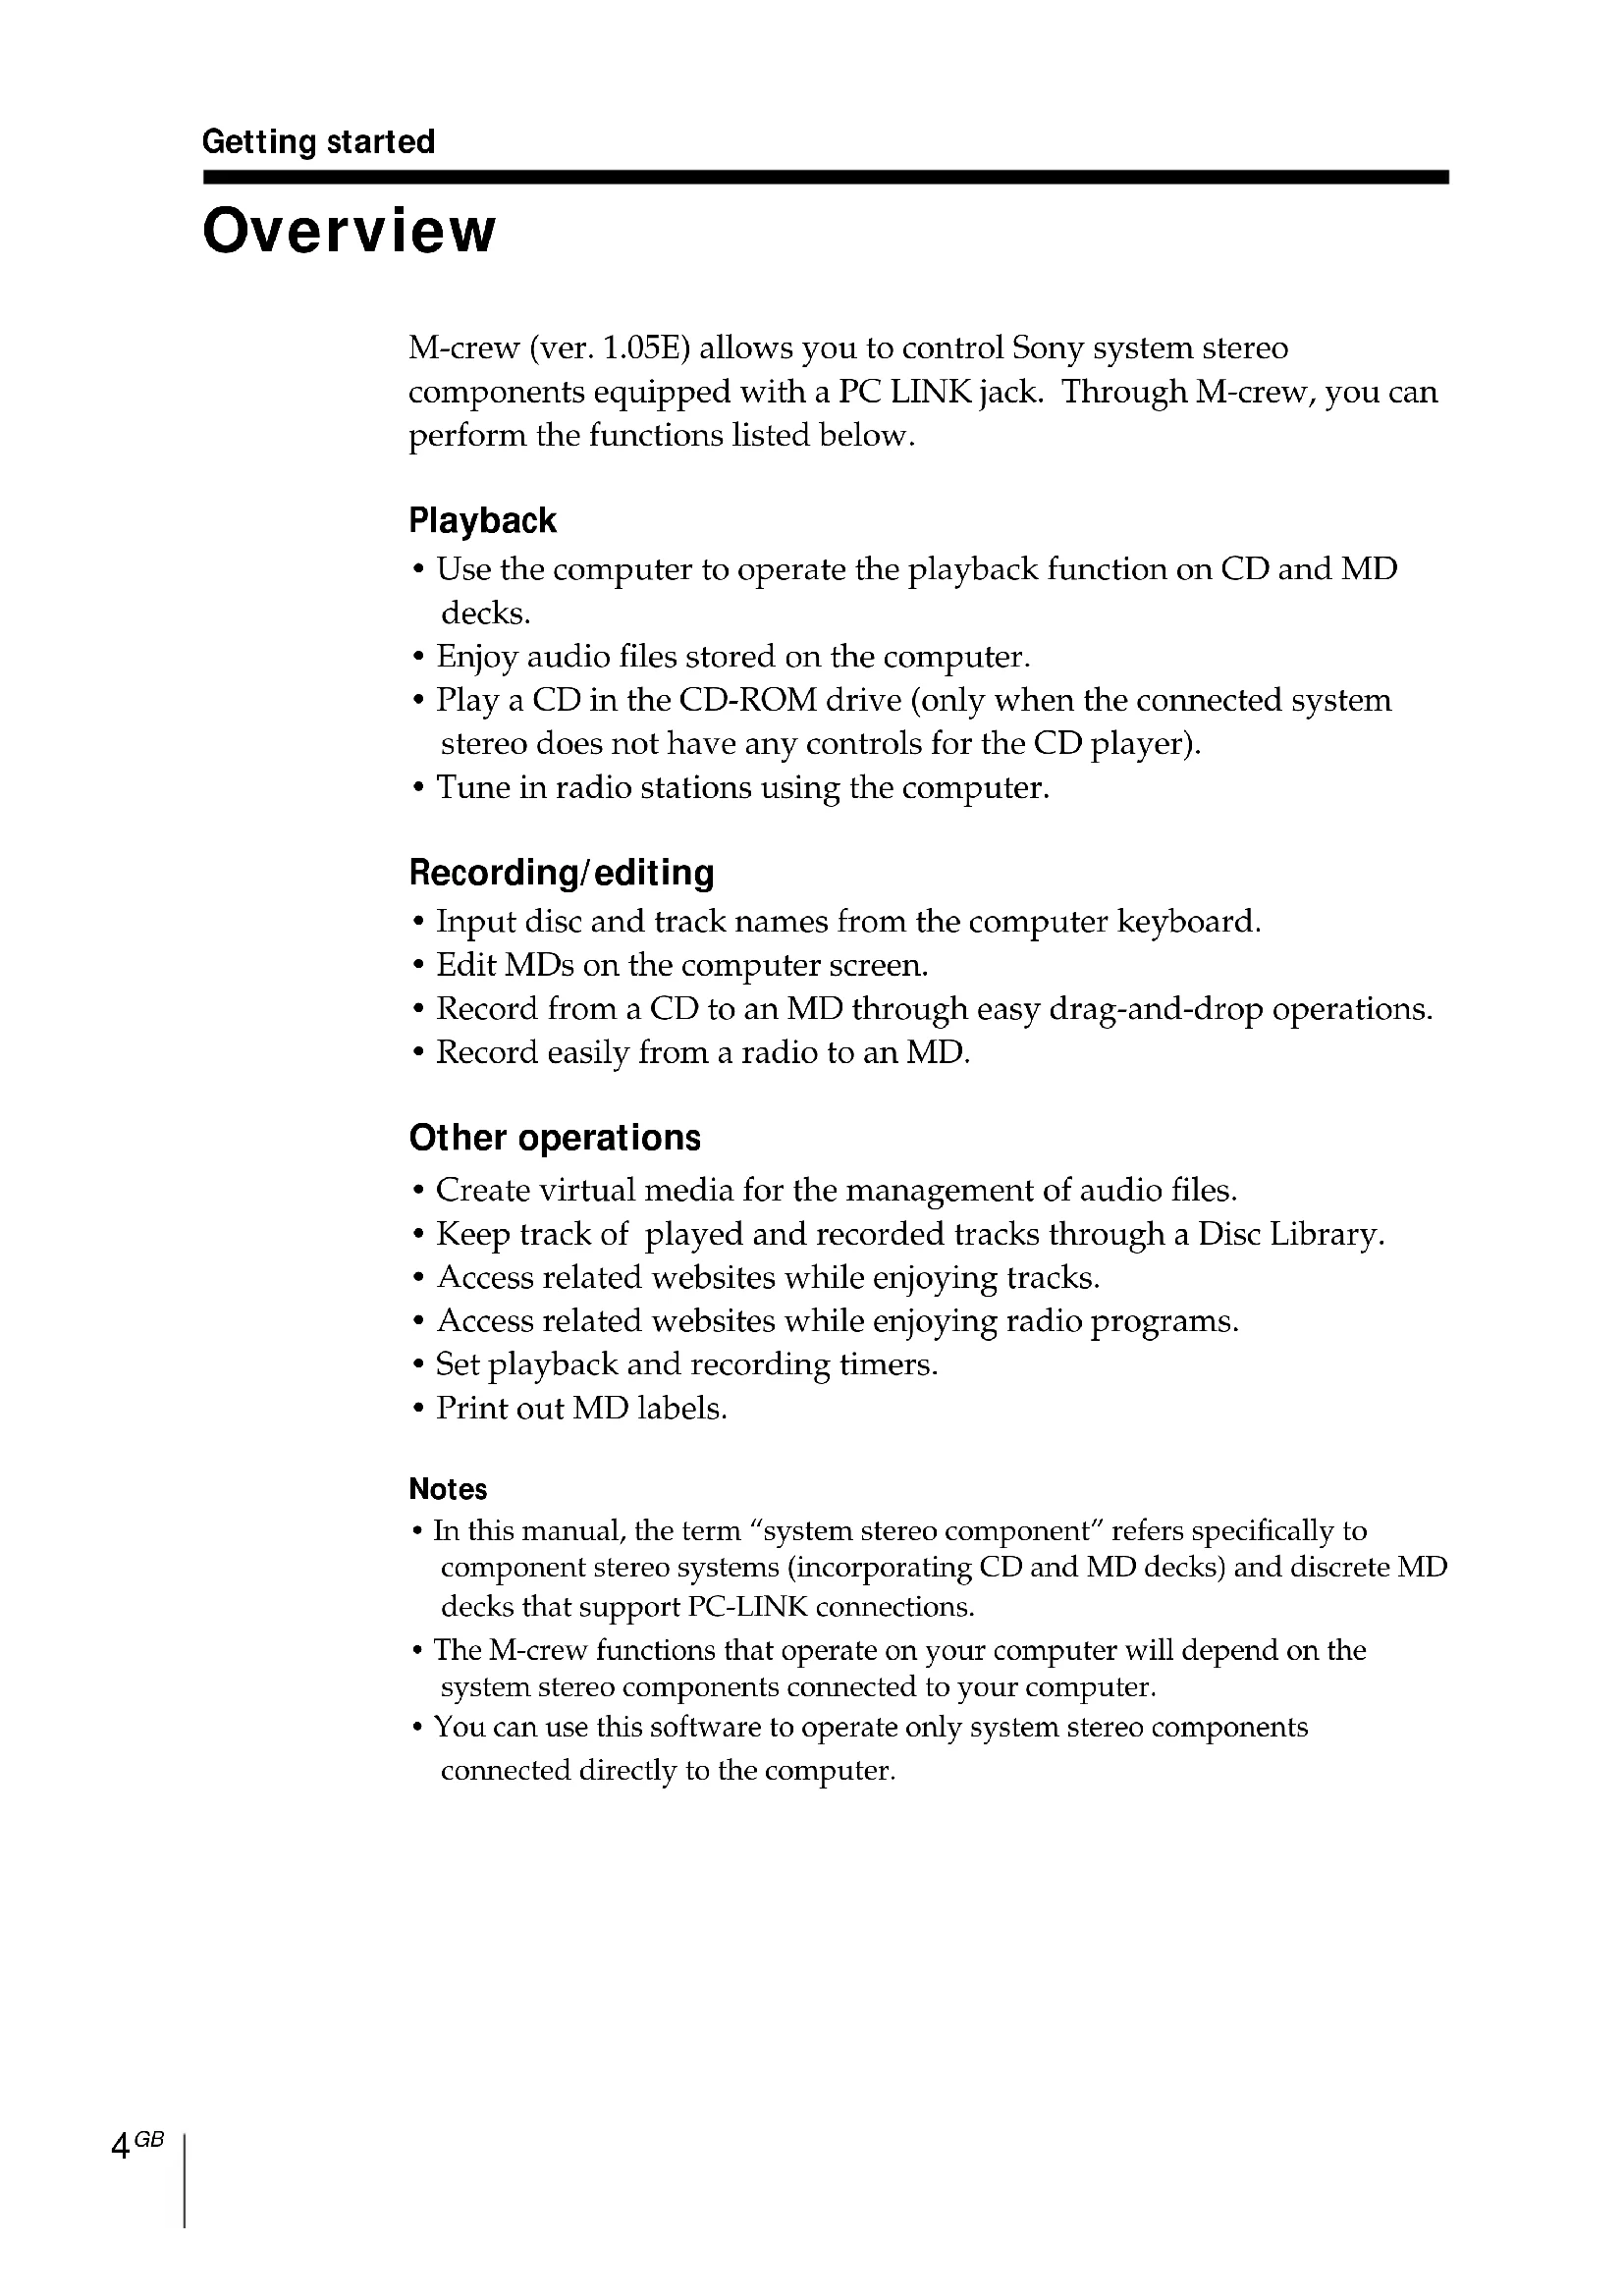
• PC connecting adaptor CAV-MN10 (1)
Note
The model name "PCLK-MN10" is printed on the adapter unit.
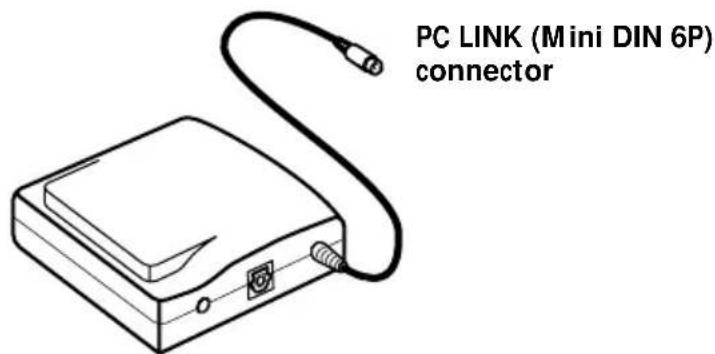
- USB cable (1)
natural_image
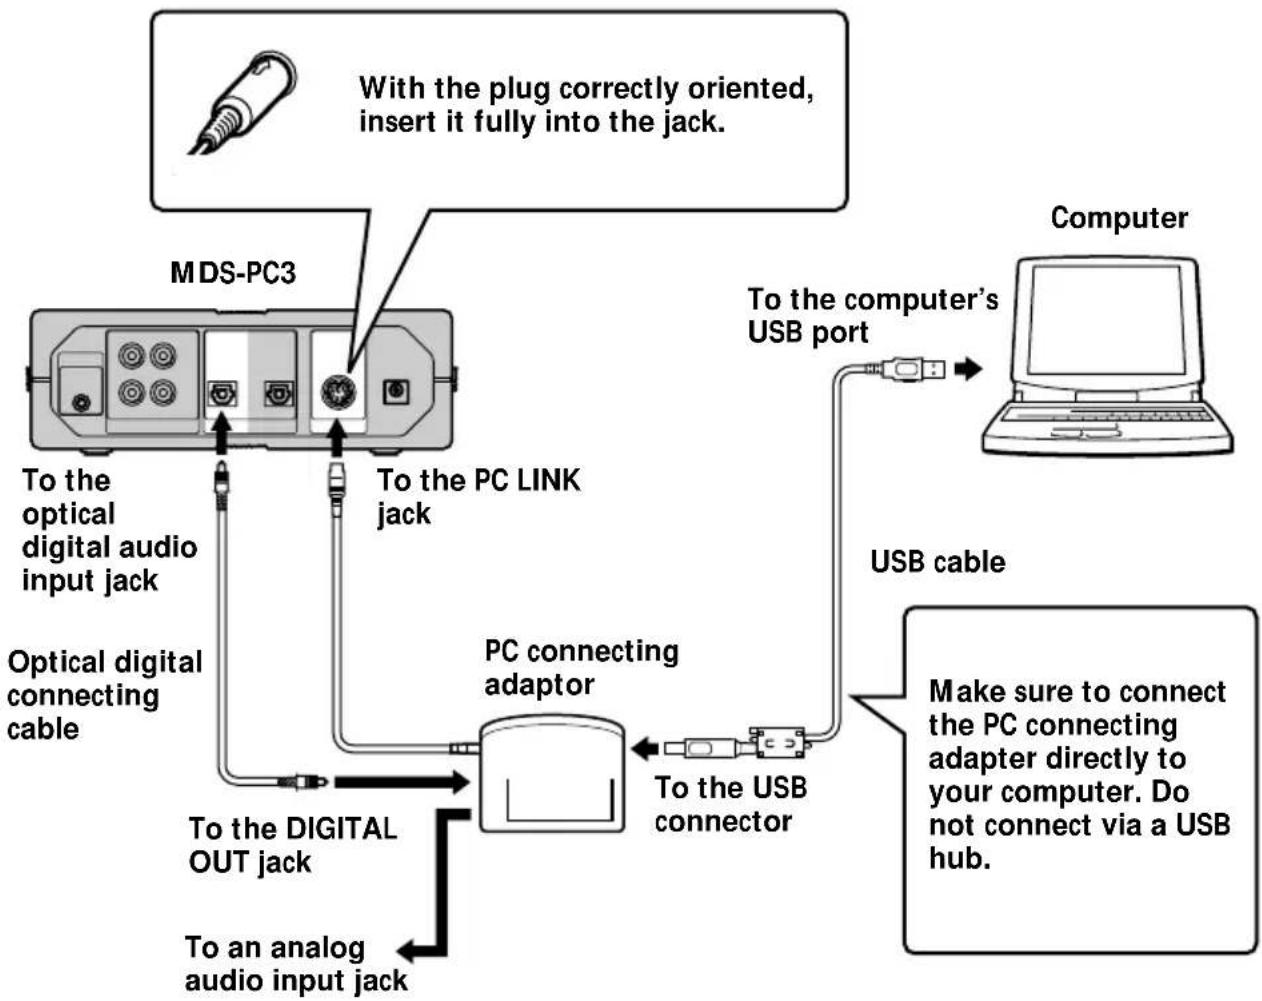
Pure electrical circuit lines without any symbols• Optical digital connecting cable (1)
• M-crew CD-ROM (1)
- Operating instructions (1)
- Warranty card (1)
Connections
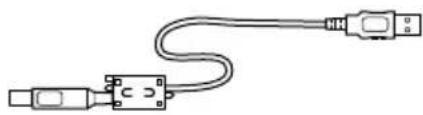
Connecting your personal computer with a system stereo component
Use the supplied PC connecting adaptor, USB cable, and optical digital connecting cable to connect your personal computer with a system stereo component.
The diagram below shows an example of the MDS-PC3 connected with a computer.
flowchart
graph TD
    A["With plug correctly oriented, insert it fully into the jack."] --> B["MDS-PC3"]
    B --> C["To the optical digital audio input jack"]
    B --> D["Optical digital connecting cable"]
    B --> E["To the PC LINK jack"]
    B --> F["To the digital OUT jack"]
    B --> G["To an analog audio input jack"]
    H["Computer"] --> I["USB port"]
    I --> J["USB cable"]
    J --> K["PC connecting adaptor"]
    K --> L["To the USB connector"]
    L --> M["Make sure to connect the PC connecting adapter directly to your computer. Do not connect via a USB hub."]
Notes
- Make sure each plug is straight when you insert it. Inserting it at an angle may damage the connector parts.
- Connect the USB connector directly to the computer's USB port with the supplied USB cable. If you connect the two units via a USB hub, the computer may not be able to control the connected system component or the sound may not be output properly.
- If you connect the DIGITAL OUT jack on the PC connecting adaptor to the optical digital audio input connector on a system stereo component through the supplied optical digital connecting cable fitted with a rectangular connector, you will be able to enjoy audio files stored on your computer's hard disk or CDs in your computer's CD-ROM drive on the system stereo component. Refer to the operating instructions supplied with the system stereo component for connection details.
- By connecting an active speaker system to the ANALOG OUT jack (stereo mini-jack) on the PC connecting adaptor through an audio connecting cord (not supplied), you can listen to the audio output from your computer through the active speaker system.
Do not, however, connect this jack to the analog input connector on a system stereo component. Due to the incompatibility between the components, noise may be generated as a result.
Setup procedure for your computer's system
The following procedure is for Windows 98/98SE. Some parts of the procedure may differ depending on which operating system you are installing the driver to. See page 15 for Windows 2000, and page 17 for Windows Me.
Setting up for Windows 98/98SE
1 Installing the USB driver
Start up Windows, and then quit any active applications.
1 Hook up the system (page 7).
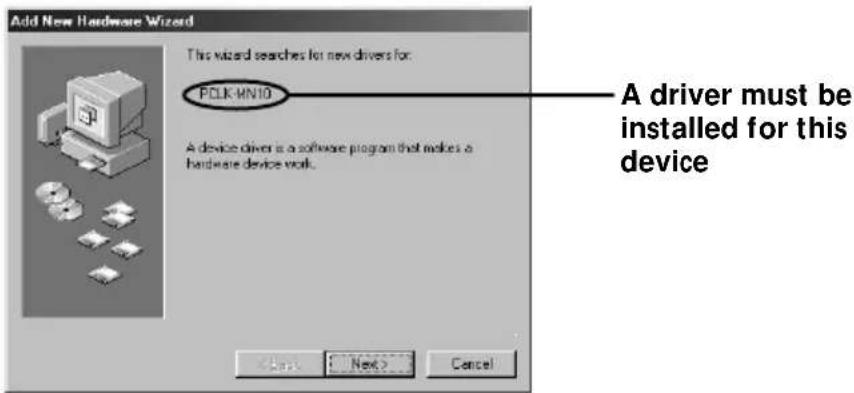
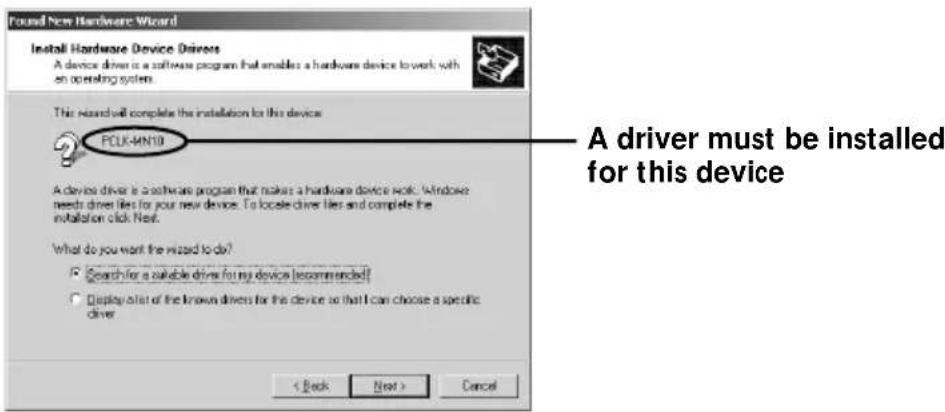
"Add New Hardware Wizard" appears.
Note
It may be necessary to install three or more drivers for certain devices before installing the PCLK-MN10-dedicated driver. The name of each device for which a driver must be installed will appear in the dialog box.
Installing the standard driver supplied with Windows for a device other than the PCLK-MN10
When requested to do so, click "Next," and then select "Search for the best driver for your device. (Recommended)" option. Then follow the instructions displayed by the wizard. Be sure to have on hand the Windows 98/98SE CD-ROM containing the required driver.
→ Installing the PCLK-MN10-dedicated driver
When "PCLK-MN10" appears in the dialog box, click "Next," and then load the M-crew CD-ROM into the CD-ROM drive.
![Add New Hardware Wizard What do you want Windows to do? • Search for the best driver for your device. [Recommended] • Display a list of all the drivers in a specific location, so you can select the driver you want. < Back Next > Cancel](/content/2026/02/395153/images/eba168cb02b4b7125479adfac6c9ba1cbb28c3d7d6f5c3810a568c4d3904342e.jpg)
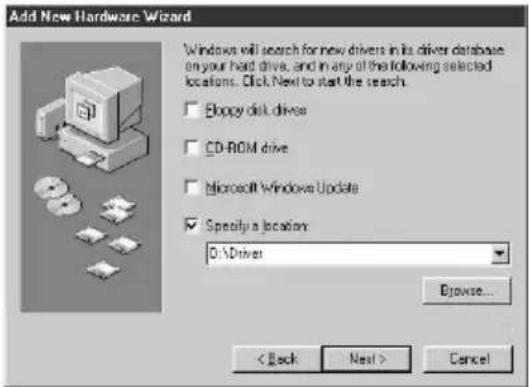
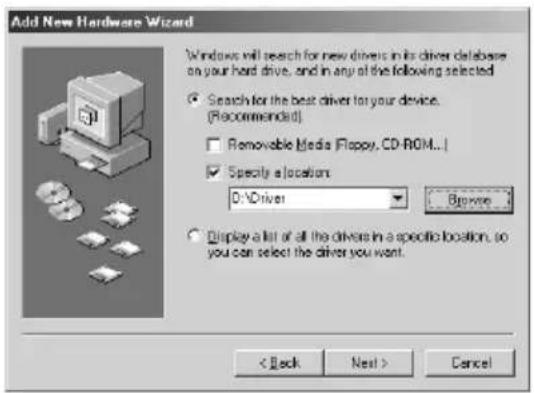
2 Select "Search for the best driver for your device. (Recommended)" and click "Next."
A dialog box for selecting the search location appears.
3 Check "Specify a location:" and enter "D:\Driver."
Note
The drive name ("D:" in step 3) depends on your computer's configuration. Enter the name of the CD-ROM drive of your computer.
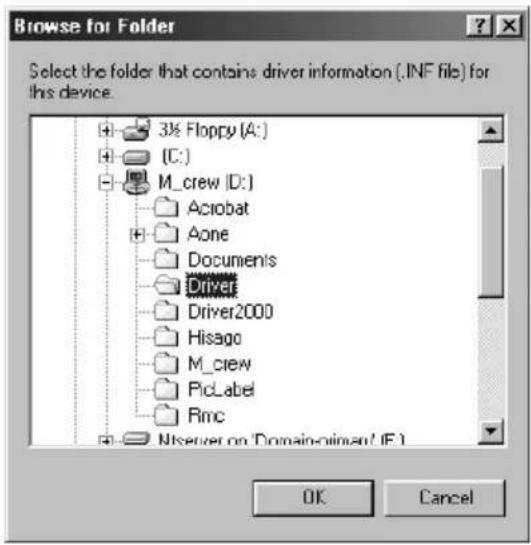
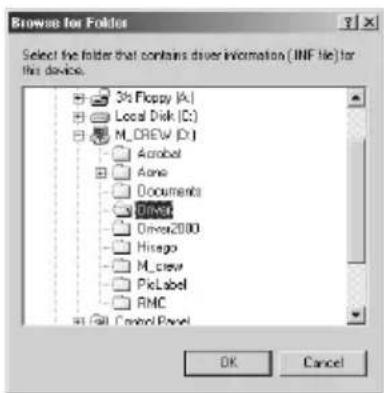
If you do not know the drive name, click "Browse" after selecting "Specify a location:" The following window appears. Double-click "M_crew" under My Computer, and then select "Driver" and click "OK."
4 Click "Next."
A dialog box appears, indicating that the copying of files has been completed.
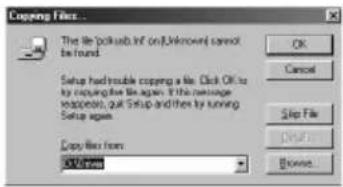
Note
During the installation of the USB driver, the following dialog box may appear. If it does, click "OK" and go to the next step.
5 Click "Finish."
The installation is complete.
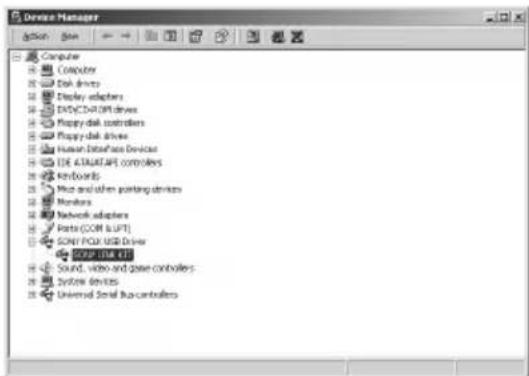
② Verifying the status of the installed device
Be sure to check the status of the installed device after you have installed its driver.
1 Open the Control Panel. In the Start menu, point to "Settings" and click "Control Panel".
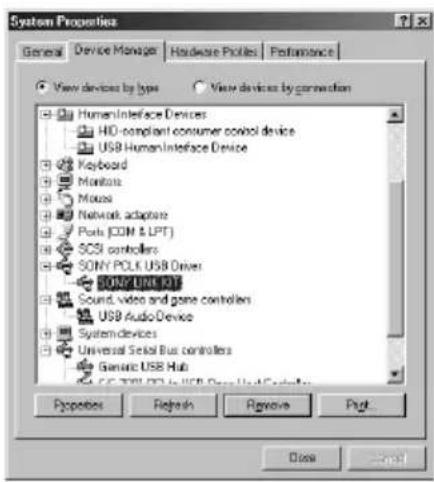
2 Double-click the System icon. The "System Properties" dialog box appears.
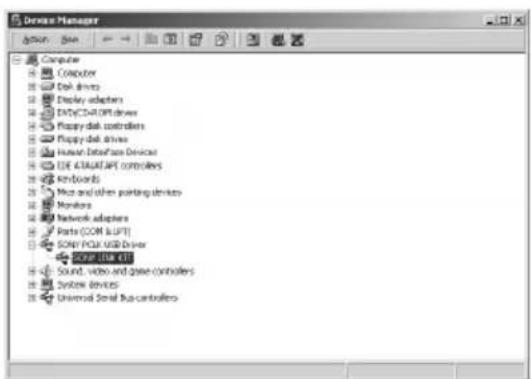
3 Click the "Device Manager" tab. Make sure that the following items are listed in the "Device Manager" window. — "SONY LINK KIT" under "SONY PCLK USB Driver" — "USB Audio Device" under "Sound, video and game controllers" — "USB Human Interface Device" under "Human Interface Devices" — "USB Composite Device" and "Generic USB Hub" under "Universal Serial Bus controllers"

4 Click "OK" to close the "System Properties" dialog box.
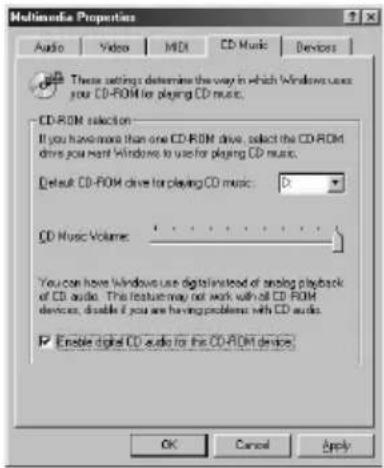
3 Setting the multimedia parameters on your computer
You must set the multimedia parameters on your computer before you can output audio from a CD in your computer's CD-ROM drive or a MIDI file stored on your computer's hard disk through the system stereo component connected to your computer.
1 Open the Control Panel. In the Start menu, point to "Settings" and click "Control Panel".
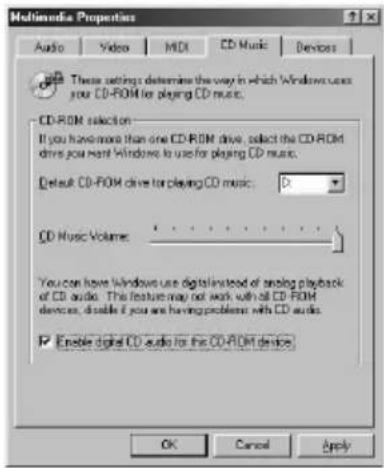
2 Double-click the Multimedia icon. The "Multimedia Properties" dialog box appears.
3 Click the "Audio" tab, and then select "USB Audio Device" for "Preferred device:" in the "Playback" group box.
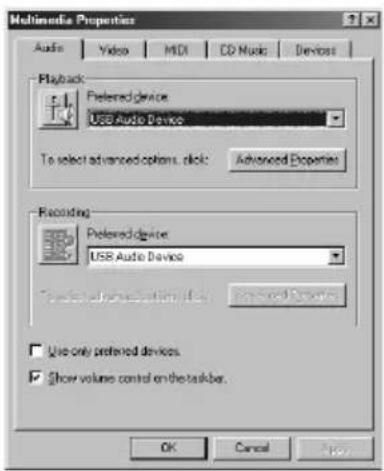
4 Click the "CD Music" tab and check "Enable digital CD audio for this CD-ROM device."

Note
Depending on the version of Windows 98 (i.e., First Edition), this item may be grayed out and therefore inaccessible. If this is the case, restart your computer.
5 Click the "MIDI" tab and click "Microsoft GS Wavetable SW Synth."
Note
If "Microsoft GS Wavetable SW Synth" does not appear, restart your computer.
6 Click "OK" to close the "Multimedia Properties" dialog box. Go to "Installing the software" on page 22.
Setup for Windows 2000
Note
Be sure to log on through the administrator's account to install and set up a device.
1 Installing the USB driver
Start up Windows, and then quit any active applications.
1 Hook up the system (page 7).
"Found New Hardware Wizard" appears.
2 Click "Next."
Note
It may be necessary to install three or more drivers for certain devices before installing the PCLK-MN10-dedicated driver. The name of each device for which a driver must be installed will appear in the dialog box.
Installing the standard driver supplied with Windows for a device other than the PCLK-MN10
When requested to do so, select "Search for a suitable driver for my device (recommended)." option. Then follow the instructions displayed by the wizard. Be sure to have on hand the Windows 2000 CD-ROM containing the required driver.
→ Installing the PCLK-MN10-dedicated driver
When "PCLK-MN10" appears in the dialog box, click "Next," and then load the M-crew CD-ROM into the CD-ROM drive.
3 Select "Search for a suitable driver for my device (recommended)" and click "Next."
A dialog box for selecting a search location appears.
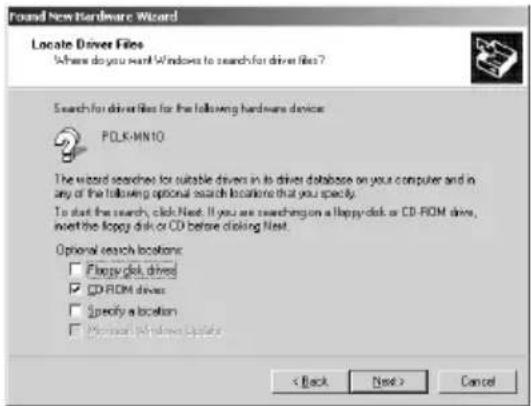
4 Check only "CD-ROM drives" and click "Next."
A dialog box for searching for the driver file appears.
5 Verify the search result, and then click "Next."
A dialog box appears, indicating that the copying of files has been completed.
6 Click "Finish."
The installation is complete.
Go to “② Verifying the status of the installed device” on page 19, and then “③ Setting the multimedia parameters on your computer” on page 20.
Setting up for Windows Me
1 Installing the USB driver
Start up Windows, and then quit any active applications.
1 Hook up the system (page 7).
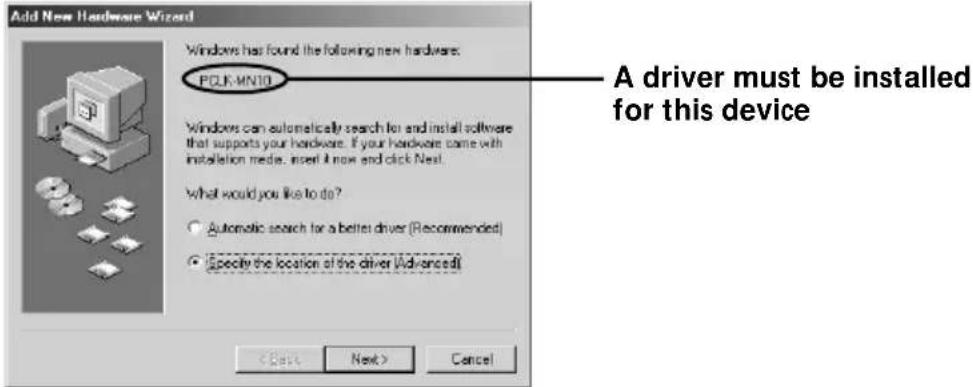
"Add New Hardware Wizard" appears.
Note
It may be necessary to install three or more drivers for certain devices before installing the PCLK-MN10-dedicated driver. The name of each device for which a driver must be installed will appear in the dialog box.
Installing the standard driver supplied with Windows for a device other than the PCLK-MN10
When requested to do so, click "Next," and then select "Search for the best driver for your device. (Recommended)" option. Then follow the instructions displayed by the wizard. Be sure to have on hand the Windows Me CD-ROM containing the required driver.
→ Installing the PCLK-MN10-dedicated driver
When "PCLK-MN10" appears in the dialog box, go to step 2 after loading the M-crew CD-ROM into the CD-ROM drive.
2 Check "Specify the location of the driver (Advanced)" option, and then click "Next."
A dialog box for selecting the search location appears.
3 After selecting "Search for the best driver for your device.
(Recommended)" option, check "Specify a location" and enter "D:\Driver."
If "Removable Media (Floppy, CD-ROM...)" is checked, click the check box to deselect it.
Note
The drive name ("D:" in step 3) depends on your computer's configuration. Enter the name of the CD-ROM drive of your computer.
If you do not know the drive name, click "Browse" after selecting "Specify a location:" The following window appears. Double-click "M_crew" under My Computer, and then select "Driver" and click "OK."
4 Click "Next."
A dialog box for searching for the driver file appears.
5 Click "Next."
A dialog box appears, indicating that the copying of files has been completed.
6 Click "Finish."
The installation is complete.
② Verifying the status of the installed device (for Windows 2000/Windows Me)
Be sure to check the status of the installed device after you have installed its driver.
1 Open the Control Panel. In the Start menu, point to "Settings" and click "Control Panel".
2 Double-click the "System" icon. The "System Properties" dialog box appears.
Note
If you cannot find the "System" icon, click "View all Control Panel options" (in the case of Windows Me).
3 (For Windows 2000 only) Click the "Hardware" tab.
4 Click the "Device Manager" tab. (For Windows 2000, click the "Device Manager" button, instead)
Make sure that the following items are listed in the "Device Manager" window.
— "SONY LINK KIT" under "SONY PCLK USB Driver"
— "USB Audio Device" under "Sound, video and game controllers"
— "USB Human Interface Device" under "Human Interface Devices"
— "USB Composite Device" and "Generic USB Hub" under "Universal Serial Bus controllers"
Example: Window for Windows 2000
Note (for Windows Me only)
Depending on the configuration of your computer, may appear before the listed device. This, however, does not affect the operation of the system (the computer and system stereo component).
5 Click "OK" to close the "System Properties" dialog box.
③ Setting the multimedia parameters on your computer (for Windows 2000/Windows Me)
You must set the multimedia parameters on your computer before you can output audio from a CD in your computer's CD-ROM drive or a MIDI file stored on your computer's hard disk through the system stereo component connected to your computer.
1 Open the Control Panel. In the Start menu, point to "Settings" and click "Control Panel".
2 Double-click the "Sounds and Multimedia" icon. The "Sounds and Multimedia Properties" dialog box appears.
Note
If you cannot find the "Sounds and Multimedia" icon, click "view all Control Panel options" (in the case of Windows Me).
3 Click the "Audio" tab, and then select "USB Audio Device" and "Microsoft GS Wavetable SW Synth" for the respective "Preferred device:" of the "Sound Playback" and "MIDI Music Playback" group boxes.
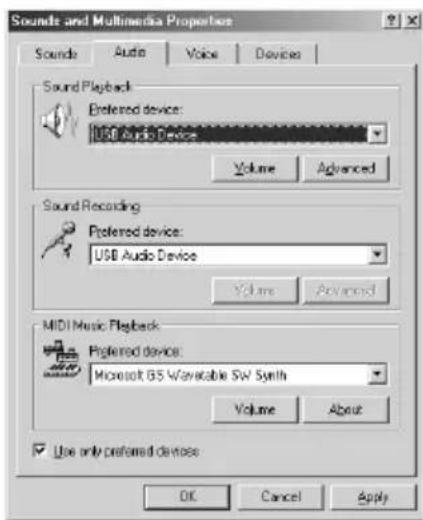
4 Click "OK" to close the "Sounds and Multimedia Properties" dialog box.
Setting up the CD-ROM drive
1 Open the Control Panel. In the Start menu, point to "Settings" and click "Control Panel".
2 Double-click System icon. The "System Properties" dialog box appears.
3 (For Windows 2000 only) Click the "Hardware" tab.
4 Click the "Device Manager" tab. (For Windows 2000, click the "Device Manager" button, instead.) The "Device Manager" dialog box appears.
5 Double-click "CDROM" (For Windows 2000, double-click "DVD/CD-ROM drive" instead.)
6 Select the CD-ROM drive you want to use under "CDROM," and then click the "Properties" button. (For Windows 2000, double-click the CD-ROM drive under "DVD/CD-ROM drive" instead.) The "System Properties" dialog box of the selected CD-ROM drive appears.
Note
If necessary, you can select two or more CD-ROM drives in this procedure as long as the drives are connected to your computer.
7 Click the "Properties" tab.
8 Check "Enable digital CD audio for this CD-ROM device," and then click "OK." The "System Properties" dialog box of the selected CD-ROM drive closes. (For Windows 2000 only) Click ✗ to close the "Device Manager" dialog box.
9 Click "OK" to close the "System Properties" dialog box. Go to "Installing the software" on page 22.
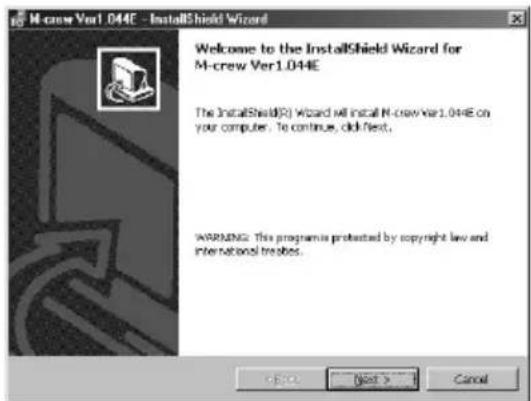
Installing the software
Use this procedure to install the M-crew software onto your computer's hard disk. Be sure to start up Windows in advance.
Installing M-crew
1 Load the supplied M-crew CD-ROM into the CD-ROM drive of your computer.
2 Double-click the InstallDlg.exe) icon. The setup window appears.
3 Click "Setting up M-crew" in the setup window. The setup program starts up.
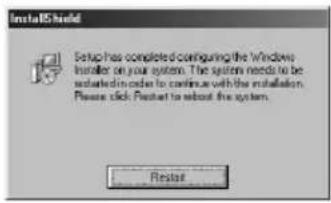
Note
The Windows Installer is necessary to install M-crew. If the Windows Installer is not installed on your computer, the following window appears. If this happens, click "Restart" to restart your computer. When you restart your computer, do not remove the CD-ROM.
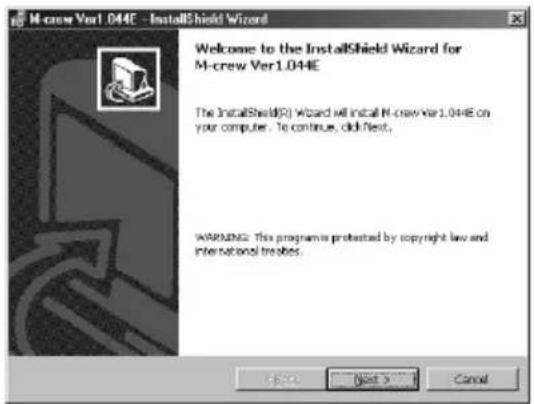
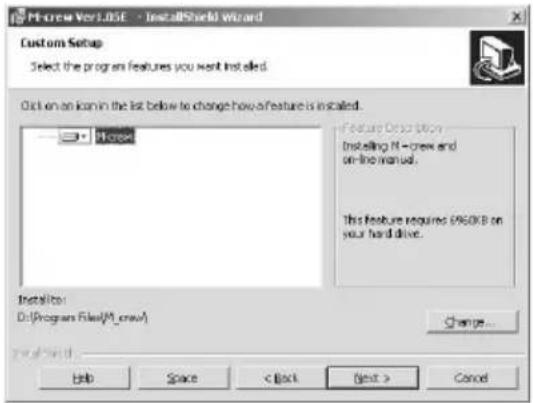
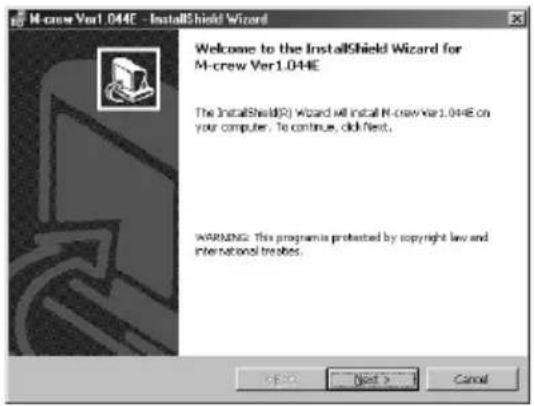
4 Click "Next."

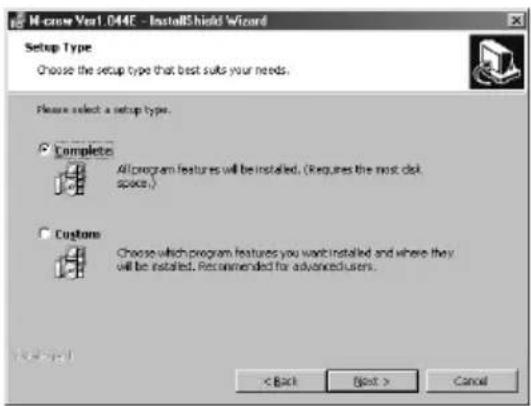
5 Select one of the setup type options, and then click "Next."
Complete: All the M-crew files on the CD-ROM will be installed. This option does not allow you to specify the folder in which the M-crew files are installed. (Normally the files are installed in "C:\Program Files\M_crew" folder.)
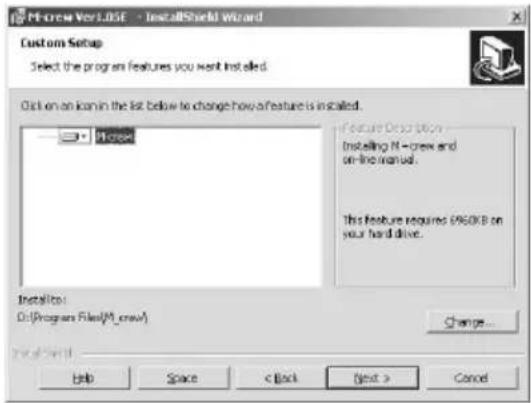
Custom: You can specify the folder to which the M-crew files are installed.
6 If you selected "Complete" in step 5, click "Install."
The installation starts.

If you selected "Custom" in step 5, click "Next."
You can specify the folder to which the files are installed.
7 When the dialog box indicating the completion of the installation appears, click "Finish."
Before starting M-crew
Open the "Readme" file and read it.
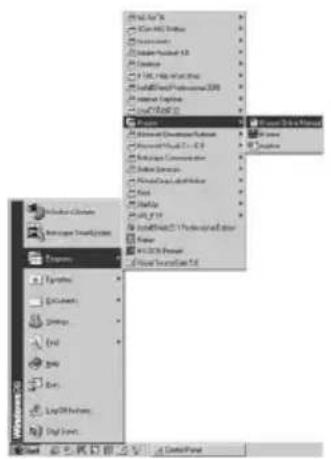
To open the "Readme" file, go to the Start menu and select "Programs" and "M-crew," and then click "Readme."
Note
A folder is created as a result of the installation. This folder is used by the software. Do not erase, move, or change its contents.
Installing PictureGear Label Maker
Please note that when you install PictureGear Label Maker, any older version of PictureGear Label Maker that exists on your computer will be overwritten by the new version.
1 Click "Setting up PictureGear Label Maker" in the setup window (see step 2 on page 22).
2 Follow the instructions that appear to install the application.
Installing Acrobat Reader 4.05
You must install Acrobat Reader 4.05 onto your computer before you can open up the on-line manual. After installing PictureGear Label Maker and restarting your computer, open the setup window again. (see step 2 on page 22).
1 Click “Setting up Acrobat Reader 4.05 (English)” in the setup window.
The “Acrobat Reader 4.05 Setup” window appears.
Carefully read the contents that are displayed in the window.
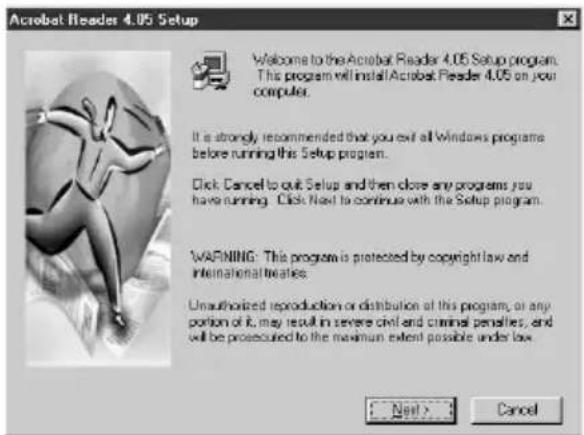
If you do not want to install Acrobat Reader 4.05, click "Cancel."
Note
If Adobe Acrobat Reader 3.0 is already installed on your computer, "Warning" is displayed. If this happens, uninstall Adobe Acrobat Reader 3.0 and restart your computer. "Warning" will no longer appear, and you will be able to continue the installation.
2 Follow the instructions that appear to install the software. After you have completed installation, click "EXIT" and remove the CD-ROM.
Uninstalling the software
When you no longer require M-crew, PictureGear Label Maker, or Acrobat Reader 4.05, uninstall the programs as follows:
1 Open the Control Panel.
In the Start menu, point to "Settings" and click "Control Panel".
2 Double-click the "Add/Remove Programs" icon.
The "Add/Remove Programs Properties" window appears.
3 Select and click "M-crew," "PictureGear Label Maker 4.1," or
"Acrobat Reader 4.0" in the program list.
4 Click "Add/Remove."
Uninstaller is activated and the software selected in step 3 is deleted automatically.
Notes
- After uninstalling M-crew, the folders "Database" and "Jacket" created under the M-crew folder (usually C:\Program Files\M_crew) and their files still remain on the hard disk. Delete them manually, if there is no more need for them.
- When you uninstall PictureGear Label Maker, the PictureGear Label Maker installed through M-crew is deleted, as well as any other copy of PictureGear Label Maker that exists on your computer.
- When you uninstall the PictureGear Label Maker installed through M-crew, the label printing function in PictureGear will stop functioning. If this happens, uninstall PictureGear, and then install PictureGear again.
Starting up the software
Starting up the software
→In the Start menu, point to “Programs” and “M-crew”, and then click “M-crew.”
The software starts up and the M-crew Main bar appears.
The bar below is displayed immediately after M-Crew is started up (in this example, "CD" is selected as the system stereo function (component)).

Note
During MD recording, a dialog box appears to prompt you to stop recording or to start up M-crew.
Quitting the software
1 Click on the Main bar.
A dialog box for quitting the software appears.
2 Click "Do not shut off power."
M-crew ends.
If you want to turn off the system stereo component as well, click "Shut off power."
Using the on-line manual
Before you can use the on-line manual, Acrobat Reader 4.05 (supplied by Adobe Systems Incorporated) must be installed on your computer. If it is not, do the procedure "Installing Acrobat Reader 4.05" (on page 25).
To open the on-line manual, go to the Start menu, point to "Programs" and "M-crew," and then click "M-crew On-line manual."
The cover page appears in the display.
![Adobe Acrobat - [PCLK-MN10A[60] .pF] Click to turn the pages Double-click to display a page Click to change the size of the displayed page Click to exit the on-line manual SONY. M-crew Version 1.05E On-line Manual PCLK-MN10A ©2017 Sony Corporation](/content/2026/02/395153/images/644b103a243e6c8a112eb09fa967c8f7f71fc14cc390316b81e8d0b39623c6cc.jpg)
Using Help
Note
Help is provided only in English.
Operating instructions in other languages can be found in the on-line manual.
Opening the Help table of contents
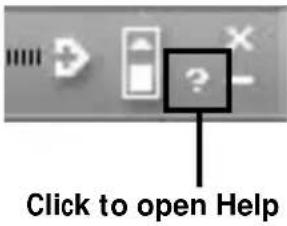
Click the Help button on the Main bar. The M-crew table of contents will appear.

- Double-click to display the topics within.
- Click ? to display an explanation of the given item.
- Click an underlined item in an explanation to display a related explanation on anther page.
Searching by Keyword
1 Click the "Index" tab in the above topic search dialog box.
2 Enter a word or phrase that you want to search for or select the keyword by scrolling the list of keywords.
3 Click "Display."
A topic containing the selected keyword appears in the right frame of the dialog box.
If the "Topics Found" dialog box appears, select the appropriate topic and click "Display."
Finding topics with a certain word or phrase
1 Click the "Search" tab in the above topic search dialog box.
2 Enter a word or phrase that is related to the desired topic, and then click "List Topics". The topics that are found appear in the "Select Topics to display:" list box.
3 Select the appropriate entry and click "Display."
A topic corresponding to the selected entry appears in the right frame of the dialog box.
Troubleshooting
If you experience any of the following difficulties while using this software, use this troubleshooting guide to remedy the problem. Should any problem persist, consult your nearest Sony dealer. Please also refer to your computer's manual, as well as the "Readme.txt" file installed on the hard disk with the software.
| Problem Cause/countermeasure | |
| The message “The PCLK-MN10A does not respond. Please check the connections.” appears. | The USB connector on the PC connecting adaptor is not properly connected to the USB port on the computer.→Check the USB connector connection.→Try disconnecting the USB cable from the PC connecting adaptor and from the computer, and then connecting it again.The PC LINK connector on the PC connecting adaptor is not properly connected to the system stereo component.→Check the PC LINK connector connection.→Check that the AC power cord of the system stereo component is connected to an AC outlet. |
| No screen response or screen error. | →Turn the power of the system stereo component off and on, and then restart M-crew.→Try disconnecting the USB cable from the PC connecting adaptor and from the computer, and then connecting it again.→Start up another often-used application and verify that the computer functions properly.→After uninstalling the M-crew software (page 26), try re-installing it (page 22). |
| Text input, recording, editing etc., cannot be done. | The disc's protect tab may be set to write-protect.→Slide the tab so that recording is possible.The MD may be a commercial playback-only MD (an MD with prerecorded tracks).→Text input, recording, editing, etc., are not possible on commercial playback-only MDs. |
| The system stereo component does not respond. | →Check that the connections have been made properly (page 7).→Disconnect the connecting cables and then reconnect them.→Try disconnecting the USB cable from the PC connecting adaptor and from the computer, and then connecting it again. |
| The displayed name of the MD or CD does not match the disc's contents. | →Click the Reload button (pages 11 and 15 in the on-line manual).→Restart M-crew. Should the problem persist, the data in the Disc Library may be corrupted. Enter the names again. |
| The system sounds (warning alarm/mail arrival notice) are not heard. | →The system sounds have been specified not to sound during M-crew startup, or the setting may have changed to OFF when M-crew was abnormally ended. To restore the sounds, restart M-crew and then quit the program normally. Or double-click the backup file (reg0.reg to reg3.reg) in the M-crew folder and follow the instructions to set up the program again. |
Specifications of CAV-MN10
Description Adaptor for connecting external devices to a PC
Sampling frequency 44.1 kHz
USB terminal Series B, bus power mode (conforms to USB Version 1.1)
* Connect this terminal directly to the PC with the supplied USB cable.
DIGITAL OUT Square optical connector jack with optical emission
wavelength of 660 nm
ANALOG OUT Stereo mini jack with an output level of 0.63 Vrms and a
load impedance of 10 kΩ or more
Maximum external dimensions
96 · 26 · 106 mm (W · H · D); (not including projecting parts)
Weight Approx. 140 g
natural_image
Pure electrical circuit lines without any symbolsRemarque
4 Cliquez sur l'onglet "CD Music" et cochez "Enable digital CD audio for this CD-ROM device.".
Remarque
— "SONY LINK KIT" sous "SONY PCLK USB Driver"
— "USB Audio Device" sous "Sound, video and game controllers"
— "USB Human Interface Device" sous "Human Interface Device"
— "USB Composite Device" et "Generic USB Hub" sous "Universal Serial Bus controller"
Remarque
natural_image
Line drawing of a portable electronic device with a coiled cable and connector (no text or symbols)natural_image
Pure electrical circuit lines without any symbolsHinweis
Hinweis
Hinweis
natural_image
Pure graphical icon with no text or symbols, including a question mark in a box (no readable text or symbols)Nota
2 Seleccione "Search for the best driver for your device. (Recommended)" y haga clic en "Next".
Nota
4 Haga clic en "Next".
5 Haga clic en "Finish".
4 Haga clic en la ficha "CD Music" y coloque una tilde en "Enable digital CD audio for this CD-ROM device".
Nota
3 Seleccione "Search for a suitable driver for my device (recommended)" y haga clic en "Next".
4 Haga clic en "Next".
— "SONY LINK KIT" bajo "SONY PCLK USB Driver"
— "USB Audio Device" bajo "Sound, video and game controllers"
— "USB Human Interface Device" bajo "Human Interface Devices"
— "USB Composite Device" y "Generic USB Hub" bajo "Universal Serial Bus controllers"

4 Haga clic en "Next".
Si no desea instalar el Acrobat Reader 4.05, haga clic en "Cancel".
Nota
Nota
natural_image
Line drawing of a portable electronic device with a cable and connector (no text or symbols)PC LINK (6-polige mini-DIN) stekker
Opmerking
natural_image
Pure electrical circuit lines without any symbols2 Stel in op "Search for the best driver for your device.
Opmerking
4 Klik op "Next".
— "SONY LINK KIT" onder "SONY PCLK USB Driver"
— "USB Audio Device" onder "Sound, video and game controllers"
— "USB Human Interface Device" onder "Human Interface Devices"
— "USB Composite Device" en "Generic USB Hub" onder "Universal Serial Bus controllers"

Opmerking
3 Stel in op "Search for a suitable driver for my device (recommended)" en klik weer op "Next".
3 Stel in op "Search for the best driver for your device.
(Recommended)", markeer "Specify a location" en tik "D:\Driver" op de invoerregel.
4 Klik op "Next".
4 Klik op "Next".

Opmerking
Program © 1997-2001 Sony Corporation. Dokumentation © 2001 Sony Corporation.
2 Välj "Search for the best driver for your device. (Recommended)" och klicka på "Next".
Observera
4 Klicka på "Next".
— "SONY LINK KIT" under "SONY PCLK USB Driver".
— "USB Audio Device" under "Sound, video, and game controllers"
— USB Human Interface Device" under "Human Interface Devices"
— "USB Composite Device" och "Generic USB Hub" under "Universal serial bus controllers"

Observera
— "SONY LINK KIT" under "SONY PCLK USB Driver"
— "USB Audio Device" under "Sound, video and game controllers"
— "USB Human Interface Device" under "Human Interface Devices"
— "USB Composite Device" och "Generic USB Hub" under "Universal Serial Bus controllers"

4 Klicka på "Next".
Om du valde "Custom" i steg 5, skall du klicka på "Next". Du kan specificera den mapp, i vilken filerna skall installeras.
Observera
2 Selezionare "Search for the best driver for your device.
Nota
4 Fare clic su "Next".
5 Fare clic su "Finish".
Nota
4 Fare clic su "Next".
Nota
natural_image
Pure electrical connector diagram showing a USB cable and two USB connectors (no text or symbols)2 Seleccione "Search for the best driver for your device.
(Recommended)" e clique em "Next".
Nota
4 Clique em "Next".
— "SONY LINK KIT", sob "SONY PCLK USB Driver"
— "USB Audio Device", sob "Sound, video and game controllers"
— "USB Human Interface Device", sob "Human Interface Devices"
— "USB Composite Device" e "Generic USB Hub", sob "Universal Serial Bus controllers"
Nota
3 Seleccione "Search for a suitable driver for my device (Recommended)" e clique em "Next".
Exemplo: Janela do
Windows 2000
Nota (somente para Windows Me)
Nota
- Table of contents
- Getting started
- Preparation
- Additional Information
- About this manual
- Overview
- Playback
- Recording/editing
- Other operations
- Notes
- System requirements
- Note
- Checking the supplied items
- Connections
- Connecting your personal computer with a system stereo component
- Setup procedure for your computer's system
- Setting up for Windows 98/98SE
- Installing the USB driver
- Installing the standard driver supplied with Windows for a device other than the PCLK-MN10
- → Installing the PCLK-MN10-dedicated driver
- Click "Next."
- Click "Finish."
- ② Verifying the status of the installed device
- Setting the multimedia parameters on your computer
- Setup for Windows 2000
- Setting up for Windows Me
- ② Verifying the status of the installed device (for Windows 2000/Windows Me)
- Note (for Windows Me only)
- ③ Setting the multimedia parameters on your computer (for Windows 2000/Windows Me)
- Setting up the CD-ROM drive
- Installing the software
- Installing M-crew
- If you selected "Custom" in step 5, click "Next."
- Before starting M-crew
- Installing PictureGear Label Maker
- Installing Acrobat Reader 4.05
- Uninstalling the software
- Starting up the software
- →In the Start menu, point to “Programs” and “M-crew”, and then click “M-crew.”
- Quitting the software
- Using the on-line manual
- Using Help
- Opening the Help table of contents
- Searching by Keyword
- Finding topics with a certain word or phrase
- Troubleshooting
- Specifications of CAV-MN10
- Remarque
- Hinweis
- Nota
- Haga clic en "Next".
- Haga clic en "Finish".
- Opmerking
- Klik op "Next".
- Observera
- Klicka på "Next".
- Fare clic su "Next".
- Fare clic su "Finish".
- Clique em "Next".
- Nota (somente para Windows Me)
Brand : SONY
Model : NASCZ1
Category : Hi-Fi System