
MP1100 - Mp3 player Difrnce - Free user manual and instructions
Find the device manual for free MP1100 Difrnce in PDF.

| Product Type | Multimedia MP3 Player |
| Brand | Difrnce |
| Model | MP1100 |
| Dimensions | 39 x 90 x 8 mm |
| Weight | 45 g |
| Power | Rechargeable lithium battery via USB |
| Screen | Color TFT 4.5 cm (1.8 inches) |
| Audio formats | MP3 (32-384 kbps), WMA (64-128 kbps) |
| Video formats | AMV |
| Image formats | JPG, BMP, GIF |
| Text formats | TXT (e-book) |
| Voice recording | ACT and WAV with 4 modes (Fine REC, Long REC, Fine VOR, Long VOR) |
| FM radio | Built-in (optional) |
| Additional functions | Games, photo viewing, e-book, A-B repeat, 7 equalizer modes |
| Connectivity | High-speed USB 2.0, 2.5mm headphone jack (3.5mm adapter included) |
| Internal memory | 128 MB to 2 GB depending on version |
| Signal-to-noise ratio | 90 dB |
| Headphone output | 9 mW x 32 ohms |
| System compatibility | Windows 98/ME/2000/XP, Mac OS 9.0/10.0 |
| Care and cleaning | Clean with a soft, dry cloth. Do not use abrasive products or solvents. |
| Safety | Do not expose to moisture, extreme temperatures, or disassemble. Use only the supplied charger. |
| Spare parts and included accessories | Earphones, USB cable, 2.5mm to 3.5mm adapter, charger, silicone case, CD with drivers and software |
Frequently Asked Questions - MP1100 Difrnce
User questions about MP1100 Difrnce
0 question about this device. Answer the ones you know or ask your own.
Ask a new question about this device
Download the instructions for your Mp3 player in PDF format for free! Find your manual MP1100 - Difrnce and take your electronic device back in hand. On this page are published all the documents necessary for the use of your device. MP1100 by Difrnce.
USER MANUAL MP1100 Difrnce
On-screenmenu bediening 8
On-screenmenu bediening
Clock LCD Set Language ScreenSaver Sel Power Off Replay Mode Online Mode Memory Info Firmware version Firmware Upgrac Exit
Clock
THIS INSTRUCTION BOOK MAY CONTAIN ERRORS AND OMISSIONS. DESIGN AND SPECIFICATION ARE SUBJECT TO CHANGE WITHOUT NOTICE.
No part of this document may be reproduced or transmitted in any form or by any means, electronics or mechanical, including photocopying and recording or translated to another language for any purpose without the prior written consent of the manufacturer.
All brand names, logos and registered trademarks mentioned are property of their respective owners.
© 2006. All right reserved. Version 1.0 04202008
Please read this booklet and note the warning statements before using the product.
Warning! Improper use of battery might cause the battery to turn hot or explode.
Note:

Electrical and electronic equipment (EEE) contains materials, parts and substances which can be dangerous to the environment and harmful to human health if waste of electrical and electronic equipment (WEEE) is not disposed of correctly.
Equ equipments which are marked wide the WEEE logo (as shown on the left), should not be shown away with your household waste. Contact your Local Authority Waste Disposal Department as they will be able to provide details of the recycling options available in your area.
Table of Contents
Introduction 4
Package Contents 4
6
On-screen menu Operation 8
Changing Mode 9
Playing Movie 1
Skip a movie 114
Playing Song 11
Song 12 East Forward and Backward 12
FM Radio (optional) 12
Recording Voice 13
Playing Recorded Voice 14
15
Fas Forward and Backward 15 View Photos. 15
E-Book 16
System Settings 1b
LCD Set 17
Change On-screen-Menu Language 18
Screening Srl 19
Power off 19
Replay Mode 19
Online Mode 20
ShoR Mmern 80
Show Firmware Version 20
Game Function 20
Repeat Mode- 21
EQ mode 21
Changing Playing Rate 22
A-B Repeat 223
Replay Times 22
Replay Gap 22
Instaing Driver and Software Utilities 23
System Requirements 23
Driver and Software Utilities Installation. 23
AMV Convert 25
1. Summarize 25
2. Installation software 65
2.3. Using the software 26
4. Convert the fie 28
English
-
Download media files from internet and convert files 41
-
Attention 10
EBF 42
1 Media manager Introduction 43
2 Install and Uninstall 42
3 Quick Start Guide 43
Instructions
5 Converting ACT. audio to WAV. audio. 55
Lyrics 58
Downloading MP3 and WMA songs or AMV movies 59
Folder Management and Navigation 62
Folder Management 62
Folder Navigation- 62
Sub-Folder 62
Root Directory 62
Using USB Mass Storage Function 62
Disconting the USB Cable 62
Conducting the bus
10
64
Using the Formating Software Utilities 64
64
Technical Specifications 67
41
45
Introduction
Thank you for choosing our digital MP3 player. You can use this versatile MP3 player not only for playing MP3 and WMA songs, but also playing AMV movie, recording voice and serving as a USB flash disk, etc.
Features
Colour TFT 1.8" display
Support MP3 (MPEG1/2 Layer2) and WMA music playback
Support AMV movie play
Support Game function
Support E-Book function
- Support JPG, BMP and GIF picture
Digital voice recorder
- USB mass storage function for data storage
7 EQ settings
- Lithium battery supports long playing time
No driver installation is required (except Windows® 98/98SE)
Package Contents
- User's manual
- Earphones
2.5mm to 3.5mm Earphones adaptor
Silicon pouch
Power charger
USB cable
CD including the driver and software utilities
Overview
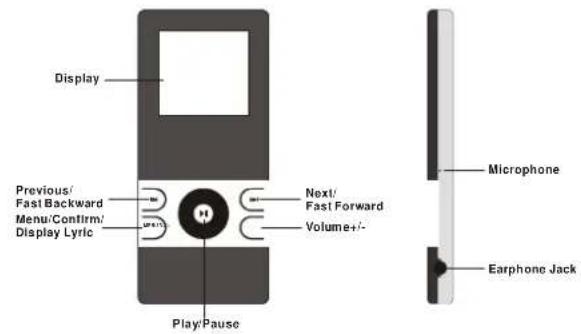
Front and Right
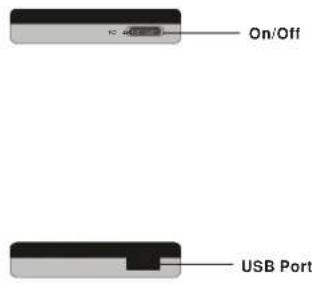
Top and Botton
Buttons Operation
| Operation | |
| EARPHONE JACK | Insert the earphone plug into the earphone jack |
| USB PORT Connect | the USB cable to the USB port of the computer for uploading the songs |
| MICROPHONE Micophone for voice recording | |
| NEXT/FAST FORWARD | In PLAYING mode, press the button and release immediately to jump to next song.In PLAYING mode, press and hold the button to fast forward |
| MENUB/CONFIRM/DISPLAY LYRIC | In STOP mode, press and hold the button to enter the Main Menu page for changing the modes.Under Menu or Sub-menu page, press the button to confirm to the selection of menu items.IN PLAYING mode, press and hold the button to display the lyric (The lyric is necessary edited by the user before shown on the LCD display) |
| PREVIOUS/FAST BACKWARD | In PLAYING mode, press the button and release immediately to jump to previous songIn PLAYING mode, press and hold the button to fast backward the song |
| VOLUME+VOLUME- | Press the VOL button to tune volume, increase the volume by pressing NEXT button.Press the VOL button to tune volume, decrease the volume by pressing PREVIOUS button. |
| ON/OFF/ | In IDLE mode, slide the button rightward to power on the playerIn STOP mode, slide the button leftward power off the player |
| PLAY/PAUSE/ | In STOP mode, press the button to play the songsIn PLAYING mode, press the button to pause the playing songWhen the ON/OFF button is locating at ON, press and hold the button to turn on and turn off the player. |
| DISPLAY Display the operating status, lyrics with backlight | |
Display
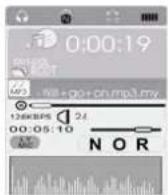
| Display Icon Function | |
| N | Repeat Mode Show the current repeat mode used. |
| Battery | Show the battery level. |
| Volume increase or decrease | Show the current volume |
| VOL | |
| NOR | Mode of Equalizer Indicate the current mode of equalizer used. 7 different EQ settings are available for selection. |
| 128KBPS Bit Rate | Show the bit rate of the song |
| +WII+gc+on.mp3.my | The Name of Playing Song Show the playing song currently |
On-screen-menu Operation
In STOP mode (No song or voice is playing)
Remark: "FM" is only applicable for the player with built in FM function.
In PLAY mode (A song or voice is playing)

Power On and Off
Power On
Slide the ON/OFF button leftward to switch the player on. The startup logo appears on the display.
Power Off
Slide the ON/OFF button rightward to switch the player off.
Note: When the ON/OFF button is locating at ON, press and hold the PLAY/PAUSE button to turn on and turn off the player.
Battery Level
The battery icon on the display shows the battery level.
Low Battery
When the battery icon shows in , it indicates the battery power is running out. Please recharge your player with the power charger.
Charge Battery
Use usb cable to connect the unit and power charger for recharging. When the indicated light turns green, the battery is full charged.
Note: 1. Do full charge the battery before the unit is used for first time.
2.Re-charge the battery if the unit is not used for a long time.
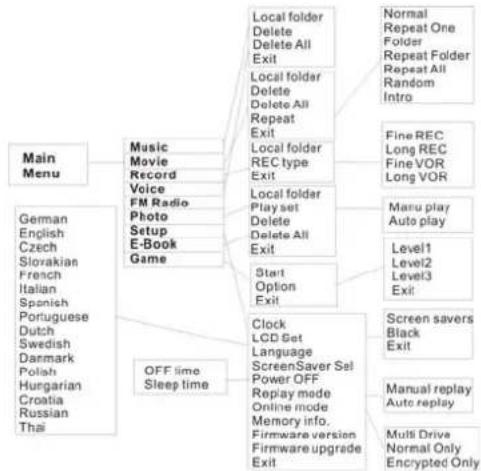
Changing Mode
Entering Main Menu Page
-
Slide ON/OFF button to enter below Main Menu page. You've entered the Main Menu page.
-
Remark: "FM" is only applicable for the player with built-in FM function.
English
- Press PREVIOUS/NEXT button to jump to other menu items in sequence of Movie, Music, FM radio, Record, Voice, Photo Browse, E-Book, System setup and Game.
- Select your desired menu item and press MENU/CONFIRM button again to enter sub-menu page.
Playing Movie
- After entering Main Menu page, select Movie and press MENU/CONFIRM button to enter Playing movie mode, Note: Only AMV format will be played under Playing Movie mode.

- The display will return to the following screen in STOP mode.
- Press PREVIOUS/NEXT button to select your desired movie.
- Press PLAY/PAUSE button to start playing selected .AMV movie. If there is no .AMV files, "No Movie Files" will show on the display.
Skip a Movie
Press PREVIOUS/NEXT button to jump to next or previous movie.
Fast Forward and Backward
Fast forward or backward by press and hold the PREVIOUS/NEXT button during playing movie
Playing Song
- After entering Main Menu page, select Music and press MENU/CONFIRM button to enter Playing Song mode.
Note: Only .MP3 and .WMA format will be played under Playing Song mode.

- The display will enter to the following screen in STOP mode.
- Press PREVIOUS/NEXT button to select your desired song.
- Press PLAY/PAUSE button to start playing selected .MP3 or .WMA music. If there is no .MP3 and .WMA files, "No Files" will show on the display.
Skip a Song
Press NEXT/PREVIOUS button to jump to next or previous song.
Fast Forward and Backward
Fast forward or backward by press and hold PREVIOUS/NEXT during playing music
* FM Radio
Remark: FM is only applicable for the player with built-in FM function.
Choosing Channels
- After entering Main Menu page, select FM and press MENU/CONFIRM button to enter FM radio mode.
- Press and hold PREVIOUS/NEXT button, the player can scan FM channels automatically, users are free to choose different FM channels.
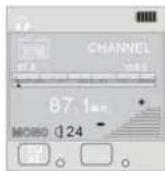
- Save FM Channels searched
Press MENU/CONFIRM button to enter FM Sub-menu Page, press MENU/CONFIRM button to select Save function.
- Select FM Channels saved
Press PLAY button to Select FM Channel saved in sequence.
Recording Voice
- After entering Main Menu page, select Record and press MENU/CONFIRM button to enter Recording Voice mode.
Note: The recorded voice will be saved in .ACT or .WAV only. Please pre-set before starting voice recording.

- following display will show once you've entered Recording Voice mode
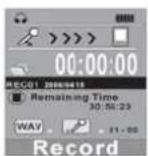
- Before recording, you may set your REC type. Press MENU button to enter REC Type, then press PREVIOUS/NEXT button to select REC Mode.
- There are four recording modes available: Fine REC, Long REC, Fine VOR and Long VOR. Press MENU/CONFIRM button to confirm the selection.
- Put the sound source near the built-in microphone. Then press PLAY/PAUSE button to start recording. You are allowed to press PLAY/PAUSE button to pause or stop the recording.
When you finished the recording, press and hold PLAY/PAUSE button. Release the button when the wording of "Saving..." shows on the display. The recorded audio files will be saved under Root Directory as default. Refer to Change Directory section for details.
English
Recording Mode
Fine REC
It performs High recording quality in .WAV file format but the file size is relatively larger.
Long REC
It performs Low recording quality in .ACT file format but the file size is relatively smaller
Fine VOR
The voice recording starts when there is a sound. If there is no sound, the recording will pause. It will resume recording when there is a sound.
It performs higher recording quality and more sensitive relatively than 8K VOR.
Note: This function of Fine VOR is insignificant if the environment is not silent enough.
Long VOR
The voice recording starts when there is a sound. If there is no sound, the recording will pause. It will resume recording when there is a sound. It performs lower recording quality and less sensitive relatively than 32K VOR.
Playing Recorded Voice
- After entering Main Menu page, select Voice and press MENU/CONFIRM button to enter Playing Recorded Voice mode.

English
- The display will return to the following screen in STOP mode.
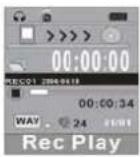
-
Press PREVIOUS/NEXT button to select your desired voice.
-
Press PLAY/PAUSE button to start playing selected audio files. If there is no recorded audio file, "No Files!" will show on the display.
Skip a Voice
Press PREVIOUS/NEXT button and release immediately to jump to previous or next recorded voice.
Fast Forward and Backward
Press and hold PREVIOUS/NEXT button to fast backward or forward.
View Photos
- After entering Main Menu page, select Photo Browse and press MENU/CONFIRM button to enter View photos function. Note: Only.JPG, BMP and .GIF format will be played under Photo Browse function.

- Press PREVIOUS/NEXT button to select your desired photo.
E-book
- After entering Main Menu page, select E-book and press MENU/CONFIRM button to enter E-book function. Note: Only .TXT format will be played under E-book function.

- Press PREVIOUS/NEXT button to select your desired article.
System Settings
- After entering Main Menu page, press PREVIOUS/NEXT button to select System Function.

English
- Press MENU/CONFIRM button to enter System Function menu page.
Clock
LCD Set
Language
Screen Saver Sel
Power Off
Replay Mode
Online Mode
Memory Info
Firmware version
Firmware Upgrade
Exit
Clock
- After entering Sys Function menu page, select Clock.
- Press VOLUME button to enter setting of Year, Month, Date and Time
- Push PREVIOUS/NEXT button for Year, Month, Date and Time increment
and decrement - Press MENU/CONFIRM button to confirm the current date and time settings.
LCD Set
After entering Sys Function menu page, press PREVIOUSNEXT button to select LCD Set Function. There are Screen savers and Black under this option.
Screen Savers
- After entering the LCD Set sub-menu, select Screen Savers by pressing MENU/CONFIRM button.

- Press PREVIOUS/NEXT button to set the Screen Savers to 0/5/10/15/20/25 /30 seconds. In the IDLE mode (no button is pressed), the LCD will turn to the selected screen saver automatically based on the duration you set. You may set "0" to disable this function. Please refer to ScreenSaver Sel for how to choose screen saver.
English
Change LCD Black time
- After entering LCD Set sub-menu page, select BLACK by pressing MENU/CONFIRM button.
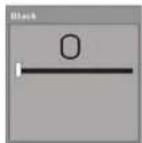
- Press PREVIOUS/NEXT button to set the black time in 0/10/20/30 seconds. In the IDLE mode (no button is pressed), the LCD will be black automatically based on the duration you set. You may set "0" to disable this function.
Change On-screen-menu Language
After entering System Function menu page, press PREVIOUS/NEXT button to select Language Function. Eleven languages are available as below.
| Simple Chinese English Trad Chinese Japanese Korean French German Italian Spanish Portuguese Dutch Swedish Denmark Polish Hungarian Czech Russia Thai |
English
ScreenSaver Sel
After entering the Sys Function menu, press the PREVIOUS/NEXT button to select ScreenSaver Sel. You can press PREVIOUS/NEXT button to choose between No 1 and No 2. There are two kind screen pictures for your choosing.
Power of
- After entering System Function menu page, press PREVIOUS/NEXT button to select Power off Function. There are Off Time and Sleep Time under this option.
- For Off Time, press PREVIOUS/NEXT button to set the off time in 0/10/20/30/40/50/60 seconds. In the STOP mode, the player will be off automatically based on the duration you set. You may set "0" to disable this function.
- For Sleep Time, press PREVIOUS/NEXT bottom to set the sleep time in 0/10/20/30/40/50/60/70/80/90/100/110/120 seconds. In the IDLE mode (no button is pressed), the player will be off automatically based on the duration you set.
You may set "0" to disable this function.
Replay Mode
There are Manual Replay and Auto Replay, press PREVIOUS/NEXT button to choose your desired option.
Online Mode
Please install the software and enable the function of dividing partition and setting password before using this function. Refer to Dividing Partition and Setting Password for details
There are three selections including Multi Drive, Normal Only and Encrypted Only.
Multi-Drive
If you select Multi-Drive, the user can both see the normal drive and encrypted drive.
Normal Only
If you select Normal Only, the user can only see the normal drive while the encrypted drive is hidden.
English
Encrypted Only
If you select Encrypted Only, the user can only see the encrypted drive while the normal drive is hidden.
Note: This function can be only supported on Windows 98/Me/XP or Windows 2000 with SP4 and the function of dividing partition is enabled.
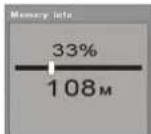
Check Memory
After entering Sys Function menu page, select Memory Info by pressing MENU/CONFIRM button to check the used memory. The used memory will be shown on the display.
Show Firmware Version
After entering Sys Function menu page, select Firmware Version by pressing MENU/CONFIRM. The date code, version of the firmware will be shown on the display for reference.
Firmware Upgrade
It will be used when there is an upgrade of firmware.
Note: It is highly recommend upgrading the firmware by the qualified engineer to prevent from any damages caused to the player.
Game function
- After entering Main Menu page, select Game and press MENU/CONFIRM button to enter E-book function. Only one game in this player is available.

Repeat Mode
In PLAYING mode, press MENU/CONFIRM button and select Repeat to enter the Repeat mode. Seven Repeat Modes are available: Normal, Repeat One, Folder, Repeat Folder, Repeat All, Random, Intro.
Normal
All music will be played one by one and stopped at the last music until you disable this function.
Repeat One
The playing music will be re-played once until you disable this function.
Folder
All music files in the selected folder will be played once until you disable this function.
Repeat Folder
All music files in the selected folder will be continuously playback until you disable this function.
Repeat All
All music will be played from the beginning to the last one and then repeated from the beginning to the last one until you disable this function.
Random
All music of the currently playing folder will be randomly playback until you disable this function.
Intro
All music from the current one to the last one will play for 10 seconds one by one until you disable this function.
The setting of Repeat mode is able to apply in Playing Song and Playing Recorded Voice mode.
EQ Mode
In PLAYING mode, press MENU/CONFIRM button and select EQ Select to enter the EQ mode. Seven EQ mode are available: DBB, Natural, Rock, Pop, Classic, Soft and Jazz
English
Press PREVIOUS/NEXT button to change the EQ mode and press MENU/CONFIRM button to confirm the EQ mode.
The setting of EQ mode is able to apply in Playing Song and Playing Recorded Voice mode.
Changing Playing Rate
-
In PLAYING mode, press MENU/CONFIRM button and select Tempo Rate to enter the sub menu.
-
Press PREVIOUS/NEXT button to adjust the playing rate of a song. A status bar will be shown on the display.
Note: This feature only supports in MP3 song while it doesn't support in WMA song.
A-B Repeat
- In PLAYING mode, press MENU/CONFIRM button and select Replay sub menu to enable A-B Repeat function.
- The mark A is flashing on the display and waiting for setting. Press PREVIOUS/NEXT to set the mark A. Mark A is set if flashing of Mark A stops.
- The mark B is flashing on the display and waiting for setting. Push MENU/CONFIRM button rightward to set the mark B. Mark B is set if flashing of Mark B stops.
- The music between mark A and mark B will be repeated once You may stop the playing until you press MENU/CONFRIM button to disable A-B Repeat function.
Replay Times
Note: This function is workable when the A-B Repeat is enabled.
In PLAYING mode, press MENU/CONFIRM button and select Replay Times to enter the sub-menu. The number of replay times can be adjusted.
Replay Gap
Note: This function is workable when the A-B Repeat and Replay Time are enabled. In PLAYING mode, press MENU/CONFIRM button and select Replay Gap to enter the sub-menu. The idle duration between mark A and mark B can be adjusted. Note: Refer to Overview section for detailed buttons operation.
Installing Driver and Software Utilities
System Requirements
PC with Pentium class or faster processor
64MB RAM
USB port
- CD-ROM drive for software installation
30MB free hard disk space
Windows® 98/98SE/Me or Windows® 2000/XP
The Driver and Software Utilities contain the followings in one Setup.exe file.
Noted: The software is not recommended to install on MAC OS.
- The driver for Windows® 98/98SE
A driver makes your player properly work on Windows® 98/98SE. - The software utilities for converting .ACT audio file to .WAV audio file
.ACT audio files can only be played in the player. If you want to play the .ACT on your PC, you have to convert .ACT to .WAV audio files, which can be playback on common software players (i.e. Windows@ Media Player). - The software utilities for formatting internal memory and setting the partition
and password for file read-write protection. - The software utilities for upgrading the firmware.
Driver and Software Utilities Installation
If you are using Windows® 98/98SE, you must install the driver before downloading any files to your player.
Note: If you are using Windows® Me/2000/XP, you may skip the following Installation procedures.
English
Step 1. Double click on Setup.exe to start the driver installation. Follow the on-screen menu guide you to complete the installation.
Step 2: After installation is completed, please restart your computer.
24
AMV Convert
1.Summarize
This tool is used for transforming media files into the AMV format which can be played on the MP3/MP4 Player. Following video types can be converted: The AVI format file: .avi ; The Windows Media format file: .asf .wmv ; The MPEG1 format file: .mpg .mpg ; The real player format file: .rm ; The quick time format file: .mov ; The MPEG2 format file: .vob.
Windows platform :Windows98, Windows Me, Windows2000, Windows XP.
Windows Media Player 9.0 or above. The DirectX 9.0 or above.
2. Installing software
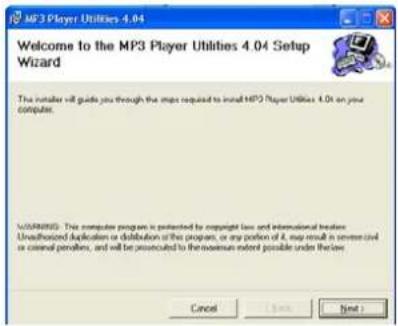
The AMV Convert Tool install fast, operate in brief. Two ways to install software:
2.1 Install automatically
Start the PC, after entering the system of Windows, put the CD of the tool into the CDROM, the system will run procedure automatically. Please adhere to hint to click the "next move" button one by one in order, while installing successful click the "close" button, complete the install.
2.2 Install manually
If the PC did not set the auto-run the function, then need to move the start procedure:
2.2.1 First, double click the Setup.exe file at the root of CD.
2.2.2 Adhere to click the "next move" button, be to hint to install successful click the "close" button, complete the install.
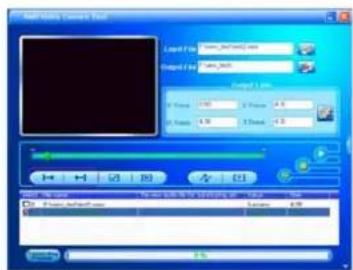
After installation is completed, "MP3 Player Utilities" can be started from the [start-] [program] menu. Select the "AMV Convert Tool" software. "the AMV Convert Tool" is the AMV format conversion tool, but "AMV Player" is the AMV on the PC document player, can browse to broadcast the AMV file that was come out by the conversion tool.
3. Using the software
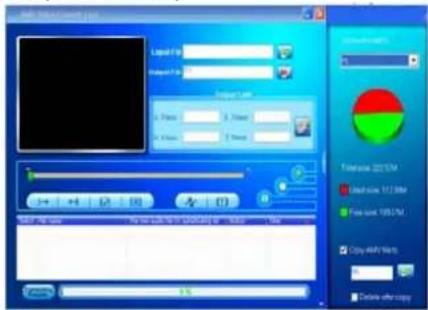
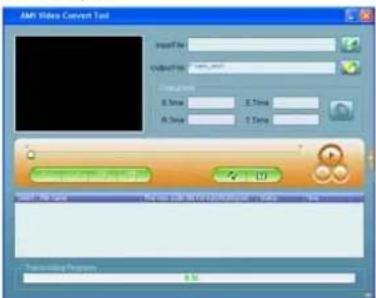
3.1 Adding a media file
After run this tool, Click "input file" button and select a movie file that needs to be converted.
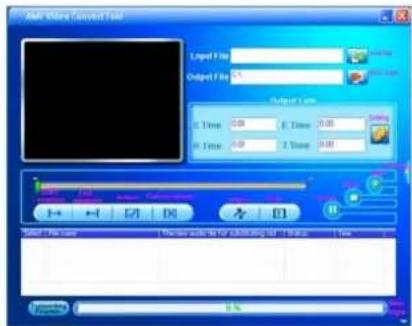
3.2 Add the media file
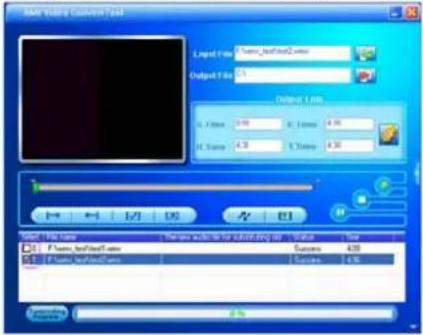
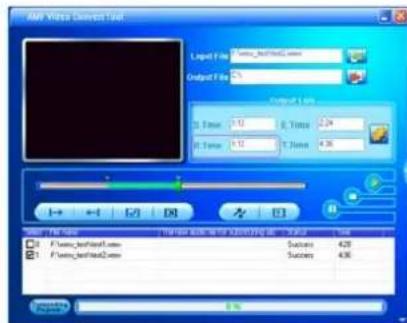
After run the tool, click "input file" button right side of the column to increase the file that want to conversion. After click the button, will flick the path window automatically. Click "files of type" small button to choose the file type. Clicks "open" button after selected files, the interface runs as follow the picture: (that picture provides reference only).
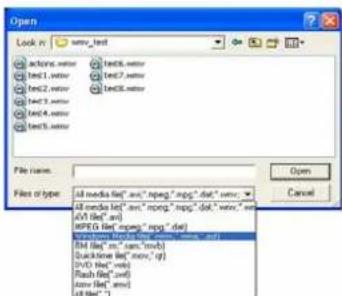
26
English
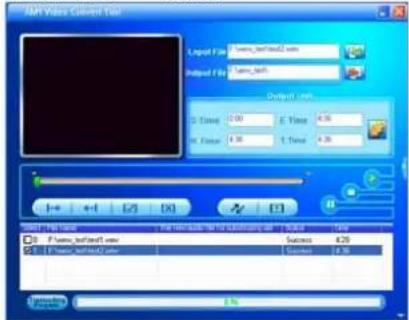
After add the file, in "input file" column, can show the path of the file, as follows the red of the picture marks to show. The status column displays the related information of these add files such as check box, the file name and path. status and file length etc:
NOTE: Here, we use WMV file as an example, for reference only.
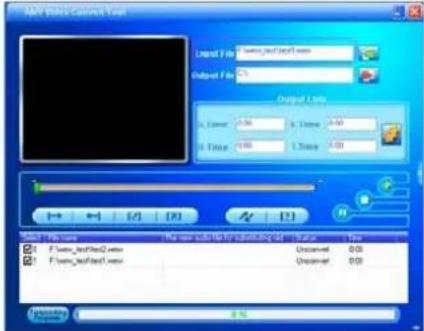
3.3 Play the media file
This conversion tool contains function of playing media file, but the premise of playing is you have already succeeded to install related decoding tool. Details please refer to following text.
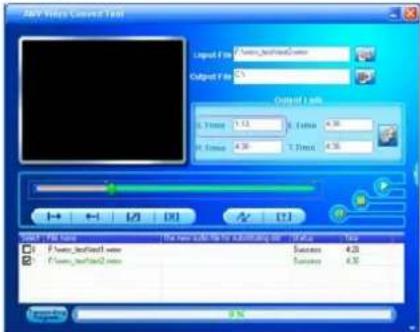
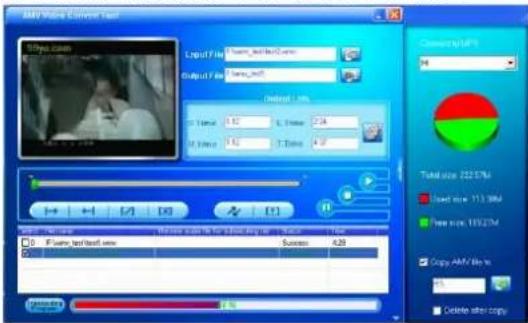
At status column click selected file, click "play" button play this file.
English
After the file start play, progress column can show the progress. After playing complete, the status of this file is changed from the "unconvert" to "success"; Time also would change actual time length: At this time, on the tool interface of "stop", "pause" button is valid at the same time, click these two buttons can stop or pause play the file.
Note: When the file status change from "unconvert" to "success", it expressing that PC has already installed the decoding tool of this file type. This tool can play that media files normally, and can carry on the conversion after stopping play. Certainly, can also carry on the conversion directly before did not play the media files, but for converting the file successful. We suggest that customer makes sure first that file can play normally, then carry on the conversion.
4. Converting the file
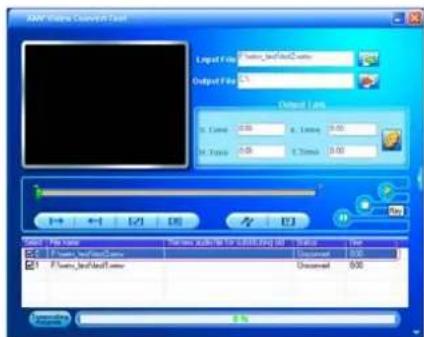
In the status bar, the left side of each media file has the check box and sequence number. The check box used for continuous conversion of several medial files of choice. The lately-increase file default setting is being picked out.If the check box didn't pick out that expressing this file will not be converted.
4.1 Choose the file that needs to be converted
The media file selected in 3.1 will be visible in the list at the lower part of the screen. Several media files can be selected and be added to the list. These files will be converted once the convert button is pushed.
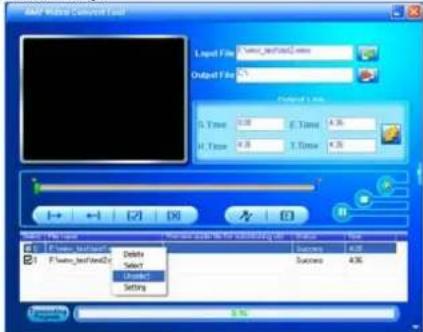
4.1.1 Excluding a specific media file
If conversion of a specific media file in the list is not wanted, a specific file can be deselected by clicking the little box. The marker will disappear and this file will not be converted.
4.1.1.1 Whether media needs to convert or not, can click the check box make selection or cancel directly.
English
4.1.1.2 In addition to directly clicking the check box, can also right click the file and select the "select" or "unselect" to make selection or cancel.
4.2 Select destination
The AMV file of this conversion tool default conserve path is C:\Before convert. Click the "output file" button and select the target where the converted files need to be saved can specify the position of the file of AMV. At flick dialog box, after choosing the specify saved path, please click the "OK" button.
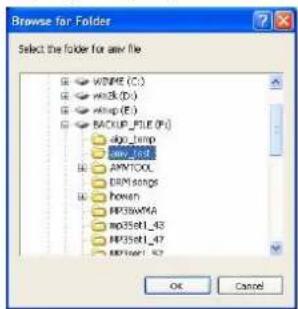
After completing the above step, at the convert interface "output file" column will display the path that files of AMV deposit.
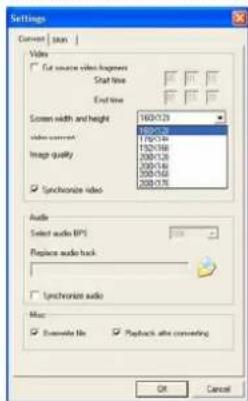
4.3 The parameter setting
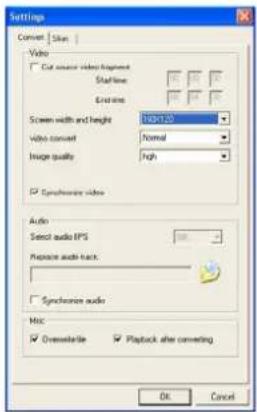
This conversion tool has the function of the AMV file parameter setting, the interception video fragment, video width and height, picture format and image quality etc.
The methods that enter to property interface contain two kinds of the following:
A. select one or more media files, then click on the button in the "output information" box B. select one or more media files, then right click mouse, and select "setting
The "choice" does not mean the check box of the media file, but mean to click the file name with the mouse, make that file background color as blue.
The concrete method will elaborate on in the continuation. This conversion tool default setting as follows picture:
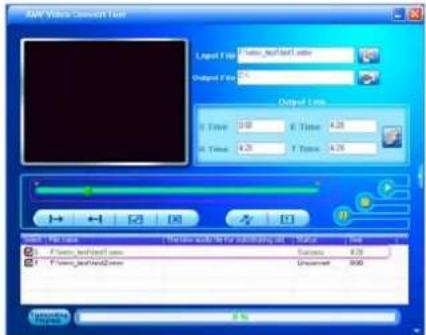
4.3.1 Fragment selection
Intercept the video fragment means to intercept a need of fragment file to conversion. At this time, the customer needs to set start position and end positions. It contain two kinds of methods, the operation is as follows:
4.3.1.1 Fragment selection with the property settings
First choose "cut source video snippet" selection box, enabling video start time
point and end time point. Input the desired start and stop time.
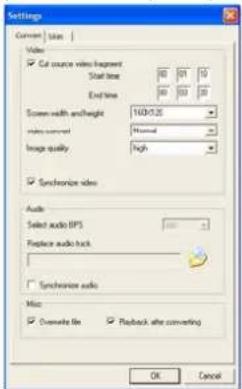
The above example: Selection of the current media files from 1 min10 sec to 3 min
20 sec.
If "cut source video snippet" is not selected, the whole media file will be converted.
4.3.1.2. Fragment selection during playback
During playback starting point and end point can also be selected with the corresponding "Start position" and "End position" buttons.
English
Press the start position button, at the S.Time column will show the selected begging point time.
Press the end position button, at the E.Time column will show the selected point end time.

English
When a fragment is chosen, the selected points will be indicated: Start time, end time, fragment time, total time.
If you want to cancel the fragment intercept, can click "cancel choice" button. Time column become total time; recover the interface that in front of click "choice" button, while convert will convert the whole document.
Notice: 4.3.1.1 methods of the interception video frequency fragments relatively be
applicable to single or several files to do the fragment of the interception together; 4.3.1.2 methods of the interception video fragments only use of while playing file, and only to just the file that playing is valid.
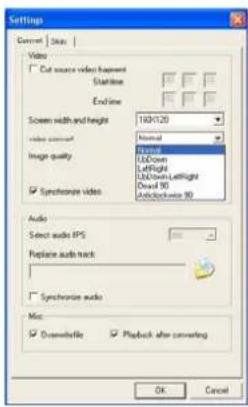
4.3.2 Choosing video resolution of AMV file Choose between 208'176 and 160'120 pixels. Please choose the correct mode depend on your MP3 Player.
4.3.3 Picture transform
There are 6 kinds of picture transform: Normal, UpDown, LeftRight, UpDown-LeftRight, Deasil 90 and Anticlock wise 90. The default choice is Normal, the interface is as follow the picture:
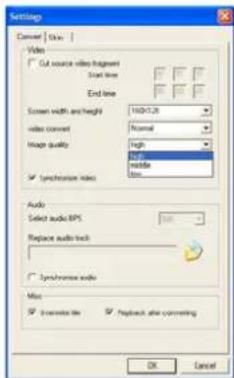
4.3.4 Image quality
There are three kinds of image quality: high, middle and low.
4.3.5 Insert picture for none picture
For converting the better effect, need to pick out those options. The options is be picked out, please use default setting.
4.3.6 Replacing the audio file
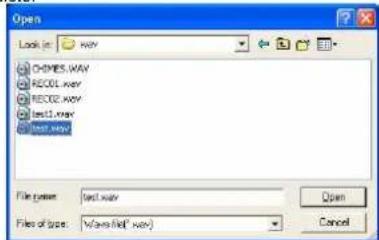
Substitutes the old audio file with the new audio file, means to choose the new audio file (the WAV type) substitute the current video file speech part, video part is not change.
Choose the new audio file, click button ,open the add window, the interface runs
as follow the picture:
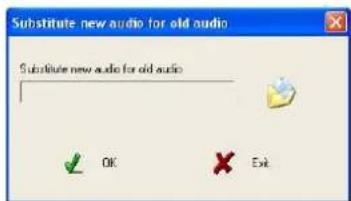
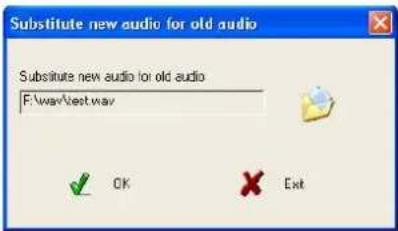
Above picture, press the button choose the new audio part file path, then press OK button to complete.
After selected new audio file, there will display the path of the file in the interface of the "substitute new audio for old audio", please press the OK button to complete. As follow the picture:
English
After adding the new audio file, the "Property setting" interface is as follow the picture:

If you want to cancel the substitution of the audio file, enter the substitute dialog box, don't choose any audio file and make the "Substitute new audio for old audio" column display blank, then click "OK" button, before exit the "Property setting" interface, click the "OK" button again, you can cancel the substitution.
English
4.3.7 Insert wave for not enough wave
For better effect, please use the default setting that not is selected.
4.3.8 Miscellaneous setting:
4.3.8.1 Overwrite file
Overwrite file is replacing the current file by new converted AMV file. This options default is to pick out. If this options did not be pick out, the then born file of AMV has already exist to converting wrong.
4.3.8.2 Play after converting
Play after converting means AMV Player begin playing AMV files automatically after conversion.
In the Miscellaneous setting, we suggest use the default setting.
Click the "OK" button after completing the operation of the above step, complete the property setting operation.
Notice: The above-mentioned system parameter setting, conversion is valid to the selected file, unselected will use the default setting. Here of pick out not means to choose the check box, but click the file name to make that background color is blue, then click the "setting" button or click the right key to choose the choice of "setting".
4.3.9 Copy AMV file to the MP3 Player automatically
If needs copy the AMV files to the MP3 Player automatically after converting, you should connect the device to PC. Make sure the connection is finished, click on the
button in the tool interface, there will display the connecting interface of tool
and MP3 Player, as the picture:
English
Click on the button to choose the conserve path of the AMV files in G:\ As above picture, there are two check boxes: "Copy AMV file to" and "Delete after copy", if they are selected, it will realize the functions, else the functions will be canceled. "Delete after copy" means to delete the AMV files which are saved on the HDD, viz. the files in the conserve path that "output file" column displays.
4.3.10 Skin setting
Click the "Setting" button in the tool interface to enter the property setting interface, choose "skin setting" option, there are two modes provided: "Ocean" and "Classic". As follow the picture:
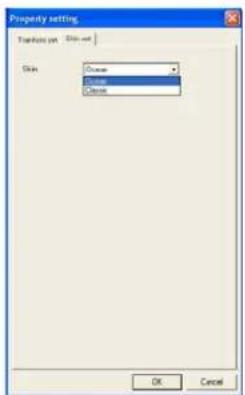
In the above pictures, we choose the "Ocean" mode, if choose "Classic" mode, the picture is as follows:
4.4 Convert file
After complete the system setting, make sure the check box had been selected that wants to convert. Click convert button in the tool interface, the procedure begins to converts all files one by one in order; the file status is one by one in order from "unconvert" to "success", at the same time in convert progress column show the convert progress, the interface as follows the picture:
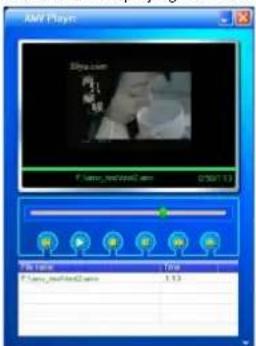
After conversion is completed, the AMV Player will play the AMV file automatically. While playing the file, click the right key on the image, choose property to check the video width and height and frame per second etc. The playing interface is as follow the picture:
English
In addition to the method of the above conversion, can also choose file from the HDD, clicking the right key, choose "beginning video conversion" at the menu that flick open, the procedure will start to convert directly.
5. Download media files from internet and convert files
5.1 Search media files
This tool has the function of downloading media files from internet, viz. after searching out the media files, click the right key on the file link, choose "add to AMV convert tool", then choose "yes" in the dialog box that flick open.
If you want to search more files, enter the next dialog box and click the "OK" button.
5.2 Download the media files
Make sure the searching is finished, choose the desired file(select or cancel the check box), the default is to select all, then click the "OK" button again.
After making sure the downloading file, you can still use the check box to select or cancel the downloading files at this time, then click the "Download" button.
If the file can be downloaded normally, it will display the downloading process, and the status will show "success" after downloading. If it can not be downloaded cause of some reasons, the status will show "failed".
Finish downloading, click "OK" button, then click the "OK" button in the dialog box to close it.
5.3 Convert the media files
After downloading the media files successfully by using the above methods, the tool will run automatically, and add the media files which were downloaded this time to the convert list.
The files will be saved in the install path, through the "file name" column, you can check the conserve path of the file. e.g. D:\Program Files\MP3 Player Utilities 4.01\AMVConverter data
Convert files, the convert methods are the same as the above 4 converting the file), please get reference from it to convert media files.
6. Attention
6.1 If you want to convert Real player, QuickTime or MPEG2 files, please first install the corresponding decoder.
English
6.2 When you convert Real player, QuickTime or MPEG2 (DVD) format files, and your Windows Media player cannot play this file, then you need to install corresponding compatible decoder for Windows Media player, until the Media Player will play this file, otherwise the conversion software will not function.
6.3 When small size AMV file is converted to big size AMV file, if the setting of "picture transform" is Normal, it is not allowed to convert; else if the setting is other option, it can be converted but it will reserve the small size and frame per second of the source AMV file.
6.4 There is no limit while big size AMV is converted to small size AMV file.
6.5 While playing the SWF format files, the tool will use IE browser to play it.
6.6 This tool doesn't support the audio and the video character display of the AMV file which is converted from Flash(SWF file).
6.7 For the moment, the tool does not support "intercept the video fragment"function of SWF file.
6.8 The operation picture of this help document provides the reference only, please follows the real tool of the concrete edition.
Media Manager
1 Media Manager Introduction
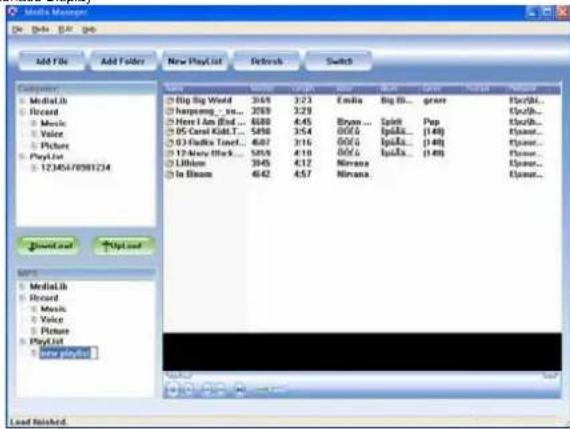
Manager the multi-media music files in the MP3 player and computer,
including .MP3, .WMA, .OGG, .ASF, .WMV, .AVI, .AG8, .JPEG, etc.
2 Install and Uninstall
2.1 Operational Conditions
Operation system
Simplified Chinese, and English version of Windows XP
Minimum requirement
CPU speed 200MHz or above
Storage 32MB above
Display Card: Standard VGA 256 colors display mode or above
Hard disk: Traditional Installation 300MB
CD-Rom drive: 8X on
Soundcard (not compulsory)
English
Suggested standard of equipment
CPU Speed 500MHz or above
Storage 64MB or above
Display Card:SVGA 16 colors display mode or above
2.2 Installation software
The installation of Media Manager is convenient, simple and fast. The procedures are as follows:
After the starting up of the Window, insert the disc into the CD-ROM drive, and the installation program will run automatically.
If your computer does not have automatic running on devices, then you have to customize your installation: Find and double click the file Setup.exe from the root folder of the disc. This is the file for setting up the program.
"Installation completed" pops up after the installation is finished. Click the "Finish" button on the pop up window.
2.3 Software start-up
After the completion of the installation, you can start the program as the following procedures: Click the Menu "Start" and then choose "All Programs". Then click the item "Media Manager".
If you have chosen "add a short cut for Media Manager on your desktop", you can simply double click the "Media Manager" Icon on your desktop and run the program.
2.4 Uninstall the Media Manager
The uninstallation of Media Manager is simple. You can easily delete all related files and programs.
Choose the "Add/Remove programs" from the control panel to remove the Media Manager
3 Quick Start Guide
3.1 To manage multi-media folders in the computer and MP3 player These multi-media folders are stored in the USB Disk of the MP3 player. Among those, audio files are stored in the folder \Music.
when you add a multimedia file from PC's hard disk into the multimedia library, you can select the files from a certain content list.
The format of multi media files which are extracted from audio CD are Ogg. You can add ID3 messages (Name/ Performer/ Albrum/ Artist/ Type) for those files.
English
When you are browsing the multi-media folders of the computer or MP3 player, you are able to delete files from the folders. You can look over the nature of multi media files, e.g. ID3 messages, file size, length of time, name, etc.
You can browse your multi-media files according to their Name/ Performer/ Album/ Artist/ Type/ file location, and arrange files according to the above categories.
You can choose any multi-media files of the computer and transfer them to the MP3 player.
You can also transfer files from the MP3 player to the computer.
3.2 Managing the Playlists in the computer and MP3 player
You can establish, remove, and rename the Playlists of the computer or MP3 player.
You can pick and put files from multi-media folders to the play list in the computer.
You can pick and put files from multi-media folders to the play list in the MP3 player.
You can transfer the Playlist in computer to the MP3 player.
You can also transfer Playlists from many MP3 players to the computer, together with other media files in those MP3 players.
Play the media file in the Playlist of PC and MP3, choose one of the files in the Playlist to play in auto boundary, there are four modes such as Repeat One. Repeat All, Play in sequence and Shuffle.
3.3 Manage the Record Base in PC and player.
There three categories in the player. Music, Voice and Picture, which are transferred from the Record Base, the Picture category will be available in the feature. Put the music files in folder \Record\Music, language files in folder \Record\Voice, and Image files in folder \Record\Picture.
Browse and delete the media files.
Browse the preference of the files, such as information about ID3, capacity, playing time, files name.
Browse the Record category in PC and MP3 Player, arrange the serial according to the name, playing time and path of the media files.
It's available to transfer the files which are been chosen in the media category of PC to the media category in MP3 player.
3.4 Play the media files.
There are Fast forward, rewind, Play and Pause functions
The nature of files is displayed in tumbling cycle.
English
When the users use the Playlist for playing the music, he can choose from four modes: Sequence, repeat one, repeat all, shuffle.
If only one file is chosen to be played; only the sequence and repeat one are available
You can select any multimedia files from the multimedia file library to set a Playlist
You can select any multimedia files from the MP3 Player to set a Playlist
You can select any multimedia files from the record folder in the computer to set a Playlist
You can select any multimedia files from the record folder in the MP3 to set a Playlist
The playing scope can be all files from one Playlist
3.5 Support PC system:
Windows XP
3.6 It supports language:
It supports simplified Chinese, English
It supports traditional Chinese
4 Instructions
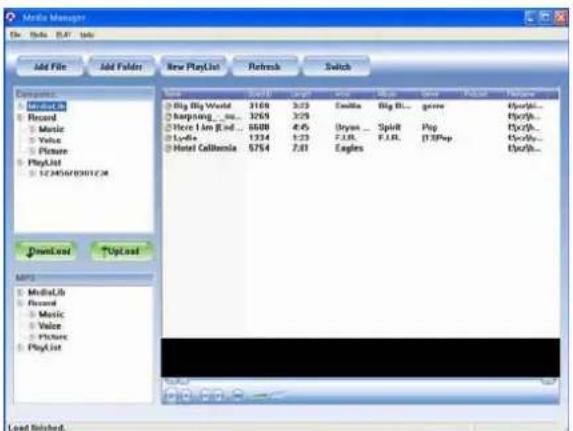
4.1 Main interface
There are 5 zones in the main interface, including content list (PC and MP3), playback, condition
hint, menu, and short cut.
English
Folder Menu:
Open Play, Delete File, Add file, Add Folder, Add URL, Quit (Alt+Q)
Media Menu:
Paste URL (V), Podcast Favorite (O), Update Song, Downloading Stop (P), Switch View, Refresh (F5), New Playlist. and Rename Playlist
Play Menu:
Pause, Stop (S), Prev. next, Mode (N)
Play Mode Menu:4
Sequence, Repeat One, Repeat All, Random
Help Menu:
Help, About...
Shortcuts:
Add file, Add folder, New Playlist, Refresh, and Switch.
4.2Playback formats
Descriptions: This tool supports file formats which are like SDK35 as follows:
Description on file format
Podcast file(xm) 一 ^ 一 xml;php;asp)
Microsoft record file (*div-ms)
Midi file (Midi) (.midi)
English
Windows media file (asf) (*.asf)
windows picture file (Jpg)('.ogg)
Windows video file (avi) (.avi;*.wmv)
Audi file (wav) [wav, sbo]
video file(mpeg)*.mpg)
4.3 Manage the media library in the computer and MP3 player 4.3.1 Add media files to the library
Choose "Add file" from the Media (M), then a window pops up. You can choose one or more media files from the recognized player, Close the window, and the interface will notify the library is renewed.
Choose one or more media files from the audio CD, and add them to the library of the computer. After that, close the window and the interface will show the updated library. Interface Display
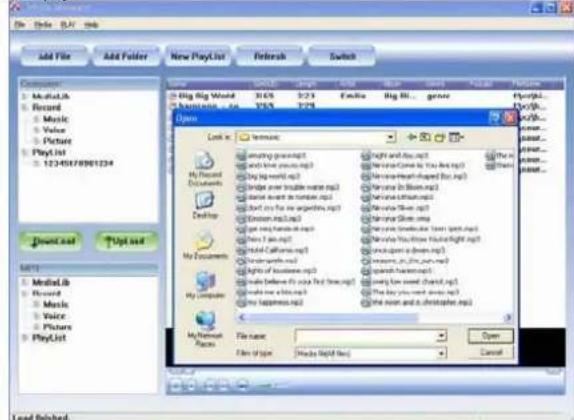
File formats:
Pod cast file (xml) (.xml;php;*asp)
Microsoft record file*.drv-n
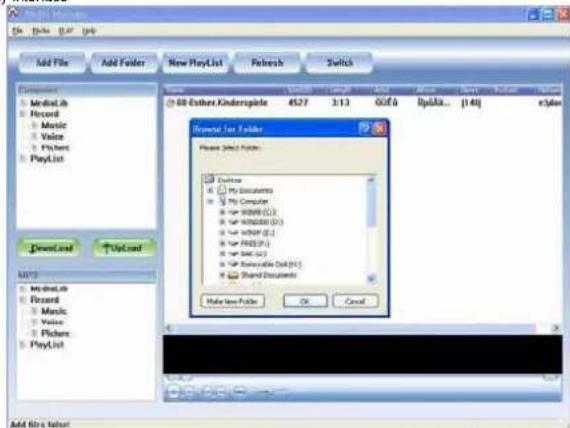
4.3.2 Add folders to the library of the computer
You can pick a folder from the connected player, and add it to the library of the computer. Then close the window. The interface will show the updated library.
Choose the starter for the Audio CD, add all files under this starter to the library. Close the window after finished. The interface will show the updated library.
Display Interface
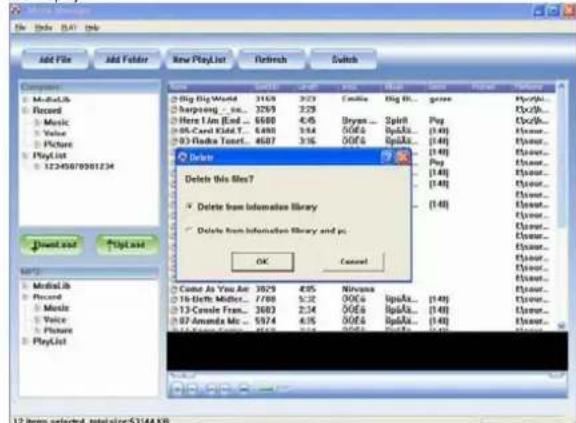
4.3.3 Browse and Delete media files
The list shows all media files in the library
Highlight one or more media files in the list, and choose 'delete' from the Edit menu, and
confirm the delete.
Interface Display
Two files are chosen to be deleted in the above picture.
4.3.4 Transfer files from the library of the computer to that of the MP3
Choose one or more media files from the library list. Right click the 'send' button, and transfer the files to the MP3 Player.
English
The window pops up due to the failure in transferring Chinese files or with insufficient space.
4.3.5 Transfer files from MP3 players to the computer
Choose files from the interface list and right click the transfer button. Update the ID3 Playlist after the transfer
The window pops up due to the failure in transferring Chinese files or with insufficient space.
4.4 Manage the Playlist of the computer and MP3 Player
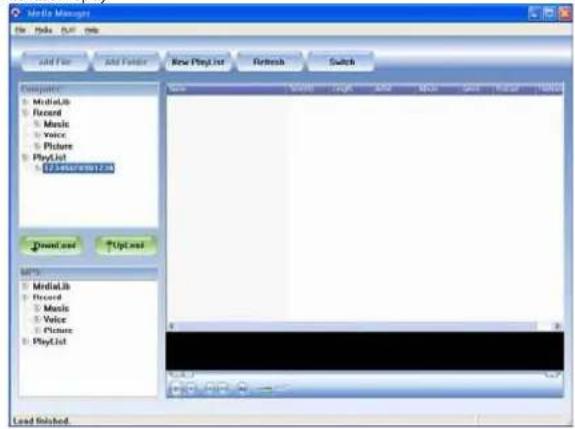
4.4.1 Establish a new Playlist
Choose Add new Playlist from the Media Menu (M). Then add a new Playlist lo in the MP3
Player box. Edit the Playlist name. The maximum of the name is 32 alphabets, and there should be no identical Playlist name.
There are 16 Playlists at maximum.
Interface Display
4.4.2 Delete/ Rename the Playlist
Right Click the Playlist that you chose and choose 'Delete' and confirm.
English
Right Click the Playlist that you chose and choose ‘Rename’. Make sure it doesn’t have an identical name with another Playlist
Interface Display
4.4.4 Mutual transfer of Playlist of the computer and MP3 player Choose any Playlist listed in the PC menu box. Click download and thus it will be trans to the MP3 player.
Both the Playlist itself and the files in the Playlist are transferred to the MP3 Player.
Choose the Playlist for transfer. Same procedures for transferring to the computer.
4.4.5 Delete files from the Playlist
Choose any Playlists from either computer or MP3 player
4.5 Manage the record library of the computer and MP3 Player 4.5.1 Browse and Delete Media files
Choose those media files from the record folder from the menu, meanwhile the chosen files are shown in the content list.
Choose any files from the content list, and choose delete files from the editing menu. Then a window pops up and you can confirm the deletion.
English
Interface Display
4.5.2 Mutual transfer of recording files of the computer and MP3 player The list of the computer is corresponding to that of the MP3 player. Media files can only be transferred to the list correspond. For example, the folder 'music flies' from the computer can only be transferred to the 'music' in the MP3 player.
Choose a folder under the recording folder, and then choose any media files and right click the button 'transfer'. Thus, files are transferred to the recording folder.
Transfer of Chinese files or with insufficient disc space.
4.5.3 Picture display
Double click on the media files chosen from the content list, and a window pops up.
4.6 Arrange the content list
4.6.1 Arrange the media list
Click on the list title, use this item as the key word for arranging the sequence. If you click on the ascendant sequence button, the sequence will be changed to descendant, vice versa.
English
4.6.2 Arrange the Playlists
Click on the list title, use this item as the key word for arranging the sequence of the Playlists. The interchange of ascendant and descendant order is like the one of the media list above.
4.7 Playing of music files
4.7.1 Playing of multiple music files
Music media files from the computer or MP3 player are both playable.
From the content list, click on one media files and stop the file which is currently playing, and start playing.
From the content list, click on one media files choose 'play' from the pop-up list, stop the file which is currently playing, and start the playing of the chosen file 'Repeat one' and 'play in sequence' are the only ways in playing multiple media files.
4.7.2 Play the Playlists
Files in the Playlists of computer and MP3 player are playable.
From the content list or menu, right click any Playlist and choose 'play'.
There are four styles of playing the music files from the Playlist: Play in sequence, repeat one, repeat all and shuffle.
Fast forward, Rewind and position scroll
You can use fast forward or rewinding when the files are being played.
When the files is paused or stopped, you can change the position by using the scroll.
4.7.3 Tumbling of the file details
When the file is playing, the file name and the playback time tumbles in a cycle.
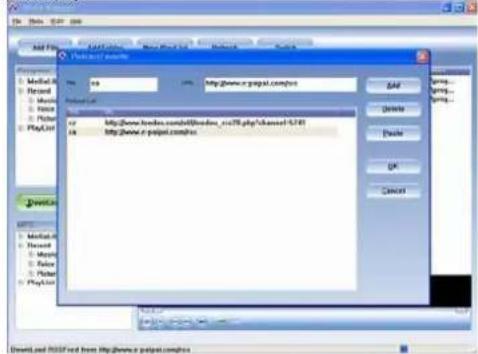
4.8 Podcast Favorite functions
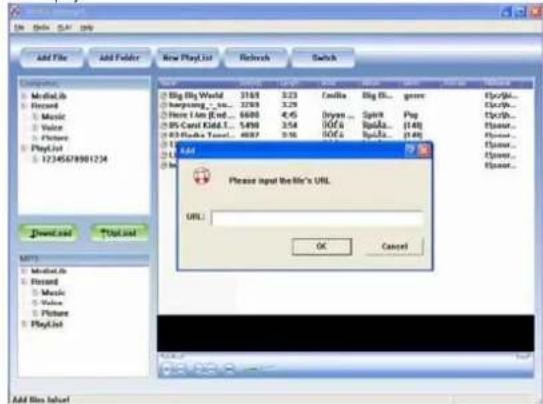
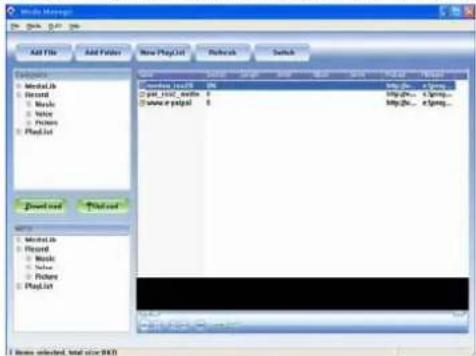
4.8.1 Add URL...
Podcast can download the media file from the Internet URL address to the MP3 player. You can enjoy the music or radio at any moment and everywhere. Podcast can automatically incept and download the program which will be saved in the content list.
Choose the 'Add URL' item and input then confirm the file's URL address which will be saved in the content list.
English
Interface Display:
You can subscribe to the web site from which you want to receive content. Double click this file in the content list, and the information will be delivered automatically to your MP3 player.
4.8.2 Podcast Favorite
Podcast Favorite function is add the title and URL link address to the Podcast Favorite list that you can use it more convenient in the future.
Choose the Media menu and click the Podcast Favorite item, fill in the Title and the URL address in the pop-up window.
Interlace display
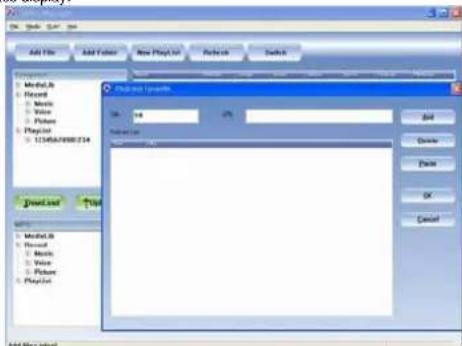
Postcast use RSS2.0 file format to transmit information, this is different from other format file. If inspection fail or the provided link is invalidation, it will show channel URL check false.
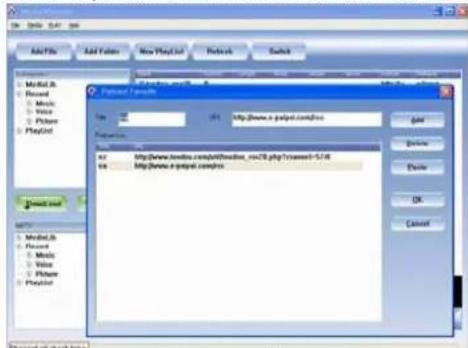
English
Click Add button This URL will be added in the Podcast Favorite list. Press the Paste button it will subscribe or update the audio/video files automatically to the content list. Interface display:
5 Converting .ACT. audio to WAV.audio.
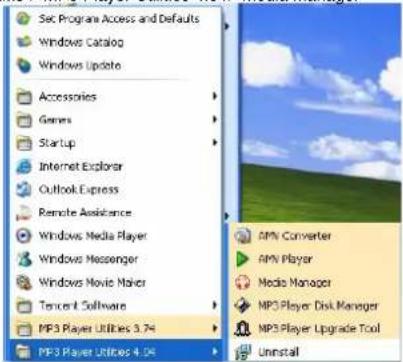
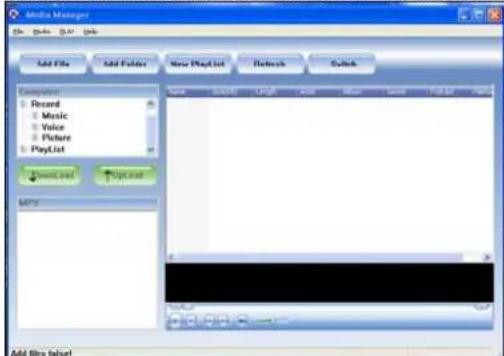
Step 1: After installing the driver and software utilities, click Start button, select Programs > MP3 Player Utilities 4.04> Media Manager
55
Step 2. Click the Media Manager and you will see the following picture
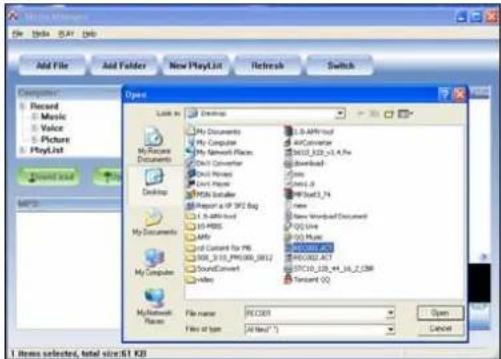
Step 3 Click Add File to choose your desired .ACT file. Note: Files of Types should be "All files".
English
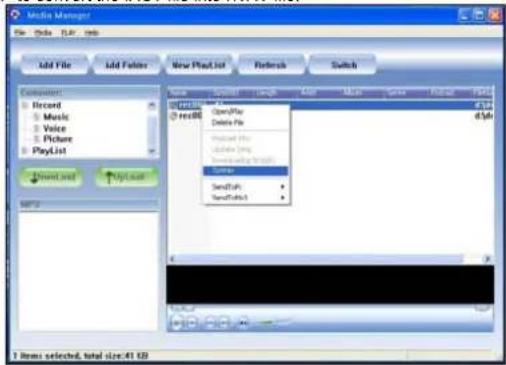
Step 4. Choose the .ACT file and press the right button of the mouse, click the "ToWav" to convert the .ACT file into .WAV file.
EditingLyrics
Instructions for teaching you to edit the lyrics synchronously with the songs.
Step 1: Click Start button, go to Programs > Accessories > Notepad to open a new text document.
Step 2: Write the lyrics as the following format. The corresponding time to lyrics should be typed in [ ] bracket format.
Step 3: Then save the text file in extension of .LRC file.
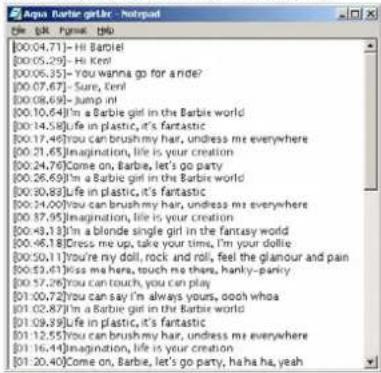
Step 4: Copy the lyrics file (.LRC) and its song into the player under the same directory. You will see the lyrics on the display.
Note: The function of scrolling lyrics should be enabled; please refer to Lyric section for details.
English
Downloading MP3 and WMA songs or AMV films
Note: The screens shown below apply to Windows® XP, other versions of Windows® may display slightly different screens.
Step 1: Ensure your player is on.
Step 2: Firmly plug the USB cable into the USB ports of your computer and player. Step 3: Once the connection is properly made, the following screen will display. If this screen doesn't show, please re-connect the USB cable once more.
The following screen will appear.
Note: Please ignore the following screen if you are not using Windows® XP.
Step 4: Double click My Computer display as follow.

on the Desktop and a Window will
You will find Removable Disk in the Window.
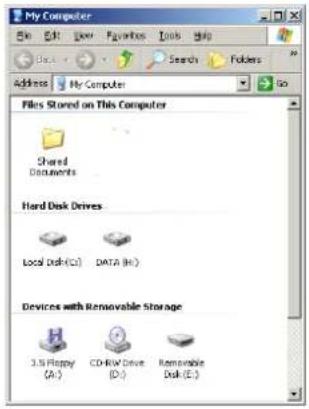
Since Windows® will assign a drive letter to the Removable Disk according to system configuration of the computer, the drive letter may be different when the player is connected to a different computer.
Step 5: Double click Removable Disk.
Note: "Busy..." will appear during downloading or uploading the files, please don't disconnect the USB cable or turn off the player at this moment. When "Busy..." disappears from the display, you may disconnect the cable.
English
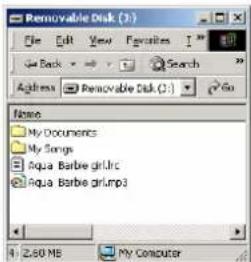
Step 6: Drag and drop .MP3 and .WMA music file or .AMV file into Removable Disk.
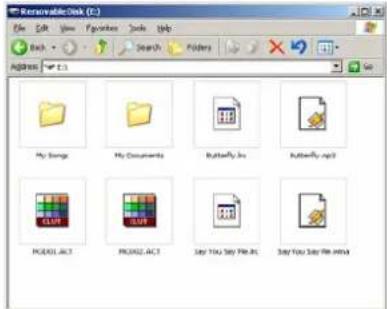
Note: You are allowed to create any directories and files in Removable Disk.
The file in the extension .LRC is the lyric file which stores the lyrics synchronously with its song. Please refer to the Editing Lyrics section for details.
The file in extension of .ACT is the recorded voice file which is the special audio format developed by the vendor. For common software audio players in the market, it can't play .ACT audio files. Therefore, an .ACT file is necessary to convert to .WAV for playback on the common software audio players such as Microsoft® Windows® Media Player. Please refer to Converting. ACT audio to .WAV audio section for details.
The file in the extension .ASF is the video file which is the special video format developed by the vendor. For common software video players in the market, it can't play .ASF video files. Therefore, an .ASF file is necessary to convert to .AMV file for playback on the common software video players such as Microsoft® Windows® Media Player. Please refer to Converting. ASF audio to .AMV video section for details.
English
Folder Management and Navigation
Folder Management
Under the ROOT directory, you may create the folder to manage the songs for easy navigation and management. Under the each folder, subfolder or ROOT directory.
Folder Navigation
- In the Stop mode, press the MENU button and select Local Folder.
- The created folder names in the first layer are listed on the display. Choose
your desired folder name by pushing the PREV/NEXT button left or right. - Press the MENU button to confirm your selection
Sub folder
- You may enter each folder in order to locate your desired sub folder. Then
press MENU button for confirmation. - You may go back to the previous layer by selecting "i" on the LCD display
Root Directory
- You may select "ROOT" for going backwards to the root directory.
Using USB Mass Storage Function
USB mass storage function allows you to access the player as a disk drive of your computer. You can Copy and Delete the files with any formats into/from the player. Follow the same procedures in Downloading MP3 and WMA songs for details.
Note: "Busy..." will appear during downloading or uploading the files, please don't disconnect the USB cable or turn off the player at this moment. When "Busy..." disappears from the display, you are allowed to disconnect the cable.
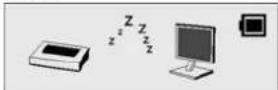
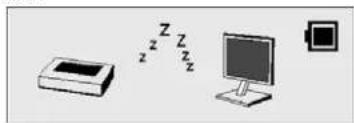
Disconnecting the USB Cable
Before you disconnect the USB cable from your player or computer, please note the following procedures should be done for safety removal.
Note: Please ignore these procedures if you are using Windows®98/98SE.
English
Note: "Busy..." will appear during downloading or uploading the files, please don't disconnect the USB cable or turn off the player at this moment. When "Busy..." disappears from the display, you are allowed to disconnect the cable.
Step 1: Double click the Removable Disk, which is at the bottom right hand corner of your desktop.
Step 2: The following window will appear. Click Stop button.
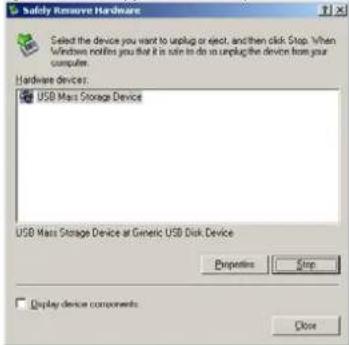
Step 3: Another window will pop up. Select "GENERIC USB DISK DEVICE USB Device" and click OK button to confirm.
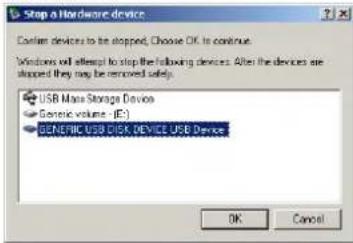
Step 4: Click Close button to exit the window. You are allowed to disconnect the USB cable from the USB port of your computer.
Formatting the Internal Memory
There are two ways to format the internal memory.
Note: This formatting procedure will cause all files in the player to be lost.
Using the Formatting Software Utilities
Please refer to Installing Driver and Software Utilities section for details.
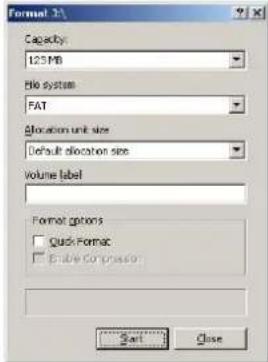
Using the Formatting in Windows®
- Click My Computer

My Computer
on your desktop.
- And you will see Removable Disk, right click on Removable Disk and click Format on the menu.
- After you have clicked Format, you will see the following screen, then click Start button to start formatting.
Trouble Shooting
| Symptom | Reasons | Solution |
| Press the POWER button, the display does not turn on | The battery has run out ● | Recharge the battery. |
| After plugging the player into the USB port of your computer, Removable Disk Drive cannot be found in My Computer | The software utilities (included in CD) has not yet been installed on Windows® 98/98SE | ● Insert the CD● Click the setup to install the software utilities● Follow the on-screen instructions to complete installation |
| The software utilities of the player (included in CD) conflicts with other software drivers which were installed on your computer | ● Uninstall software utilities of the player● Restart computer● Re-install the software utilities again | |
| Your motherboard doesn't support the USB connection | Contact the manufacturer of your motherboard to upgrade the motherboard driver | |
| The music file on the player cannot be deleted | The attribute of the music file is set as Read Only | Change the attribute of the music file |
| The playing time displays disorderly when playing mp3 music | An mp3 music file is currently compressed in VBR format, which can vary the compression speed of mp3 music. When the mp3 music is playing, the variable speed will cause the playing time displays to be disorderly | Compress the mp3 music in fix compression speed rather than variable compression speed |
| When the player is connected or disconnected to/from your computer, there is an unusual error on the computer | It is due to the sudden disconnection from the USB port during the transference the files | It is recommended that the user should not suddenly unplug the player from the USB port of computer when the files are being transferred or when the internal memory is being formatted. |
| My player can't play the mp3 music files | Most of the mp3 music files on the market are compressed in MPEG1, MPEG2, LAYER3 standard. In earlier days, some mp3 music were compressed in | If the mp3 player can't play the mp3 music file, skip to the next song until the mp3 music files are not compressed in MPEG1 LAYER1 /MPEG1 LAYER2. |
our
English
| IMPEG1 MPEG1 LAYER2. Please note our player does not support MPEG1 LAYER1, MPEG1 LAYER2 or an mp3 compressed in more than one compression standard. | Delete AMBER files which can't be played in the player | |
| Change the compression standard of an mp3 music file in MPEG1 LAYER3 | ||
| If the music file can't be played normally or you hear a long beep sound | The player doesn't support such a compression standard of the playing music file | The player can only support MPEG1 MPEG2 LAYER3 and WMA music files |
| Out of the range of compression speed | The range of MP3 compression speed: 32Kbps~384Kbps The range compression speed: 64Kbps~128Kbps | |
| Tips: If you don't know the compression standard and speed of the music file, you should use those common music players (i.e. Winamp) to check the music information. | ||
| After formatting the internal memory of the player by using our software utilities, close and re-open the software, the mp3 player can't be detected | Some system information may be deleted during formatting | Disconnect the player and then re-connect |
| the USB cable | No driver has been installed on Windows® 98/98SE | Install driver The computer can't detect |
| Unsafe removal of the USB cable | Format the internal memory | |
Technical Specifications
| Capacity | 128MB/256MB/512MB/1GB/2GB internal flash memory |
| Display Colour TFT display | |
| Interface USB 2.0 high speed | |
| Power Lithium battery | |
| File type | MP3 (32kbps - 384kbps), .WMA (64kbps - 128kbps) for music at Constant Bit Rate .ACT and .WAV for recorded audio files .AMV for movie files .TXT for E-Book files .JPG , .BMP and GIF for photo files |
| S/N ratio 90dB | |
| Earphones output power | 9mWx, 32ohm |
| Operating System | Windows® 98/98SE/Me/2000/XP MAC OS 9.0, 10.0 |
| Dimensions 39mm(W) x90mm(H) x 8mm(D) | |
| Weight 45g | |
MANUEL DE L'UTILISATEUR
IL SE PEUT QUE CE GUIDE D'UTILISATION CONTIENNE DES ERREURS ET DES
LE DESIGN ET LES SEPCIFICATION SONT SUJETS A MODIFICATION SANS PREAVIS
Specifications Techniques 67
Francals
Introduction
l'energie de la pile diminue. Please recharge your player with the power charger.
Charger la pile
Playing Recorded Voice(Lire I'enregistrement vocal)
Francals Convertir ACT audio en.WAV audio
Uberblick 5
Tetrahedron 8
Fasienbedingung 3
Bilshimnabefovce 8