MP1840 - Mp3 player Difrnce - Free user manual and instructions
Find the device manual for free MP1840 Difrnce in PDF.

| Product Type | MP3 Player |
| Model | MP1840 |
| Brand | Difrnce |
| Storage Capacity | 8 GB internal, expandable via microSD up to 32 GB |
| Display | 2.0-inch TFT color screen |
| Audio Formats Supported | MP3, WMA, WAV, FLAC, APE |
| Video Formats Supported | AMV, AVI (converted) |
| Battery Type | Lithium-ion rechargeable, 400 mAh |
| Battery Life | Up to 15 hours of music playback |
| Charging | USB 2.0 connection (cable included) |
| Connectivity | USB 2.0, 3.5mm headphone jack |
| Dimensions (W x H x D) | 95 x 42 x 10 mm |
| Weight | 45 g |
| Main Functions | Music playback, video playback, FM radio, voice recording, e-book reader, photo viewer |
| FM Radio | Yes, with preset stations |
| Voice Recording | Built-in microphone, WAV format |
| Equalizer | 7 preset EQ modes (Rock, Pop, Jazz, etc.) |
| Playback Modes | Normal, Loop, Random, Intro |
| Language Support | English, Spanish, French, German, Italian, etc. |
| Care & Cleaning | Wipe with a soft dry cloth; avoid liquids and solvents |
| Safety | Do not disassemble; keep away from water and heat sources |
| Spare Parts & Repairability | Battery replacement possible; contact authorized service center |
| General Information | User manual available in PDF at notice-facile.com |
Frequently Asked Questions - MP1840 Difrnce
User questions about MP1840 Difrnce
0 question about this device. Answer the ones you know or ask your own.
Ask a new question about this device
Download the instructions for your Mp3 player in PDF format for free! Find your manual MP1840 - Difrnce and take your electronic device back in hand. On this page are published all the documents necessary for the use of your device. MP1840 by Difrnce.
USER MANUAL MP1840 Difrnce
text_image
DIFRNCE® see & hear the difference. MENU VOLGebruiksaanwijzing
natural_image
Illustration of six different electronic devices or devices, including earphones, headphones, and TVs (no text or symbols visible)
natural_image
Illustration of various electronic devices including headphones, telephones, and a TV (no text or symbols)
text_image
Record
text_image
VoiceFoto
Systeem instellen
FM modus:
E-Book:

text_image
FM
natural_image
Illustration of various electronic devices including headphones, batteries, and a TV set (no text or symbols)
text_image
Photo Browse
text_image
SystemSPELLETJES :
USB modus:

natural_image
Three stylized game icons on a blue background: a green game icon, a blue abstract gear icon, and a blue circular game icon (no text or symbols)
text_image
Connect\*\*Volume bediening
Opmerking:
natural_image
Illustration of six different household appliances and devices (no text or symbols visible)- Selecteer REC type
natural_image
Illustration of six different household appliances and devices (no text or symbols visible)text_image
87.0 MHz 87 108foto
natural_image
Three icon buttons: a blue gear with a skull, a blue gear with a gear icon, and a green game controller with a speedometer (no text or symbols)text_image
MP3 Player firmware upgrading tool Device firmware information Device name: S1 Mp3 Player Productor: Wilson Co. Ltd. Version: 3.0.41 Upgraded firmware information Device name: Productor: Version: Select new firmware file Please select firmware file Begin upgrading Upgrade log HJT490.bin 2004-11-04 12:49 V3.0.41 Success HJT320.bin 2004-11-02 09:45 V3.0.41 Success HJT490.bin 2004-11-04 12:39 V3.0.41 Failed HJT490.bin 2004-11-04 12:39 V3.0.41 Failed HJT490.bin 2004-11-04 12:39 V3.0.41 Failed Close Helptext_image
Open Look in: upgrade HJT490text_image
HP3 Player firmware upgrading tool Device firmware information Device name: S1 Mp3 Player Produtor: Wilson Co. Ltd. Version: 3.0.41 Upgraded firmware information Device name: S1 Mp3 Player Produtor: Wilson Co. Ltd. Version: 3.0.41 Select new firmware file Complete firmware upgrading Begin upgrading Upgrade log HUT490.bin 2004-11-08 15:35 V3.0.41 Failed HUT490.bin 2004-11-08 15:35 V3.0.41 Failed HUT490.bin 2004-11-08 15:35 V3.0.41 Failed HUT490.bin 2004-11-08 15:34 V3.0.41 Failed HUT490.bin 2004-11-08 15:34 V3.0.41 Failed Close Help10、Bijwerken.
text_image
ANV convert Tool Input file: 0.00 Output file: C:\Documents and Settings Output Info Start time 0.00 Finish time 0.00 Flagged time 0.00 Total time 0.00 OK Cancel Cancel Help Select Name Audio Filter Status Type F:\Documents\01.mov Not converted 0.00 Propots 0%text_image
AMV convert Tool Property Video: Save clip Start 00 10 15 Finish 00 20 30 Fonts of AMV 120 *129 Frames per second middle Insert pie while not enough frames Audio Audio bitrate 22.05E Replace current audio data Insert voice when bitrate not enough Options Overwrite Try other decoders Play after convert OK Exit Progress
text_image
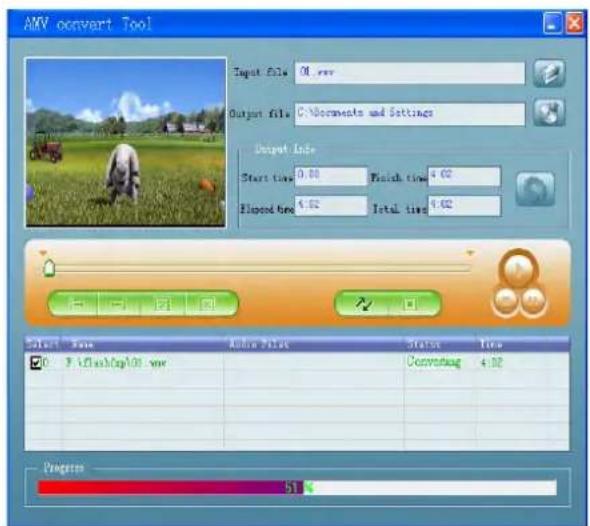
AMT convert Tool Input file: 01.mov Output file: C:\Documents and Settings Output info Start time: 0.00 Finish time: 4.02 Elopod time: 4.02 Total time: 4.02 Select Name Audio Tools Status Time X:\Documents\01.mov Comverting 4.02 Programs 51%(Afbeelding 12-2)
(Afbeelding 12-3)
text_image
DIFRNCE® see & hear the difference. MENU MOV DMH HITCE
User Manual
The MP3 player is a bran-new generation of digital portable device, supporting MP3/WAV music format ,digital record ,FM stereophonic radio , AMV format play ,JPEG photograph browse and E-book text reading .Its perfect sound quality, great reliability and exquisite appearance make it a masterpiece. Devoutly hope to bring you great enjoyment in this digital era.
Unique Features
- Exquisite Appearance
Unique appearance designed and comfortable for handling
- Multi-Codec Player
e.g.: MP1, MP2, MP3, WMA, WMV, ASF and WAV Music format
- Firmware Upgrade
Providing the latest updated features via firmware upgrade from the website
- FM Function
You may easily listen to FM stations and set your favorite stations by using Auto search or Manual Search. The player can save 40 (20 for each Band) local stations.
- Drive Free U Disk
You may manage your files directly through “Portable Disk” in “My Computer” on Winows2000 Operating System or above without driver.
- “Private Space” Disk Mode
The flash memory can be divided into two parts by using the accessory tools and one is encrypted to hide the contents saved inaccessible by others. Keep Your Secret!
- Record/ Replay
The player supports recording through built-in microphone and saves as WAV and ACT formats. Meanwhile it supports real digital A-B replay or comparison replay.
- 7 Preset EQ
Normal, Rock, Pop, Classic, Soft, Jazz and DBB
- Multi-play Mode
Normal, Repeat One, Folder, Repeat Folder, Repeat All, Random, Intro.
- Power Off
You may set Sleep Timer or Off Time mode in your own convenience.
• GUI (Graphic User Interface) Menu
Vivid animation menu with corresponding characters make it easy to operate.
Declaration
* Thank you for your purchase.
※ Please read this manual carefully before using your new player.
* Contents in this manual may change possibly for better service.
We have the right to make changes to this manual without notice.
If the actual operations of your player is not the same as the instruction in this manual, please visit our Website for latest product information.
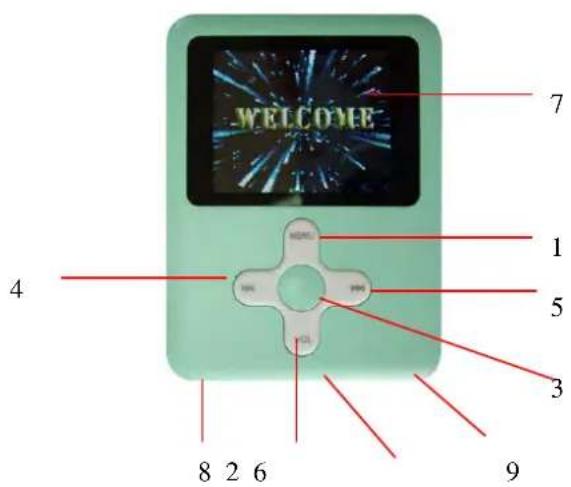
1. Locating the Controls
- Appearance & Keys
text_image
WELCOME 7 1 5 3 9 4 8 2 6| S/N | Description S/N Description | ||
| 1 | Menu button | 6 | Power switch |
| 2 | Vol | 7 | LCD display |
| 3 | Play/Stop 8 USB | ||
| 4 | Previou track/Rewind(◀)/VOL- | 9 | Earphone head |
| 5 | Next track/Forward(▶)/VOL+ | ||
- LCD Window
text_image
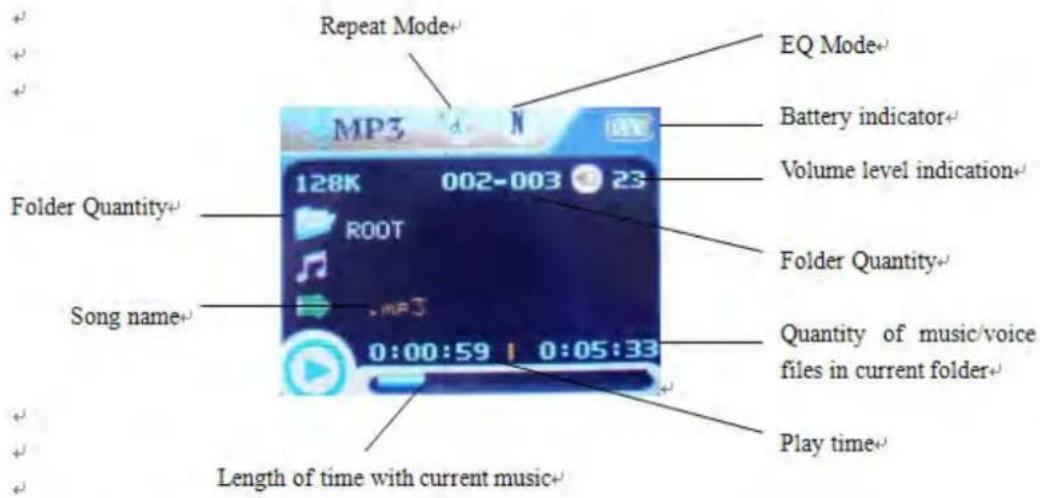
Repeat Mode+ EQ Mode+ Battery indicator+ Volume level indication+ Folder Quantity+ 128K 002-003 23 ROOT Folder Quantity+ Song name+ . MP3 0:00:59 | 0:05:33 Quantity of music/voice files in current folder+ Play time+ Length of time with current music+- Battery
The player is in multilevel level battery monitoring system.
Indicates that battery is 3.6V and the power in battery will become less when using.
☐Indicates low battery power and battery should be charged up.
Basic Operation
- Entering Menu System
Pressing MENU button may enter the menu system, including main menu (long press MENU button at Stop state), submenu at Play state (press MENU button to enter) and submenu at stop state (press MENU button to enter).
- Browsing
○Browsing music files or menu options :
Short press ▶/▲ button
○Fast forward or fast backward when playing :
Long press ▶/▲ button
- Entering Different Modes
You may enter different modes from the main menu.
Main menu:
(Long press the
MODE button to
enter ) Movie mode:
Music mode:
Record mode:
Voice mode:

natural_image
Illustration of six different household appliances or devices, including a cheese maker, coffee maker, milk carton, TV, and box (no text or symbols visible)
text_image
Music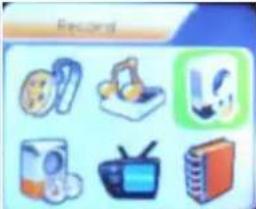
text_image
Record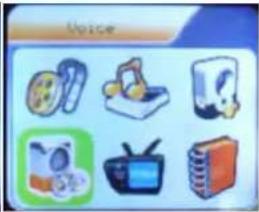
text_image
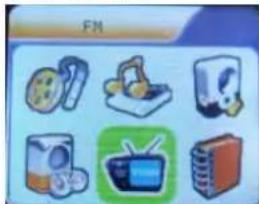
VoiceFM mode:
E-Book: Photo System setting
text_image
FM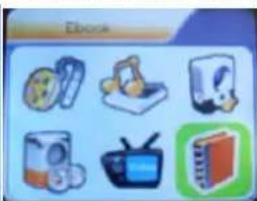
natural_image
Illustration of six different electronic devices and media icons arranged in a grid (no text or symbols)
natural_image
Three abstract icons on a light blue background: green gear, blue gear with internal structure, and blue gear with curved shape (no text or symbols)
natural_image
Three abstract icons with green and blue shapes on a light blue background (no text or symbols)GAME :
USB mode:

natural_image
Three abstract icons: a gear with blue outline, a gear with green outline, and a gear with blue outline (no text or symbols)
text_image
Connect\*\*Volume Control
Remark:
Long press MENU button to return to the main menu at the modes. When connecting the USB cable to PC, then will enter USB mode.
At the music mode, voice mode, short press VOL buttons to enter the volume control interface and then press the ▶/◀ button to adjust volume (follow along with number of volume value be changed).
- Power On/Off
1. Turn on automatically
- After push the Power button( OFF→ON), the player turn on automatically and enter power on logo interface:
- When connecting the USB plug to PC, the player turn on automatically and will be entering USB mode :
2. Turn ON/Off manual
- when the player in state of turn off, long press Power switch to turn on
- when the player in state of turn on, long press Power switch to turn off
● Play& Stop (Pause when recording)
Short press the PLAY button
Operating buttons
● Music mode and Voice mode
| Buttons | Operation | Stop Status | Play Status | Play Submenu | Stop Submenu |
| PLAY | long press | Turn off stop Exit | from menu Exit from menu | ||
| Press Play | Stop | Exit from menu Exit from menu | |||
| MENU | Long press | Enter main menu | Enter main menu | Enter main menu | Enter main menu |
| Press | Enter Stop-submenu | Enter Playing-submenu | Confirm current option or enter next submenu | Confirm current option or enter next submenu | |
| ▶▶ | Press | next song | Play next song | Switch submenu | Switch submenu |
| Press on | Continuous forward browse | Fast forward | Continuous forward | Continuous forward | |
| ◀◀ | Press | Previous song | Play previous song | Switch submenu | Switch submenu |
| Press on | Continuous backward browse | Fast backward | Continuous backward | Continuous backward | |
| VOL+ | Press volume up | volume up | X | X | |
| Press on | continual volume up | continual volume up | X | X | |
| VOL- | Press | Volume down | Volume down | X | X |
| Press on | Continual volume down | Continual volume down | X | X |
- Record Mode
| Operation | Action | Stop Status | Record Status |
| PLAY | long press | turn off | stop recording |
| press | start recording | pause recording | |
| MENU | long press | enter main menu | X |
| press | enter Record submenu | X |
Play Music
- Basic Operation
| 1. Connect the earphone to the player | 2.Keep pushing POWER→ON |
3. then enter the main menu: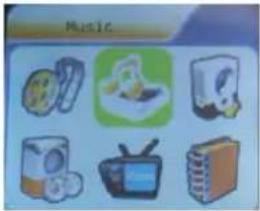 | 4.pressMENU buttonto enter the Music mode: |
| 5. Short press thePLAYbutton to play music | 6.Choose music◀◀ button: to choose previous music.▶◀ button: to choose next music. |
| 7. Volume controlpress the VOL+/VOL- button to adjust volume. |
- EQUALIZER Mode
1.When playing music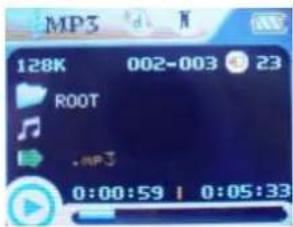 | 2.Press theMENUbutton to enter Play Submenu |
| 3. select the ‘Equalizer’ and press MENU button to conform. | 4.choose the EQ that you want from 7 kinds by press MENU button |
- Lyric Display
This player supports “*.LRC” lyric files (user can download from http://www.51lrc.com), and lyrics may be synchronous displayed while playing music.
• How to use lyric files?
Save the lyric file with the same name as that of the corresponding music file.
For example.: Music file name: GiGi-Sky.mp3
Lyric file name: GiGi-Sky.mp3.
• How to know whether the lyrics exist?
If the current song has matching lyric files, the lyric sign will be displayed at the top of music mode.
| 1. Current song has matching lyric files | 2. Long press MENU to enter the Lyric Interface when playing. |
3. Press MENU button to return to Music play mode. | 4. Browse lyrics manually. Press VOL to browse lyrics. |
Movie mode
- Enter the main menu and press the ▶ button to select “MOVIE” mode.

natural_image
Illustration of six different household appliances or devices, including a TV, keyboard, and washing machine (no text or symbols visible)- Press the MODE to enter.
- press the PLAY to start playing AMV files
- Choose movie
◀ button : to choose previous file.
▶ button : to choose next music file.
- Volume control
Short press the VOL+/VOL- button to adjust volume.
Record Voice
Make sure that the battery is not in the status of "low battery".
The player may save 99 recording files under each directory.
● Recording in Record Mode
- At he main menu.

text_image
Music- Press ▶ button to choose recording mode.

text_image
Record- Press MENU button to enter Record mode
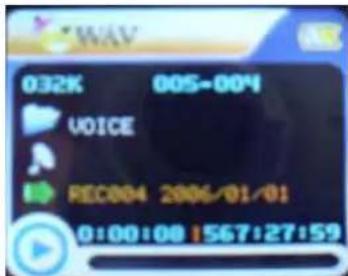
text_image
032K 005-004 VOICE REC004 2006/01/01 0:00:08 1567:27:59- Press Play button to start recording.
- Press Play button again to pause recording.
- Press Play button to continue recording.
- Long press Play button to stop recording.
- Select REC type
-
At the record mode stop interface :
-
Press MENU button to enter record submenu

text_image
032K 005-004 VOICE REC004 2006/01/01 0:00:08 1567:27:59-
Press ▶ button to select "REC type" option
-
Press MENU button enter this option
-
Press ▶ button to select desired recording type
-
Press MENU to confirm the type selected
-
Press PLAY button to start recording
Note: Voice control means when No sound the player pause record automatically.
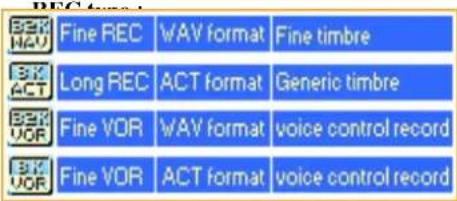
text_image
SEK HAV Fine REC WAV format Fine timbre SK ACT Long REC ACT format Generic timbre SEK VOR Fine VOR WAV format voice control record SK VOR Fine VOR ACT format voice control recordPlay Recorded Files
1.Enter the main menu | 2. Press ➤ button to choose “Voice mode” |
3.Press MENU button to enter Voice mode interface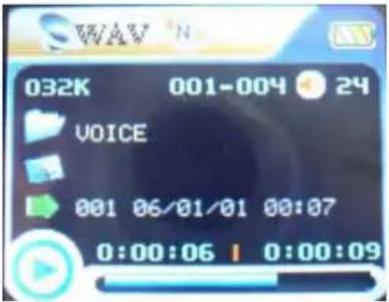 | 4. Press PLAY button to start playing. |
| 5. Choose music◀ button : to choose previous record file▶ button : to choose next record file. | |
| 6. Volume controlShort press the VOL+/VOL- button to adjust volume. |
Convert ACT format files to WAV format files
The ACT format files can be converted to WAV format files through the accessory installation tools.
- Run "Sound Convert Tool" program, and click "Open" button.

- Choose the ACT format files need conversion
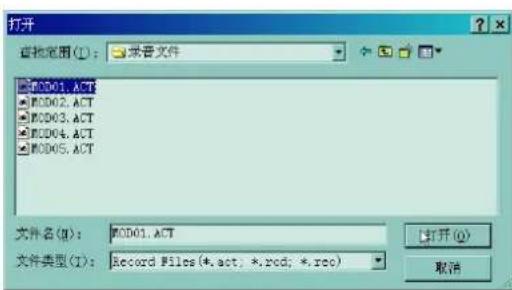
- Click the "Convert" button, the conversion starts
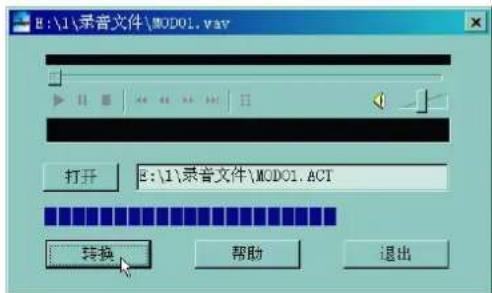
* Besides the conversion from ACT to WAV, the accessory tool can also play WAV and MP3 files.
FM Mode
1、Entering the main menu.
2、Push the "NEXT" buttons to choose "FM mode"
3、Long press "mode" buttons to enter the "FM mode"

text_image
87.0 MHz 87 108photo
1、Entering the main menu.
2、Push the "NEXT" buttons to choose "Photo"
3、Long press "mode" buttons to enter the "Photo"
System Setting
System parameters can be set here and every option varies according to firmware upgrading
At the menu, press ▶ to select the "Setup":

text_image
SystemPress MENU button to System Setting interface is as follows:
- Parameters Introduction
| Date & time set the date and time when recorded files are saved | |
| LCD set | set the period of time (second) when Backlight stays on without any operation |
| Language Set different language displayed | |
| Power saving Set a fixed time after which the player may turn power off automatically | |
| Replay mode Set working states on Replay mode | |
| Online Mode an option specially designed for “Private Space” function | |
| Memory info. show memory capacity and percentage that has been used | |
| Firmware Version show firmware version | |
| Firmware Upgrading | special for firmware upgrading |
| Exit Exit from current interface | |
- Instruction
○ “Date & time” set
| 1. System Setting Interface | 2. Press Mode to enter Record Time Interface. |
| 3. Press Vol+ to set time in sequence of “YY-MM-DD” | 4. Push ▶/◀ button to adjust numbers |
| 5. Press Mode to confirm and exit. |
○ “LCD set” setting
Operating steps is as follows:
| 1. At System Setting interface, | 2. Press ➤ key to select “LCD set” option, |
| 3. Press Mode button to enter “LCD set” submenu: | 4. Press MENU button to choose ‘Black screen time’ |
| 5. Press ▶/◀ button to adjust time (Unit : second), and press MODE to confirm and exit. | |
Black screen mode
set fixed period of time (unit: second) when no operation on keys, the player may turn black screen automatically. If “0” is selected, function is invalid.
- “Language” setting
| 1. At System setting interface, press ▶/▲▲ button to select “Language” icon: | 2. Press MENU button to enter “Language” setting interface: |
| 3. Press ▶/▲▲ button to select desired language. | 4. Press Mode to confirm to exit. |
Language lists as follows:(maybe add more language)
| English |
| French |
| German |
| Italian |
| Spanish |
| Portuguese |
| Dutch |
| Turkish |
- Power saving
Operating steps refer to Language setting.
Off Time mode refers that after a fixed period of time (unit: second) when no operation on keys at Stop mode, the player may turns off automatically to save power. If “0” is selected, power saving function is invalid.
Sleep Time refers that you may set a fixed period of time (unit: minute) for the player to turn off automatically when no keys operation no matter which mode it is at any state. This function is specially designed for listening to music before sleep. Note: Setting of Sleep Timer is valid only once and the set time will be cleared after power off. The time needs to be set again next time.
○ Replay Mode
Operating steps refer to Equalizer Setting
Manual Replay means that at A-B Replay Mode the endpoint B can be set manually only.
Auto Replay means that at A-B Replay Mode the endpoint B can be set automatically. (Especially for English Reading files without music)
○ Online Mode
Operating steps refers to Equalizer setting.
Some operating systems (under Windows 2K SP4) can not support two driver letters in one USB disk. Thus, if “Private Space” function is on, choose which disk you are going to use, i.e., “single ordinary disk” or “single encrypted disk”, in order for correct display of selected disk after connecting to PC.
○ Memory Info.
The number displayed represents total memory capacity and the percentage refers the capacity used.
- Firmware Version
Firmware Version information the player uses can be obtained here.
- Firmware Upgrade
It is specially designed for Firmware Upgrade.
E-Book function
This function supports all TXT file.
| 1. Enter the main menu. | 2. Press ➤ button to choose “E-Book” |
| 3.press MENU button to enter TXT file be select menu ( if no text file the display “No files” on the screen ) | 4.Press ➤ button to select desired text file to read, and then press Play button to enter text interface |
| 5. Press ➤/◄◄ button to turn the pages in sequence. ( only suitable for “Manual play” ) | |
Game
- At the main menu

natural_image
Three stylized game icons: a skull, a gear, and a blue helmet on a light blue background (no text or symbols)- Press ▶ button to choose "Game" option:
- press MENU button to enter game menu state.
- There are 3 games inside
Use USB Disk
The player supports standard USB disk function with operating system of Windows98 (driver needed), Windows 2K and above (driver free), Mac OS 10.3 and above, Linux 2.4.2 and above.
The player supports power supply through USB. At waiting Mode, press MODE to exit to main menu, then select to enter desired mode.
The player also supports Suspend Mode.
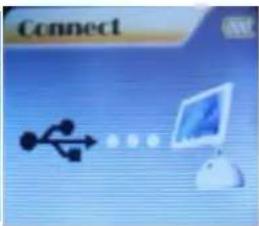
How to connect to PC? Power on the player and plugs the USB cable to enter the following Mode 1.
The player may display the following mode after connecting to PC:

text_image
1. Waiting state :
text_image
2. Downloading state:
text_image
3. Uploading state: Connect○Created new folder
The player can identify the 99 folders set
Firmware Upgrade
The player supports firmware upgrading or maintenance through installing special tools on PC.
- Enter the main menu.
- Press ▶ button to select "System Setting"
- Press MENU button to enter System Setting
-
Press ▶ button to choose "Firmware upgrade" option
-
Press MENU button to enter "firmware upgrade" interface:
-
Connect the player to PC
-
Run the "MP3 Player Update" program in upgrading tools on PC, then click "Select new firmware file" button. the UI is as follows:
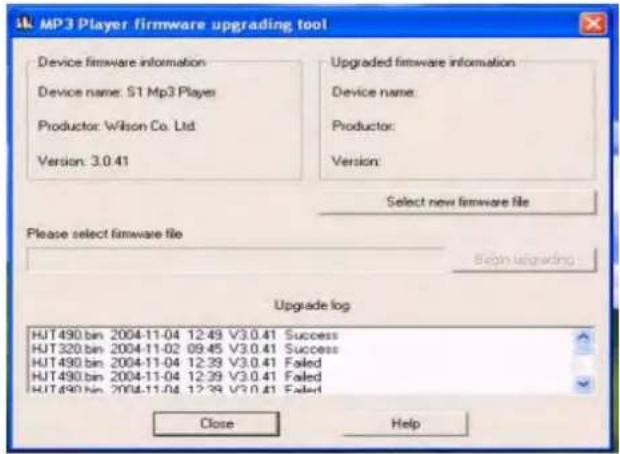
text_image
MP3 Player firmware upgrading tool Device firmware information Device name: S1 Mp3 Players Productor: Wilson Co. Ltd. Version: 3.0.41 Upgraded firmware information Device name: Productor: Version: Select new firmware file Please select firmware file Begin upgrading Upgrade log HJT490.bin 2004-11-04 12:49 V3.0.41 Success HJT320.bin 2004-11-02 09:45 V3.0.41 Success HJT490.bin 2004-11-04 12:39 V3.0.41 Failed HJT490.bin 2004-11-04 12:39 V3.0.41 Failed HJT490.bin 2004-11-04 12:39 V3.0.41 Failed Close Help8、Choose new firmware program (You may find it in accessory CD or download form our website.)

text_image
Open Look in: upgrade HJT490 File name: Files of type: Firmware image file(*.fw;*.bin) Open Cancel9、
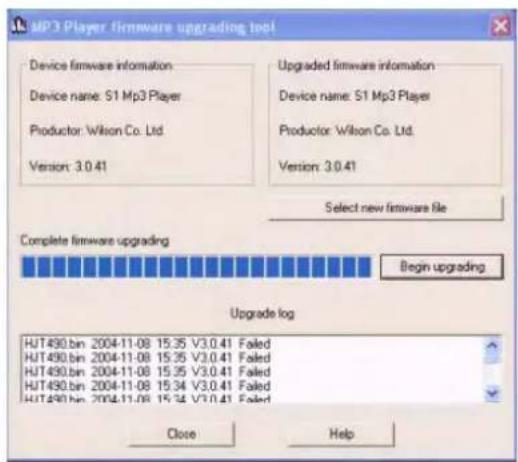
text_image
MP3 Player firmware upgrading tool Device firmware information Device name: S1 Mp3 Player Produtor: Wilson Co. Ltd. Version: 3.0.41 Upgraded firmware information Device name: S1 Mp3 Player Produtor: Wilson Co. Ltd. Version: 3.0.41 Select new firmware file Complete firmware upgrading Begin upgrading Upgrade log HJT490.bin 2004-11-08 15:35 V3.0.41 Failed HJT490.bin 2004-11-08 15:35 V3.0.41 Failed HJT490.bin 2004-11-08 15:35 V3.0.41 Failed HJT490.bin 2004-11-08 15:34 V3.0.41 Failed HJT490.bin 2004-11-08 15:34 V3.0.41 Failed Close Help10、upgrading.
11、If upgrading successfully, the player reset.

text_image
ConnectNotice:
- Firmware upgrade is an operation to promote and optimize the performance of the player. Even if the
firmware works without upgrading, there is no any influence on the normal operation of the player.
- Incorrect operation of firmware upgrading may cause the player working abnormally. Please read the manual carefully before operation and firmware upgrading should be operated by the people with basic knowledge in computer operation.
- The upgrading firmware is specially programmed for this player only and not suitable for other serial players, and other firmware is not suitable for this player as well.
Others setting
- Select Folders (At Stop Submenu)
Users can save files in different folders (folders should be created on PC in advance), to manage and play files according to different types. The player supports identification of 8 level subdirectories.
-
At Stop interface. (Current example is at Music MENU, and folders can be selected at both Record and Voice MENU as well.)
-
Press MENU to enter Stop Submenu.
-
Press MENU again to enter Select Folder interface.
-
Press▶/◀button to select folders at root directory.
-
Press PLAY button to confirm and return the stop interface, or short press MENU button to enter next select directories as following view.
-
Press ▶/▲ button to select folders at this directories.
-
press PLAY button to confirm and return the stop interface, or short press MENU button to enter next select subdirectories as following view.
-
When did not selected folder as following states.
-
Short press MENU button to return previous directory
Note: Independent folders can be set at corresponding mode as Music mode, Record mode and Voice mode, i.e., three modes are not bound to correspond with the same folder.
- Delete File (At Stop Submenu)
Files and FM stations can be deleted at corresponding modes as Music Mode, Voice Mode and FM Mode.
- At the stop interface. (No stop interface exists at FM Mode)
- Press MENU button to enter stop submenu
- Press ▶▶ buttons to choose "Delete" option.
- Press MENU button to enter Delete file folder
- Press MENU button to enter Delete file folder submenu
- Press ▶ button to choose "Delete" or "Delete all", and Press MENU button to confirm and deletion starts.
Remark: “Delete All” means to delete all the relevant files at current mode in current folder. (For example, at Music Mode executing “Delete All”, all the music files in current files may be deleted, while recorded files without change.)
The deleting interface is much simpler at FM Mode, only to the 3^rd step. It is the saved stations to be deleted. Note: When deleting files on PC, please take care to eject the player safely before pulling out USB cable, otherwise files may not be deleted.
● Play Mode (Play Submenu)
When playing music and recorded files, different play modes can be selected.
Enter play/stop submenu to enter The first option in Play Submenu is Play Mode. The player will play files according to the mode selected.
| Normal | Play files in current folder in normal sequence and then play other files in next folders one by one |
| Repeat One | Play a single music file repeatedly |
| Folder | Play all music files in current folder in sequence and stop |
| Folder All | Play all music files in current folder repeatedly |
| Repeat All | Play all music files repeatedly |
| Random | Play music files in current folder randomly |
| Intro | Play the first 10 seconds of each music file in sequence in the current folder |
● Tempo Rate (Play Submenu)
When playing music(Only for MP3 formats) or recorded files, different tempo rate can be set (faster or slower) without changing the tone and sound. Files.
- When playing music
- Press MENU button to enter Play Submenu is as follows:
- Press ▶ button to choose Tempo Rate option
- Press MENU button to enter Tempo Rate interface is as follows:
- Press ▶ button to quicken tempo rate and press ◀ button to slow down tempo rate.
- Replay Mode
○ A-B Replay
- At Music Mode or Voice Mode
- Press Mode to enter Play Submenu.
- Press ▶ to select "Replay".
- Press Mode to enter Replay.
“A” flickers in Replay Mode icon and start point is to be set.
-
Press ▶ to set "A".
-
After “A” set, “B” flickers in icon [F], and endpoint B needs to be set.
-
Press ▶ to set "B".
Replay icon is fixed and A-B segment replay begins. When replay times count up to times set in advance, the player will quit from Replay Mode. At Replay Mode, pressing ◀ can set “A” again to select another segment. (Setting of replay times refers to “Replay Times” in the ▶ section.
● Replay Times (Play Submenu)
Operating steps refer to Backlight setting.
Replay times mean that after A-B segment has been replayed up to fixed times, it will exit from Replay Mode.
● Replay Gap (Play Submenu)
Operating steps refer to Backlight setting.
Replay gap means the break period between different playing times (unit: second).
Convert Video files into AMV
This program is used to convert video files into AMV format, currently only WMV format is supported.
- Run "AMV Convert Tools", click 📋 to choose the folder where to save the AMV files, then click 📋 to select the folder where the original files are.
(Picture 12-1)
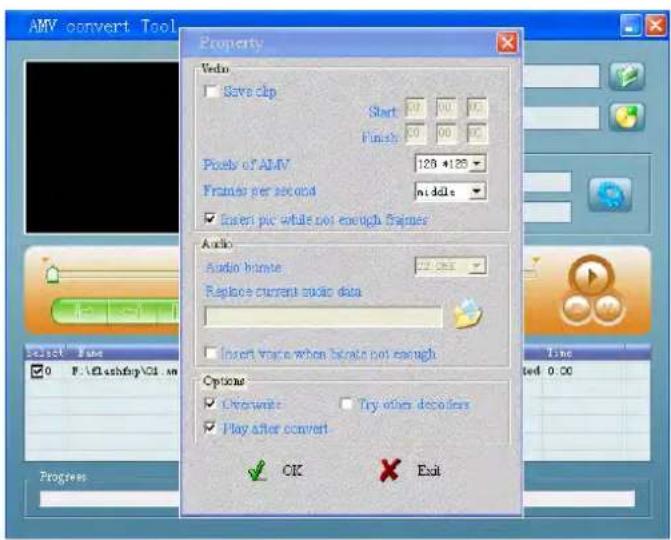
- Select unprocessed AMV files, then click 📄, the icon will be highlighted into 🔍 and a dialog box will shown. Choosing Pixels of AMV to "160 * 128" and Frames per second to "middle", then click OK to confirm. (Note: Only pixels in 160*128 can be supported)
(Picture 12-2)
- Click ↗ to start converting. (Picture 12-3)
text_image
AMV convert Tool Property Video Save clip Start 0.0 0.0 0.0 Finish 0.0 0.0 0.0 Pixels of AMV 128 x126 Frames per second middle Insert pic while not enough frames Audio Audio home: 72.000 Replace current audio data Insert trace when here is not enough Options Overwrite Try other decoders Play after convert OK Exit Progress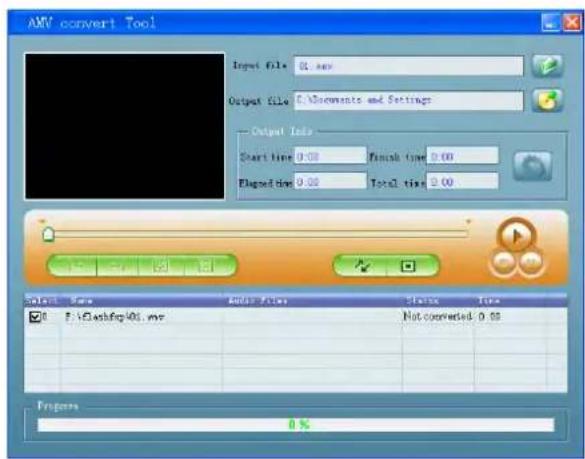
text_image
ANV convert Tool Input file: 01.mov Output file: C:\Documents and Settings Output Info Start time 0.00 Finish time 0.00 Planted time 0.00 Total time 0.00 Select Name Audio Filter Status Time F:\Users\01.mov Not converted 0.00 Prepens 0%(Picture 12-1)

text_image
AXV convert Tool Input file: 01.vov Output file: C:\Documents and Settings Output Info Start time: 0.00 Finish time: 4.02 Flipped time: 4.02 Total time: 4.02 Progress: 51.4(Picture 12-2)
(Picture 12-3)
- After convert, the AMV files will be played automatically.
Trouble Shooting
| No sound is heard from headphone. | ※ Check whether Volume is set “0” and connect the headphone plugs firmly.※ Check whether the headphone plug is dirty.※ Corrupted MP3 may make a static noise and the sound may cut off. Make sure that the music files are not corrupted. |
| Characters in OLCD are corrupted | ※ Check whether the right language has been selected. |
| Download of music files fails. | ※ Check whether USB cable is damaged and is connected properly.※ Check whether driver is installed correctly.※ Check whether the player’s memory is full. |
Specification
| Dimension | 72*55*8.5mm | |
| Weight | 41g | |
| LCM Window 1.8” | ||
| PC connection | USB2.0(FS) (Read: 1000K Byte, Write: 1000-900K Byte) | |
| Battery | ||
| Max Play time: 6-7 hours | ||
| Sample rate 8KHz Record | ||
| Recording format | WAV、ACT、MP3 | |
| Recording time | 35hrs ( ACT , 128M Flash ) | |
| MP3、WMA、WMV、ASF | Max output of headphone | ( L ) 10mW + ( R ) 10mW ( 32Ohm ) |
| MP3 bit rate 8K bps – 320K | bps | |
| WMA、WMV、ASF bit rate | 5K bps – 384K bps | |
| Frequency response 20Hz to | 20KHz | |
| SNR | 85dB | |
| Distortion | ||
| Stations saved | 20 + 20 | |
| Max output of headphone | ( L ) 10mW + ( R ) 10mW ( 32Ohm ) | |
| SNR | 45dB | |
| Music format | MP1、MP2、MP3、WMA、WMV、ASF、WAV | |
| Working temperature -5 to 40 ‖ | ||
| multilateral language show | ||
| Operating System | Windows98/SE/ME/2K/XP、Mac OS 10、Linux 2.4.2 | |
DIFRNCE cannot be hold responsible for defective products as a result of misuse, improper installation or other abuse or misuse.
Benutzerhandbuch
MP3-/MP4-Player
MP1840
text_image
DIFRNCE® see & hear the difference. MENU H&E VOLCE
Benutzerhandbuch
- GUI-Menü (Graphic User Interface)
natural_image
Illustration of six different objects or devices arranged in a grid (no text or symbols visible)
text_image
Music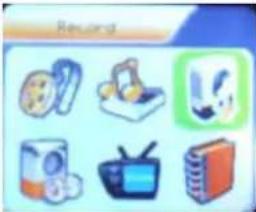
text_image
Record
text_image
VoiceFM-Modus:

natural_image
Illustration of eight different electronic devices or tools (no text or symbols visible)natural_image
Illustration of six different electronic devices and media icons arranged in a grid (no text or symbols visible)
text_image
Photo Browse
text_image
SystemSPIEL :

natural_image
Three abstract icons: a gear with blue outline, a gear with green handle, and a blue gear with green handle (no text or symbols)USB-Modus:
text_image
Connectnatural_image
Illustration of six different objects and devices, including a baby, TV, and household items (no text or symbols)text_image
87.0 MHz 87 108Foto
natural_image
Three stylized icons: a green game controller, a blue gear, and a blue game controller with a red gear icon (no text or symbols)text_image
sk MP3 Player firmware upgrading tool Device firmware information Device name: S1 MP3 Player Productor: Wilson Co. Ltd Version: 3.0.41 Upgraded firmware information Device name: Producer: Version: Select new firmware file Please select firmware file Upgrade log HUT490.bin 2004-11-04 12:49 V3.0.41 Success HUT520.bin 2004-11-02 65:45 V3.0.41 Success HUT490.bin 2004-11-04 12:29 V3.0.41 Failed HUT490.bin 2004-11-04 12:29 V3.0.41 Failed HUT490.bin 2004-11-04 12:29 V3.0.41 Failed Close Helptext_image
Look in: upgrade HJT490 File name: Files of type: Firmware image file(".fw,".bin) Open Canceltext_image
MP3 Player Firmware upgrading test Device firmware information Device name: 51 Mp3 Player Producer: Wilson Co. Ltd. Version: 3.0.41 Upgraded firmware information Device name: 51 Mp3 Player Producer: Wilson Co. Ltd. Version: 3.0.41 Select new firmware file Complete firmware upgrading Begin upgrading Upgrade log HUT90.bin 2004-11-08 15:35 V3.0.41 Failed HUT90.bin 2004-11-08 15:35 V3.0.41 Failed HUT90.bin 2004-11-08 15:35 V3.0.41 Failed HUT90.bin 2004-11-08 15:34 V3.0.41 Failed HUT90.bin 2004-11-08 15:34 V3.0.41 Failed Close Help10、den Upgradevorgang
text_image
AMV convert Tool Property Video Save clip Start: 0.0 0.0 0.0 Finish: 0.0 0.0 0.0 Pixel of AMV 129 x129 Frames per second middle Insert pic while not enough frames Audio Audio bitrate 32.000 Replace current audio data Insert voice when bitrate not enough Options Overwrite Try other decoders Play after convert OK Exit Progress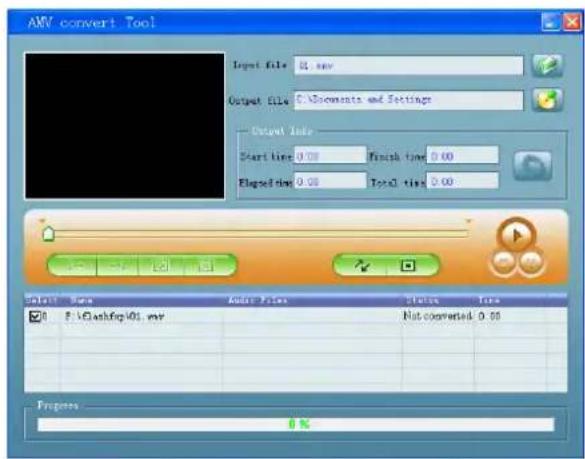
text_image
ANV convert Tool Input file: 0.00 Output file: C:\Documents and Settings Output Info Start time 0.00 Finish time 0.00 Flagging time 0.00 Total time 0.00 OK Cancel Cancel Help OK Cancel Cancel Select Tools ✓ Edit View Insert Tools ✓ CleanUp 01.mv Not converted: 0.00 Progress: 0%