KMC218 - Multi-cooker KeMar - Free user manual and instructions
Find the device manual for free KMC218 KeMar in PDF.
| Brand | KeMar |
| Model | KMC218 |
| Product type | Multi-cooker |
| Power supply | 220-240 V ~ 50 Hz |
| Power consumption | 1000 W |
| Net weight | Approximately 3.2 kg |
| Power cord length | Approximately 0.95 m |
| Bowl capacity | Up to 10 cups of rice (approx. 3 L) |
| Cooking functions | Rice, simmer, risotto, sauté, pasta, keep warm / cancel |
| Inner coating | Non-stick |
| Lid | Glass |
| Included accessories | Spatula, colander, measuring cup, stirrer |
| Control type | Electronic with LED display and buttons |
| Safety | Automatic shut-off, overheat protection |
| Care of bowl and lid | Dishwasher safe |
| Care of exterior surfaces | Soft damp cloth |
| Intended use | Household use only |
| Warranty | 1 year |
| Customer service | KeMar GmbH, +49 (89) 28857266, service@kemar.de |
| Website | www.kemar.de |
Frequently Asked Questions - KMC218 KeMar
User questions about KMC218 KeMar
0 question about this device. Answer the ones you know or ask your own.
Ask a new question about this device
Download the instructions for your Multi-cooker in PDF format for free! Find your manual KMC218 - KeMar and take your electronic device back in hand. On this page are published all the documents necessary for the use of your device. KMC218 by KeMar.
USER MANUAL KMC218 KeMar
Premium Ruhrkocher KMC-218
KeMar www.kemar.de
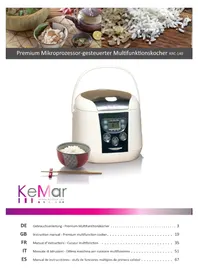
DE Gebrauchsanleitung - Premium Multifunktionskocher mit Ruhreinsatz 3
GB Instruction manual - Premium multifunction cooker with stirring insert 21
FR Manuel d'instructions-Cuiseur multifonction de haute qualite avec melangeur 39
IT Manuale di Istruzioni - Ottima macchina per cucinare multifunzione con inserto per mescolare.. 59
ES Manual de Instrucciones - Estufa de funcciones multiples de primera calidad con pieza para agitar..77
DE
Inhaltsverzeichnis:
- Important safety instructions 23
- Special notes on the power cable / electrical requirements 24
3.Before first use 25
4.Description and function of the parts 26 - Quick reference guide - in just a few steps to the perfect preparation 26
- Cleaning and maintenance 34
- Customer service 35
HEALTH THROUGH INNOVATION
Congratulations on the purchase of this high quality product.
This clever and versatile Stir Cooker can perform a number of different functions from cooking rice, pasta and risottos to sautéing and slow cooking.
The electronic control system looks after the hard work allowing you to enjoy the benefits of good food with less effort! Used and cared for in line with the guidance provided within this Instruction Manual it should provide you with many years of trouble free service.
Dear customer!
Your new product helps you prepare delicious meals in no time. The product is easy to handle and simple to clean, due to its inner pot with non-stick coating.
On our website www.kemar.de, you will find recipes and useful tips for an easy introduction.
This item has integrated safety devices. You should nevertheless read the safety instructions carefully and only use the item as described in this manual, in order to avoid incidental injuries or damages.
Keep this manual for further use. In case the item is passed on, this manual has to be passed on as well.

This sign warns you of the risk of injuries.

This sign warns you of the risk of injuries due to electricity.

This signs warns you of the risk of burns or scalding.

This sign marks additional information.
1. Important safety instructions
INTENDED USE

It is exclusively designed for the private household and it is not intended for commercial purposes.
The manufacturer does not accept any liability in the case of improper use caused by failure to observe this instruction manual.
In order to avoid hazards, only customer service is authorized to carry out repairs at the item
The important precautions described within this section must be followed carefully to prevent the possibilty of fire, electrical shock, personal injuries and/or
property damage:

- Read all instructions.
- Do not touch HOT surfaces. Use handles or knobs.
- To protect against fire, electrical shock, and personal injury, do not immerse cord, plugs, or appliance in water or other liquid.
- Close supervision is necessary when the appliance is used by or near children.
- Unplug unit from outlet when not in use and before cleaning.
Allow to cool before attaching or removing parts, and before cleaning the appliance.
- Do not operate any appliance with a damaged cord or plug after the appliance malfunctions or has been damaged in any manner. Return appliance to an authorized service facility for examination, repair or adjustment.
- To protect against risk of electrical shock, do not force any foreign objects, such as pins and wires, into any openings.
- The use of accessory attachments not recommended by the appliance manufacturer may result in fire, electric shock or personal injury.
- Do not use outdoors.
- Do not let cord hang over edge of table or counter, or touch hot surfaces
- Do not place the appliance on or near a hot gas or electric burner, or in a heated oven.
- Extreme caution must be used when moving an appliance containing hot oil or other liquids.
- Do not clean the appliance with cleansers, steel wool pads, or other abrasive material.
- Always attach plug to appliance first, then plug cord into the wall outlet. To disconnect, turn the switch to its "OFF" position then remove the plug from wall outlet.
- Do not use appliance for other than intended use. This product is designed for household use only.
- Use only the appropriate Volt AC electrical current.
-
Always keep the power supply plug clean.
-
Plug the appliance into a single electrical outlet only.
- Make sure that the power supply plug is firmly inserted all the way into the electrical outlet.
- Do not attempt to plug in or unplug with wet hands.
- Do not touch the steam vent.
- Do not handle the power supply cord in a rough manner
- Grasp only the plug when unplugging the power supply cord.
- Do not shake the appliance by the handle.
- Do not touch the metal part on the inside of the lid or inner lid during or immediately after operation.
- Do no operate the appliance near flames or wet areas.
- Do not operate the appliance on an unstable surface or on any surface that is not resistant to head.
- Do not touch the Lid Release button while carrying the appliance.
- Do not use any Inner Pot other than provided.
- Do not place the appliance near walls or furniture (within 12^ / 30cm ).
- Do not place the appliance in the locations where hot cooking oil may splash onto the appliance or where the appliance is exposed to direct sunlight.
- Do not place a cloth or towels over the appliance during operation.
- Remove all foreign substances before using appliances.
2. Special Cord Set Instructions
A A short power-supply cord is provided to reduce risks of becoming entangled in or tripping over a longer cord.
B Extension cords are available and may be uses if care is exercised in their use.
C If extension cord is used:
(1) The marked electrical rating of the extension cord should be at least as great as the electrical rating of the appliance.
(2) The longer cord should be arranged so that it will not drape over the countertop or table top where it can be pulled on by children or tripped over.
Warning


Risk of electric shock.
Only use grounded outlets.
Do not remove the grounding connection.
Do not use any adapters.
Do not use any extension cables.
Failure to observe these instructions may result in
lethal injuries, fire or electric shock.
3. Before first use
Remove the unit from packaging. HAZARD FOR CHILDREN - risk of death due to choking/ swallowing of packaging. Keep packaging away from children.
Dispose of it immediately.
Disconnect the power plug from the socket.
Clean the container with hot water and a bit of detergent prior to first use. Wipe the pot dry with a cloth.
Do not immerse electrical components under water!
Wipe the lid only with a damp cloth and then let it dry.
Safety Considerations Specifically for this Product
This is a CLASS I Product and as such needs to be connected to an
earthed supply. To prevent damage or a potential shock hazard, cook only in the inner pot or the inner pot together with the food steamer / pasta pot.
Do not attempt to cook in the base unit alone. Ensure that there is sufficient ventilation around the appliance to allow the escape of heat and steam.
The appliance must be unplugged from the power supply after use or whilst any maintenance such as cleaning is carried out.
Ensure that the supply cord is kept away from heat or sharp edges that could cause damage. This appliance is intended for domestic use only.
It should not be used for commercial purposes
During operation the Stir Cooker will get HOT. Ensure there is sufficient distance between the Stir Cooker and other items on the work surface, or sufficient distance between the Stir Cooker and the confines of the area in which it is situated.
We recommend a minimum clearance around all faces of at least 10cms., with at least 30 cms. vertical clearance.
Do not use the Stir Cooker underneath kitchen cupboards or close to curtains or other soft furnishings.
Do not overfill with excess ingredients, since a hazard may occur.
NEVER cook meat, poultry or seafood from frozen.
ALWAYS thaw completely first
NEVER allow the Stir Cooker to run out of liquid, or operate empty, otherwise a hazard may occur.
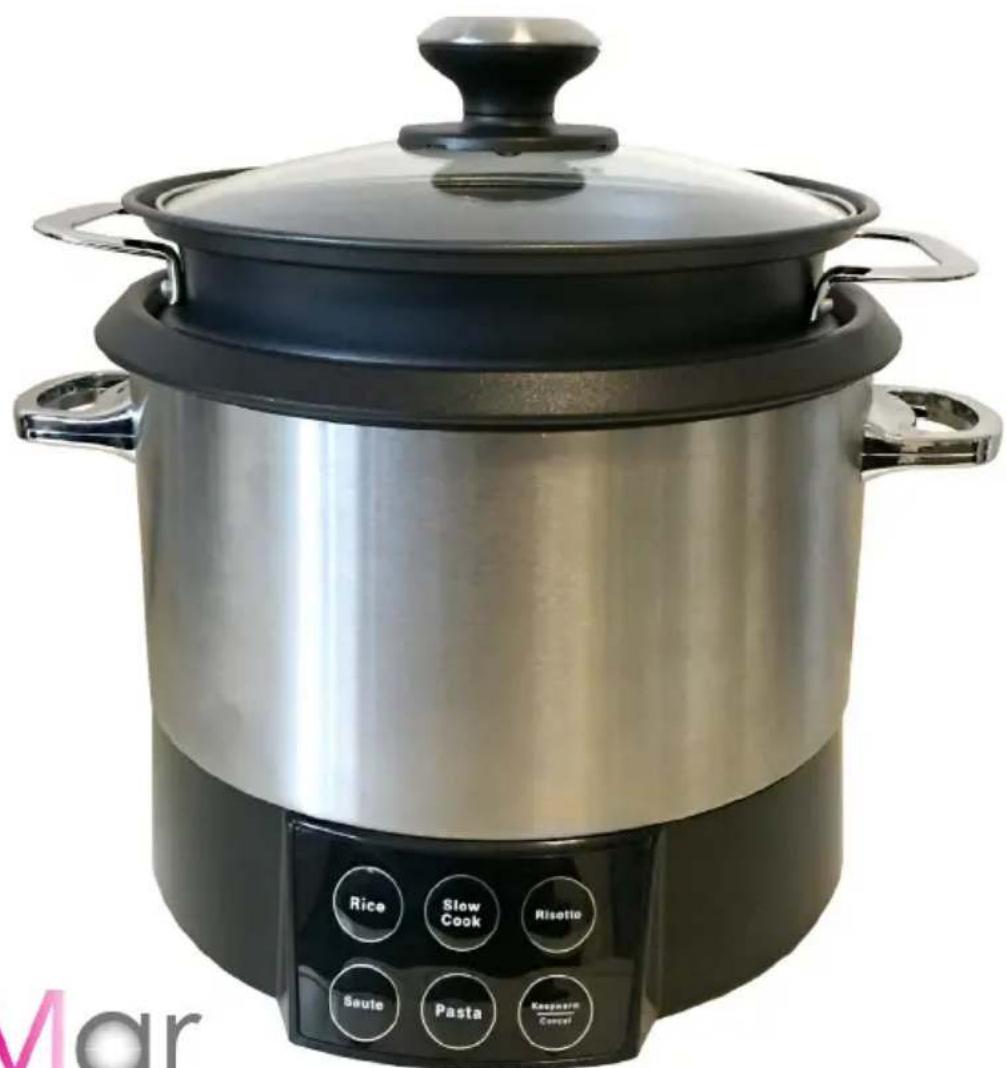
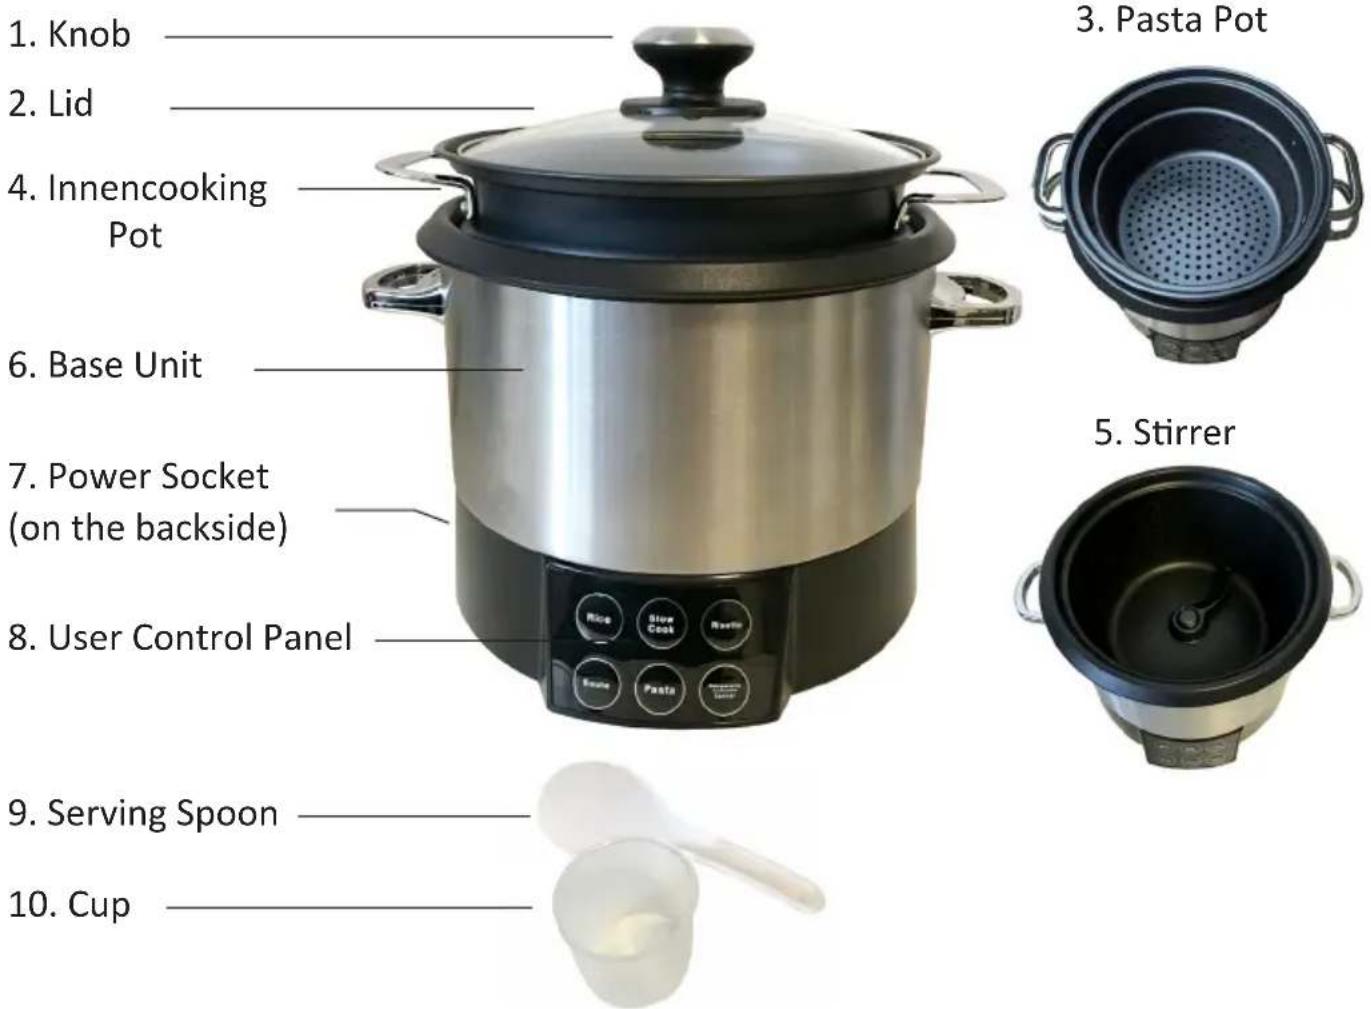
4. Description and function of the parts
Operating panel
The operation is very simple.
Familiarize yourself below with the device and the control panel.
5. In a few steps to the perfect preparation.

Preparing the dishes.
Follow the instructions to prepare the dishes.
Always make sure that dishes to be prepared are always fresh and of high quality.
Always make sure that meat, fish, seafood and poultry, for example, have been stored at temperatures below 5^ before use.
Before use, vacuum bags have to be clean and unused in order to avoid impurities.
Always prepare food only on clean working surfaces.
Wash your hands thoroughly before preparation.
Prepare the dishes in the correct size (thickness) and at the right temperature.
How to use your Stir Cooker
Before first use
Unpack your Stir Cooker carefully. Check that no transit damage has occurred and that all the items shown in the Product Overview section are present.
We recommend that you retain your packaging so that, in the unlikely event of a fault developing you are able to return the product in the correct packaging for best protection.
Preparing for use
-
Before using your Stir Cooker for the first time it is good practice to wash the INNER POT, PASTA POT, STIRRER and the LID first. Simply wash with warm soapy water, rinse and dry. Your Stir Cooker is now ready for its first use.
-
Place the BASE UNIT on a dry, level, heat resistant surface, away from the counter edge.
-
When you connect your Stir Cooker to the mains supply you will hear a long „beep“ and the Standby / Keep Warm LED will flash slowly.
-
You can now choose your desired programme from the list shown in the section „Stir Cooking Functions" below. When you press one of the function buttons the indicator light of the function you have selected begins to flash. After 8 seconds the selected function will begin. During the 8 second period you can select a different function if you accidentally pressed the wrong button. The new function will then begin after a further 8 seconds have elapsed.
NOTE: The first time you use your Stir Cooker you may experience a small amount of smoke or a slight smell. This is just the manufacturing residues burning off. It is not a fault or a cause for concern and will soon dissipate
-
IMPORTANT: Important – Do not overfill your Stir Cooker. Always leave a space of around 2.5cm from the top of the inner pot to allow for expansion and for the contents to boil.
-
Only use plastic or wooden utensils for stirring etc. Metal utensils will damage the non-stick surfaces on the pots.
-
Use oven mitts when handling the lid or the pots of the Stir Cooker as they will become very hot during cooking and remain hot for some time afterwards, so care is required at all times.
- During and after use the lid becomes HOT. To prevent a hazard occurring, always remove the lid slowly with the inside of the lid directed away from you and other persons so that the steam escapes gradually. Condensation dropping from the inside of the lid will also be hot.
Stir Cooking Functions
- Your Stir Cooker can carry out the following cooking functions:
a. Cooking Rice
b. Slow Cooking
c. Risotto
d. Sauté Foods
e. Pasta
f. Keep Warm / (Cancel) function
Cooking Rice

From the chart below choose the quantity of rice you wish to cook:
NOTE: These tables are for guidance only. There are many different types of rice and also many different brands of a particular type. Because of this it is not possible to precisely advise the quantity of water to cook the rice as you would like it. Personal preferences also, of course, vary in this area. Therefore it is recommended that to change the level of softness of your cooked rice you add or reduce the amount of water that you add by a small amount to cook the rice exactly as you like it. This has to be by experimentation, a little more water will increase the cooking time and provide softer rice, less water will have the reverse effect.
| White Rice | ||
| Quantity Rice | Quantity Water | appr. cooking time |
| Cup Cup | Minutes | |
| 2 2 20-28 | ||
| 4 4 33-38 | ||
| 6 6 36-40 | ||
| 8 8 38-42 | ||
| 10 10 40-44 | ||
| Brown Rice | ||
| 2 3 38-44 | ||
| 4 5 43-47 | ||
| 6 7 50-54 | ||
I. White Rice:
a. Place the INNER POT (3) into the BASE UNIT (6). Rotate it both left and right to ensure it is correctly located. It should come to a stop in both directions when it is seated properly.
b. Add the number of cups of rice you require.
c. Fill the INNER POT to the same scale mark as the number of cups of rice you added, e.g., 2 cups of rice fill to scale mark ,,2^ , 4 cups of rice fill to scale mark ,,4^ .
d. Place the LID (2) on the Stir Cooker
e. Plug the power cord in to the POWER SOCKET (7), then the Stir Cooker into a wall socket and switch on.
f. The Stir Cooker will „Beep“ once and the „Keep Warm / Cancel“ LED will flash slowly.
g. Press the „Rice“ button on the USER CONTROL PANEL (8)
h. The Rice LED Indicator will illuminate.
i. After 8 seconds the cooking process will begin.
j. The cooking time will vary depending upon the amount of rice that has been added, (refer to the tables above for guidance).
k. When the rice is cooked the buzzer will „Beep“ 5 times and the Stir Cooker will switch to „Keep Warm“ mode. The LED will illuminate continuously whilst the unit is left powered on.
I. When you are ready to serve the rice turn off and unplug the Cooker allowing it to cool before cleaning.
IMPORTANT: Use Plastic or Wooden utensils to avoid damage to the non stick surfaces.
II. Brown Rice
NOTE: The maximum recommended capacity for Brown Rice is six cups.
a. Follow the procedure for cooking white rice but please note that the amount of water added per cup of rice is different and the cooking times are longer. Refer to the tables above for guidance.
NOTE: These tables are for guidance only. There are many different types of rice and also many different brands of a particular type. Because of this it is not possible to precisely advise the quantity of water to cook the rice as you would like it. Personal preferences also, of course, vary in this area.
Therefore it is recommended that to change the level of softness of your cooked rice you add or reduce the amount of water that you add by a small amount to cook the rice exactly as you like it. This has to be by experimentation, a little more water will increase the cooking time and provide softer rice, less water will have the reverse effect.
Slow Cooking
NOTE: The Slow Cooking function on this appliance has a fixed cooking time of 8 hours. Should you have a recipe that requires less cooking time then you will need to switch off the Stir Cooker manually by pressing the „Keep Warm / Standby“ button. The first press of the button will change the unit to „Standby“ a second press will switch it to the „Keep Warm Mode.
a. Place the INNER POT (3) into the BASE UNIT (6). Rotate it both left and right to ensure it is correctly located. It should come to a stop in both directions when it is seated properly.
b. Add the food that you wish to cook to the INNER POT.
NOTE: If you are cooking meat and wish to seal it before adding to your ingredients then you can use the „Sauté“ mode first to achieve this.
c. If desired, ingredients for the recipe can be combined in the cooking pot and kept refrigerated (but not frozen) for up to 2 days before cooking.
d. Raw vegetables typically take longer to cook than meats as the liquid simmers rather than boils for most of the cooking time.
e. Fresh or thawed fish and seafood fall apart during long hours of cooking. To avoid this, add these ingredients about an hour before serving.
f. Because milk, soured cream and natural cheese break down during long hours of cooking, add these ingredients just before serving or substitute with undiluted condensed creamed canned soups or evaporated milk. Processed cheese tends to give better results than naturally aged cheese.
g. Rice and pasta may either be cooked separately or added, uncooked, during the last hour of cooking time. If added uncooked, make sure that there are at least 2 cups (half litre) of liquid in the cooking pot. Stir occasionally to prevent pieces from sticking together.
h. Dried beans must be pre-soaked and fresh kidney beans MUST be boiled for at least 12-minutes before being added; canned varieties of kidney beans are generally pre-boiled and safe to add straightaway. If in doubt, contact the manufacturer. i. Dried beans must be pre-soaked and fresh red kidney beans MUST be boiled for at least 12-minutes before being added; canned varieties of kidney beans are generally pre-boiled and safe to add straightaway. If in doubt, contact the manufacturer. j. Take care to thicken the sauces with flour near the beginning, or corn flour towards the end.
k. Any recipes that call for milk or cream - add as close to the end as possible to avoid curdling.
I. IMPORTANT: NEVER let the Stir Cooker run out of liquid
m. Place the LID (2) on the Stir Cooker
n. Plug the power cord in to the POWER SOCKET (7), then the Stir Cooker into a wall socket and switch on.
o. The Stir Cooker will „Beep“ once and the „Keep Warm / Cancel“ LED will flash slowly.
p. Press the „Slow Cook“ button on the USER CONTROL PANEL (8)
q. The Slow Cook LED Indicator will illuminate.
r. After 8 seconds the cooking process will begin.
s. After around 2 hours your food will have reached a temperature of about 650C.
This will rise gradually to around 95-980C after 4 hours. The cooking time in total will be 8 hours.
t. When the cooking is completed the buzzer will „Beep“ 5 times and the Stir Cooker will switch automatically to „Keep Warm“ mode. The LED will illuminate continuously whilst the unit is left powered on.
NOTE: If your food is not cooked sufficiently then select the „Slow Cook“ mode again. You will have to control this manually switching off when you are happy the food is to your liking.
u. When you are ready to serve the food turn off and unplug the Cooker allowing it to cool before cleaning.
IMPORTANT: Use Plastic or Wooden utensils to avoid damage to the non stick surfaces.
Risotto
a. Place the INNER POT (3) into the BASE UNIT (6). Rotate it both left and right to ensure it is correctly located. It should come to a stop in both directions when it is seated properly.
b. Taking the STIRRER (5) locate it on to the spigot in the centre of the INNER POT. Make sure that it is correctly located by twisting it both ways, it should stop at both directions if located properly.
c. Add a small amount of cooking oil (around one tablespoon) to the INNER POT.
d. Place the LID on the Stir Cooker

e. Plug the power cord in to the POWER SOCKET, then the Stir Cooker into a wall socket and switch on.
f. The Stir Cooker will „Beep“ once and the „Keep Warm / Cancel“ LED will flash slowly.
g. Press the „Risotto“ button on the USER CONTROL PANEL.
h. The Risotto LED Indicator will illuminate.
i. After 8 seconds the cooking process will begin and the STIRRER will begin to rotate. Allow the Cooker to preheat for 2-3 minutes.
j. Add the amount of rice you require (refer to the guidelines for brown rice when using Risotto (Arborio) type rice). Do not add water / stock at this stage.
NOTE: If your recipe requires onions or garlic then add them at this stage to allow them to brown with the rice.
k. Observe the rice and when it has started to brown add water / stock according to your recipe.
I. The Stir Cooker will continue cooking your Risotto for around another 30 minutes.
At approximately 20 minutes the stir function will stop, the buzzer will sound and after 10 minutes the Stir Cooker will switch to „Keep Warm“ mode.
m. If you wish you can now add additional cooked ingredients to your Risotto, carefully stirring them in and allowing them to warm through.
n. Your Risotto should be ready to serve.
v. When have served the food turn off and unplug the Cooker allowing it to cool before cleaning. IMPORTANT. Use Plastic or Wooden utensils to avoid damage to the non stick surfaces.
Sauté
a. Place the INNER POT (3) into the BASE UNIT (6). Rotate it both left and right to ensure it is correctly located. It should come to a stop in both directions when it is seated properly.
b. Taking the STIRRER locate it on to the spigot in the centre of the INNER POT.
Make sure that it is correctly located by twisting it both ways, it should stop at both directions if located properly.
c. Add a little cooking oil or similar.
d. Place the LID on the Stir Cooker
e. Plug the power cord in to the POWER SOCKET, then the Stir Cooker into a wall socket and switch on.
f. The Stir Cooker will „Beep“ once and the „Keep Warm / Cancel“ LED will flash slowly
g. Press the „Sauté“ button on the USER CONTROL PANEL.
h. After 8 seconds the cooking process will begin and the STIRRER will begin to rotate.
NOTE: If you don't wish to use the STIRRER function then simply don't fit the stirring paddle.
i. After 10 minutes of pre-heat the buzzer will sound. The Stir Cooker is now ready for use. The Temperature at this point will be around 120-1400C
j. Add the food that you wish to Saute
k. Continue to cook until you are happy with the results, then press the „Keep Warm / Cancel“ button to turn your Stir Cooker to „Standby“ Mode.
I. When have served the food turn off and unplug the Cooker allowing it to cool before cleaning.
NOTE: The Stir Cooker is programmed to switch to „Standby“ Mode after 30 minutes of Sauté cooking.
IMPORTANT: Use Plastic or Wooden utensils to avoid damage to the non stick surfaces.
Pasta
a. Place the INNER POT into the BASE UNIT. Rotate it both left and right to ensure it is correctly located. It should come to a stop in both directions when it is seated properly.
b. Fill the INNER POT with cold water to the 9 CUP mark
c. Place the PASTA POT into the INNER POT.
d. Place the LID on the Stir Cooker
e. Plug the power cord in to the POWER SOCKET, then the Stir Cooker into a wall socket and switch on.
f. The Stir Cooker will „Beep“ once and the „Keep Warm / Cancel“ LED will flash slowly.
g. Press the „Pasta“ button on the USER CONTROL PANEL.
h. The Pasta LED Indicator will illuminate.
i. After 8 seconds the cooking process will begin.
j. After approximately 25 minutes the buzzer will sound 10 times and the PASTA LED will flash.
k. Remove the lid and add your Pasta.
I. After approximately 10-12 minutes the buzzer will sound 30 times and the stir Cooker will switch automatically to „Standby“ Mode.
m. Your pasta is now ready to serve.
n. When have served the food turn off and unplug the Cooker allowing it to cool before cleaning.
IMPORTANT: Use Plastic or Wooden utensils to avoid damage to the non stick surfaces.
Keep Warm / Cancel
a. When you are using one of the Stir Cooker modes a single press of the „Keep Warm / Cancel“ button will cause the Cooker to enter „Cancel“ mode and stop the cooking process immediately.
b. A second press switches the unit to „Keep Warm".
This maintains a temperature of 60-800C which will be maintained for
12 hours after which it will switch to „Cancel" (Standby).
ALWAYS USE OVEN GLOVES/MITTS WHEN REMOVIDING THE LID AND/OR THE COOKING POTS AFTER OR DURING COOKING.
WARNING:
NEVER cook meat, poultry or seafood from frozen;
ALWAYS thaw completely first. Note that thawed food will cook more quickly than its freshly prepared counterparts.
6. Cleaning and maintenance
Switch the device off and disconnect it from the power supply.
Before you clean the device, make sure it has cooled down sufficiently after use.
Only pour the water after it has cooled down sufficiently in order to avoid scalding.
Never submerge the device into water, as it may be damaged.
The lid and the inner pot are not dishwasher-proof.
Before reusing the parts, dry them sufficiently, please.
- Clean the external surfaces of the Stir Cooker with a soft, damp, lint free cloth.
- Wash the Cooking Pots, Stirrer and Glass Lid in warm, soapy water. Rinse and dry thoroughly.
- Do not use a scouring pad or other abrasive materials. This can damage the non stick surfaces of your Cooking Pots.
SPECIFICATIONS
| Model No. KMC-218 | |
| Power Source 220-240V 50 Hz | |
| Power Consumption (Cooking) 1000 W | |
| Weight (Approx.) 3,2kg | |
| Accessories Power Cord, Rice | Scoop, Measuring Cup, Pasta Tray |
| Cord Lenght approx. 0,95 m |
Notes on various cooking times:
Please note: The cooking times are based on estimates only.
To find your individual taste, please experiment with the times.
The preparation time always depends on the size and thickness of the food.
Recipes and more applications can be found on our website www.kemar.de.
7. Service
This model in the KeMar range of Product is recommended for DOMESTIC USE ONLY. Its use in a commercial capacity will render this guarantee inoperative.
To obtain service, you are advised to contact either the dealer from whom the product was purchased. Should this not be possible, please find your nearest dealer agent on internet at www.kemar.de and follow the link SERVICE & SUPPORT.
KeMar GmbH
Service Department
Rohlfstr.5
D-81929 Munich / Germany
Telephone: +49 (89) 28857266
service@kemar.de

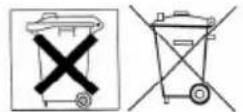
Your KeMar product is designed and manufactured with high quality materials and components which can be recycled and reused.
This symbol means that electrical and electronic equipment, at their end-of-life, should be disposed of separately from your household waste.
Please dispose of this equipment at your local community waste collection/recycling centre.
In the European Union there are separate collection systems for used electrical and electronic products.
Please help us to conserve the environment we live in!
CAUTION
This appliance is not intended for use by persons (including children) with reduced physical, sensory or mental capabilities, or lack of experience and knowledge, unless they have been given supervision or instruction concerning use of the appliance by a person responsible for their safety.
Children should be supervised to ensure that they do not play with the appliance.
Seller's Guarantee - Terms of Guarantee
Dear customer,
Our products are subject to strict quality control.
If, however, a product purchased from us does not function properly, we deeply regret this and ask you to contact Customer Service given below. We will be happy to help you by phone via the service hotline mentioned above.
In addition to the legal warranty, we grant a guarantee on all multifunctional cookers/ rice cookers purchased from us, according to the provisions mentioned below.
This represents no limitation of your legal rights.
1) The guarantee period is one year from date of purchase. The guarantee is valid within the European Union and Switzerland.
2) During the guarantee period, devices showing defects due to material or manufacturing defaults will be repaired or replaced at our choice.
Exchanged devices or parts of devices shall become our property.
Neither shall guarantee services prolong the guarantee period nor put a new guarantee into effect.
3) Guarantee claims have to be asserted immediately after becoming aware of the defect, within the guarantee period.
4) In order to assert claims under the guarantee, the following steps are necessary: Please contact Customer Service by email, fax or phone, so that we can email you a franked shipping label in a pdf file. Use this shipping label to send the faulty device, free of postage, to the given service address, enclosing the guarantee card below as well as your original proof of purchase. If the defect is covered by our guarantee services, you will receive back a repaired or a new device. The return shipment costs will be paid by us.
5) Claims under the guarantee are excluded in cases of damage due to:
-
Abusive or incorrect use
-
Environmental exposure (humidity, heat, overvoltage, dust, etc.)
-
Failure to follow the safety precautions applicable to the device
-
Failure to follow the instruction manual
-
Use of force (e.g. strike, kick, drop)
-
Interference by a service address not authorized by us
-
Arbitrary attempts at repair
-
Shipment in packaging which is not transport-proof
6) We also offer you to repair defects or damages to the device, which are not (or no longer) covered by the guarantee, against reimbursement of costs. Please contact Customer Support for an individual offer.
In this case, shipping costs are at your charge.
KeMar GmbH
Rohlfstr. 5
81929 München
Germany
In the case of a guarantee claim, please contact Customer Service mentioned here. Detach this card, complete it clearly and legibly and send it back, together with the faulty device and the original proof of purchase, to the following service address:
KeMar GmbH
Rohlfstr. 5
81929 München
Germany
Tel.: +49 (0) 89 28857266
Fax: +49 (0) 89 28857265
Email: service@kemar.de
Device/Item Name:
Date of Purchase: (Proof of Purchase included)
Description of the defect:
Name:
Street: Postal Code/ Place
Phone: Fax:
Date: Signature:
KeMar GmbH accepts no liability for incidental or consequential damages.
Technical data are subject to change without notice.