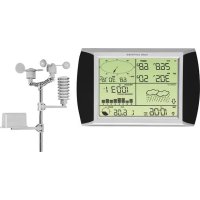
WS1080 - Weather Station VELLEMAN - Free user manual and instructions
Find the device manual for free WS1080 VELLEMAN in PDF.



| Product type | Wireless weather station with outdoor sensors |
| Brand | Velleman |
| Model | WS1080 |
| Dimensions (outdoor station) | 455 x 415 x 425 mm |
| Dimensions (indoor station) | 233 x 145 x 33 mm |
| Total weight | 1300 g |
| Power supply (outdoor station) | 2 AA 1.5 V batteries (not included) |
| Power supply (indoor station) | 3 AA 1.5 V batteries (not included) |
| Transmission frequency | 868 MHz |
| Transmission range | Up to 150 m in open field |
| Protection rating (outdoor station) | IPX3 |
| Outdoor temperature range | -40 °C to 65 °C (0.1 °C resolution) |
| Indoor temperature range | 0 °C to 60 °C (0.1 °C resolution) |
| Humidity range | 10% to 99% RH |
| Atmospheric pressure range | 919 hPa to 1080 hPa |
| Wind speed range | 0 to 160 km/h |
| Rainfall range | 0 to 9999 mm (0.1 mm resolution) |
| Main functions | Indoor/outdoor temperature, humidity, wind speed and direction, rainfall, atmospheric pressure, weather forecast, pressure histogram, radio-controlled clock, multiple alarms, data recording (up to 4,800 sets), USB connection with EasyWeather software |
| Display | Touch screen |
| Memory | Non-volatile EEPROM, capacity of 4,800 readings with date and time |
| Maintenance and cleaning | Clean with a soft, dry cloth. Avoid liquids. Keep sensors clean for accurate measurements. |
| Safety | Use only original accessories. Observe battery polarity. Do not expose to shock or excessive moisture. Keep out of reach of children. |
| Spare parts and repairability | Contact Velleman after-sales service or an authorized dealer for any repair or spare part. |
| Warranty | 24 months for consumer products (see conditions) |
| General information | Complies with EMC, LVD, and R&TTE standards. EasyWeather software included on CD-ROM. Compatible with Windows NT 4.0, 2000, XP. |
Frequently Asked Questions - WS1080 VELLEMAN
User questions about WS1080 VELLEMAN
0 question about this device. Answer the ones you know or ask your own.
Ask a new question about this device
Download the instructions for your Weather Station in PDF format for free! Find your manual WS1080 - VELLEMAN and take your electronic device back in hand. On this page are published all the documents necessary for the use of your device. WS1080 by VELLEMAN.
USER MANUAL WS1080 VELLEMAN
WS1080 - WEATHER CENTRE WITH TOUCHSCREEN AND PC INTERFACE
1. Introduction
To all residents of the European Union
Important environmental information about this product

This symbol on the device or the package indicates that disposal of the device after its lifecycle could harm the environment. Do not dispose of the unit (or batteries) as unsorted municipal waste; it should be taken to a specialized company for recycling. This device should be returned to your distributor or to a local recycling service. Respect the local environmental rules.
If in doubt, contact your local waste disposal authorities.
Thank you for choosing Velleman! Please read the manual thoroughly before bringing this device into service. If the device was damaged in transit, do not install or use it and contact your dealer. Damage caused by disregard of certain guidelines in this manual is not covered by the warranty and the dealer will not accept responsibility for any ensuing defects or problems.
2. Setting up the Stations
natural_image
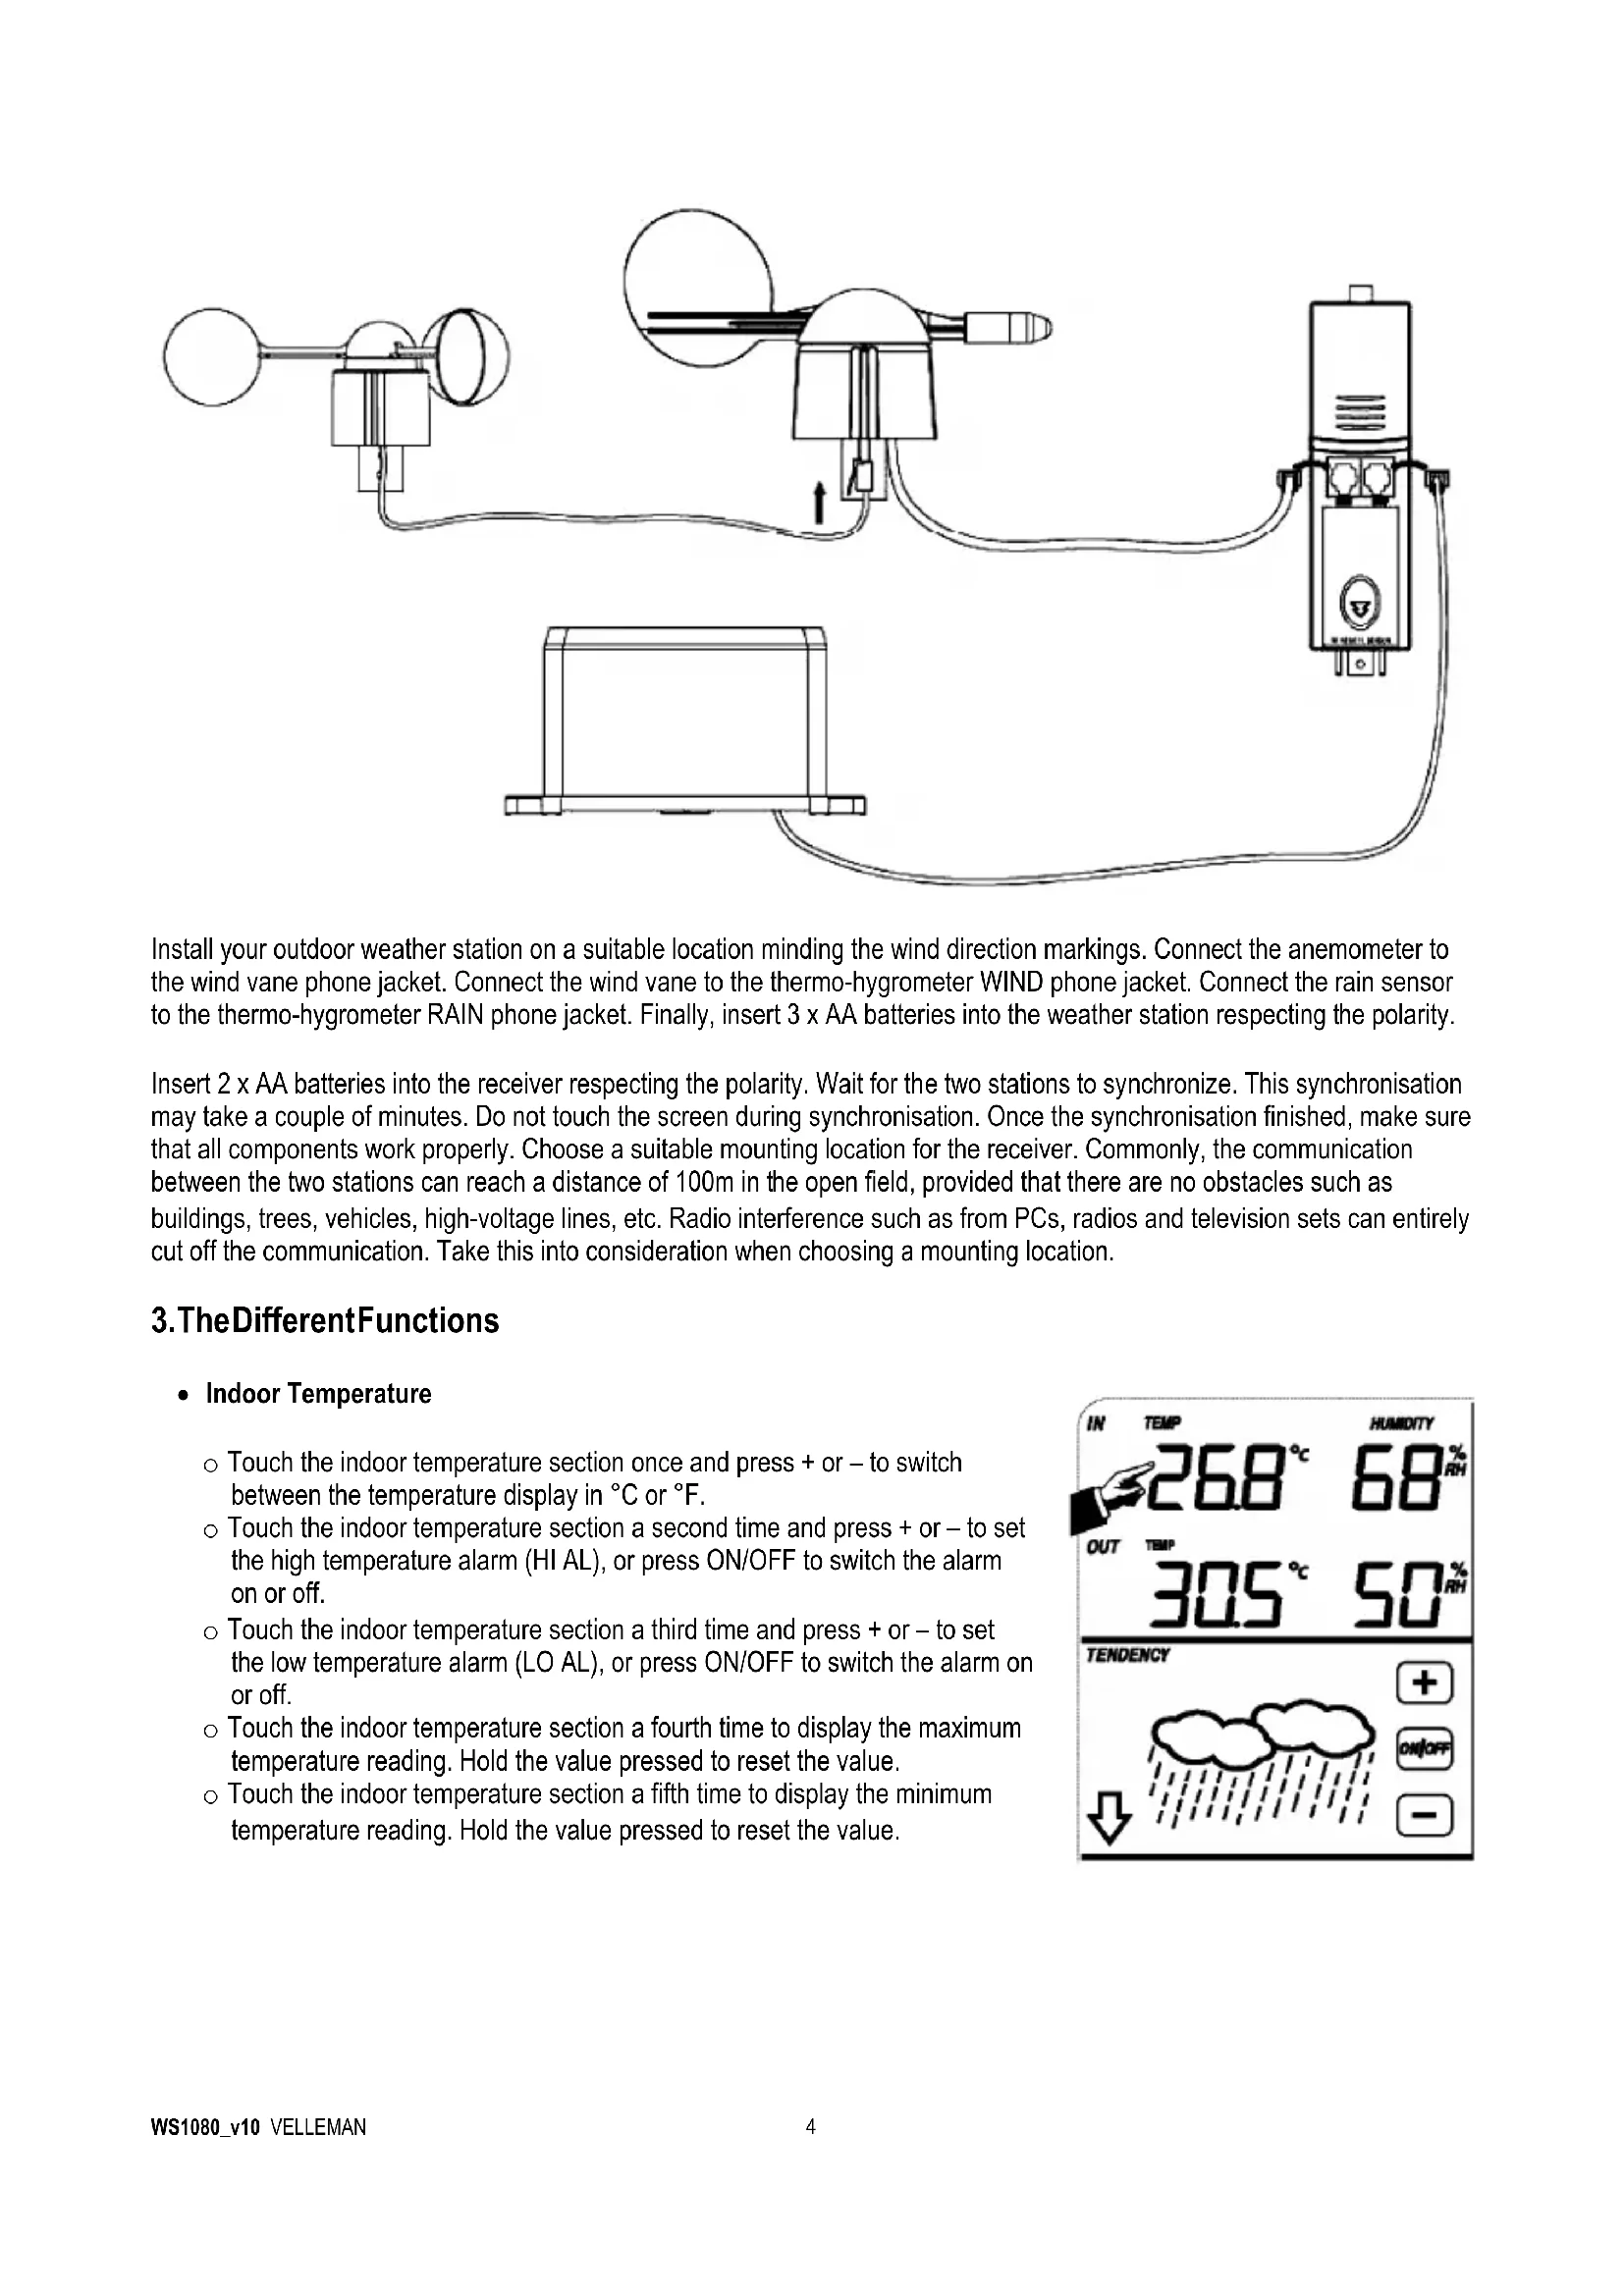
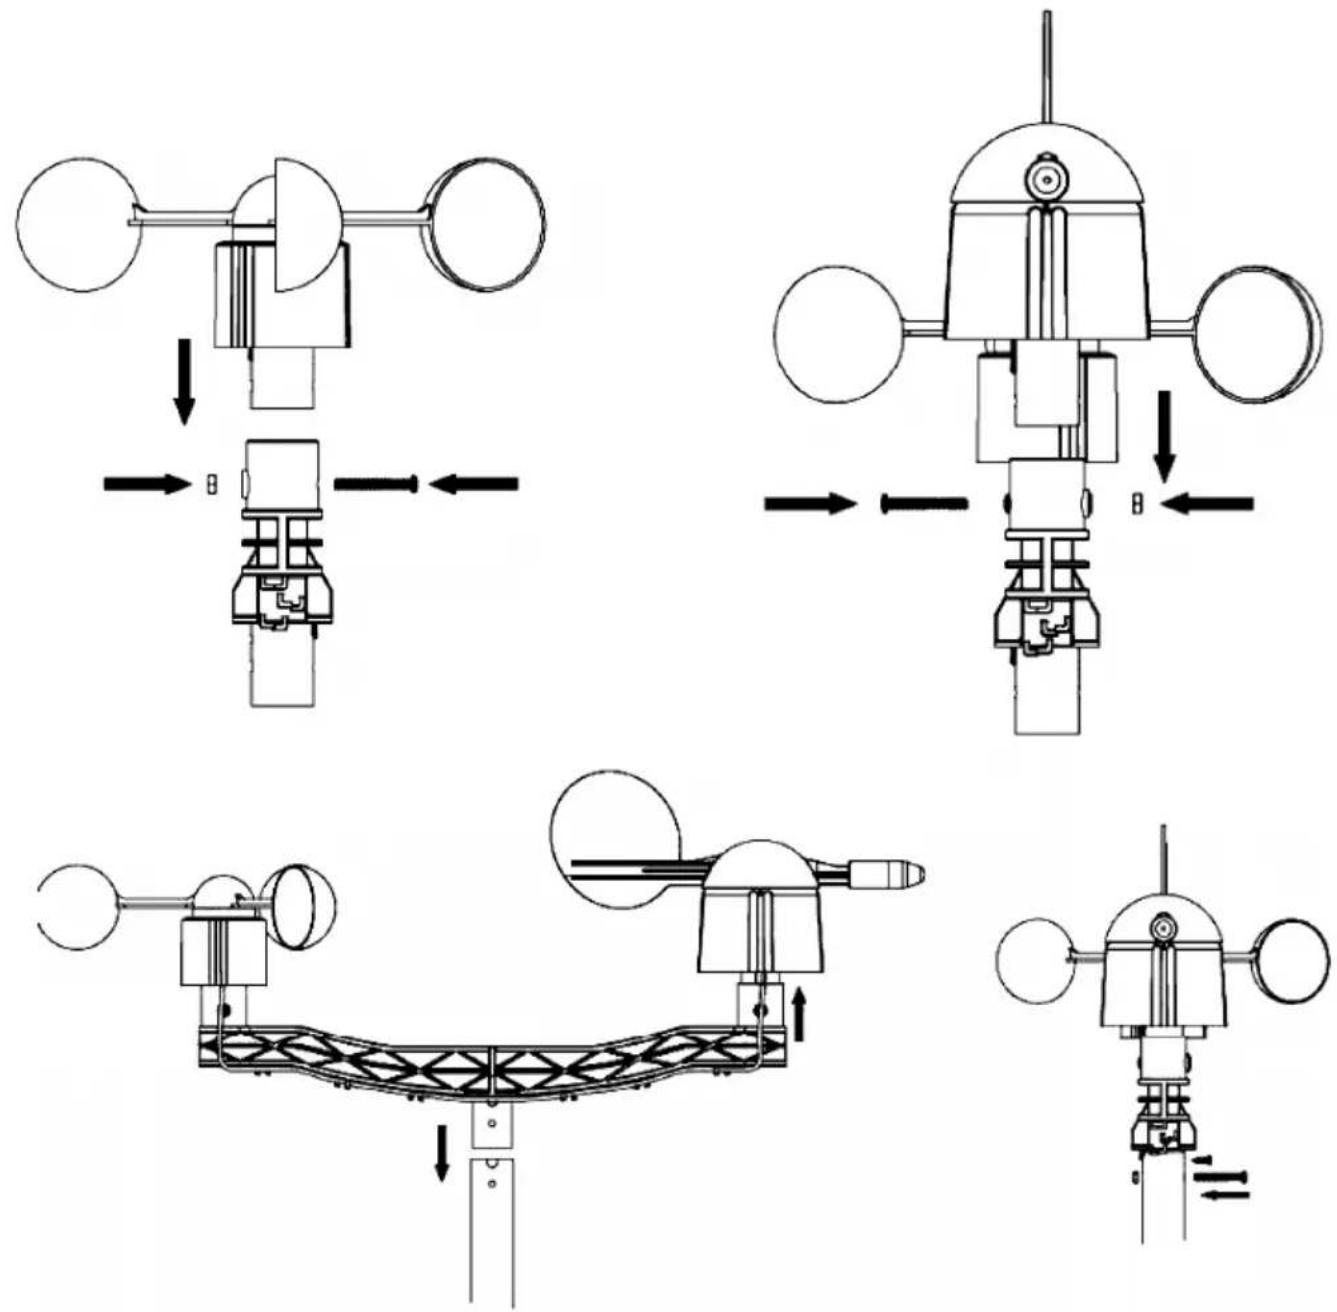
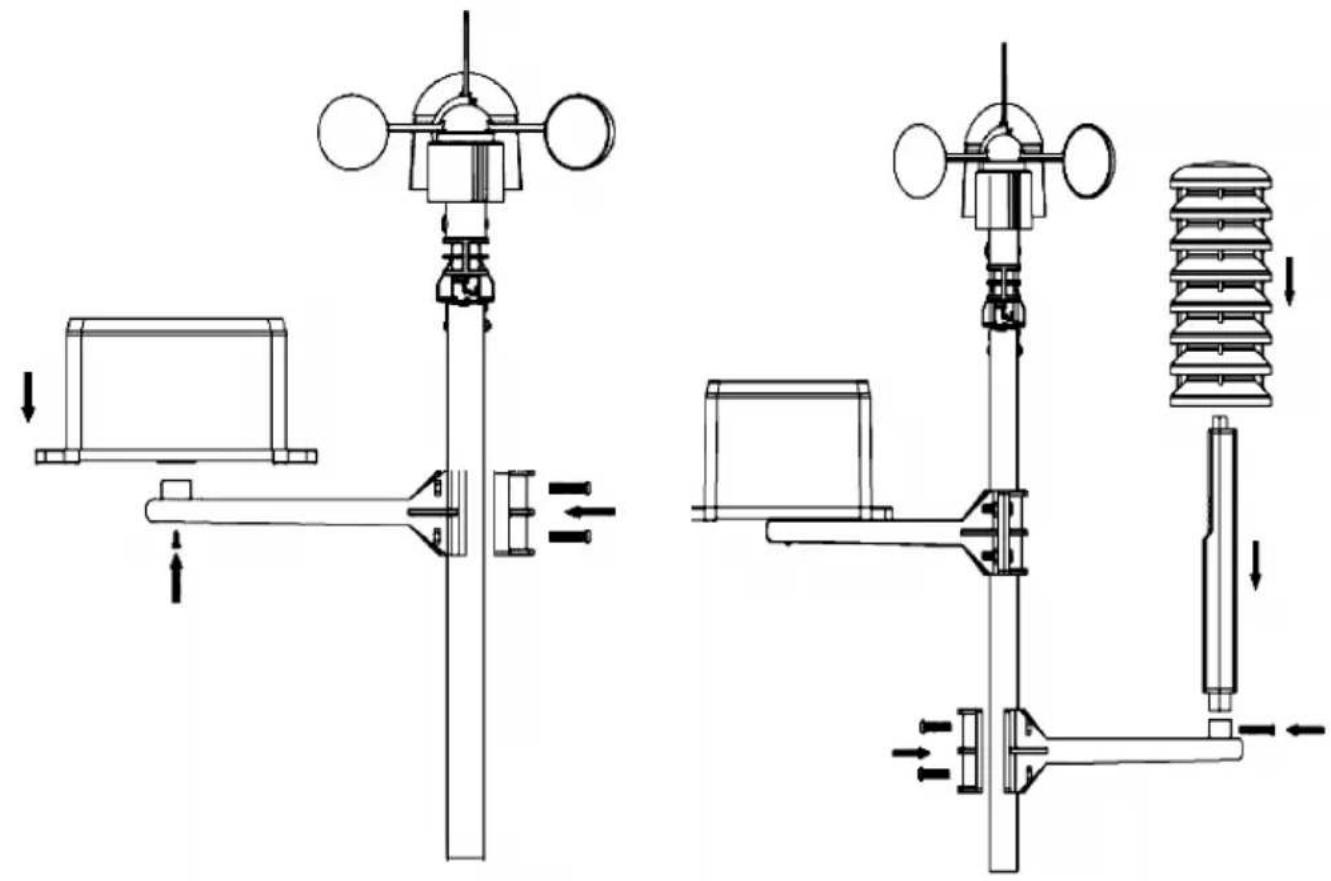
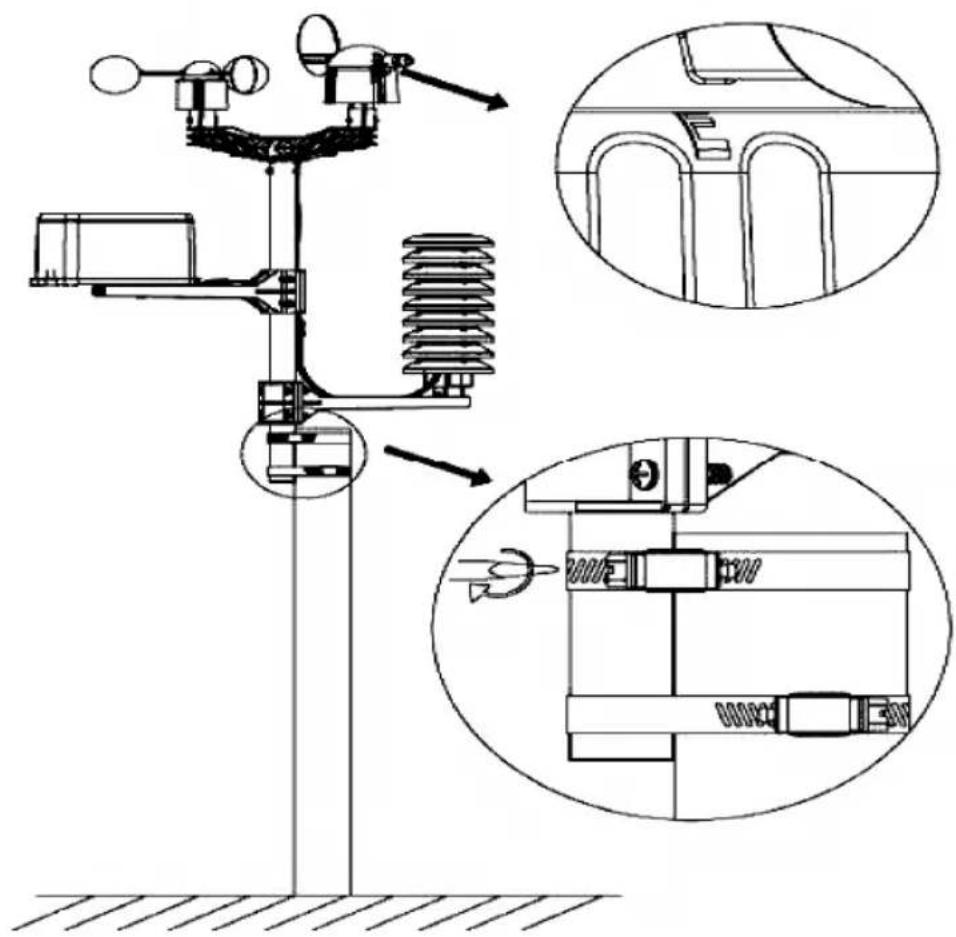
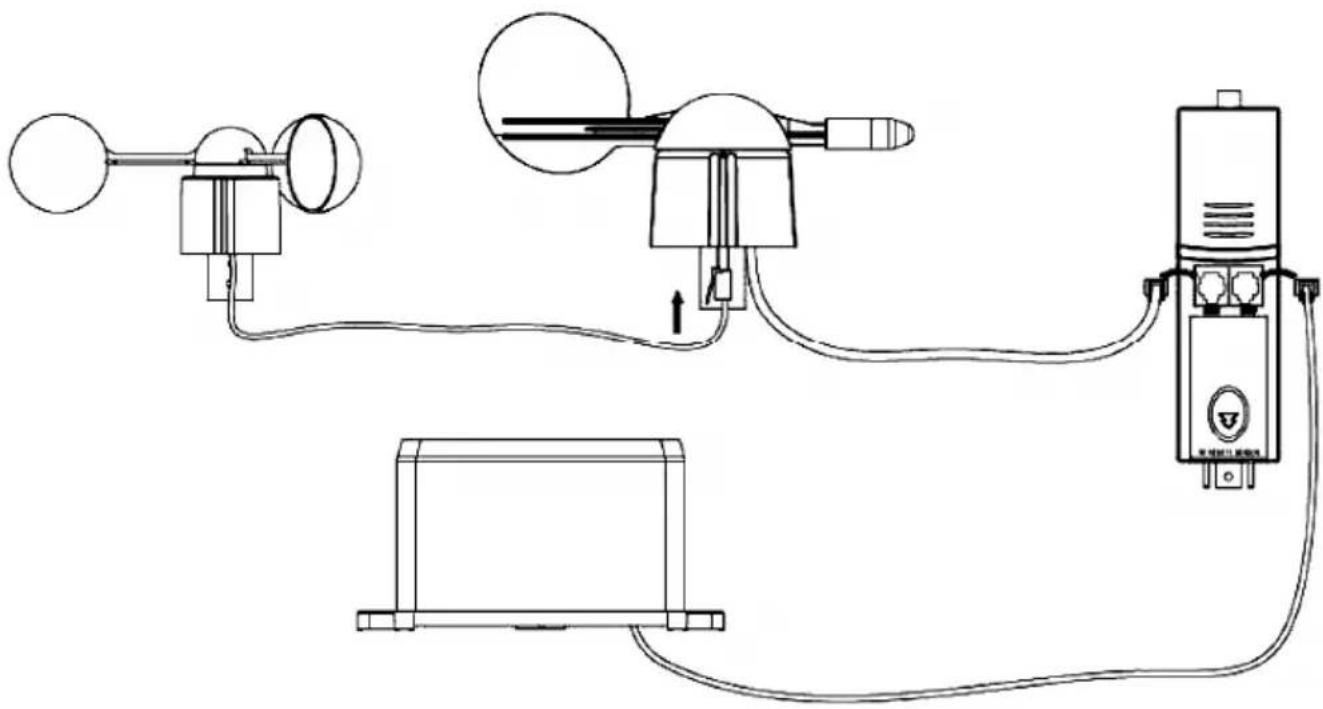
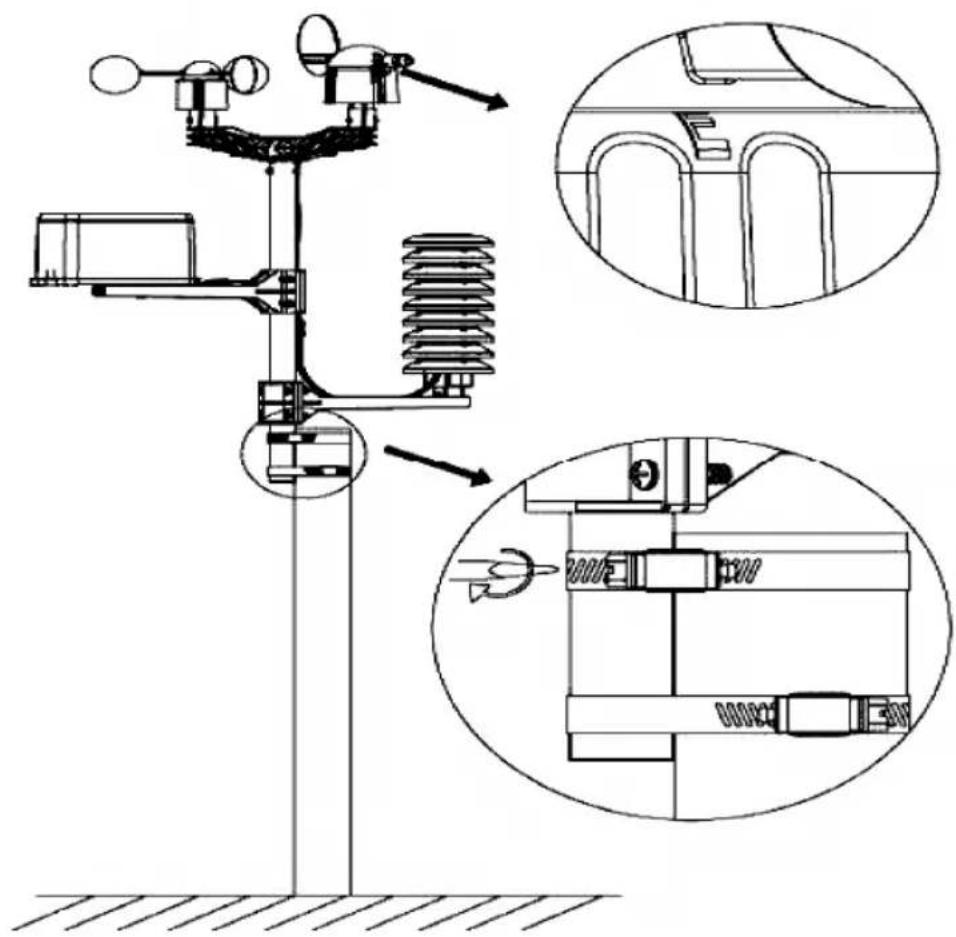
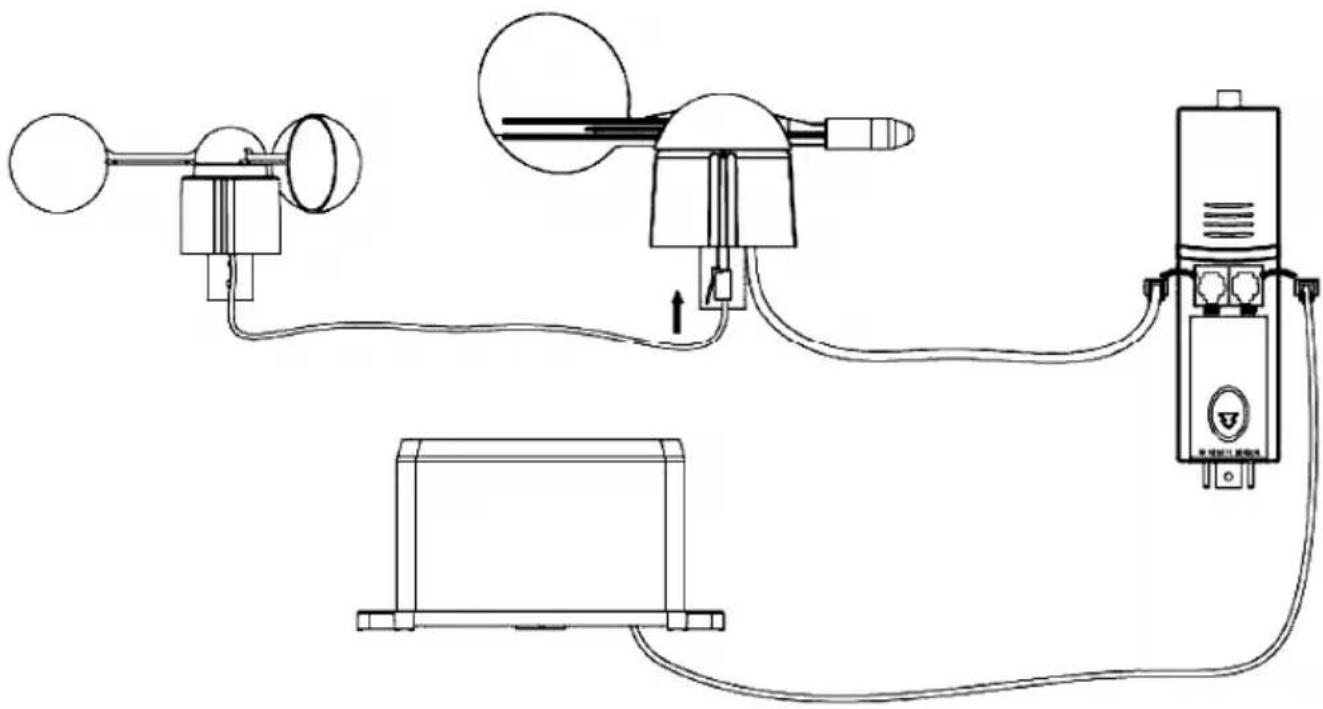
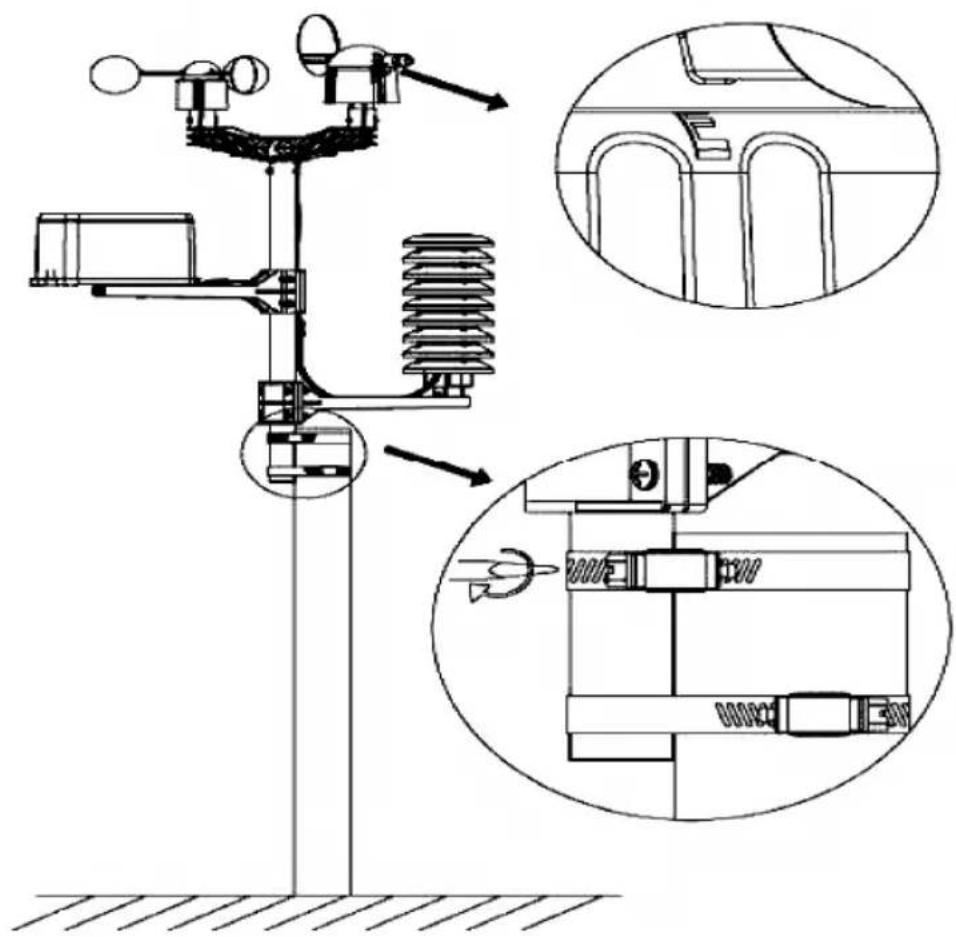
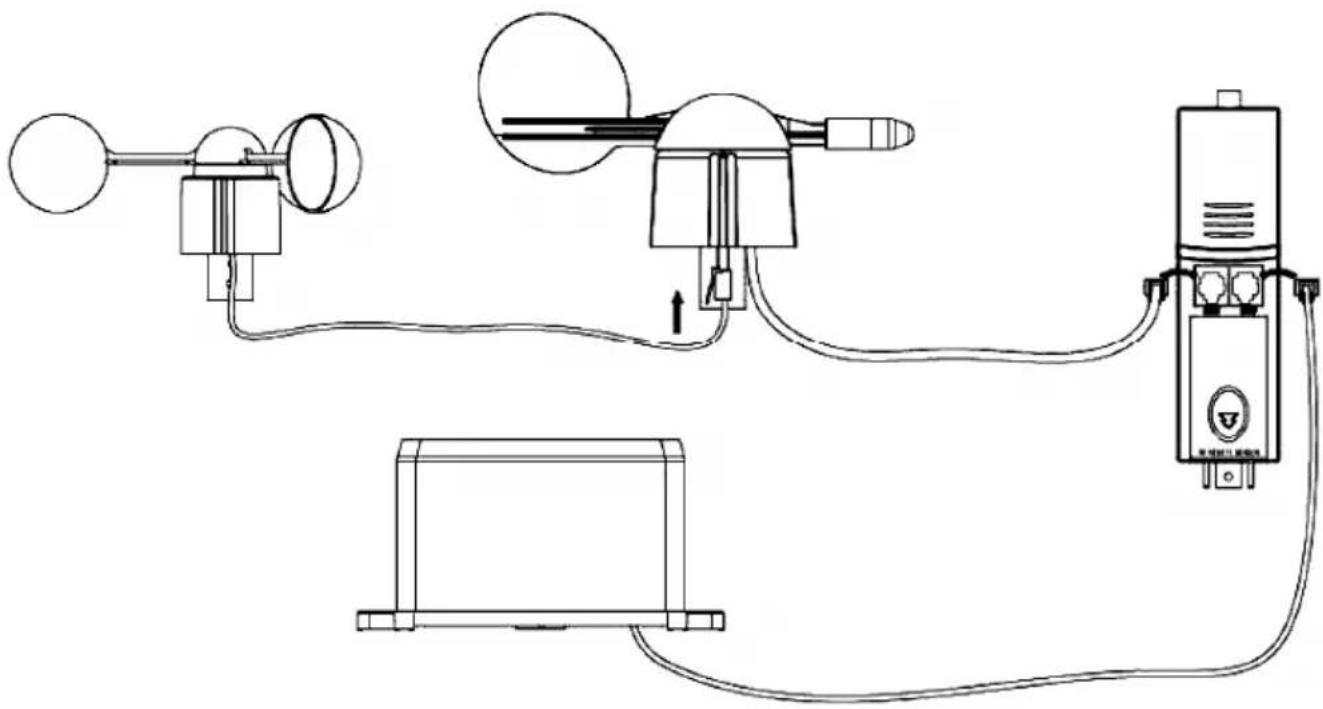
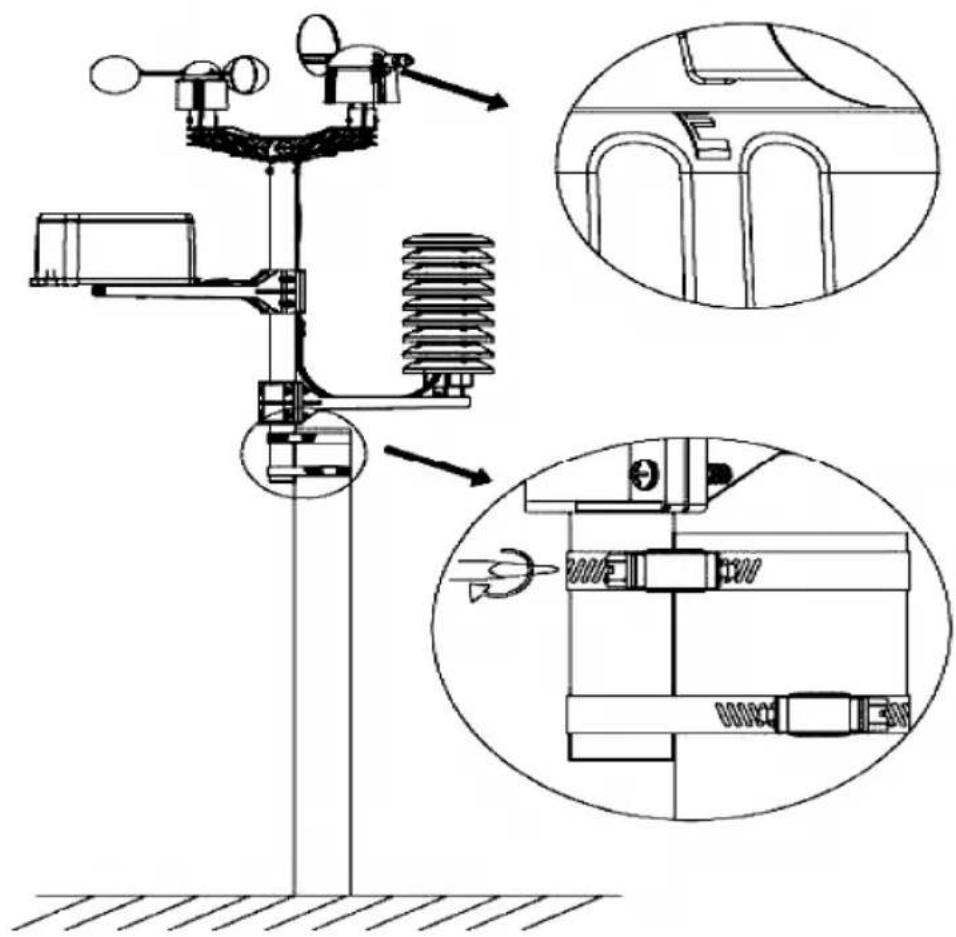
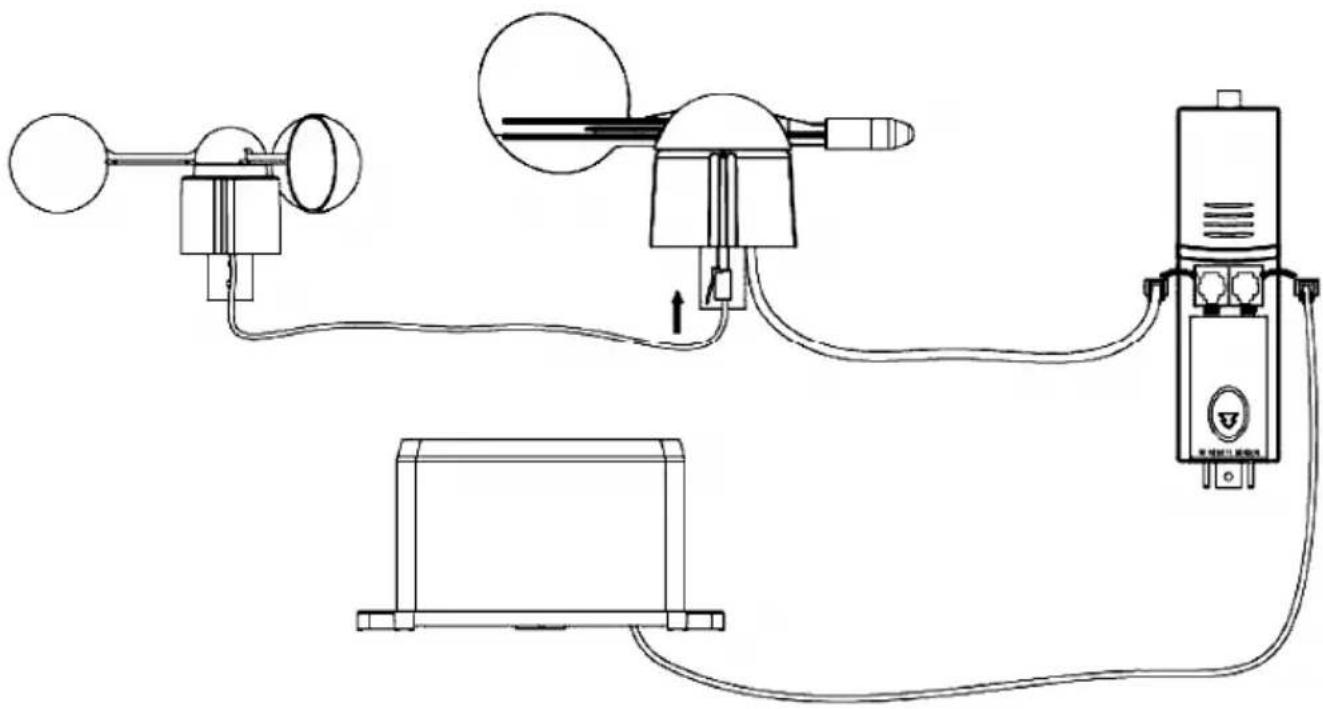
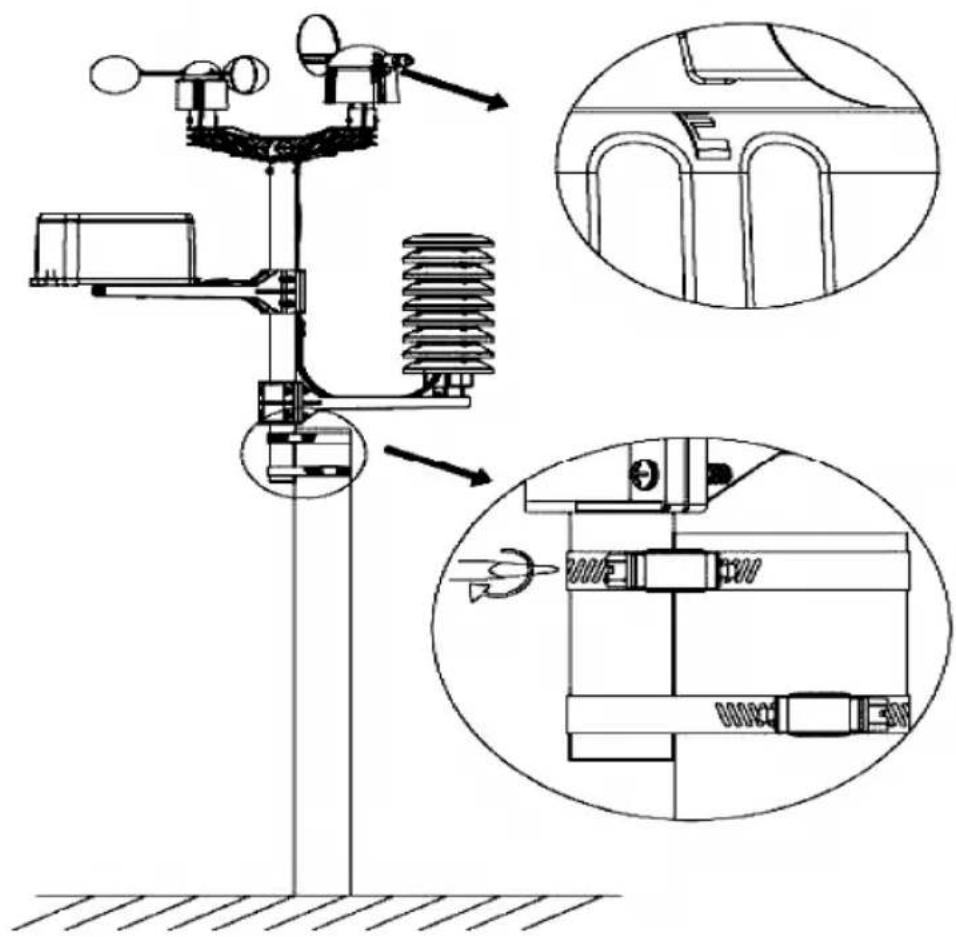
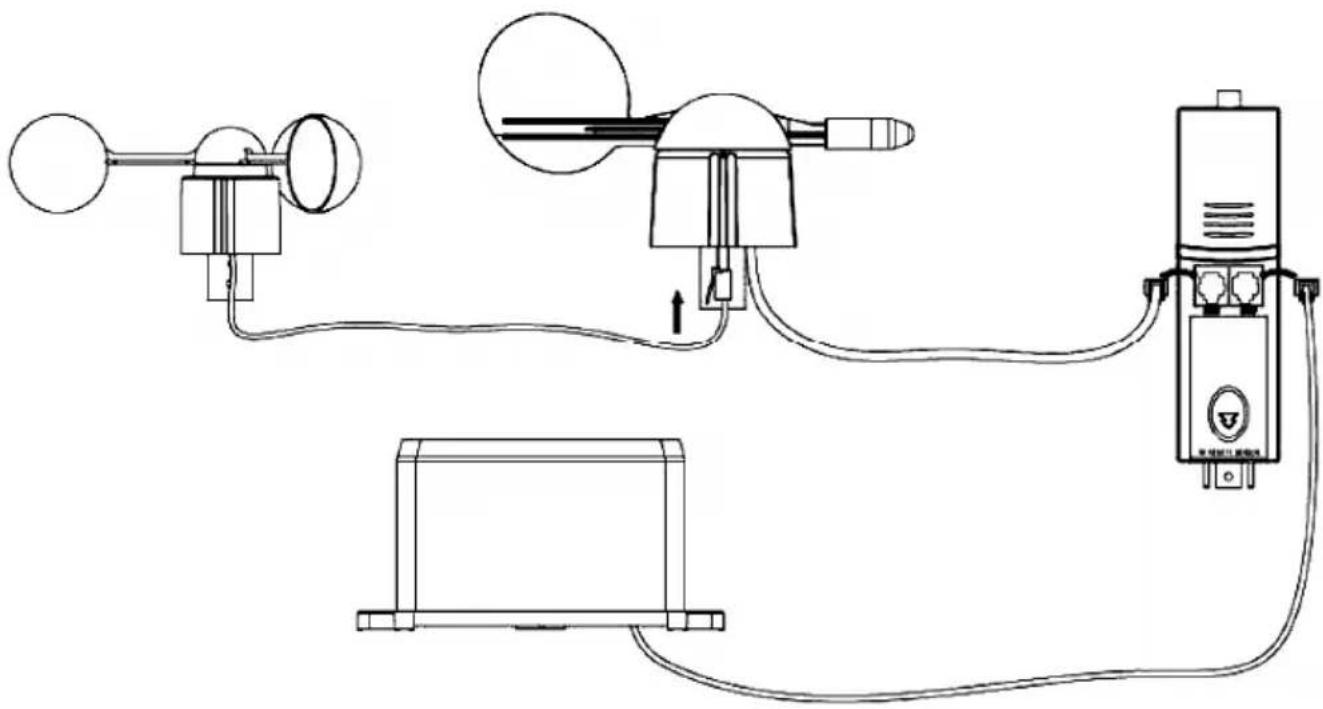
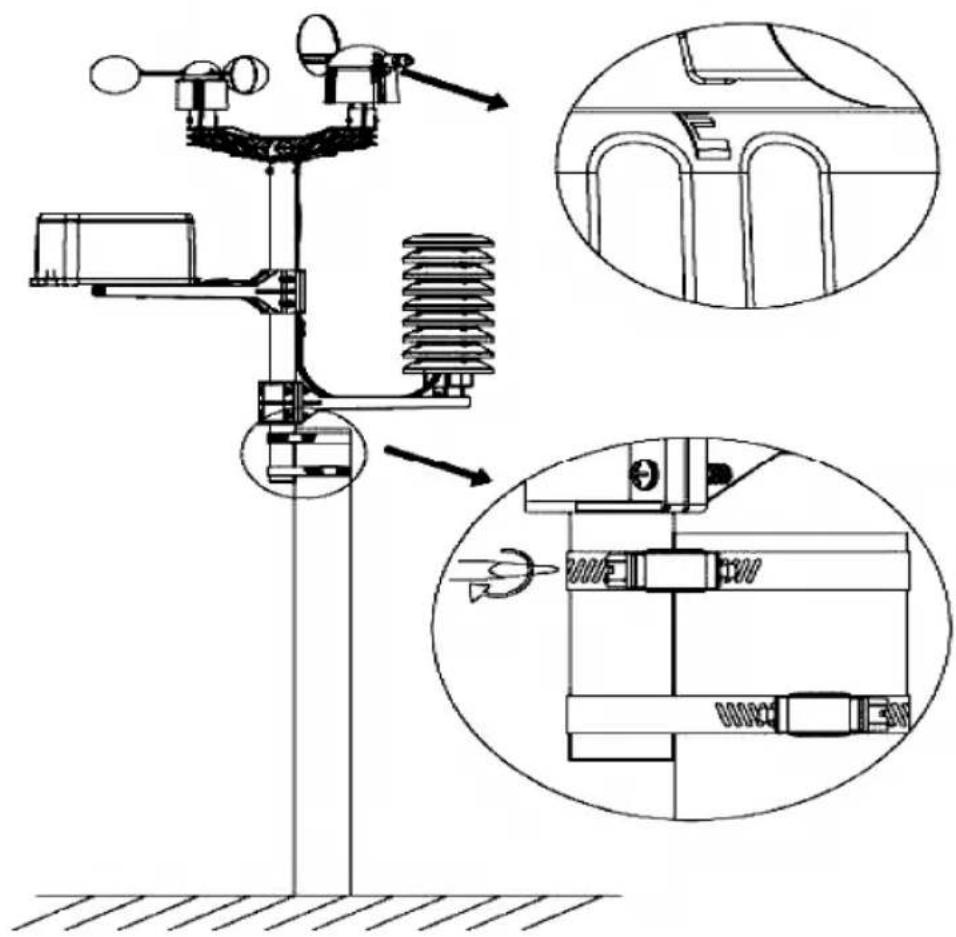
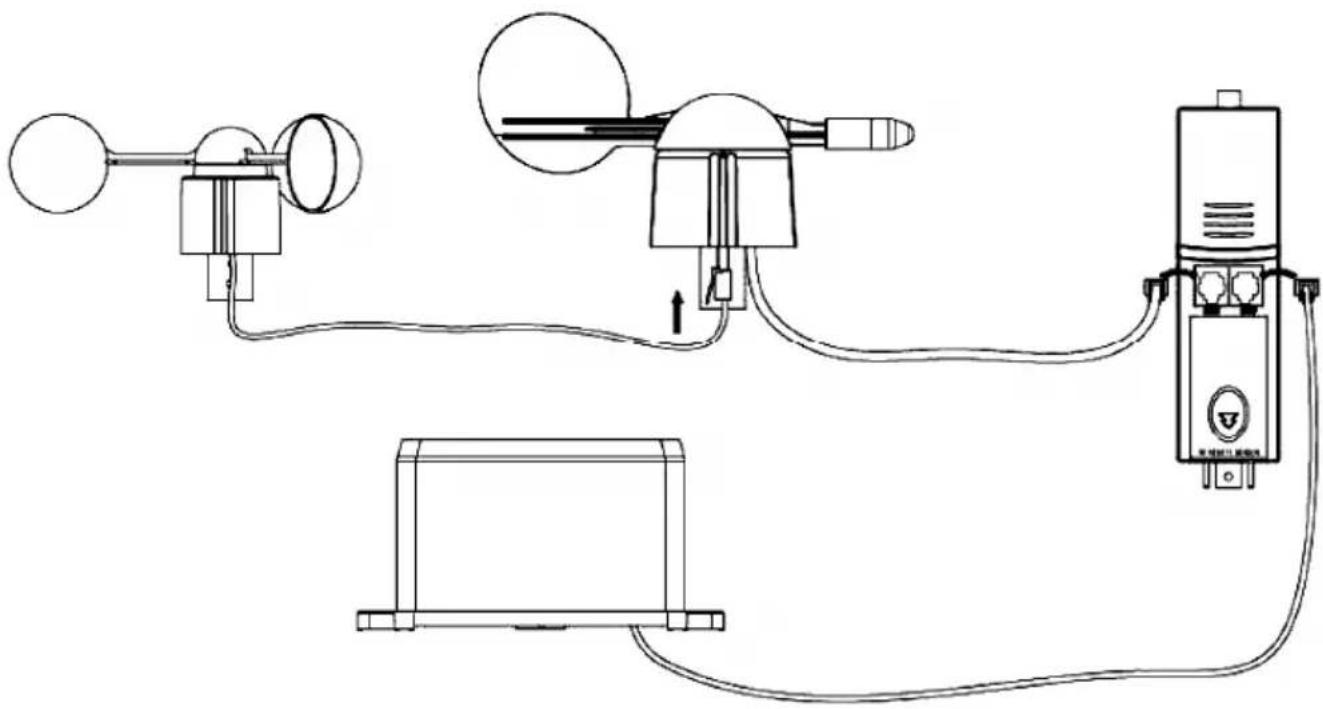
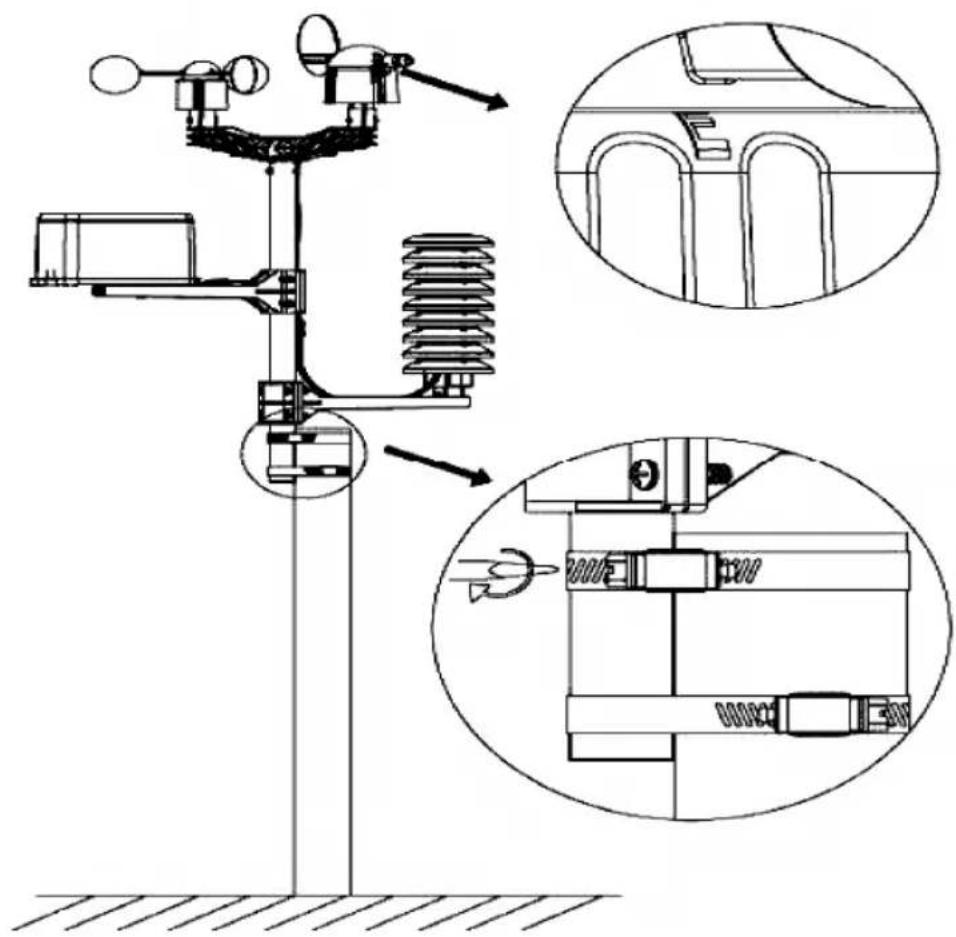
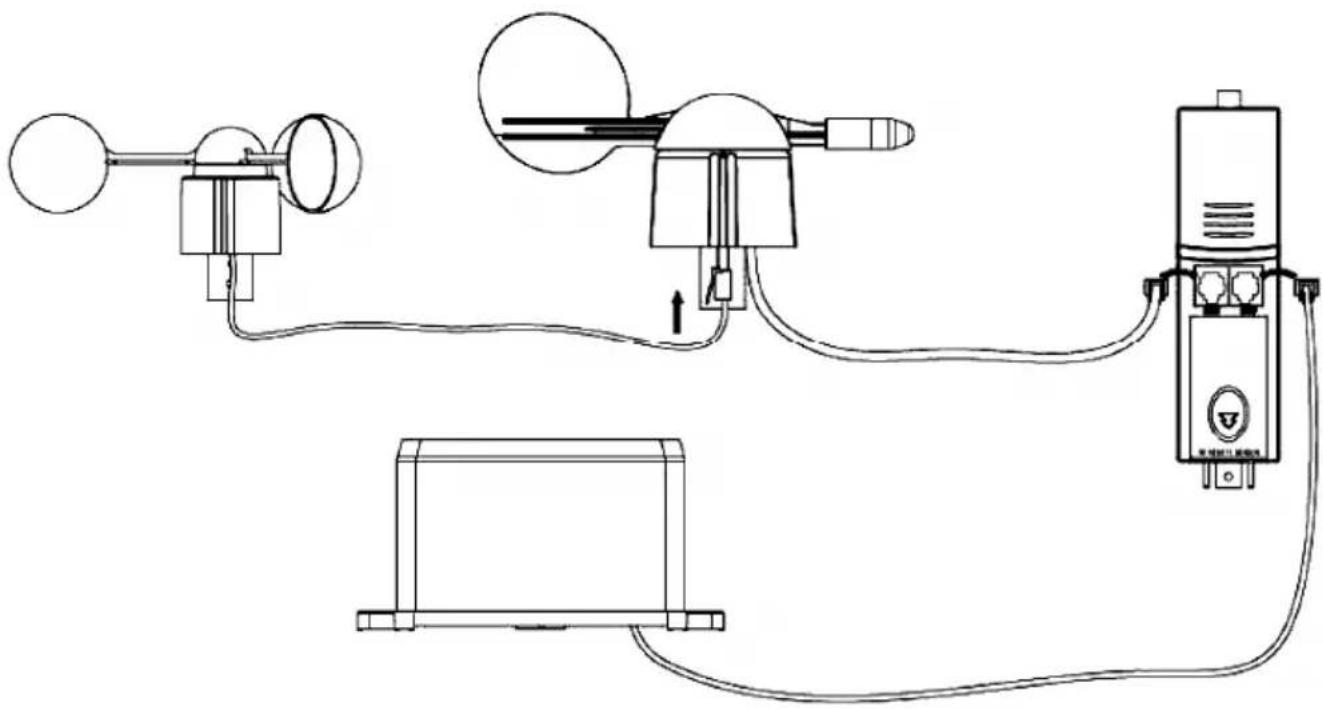
Technical line drawing of a mechanical or electrical device with no visible text, numbers, or symbols.Install your outdoor weather station on a suitable location minding the wind direction markings. Connect the anemometer to the wind vane phone jacket. Connect the wind vane to the thermo-hygrometer WIND phone jacket. Connect the rain sensor to the thermo-hygrometer RAIN phone jacket. Finally, insert 3 x AA batteries into the weather station respecting the polarity.
Insert 2 x AA batteries into the receiver respecting the polarity. Wait for the two stations to synchronize. This synchronisation may take a couple of minutes. Do not touch the screen during synchronisation. Once the synchronisation finished, make sure that all components work properly. Choose a suitable mounting location for the receiver. Commonly, the communication between the two stations can reach a distance of 100m in the open field, provided that there are no obstacles such as buildings, trees, vehicles, high-voltage lines, etc. Radio interference such as from PCs, radios and television sets can entirely cut off the communication. Take this into consideration when choosing a mounting location.
3. The Different Functions
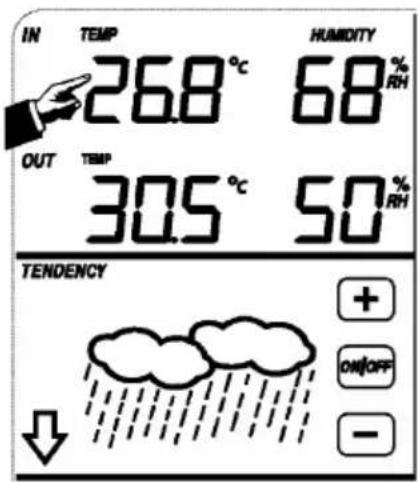
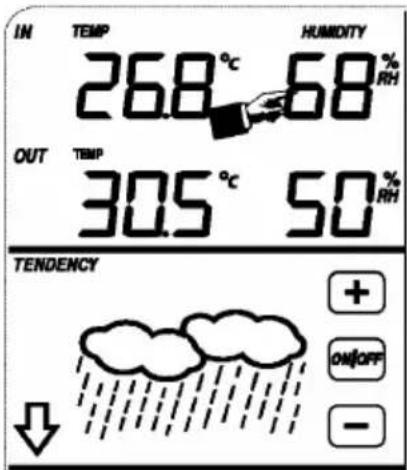
- Indoor Temperature
- Touch the indoor temperature section once and press + or - to switch between the temperature display in °C or °F.
- Touch the indoor temperature section a second time and press + or - to set the high temperature alarm (HI AL), or press ON/OFF to switch the alarm on or off.
- Touch the indoor temperature section a third time and press + or – to set the low temperature alarm (LO AL), or press ON/OFF to switch the alarm on or off.
- Touch the indoor temperature section a fourth time to display the maximum temperature reading. Hold the value pressed to reset the value.
- Touch the indoor temperature section a fifth time to display the minimum temperature reading. Hold the value pressed to reset the value.
- Outdoor Temperature
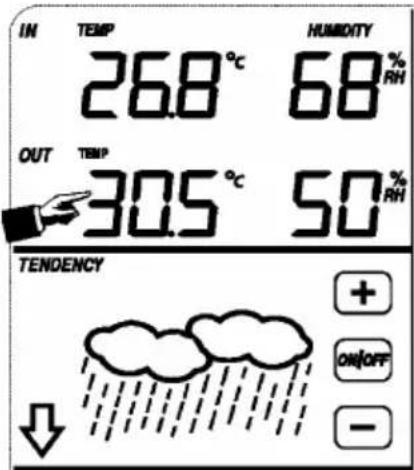
- Touch the outdoor temperature section once and press + or - to switch between outdoor temperature, wind chill and dew point display.
- Touch the outdoor temperature section a second time and press + or - to switch between the temperature display in °C or °F.
- Touch the outdoor temperature section a third time and press + or – to set the high temperature alarm (HI AL), or press ON/OFF to switch the alarm on or off.
- Touch the outdoor temperature section a fourth time and press + or – to set the low temperature alarm (LO AL), or press ON/OFF to switch the alarm on or off.
- Touch the outdoor temperature section a fifth time to display the maximum temperature reading. Hold the value pressed to reset the value.
- Touch the outdoor temperature section a sixth time to display the minimum temperature reading. Hold the value pressed to reset the value.
- Indoor/Outdoor Humidity
- Touch the indoor/outdoor humidity section once and press + or - to set the high humidity alarm (HI AL), or press ON/OFF to switch the alarm on or off.
- Touch the indoor/outdoor humidity section a second time and press + or – to set the low humidity alarm (LO AL), or press ON/OFF to switch the alarm on or off.
- Touch the indoor/outdoor humidity section a third time to display the maximum indoor/outdoor humidity reading. Hold the value pressed to reset the value.
- Touch the indoor/outdoor humidity section a fourth time to display the minimum indoor/outdoor humidity reading. Hold the value pressed to reset the value.
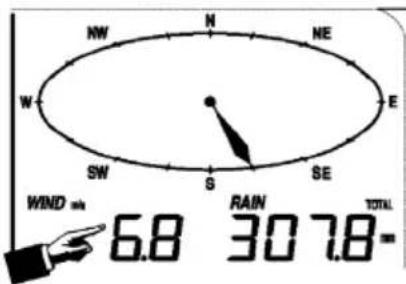
- Wind Speed
- Touch the wind speed section once and press + or – to switch between average wind speed and gust speed (GUST).
- Touch the wind speed section a second time and press + or – to switch between the wind speed display in km/h, mph, m/s, knots or Bft.
- Touch the wind speed section a third time and press + or – to set the high wind speed alarm (HI AL), or press ON/OFF to switch the alarm on or off.
- Touch the wind speed section a fourth time and press + or - to set the wind direction alarm, or press ON/OFF to switch the alarm on or off.
- Touch the wind speed section a fifth time to display the maximum wind speed reading. Hold the value pressed to reset the value.
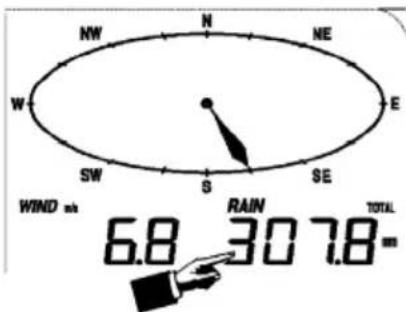
- Rain
- Touch the rain section once and press + or – to switch between 1h, 24h, week, month and total rainfall display.
- Touch the rain section a second time and press + or – to switch between the rainfall display in mm or inches.
- Touch the rain section a third time and press + or – to set the high rainfall alarm (HI AL), or press ON/OFF to switch the alarm on or off.
- Touch the rain section a fourth time to display the maximum rainfall reading. Hold the value pressed to reset the value.
- Touch the rain section a fifth time and press CLEAR to reset all rainfall values.
- Weather Forecast
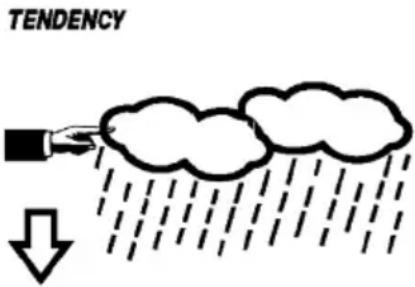
- Touch the weather forecast section once and press + or – to switch between sunny, partly cloudy, cloudy and rainy display.
- Touch the weather forecast section a second time and press + or – to set the pressure threshold from 2 \~ 4 hPa.
- Touch the weather forecast section a third time and press + or – to set the storm threshold from 3 \~ 9 hPa.
- Pressure
- Touch the pressure section once and press + or – to switch between absolute pressure and relative pressure display.
- Touch the pressure section a second time and press + or – to switch between pressure display in hPa, inHg or mmHg.
- Touch the pressure section a third time and press + or – to set the relative pressure value.
- Touch the pressure section a fourth time and press + or – to set the high pressure alarm (HI AL), or press ON/OFF to switch the alarm on or off.
- Touch the pressure section a fifth time and press + or – to set the low pressure alarm (LO AL), or press ON/OFF to switch the alarm on or off.
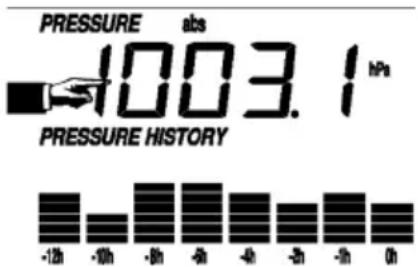
- Touch the pressure section a sixth time to display the maximum pressure reading. Hold the value pressed to reset the value.
- Touch the pressure section a seventh time to display the minimum pressure reading. Hold the value pressed to reset the value.
NOTE: When the absolute pressure is selected, step 3 will be skipped.
- Pressure Bar Graph
- Touch the pressure bar graph once and press + or – to switch between the 12h and 24h pressure history.
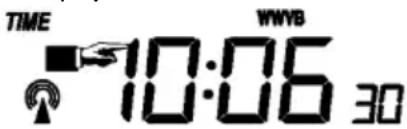
- Time
NOTE: The DCF function will only work if the outdoor sensor receives the signal.
- Touch the time section once and press + or – to adjust the contrast level (from 0 \~ 8, default 5).
- Touch the time section a second time and press + or – to select the time zone.
- Touch the time section a third time and press + or – to select the 12h or 24h time display.
- Touch the time section a fourth time and press + or – to set the hour.
- Touch the time section a fifth time and press + or – to set the minutes.
- Date
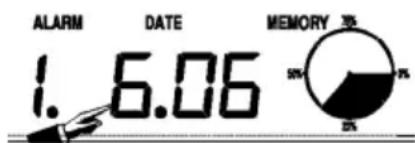
- Touch the date section once and press + or – to switch between alarm time, date and week.
- Touch the date section a second time and press + or – to switch between date display in DD-MM and MM-DD format.
- Touch the date section a third time and press + or – to set the year.
- Touch the date section a fourth time and press + or – to set the month.
- Touch the date section a fifth time and press + or – to set the day.
- Touch the date section a sixth time and press + or – to set the alarm hour.
- Touch the date section a seventh time and press + or – to set the alarm minutes, or press ON/OFF to switch the alarm on or off.
- Memory
- Touch the memory section once and press + or – to switch between the weather history data. This data can be edited through the included PC software.
- Touch the memory section a second time. Hold the memory section pressed to clear the contents.
4. PC Connection and EasyWeather Software
The WS1080 weather station is a high-quality and easy-to-use weather station that reads, displays and records weather data from internal as well as external sensors. The receiver itself has a non-volatile ring buffer memory (EEPROM) for up to 4,800 weather data sets with time and date.
After installing the EasyWeather software, you will be able to display the gathered data as diagrams and graphs. Simply connect the receiver to your PC using the included USB cable.
To install and use the EasyWeather software on your PC, the minimum requirements are as follows:
- Windows® NT 4.0 (Service Pack ≥ 6a), Windows® 2000, Windows® XP
- Windows® Internet Explorer 6.0 or above
- Pentium ^® III 500MHz or above
- 128MB memory, 256MB recommended
- CD-ROM drive
- Software Installation
○ Insert the included CD-ROM into the CD-ROM drive.
○ Double click on [Setup.exe].
- Select the installation process language and click [Next].
- Select the destination folder or create a new folder and click [Next]. The software will be installed automatically.
- Press [OK] to finish the installation process.
○ Start the application by clicking [Start] > [All Programs] > [EasyWeather].
NOTE: Install the software under an administrator account. The graphic function may not be working properly when installed under a limited user account.
- Basic Settings
After the EasyWeather application has been started, the following main window will appear:
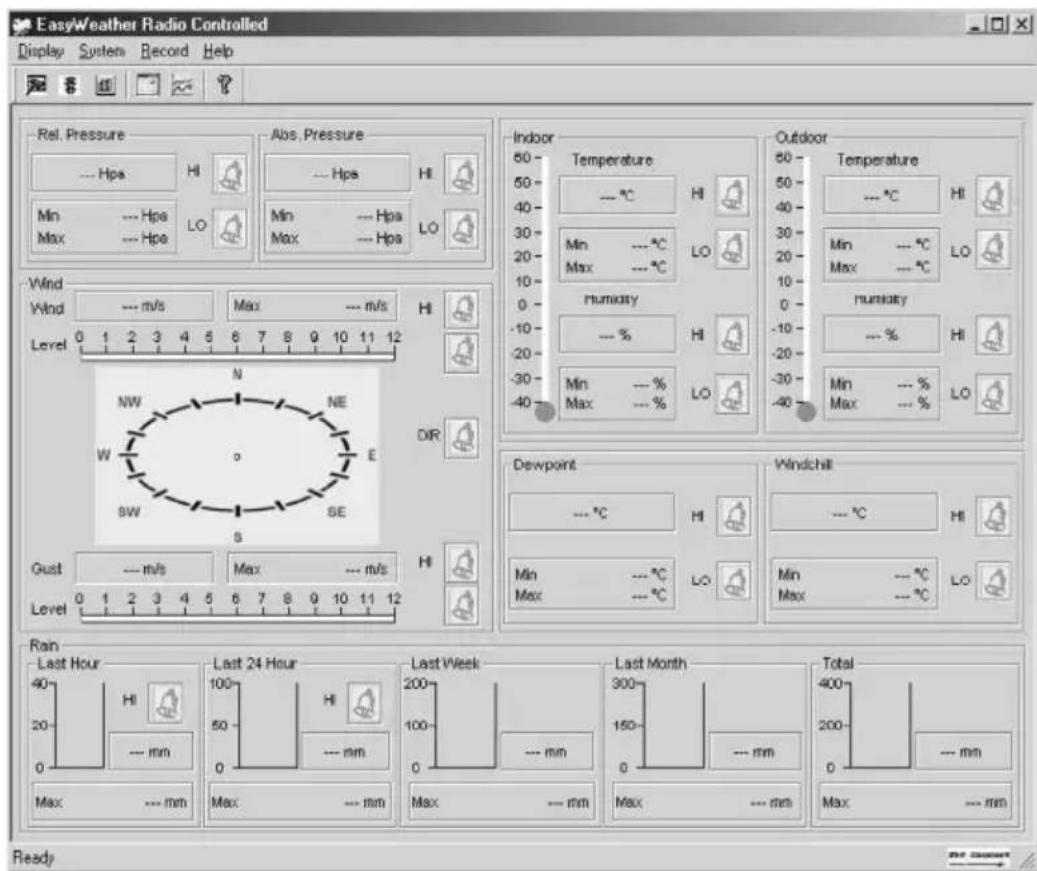
All settings from the receiver are mirrored into the software. Once you have set the receiver, there is no need to make any setting changes on the PC. However, modifications can easily be made through the EasyWeather software if needed. Those modifications will automatically be saved into the receiver.
Note that the icon is displayed when the receiver is connected to your PC. Otherwise, the icon will be displayed.
- Function Button
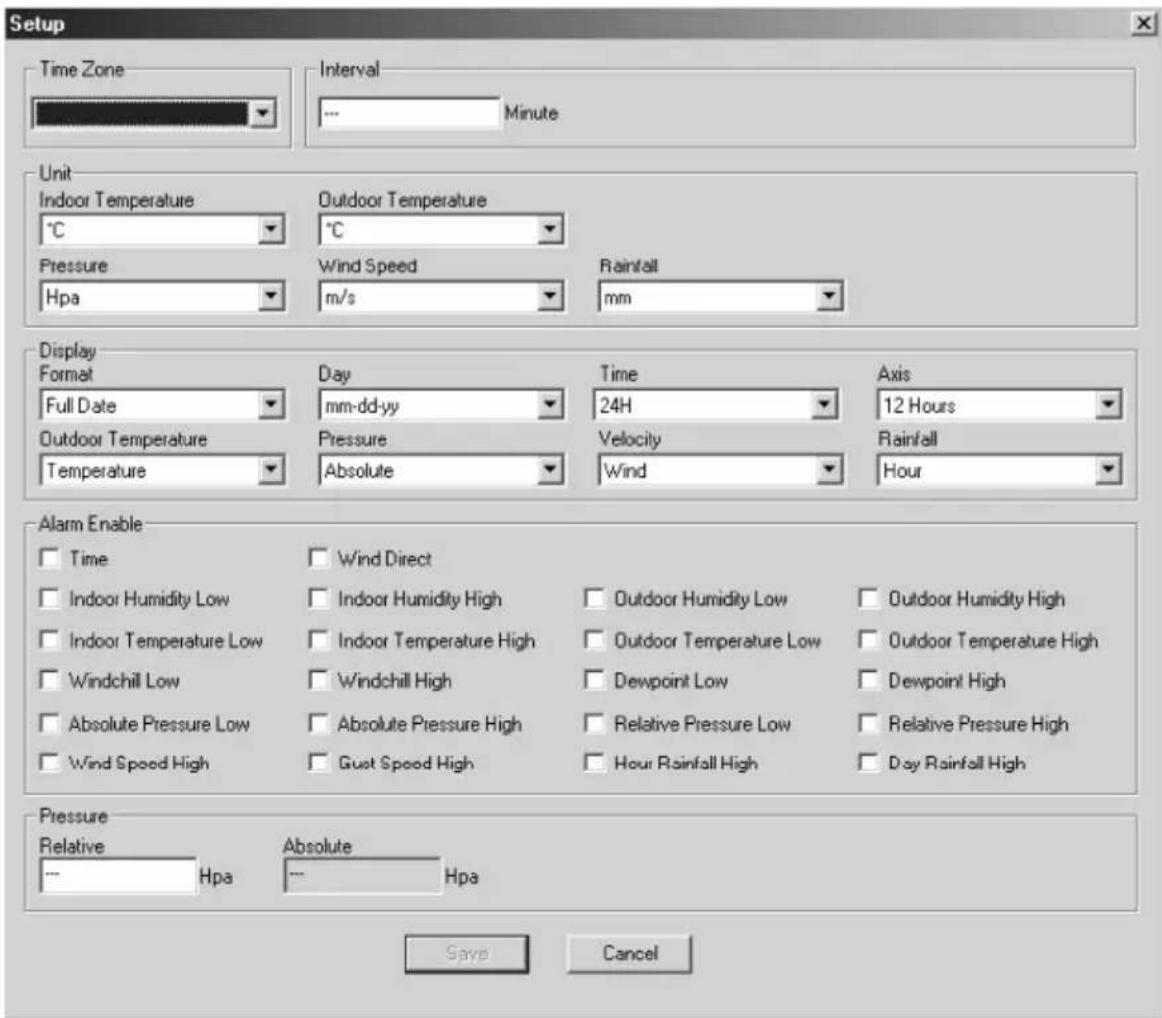
Press 📄 to display the function window.
This window enables you to modify all the functions of the receiver as well as enable or disable the corresponding alarm functions. Edit as desired and click [Save] or [Cancel].
○ Alarm Button
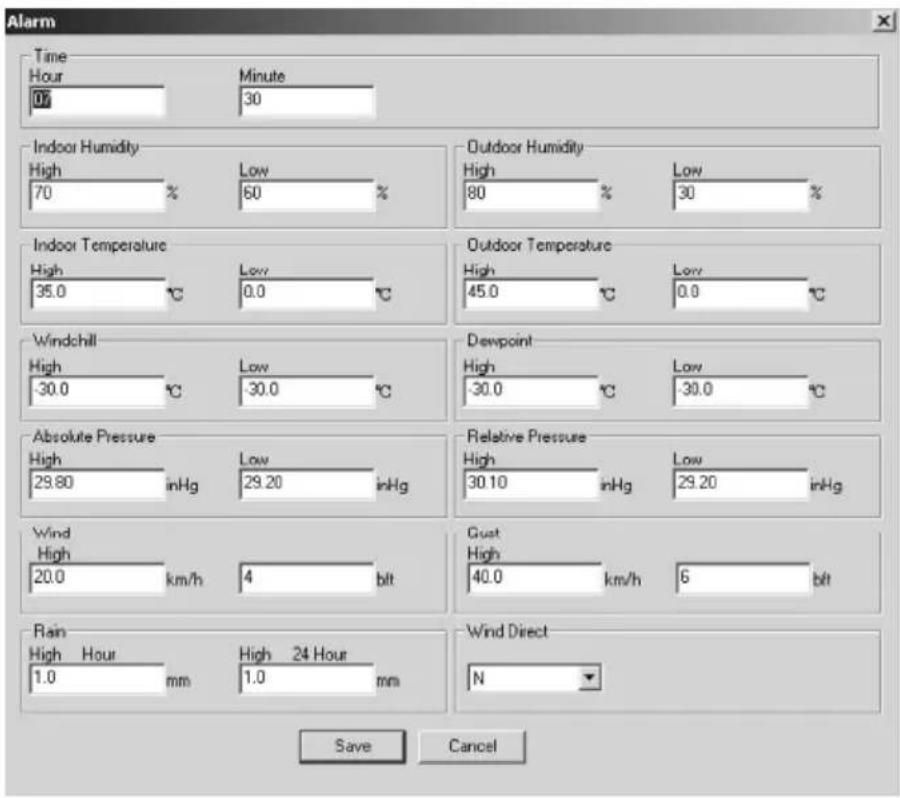
Press ☑ to display the alarm window.
This window enables you to set the alarm time, and the high and low alarm of the receiver. Edit as desired and click [Save] or [Cancel].
- Scope Button
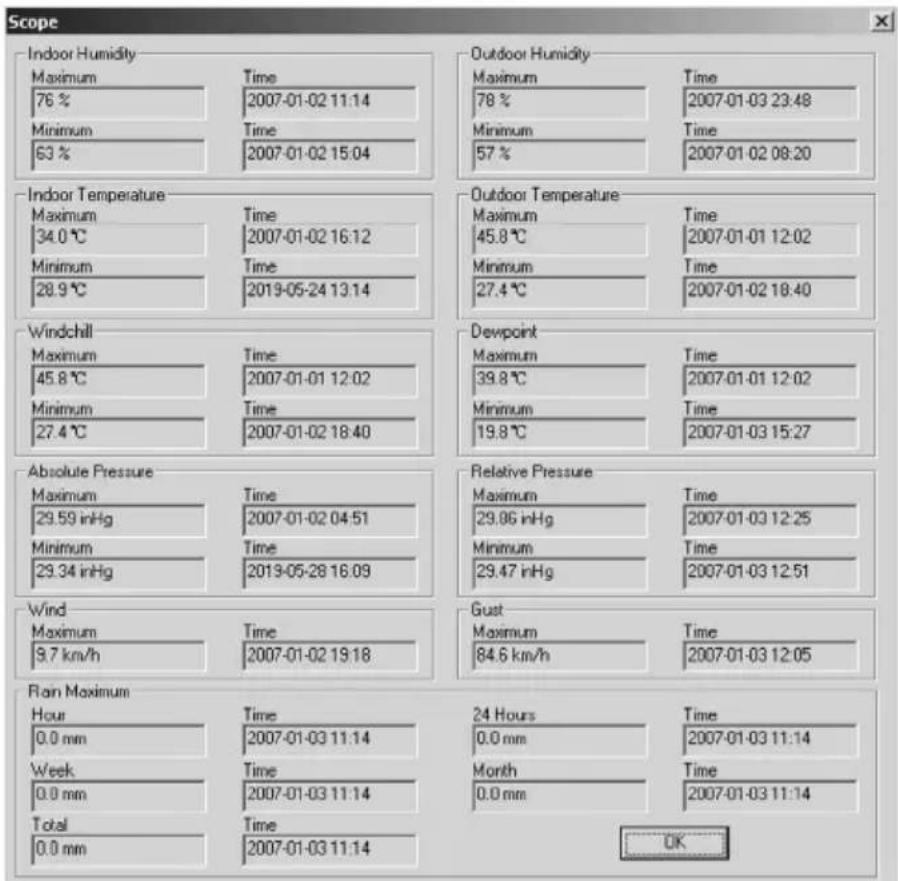
Press 📄 to display the scope window.
This window gives you a complete overview of the recorded minimum and maximum values with time and date. Value reset can only be done on the receiver. Click [OK] to exit.
○ History Data Button
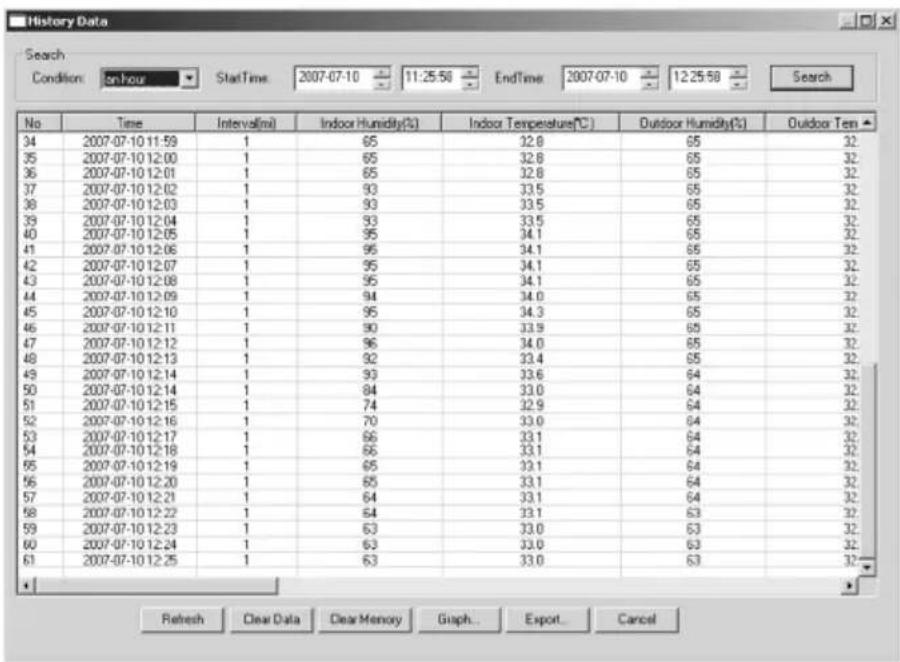
Press ☐ to display the history data window.
This window gives you a complete recorded data overview in a spread sheet format. Enter the start time in the [StartTime] window and the end time in the [EndTime] window, and press [Search] for a quick search. Select a line and press [Export] to export the selected data into a text format file for further application purpose. Clear the receiver memory by pressing [Clear Memory]. Press [Clear Data] to clear the history data window and to start a new record. To keep a back-up file of the history before deleting all data, please make a copy of the EASYWEATHER.DAT file into another folder and rename the file, e.g. [Jan-08.DAT].
○ Graph Button
Press 📋 to display the graph window.
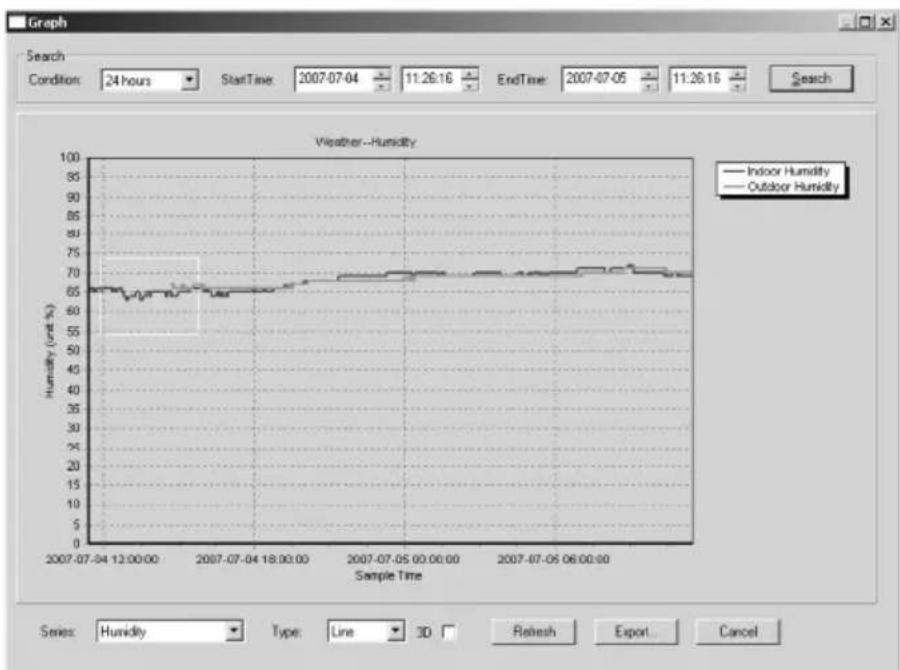
line
| Sample Time | Indoor Humidity | Outdoor Humidity | | ------------------------ | --------------- | ---------------- | | 2007-07-04 12:00:00 | ~65 | ~65 | | 2007-07-04 18:00:00 | ~65 | ~65 | | 2007-07-05 00:00:00 | ~70 | ~70 | | 2007-07-05 06:00:00 | ~70 | ~70 |This window gives you a plotted graph. Zoom into the graph by selecting the desired area with your mouse. Select the [3D] option to display the graph in 3D format.
• What to Do if the Graph Is Not Working
- Open folder containing the [EasyWeather.exe] file.
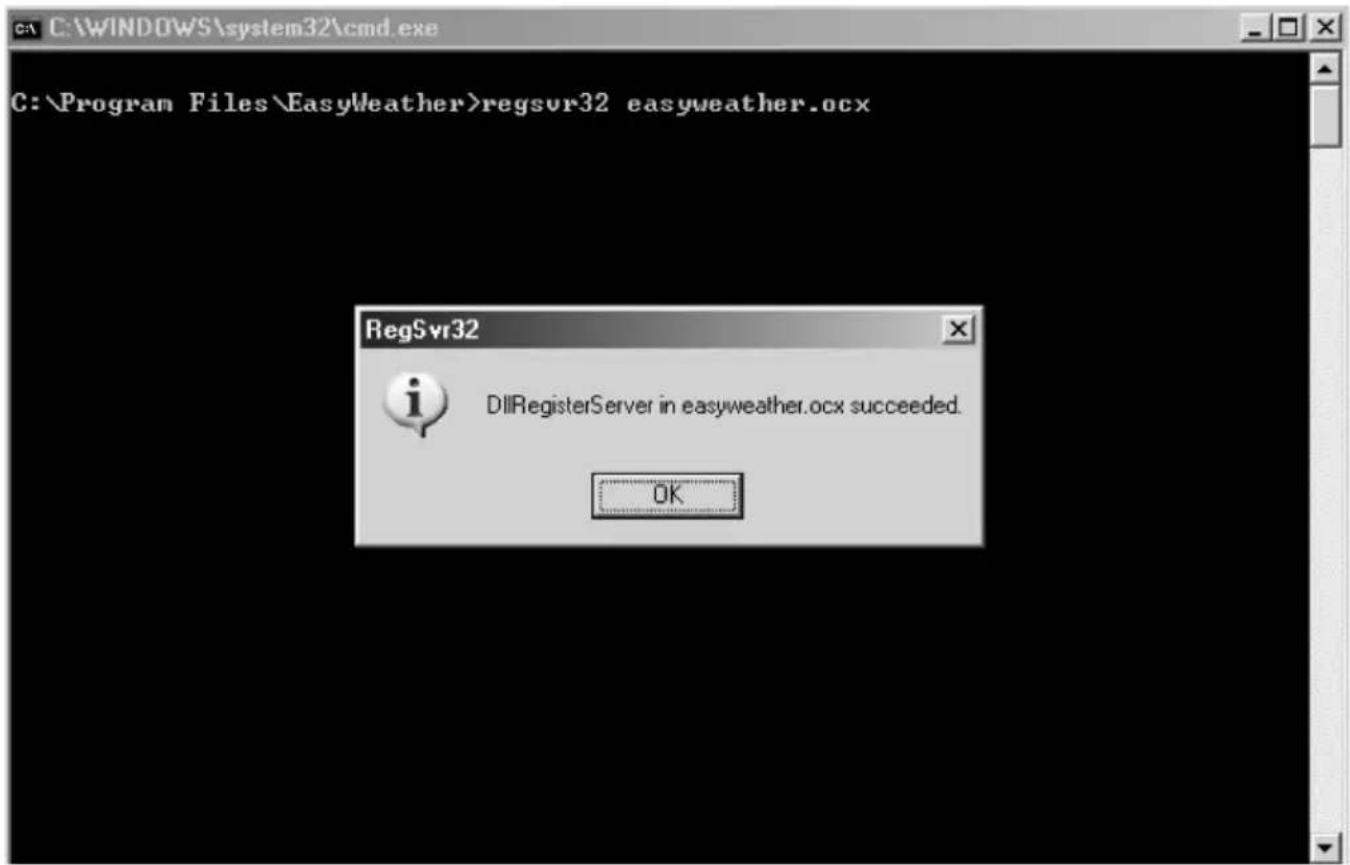
○ Create file [reg_graph.bat] in WordPad or Notepad. - Open the file, type [regsvr32 easyweather.ocx] and save the file.
- Double click the [reg_graph.bat] file. The graphic driver should register again. The following window should appear off successful.
- Special Notes
To successfully use your WS1080, both the receiver and your PC should display the exact same time. The WS1080 will only consider the set time on the receiver or through the software, not the time set on your PC.
Remember that the history data will be lost permanently when deleting manually.
Before the memory on the receiver reaches full capacity, the memory icon on the LCD will display 100%. Remember to regularly upload the history data to the PC.
5. Technical Specifications
Outdoor Weather Station
Transmission Range ± 150m (under ideal circumstances)
Frequency 868MHz
Temperature Range -40°C \~ 65°C with 0.1°C resolution
Humidity Range 10% \~ 99% RH
Rain Volume Display 0 \~ 9,999mm with 0.1mm resolution (volume < 1,000mm) or 1mm resolution
(volume > 1,000mm)
Wind Speed 0 \~160km/h
Measuring Interval 48 sec
IP Rating IPX3
Power Supply 2 x 1.5V AA batteries (order code LR6C, not incl.)
Dimensions 455 x 415 x 425mm
Indoor Receiver
Pressure/Temperature Reading Interval 48 sec
Temperature Range 0°C \~ 60°C with 0.1°C resolution
Humidity Range 10% \~ 99% RH
Humidity Accuracy 1%
Air Pressure Range 919hPa \~ 1,080hPa
Resolution/Accuracy
0.1hPa/1.5hPa
Alarm Duration 120 sec
Power Supply
3 x 1.5V AA batteries (order code LR6C, not incl.)
Dimensions 233 x 145 x 33mm
Total Weight 1,300g
Use this device with original accessories only. Velleman nv cannot be held responsible in the event of damage or injury resulted from (incorrect) use of this device.
For more info concerning this product, please visit our website www.velleman.eu.
The information in this manual is subject to change without prior notice.
WS1080 - WEERSTATION MET TOUCHSCREEN EN PC-AANSLUITING
1.Inleiding
natural_image
Technical line drawing of a mechanical or electrical device with no visible text, numbers, or symbols.- Regenval
- Weersvoorspelling
- Geheugen
○ Alarmknop
○ Overzichtknop
- Speciale opmerkingen
natural_image
Technical line drawing of a mechanical or electrical device with no visible text, numbers, or symbols.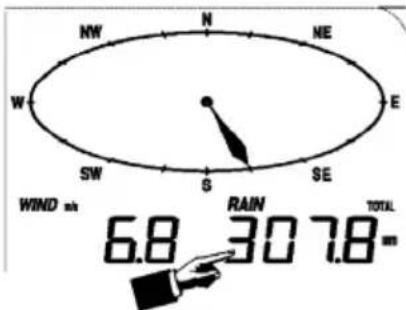
- Prévisions météo
natural_image
Simple line drawing of a hand pointing at clouds with raindrops falling (no text or symbols)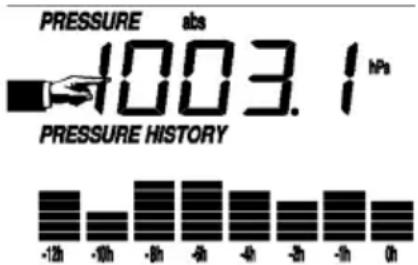
- La date
- Mémoire
○ L'aperçu
- Remarque
natural_image
Technical line drawing of a mechanical or electrical device with no visible text, numbers, or symbols.• Temperatura exterior
- Memoria
○ Resumen
- Nota
natural_image
Technical line drawing of a mechanical or electrical device with no visible text, numbers, or symbols.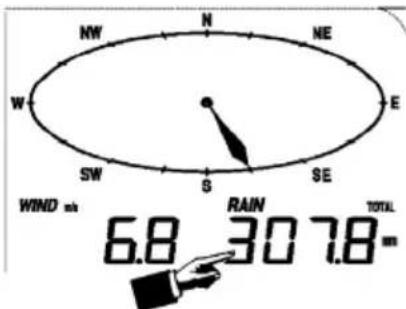
- Wettervorhersage
natural_image
Simple line drawing of a hand pouring liquid into a cloud with raindrops falling (no text or symbols)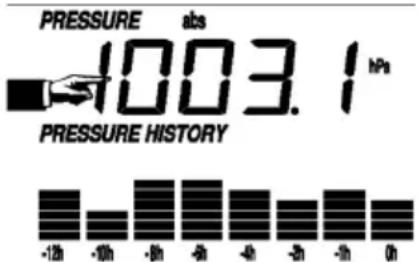
- Datum
- Speicher
○ Alarmtaste
- Überblicktaste
natural_image
Technical line drawing of a mechanical or electrical device with no visible text, numbers, or symbols.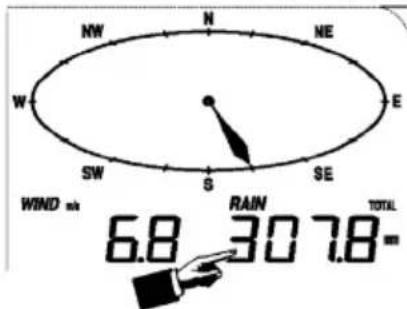
○ Tasto allarmi
○ Tasto valori max/min registrati
- Note particolari
natural_image
Technical line drawing of a mechanical or electrical device with no visible text, numbers, or symbols.• Prognoza pogody (TENDENCY)
- Pamięć
○ Przycisk Alarmu
- Uwagi Dodatkowe
natural_image
Technical line drawing of a mechanical or electrical device with no visible text, numbers, or symbols.• Temperatura exterior
- Pluviosidade
natural_image
Simple line drawing of a hand pointing at clouds with raindrops falling (no text or symbols)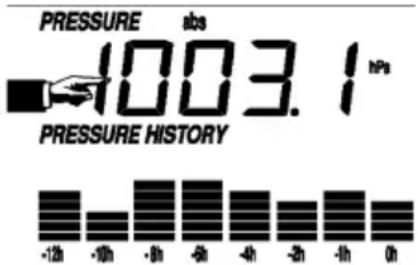
○ O ecrã de alarme
- Resumo
Prima para visualizar o resumo.
- Nota
Velleman® Service and Quality Warranty
Velleman® has over 35 years of experience in the electronics world and distributes its products in more than 85 countries.
All our products fulfil strict quality requirements and legal stipulations in the EU. In order to ensure the quality, our products regularly go through an extra quality check, both by an internal quality department and by specialized external organisations. If, all precautionary measures notwithstanding, problems should occur, please make appeal to our warranty (see guarantee conditions).
General Warranty Conditions Concerning Consumer Products (for EU):
- All consumer products are subject to a 24-month warranty on production flaws and defective material as from the original date of purchase.
- Velleman® can decide to replace an article with an equivalent article, or to refund the retail value totally or partially when the complaint is valid and a free repair or replacement of the article is impossible, or if the expenses are out of proportion.
You will be delivered a replacing article or a refund at the value of 100% of the purchase price in case of a flaw occurred in the first year after the date of purchase and delivery, or a replacing article at 50% of the purchase price or a refund at the value of 50% of the retail value in case of a flaw occurred in the second year after the date of purchase and delivery.
• Not covered by warranty:
- all direct or indirect damage caused after delivery to the article (e.g. by oxidation, shocks, falls, dust, dirt, humidity...), and by the article, as well as its contents (e.g. data loss), compensation for loss of profits;
- frequently replaced consumable goods, parts or accessories such as batteries, lamps, rubber parts, drive belts... (unlimited list);
- flaws resulting from fire, water damage, lightning, accident, natural disaster, etc. ...;
- flaws caused deliberately, negligently or resulting from improper handling, negligent maintenance, abusive use or use contrary to the manufacturer's instructions;
- damage caused by a commercial, professional or collective use of the article (the warranty validity will be reduced to six (6) months when the article is used professionally);
- damage resulting from an inappropriate packing and shipping of the article; - all damage caused by modification, repair or alteration performed by a third party without written permission by Velleman®.
- Articles to be repaired must be delivered to your Velleman® dealer, solidly packed (preferably in the original packaging), and be completed with the original receipt of purchase and a clear flaw description.
- Hint: In order to save on cost and time, please reread the manual and check if the flaw is caused by obvious causes prior to presenting the article for repair.
Note that returning a non-defective article can also involve handling costs. - Repairs occurring after warranty expiration are subject to shipping costs.
- The above conditions are without prejudice to all commercial warranties.
The above enumeration is subject to modification according to the article (see article's manual).
WEATHER CENTRE WITH TOUCHSCREEN AND PC INTERFACE
Type or model / type of model / type ou modèle / Typ oder Modell / tipo o modelo :
WS1080
constituting the subject of this declaration, conforms with the essential requirements and other relevant stipulations of the R&TTE Directive (1999/5/EC). die het voorwerp uitmaakt van deze verklaring, voldoet aan de essentiële vereisten en andere relevante bepalingen van de R&TTE-richtlijn (1999/5/EC). faisant l'objet de la présente déclaration, satisfait aux exigences essentielles et toute autre stipulation pertinente de la directive R&TTE Directive (1999/5/EC). auf das sich diese Erklärung bezieht, den grundlegenden Anforderungen und anderen relevanten Vereinbarungen der R&TTE-Richtlinie (1999/5/EC) entspricht. cumple los requisitos esenciales y las otras estipulaciones relevantes de la Directiva R&TTE (1999/5/EC). The product conforms to the following norm(s) and/or one or several other normative documents: Het product voldoet aan de volgende norm(en) en/of meerdere andere normgevende documenten: Le produit est conforme à la norme suivante / aux normes suivantes et/ou à plusieurs autres documents normatifs : Das Produkt entspricht den folgenden Normen und/oder anderen normativen Dokumenten: Es conforme a la(s) siguiente(s) norma(s) y/o a uno o varios otros documentos normativos:
Technical data are available and can be obtained from :


- WS1080 - WEATHER CENTRE WITH TOUCHSCREEN AND PC INTERFACE
- Introduction
- To all residents of the European Union
- Important environmental information about this product
- Setting up the Stations
- The Different Functions
- - Indoor Temperature
- - Outdoor Temperature
- - Indoor/Outdoor Humidity
- - Wind Speed
- - Rain
- - Weather Forecast
- - Pressure
- - Pressure Bar Graph
- - Time
- - Date
- - Memory
- PC Connection and EasyWeather Software
- - Software Installation
- - Basic Settings
- - Function Button
- ○ Alarm Button
- - Scope Button
- ○ History Data Button
- ○ Graph Button
- • What to Do if the Graph Is Not Working
- - Special Notes
- Technical Specifications
- WS1080 - WEERSTATION MET TOUCHSCREEN EN PC-AANSLUITING
- 1.Inleiding
- - Regenval
- - Weersvoorspelling
- - Geheugen
- ○ Alarmknop
- ○ Overzichtknop
- - Speciale opmerkingen
- - Prévisions météo
- - La date
- - Mémoire
- ○ L'aperçu
- - Remarque
- • Temperatura exterior
- - Memoria
- ○ Resumen
- - Nota
- - Wettervorhersage
- - Datum
- - Speicher
- ○ Alarmtaste
- - Überblicktaste
- ○ Tasto allarmi
- ○ Tasto valori max/min registrati
- - Note particolari
- • Prognoza pogody (TENDENCY)
- - Pamięć
- ○ Przycisk Alarmu
- - Pluviosidade
- ○ O ecrã de alarme
- - Resumo
- Velleman® Service and Quality Warranty
- General Warranty Conditions Concerning Consumer Products (for EU):
- • Not covered by warranty:
- The above enumeration is subject to modification according to the article (see article's manual).
- WEATHER CENTRE WITH TOUCHSCREEN AND PC INTERFACE
- WS1080
Brand : VELLEMAN
Model : WS1080
Category : Weather Station