
WS1170 - Weather Station VELLEMAN - Free user manual and instructions
Find the device manual for free WS1170 VELLEMAN in PDF.


| Product type | Weather station |
| Brand | Velleman |
| Model | WS1170 |
| Dimensions (approx.) | 150 x 80 x 20 mm |
| Weight | 200 g |
| Power supply | 2 AAA batteries (not included) |
| Indoor temperature | Yes, from 0°C to 50°C |
| Outdoor temperature | Yes, via wireless sensor (up to 60 m) |
| Humidity | Indoor and outdoor (20% to 95%) |
| Atmospheric pressure | Display and trend |
| Weather forecast | Forecast icons (sun, cloud, rain, etc.) |
| Radio-controlled clock | Yes, DCF77 reception |
| Display | Backlit LCD |
| Additional functions | Alarm, date, moon phase |
| Maintenance and cleaning | Soft dry cloth, avoid solvents |
| Safety | Indoor use, do not expose to water |
| Spare parts and repairability | Not available, device not repairable |
| General information | Manual downloadable at notice-facile.com |
| Warranty | 2 years |
Frequently Asked Questions - WS1170 VELLEMAN
User questions about WS1170 VELLEMAN
0 question about this device. Answer the ones you know or ask your own.
Ask a new question about this device
Download the instructions for your Weather Station in PDF format for free! Find your manual WS1170 - VELLEMAN and take your electronic device back in hand. On this page are published all the documents necessary for the use of your device. WS1170 by VELLEMAN.
USER MANUAL WS1170 VELLEMAN
DRAADLOOS WEERSTATION
STATION MÉTÉO SANS FIL
ESTACIÓN METEOROLÓGICA INALÁMBRICA
DRAHTLOSE WETTERSTATION

natural_image
White portable electronic device with digital display showing temperature reading (no visible text or symbols on device body)
USER MANUAL 3
GEBRUIKERSHANDLEIDING 7
NOTICE D'EMPLOI 11
MANUAL DEL USUARIO 15
To all residents of the European Union
Important environmental information about this product

This symbol on the device or the package: indicates that disposal of the device after its lifecycle could harm the environment. Do not dispose of the unit (or batteries) as unsorted municipal waste; it should be taken to a specialized company for recycling. This device should be returned to your distributor or to a local recycling service. Respect the bcal environmental rules.

If in doubt, contact your local waste disposal authorities.
Thank you for buying the WS1170! This is a wireless weather station with DCF clock and outdoor sensor. Please read the manual thoroughly before bringing this device into service. If the device was damaged in transit, don't install or use it and contact your dealer. Note that damage caused by disregard of certain guidelines in this manual is not covered by the warranty and the dealer will not accept responsibility for any ensuing defects or problems. Contents: 1 x base station, 1 x remote outdoor sensor and this manual.
For more info concerning this product and the latest version of this user manual, please visit our website www.velleman.eu.
2. Safety Instructions

Keep the device away from children and unauthorised users.
Indoor use only.
Keep this device away from rain, moisture, splashing and dripping liquids.
3. General Guidelines
Refer to the Velleman® Service and Quality Warranty on the last pages of this manual.

Keep this device away from dust and extreme heat.
Protect this device from shocks and abuse. Avoid brute force when operating the device.
- Familiarise yourself with the functions of the device before actually using it.
- All modifications of the device are forbidden for safety reasons. Damage caused by user modifications to the device is not covered by the warranty.
- Only use the device for its intended purpose. Using the device in an unauthorised way will void the warranty.
- Damage caused by disregard of certain guidelines in this manual is not covered by the warranty and the dealer will not accept responsibility for any ensuing defects or problems.
- Keep this manual for future reference.
4. Features
- wireless outdoor and indoor humidity measurement
- wireless outdoor and indoor temperature measurement
- records min/max humidity and temperature
• barometric pressure 24-hour history graph
• weather forecast tendency arrow
• forecast iccns based on changing barometric pressure
• time and date by manual setting - DCF radio-controlled time and date with manual setting
• automatic daylight saving time switching based on German DST system
• 12/24h display mode
• perpetual calendar
• time alarm with snooze - LED backlight
• wall-mounting or free standing
• includes transmitter
• with low battery indication
• synchronized instant reception - spare thermo/hygro sensor: WS1170/THS
5. Setting up your weather station
- Open the battery compartment of the outdoor sensor and insert 2 x AAA alkaline batteries. Mind the polarity.
-
Open the battery compartment of the weather station and insert 3 x AA alkaline batteries. Mind the polarity.
-
Wait ± 3 minutes until the temperature is displayed on the weather station. Do not press any keys before the weather station has received data.
- Mount both units (see "6. Mounting the Units") at a distance where the weather station is still able to pick up the signal from the sensor.
Every time the outdoor sensor is powered up (after e.g. a battery replacement), a random security code will be transmitted. This code must be synchronized to the base station in order to receive weather data. The station base must also be powered up when replacing the batteries in the outdoor sensor.
When the weather station is powered up, a short beep will sound and all LCD segments will light for 3 seconds before the station enters into the learning mode. After the learning mode the station will start DCF radio-controlled time reception and RCC time reception for ± 10 minutes during which it will not be able to receive any weather data. If the RCC signal cannot be found within 1 minute, the signal search will be cancelled and will automatically resume every two hours until the signal is successfully captured. Regular RF link will be established once the RCC reception routine is finished.
Do not press any key during the learning period ( ± 3 minutes). After both indoor and outdoor data is displayed you can install the remote outdoor sensor and set the time (if no RCC reception is available). If there is no temperature reading on the outdoor station make sure both units are within transmission range or check the batteries. If you press a key before the weather station receives the temperature signal, take out the batteries and reinstall them after ± 10 seconds.
Time and date are provided by a highly accurate atomic clock. Note that, whenever reception is possible, the weather station will scan for the DCF radio signal and overwrite a manually set time and date.
6. Mounting the units
a. The Base Station
Place the base station onto a flat surface by deploying the foldable legs at the back of the unit. The unit can also be wall-mounted. It is important to check that the radio signal can be received before permanently mounting both units.
b. The Outdoor Station
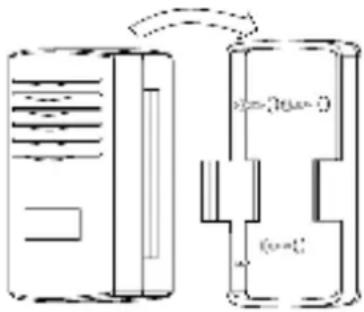
To achieve true temperature reading, avoid mounting the remote sensor in direct sunlight. We recommend mounting the sensor on an outdoor north-facing wall. Obstacles such as walls, concrete and large metal objects will reduce the transmission range.
To wall-mount the sensor, fix the bracket on the wall using the three screws. Fix the unit onto the bracket as shown.
7. Description of the LCD
a. Overview
Refer to the illustration on page 2 of this manual.
| 1 | DST (Daylight Saving Time) | 16 | outdoor humidity |
| 2 | DCF77 radio signal | 17 | outdoor temperature and humidity HI / LO alarm |
| 3 | time 18 temperature scale | ||
| 4 | radio-controlled time icon | 19 | outdoor temperature |
| 5 | alarm on icon 20 general outdoor alarm | ||
| 6 | day of the week / time zone 21 weather forecast | ||
| 7 | date 22 weather tendency | ||
| 8 | indoor humidity | 23 | pressure HI alarm |
| 9 | indoor temperature and humidity HI / LO alarm | 24 | absolute or relative atmospheric pressure selection |
| 10 | indoor temperature | 25 | pressure LO alarm |
| 11 | temperature scale | 26 | atmospheric pressure with 24-hour history graph |
| 12 | indoor temperature and humidity alarm on | 27 | atmospheric pressure |
| 13 | outdoor sensor signal transmission | 28 | atmospheric pressure scale |
| 14 | MIN / MAX | 29 | atmospheric pressure alarm |
| 15 | dew point temperature | ||
b. Weather icons


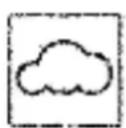

sunny
partly cloudy
cloudy
rainy
The four weather icons (sunny, partly cloudy, cloudy and rainy) represent the weather icons. These icons are based upon change of atmospheric pressure.
c. Weather forecast icons
Weather tendency arrows are located between the weather icons to show the atmospheric pressure tendency and to provide the weather to be expected by decreasing or increasing the atmospheric pressure.
The rightward arrows indicate an increase of the atmospheric pressure and a weather improvement. The leftward arrows indicate a decrease of the atmospheric pressure and a weather worsening.
The change of the icons is in accord to the relationship between the current relative pressure and the pressure change of the last six hours. If the weather is changing, the weather tendency arrows will be flashing for three hours indicating a weather change is happening. After that, the arrows will stop flashing when conditions have become stable and no weather changes are expected.

d. Storm Warning Icon
The storm threshold can be set to suit your requirement for storm forecasting from 5 \~ 9 hPa (default 6 hPa). When there is a fall over the pressure threshold within 3 hours, the storm forecasting will be activated, and the rainy icon and the arrows will flash for 3 hours indicating the storm warning feature has been activated.

Note to pressure sensitivity setting for weather forecasting
The atmospheric pressure threshold can be set to suit your requirement for weather forecasting from 2 \~ 4 hPa (default 3 hPa). Areas that experience frequent pressure changes require a higher setting compared to an area where the atmospheric pressure is stagnant.
8. Programming your weather station
a. Quick Display Mode
- In normal display mode, press SET.
- Outd oor temperature / Dew point: press MIN / MAX or + to switch between the outdoor temperature and the dew point.
○ Abso lute pressure / Relative pressure: press MIN / MAX or + to switch between the absolute and the relative pressure.
- Press SET to confirm the settings and to move to the next setting level. Press SET to scroll through the display node and to return to the normal display mode.
b. Setting Modes
- In normal display mode, hold SET pressed for 3 seconds.
- Press SET to select a setting in the following sequence: Time zone format - 12 / 24h format - Manual time setting (h / m) - Calendar setting (Y / M / D) - Temperature scale unit (°C or °F) - Atmospheric pressure unit (hPa or inHg) - Relative pressure setting from 919.0 hPa \~ 1080.0 hPa (default 1013.5 hPa) - Atmospheric pressure threshold setting (default 2 hPa) - Storm threshold setting (default 4 hPa).
- Press + or MIN / MAX to modify the settings. Hold + pressed for 3 seconds to modify the setting rapidly.
- Press S NOOZE / LIGHT to return to the normal display mode.
NOTE: Plea se set the scale unit before modifying the setting. Converting a value into another unit might cause a resolution loss.
c. Alarm Modes
- In normal display mode, press ALARM to enter the HI alarm mode.
- Press A LARM again to enter the LO alarm mode. After the first press the display will be refreshed to show the current HI and LO alarm values. The Normal Alarm value will be displayed only for values already activated. All other values will be displayed as - - - or - - .
- Press A LARM to return to normal display mode.
- In the H I alarm mode, press SET to select the following modes: Time alarm (h / m) – Indoor humidity HI alarm – Indoor temperature HI alarm – Outdoor humidity HI alarm – Outdoor temperature HI alarm – Pressure HI alarm.
- In the L O alarm mode, press SET to select the following modes: Time alarm (h / m) - Indcor humidity LO alarm - Indoor temperature LO alarm - Outdoor humidity LO alarm - Outdoor temperature LO alarm - Pressure LO alarm.
- In both alarm modes, press + or MIN / MAX to modify the alarm value. Hold + pressed for 3 seconds to modify the value rapidly. Press ALARM to switch the alarm on or off (if the alarm is enabled, the speaker icon will appear on the display). Press SET to confirm the settings. Press SET to scroll through the setting options and to return to the normal display mode.
- Press S NOOZE / LIGHT to return to the normal display mode.
Cancelling the temperature alarm while sounding
- When a set weather alarm condition has been activated, that particular alarm will sound and flash for 120 seconds. Press any key to mute the alarm. If the alarm is activated again within 10 minutes, the alarm will not sound but will continue to flash until the weather conditions have become stable. This feature is useful to avoid repeated triggering for the same value.
- The alarm will automatically reactivate once the value has fallen below the set temperature value or if a new value is entered.
The outdoor weather alarm
When a set outdoor alarm has been triggered, it will flash on the LCD display. The general outdoor alarm icon and HI / LO alarm icon will flash accordingly. Example: In outdoor temperature mode, the dew point icon will flash along the outdoor alarm and the HI alarm icons when the dew point HI alarm is triggered. This will indicate that the current alarm source is from the dew point.
d. MIN / MAX Mode
- Press MIN / MAX to enter the MAX mode. MAX and the maximum record will be displayed.
- Press MIN / MAX to enter the MIN mode. MIN and the minimum record will be displayed.
- Press MIN / MAX to return to the normal display mode.
- In MAX mode, press + to display the following maximum values with their time and date: Indoor humidity maximum – Indoor temperature maximum – Outdoor humidity maximum – Outdoor temperature maximum – Pressure maximum.
- In MIN mode, press + to display the following minimum values with their time and date: Indoor humidity minimum – Indoor temperature minimum – Outdoor humidity minimum – Outdoor temperature minimum – Pressure minimum.
- In MIN or MAX mode, hold SET pressed for 2 seconds to reset the respective value, time and date.
- Press SNOOZE / LIGHT to return to the normal display mode
9. Troubleshooting
| Problem | Possible Cause | Solution |
| Transmission problem | Distance between the two units is too longShielding materials between two units (thick wall, steel...)Interference from other sources | Reduce distanceFind a different mounting locationEliminate interference sources |
| Data on LCD is illegible | No data receptionLow batteries | Find a different mounting locationReplace batteries |
| Incorrect data • Low batteries | Incorrect settings | Replace batteriesReprogram the weather station |
10. Technical specifications
| Indoor Station | Temperature Range 0°C ~ +60°C (OFL displayed when out of range) | |
| Resolution 0.1°C | ||
| Relative Humidity | 1% ~ 99% | |
| Resolution 1% | ||
| Atmospheric Pressure | 919 hPa ~ 1080 hPa | |
| Resolution / Accuracy | 0.1 hPa / 1.5 hPa | |
| Alarm Duration | 120 sec | |
| Outdoor Station | Transmission Range in Open Field | max. 100m |
| Frequency | 433MHz | |
| Temperature Range -40°C ~ +65°C (OFL displayed when out of range) | ||
| Resolution 0.1°C | ||
| Relative Humidity | 20% ~ 95% | |
| Humidity Accuracy | +/- 5% under 0°C ~ 45°C | |
| Power Supply | Indoor Station | 3 x 1.5V AA alkaline batteries (not incl.) for battery life of 6 months |
| Outdoor Station | 2 x 1.5V AAA alkaline batteries (not incl.) for battery life of 12 months | |
Use this device with original accessories only. Velleman nv cannot be held responsible in the event of damage or injury resulted from (incorrect) use of this device.
The information in this manual is subject to change without prior notice.
© COPYRIGHT NOTICE
The copyright to this manual is owned by Velleman nv. All worldwide rights reserved.
No part of this manual or may be copied, reproduced, translated or reduced to any electronic medium or otherwise without the prior written consent of the copyright holder.
Temperature display mode

Dew point HI alarm triggered

9. Problemen en oplossingen
d. Sturmvorhersage

Declare on our own responsibility that the finished product(s):
WIRELESS WEATHER STATION WITH DCF CLOCK AND OUTDO OR SENSOR
Type or model / type of model / type ou modèle / Typ oder Modell / tipo o modelo :
WS1170
constituting the subject of this declaration, conforms with the essential requirements and other relevant stipulations of the R&TTE Directive (1999/5/EC).
The product conforms to the following norm(s) and/or one or several other normative documents:
Technical data are available and can be obtained from :
Velleman® Service and Quality Warranty
Velleman® has over 35 years of experience in the electronics world and distributes its products in more than 85 countries.
All our products fulfil strict quality requirements and legal stipulations in the EU. In order to ensure the quality, our products regularly go through an extra quality check, both by an internal quality department and by specialized external organisations. If, all precautionary measures notwithstanding, problems should occur, please make appeal to our warranty (see guarantee conditions).
General Warranty Conditions Concerning Consumer Products (for EU):
- All consumer products are subject to a 24-month warranty on production flaws and defective material as from the original date of purchase.
- Velleman® can decide to replace an article with an equivalent article, or to refund the retail value totally or partially when the complaint is valid and a free repair or replacement of the article is impossible, or if the expenses are out of proportion.
You will be delivered a replacing article or a refund at the value of 100% of the purchase price in case of a flaw occurred in the first year after the date of purchase and delivery, or a replacing article at 50% of the purchase price or a refund at the value of 50% of the retail value in case of a flaw occurred in the second year after the date of purchase and delivery.
• Not covered by warranty:
- all direct or indirect damage caused after delivery to the article (e.g. by oxidation, shocks, falls, dust, dirt, humidity...), and by the article, as well as its contents (e.g. data loss), compensation for loss of profits;
- frequently replaced consumable goods, parts or accessories such as batteries, lamps, rubber parts, drive belts... (unlimited list);
- flaws resulting from fire, water damage, lightning, accident, natural disaster, etc. ...;
- flaws caused deliberately, negligently or resulting from improper handling, negligent maintenance, abusive use or use contrary to the manufacturer's instructions;
- damage caused by a commercial, professional or collective use of the article (the warranty validity will be reduced to six (6) months when the article is used professionally);
- damage resulting from an inappropriate packing and shipping of the article;
- all damage caused by modification, repair or alteration performed by
a third party without written permission by Velleman®. - Articles to be repaired must be delivered to your Velleman® dealer, solidly packed (preferably in the original packaging), and be completed with the original receipt of purchase and a clear flaw description.
- Hint: In order to save on cost and time, please reread the manual and check if the flaw is caused by obvious causes prior to presenting the article for repair. Note that returning a non-defective article can also involve handling costs.
- Repairs occurring after warranty expiration are subject to shipping costs.
- The above conditions are without prejudice to all commercial warranties.
The above enumeration is subject to modification according to the article (see article's manual).
NL



- DRAADLOOS WEERSTATION
- STATION MÉTÉO SANS FIL
- ESTACIÓN METEOROLÓGICA INALÁMBRICA
- DRAHTLOSE WETTERSTATION
- To all residents of the European Union
- Important environmental information about this product
- Safety Instructions
- General Guidelines
- Features
- Setting up your weather station
- Mounting the units
- a. The Base Station
- b. The Outdoor Station
- Description of the LCD
- a. Overview
- b. Weather icons
- c. Weather forecast icons
- d. Storm Warning Icon
- Note to pressure sensitivity setting for weather forecasting
- Programming your weather station
- a. Quick Display Mode
- b. Setting Modes
- c. Alarm Modes
- Cancelling the temperature alarm while sounding
- The outdoor weather alarm
- d. MIN / MAX Mode
- Troubleshooting
- Technical specifications
- © COPYRIGHT NOTICE
- Problemen en oplossingen
- d. Sturmvorhersage
- WIRELESS WEATHER STATION WITH DCF CLOCK AND OUTDO OR SENSOR
- WS1170
- Velleman® Service and Quality Warranty
- General Warranty Conditions Concerning Consumer Products (for EU):
- • Not covered by warranty:
- The above enumeration is subject to modification according to the article (see article's manual).
- NL
Brand : VELLEMAN
Model : WS1170
Category : Weather Station