
BS 1267 - Vacuum Cleaner CLATRONIC - Free user manual and instructions
Find the device manual for free BS 1267 CLATRONIC in PDF.

| Product type | Cylinder vacuum cleaner |
| Brand | Clatronic |
| Model | BS 1267 |
| Power supply | 220-240 V ~ 50 Hz |
| Rated power consumption | 1600 W |
| Maximum power consumption | 2000 W |
| Protection class | II |
| Suction power | Variable from min to max |
| Dust container | With dust bag (not supplied) |
| Bag full indicator | Yes, red indicator |
| Motor filter | Washable (every 10 bag changes) |
| Exhaust filter | Washable |
| Suction tube | Telescopic, height adjustable |
| Included accessories | Floor nozzle, crevice tool/bristle brush 2 in 1, upholstery nozzle |
| Accessory holder | On the suction tube |
| Cable length | Approx. 5 m (unwind to the yellow mark) |
| Cable storage | Automatic rewinder with storage button |
| Dimensions (W x D x H) | Approx. 40 x 30 x 30 cm |
| Weight | Approx. 4.5 kg |
| Warranty | 24 months |
| Safety | Do not vacuum liquids, hot ashes, or sharp objects; disconnect before maintenance |
| Maintenance | Clean filters with warm water without detergent, fully dry before reinstalling |
Frequently Asked Questions - BS 1267 CLATRONIC
User questions about BS 1267 CLATRONIC
0 question about this device. Answer the ones you know or ask your own.
Ask a new question about this device
Download the instructions for your Vacuum Cleaner in PDF format for free! Find your manual BS 1267 - CLATRONIC and take your electronic device back in hand. On this page are published all the documents necessary for the use of your device. BS 1267 by CLATRONIC.
USER MANUAL BS 1267 CLATRONIC
Overview of the Components.. 3
Instruction Manual.. 26
Technical Data Page 28
Guarantee
FRANÇAIS
JEZYK POLSKI
Sommaire
D-47906 Kempen/Germany

Limpe as components.
Causa possivel:
Sett inn ny stovsugerpose.
eller
Mulig arsak:
Filtrene er urene.
Tiltak:
Rengjor bestanddelene.
Mulig arsak:
General Safety Instructions
Read the operating instructions carefully before putting the appliance into operation and keep the instructions including the warranty, the receipt and, if possible, the box with the internal packing. If you give this device to other people, please also pass on the operating instructions.
- The appliance is designed exclusively for private use and for the envisaged purpose. This appliance is not fit for commercial use. Do not use it outdoors (except if it is designed to be used outdoors). Keep it away from sources of heat, direct sunlight, humidity (never dip it into any liquid) and sharp edges. Do not use the appliance with wet hands. If the appliance is humid or wet, unplug it immediately.
- When cleaning or putting it away, switch off the appliance and always pull out the plug from the socket (pull on the plug, not the cable) if the appliance is not being used and remove the attached accessories.
- Do not operate the machine without supervision. If you should leave the workplace, always switch the machine off or remove the plug from the socket (pull the plug itself, not the lead).
- Check the appliance and the cable for damage on a regular basis. Do not use the appliance if it is damaged.
- Do not try to repair the appliance on your own. Always contact an authorized technician. To avoid the exposure to danger, always have a faulty cable be replaced only by the manufacturer, by our customer service or by a qualified person and with a cable of the same type.
- Use only original spare parts.
- Pay careful attention to the following "Special Safety Instructions".
Children and Frail Individuals
- In order to ensure your children's safety, please keep all packaging (plastic bags, boxes, polystyrene etc.) out of their reach.
Caution! Do not allow small children to play with the foil as there is a danger of suffocation!
- In order to protect children or frail individuals from the hazards of electrical equipment, please ensure that this device is only used under supervision. This device is not a toy. Do not allow small children to play with it.
Special Safety Instructions
- Do not suck up liquids!
- Do not suck up hot ashes or pointed or sharp objects!
- Do not use the appliance in humid rooms!
- Never use without the filter. Check that the filter is inserted correctly!
- Hair, clothing and body parts away from the vacuum nozzle during use!
- Keep the vacuum cleaner away from sources of heat like radiators, ovens, etc.!.
Overview of the Components
1 Air Slide
2 On/off switch / Vacuum power regulator
3 Carrying handle
4 Cable-winding key
5 Dust bag compartment
6 Dust bag fi lling display
7 Handle for opening the dust bag compartment
8 Filter cover - Outlet filter
9 Hose connection
10 Vacuum hose
11 Suction tube
12 Floor nozzle
13 Accessory compartment (2-in-1" nozzle)
14 Upholstery nozzle
15 Accessories holder
16 Parking assistance
17 Hook on the suction tube
Start-up
- Insert the connection head of the suction hose into the hose connector (9) until it locks in place. To do so, please press the buttons simultaneously. In order to release the hose again, please press the buttons once more on the connection head.
- Keep the buttons pressed down and then pull out the hose.
- Insert the vacuum tube (11) into the handle if required.
Telescope Vacuum Pipe
The height-adjustable vacuum pipe enables individual alignment to your height.
- Unlock the coupling by pressing the key in the direction of the arrow.
- Slide the vacuum pipe to the desired length.
- To lock the device, release the key until you hear it lock in place.
Using the Appliance
- Unwind the length of cable you require.
- Insert the mains plug into a correctly installed 230V,50Hz power socket. Turn the vacuum cleaner on by pressing the on/off switch (2) down with your foot.
- Set the vacuum power with the vacuum power regulator (2) (min to max).
- Vacuum at a steady speed. There is no need to exert pressure.
Attention: pay attention to the range that can be covered with the cable length.
Accessory compartment / Accessories holder
The accessories (crevice and brush nozzle) are located in the accessory compartment (13) next to the cable duct. If necessary, attach the accessories if required to the accessory holder (15) on the suction tube.
Vacuum power regulator (2)
Low vacuum power: For curtains and delicate fabrics
Medium vacuum power: For long-pile velour carpets and textile flooring
High vacuum power: For sturdy rugs and floors
Cable winding device
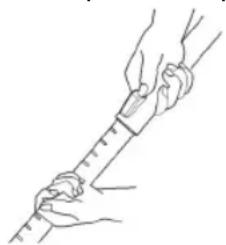
Pull out the cable up to the maximum length indicated with the yellow mark. Never pull the cable out up to the red mark as the cable winding can be damaged. Said damages are not covered by the warranty.
Winding
Press the carrying handle (3) down with your foot above the symbol with the plug and guide the cable into the device. Hold the cable to avoid wrapping.
Nozzle Attachment
| Crevice and jointed nozzle: | For vacuuming upholstery, curtains and in corners and crevices etc. “2-in-1” nozzle: When this is folded together it can be used as a groove nozzle. If you would like to use the brush nozzle, pull the brush section in the direction of the arrow until it locks in place. | |
| Upholstery nozzle: For cleaning upholstery, curtains etc. | ||
| Floor nozzle: To clean | carpets or smooth surfaces. | |
| Smooth floors: | Press down the lever with the brush symbol with your foot. The brush is now visible. | |
| Carpets: | Press the lever In the opposite direction. The brushes are now retracted. | |
| Releasing the nozzles: | Pull these off while turning slightly. | |
Air Slide (1)
Open the air slide on the hose handle in order to regulate the airflow or to clear any particles sticking to the nozzle.
Dust bag replacement display (6)
Hold the hose up into air. If the display is red the bag is full. Please replace it.
Changing the dust bag
- Pull the plug out of the socket.
- Open the lid of the dust bag compartment by the handle (7) (the cover must click into place).
- Remove the bag by carefully pulling the clamp towards the front so that the bag becomes more accessible. Then remove the dust bag by pulling it upwards.
- Insert a new bag. Please ensure that the bag is located correctly in the guide mechanism. Then reinsert the retainer. Close the cover so that it snaps into place.
Filter
Your appliance has two filters.
Motor protection fi iter (inlet fi iter)
The inlet fi ler is located in the dust bag compartment. The fi liter is located vertically in the rear section of the dust housing. Pull the motor protection fi liter upwards and remove it. Clean the engine protection fi liter after 10 dust bag changes. If necessary, the fi liter can also be washed in warm water without any additives. Place it back into place only once it is completely dry! Please push the motor protection fi liter back under the struts and into the guide mechanisms on the edge so that it is correctly positioned.
Outlet filter
The appliance is also equipped with an outlet fi liter. This fi liter is to be found under the fi liter cover (8).
Press the lever on the upper edge of the ventilation grille downwards in order to open it.
Then pull the grille out towards the front. Remove the fi liter and clean as described above. Please re-insert the fi liter correctly and close the ventilation grille (until it clicks in place).
Cleaning and storage
Cleaning
- Pull the plug out of the socket before cleaning!
- Clean the casing with a dry cloth.
Storage
- Let the iron cool down completely.
- Wind the cable completely.
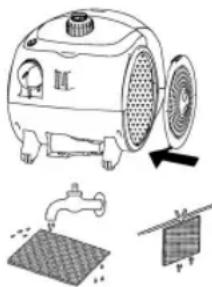
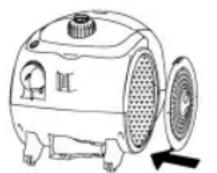
- Position the device horizontally. Please suspend the hook (17) of the floor nozzle in the parking aid (16) on the back of the device.
Troubleshooting
The Device Does Not Work.
Remedy:
Check the connection to the mains.
Check the position of the switch.
The device does not suck up anything.
Possible
Cause:
The suction power is set too low.
Remedy:
Check the position of the control switch.
Possible
Cause:
The dust bag is full.
Remedy:
Renew the dust bag.
or
Possible Cause: The fi tters are di
Remedy: Clean the components.
Possible Cause:
There is a foreign body in the suction tube or the nozzle.
Remedy: Check the accessories for foreign bodies.
Noise development
The sound pressure level in the ear of an operator (LpA) was measured according to DIN EN ISO 3744.
Sound pressure level detected: 82.0 dB(A) (no limit)
Technical Data
Model: .BS 1267
Power supply: 220-240 V, 50 Hz
Power consumption:
Pn 1600W
Pmax 2000W
Protection class: II
This device has been tested according to all relevant current CE guidelines, such as electromagnetic compatibility and low voltage directives, and has been constructed in accordance with the latest safety regulations.
Subject to technical changes without prior notice!
Guarantee
The device supplied by our Company is covered by a 24 month guarantee starting on the date of purchase (receipt).
During the life of the guarantee any fault of the device or its accessories ascribable to material or manufacturing defects will be eliminated free of charge by repairing or, at our discretion, by replacing it. The guarantee services do not entail an extension of the life of the guarantee nor do they give rise to any right to a new guarantee!
Proof of the guarantee is provided by the proof of purchase. Without proof of purchase no free replacement or repair will be carried out.
If you wish to make a claim under the guarantee please return the entire machine in the original packaging to your dealer together with the receipt.
Defects to consumables or parts subject to wearing as well as cleaning, maintenance or the replacement of said parts are not covered by the guarantee and hence are to be paid!
The guarantee lapses in case of unauthorized tampering.
After the expiry of the guarantee
After the expiry of the guarantee repairs can be carried by the competent dealer or repair service against the payment of the ensuing costs.
Meaning of the "Dustbin" Symbol
Protect our environment: do not dispose of electrical equipment in the domestic waste.
Please return any electrical equipment that you will no longer use to the collection points provided for their disposal.
This helps avoid the potential effects of incorrect disposal on the environment and human health.
This will contribute to the recycling and other forms of reutilisation of electrical and electronic equipment.
Information concerning where the equipment can be disposed of can be obtained from your local authority.
Regulator sily ssania (2)
Niski stopien ssania: Do fi ranek, materialow delikat-nych.
IOnKaJyNcta He BbITnBaIte CTeBOI ShHpy DaJIeE JeKlToI MetKN. H N B KOem Clyuae He BbITraBaIte erO Do KpaCHoI MetKN, 3TO MOKeT npBecTI K NOLOMKe MExaHn3Ma CMatbIbAHII. PIOObHle NoIOMKn He NoIaIOT nO rapaHTHO.
CmTaBHaHHe
HaKMnTe HoroHa pyky dIe nepeHoca (3) BbIe CmBOna WTeNcEbnHO BNKn NIOJTHNE Ka6JIb. DePKeHtne Ka6JIb KpENK Bo pykax, YTO6bl PpeDToBpaTntb erO XNeCTaHHe.
Hacaika-coTIO
Bo3duuHaHa 3acNoHka(1)
OTkpbBaB03DyUHyo 3acnoHky Ha pyKoTke Nblneocaca MoKHO peYnIPOBaTB CnIy NtOKa B03DyXa HIN OCBO6OHTb CONIO OT pNHCOCABuNXCRA K HeMy PpeDMTOB.
HnHaTOp CmHeB MeKa-tnBeNec6OpHnKa (6)
IpoBIMTe PbIEcOCHyIO Tpy6By B03dyx.Ecnn HnHnKaTOp KpaChbI, 3HaHT MeJOK-PbIEc6OpHNK NOHbI. 3aMeHInTe erO, noKaanyIcTa.
CmeHa MeSha-NbIeSc6OpHnKa
- BbHbTe cTeBvIb BNkY n3 pO3ETKn.
- OtkpoTe npn nOmoU pyuK (7) KpbIuKy oTceKa nbJeNc6OpHka (KpbIuKa dOnJHa BOHTB na3bl).
- BbHMaTe MeWOK-PbIeC6OpHNK, npn 3OM depXHtemeWOK 3a depXaTeJI N OCTopoXHO TAHNTE erO h Ce6raTAKIM Oba3OM, YTO6bl IeYue 6bIy OYXBaHTb cam MeWOK. BbTaUHe MeWOK-PbIeC6OpHNK BBepx.
BCTaBbTe HOBm MeIOK-NbIeC6OpHnK, npOBepbTe npaBnblHo JIN OH CnDNT B HAnpaBnHOuX. ONrTB BCTaBtB fNkCatop. 3akpoTe KpbUkY o6paTHo, do KNcaun.
ΦnIbTp
3JnKtPOnpN6Op OChaUeH DByMa 4nIbTpamM.
3aunTHbI ΦnIbTp MOTOPa (BXoHOn ΦnIbTp)
BxOJHOH FnIbTp HaxoHTcB O TCEKe MeuKa-tnEe6OpHka.
FnbTp pa3Meue Hen BepTKaJIbHo B 3aDHe N qactN Kopnyca
bIeococa.BtITnTe BBepx FnIbTp 3aunTb I DBratae N
BbIte erO.PoUHaIe erO npImepHO nocne KaJdo10
CmHbI MeuKa-TbIe6OBHIOCTN erO
MOHNO pOMbITB T eNo BOe, 6e3 DoabOK. BCTABnIe
ero o6paTHo TObKO nocne noHIOH npocywn! BCTABBe,
noKanyIcTa, FnIbTp 3aunTb I DBratae CHOba nod pacnopKn
IN HapBaBHIOUe No KpAHO TaKIM O6pa3OM, YTObI OH
npabNBo JIeR.
BbinyckHoi fNt
Kpome Bcero 3JIeKTPoPn6Op OCHaSeH BbIyNcKbIM ΦIbTpOM. BbHaJHeTe 3OT ΦIbTp NO KpbIkwOfΦIbTpA (8).
TtObblOTKpbITb BEHTINLAIOHHyopeWETKy,HaIaBnTE BHN3 pbIar HaBepxHem Kpae BeHTINLAIOHNOHpeWETKn.
Pocne 3TOBOBbIaHInTe peWETKyBnepd.BbIbTe FnIbTp n npOcnCTteero,Kak 3TOyXe bIIO ONCaHO.PoCb6a ONATb BCTaBnTb FnIbTpHaJIeKaUIMO6pa3OM N3aKpbITbBEHTINLAIOHHyOppeWETKy (TtO6blOHA3aFHKcnpOBaJacBkpenJeHHN).
UcTkaHxpaHeHne
UHCTka
- Pn60p He yHKUHOHpyET.
POMOUIb:
IpoBepbTe noDknHoueHne 3LeKtpoNtHaHn.
PpOBeBpe nOLOXKeHne BbIKIOUaTeIa.
- Pn60p He nbIeococnt.
Bo3MOxHa npHnHa:
YcTaHOBVeHa CnIuKoM Cna6aB MoUHocTb.
POMOULB:
IpoKoHTpOIpuPyTe noLoXeHne peryIaTopa.
Bo3MOxHnHa npuHnHa:
MeIOK-NbIeNc6OpHnK HAnIOHINJCA.
POMOUIB:
BCTaBbTe HOBbMeJIOK-PlJIeC6OpHIK.
HNN
Bo3MOxHa npHnHa:
ΦnIbTpbl 3acopnIncb.
POMOLIb:
IpoHCTnTE 3n DetaTAM.
Bo3MOxHa npuHa:
B BnIeCOHOM IJAAHRE INN CONJIe 3aCTPRAIO HOpOAnHOE TENO.
HOMOUB:
IpoKoHTpOInpyuTe Hx Ha HauNue HnOpOdbx TeT.
TexHnueckne daHHbIe
Moienb: BS 1267
3JIeKTPoPMTaHHe: 220-240B,50T
Iotpe6JIReMaM MOUHOCtB:
P nom: 1600 BaT
P max 2000 BaT
Klacc 3aunTbI: II
3To H3deneHHe npoJIO BCE Heo6xOaMbIe n AkTyalbHbIe npOBepKn, npEtnCaHbIe DnpeKTHBOI CE, K npm. Ha 3JIeKTPOMaHTHyO COBMeCTMOCt b COOTBetCTBne Tpe6oBaHmK Hn3KOBoTbHO TexHKe, OHO 6blIO TaKKe CCKHOpyuPoBaHO n NOcTpoEHO C yYeTOM NocJeHNX Tpe6oBaHmNo TEXHKe 6e3OnaNCHOTN.
Mbl octabnem 3a coboi npabo HA texhueckne n3mehenra!
TapaHTHnHOe 683aTeNbCTBO
TapaHnHbI cpoK Ha TeppHTOpIN PocCnCKo FedepaunnyCTaHaBnBaetcN NlHOMOuHbIMn PpeCTaBnTeJAMN.
KaccobyuekRBnreTcraapHnHbIM TaHOHm.8e3 HEOB03MOKeH 6ecIaTHbI pMoHT HIN 3aMeHa H3dEInr.
B cnyae BO3HNKHOBJHn npTeH3n no rapaHTn, npeJbRbTE H3dJIne B pONHOHOMNKeTauHH, C opHnHaJIbHOyNAHOBKO IN KACCObbIM YekOM TOPOBTOUKe, PpOdaBWeI 3To H3dJIne.
DeΦeKtby 3HaWbAebMIX pInHApIeXHOCTe HIN TpyuNXcB DeTanei, a TaKKe YnCTKa, TexOcLyKbAHne HIN 3aMeHa TpyuNXC DeTanei He NoJaIOT nOd rapaHTIO, I NO3ToMy npOBoADTCa OTDenbHyO ONnATy!
TapaHTN TepReTc npB BCKpbITn H3dJIIN NOCTOPOHHIMNIIaMn.
Pocne rapaHTM
Iocne oKoHuaHnCpoka rapaHTnn,peMOHT n3denn npOn3BODNTc3a OnNAty, COOTBetCTByUOuMMM MaCTepCKMN nnnyHKtAmn CepBnCHOrO 06cLyKbHaHH.

CAtRONICINTERNATIONAL GMBH
D-47906 Kempen/Germany · Industriering Ost 40 Internet: http://www.clatronic.de · email: info@clatronic.de

- FRANÇAIS
- JEZYK POLSKI
- Sommaire
- General Safety Instructions
- Children and Frail Individuals
- Special Safety Instructions
- Overview of the Components
- Start-up
- Telescope Vacuum Pipe
- Using the Appliance
- Accessory compartment / Accessories holder
- Vacuum power regulator (2)
- Cable winding device
- Winding
- Air Slide (1)
- Dust bag replacement display (6)
- Changing the dust bag
- Filter
- Motor protection fi iter (inlet fi iter)
- Outlet filter
- Cleaning and storage
- Cleaning
- Storage
- Troubleshooting
- The Device Does Not Work.
- The device does not suck up anything.
- Noise development
- Technical Data
- Guarantee
- After the expiry of the guarantee
- Meaning of the "Dustbin" Symbol
- Regulator sily ssania (2)
- CmTaBHaHHe
- Bo3duuHaHa 3acNoHka(1)
- HnHaTOp CmHeB MeKa-tnBeNec6OpHnKa (6)
- CmeHa MeSha-NbIeSc6OpHnKa
- ΦnIbTp
- 3aunTHbI ΦnIbTp MOTOPa (BXoHOn ΦnIbTp)
- BbinyckHoi fNt
- UcTkaHxpaHeHne
- UHCTka
- - Pn60p He yHKUHOHpyET.
- - Pn60p He nbIeococnt.
- TexHnueckne daHHbIe
- TapaHTHnHOe 683aTeNbCTBO
- Pocne rapaHTM
- CAtRONICINTERNATIONAL GMBH
Brand : CLATRONIC
Model : BS 1267
Category : Vacuum Cleaner