Baboo - Car seat CONCORD - Free user manual and instructions
Find the device manual for free Baboo CONCORD in PDF.
| Brand | CONCORD |
| Model | Baboo |
| Product type | Child car seat |
| Usage | From birth to 18 months (up to 13 kg) |
| Seat weight | Approximately 4.5 kg |
| Safety standard | Compliant with ECE 44 standard, series of amendments 03 |
| Installation | Rear-facing, 3-point safety belt (without airbag) |
| Functions | Carrycot, rocking cradle, seat, manual transport (4 handle positions) |
| Harness | 5-point, adjustable in 3 heights, centralized |
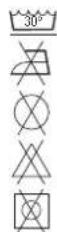
| Care | Machine-washable cover at 30°C (delicate cycle) |
| Compatible accessories | MINI/MINI-PLUS reducer, Shady 2 sunshade, Sloomy cocoon |
| Warranty | According to legal requirements of the country of purchase |
| Recommended lifespan | 4 years maximum |
| Spare parts | Cover, straps, shoulder pads (CONCORD original accessories) |
| Repairability | After an accident, the seat must be inspected by the manufacturer |
Frequently Asked Questions - Baboo CONCORD
User questions about Baboo CONCORD
0 question about this device. Answer the ones you know or ask your own.
Ask a new question about this device
Download the instructions for your Car seat in PDF format for free! Find your manual Baboo - CONCORD and take your electronic device back in hand. On this page are published all the documents necessary for the use of your device. Baboo by CONCORD.
USER MANUAL Baboo CONCORD
natural_image
Black and white photo of a baby car seat with straps and seatbelt (no text or symbols visible)D Einbau- und Bedienungsanleitung
GB Instructions for fitting and use
NL Montage - en gebruiksaanwijzing
DK Monterings - og brugervejilednig
F Instructions de Montage et Mode d'Emploi
CZ Montážní návod a návod k obsluze
CONCORD®
natural_image
Line drawing of a baby car seat with adjustable straps and seatbelt (no text or symbols)BABOO
| Kindergewichtchild's weight | - 13 kg- 13 kg |
| ca. AlterApprox. age | - 18 Monate- 18 months |
| ECE GruppeECE group | 0 +0 + |
Deutsch D
To ensure the maximum efficiency of your child car safety seat after the exchange of the covers or spare parts ask your retailer about following information:
natural_image
Three technical line drawings of car seatbelt components (no text or symbols)CONCORD
natural_image
Line drawing of a baby car seat with adjustable straps and a strap (no text or symbols)Deutsch
CONCORD BABOO
Installing Baboo in the car page 9
Securing the baby in Baboo page 10
Adjusting the harness page 11
Adjusting the handle mode page 11
GENERAL
How to care for Baboo page 12
Important information page 12
Please note page 14
Accessories page 14
Guarantee page 15
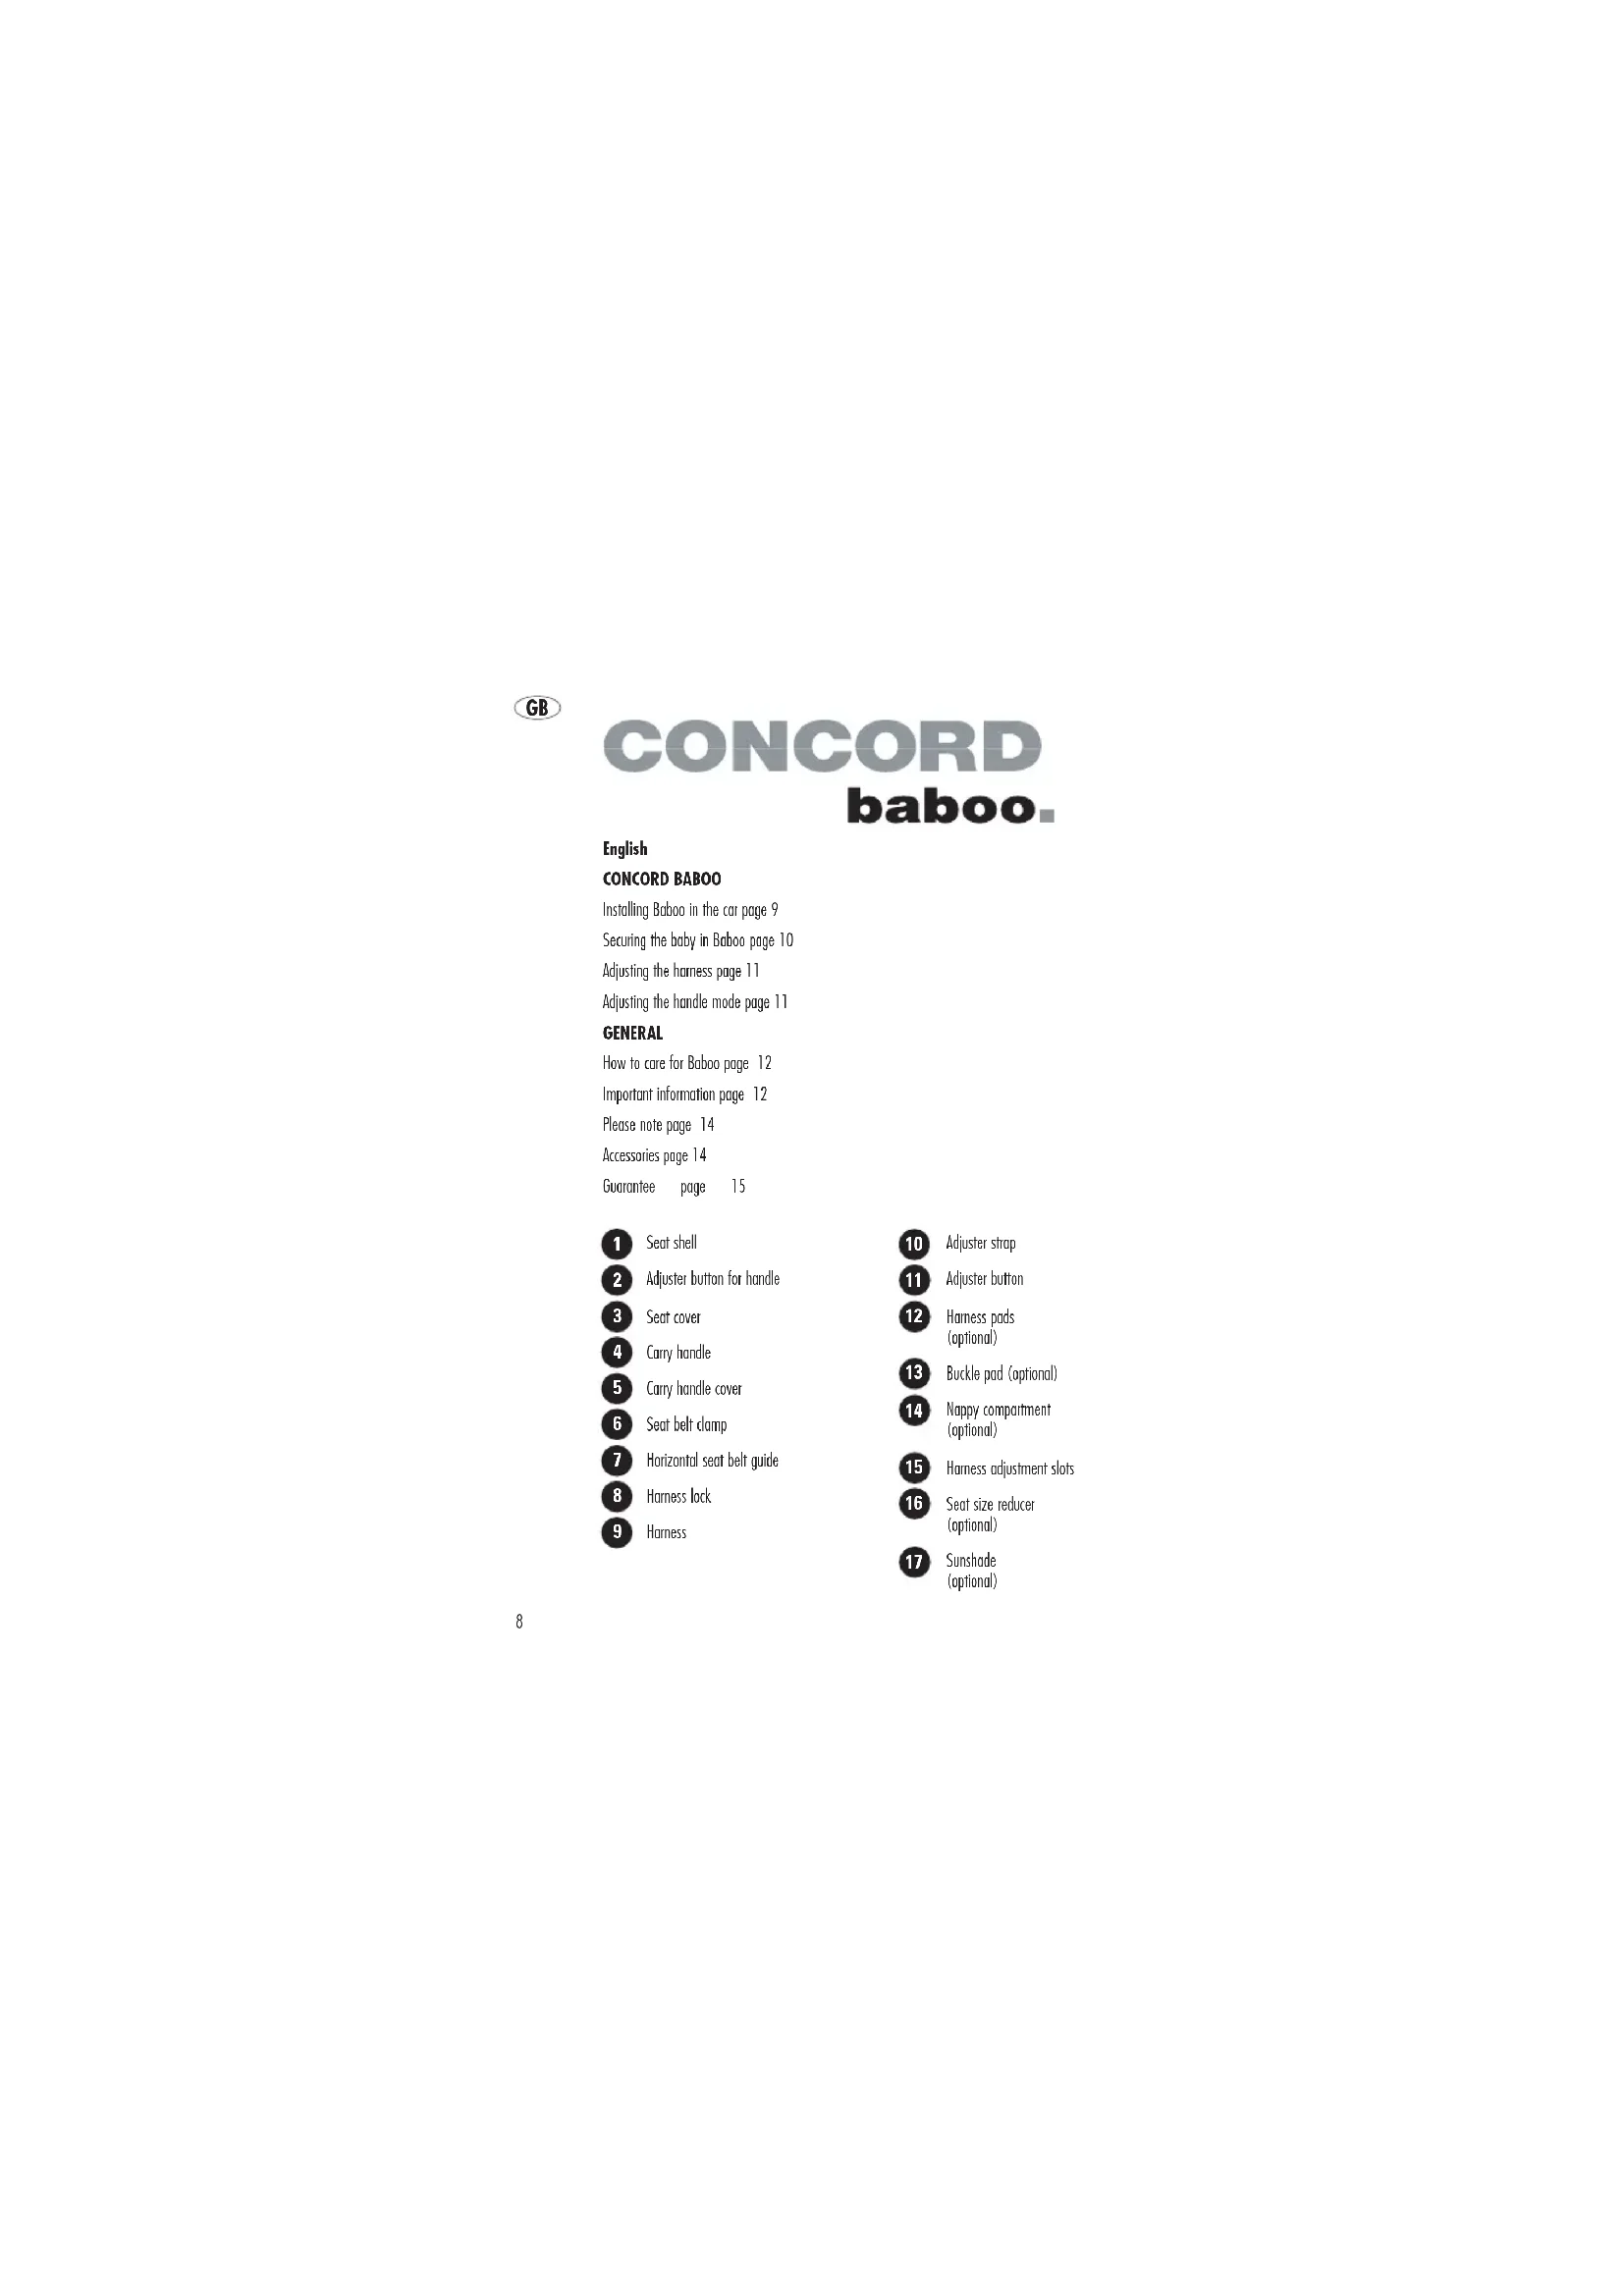
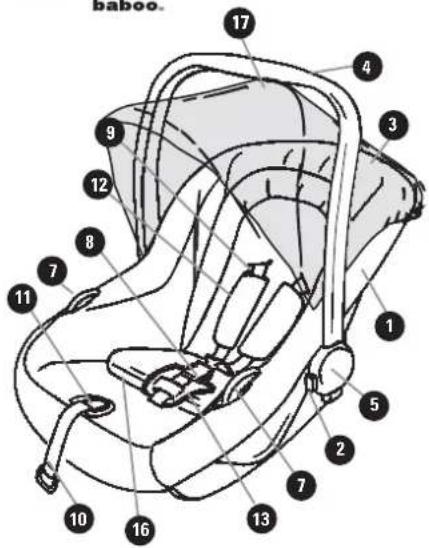
1 Seat shell
2 Adjuster button for handle
3 Seal cover
4 Carry handle
5 Carry handle cover
6 Seat belt clamp
7 Horizontal seat belt guide
8 Harness lock
9 Harness
10 Adjuster strap
11 Adjuster button
12 Harness pods (optional)
13 Buckle pod (optional)
14 Nappy compartment (optional)
15 Harness adjustment slots
16 Seat size reducer (optional)
17 Sunshade (optional)
Congratulations on the arrival of your new baby.
We hope you enjoy every moment of such a special time. To protect and safeguard your baby on journeys you have chosen our CONCORD Baboo seat, a product manufactured to a strict regime of quality controls.
But the seat's optimum safety features can only be exploited if it is properly used, so please adhere to the instructions on how to correctly install and use it.
Baboo can be used on any seat in the car fitted with a three point belt but not fitted with an airbag. Based on accident statistics, we recommend the seat behind the front passenger seat.
Baboo is ECE 44 approved and is suitable for babies up to approx. 18 months old (up to 13 kg body weight).
Installing Baboo in the car
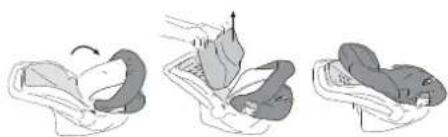
Put Carry handle (4) in position A (Fig. 1).
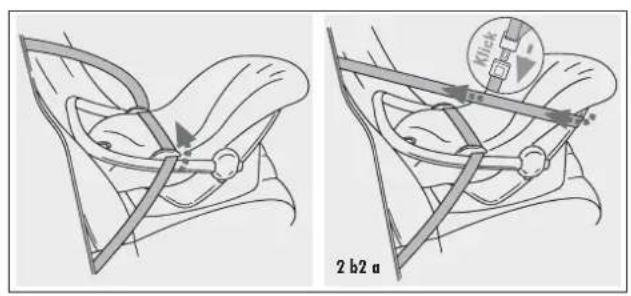
Always install Baboo in a rear facing position (Fig. 2).
There are two installation options, option 2 is always to be recommended for vehicles with shorter seat-belts.
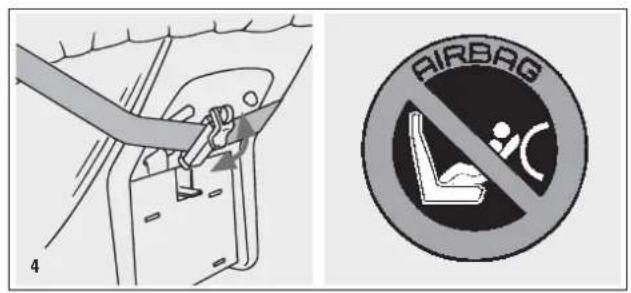
Option A: Pull the horizontal car seat belt through the horizontal belt guides (7) marked blue and fasten (Fig. 2a+b). Open diagonal seat belt clamp (6) at back of Baboo (Fig. 4).
Tighten horizontal seat belt and place diagonal seat belt around back of Baboo (Fig. 2).
Tighten diagonal seat belt and put into blue belt clamp (6) (Fig. 4). The front edge of Baboo and the edge of the handle should touch the seat back (Fig. 2). Close seat belt clamp (Fig. 4).
GB
Option B: Open diagonal seat belt clamp (6) on back of Baboo (Fig. 4).
Pull out diagonal seat belt all the way, placing it around the back of Baboo. Now pull horizontal seat belt through blue horizontal guides (7), finishing by fastening seat belt (Fig. 3).
Tighten horizontal seat belt. Tighten diagonal seat belt and put into blue belt clip (6) (Fig. 4). The front edge of Baboo and the edge of the handle should touch the seat back (Fig. 3). Close seat belt clamp (Fig. 4).
Please make sure that the seat belt is tight and flush, not twisted. Figures 2b and 3b show the correct position of the seat belt, the diagonal seat belt should always be passed beneath the carry hand cover (5) on the lock side.
The diagonal and horizontal elements of the car seat belt must not be mixed up.
Securing your baby in Baboo
Children should never be left unattended in Baboo.
Open harness lock (8) by pressing the red button (Fig. A).
Carefully place the baby in the seat and arrange comfortably.
For smaller babies we recommend using the seat size reducer,
available as an accessory.
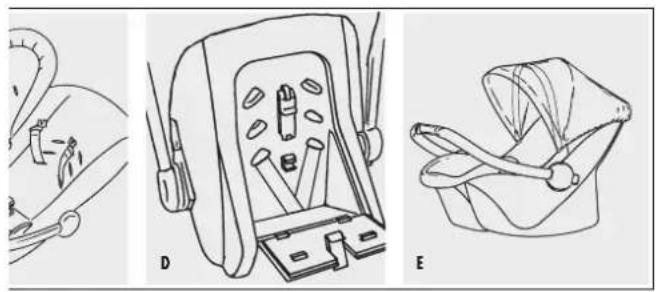
Place harness (9) over baby's shoulders and insert both elements into lock (8), making a distinct click (Fig. A).
Shorten the harness by pulling the adjuster strap (10). The harness should firmly hug the child's body (Fig. B).
The harness must not be twisted.
The seat must no longer be used when the top of the baby's head reaches the top edge of the seat shell.
Adjusting the harness
The harness has three settings for adjusting to the body size of the baby. The harness should come out of the shell's openings (15) at approx. height of baby's shoulders (Fig. C + D). In order to adjust the harness the straps are simply inserted through the appropriate holes in the shell (Fig. D). In the case of seats fitted with a nappy compartment, the compartment door (14) must be open. The harness must not be twisted or crossed.
Loosening the harness: Press the adjuster button (11) at the front edge of Baboo, at the same time pulling the harness (9) (Fig. B).
Tightening the harness: Pull adjuster strap (10) until harness is tight (Fig. B).
Adjusting the handle mode
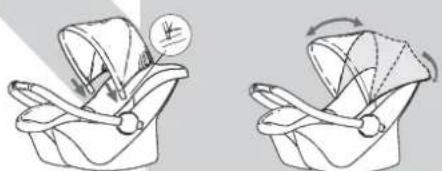
The handle has 4 modes (Fig. 1).
1 Automatic mode
2 Carrying mode
3 Rocking mode
4 Sitting mode
The handle is swung forwards or backwards by pressing the buttons (2) on both sides of the handle at the same time. In positions B, C and D the buttons automatically spring back out.
Adaptation of the Baboo for bigger babies
If the Baby has a weight of about 9 kg the styrofoam pelvis inlay can be removed in order to adapt the seat to the size of the baby.
GB
To remove:
Open harness system remove shoulder pads and pull backside of the cover forward.
The pelvis inlay now can be taken out in an upper direction.
Afterwards pull the harness through the cover, re-attach the belt padding and pull cover over the shell.
How to care for Baboo
The cover (3) is removable and can be washed at 30 °C in the delicates cycle. For further instructions see label.
Remove cover from rim and adjuster button (11), carefully pulling harness through holes in cover. Put cover back on in reverse sequence, taking care not to twist harness.
When purchasing Baboo we recommend buying a spare cover straight away so that Baboo is always ready for use.
Important information
- The safety of your child is only assured if the instructions for installation and use are adhered to.
- The straps must be tight, flush and not twisted, and are to be protected from damage.
- Parts of the seat which are not covered by fabric must be protected from direct sunlight so that your baby does not burn itself.
- The child holding system must not be damaged or trapped by movable parts within the interior of the vehicle.
-
Do not effect any changes to the holding system. This jeopardises the safety of the baby and the seat will no longer be certified.
-
Following any accident, the entire seat is to be replaced or returned to the manufacturer, accompanied by an accident report, for checking purposes.
- Please instruct other passengers as to how baby is freed in event of accident or danger.
- Do not leave your baby in Baboo unattended or unsecured.
- The instructions for using the seat must always accompany it.
- The use of any accessories or replacement parts is not permissible and negates all guarantees and claims for liability. This does not apply to any original or special accessories from CONCORD.
- The child holding system may not be used without the seat cover. The seat cover should not be replaced with a cover other than one recommended by the manufacturer because the cover constitutes an important element of the overall seat.
- Suitable for vehicles with 3 point seat belts tested to ECE regulation R 16 or a comparable standard.
- In order to reduce risk of injury in the event of an accident, secure other passengers as well as luggage and other items.
- If you should notice any wear and tear or damage to the seat it is advisable to have the seat checked.
- Moreover, please heed the notes on transporting children stated in your vehicle handbook.
- The manufacture is only able to guarantee the safety of your baby if the seat is used by the initial purchaser. For this reason you are recommended not to purchase a second hand seat.
- Heavy use may impair the quality of Baboo. Baboo should therefore be used for no longer than 4 years from time of purchase.
- Do not place Baboo on any raised surfaces, the seat may fall down, injuring your child.
- Baboo may not be used on car seats fitted with an airbag.
Please note
- Only suitable for vehicles with 3 point seat belts approved to ECE regulation 16 or a comparable standard.
- This is a universal child safety item, approved for general use in vehicles in accordance with ECE regulation 44, revised series 03 and fitting most, but not all, car seats.
- The seat will be properly installed if the vehicle manufacturer states in the handbook that the vehicle is suitable for the installation of a universal child safety system for the age group in question.
- This safety system has been classified according to stricter conditions than previous versions not designated UNIVERSAL.
- In the event of questions, please contact the manufacturer of the system or the retailer for advice or information.
- When washed or in contact with any moisture, the cover fabric may fade slightly.
Accessories
• MINI, MINI-PLUS seat size reducer
• SHADY 2 sunshade
• SLOOMY winter foot muff
Mounting instructions for Shady 2 sun canopy:
Attach the Shady 2 behind the covers and fix both clips in the notches on the left and right. The Shady 2 can be adjusted in two positions. When doing this, you should check carefully whether both clips remain firmly located in the notches, as these can easily be loosened through frequent adjustment.
natural_image
Illustration of two different types of baby seat designs with arrows indicating rotation (no text or symbols)Warranty
The warranty period shall commence at the time of purchase. The warranty period shall correspond to the duration of the applicable statutory warranty period for the sale of child seats in the respective end user country. Depending on the wishes of the manufacturer, the warranty shall cover rectification, replacement or a price reduction.
The warranty is only valid for the initial purchaser.
Should a defect occur, warranty rights shall only apply if the specialist retailer is notified of the defect immediately after its initial occurrence. If the specialist retailer cannot solve the problem, then it must return the product with an exact description of the problem and official proof of purchase.
The manufacturer shall assume no liability for damage to products which it did not supply.
Warranty shall lapse if:
• the product was altered.
- the product is not returned complete with proof of purchase to the retailer within 14 days of the defect occurring.
- the defect occurred due to incorrect operation or maintenance or anything else deemed to be the fault of the user, or when the user instructions have not been adhered to.
• repairs to the product have been carried out by third parties.
- the defect has occurred as the result of an accident.
- the serial number has been damaged or removed.
Alteration to or deterioration of the product which occurs due to normal wear and tear is not covered by the warranty.
Any corrective action taken by the manufacturer in response to a warranty claim does not extend the duration of warranty.
NL
CONCORD baboo.
Nederlands
CONCORD BABOO
natural_image
Illustration of two different types of baby car seat designs, showing fold changes with arrows indicating movement (no text or symbols)NL
Garantie
natural_image
Three-step illustration showing a hand performing a seated posture with a triangular head and arrow indicating rotation (no text or symbols)natural_image
Illustration of two different types of baby seat designs with arrows indicating rotation (no text or symbols)DK
Garanti
natural_image
Three-step illustration showing a person performing a neck massage or exercise (no text or symbols present)natural_image
Illustration of two different types of clothing or accessories with curved arms and a leaf, shown from different angles (no text or symbols)F
Garantie
natural_image
Three-step illustration showing a hand pressing down on a seatbelt, with no text or symbols present.natural_image
Illustration of two different types of baby car seat designs, showing fold changes (no text or symbols)CZ