
Adventure 7 - Exercise bike Horizon Fitness - Free user manual and instructions
Find the device manual for free Adventure 7 Horizon Fitness in PDF.
| Product Type | Treadmill |
| Brand | Horizon Fitness |
| Model | Adventure 7 |
| Power Supply | 220-240 V, 50/60 Hz |
| Maximum Speed | 16 km/h |
| Maximum Incline | 12% |
| Maximum User Weight | 150 kg (estimated) |
| Display | LCD screen displaying time, distance, speed, calories, incline, and heart rate |
| Programs | Manual, Speed Intervals, Peak Intervals, Weight Loss, Calories, Distance, Steps, Target Heart Rate, Custom |
| Connectivity | Wi-Fi (xID/ViewFit account), 3.5 mm audio jack, Passport reader (optional) |
| Speakers | Integrated into console |
| Heart Rate Sensors | Handgrip touch sensors + compatible chest strap (not included) |
| Safety | Safety key, anti-fall safety clip, lock pedal |
| Maintenance | Periodic lubrication of the running belt, belt alignment and tension, cleaning of the console and frame |
| Spare Parts | Available from the manufacturer (Johnson Health Tech) |
| General Information | Manufacturer: Johnson Health Tech, Made in China |
Frequently Asked Questions - Adventure 7 Horizon Fitness
User questions about Adventure 7 Horizon Fitness
0 question about this device. Answer the ones you know or ask your own.
Ask a new question about this device
Download the instructions for your Exercise bike in PDF format for free! Find your manual Adventure 7 - Horizon Fitness and take your electronic device back in hand. On this page are published all the documents necessary for the use of your device. Adventure 7 by Horizon Fitness.
USER MANUAL Adventure 7 Horizon Fitness
There are several areas during the assembly process that special attention must be paid. It is very important to follow the assembly instructions correctly and to make sure all parts are firmly tightened, if the assembly instructions are not followed correctly, the treadmill could have frame parts that are not tightened and will seem loose and may cause irritating noises. To prevent damage to the treadmill, the assembly instructions must be reviewed and corrective actions should be taken.
Before proceeding, find your treadmill's serial number located on the front stabilizer tube and enter it in the space provided below. Also locate the model name which is next to the serial number.
ENTER YOUR SERIAL NUMBER AND MODEL NAME IN THE BOXES BELOW:

text_image
SERIAL NUMBER: MODEL NAME: HORIZON TREADMILL
text_image
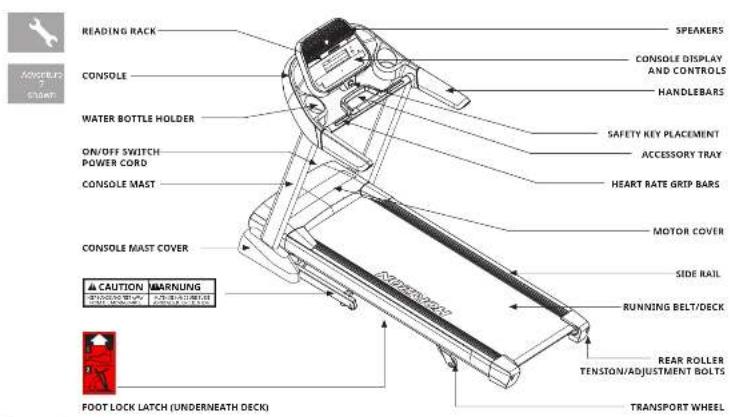
READING RACK CONSOLE WATER BOTTLE HOLDER ON/OFF SWITCH POWER CORD CONSOLE MAST CONSOLE MAST COVER CAUTION MARNUNG FOOT LOCK LATCH (UNDERNEATH DECK) SPEAKERS CONSOLE DISPLAY AND CONTROLS HANDLEBARS SAFETY KEY PLACEMENT ACCESSORY TRAY HEART RATE GRIP BARS MOTOR COVER SIDE RAIL RUNNING BELT/DECK REAR ROLLER TENSION/ADJUSTMENT BOLTS TRANSPORT WHEELH213_AU_Akt_1_3_5_7_r1_Dundd 4-570305 291 FM
TOOLS INCLUDED:
□ T-Wrench (included) □ L-Wrench (included)
PARTS INCLUDED:
□ 2 Console Masts
□ 1 Console Assembly
□ 2 Console Mast Covers
□ 2. Handlebars
1. Hardware K
1 Safety Key
□ Safety Key
□ 1. Balance Card
□ POWER GAS
□ 1 Audio Adapter Cable
□ 1 Bottle of Silicone Lubricant
(for 2 applications)

NEED HELP?
If you have questions or if there are any missing parts, contact Customer Tech Support. Contact information is located on the back cover of this manual.
PRE ASSEMBLY
UNPACKING
Place the treadmill carton on a level flat surface. It is recommended that you place a protective covering on your floor. Take CAUTION when handling and transporting this unit. Never open box when it is on its side. Once the banding straps have been removed, do not lift or transport this unit unless it is fully assembled and in the upright folded position, with the lock latch secure. Unpack and assemble the unit where it will be used. The enclosed treadmill is equipped with high-pressure shocks and may spring open if mishandled. Never grab hold of any portion of the incline frame and attempt to lift or move the treadmill.

WARNING
• DO NOT ATTEMPT TO LIFT THE TREADWILL! Do not move or lift treadmill from packaging until specified to do so in the assembly instructions. You may ignore the plastic waste from consumer plants.
• FAILURE TO FOLLOW THESE INSTRUCTIONS COULD RESULT IN INJURY!

IMPORTANT NOTES
- During each assembly step, ensure that ALL nuts and bolts are in place and partially threaded. It is recommended you complete the full assembly of your unit before completely tightening any ONE bolt.
- Several parts have been pre-lubricated to aid in assembly and usage. Please do not wipe this off. If you have difficulty, a light application of lithium bike grease is recommended.


ASSEMBLY STEP 1 (Adventure 7)

text_image
Technical diagram of a treadmill with labeled parts and directional arrows indicating movement or assembly.HARDWARE FOR STEP 1
| PART TYPE DESCRIPTION QTY | |||
| A BCLT MBSX1.25FXGDL3CL 3 | |||
A Cut the yellow banding straps and lift the running deck upward to remove all contents from underneath the running deck.
B Open HARDWARE FOR STEP 1.
C Attach LEFT CONSOLE MAST (1) to MAIN FRAME (2) using 3 BOLTS (A) and do not tight these 3 BOLTS (A).
D Carefully slid down the LEFT CONSOLE MAST COVER (3) to LEFT CONSOLE MAST (1).
NOTE: Do not assemble CONSOLE MAST COVER BOLTS (I) at this step.
ASSEMBLY STEP 2 (Adventure 7)

text_image
Technical diagram of a treadmill with numbered components and an inset showing a close-up view of the handle.HARDWARE FOR STEP 2
| PART TYPE DESCRIPTION QTY | ||
| A BOLT M8X1.25PX0CL 30L 3 |
A Pull the BASE CABLE (5) away from the treadmill base frame. Connect the CONSOLE CABLE (5) from the MAIN FRAME (4) to the CONSOLE CABLE (5) in the bottom of the RIGHT CONSOLE MAST (6). The other end of the CONSOLE CABLE (10) should be located at the top of the mast.
B. Open HARDWARE FOR STEP 2.
C Attach RIGHT CONSOLE MAST (6) to MAIN FRAME (4) using 3 BOLTS (A), and do not light these 3 BOLTS (A).
D Carefully slid down the RIGHT CONSOLE MAST COVER (7) to RIGHT CONSOLE MAST (6).
NOTE: Do not assemble CONSOLE MAST COVER BOLTS (L) at this step.


ASSEMBLY STEP 3 (Adventure 7)

text_image
Technical diagram of a device's internal components with numbered labels pointing to various parts.HARDWARE FOR STEP 3
| PART TYPE DESCRIPTION QTY | ||
| B BOLT MGX1.0FX15L 6 | ||
| C ARO WASHER ΦS.2XΦ18.0X1.5T 6 | ||
| D SPRING WASHER ΦS.1XΦ12.2X 1.5T 6 |
A Open HARDWARE FOR STEP 3.
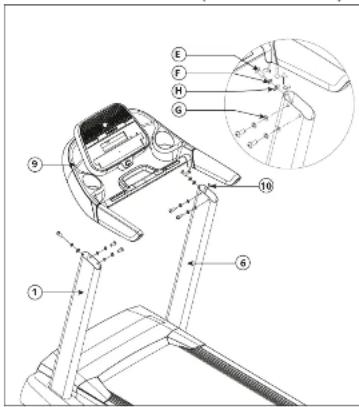
B Slide HANDLEBARS (8) onto CONSOLE (9).
C Attach HANDLEBARS (8) to CONSOLE (9) using 3 BOLTS (B), 3 ARC WASHERS (C) and 3 SPRING WASHERS (D) from each side.
ASSEMBLY STEP 4 (Adventure 7)
text_image
Technical diagram of a treadmill with numbered parts and an inset view showing internal components labeled E, F, H, G.HARDWARE FOR STEP 4
| PART TYPE DESCRIPTION QTY | |||
| E | BOLT | M8X1.25PX20L | 6 |
| F | SPRING WASHER | Φ8.2XΦ13.5X2.0T | 6 |
| G | FLAT WASHLR | Φ8.2XΦ15X1.2T | 4 |
| H | ARC WASHER Φ8.2XΦ18.0X1.5T 2 | ||
A Open HARDWARE FOR STEP 4.
B Gently place CONSOLE (9) on top of CONSOLE MASTS (1&6).
C Connect the CONSOLE CABLES (10) and ensure they are tucked inside the CONSOLE (9).
D Connect the CONSOLE (9) to the right CONSOLE MAST (6) using 2 BOLTS (E), 2 SPRING WASHERS (F) and 2 FLAT WASHERS (G) from the inside of the mast and 1 BOLT (E), 1 SPRING WASHER (F) and 1 ARC WASHER (H) from the front of the mast.
E Repeat STEP D on left side.
F Tighten all CONSOLE MAST BOLTS (A) in step 1&2 completely.


ASSEMBLY STEP 5 (Adventure 7)

text_image
Technical diagram of a mechanical device with numbered components for identificationA Lift the RUNNING DECK (11) upward until the FOOT LATCH (12) locks. Remove all contents underneath the MAIN FRAME (2&4).
B While the RUNNING DECK (11) in the raised position, attached the LEFT CONSOLE MAST COVER(3) and RIGHT CONSOLE MAST COVER(7) to the MAIN FRAME (2&4) using 2 PRE-INSTALLED CONSOLE MAST COVER BOLTS(I) on each side.
Before the first use, lubricate the treadmill deck by following the instructions in the MAINTENANCE section in the TREADMILL GUIDE.
H213_AE_Akt_1_3_5_7_r1_Dradd 10-11 T1N15 241 PM
MONTAGE

WARNUNG
□ L-farmiger [nbusschlüssel]
(mitgeliefert)
ENTHALTENE TEILE:
text_image
Technical diagram of a treadmill with labeled parts and directional arrows indicating movement or assembly.text_image
Technical diagram of a treadmill with numbered components and an inset close-up view showing internal structure.text_image
Technical diagram of a car interior frame with labeled components and assembly linestext_image
Technical diagram of a treadmill with numbered parts and an inset view showing mechanical components labeled E, F, H, G.text_image
Technical diagram of a mechanical device with numbered components for identificationtext_image
Technical diagram of a treadmill with labeled parts and directional arrows indicating motion or assembly.| SACHET DE VISSERIE POUR ÉTAPE DE MONTAGE 1 | ||
| PIÈCE TYPE DESCRIPTION QTÉ | ||
| A BOULON | MS X 1,25 P X 00 L - 30 L | 3 |
text_image
Technical diagram of a treadmill with numbered components and an inset showing a close-up view of the handle.| SACHET DE VISSERIE POUR ÉTAPE DE MONTAGE 2 | ||
| PIÈCE TYPE DESCRIPTION QTÉ | ||
| A BOULON MB X 1,25 P X 60 L - 30 L 3 | ||
text_image
Technical diagram of a device's internal components with numbered labels and assembly lines| SACHET DE VISSERIE POUR ÉTAPE DE MONTAGE 3 | |||
| PIÈCE TYPE DESCRIPTION QTÉ | |||
| B BC ULON M5 X 1,0P X 15L 6 | |||
| C RONDELLE BOMBÉE 26,2 X | 18,0 × 1,5T 6 | ||
| D | RONDELLLE ELASTIQUE | 9,1 × 12,2 × 1,5 T 0 | |
text_image
Technical diagram of a treadmill with numbered parts and an inset view of the seat assembly| SACHET DE VISSERIE POUR ÉTAPE DE MONTAGE 4 | ||||
| PIÈCE TYPE DESCRIPTION Q'TÉ | ||||
| E B O L O N | M8 X 1,25 | P X 20 L | 5 | |
| F | RONDELLE ÉLASTIQUE | ∅8,2 X ∅13,5 X 2,6 T | 6 | |
| G | RONDELLE PLATE | ∅8,2 X ∅15 X 1,2 T | 4 | |
| H | RONDELLE BOMBÉE | ∅8,2 X ∅18,0 X 1,5 T | 2 | |
text_image
Technical diagram of a mechanical device with numbered components for identificationtext_image
Technical diagram of a treadmill with labeled parts and directional arrows indicating movement or assembly.text_image
Technical diagram of a treadmill with numbered components and an inset showing a close-up view of the device's internal structure.text_image
Technical diagram of a car interior frame with labeled components and directional arrows indicating assembly or movement.| GEREEDSCHAP VOOR STAP 3 | |||
| ONDERDEEL | TYPE BESCHRIJVING | AANTAL | |
| B BOUT | M6X1,0FX15L 5 | ||
| C DICHT | TNGSRING Φ6,2XΦ | 8,0X1,5T 6 | |
| D VLLRKING | Φ6,1XΦ12,2XΦ | 5T 5 | |
A Open GEREEDSCHAPSSET VOOR STAP 3.
text_image
Technical diagram of a treadmill with numbered parts and an inset view showing mechanical components labeled E, F, H, G.| GEREEDSCHAP VOOR STAP 4 | |||
| ONDERDEEL | TYPE | BESCHRÜVING | AANTAL |
| E | BOUT | M8X1,25PX20L | 0 |
| F | VEEBRING | 8,2 13,5X2,0T | 6 |
| G | VLAKKL SLUITRING | 8,2 15X1,2T | 4 |
| H | DUCHITINGSRING | 8,2 18,0X1,5T | 2 |
text_image
Technical diagram of a mechanical device with numbered components for identificationtext_image
Technical schematic diagram of a vehicle's internal components and assembly, with labeled parts and part numbersH21_A0_Akt_1_3_5_7_r1_Dvrdd 36-37
ADVENTURE 1 PARTS LIST
| NO. | DESCRIPTION | OTV |
| 1 | CONNECTIC SET/SEM ASEPTENAR JNASESEM | 1 |
| 2 | MASCULAR SEISM-ASPLANTUM MARAMANSEM | 1 |
| 3 | DISH COORD SET/SEM/SEM, NASH-CESSEM/SE | 1 |
| 3 | CONNECTIC TUBE SET/SEM ASEPTENAR JNASESEM/1 | 1 |
| 4 | HATATE SET/SEM/SEM/SEM SEVERED | 1 |
| 4' | CABB NETT SET/SEM/SEM/SEM/SEM/SEM/SEM | 1 |
| 4'2 | CONSOLIANCE (DESPRING/SEM/SEM/SEM/SEM) | 1 |
| 4'20 | ABSOR SET/SEM/SEM/SEM/SEM/SEM/SEM/SEM/SEM/SEM/SEM/SEM/SEM/SEM/SEM/SEM/SEM/SEM/SEM/SEM/SEM/SEM/SEM/SEM/SEM/SEM/SEM/SEM/SEM/SEM/SEM/SEM/SEM/SEM/SEM/SEM/SEM/SEM/SEM/SEM/SEM/SEM/SEM/SEM/SEM/SEM/SEM/SEM/SEM/SEM/SEM/SE | 1 |
| 4'26 | ABSOR SET/SEM/SEM/SEM/SEM/SEM/SEM/SEM/SEM/SEM/SEM/SEM/SEM/SEM/SEM/SEM/SEM/SEM/SEM/SEM/SEM/SEM/SEM/SEM/SEM/SEM/SEM/SEM/SEM/SEM/SEM/SEM/SEM/SEM/SEM/SEM/SEM/SEM/SEM/SEM/SEM/SEM/SEM/SEM/SEM/SEM/SEM/SEM/SE | 1 |
| 4'41 | ACCELONE FINANCE SET/TAREER ZAKI SALMES SERVICES | 1 |
| 4'41 B | ACCELONE FINANCE SET/MEM/MEM/MEM/MEM/MEM/MEM/MEM/MEM/MEM/MEM/MEM/MEM/MEM/MEM/MEM/MEM/MEM/MEM/MEM/MEM/MEM/MEM/MEM/MEM/MEM/MEM/MEM/MEM/MEM/MEM/MEM/MEM/MEM/MEM/MEM/MEM/MEM/MEM/MEM/MEM/MEM/MEM/MEM/MEM/MEM/MEM/MEM/MEM/MEM/MEM/MCM | 1 |
| 4'43 | ACCELONE FINANCE SET/TAREER ZAKI SALMES SERVICES | 1 |
| 4'43 | ACCELONE FINANCE SET/TAREER ZAKI SALMES SERVICES | 1 |
| 4'43 | ACCELONE FINANCE SET/TAREER ZAKI SALMES SERVICES | 1 |
| 4'43 | ACCELONE FINANCE SET/TAREER ZAKI SALMES SERVICES | 1 |
| 4'43 | ACCELONE FINANCE SET/TAREER ZAKI SALMES SERVICE | 1 |
| 4'43 | ACCELONE FINANCE SET/TAREER ZAKI SALMES SERVICE | 1 |
| 4'43 | ACCELONE FINANCE SET/TAREER ZAKI SALMES SERVICE | 1 |
| 4'43 | ACCELONE FINANCE SET/TAREER ZAKI SALMES SERVICE | 1 |
| 4'43 | ACCELONE FINANCE SET/TAREER ZAKI SALMES SERVIC | 1 |
| 4'43 | ACCELONE FINANCE SET/TAREER ZAKI SALMES SERVIC | 1 |
| 4'43 | ACCELONE FINANCE SET/TAREER ZAKI SALMES SERVIC | 1 |
| 4'43 | ACCELONE FINANCE SET/TAREER ZAKI SALMES SERVIC | 1 |
| 4'43 | ACCELONE FINANCE SET/TAREER ZAK I SALMES SERVIC | 1 |
| 4'43 | ACCELONE FINANCE SET/TAREER ZAKI SALMES SERVIC | 1 |
| 4'43 | ACCELONE FINANCE SET/TAREER ZAKI SALMES SERVIC | 1 |
| 4'43 | ACCELONE FINANCE SET/TAREER ZAKI SALMES SERVIC | 1 |
| 4'43 | ACCELONE FINANCE SET/THEA/SEM/SEM/SEM/SEM/SEM/SEM/SEM/SEM/SEM/SEM/SEM/SEM/SEM/SEM/SEM/SEM/SEM/SEM/SEM/SEM/SEM/SEM/SEM/SEM/SEM/SEM/SEM/SEM/SEM/SEM/SEM/SEM/SEM/SEM/SEM/SEM/SEM/SEM/SEM/SEM/SEM/SEM/SEM/SEM/SEM/SEM/SEM/SEM/SEM/SEC | 1 |
| 4'43 | ACCELONE FINANCE SET/TAREER ZAKI SALMES SERVIC | 1 |
| 4'43 | ACCELONE FINANCE SET/TAREER ZAKI SALMES SERVIC | 1 |
| 4'43 | ACCELONE FINANCE SET/TAREER ZAKI SALMES SERVIC | 1 |
| 4'43 | ACCELONE FINANCE SET/TAREER ZAKLISAL/SALMES SERVIC | 1 |
| 4'43 | ACCELONE FINANCE SET/TAREER ZAKLISAL/SALMES SERVIC | 1 |
| 4'43 | ACCELONE FINANCE SET/TAREER ZAKLISAL/SALMES SERVIC | 1 |
| 4'43 | ACCELONE FINANCE SET/TAREER ZAKLISAL/SALMES SERVIC | 1 |
| NO. | DESCRIPTION | QTY |
| 102 | SCREWING/ARSHI 25-POOLING 612 N.B.N. | 5 |
| 104 | CUSHING/CAREM/BEET FLOW/REDAVAL (W.P.G) | 2 |
| 107 | CUSHING/CAREM/BEET FLOW/REDAVAL (W.P.G) | 2 |
| 108 | FLOORING/CAREM/BEET FLOW/REDAVAL (W.P.G) | 2 |
| 109 | CUSHING/CAREM/BEET FLOW/REDAVAL (W.P.G) | 2 |
| 111 | CUSHING/CAREM/BEET FLOW/REDAVAL (W.P.G) | 4 |
| 114 | CUSHING/CAREM/BEET FLOW/REDAVAL (W.P.G) | 2 |
| 105 | POTATO/RATURAL/BEET FLOW/REDAVAL (W.P.G) | 5 |
| 106 | CUSHING/CAREM/BEET FLOW/REDAVAL (W.P.G) | 4 |
| 109 | SHORTER/BEET FLOW/REDAVAL (W.P.G) | 4 |
| 112 | SHORTER/BEET FLOW/REDAVAL (W.P.G) | 4 |
| 113 | SHORTER/BEET FLOW/REDAVAL (W.P.G) | 1 |
| 116 | SHORTER/BEET FLOW/REDAVAL (W.P.G) | 1 |
| 117 | SHORTER/BEET FLOW/REDAVAL (W.P.G) | 2 |
| 118 | SHORTER/BEET FLOW/REDAVAL (W.P.G) | 2 |
| 119 | SHORTER/BEET FLOW/REDAVAL (W.P.G) | 2 |
| 120 | SHORTER/BEET FLOW/REDAVAL (W.P.G) | 2 |
| 121 | SHORTER/BEET FLOW/REDAVAL (W.P.G) | 2 |
| 122 | SHORTER/BEET FLOW/REDAVAL (W.P.G) | 2 |
| 123 | SHORTER/BEET FLOW/REDAVAL (W.P.G) | 2 |
| 124 | SHORTER/BEET FLOW/REDAVAL (W.P.G) | 2 |
| 125 | SHORTER/BEET FLOW/REDAVAL (W.P.G) | 2 |
| 126 | SHORTER/BEET FLOW/REDAVAL (W.P.G) | 2 |
| 127 | SHORTER/BEET FLOW/REDAVAL (W.P.G) | 2 |
| 128 | SHORTER/BEET FLOW/REDAVAL (W.P.G) | 2 |
| 129 | SHORTER/BEET FLOW/REDAVAL (W.P.G) | 2 |
| 130 | SHORTER/BEET FLOW/REDAVAL (W.P.G) | 2 |
| 131 | SHORTER/BEET FLOW/REDAVAL (W.P.G) | 2 |
| 132 | SHORTER/BEET FLOW/REDAVAL (W.P.G) | 2 |
| 133 | SHORTER/BEET FLOW/REDAVAL (W.P.G) | 2 |
| 134 | SHORTER/BEET FLOW/REDAVAL (W.P.G) | 2 |
| 135 | SHORTER/BEET FLOW/REDAVAL (W.P.G) | 2 |
| 136 | SHORTER/BEET FLOW/REDAVAL (W.P.G) | 2 |
| 137 | SHORTER/BEET FLOW/REDAVAL (W.P.G) | 2 |
791215 2:1 PM
ADVENTURE 1 PARTS LIST
text_image
Technical schematic diagram of a vehicle's internal components and assembly, with labeled parts and part numbersADVENTURE 3 PARTS LIST
| NO. | DESCRIPTION | QTY |
| A01 | FRAME SETTING & NAM SALES SERVICES | 1 |
| A27 | FRESHED FINANCIAL DEPARTMENT OF CHANGES (WHIP) SUS | 1 |
| VCCI DIRECTORS: AIRLICARIS-2 | ( ) | |
| B48 | FINDING SUNVERC, BLACK SHEET SUS | 2 |
| B28 | SCHOOL PRACTY, ZAFFIR BALANCE | 5 |
| B01 | CREAM BOX CORNERS | 1 |
| B30 | LADY DOCKMART ZIFFERAGE 12 BLACK TINCH | 2 |
| B26 | TROKSHUT GREEN RED CABBAGE | 4 |
| B02 | MINIPEZ CHEESE CAPIT RESOLEDINGS | 5 |
| X24 | BEANS OIL CHEESE GOURD BY COOKING | 5 |
| X41 | WHIP/HEARTLE CABBAGE COVER SUIS | 1 |
| V18 | RICH COOLING PROCESSED ITEMS | 1 |
| S20 | WASHER FLAT BANANA, WHITE BANANA BEACH | 2 |
| B24 | CARROTISH PHILADEL CHEESE CHIP | 4 |
| S02 | STRAWBERRY ZUCCHINI SHEET CHIP | 3 |
| B58 | CUSHROOM CONDUCTOR YELLOW BLACK ITEMS | 2 |
| B26 | WABBER SHAKEN PEPPER LATCH & SWITCHER BEACH | 2 |
| S20 | SHORTWIRE LIME ZUCCHINI SHEET | 3 |
| S46 | CUSHROOM ROCKET SLICE SHAKEN YELLOW YELLOW | 2 |
| B68 | GREEN BLACK SLICE BANANA ZUCHINI SHEET | 8 |
| B91 | SLICE GREEN PAINTAGE LEMON GRAPES | 3 |
| S32 | SCOTEN SHAKEN ZUCCHINI SHEET ZUCCHINI POT | 4 |
| B47 | CUSHROOM GREEN ZUCCHINI SHEET | 4 |
| AK03 | ARM BOX 5" WASHROOM ZUCCHINI SHEET ZUCCHINI SALES ITEMS | 1 |
| C16 | CAPSICUM RED PLET PERE RED | 2 |
| NO. | DESCRIPTION | OTC |
| A71 | CHINESE MERRY (EQUITY) COMPLEXING SHEET BREAKFAST | 1 |
| A94 | ARBIER LEAVES (HEAVY) (HEAVY) (HEAVY) (HEAVY) | 1 |
| A92 | COCONUT (HEAVY) (HEAVY) (HEAVY) (HEAVY) (HEAVY) (HEAVY) | 1 |
| C11 | SWEET (HEAVY) (HEAVY) (HEAVY) (HEAVY) (HEAVY) | 1 |
| A95 | ZILLIPE (HEAVY) (HEAVY) (HEAVY) (HEAVY) (HEAVY) | 1 |
| B35 | YELLOW (HEAVY) (HEAVY) (HEAVY) (HEAVY) (HEAVY) (HEAVY) | 5 |
| A98 | THICK (HEAVY) (HEAVY) (HEAVY) (HEAVY) (HEAVY) (HEAVY) (HEAVY) | 1 |
| B00 | SPRING (HEAVY) (HEAVY) (HEAVY) (HEAVY) (HEAVY) (HEAVY) | 1 |
| S | CONNECT TUTTER SHEET (HEAVY) (HEAVY) (HEAVY) (HEAVY) | 1 |
| B10 | WASHER (HEAVY) (HEAVY) (HEAVY) (HEAVY) (HEAVY) (HEAVY) (HEAVY) | 1 |
| P 22 | SWEET (HEAVY) (HEAVY) (HEAVY) (HEAVY) (HEAVY) (HEAVY) (HEAVY) | 1 |
| L 27 | BOTTO (HEAVY) (HEAVY) (HEAVY) (HEAVY) (HEAVY) (HEAVY) | 1 |
| A10 | BOTTO (HEAVY) (HEAVY) (HEAVY) (HEAVY) (HEAVY) (HEAVY) (HEAVY) | 1 |
| B14 | CAULIFLOWER (HEAVY) (HEAVY) (HEAVY) (HEAVY) (HEAVY) (HEAVY) | 2 |
| B11 | SPRING (HEAVY) (HEAVY) (HEAVY) (HEAVY) (HEAVY) (HEAVY) (HEAVY) (HEAVY) | 2 |
| B52 | PODER (HEAVY) (HEAVY) (HEAVY) (HEAVY) (HEAVY) (HEAVY) (HEAVY) | 4 |
| B20 | DAVING (HEAVY) (HEAVY) (HEAVY) (HEAVY) (HEAVY) (HEAVY) (HEAVY) | 2 |
| S | MOTOR (HEAVY) (HEAVY) (HEAVY) (HEAVY) | 1 |
| N06 | ELASTOM (HEAVY) (HEAVY) (HEAVY) (HEAVY) (HEAVY) (HEAVY) (HEAVY) | 1 |
| K09 | TAWERS (HEAVY) (HEAVY) (HEAVY) (HEAVY) (HEAVY) (HEAVY) (HEAVY) | 1 |
| K07 | SANDS (HEAVY) (HEAVY) (HEAVY) (HEAVY) (HEAVY) | 1 |
| K16 | WATER (HEAVY) (HEAVY) (HEAVY) (HEAVY) (HEAVY) (HEAVY) (HEAVY) (HEAVY) | 1 |
| K01 | MOBLES (HEAVY) (HEAVY) (HEAVY) (HEAVY) (HEAVY) (HEAVY) (HEAVY) (HEAVY) (HEAVY) | 1 |
| K02 | LETT (HEAVY) (HEAVY) (HEAVY) (HEAVY) (HEAVY) (HEAVY) (HEAVY) (HEAVY) (HEAVY) (HEAVY) (HEAVY) (HEAVY) (HEAVY) (HEAVY) (HEAVY) (HEAVY) (HEAVY) (HEAVY) (HEAVY) (HEAVY) (HEAVY)(HEAVY) (HEAVY) (HEAVY) (HEAVY) (HEAVY) (HEAVY) (HEAVY) (HEAVY) (HEAVY) (HEAVY) (HEAVY) (HEAVY) (HEAVY) (HEAVY) (HEAVY) (HEAVY) (HEAVY) (HEAVY) (HEAVY) (HEAVY) | 1 |
ADVENTURE 3 PARTS LIST
text_image
Technical schematic diagram of an automotive assembly with labeled components and partsH213_A0_Akt_1_3_5_7_r1_Dvadd 42-43
ADVENTURE 5 PARTS LIST
| NO. | DESCRIPTION | QTY |
| CONSOLE DETELEC ASPECTRANGIC NASHROOM | 1 | |
| 2 | MINI CARLE GABBAGE MELKCHINI SHROOM | 1 |
| 3 | SHORT CREAM SLICE SHEET SMOODING (SALAD) | 1 |
| 3 | CONNECT TUBE DETELEC ASPECTRANGIC NASHROOM | 1 |
| A500 | TOMATO (HOTATO) GRAVESHARES SHROOM | 1 |
| A67 | CABBAGE (GRAVESHARE) SHEET SHROOM | 1 |
| A67 | COASTROPE (SWEETSHARES) SHEET SHROOM, 1 | |
| A67 | ARANT-SEAL (GRAVE) SHEET SHROOM, POLDING SHIP, 1 | |
| A67 | ARANT-SEAL (GRAVE) SHEET SHROOM, POLDING SHIP, 1 | |
| A490 | THICKLE PEAS SHEETSHARES (GRAVE) SHEETS SHIP | 1 |
| A67 | BEET (BEETSHARE) SHEET SHROOM, GRAVE SHIP, 1 | |
| A67 | BELL PEAS SHEET SHIP, SHEET SHIP, 1 | |
| A67 | ROLLER SHEET SHIP, SHEET SHIP, 1 | |
| A67 | SCHEM CHEESE (CHEE) SHEET SHIP, 1 | |
| A67 | WATER SHIP (WATER) SHEET SHIP, SHEET SHIP, 1 | |
| A67 | SCHOOL SHEET (SCHOOL) SHEET SHIP, 2 | |
| A67 | BRINJAL (BRINJAL) SHEET SHIP, 1 | |
| A67 | WATER SHIP (WATER) SHEET SHIP, SHEET SHIP, 1 | |
| A67 | FRESH-SEAL SHEET SHIP, SHEET SHIP, SHEET SHIP, 1 | |
| A67 | CAULIFLOWER SHEET SHIP, SHEET SHIP, 1 | |
| A67 | CAULIFLOWER SHEET SHIP, SHEET SHIP, 1 | |
| A67 | CARROT (CARROT) SHEET SHIP, SHEET SHIP, 1 | |
| A67 | CARROT (CARROT) SHEET SHIP, SHEET SHIP, 1 |
| NO. | DESCRIPTION | STP |
| 042 | SCENEYBHARSHI (SPRING) HS 612 BONE | 2 |
| 849 | CUSHIONBULB (SHERTEL) PAPAYA, RATHA | 2 |
| 851 | CAULIFLOWER (CURRY) (SPRING) (AMERICAN) | 2 |
| 848 | FINGER (BURGERIC) BLACK TINCE (SUS) | 2 |
| 850 | LIFE (WHIP) (CURRY) (BURGERIC) BLACK TINCE, WINDA | 2 |
| 851 | GINGER (GOLDEN) (SPRING) (MILKINI) | 4 |
| 852 | LENT (LENT) (SPRING) (SPRING) BLACK TINCE | 3 |
| 853 | SCHINESE (GRAVY) (SPRING) (WALTA) BLACK TINCE | 4 |
| 854 | TAW (TAW) (SPRING) (SPRING) BLACK TINCE, GREEN TINCE | 4 |
| 855 | BOTTLE (BHAT) (SPRING) (WALTA) BLACK TINCE | 1 |
| 856 | SPRING (SPRING) (SPRING) (WALTA) BLACK TINCE | 1 |
| 857 | MASSACH (MASSACH) (SPRING) (AMERICAN) | 1 |
| 858 | CORIPE (CORIPE) (SPRING) (AMERICAN) | 1 |
| 859 | CORIPE (CORIPE) (SPRING) (AMERICAN) | 3 |
| 860 | CUSHION (CUSHION) (SPRING) (AMERICAN) | 2 |
| 861 | WOOD (WOOD) (SPRING) (AMERICAN) | 4 |
| 862 | MOYA (MOYA) (SPRING) (AMERICAN) | 1 |
| 863 | LETT (LETT) (SPRING) (AMERICAN) | 1 |
| 864 | LETT (LETT) (SPRING) (AMERICAN) | 1 |
| 865 | LETT (LETT) (SPRING) (AMERICAN) | 1 |
| 866 | SPRING (SPRING) (SPRING) (AMERICAN) | 1 |
| 867 | SPRING (SPRING) (SPRING) (AMERICAN) | 1 |
| 868 | SPRING (SPRING) (SPRING) (AMERICAN) | 1 |
| 869 | SPRING (SPRING) (SPRING) (AMERICAN) | 1 |
| 870 | SPRING (SPRING) (SPRING) (AMERICAN) | 1 |
| 871 | SPRING (SPRING) (SPRING) (AMERICAN) | 1 |
| 872 | SPRING (SPRING) (SPRING) (AMERICAN) | 1 |
| 873 | SPRING (SPRING) (SPRING) (AMERICAN) | 1 |
701215 231PM
ADVENTURE 5 PARTS LIST
| NO. | DESCRIPTION | QTY |
| 185 | MUNT CAPCLOCK 250 GRAD 123 BLACK ZONE | 2 |
| 187 | GARTTY KEY SET TARGET | 1 |
| 188 | POWER SWITCH ON/OFF LIGHT | 1 |
| 189 | POWER SWITCH ON/OFF LIGHT | 1 |
| 190 | POWER POWER SWITCH | 1 |
| 196 | WIRE SWITCH ON/OFF OFF/ORDER 2/2/AMERICAN | 0.21 |
| 197 | POWER SWITCH ON/OFF OFF/ORDER 2 | 1 |
| 198 | WIRE SWITCH ON/OFF OFF/ORDER 2/2 | 1 |
| 199 | WIRE SWITCH ON/OFF OFF/ORDER 2/2 | 1 |
| 200 | WIRE SWITCH ON/OFF OFF/ORDER 2/2 | 1 |
| 201 | WIRE SWITCH ON/OFF OFF/ORDER 2/2 | 1 |
| 202 | WIRE SWITCH ON/OFF OFF/ORDER 2/2 | 1 |
| 203 | WIRE SWITCH ON/OFF OFF/ORDER 2/2 | 1 |
| 204 | WIRE SWITCH ON/OFF OFF/ORDER 2/2 | 1 |
| 205 | WIRE SWITCH ON/OFF OFF/ORDER 2/2 | 1 |
| 206 | WIRE SWITCH ON/OFF OFF/ORDER 2/2 | 1 |
| 207 | WIRE SWITCH ON/OFF OFF/ORDER 2/2 | 1 |
| 208 | WIRE SWITCH ON/OFF OFF/ORDER 2/2 | 1 |
| 209 | WIRE SWITCH ON/OFF OFF/ORDER 2/2 | 1 |
| 210 | WIRE SWITCH ON/OFF OFF/ORDER 2/2 | 1 |
| 211 | WIRE SWITCH ON/OFF OFF/ORDER 2/2 | 1 |
| 212 | WIRE SWITCH ON/OFF OFF/ORDER 2/2 | 1 |
| 213 | WIRE SWITCH ON/OFF OFF/ORDER 2/2 | 1 |
| 214 | WIRE SWITCH ON/OFF OFF/ORDER 2/2 | 1 |
| 215 | WIRE SWITCH ON/OFF OFF/ORDER 2/2 | 1 |
| 216 | WIRE SWITCH ON/OFF OFF/ORDER 2/2 | 1 |
| 217 | WIRE SWITCH ON/OFF OFF/ORDER 2/2 | 1 |
| 218 | WIRE SWITCH ON/OFF OFF/ORDER 2/2 | 1 |
| 219 | WIRE SWITCH ON/OFF OFF/ORDER 2/2 | 1 |
| 220 | WIRE SWITCH ON/OFF OFF/ORDER 2/2 | 1 |
| 221 | WIRE SWITCH ON/OFF OFF/ORDER 2/2 | 1 |
| 222 | WIRE SWITCH ON/OFF OFF/ORDER 2/2 | 1 |
| 223 | WIRE SWITCH ON/OFF OFF/ORDER 2/2 | 1 |
| 224 | WIRE SWITCH ON/OFF OFF/ORDER 2/2 | 1 |
| 225 | WIRE SWITCH ON/OFF OFF/ORDER 2/2 | 1 |
| 226 | WIRE SWITCH ON/OFF OFF/ORDER 2/2 | 1 |
| 227 | WIRE SWITCH ON/OFF OFF/ORDER 2/2 | 1 |
| 228 | WIRE SWITCH ON/OFF OFF/ORDER 2/2 | 1 |
| 229 | WIRE SWITCH ON/OFF OFF/ORDER 2/2 | 1 |
| 230 | WIRE SWITCH ON/OFF OFF/ORDER 2/2 | 1 |
| 231 | WIRE SWITCH ON/OFF OFF/ORDER 2/2 | 1 |
| 232 | WIRE SWITCH ON/OFF OFF/ORDER 2/2 | 1 |
| 233 | WIRE SWITCH ON/OFF OFF/ORDER 2/2 | 1 |
| 234 | WIRE SWITCH ON/OFF OFF/ORDER 2/2 | 1 |
| 235 | WIRE SWITCH ON/OFF OFF/ORDER 2/2 | 1 |
| 236 | WIRE SWITCH ON/OFF OFF/ORDER 2/2 | 1 |
| 237 | WIRE SWITCH ON/OFF OFF/ORDER 2/2 | 1 |
| 238 | WIRE SWITCH ON/OFF OFF/ORDER 2/2 | 1 |
| 239 | WIRE SWITCH ON/OFF OFF/ORDER 2/2 | 1 |
| 240 | WIRE SWITCH ON/OFF OFF/ORDER 2/2 | 1 |
| 241 | WIRE SWITCH ON/OFF OFF/ORDER 2/2 | 1 |
| 242 | WIRE SWITCH ON/OFF OFF/ORDER 2/2 | 1 |
| 243 | WIRE SWITCH ON/OFF OFF/ORDER 2/2 | 1 |
| 244 | WIRE SWITCH ON/OFF OFF/ORDER 2/2 | 1 |
| 245 | WIRE SWITCH ON/OFF OFF/ORDER 2/2 | 1 |
| 246 | WIRE SWITCH ON/OFF OFF/ORDER 2/2 | 1 |
| 247 | WIRE SWITCH ON/OFF OFF/ORDER 2/2 | 1 |
| 248 | WIRE SWITCH ON/OFF OFF/ORDER 2/2 | 1 |
| 249 | WIRE SWITCH ON/OFF OFF/ORDER 2/2 | 1 |
| 250 | WIRE SWITCH ON/OFF OFF/ORDER 2/2 | 1 |
| 251 | WIRE SWITCH ON/OFF OFF/ORDER 2/2 | 1 |
| 252 | WIRE SWITCH ON/OFF OFF/ORDER 2/2 | 1 |
| 253 | WIRE SWITCH ON/OFF OFF/ORDER 2/2 | 1 |
| 254 | WIRE SWITCH ON/OFF OFF/ORDER 2/2 | 1 |
| 255 | WIRE SWITCH ON/OFF OFF/ORDER 2/2 | 1 |
| 256 | WIRE SWITCH ON/OFF OFF/ORDER 2/2 | 1 |
| 257 | WIRE SWITCH ON/OFF OFF/ORDER 2/2 | 1 |
| 258 | WIRE SWITCH ON/OFF OFF/ORDER 2/2 | 1 |
| 259 | WIRE SWITCH ON/OFF OFF/ORDER 2/2 | 1 |
| 260 | WIRE SWITCH ON/OFF OFF/ORDER 2/2 | 1 |
| 261 | WIRE SWITCH ON/OFF OFF/ORDER 2/2 | 1 |
| 262 | WIRE SWITCH ON/OFF OFF/ORDER 2/2 | 1 |
| 263 | WIRE SWITCH ON/OFF OFF/ORDER 2/2 | 1 |
| 264 | WIRE SWITCH ON/OFF OFF/ORDER 2/2 | 1 |
| 265 | WIRE SWITCH ON/OFF OFF/ORDER 2/2 | 1 |
| 266 | WIRE SWITCH ON/OFF OFF/ORDER 2/2 | 1 |
| 267 | WIRE SWITCH ON/OFF OFF/ORDER 2/2 | 1 |
| 268 | WIRE SWITCH ON/OFF OFF/ORDER 2/2 | 1 |
| 269 | WIRE SWITCH ON/OFF OFF/ORDER 2/2 | 1 |
| 270 | WIRE SWITCH ON/OFF OFF/ORDER 2/2 | 1 |
| 271 | WIRE SWITCH ON/OFF OFF/ORDER 2/2 | 1 |
| 272 | WIRE SWITCH ON/OFF OFF/ORDER 2/2 | 1 |
| 273 | WIRE SWITCH ON/OFF OFF/ORDER 2/2 | 1 |
| 274 | WIRE SWITCH ON/OFF OFF/ORDER 2/2 | 1 |
| 275 | WIRE SWITCH ON/OFF OFF/ORDER 2/2 | 1 |
| 276 | WIRE SWITCH ON/OFF OFF/ORDER 2/2 | 1 |
| 277 | WIRE SWITCH ON/OFF OFF/ORDER 2/2 | 1 |
| 278 | WIRE SWITCH ON/OFF OFF/ORDER 2/2 | 1 |
| 279 | WIRE SWITCH ON/OFF OFF/ORDER 2/2 | 1 |
| 280 | WIRE SWITCH ON/OFF OFF/ORDER 2/2 | 1 |
| 281 | WIRE SWITCH ON/OFF OFF/ORDER 2/2 | 1 |
| 282 | WIRE SWITCH ON/OFF OFF/ORDER 2/2 | 1 |
| 283 | WIRE SWITCH ON/OFF OFF/ORDER 2/2 | 1 |
| 284 | WIRE SWITCH ON/OFF OFF/ORDER 2/2 | 1 |
| 285 | WIRE SWITCH ON/OFF OFF/ORDER 2/2 | 1 |
| 286 | WIRE SWITCH ON/OFF OFF/ORDER 2/2 | 1 |
| 287 | WIRE SWITCH ON/OFF OFF/ORDER 2/2 | 1 |
| 288 | WIRE SWITCH ON/OFF OFF/ORDER 2/2 | 1 |
| 289 | WIRE SWITCH ON/OFF OFF/ORDER 2/2 | 1 |
| 290 | WIRE SWITCH ON/OFF OFF/ORDER 2/2 | 1 |
| 291 | WIRE SWITCH ON/OFF OFF/ORDER 2/2 | 1 |
| 292 | WIRE SWITCH ON/OFF OFF/ORDER 2/2 | 1 |
| 293 | WIRE SWITCH ON/OFF OFF/ORDER 2/2 | 1 |
| 294 | WIRE SWITCH ON/OFF OFF/ORDER 2/2 | 1 |
| 295 | WIRE SWITCH ON/OFF OFF/ORDER 2/2 | 1 |
| 296 | WIRE SWITCH ON/OFF OFF/ORDER 2/2 | 1 |
| 297 | WIRE SWITCH ON/OFF OFF/ORDER 2/2 | 1 |
| 298 | WIRE SWITCH ON/OFF OFF/ORDER 2/2 | 1 |
| 299 | WIRE SWITCH ON/OFF OFF/ORDER 2/2 | 1 |
| 300 | WIRE SWITCH ON/OFF OFF/ORDER 2/2 | 1 |
| 301 | WIRE SWITCH ON/OFF OFF/ORDER 2/2 | 1 |
| 302 | WIRE SWITCH ON/OFF OFF/ORDER 2/2 | 1 |
| 303 | WIRE SWITCH ON/OFF OFF/ORDER 2/2 | 1 |
| 304 | WIRE SWITCH ON/OFF OFF/ORDER 2/2 | 1 |
| 305 | WIRE SWITCH ON/OFF OFF/ORDER 2/2 | 1 |
| 306 | WIRE SWITCH ON/OFF OFF/ORDER 2/2 | 1 |
| 307 | WIRE SWITCH ON/OFF OFF/ORDER 2/2 | 1 |
| 308 | WIRE SWITCH ON/OFF OFF/ORDER 2/2 | 1 |
| 309 | WIRE SWITCH ON/OFF OFF/ORDER 2/2 | 1 |
| 310 | WIRE SWITCH ON/OFF OFF/ORDER 2/2 | 1 |
| 311 | WIRE SWITCH ON/OFF OFF/ORDER 2/2 | 1 |
| 312 | WIRE SWITCH ON/OFF OFF/ORDER 2/2 | 1 |
| 313 | WIRE SWITCH ON/OFF OFF/ORDER 2/2 | 1 |
| 314 | WIRE SWITCH ON/OFF OFF/ORDER 2/2 | 1 |
| 315 | WIRE SWITCH ON/OFF OFF/ORDER 2/2 | 1 |
| 316 | WIRE SWITCH ON/OFF OFF/ORDER 2/2 | 1 |
| 317 | WIRE SWITCH ON/OFF OFF/ORDER 2/2 | 1 |
| 318 | WIRE SWITCH ON/OFF OFF/ORDER 2/2 | 1 |
| 319 | WIRE SWITCH ON/OFF OFF/ORDER 2/2 | 1 |
| 320 | WIRE SWITCH ON/OFF OFF/ORDER 2/2 | 1 |
| 321 | WIRE SWITCH ON/OFF OFF/ORDER 2/2 | 1 |
| 322 | WIRE SWITCH ON/OFF OFF/ORDER 2/2 | 1 |
| 323 | WIRE SWITCH ON/OFF OFF/ORDER 2/2 | 1 |
| 324 | WIRE SWITCH ON/OFF OFF/ORDER 2/2 | 1 |
| 325 | WIRE SWITCH ON/OFF OFF/ORDER 2/2 | 1 |
| 326 | WIRE SWITCH ON/OFF OFF/ORDER 2/2 | 1 |
| 327 | WIRE SWITCH ON/OFF OFF/ORDER 2/2 | 1 |
| 328 | WIRE SWITCH ON/OFF OFF/ORDER 2/2 | 1 |
| 329 | WIRE SWITCH ON/OFF OFF/ORDER 2/2 | 1 |
| 330 | WIRE SWITCH ON/OFF OFF/ORDER 2/2 | 1 |
| 331 | WIRE SWITCH ON/OFF OFF/ORDER 2/2 | 1 |
| 332 | WIRE SWITCH ON/OFF OFF/ORDER 2/2 | 1 |
| 333 | WIRE SWITCH ON/OFF OFF/ORDER 2/2 | 1 |
| 334 | WIRE SWITCH ON/OFF OFF/ORDER 2/2 | 1 |
| 335 | WIRE SWITCH ON/OFF OFF/ORDER 2/2 | 1 |
| 336 | WIRE SWITCH ON/OFF OFF/ORDER 2/2 | 1 |
| 337 | WIRE SWITCH ON/OFF OFF/ORDER 2/2 | 1 |
| 338 | WIRE SWITCH ON/OFF OFF/ORDER 2/2 | 1 |
| 339 | WIRE SWITCH ON/OFF OFF/ORDER 2/2 | 1 |
| 340 | WIRE SWITCH ON/OFF OFF/ORDER 2/2 | 1 |
| 341 | WIRE SWITCH ON/OFF OFF/ORDER 2/2 | 1 |
| 342 | WIRE SWITCH ON/OFF OFF/ORDER 2/2 | 1 |
| 343 | WIRE SWITCH ON/OFF OFF/ORDER 2/2 | 1 |
| 344 | WIRE SWITCH ON/OFF OFF/ORDER 2/2 | 1 |
| 345 | WIRE SWITCH ON/OFF OFF/ORDER 2/2 | 1 |
| 346 | WIRE SWITCH ON/OFF OFF/ORDER 2/2 | 1 |
| 347 | WIRE SWITCH ON/OFF OFF/ORDER 2/2 | 1 |
| 348 | WIRE SWITCH ON/OFF OFF/ORDER 2/2 | 1 |
| 349 | WIRE SWITCH ON/OFF OFF/ORDER 2/2 | 1 |
| 350 | WIRE SWITCH ON/OFF OFF/ORDER 2/2 | 1 |
| 351 | WIRE SWITCH ON/OFF OFF/ORDER 2/2 | 1 |
| 352 | WIRE SWITCH ON/OFF OFF/ORDER 2/2 | 1 |
| 353 | WIRE SWITCH ON/OFF OFF/ORDER 2/2 | 1 |
| 354 | WIRE SWITCH ON/OFF OFF/ORDER 2/2 | 1 |
| 355 | WIRE SWITCH ON/OFF OFF/ORDER 2/2 | 1 |
| 356 | WIRE SWITCH ON/OFF OFF/ORDER 2/2 | 1 |
| 357 | WIRE SWITCH ON/OFF OFF/ORDER 2/2 | 1 |
| 358 | WIRE SWITCH ON/OFF OFF/ORDER 2/2 | 1 |
| 359 | WIRE SWITCH ON/OFF OFF/ORDER 2/2 | 1 |
| 360 | WIRE SWITCH ON/OFF OFF/ORDER 2/2 | 1 |
| 361 | WIRE SWITCH ON/OFF OFF/ORDER 2/2 | 1 |
| 362 | WIRE SWITCH ON/OFF OFF/ORDER 2/2 | 1 |
| 363 | WIRE SWITCH ON/OFF OFF/ORDER 2/2 | 1 |
| 364 | WIRE SWITCH ON/OFF OFF/ORDER 2/2 | 1 |
| 365 | WIRE SWITCH ON/OFF OFF/ORDER 2/2 | 1 |
| 366 | WIRE SWITCH ON/OFF OFF/ORDER 2/2 | 1 |
| 367 | WIRE SWITCH ON/OFF OFF/ORDER 2/2 | 1 |
| 368 | WIRE SWITCH ON/OFF OFF/ORDER 2/2 | 1 |
| 369 | WIRE SWITCH ON/OFF OFF/ORDER 2/2 | 1 |
| 370 | WIRE SWITCH ON/OFF OFF/ORDER 2/2 | 1 |
| 371 | WIRE SWITCH ON/OFF OFF/ORDER 2/2 | 1 |
| 372 | WIRE SWITCH ON/OFF OFF/ORDER 2/2 | 1 |
| 373 | WIRE SWITCH ON/OFF OFF/ORDER 2/2 | 1 |
| 374 | WIRE SWITCH ON/OFF OFF/ORDER 2/2 | 1 |
| 375 | WIRE SWITCH ON/OFF OFF/ORDER 2/2 | 1 |
| 376 | WIRE SWITCH ON/OFF OFF/ORDER 2/2 | 1 |
| 377 | WIRE SWITCH ON/OFF OFF/ORDER 2/2 | 1 |
| 378 | WIRE SWITCH ON/OFF OFF/ORDER 2/2 | 1 |
| 379 | WIRE SWITCH ON/OFF OFF/ORDER 2/2 | 1 |
| 380 | WIRE SWITCH ON/OFF OFF/ORDER 2/2 | 1 |
| 381 | WIRE SWITCH ON/OFF OFF/ORDER 2/2 | 1 |
| 382 | WIRE SWITCH ON/OFF OFF/ORDER 2/2 | 1 |
| 383 | WIRE SWITCH ON/OFF OFF/ORDER 2/2 | 1 |
| 384 | WIRE SWITCH ON/OFF OFF/ORDER 2/2 | 1 |
| 385 | WIRE SWITCH ON/OFF OFF/ORDER 2/2 | 1 |
| 386 | WIRE SWITCH ON/OFF OFF/ORDER 2/2 | 1 |
| 387 | WIRE SWITCH ON/OFF OFF/ORDER 2/2 | 1 |
| 388 | WIRE SWITCH ON/OFF OFF/ORDER 2/2 | 1 |
| 389 | WIRE SWITCH ON/OFF OFF/ORDER 2/2 | 1 |
| 390 | WIRE SWITCH ON/OFF OFF/ORDER 2/2 | 1 |
| 391 | WIRE SWITCH ON/OFF OFF/ORDER 2/2 | 1 |
| 392 | WIRE SWITCH ON/OFF OFF/ORDER 2/2 | 1 |
| 393 | WIRE SWITCH ON/OFF OFF/ORDER 2/2 | 1 |
| 394 | WIRE SWITCH ON/OFF OFF/ORDER 2/2 | 1 |
| 395 | WIRE SWITCH ON/OFF OFF/ORDER 2/2 | 1 |
| 396 | WIRE SWITCH ON/OFF OFF/ORDER 2/2 | 1 |
| 397 | WIRE SWITCH ON/OFF OFF/ORDER 2/2 | 1 |
| 398 | WIRE SWITCH ON/OFF OFF/ORDER 2/2 | 1 |
| 399 | WIRE SWITCH ON/OFF OFF/ORDER 2/2 | 1 |
| 400 | WIRE SWITCH ON/OFF OFF/ORDER 2/2 | 1 |
| NO. | DESCRIPTION | OTY | |
| C40 | BALANCE SHEET BREAKS, COLD, 2.5 WTR/LETTRE SHEET (LPG) | ||
| C41 | FROIC ROLL SETT MARGIN SHEET SHEET SHEET SHEET SHEET SHEET SHEET SHEET SHEET SHEET SHEET SHEET SHEET SHEET SHEET SHEET SHEET SHEET SHEET SHEET SHEET SHEET SHEET SHEET SHEET SHEET SHEET SHEET SHEET SHEET SHEET SHEET SHEET SHEET SHEET SHEET SHEET SHEET SHEET SHEET SHEET SHEET SHEET SHEET SHEET SHEET SHEET SHEET SHEET SHEET SHEAT SHEET SHEET SHEET SHEET SHEET SHEET SHEET SHEET SHEET SHEET SHEET SHEET SHEET SHEET SHEET SHEET SHEET SHEET SHEET SHEET SHEET SHEET SHEET SHEET SHEET SHEET SHEET SHEET SHEET SHEET SHEET SHEET SHEET SHEET SHEET SHEET SHEET SHEET SHEET SHEET SHEET SHEET SHEET SHEET SHEET SHEET SHEET SHEET SHEET SHEETS SHEET SHEET SHEET SHEET SHEET SHEET SHEET SHEET SHEET SHEET SHEET SHEET SHEET SHEET SHEET SHEET SHEET SHEET SHEET SHEET SHEET SHEET SHEET SHEET SHEET SHEET SHEET SHEET SHEET SHEET SHEET SHEET SHEET SHEET SHEET SHEET SHEET SHEET SHEET SHEET SHEET SHEET SHEET SHEET SHEET SHEET SHEET SHEET SHEET SHEES SHEET SHEET SHEET SHEET SHEET SHEET SHEET SHEET SHEET SHEET SHEET SHEET SHEET SHEET SHEET SHEET SHEET SHEET SHEET SHEET SHEET SHEET SHEET SHEET SHEET SHEET SHEET SHEET SHEET SHEET SHEET SHEET SHEET SHEET SHEET SHEET SHEET SHEET SHEET SHEET SHEET SHEET SHEET SHEET SHEET SHEET SHEET SHEET SHEET SHEE SHEET SHEET SHEET SHEET SHEET SHEET SHEET SHEET SHEET SHEET SHEET SHEET SHEET SHEET SHEET SHEET SHEET SHEET SHEET SHEET SHEET SHEET SHEET SHEET SHEET SHEET SHEET SHEET SHEET SHEET SHEET SHEET SHEET SHEET SHEET SHEET SHEET SHEET SHEET SHEET SHEET SHEET SHEET SHEET SHEET SHEET SHEET SHEET SHEET SHE | 9 | |
| C12 | FULL CREAM MILK RESOIL SHEET SHEET SHEET SHEET SHEET SHEET SHEET SHEET SHEET SHEET SHEET SHEET SHEET SHEET SHEET SHEET SHEET SHEET SHEET SHEET SHEET SHEET SHEET SHEET SHEET SHEET SHEET SHEET SHEET SHEET SHEET SHEET SHEET SHEET SHEET SHEET SHEET SHEET SHEET SHEET SHEET SHEET SHEET SHEET SHEET SHEET SHEET SHEET SHEET SHEETF SHEET SHEET SHEET SHEET SHEET SHEET SHEET SHEET SHEET SHEET SHEET SHEET SHEET SHEET SHEET SHEET SHEET SHEET SHEET SHEET SHEET SHEET SHEET SHEET SHEET SHEET SHEET SHEET SHEET SHEET SHEET SHEET SHEET SHEET SHEET SHEET SHEET SHEET SHEET SHEET SHEET SHEET SHEET SHEET SHEET SHEET SHEET SHEET SHEET SHEFT SHEET SHEET SHEET SHEET SHEET SHEET SHEET SHEET SHEET SHEET SHEET SHEET SHEET SHEET SHEET SHEET SHEET SHEET SHEET SHEET SHEET SHEET SHEET SHEET SHEET SHEET SHEET SHEET SHEET SHEET SHEET SHEET SHEET SHEET SHEET SHEET SHEET SHEET SHEET SHEET SHEET SHEET SHEET SHEET SHEET SHEET SHEET SHEET SHEET SHEAM SHEET SHEET SHEET SHEET SHEET SHEET SHEET SHEET SHEET SHEET SHEET SHEET SHEET SHEET SHEET SHEET SHEET SHEET SHEET SHEET SHEET SHEET SHEET SHEET SHEET SHEET SHEET SHEET SHEET SHEET SHEET SHEET SHEET SHEET SHEET SHEET SHEET SHEET SHEET SHEET SHEET SHEET SHEET SHEET SHEET SHEET SHEET SHEET SHEET SHEAR SHEET SHEET SHEET SHEET SHEET SHEET SHEET SHEET SHEET SHEET SHEET SHEET SHEET SHEET SHEET SHEET SHEET SHEET SHEET SHEET SHEET SHEET SHEET SHEET SHEET SHEET SHEET SHEET SHEET SHEET SHEET SHEET SHEET SHEET SHEET SHEET SHEET SHEET SHEET SHEET SHEET SHEET SHEET SHEET SHEET SHEET SHEET SHEET SHEET SHEER SHEET SHEET SHEET SHEET SHEET SHEET SHEET SHEET SHEET SHEET SHEET SHEET SHEET SHEET SHEET SHEET SHEET SHEET SHEET SHEET SHEET SHEET SHEET SHEET SHEET SHEET SHEET SHEET SHEET SHEET SHEET SHEET SHEET SHEET SHEET SHEET SHEET SHEET SHEET SHEET SHEET SHEET SHEET SHEET SHEET SHEET SHEET SHEET SHEET SHEED SHEET SHEET SHEET SHEET SHEET SHEET SHEET SHEET SHEET SHEET SHEET SHEET SHEET SHEET SHEET SHEET SHEET SHEET SHEET SHEET SHEET SHEET SHEET SHEET SHEET SHEET SHEET SHEET SHEET SHEET SHEET SHEET SHEET SHEET SHEET SHEET SHEET SHEET SHEET SHEET SHEET SHEET SHEET SHEET SHEET SHEET SHEET SHEET SHEET SHEEN SHEET SHEET SHEET SHEET SHEET SHEET SHEET SHEET SHEET SHEET SHEET SHEET SHEET SHEET SHEET SHEET SHEET SHEET SHEET SHEET SHEET SHEET SHEET SHEET SHEET SHEET SHEET SHEET SHEET SHEET SHEET SHEET SHEET SHEET SHEET SHEET SHEET SHEET SHEET SHEET SHEET SHEET SHEET SHEET SHEET SHEET SHEET SHEET SHEET SHEETY SHEET SHEET SHEET SHEET SHEET SHEET SHEET SHEET SHEET SHEET SHEET SHEET SHEET SHEET SHEET SHEET SHEET SHEET SHEET SHEET SHEET SHEET SHEET SHEET SHEET SHEET SHEET SHEET SHEET SHEET SHEET SHEET SHEET SHEET SHEET SHEET SHEET SHEET SHEET SHEET SHEET SHEET SHEET SHEET SHEET SHEET SHEET SHEET SHEET SHE | ||
| C13 | GREEN ZUCCHINI CHEESE TANGIBLE CHEESE TANGIBLE CHEESE TANGIBLE CHEESE TANGIBLE CHEESE TANGIBLE CHEESE TANGIBLE CHEESE TANGIBLE CHEESE TANGIBLE CHEESE TANGIBLE CHEESE TANGIBLE CHEESE TANGIBLE CHEESE TANGIBLE CHEESE TANGIBLE CHEESE TANGIBLE CHEESE TANGIBLE CHEESE TANGIBLE CHEESE TANGIBLE CHEESE | 8 | |
| C14 | GREEN ZUCCHINI CHEESE TANGIBLE CHEESE TANGIBLE CHEESE TANGIBLE CHEESE TANGIBLE CHEESE TANGIBLE CHEESE TANGIBLE CHEESE TANGIBLE CHEESE TANGIBLE CHEESE TANGIBLE CHEESE TANGIBLE CHEESE TANGIBLE CHEESE TANGIBLE CHEESE TANGIBLE CHEESE TANGIBLE CHEESE TANGIBLE CHEESE | 8 | |
| C20 | GREEN ZUCCHINI CHEESE TANGIBLE CHEESE TANGIBLE CHEESE TANGIBLE CHEESE TANGIBLE CHEESE TANGIBLE CHEESE TANGIBLE CHEESE TANGIBLE CHEESE TANGIBLE CHEESE TANGIBLE CHEESE TANGIBLE CHEESE TANGIBLE CHEESE TANGIBLE CHEESE TANGIBLE CHEESE TANGIBLE CHEESE TANGIBLE CHEESE TOTAL MEAT | 1 | |
| C21 | GREEN ZUCCHINI CHEESE TANGIBLE CHEESE TANGIBLE CHEESE TANGIBLE CHEESE TANGIBLE CHEESE TANGIBLE CHEESE TANGIBLE CHEESE TANGIBLE CHEESE TANGIBLE CHEESE TANGIBLE CHEESE TANGIBLE CHEESE TANGIBLE CHEESE TANGIBLE CHEESE TANGIBLE CHEESE TOTAL MEAT | 1 | |
| C22 | GREEN ZUCCHINI CHEESE TANGIBLE CHEESE TANGIBLE CHEESE TANGIBLE CHEESE TANGIBLE CHEESE TANGIBLE CHEESE TANGIBLE CHEESE TANGIBLE CHEESE TANGIBLE CHEESE TANGIBLE CHEESE TANGIBLE CHEESE TOTAL MEAT | 1 | |
| C23 | GREEN ZUCCHINI CHEESE TANGIBLE CHEESE TANGIBLE CHEESE TANGIBLE CHEESE TANGIBLE CHEESE TANGIBLE CHEESE TANGIBLE CHEESE TANGIBLE CHEESE TANGIBLE CHEESE TOTAL MEAT | 1 | |
| C24 | GREEN ZUCCHINI CHEESE TANGIBLE CHEESE TANGIBLE CHEESE TANGIBLE CHEESE TANGIBLE CHEESE TANGIBLE CHEESE TANGIBLE CHEESE TANGIBLE CHEESE TANGIBLE CHEESE TOTAL MEAT | 1 | |
| C25 | GREEN ZUCCHINI CHEESE TANGIBLE CHEESE TANGIBLE CHEESE TANGIBLE CHEESE TANGIBLE CHEESE TANGIBLE CHEESE TANGIBLE CHEESE TANGIBLE CHEESE TANGIBLE CHEESE TOTAL MEAT | 1 | |
| C26 | GREEN ZUCCHINI CHEESE TANGIBLE CHEESE TANGIBLE CHEESE TANGIBLE CHEESE TANGIBLE CHEESE TANGIBLE CHEESE TANGIBLE CHEESE TANGIBLE CHEESE TANGIBLE CHEESE TOTAL MEAT | 1 | |
ADVENTURE 7 EXPLODED VIEW

text_image
Technical schematic diagram of an automotive assembly with labeled components and parts↓
ADVENTURE 7 PARTS LIST
| NO. | DESCRIPTION | QTY |
| 1 | CONSOLE SET GEAR ASSISTING ROOM ROOM | 1 |
| 2 | MOZZARE SEED CHAPES, MOUNTED EXPOUND | 1 |
| 3 | MUSHROOM SELLING SHEET EXPOUND | 1 |
| 5 | COCONDUCTURE SET GEAR ASSISTING ROOM EXPOUND | 1 |
| 6ABT | 1 NAME OF MANUFACTURABLE SYSTEMS | 1 |
| ACT | CORNATE WITH COORDING CABBAGE SYSTEMS | 1 |
| ACT2 | COORDING MEAT EXPOUND SCREEN PRINT | 1 |
| ACD | ARM SHEET LIME ARM ROLLING CONNECTORATE | 1 |
| ACD3 | ARM SHEET SHEET ROLLING SWITCH SWITCH | 1 |
| ACHC | FOOT FRAME SET TENDER CONNECTORATE SERVICES | 1 |
| AHW | RICH COORDING SLIDE ARM SIMULATION SYSTEMS | 1 |
| ARJ | RICH FOR SPIN FRONT TEXTILE SWITCH | 1 |
| AIX | CORIAND SHAKLE STEM BOARD POWER | 1 |
| AXL | PANENTILLA YELLOW BREADS SLICE SWITCH, BEACH | 2 |
| AXL1 | SPRING GREEN GREEN CABBAGE | 2 |
| AXL2 | TRANSPORT KARELLA TECH | 2 |
| AXL3 | VANONE LAURA GREEN GREEN PLANE SWITCH | 2 |
| AXL4 | GREEN PETE GREEN PETE GREEN PETE GREEN FLA | 1 |
| AXL5 | STRAW PERRY ZONEZ LEAF | 0 |
| AXL6 | CURRY PHILADES GREEN PHILADES | 8 |
| AXL7 | CURRY PHILADES GREEN PHILADES | 4 |
| AXL8 | THICK CHUCKER GREEN STRONG CABBAGE SYSTEMS | 8 |
| AXL9 | MINI CABBAGE GREEN STRONG CABBAGE SYSTEMS | 5 |
| AXL10 | MINI CABBAGE GREEN STRONG CABBAGE SYSTEMS | 1 |
| AXL11 | SPRING GREEN GREEN STRONG CABBAGE SYSTEMS | 2 |
| NO. | DESCRIPTION | QTY |
| 1A2 | CUSHION DECK SLABRUE BURCHANDAL TM 4A | 2 |
| 2A7 | CUSHION GOURCHEN PRAVIVA, WANGYUAN | 2 |
| 30B | KONIUS SUSTRIEFIC AKRY WMG TUS | 2 |
| 35B | CUSHION-CONDUCT RUBBERBLU- Black CTWAHE | 2 |
| 311 | SARSHIPEHATNG YOZILPHISN | 4 |
| 312 | NUK MUNCHWATLLITSP AOK PINT | 1 |
| 313 | SCENE SPECIAL NATH SPIN ALAM 2 LUX | 2 |
| 314 | X-MARQUA VY MAHUA ZUCHI SHIRMA BA CHUJING MA | 2 |
| 315 | MARTIN KATY KUSIKDI YUAN PAH GHN | 4 |
| 316 | SCENE KATY KUSIKDI YUAN PAH LEH BDNIP | 1 |
| 317 | SCENE KATY KUSIKDI YUAN PAH LEH PAH | 1 |
| 318 | MARTIN KATY KUSIKDI YUAN PAH LEH PAH LEH PAH | 1 |
| 319 | LIMETHROCHIN MO PEACH YUAN PAH LEH PAH LEH PAH | 2 |
| 320 | LIMETHROCHIN MO PEACH YUAN PAH LEH PAH LEH PAH | 2 |
| 321 | POKTI PAPAYA ONGOLE PAPAYA PAPAYA PAPAYA | 4 |
| 322 | MOZI ZUCHI PAPAYA PAPAYA ZUCHI | 1 |
| 323 | LIMI MOZI PAPAYA PAPAYA PAPAYA PAPAYA PAPAYA | 1 |
| 324 | LIMI MOZI PAPAYA PAPAYA PAPAYA PAPAYA | 1 |
| 325 | SCENE ZUCHI PAPAYA PAPAYA ZUCHI | 2 |
| 326 | MARTIN MAHUA ZUCHI PAPAYA ZUCHI PAPAYA ZUCHI PAPAYA | 2 |
| 327 | SCENE ZUCHI PAPAYA PAPAYA ZUCHI PAPAYA ZUCHI | 1 |
| 328 | SOVER DUMES, LAD BID | 1 |
| 329 | VASHE PAPAYA PAPAYA PAPAYA PAPAYA | 2 |
| 330 | MARTIN MAHUA ZUCHI PAPAYA ZUCHI PAPAYA ZUCHI | 1 |
| 331 | VASHE PAPAYA PAPAYA ZUCHI PAPAYA ZUCHI | 1 |
ADVENTURE 7 PARTS LIST
| NO. | DESCRIPTION | QTY |
| A00 | MUTANY LOCKSHAKI, SPRY GRADE 2.5 BLACK ZING | 2 |
| A01 | SARPTY LIFT SETTING | 1 |
| A02 | POWER SWITCH/CHOW LIGHT | 1 |
| A03 | TOMES CABBAGE, SHUT BARRICKLE GINGER | 1 |
| A04 | METHI PETER CUTTER | 1 |
| A05 | PANEER LETT CAPITATION POTENTIAL CABBAGE | 2,000 |
| A15 | SPRING CHAPET POTENTIAL PERECE | 1 |
| A16 | AMERICAN ELECTRICAL POWER | 1 |
| A17 | SUPPERATING CONCELLE POWER | 1 |
| A18 | MOZZARE TRINATE CONTROL ON EQUITY FORCE | 1 |
| A19 | MINIMUM CABBAGE SHEET CAPACITY & BALANCE | 1 |
| A20 | WATER CAPACITY SHEET CAPACITY & CONSTRUCTION | 2,000 |
| A22 | INDUSTRAL SHEET CAPACITY & TRANSITION | 2 |
| A23 | SWEET WIRELESS CAPACITY SUPPLY (REACH) | 4 |
| A24 | RED POWER CAPACITY SUPPLY RESOIL | 1 |
| A24 | BEANS CAPACITY RESOIL | 1 |
| A26 | SHORT TOLERANCE CAPACITY & COAST PROCESSED | 1 |
| A27 | CONCRETE CONNECTOR WRITTEN & GREEN CAPACITY | 1 |
| A28 | CORIANDER GREEN CAPACITY & GREEN CAPACITY | 1 |
| A29 | SOYA BEANS CAPACITY & GREEN CAPACITY | 0 |
| A32 | GREEN BEANS CAPACITY & GREEN CAPACITY | 1 |
| A33 | GREEN BEANS CAPACITY & GREEN CAPACITY | 1 |
| A34 | GREEN BEANS CAPACITY & GREEN CAPACITY | 1 |
| A35 | GREEN BEANS CAPACITY & GREEN CAPACITY | 1 |
| A36 | GREEN BEANS CAPACITY & GREEN CAPACITY | 1 |
| A37 | GREEN BEANS CAPACITY & GREEN CAPACITY | 1 |
| A38 | GREEN BEANS CAPACITY & GREEN CAPACITY | 1 |
| NO. | DESCRIPTION | QTY |
| 010 | ONE OF LETTLE BEANS, 2013 TO MATTLE SHEET SLK | 1 |
| 011 | FULL CABBAGE TAT LANDING WITH MEASURE SHEET | 1 |
| 012 | SCHEMA SHAKING, TO FLOWER FOR PEAS | 6 |
| 021 | SALAWA SHAKING, WITH SHEET | 1 |
| 022 | SPRING ON CHAPES, WITH COOKING SHEET | 1 |
| 023 | RICH COOKING SHEET WITH MEASURE SHEET | 1 |
| 024 | LEFT PEEACHING SHEET WITH MEASURE SHEET | 1 |
| 025 | LEFT PEEACHING SHEET WITH COOKING SHEET | 1 |
| 026 | CURRY WITH COOKING SHEET WITH MEASURE SHEET | 3 |
| 027 | SHORT TRAVEL SHEET WITH SHEET | 1 |
| 028 | BLUEBELL SHEET WITH MEASURE SHEET | 1 |
| 029 | BITT WITH COOKING SHEET WITH MEASURE SHEET | 1 |
| 030 | SHORT SWEET SHEET WITH MEASURE SHEET | 1 |
| 031 | SHORT SWEET SHEET WITH MEASURE SHEET | 1 |
| 032 | CORRECTED SHEET | 1 |
| 033 | DECUL CROCKING SHEET | 1 |
| 034 | WORKING SHEET WITH MEASURE SHEET | 2 |
| 035 | BEAUTY CROCKING SHEET WITH MEASURE SHEET | 1 |
| 036 | SHORT SWEET SHEET WITH MEASURE SHEET | 1 |
| 037 | SHORT SWEET SHEET WITH MEASURE SHEET | 1 |
| 038 | SHORT SWEET SHEET WITH MEASURE SHEET | 1 |
| 039 | SHORT SWEET SHEET WITH MEASURE SHEET | 1 |
| 040 | SHORT SWEET SHEET WITH MEASURE SHEET | 1 |
| 041 | SHORT SWEET SHEET WITH MEASURE SHEET | 1 |
| 042 | SHORT SWEET SHEET WITH MEASURE SHEET | 1 |
| 043 | SHORT SWEET SHEET WITH MEASURE SHEET | 1 |
| 044 | SHORT SWEET SHEET WITH MEASURE SHEET | 1 |
| 045 | SHORT SWEET SHEET WITH MEASURE SHEET | 1 |
| 046 | SHORT SWEET SHEET WITH MEASURE SHEET | 1 |
| 047 | SHORT SWEET SHEET WITH MEASURE SHEET | 1 |
| 048 | SHORT SWEET SHEET WITH MEASURE SHEET | 1 |
Adventure 1 / 3 / 5 / 7 Assembly Guide Rev. 1.0 | © 2015 Johnson Health Tech Made in China
Adventure 1 / 3 / 5 / 7 Montageanleitung Ver. 1.0 | © 2015 Johnson Health Tech Hergestellt in China
Adventure 1 / 3 / 5 / 7 Guide de montage Rév. 1.0 | © 2015 Johnson Health Tech Fabriqué en Chine
Montagehandleiding Adventure 1 / 3 / 5 / 7 revisie 1.0 | © 2015 Johnson Health Tech Made In Chin

HORIZON
FITNESS

natural_image
Silhouette of a person on a treadmill (no text or symbols)ADVENTURE 1
ADVENTURE 3

natural_image
Silhouette of a person on a treadmill (no text or symbols)ADVENTURE 5
ADVENTURE 7

OPERATION GUIDE
BEDIENUNGSANLEITUNG
GUIDE DE FONCTIONNEMENT
GEBRUIKERSHANDLEIDING
3 ENGLISH
26 DEUTSCH
50 FRANÇAIS
74 NEDERLANDS
TREADMILL OPERATION
This section explains how to use your treadmill's console and programming.
The BASIC OPERATION section in the TREADMILL GUIDE has instructions for the following:
• LOCATION OF THE TREADMILL
• USING THE SAFETY KEY
• FOLDING THE TREADMILL
• MOVING THE TREADMILL
• LEVELING THE TREADMILL
• TENSIONING THE RUNNING BELT
• CENTERING THE RUNNING BELT
• USING THE HEART RATE FUNCTION


text_image
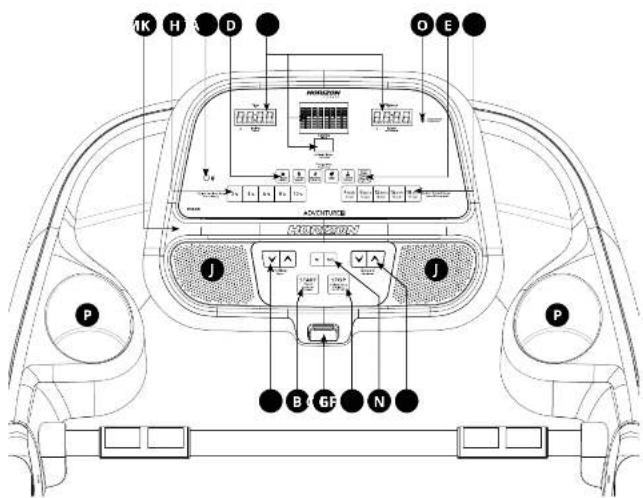
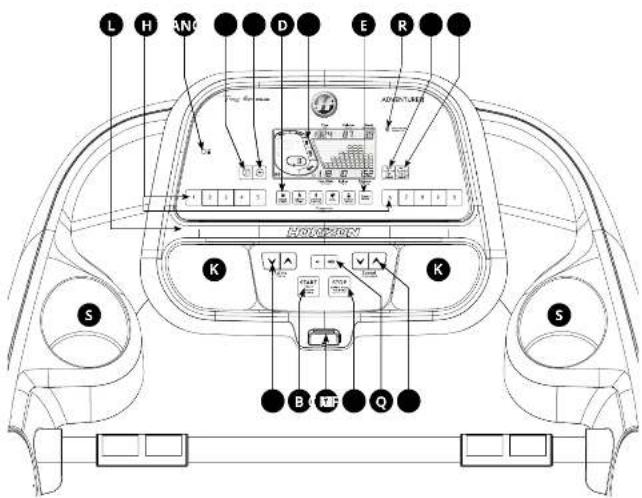
M K H A D O E P J B G F N PNote: There is a thin protective sheet of clear plastic on the overlay of the console that should be removed before use.
A) LED DISPLAY WINDOW: time, distance, speed, calories, incline and heart rate.
B) START/PAUSE KEY: press to start workout and pause workout.
C) STOP KEY: press to stop workout. Hold to reset console.
D) PROGRAM KEYS: press to select workout.
E) ENTER KEY: press to confirm selection during programming setup.
F) INCLINE ▼▲ KEYS: press to adjust incline level.
G) SPEED ▼▲ KEYS: press to adjust speed level.
H) INCLINE QUICK KEYS: used to reach desired incline quickly.
I) SPEED QUICK KEYS: used to reach desired speed quickly.
J) SPEAKERS: plays music through speakers when connected to your media player
K) READING RACK: holds reading material.
L) SAFETY KEY: enables treadmill when safety key is inserted.
M) AUDIO IN JACK: plug your media player into the console using the included audio adaptor cable.
N) VOLUME: used to adjust volume up or down.
O) ENERGY SAVER LIGHT: Indicates if machine is in Energy Saver mode.
P) WATER BOTTLE HOLDER: holds personal workout equipment.


text_image
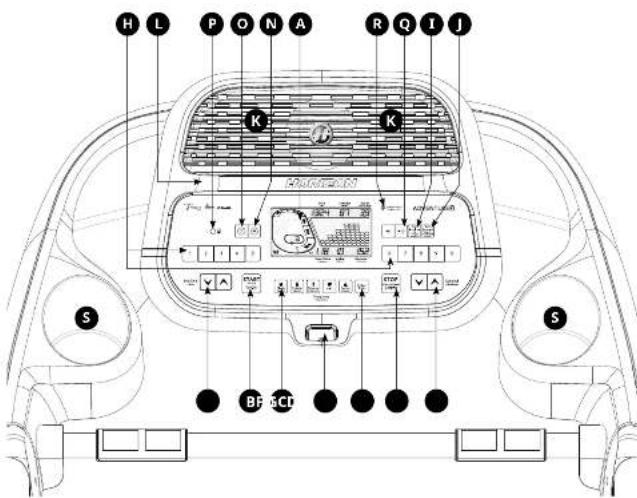
H L P O N A R Q I J K K T### 10000000000000000000000000000000000000000000000000000000000000000000000000000000000000000 S S BF SCINote: There is a thin protective sheet of clear plastic on the overlay of the console that should be removed before use.
A) LCD DISPLAY WINDOW: time, distance, speed, calories, incline, laps, and heart rate.
B) START/PAUSE KEY: press to start workout and pause workout.
C) STOP KEY: press to stop workout. Hold to reset console.
D) PROGRAM KEYS: press to select workout.
E) ENTER KEY: press to confirm selection during programming setup.
F) INCLINE ▼▲ KEYS: press to adjust incline level.
G) SPEED ▼▲ KEYS: press to adjust speed level.
H) QUICK ADJUST KEYPAD: quickly access any incline or speed level by typing the number and pressing SET INCLINE (1) or
SET SPEED (j) Keys. Examples:
To change the speed limit to 12 years, 3.0 SET SPEED
I) SET INCLINE KEY: press to change incline to level entered into keypad.
J) SET SPEED KEY: press to change resistance to level entered into keypad.
K) SPEAKERS: plays music through speakers when connected to your media player.
L) READING RACK: holds reading material.
M) SAFETY KEY: enables treadmill when safety key is inserted.
N) WI-FI CONNECT & SYNC & TIMEZONE: press to reset and connect your wireless internet connection and set time zone.
see Page 15 for more info.
O) PASSPORT CONNECT & SYNC: press to reset and connect your Passport box for Virtual Active programming.
P) AUDIO IN JACK: plug your media player into the console using the included audio adaptor cable.
Q) VOLUME: used to adjust volume up or down.
R) ENERGY SAVER LIGHT: indicates if machine is in Energy Saver mode.
S) WATER BOTTLE HOLDER: holds personal workout equipment.


text_image
L H AN: D E R H A N K B Q S SNote: There is a thin protective sheet of clear plastic on the overlay of the console that should be removed before use.
A) LCD DISPLAY WINDOW: time, distance, speed, calories, incline, laps, and heart rate.
B) START/PAUSE KEY: press to start workout and pause workout.
C) STOP KEY: press to stop workout. Hold to reset console.
D) PROGRAM KEYS: press to select workout.
E) ENTER KEY: press to confirm selection during programming setup.
F) INCLINE ▼▲ KEYS: press to adjust incline level.
G) SPEED ▼▲ KEYS: press to adjust speed level.
H) QUICK ADJUST KEYPAD: quickly access any incline or speed level by typing the number and pressing SET INCLINE (1) or
SET SPEED (j) Keys. Examples:
• To change the incline to 4.0%, press 4-0-SET INCLINE.
I) SET INCLINE KEY: press to change incline to level entered into keypad.
J) SET SPEED KEY: press to change resistance to level entered into keypad.
K) SPEAKERS: plays music through speakers when connected to your media player.
L) READING RACK: holds reading material.
M) SAFETY KEY: enables treadmill when safety key is inserted.
N) WI-FI CONNECT & SYNC & TIMEZONE: press to reset and connect your wireless internet connection and set time zone.
See Page 15 for more info.
O) PASSPORT CONNECT & SYNC: press to reset and connect your Passport box for Virtual Active programming.
P) AUDIO IN JACK: plug your media player into the console using the included audio adaptor cable.
Q) VOLUME: used to adjust volume up or down.
R) ENERGY SAVER LIGHT: indicates if machine is in Energy Saver mode.
S) WATER BOTTLE HOLDER: holds personal workout equipment.


text_image
HTNO K K T B G M TNote: There is a thin protective sheet of clear plastic on the overlay of the console that should be removed before use.
A) LCD DISPLAY WINDOW: time, distance, speed, calories, incline, laps, and heart rate.
B) START/PAUSE KEY: press to start workout and pause workout.
C) STOP KEY: press to stop workout. Hold to reset console.
D) PROGRAM KEYS: press to select workout.
E) ENTER KEY: press to confirm selection during programming setup.
F) INCLINE ▼▲ KEYS: press to adjust incline level.
G1 SPEED ▼▲ KEYS: press to adjust speed level.
H) QUICK ADJUST KEYPAD: quickly access any incline or speed level by typing the number and pressing SET INCLINE (1) or SET SPEED (1) keys. Examples:
• To change the incline to 4.0%, press 4-0-SET INCLINE.
• To change the speed level to 12, Press 1-2-0-SET SPEED
I) SET INCLINE KEY: press to change incline to level entered into keypad.
J) SET SPEED KEY: press to change resistance to level entered into keypad.
K) SPEAKERS: plays music through speakers when connected to your media player.
L) READING RACK: holds reading material.
M) SAFETY KEY: enables treadmill when safety key is inserted.
N) WI-FI CONNECT & SYNC & TIMEZONE: press to reset and connect your wireless internet connection and set time zone. See Page 15 for more info.
O) PASSPORT CONNECT & SYNC: press to reset and connect your Passport box for Virtual Active programming.
P) AUDIO IN JACK: plug your media player into the console using the included audio adaptor cable.
Q) VOLUME: used to adjust volume up or down.
R) ENERGY SAVER LIGHT: indicates if machine is in Energy Saver mode.
S) POWER BUTTOM: used to power on/off console and also the console will into Energy Saver Mode when power off console.
T) WATER BOTTLE HOLDER: holds personal workout equipment.


ADVENTURE 1 DISPLAY
inthe

speed
ADVENTURE 3 / 5 DISPLAY

text_image
A E B 1324 87 39 1 18 10 152 F D
distance control unit sale
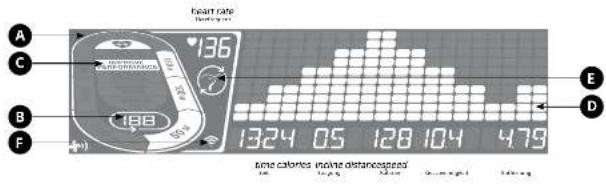
ADVENTURE 7 DISPLAY
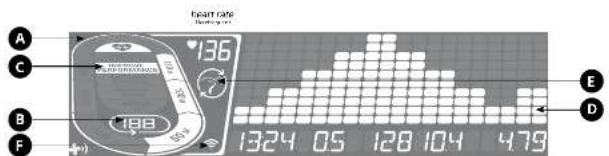
text_image
A B C D heart rate (Resting out) 136 188 50% 1324 05 128 104 479time calories: inline distancespeed
Sunlight Library

DISPLAYS WINDOW
• TIME: Shown as minutes : seconds. View the time remaining or the time elapsed in your workout.
- SPEED: Shown as KIWH. Indicates how fast the foot pads is moving.
• CALORIES: Total calories burned or remaining for your workout.
• DISTANCE: Shown as KM. Indicates distance traveled or distance remaining during your workout.
• INCLINE: Shown as percent. - HEART RATE: Shown as BPM (beats per minute). Used to monitor your heart rate (displayed when contact is made with both pulse grips).
A) TRACK: Follows progress around a simulated track. Segments light up with every 50 meters completed.
B) LAPS: Shows how many laps have been completed. One lap is 400 meters.
C) CARDIOCOMPASS™ HEART RATE WHEEL: Displays what activity zone you are in during your workout.
• WARM UP: 0-60% of maximum heart rate
WEIGHT LOSS: 60-70% of maximum heart rate
• IMPROVE FITNESS: 70-80% of maximum heart rate
• MAXIMUM PERFORMANCE: 90-100% of maximum heart rate
D) PROGRAM PROFILE: Represents the profile of the program being used (speed during speed based programs and incline during incline based programs).
E) PASSPORT: Indicates Passport box connection is present.
F) WI-FI: Indicates wireless connection is present and the strength (low, medium, high).
SET UP XID ACCOUNT FOR VIEWFIT CONNECTIVITY
Creating an xID account will allow you to save and share workout data online at www.viewfit.eu
Up to four users can be saved on a machine. This process is the first step in connecting your equipment. It must be done from a computer, tablet, or mobile device that is connected to the internet.
1) Visit the web site: www.vlevfit.eu
2) Once at the web site, select the CONNECT YOUR EQUIPMENT option on the top menu bar.
3) The first step in connecting your equipment will to be creating your xID account. This will be your login to View Fit.
4) Enter your phone number or another easy-to-remember 10-14 digit number. This will be your account number.
5) Fill in your profile information to finish the xID account set up process. You will be asked to provide an email address not associated with any other xID account. Check your email after the set-up process for a link to validate your account.
CONNECT WI-FI & SET TIMEZONE
Once you have treated your xID account, you will be able to move on to activating the Wi-Fi on your equipment. Reminder, this requires you to use your computer, tablet, or mobile device that is connected to the internet.
6) Press and hold 📋 for 3-5 seconds, Then enter your time zone, press ENTER button you will see the message ACTIVATED on your screen.
7) On your computer or other device, go to your Wi-Fi settings. You should select the network with your model name. Doing this enables you to connect your equipment to your wireless network.
8) A new window will pop up with the list of wireless networks your equipment can see. Select your home Wi-Fi network and connect.
9) The remaining step is to reconnect your computer or other device back to your WI-FI network. Go to your settings again and connect as you normally would.
Congratulations! You are now connected and ready to get started.


GETTING STARTED
1) Check to make sure no objects are placed on the belt that will hinder the movement of the treadmill.
2) Plug in the power cord and turn the treadmill ON.
3) Stand on the side rails of the treadmill
4) Attach the safety key clip to part of your clothing making sure that it is secure and will not become detached during
operation. Insert the safety key into the safety keyhole in the console.
5) Select your xID account, User, Guest, or Edit a User using ▼ and press ENTER.
6) When you log in for the first time as User 1-4, you will be prompted to enter your xID information.
a) Enter your xID account number using NUMBER 0 to NUMBER 9. After the final input, press ENTER.
b) Enter your nargcode using NUMBER 0 to NUMBER 9. After the final input, press ENTER
SI. If you key the incorrect number during entering your xID or passcode press INCLUDEDOWS or SPEED SLOW to
delete the last entered number.
A) QUICK START
Simply press START to begin working out. Time will count up from 0:00.
The speed will default to 0.8 KM. Incline will default to 0%.
B) SELECT A PROGRAM
1) Select a PROGRAM using ▼ and press ENTER.
2) Set workout program information using ▼ and press ENTER after each selection.
3) Press START to begin workout.
NOTE: You can adjust the speed and incline levels during your workout.
When your workout is complete, your workout information will stay displayed on the console for 30 seconds and
that is automatically given to the user profile if aID Terms and Conditions were accepted.
TO CLEAR CURRENT SELECTION
To clear the current program selection or screen, press and hold STOP for 3 seconds.

PROGRAM INFORMATION
CLASSIC: MANUAL, INTERVALS (SPEED INTERVALS & PEAK INTERVALS), WEIGHT LOSS.
MANUAL: Adjust your speed and incline manually during your workout. User sets time, starting speed and incline.
INTERVALS (SPEED INTERVALS & PEAK INTERVALS): An effective fat-burning workout that helps you improve your fitness level. Choose from speed intervals, peak intervals.
WEIGHT LOSS: Promotes weight loss by increasing and decreasing the speed and incline, while keeping you in your fat burning zone. Speed and Incline changes, segments repeat every 30 seconds.
CALORIES: Set goals for burning calories with three workouts. Choose from 100,300,500. User sets starting speed and incline levels. Calories burned are calculated using weight input of user profile.
DISTANCE: Push yourself and go further during your workout with 3 distance workouts. Choose from 1K, 5K, 10k. User sets starting speed and incline levels.
STEPS: Promotes healthy activity with 2 step-based workouts calculated using average stride length. Choose from 5000 and 10,000 step workouts. User sets starting speed and incline levels.


TARGET HEART RATE PROGRAME (HR SPEED, HR INCLINE): A workout designed to keep you in your specified target heart rate zone. This workout requires you to wear a wireless heart rate strap. See next page for calculating your target heart rate.
HR SPPED: Program adjusts speed to bring to your target heart rate.
HR INCLINE: Program adjusts incline to bring to your target heart rate.
HEART RATE TRAINING
The first step in knowing the right intensity for your training is to find out your maximum heart rate (max HR = 220 - your age). The age-based method provides an average statistical prediction of your max HR and is a good method for the majority of people, especially those new to heart rate training. The most precise and accurate way of determining your individual max HR is to have it clinically tested by a cardiologist or exercise physiologist through the use of a maximal stress test. If you are over the age of 40, overweight, have been sedentary for several years, or have a history of heart disease in your family, clinical testing is recommended. This chart gives examples of the heart rate range for a 30 year old exercising at 5 different heart rates. For example, a 30-year-old's max HR ≤ 220 - 30 - 190 bpm and 90% max HR ≤ 190 × 0.9 - 171 bpm.
| Target Heart Rate zone | Workout Duration | Example THR zone (age 30) | Your THR zone | Recommended For |
| VERY IMPRO 70-100% | <5 min | 171~190 min | Fit persons and for athletic training | |
| IMPRO 82-90% | 2-10 min | 152-171 min | Shorter workouts | |
| MOFRATE 70-90% | 10~40 min | 133~152 min | Moderately long workouts | |
| LIGHT 60-70% | 40-90 min | 114~133 min | Longer and frequently repeated shorter exercises | |
| VERY LIGHT 50-80% | 20-40 min | 164-114 min | Weight management and active recovery. |
Your target heart rate should be set at a number that you will be able to exercise at throughout the majority of your workout. Once you have chosen your target rate, press the 'START' button and begin your workout.
TARGET HEART RATE NOTE:
- The chest strap is required to use the HRC program, with HRC program you can only choose time as your workout target.
• Target heart rate is selected in multiples of 5 beats.
• Warm-up and cool-down each last 4 minutes. - After warm-up 4 minutes, the speed of incline will automatically adjust to bring you near your specified heart rate.
- The display shows your heart rate during exercise. If you are working out beneath your THR, the treadmill will adjust speed or incline accordingly to bring you near your target.
- If there is no heart rate detected, the unit will not change the speed or incline level, and in speed remaining at the same level for maximum 60 seconds and then the console will show "NO HEART RATE DETECTED" and speed will decrease until the minimum speed is reached.
- If your heart rate is 25 beats over your target zone, the program will shut down.

CUSTOM: Lets you create and reuse a perfect workout for you with specific speed, incline and time combination. The ultimate in personal programming. Time-based goal. Your custom workout will be saved automatically.

PROGRAM CHARTS

ADVENTURE 1&7
| Speed Intervals | Speed only | ||
| Segment Length up 1/2 Cost per | |||
| Time 400 hrs | Time 300 hrs | ||
| Level 1 Speed km/h | 6.24 | 5.25 | |
| Level 2 Speed km/h | 4.32 | 3.72 | |
| Level 3 Speed km/h | 2.14 | 4.93 | |
| Level 4 Speed km/h | 2.14 | 4.93 | |
| Level 5 Speed km/h | 2.27 | 4.83 | |
| Level 6 Speed km/h | 2.57 | 5.04 | |
| Level 7 Speed km/h | 2.57 | 5.04 | |
| Level 8 Speed km/h | 2.64 | 5.6 | |
| Level 9 Speed km/h | 2.54 | 4.64 | |
| Level 10 Speed km/h | 2.42 | 4.54 | |
ADVENTURE 3&5
| Speed Intervals-Speed changes | ||||||
| Segments | Warm Up 12.500 | Warm 400 Mins | 30.100 | 39.000 | 400 Mins | |
| Time | ||||||
| Love 1 | Speed km/h | 1.07 | 4.26 | 2.41 | 16 | |
| Speed km/h | 1.08 | 4.32 | 2.41 | 16 | ||
| Love 2 | Speed km/h | 1.09 | 4.37 | 2.41 | 16 | |
| Love 3 | Speed km/h | 1.10 | 3.58 | 1.2 | ||
| Speed km/h | 1.11 | 2.5 | 8.32 | |||
| Love 4 | Speed km/h | 1.12 | 3.62 | 8.32 | 14 | |
| Love 5 | Speed km/h | 1.13 | 3.62 | 8.32 | 14 | |
| Love 6 | Speed km/h | 1.14 | 3.62 | 8.32 | 14 | |
| Love 7 | Speed km/h | 1.15 | 3.62 | 8.32 | 14 | |
| Speed km/h | 1.16 | 3.62 | 8.32 | 14 | ||
| Love 8 | Speed km/h | 1.17 | 3.62 | 8.32 | 14 | |
| Speed km/h | 1.18 | 3.62 | 8.32 | 14 | ||
| Love 9 | Speed km/h | 1.19 | 3.62 | 8.32 | 14 | |
| Speed km/h | 1.20 | 3.62 | 8.32 | 14 | ||
| Love 10 | Speed km/h | 1.21 | 3.62 | 8.32 | 14 | |
| Speed km/h | 1.22 | 3.62 | 8.32 | 14 | ||
ADVENTURE 3
| Speed | Air/Up | Cool down | |||||
| Time | 400 mins | 95 sec | 20 sec | 400 mins | |||
| Level 1 | Speed (km/h) 1.6-2.5 | 1 | 3.2-3.4 | 2.9-3.5 | |||
| Coding | 1 | 1-2 | 0-1 | 1-2 | 1-2 | 0 | |
| Level 2 | Speed (km/h) 1.6-2.5 | 1 | 3.2-3.7 | 2.9-3.5 | |||
| Coding | 1.5 | 2.5 | 3 | 6.8 | 2.5 | 1.5 | |
| Level 3 | Speed (km/h) | 2 | 3 | 4 | 8 | 5 | 2 |
| Coding | 2 | 3 | 4 | 7.5 | 3 | 2 | |
| Level 4 | Speed (km/h) | 2 | 3 | 4 | 8.8 | 3 | 2 |
| Coding | 2 | 3 | 4 | 8.5 | 3 | 2 | |
| Level 5 | Speed (km/h) 2.4-3.0 | 2.5 | 4.8-5.5 | 5.0-5.4 | 9 | 3.5 | 1.5 |
| Coding | 2.5 | 4.5 | 4.5 | 9 | 3.5 | 1.5 | |
| Level 6 | Speed (km/h) 2.4-3.5 | 2.5 | 4.5 | 10.4 | 5.0-2.4 | ||
| Coding | 2.5 | 3.5 | 4.5 | 10 | 3.5 | 2.5 | |
| Level 7 | Speed (km/h) 2.8-4.1 | 2.5 | 5.0 | 11.2 | 4.1-2.6 | ||
| Coding | 2.5 | 4 | 5.5 | 10 | 4 | 3 | |
| Level 8 | Speed (km/h) 2.4-4.1 | 2.5 | 5.5 | 12 | 4.1-2.5 | ||
| Coding | 2 | 4 | 4.5 | 10 | 4 | 3 | |
| Level 9 | Speed (km/h) 2.4-5 | 2.5 | 6.4 | 12.8 | 4.8-3.5 | ||
| Coding | 3 | 4.5 | 6.1-6.5 | 4.8-3.5 | |||
| Level 10 | Speed (km/h) 2.5-4.5 | 3 | 6.4 | 15.6 | 4.8-3.5 | ||
| Coding | 3 | 4.5 | 6.1-6.5 | 4.8-3.5 | |||
ADVENTURE 5
| Peak Intervards Speed and incline changes | |||||||
| Syst-ment | Warm-up | Cold | Long | ||||
| 400 Min | 2 Min | 30 min | 400 Min | ||||
| Level 1 | Speed (km/h) 1.6-2.4 | 1 | 3.2-6.4 | 2.4-5.6 | |||
| colive | 1 | 1.5 | 0.5 | 1.5 | 1.5 | 6 | |
| Level 2 | Speed (km/h) 1.6-2.4 | 2.2-7.2 | 2.4-5.9 | ||||
| colive | 1.5 | 2.9 | 3 | 6.2 | 2.2 | 1.5 | |
| Level 3 | Speed (km/h) | 2 | 3 | 4 | 8 | 5 | 2 |
| colive | 2 | 3 | 4 | 7.5 | 5 | 2 | |
| Level 4 | Speed (km/h) | 2 | 3 | 4 | 8.8 | 3 | 2 |
| colive | 2 | 3 | 4 | 8.5 | 5 | 2 | |
| Level 5 | Speed (km/h) 2.4-3.6 | 4.8-9.6 | 3.6-5.4 | ||||
| colive | 2.5 | 3.5 | 2.8 | 9 | 3.3 | 2.5 | |
| Level 6 | Speed (km/h) 2.4-3.5 | 4.3 | 10.1 | 2.8-5.4 | |||
| colive | 2.5 | 3.5 | 2.5 | 1.9 | 3.5 | 2.5 | |
| Level 7 | Speed (km/h) 2.4-4.1 | 5.2 | 11.2 | 4.1-7.2 | |||
| colive | 2.5 | 4 | 5.5 | 6.3 | 4 | 3 | |
| Level 8 | Speed (km/h) 2.4-4.1 | 5.6 | 17 | 4.1-7.2 | |||
| colive | 3 | 4 | 8.5 | 9.5 | 4 | 3 | |
| Level 9 | Speed (km/h) 3.5-4.5 | 6.4 | 12.8 | 4.8-7.2 | |||
| colive | 3 | 6.5 | 13.6 | 6.1-7.2 | |||
| Level 10 | Speed (km/h) 3.5-4.5 | 6.4 | 15.0 | 4.8-7.2 | |||
| colive | 3 | 6.5 | 16.1-7.2 | ||||

PROGRAM CHARTS
ADVENTURE 7
| Pole Intervals - Speed and Inline Changes | |||||
| Sugme 2 Wari - Up / Top Down | |||||
| Temp 400 Min / 10' to 35' to 400 Min | |||||
| Level 1 | Speed 0m/70.16 | 2.43 | 0.42 | 2.8 | .5 |
| Inline 1.5 | 3.5 | 1.5 | |||
| Level 2 | Speed 0m/70.16 | 2.43 | 0.72 | 2.8 | .5 |
| Inline 1.5 | 2.5 | 2.5 | .5 | ||
| Level 3 | Speed 0m/70.16 | 3.48 | 3.2 | ||
| Inline 1.5 | 4.7 | 5.2 | |||
| Level 4 | Speed 0m/70.16 | 3.48 | 3.2 | 1 | |
| Inline 2.5 | 4.8 | 5.2 | |||
| Level 5 | Speed 0m/70.24 | 3.74 | 8.9 | 3.2 | .4 |
| Inline 2.3 | 4.8 | 3.2 | .5 | ||
| Level 6 | Speed 0m/70.24 | 3.74 | 8.1 | 3.2 | .4 |
| Inline 2.3 | 4.5 | 3.2 | .5 | ||
| Level 7 | Speed 0m/70.24 | 4.25 | 11.2 | 4.2 | .8 |
| Inline 2.3 | 4.5 | 3.2 | |||
| Level 8 | Speed 0m/70.24 | 4.25 | 6.1 | 4.2 | .6 |
| Inline 2.4 | 5 | 1.4 | |||
| Level 9 | Speed 0m/70.24 | 4.86 | 12.9 | 5.2 | |
| Inline 2.4 | 6 | 1.5 | 5.2 | ||
| Level 10 | Speed 0m/70.24 | 4.86 | 11.2 | 5.2 | |
| Inline 2.4 | 6 | 1.5 | 5.2 | ||
ADVENTURE 5
| Segment | Wm Up | 6 | 7 | 8 | Low Down | |||||||
| 400 MHz | 20 kHz | 30 kHz | 20 kHz | 30 kHz | 20 kHz | 30 kHz | 30 kHz | 40 kHz | 40 kHz | |||
| Level | Speed/km/s | 1.6 | 2.5 | 3.2 | 4 | 3.8 | 5.6 | 9.4 | 5.5 | 6.8 | 4 | 2.6 |
| Indice | 0 | 0.5 | 1.2 | 5 | 1 | 0.5 | 0.5 | 0.5 | 1 | 1 | 0.5 | |
| Level | Speed/km/s | 4 | 2 | 7 | 4.8 | 5.6 | 6.7 | 7.2 | 5.6 | 5.6 | 4.5 | 4 |
| Indice | 5 | 6.5 | 1.5 | 3 | 1 | 0.5 | 1 | 0.5 | 1 | 1 | 0.5 | |
| Level | Speed/km/s | 7.4 | 5.6 | 4.8 | 5.6 | 6.4 | 7.2 | 8 | 7.2 | 6.4 | 5.6 | 4.8 |
| Indice | 8 | 2 | 2 | 2 | 1.5 | 1 | 1 | 1 | 1.5 | 2 | 1 | |
| Level | Speed/km/s | 2.9 | 4.1 | 5.6 | 6.8 | 7.2 | 8 | 9.8 | 7 | 7.2 | 6.4 | 5.6 |
| Indice | 0.5 | 1 | 2 | 2 | 1.5 | 1 | 1 | 1 | 1.5 | 2 | 1 | |
| Level | Speed/km/s | 2.9 | 4.2 | 6.4 | 1.2 | 2 | 3.8 | 3.6 | 3.8 | 3.8 | 1 | 2 |
| Indice | 1 | 2.5 | 2.5 | 2 | 2 | 1.5 | 1.5 | 1.5 | 2 | 2.5 | 1.5 | |
| Level | Speed/km/s | 3.6 | 5.4 | 7.2 | 8 | 8.2 | 6.6 | 10.4 | 6.6 | 8.8 | 8 | 6.5 |
| Indice | 1 | 3.5 | 2.5 | 2 | 2 | 1.5 | 1.5 | 1.5 | 2 | 2.5 | 1.5 | |
| Level | Speed/km/s | 4 | 6 | 8.8 | 9.6 | 9.6 | 10.4 | 11.2 | 10.4 | 9.6 | 8.8 | 7.2 |
| Indice | 1.5 | 2 | 3 | 3 | 2.5 | 2 | 2 | 2 | 2.5 | 3 | 2 | |
| Level | Speed/km/s | 4.4 | 6.5 | 8.8 | 5.8 | 10.4 | 11.2 | 12.1 | 11.2 | 10.4 | 9.6 | 7.0 |
| Indice | 1 | 2 | 3 | 3 | 2.5 | 2 | 2 | 2 | 2.5 | 3 | 2 | |
| Level | Speed/km/s | 4.9 | 7.2 | 9.6 | 10.4 | 11.2 | 12.1 | 12.8 | 12.1 | 11.2 | 10.4 | 8.8 |
| Indice | 2 | 2.5 | 3.5 | 3.5 | 3.5 | 2.5 | 2.5 | 2.5 | 3 | 3.5 | 2.5 | |
| Level | Speed/km/s | 5.2 | 7.0 | 10.4 | 11.2 | 12.1 | 12.8 | 13.6 | 12.5 | 11.2 | 11.1 | 9.0 |
| Indice | 2 | 2.5 | 3.5 | 4.5 | 3 | 2.5 | 2.5 | 2.5 | 3 | 3.5 | 2.5 | |
ADVENTURE 7
| Segment | Weight Less Change | |||||||||||
| Mean | Up | 30 | 50 | 100 | 20 | 30 | 60 | 90 | Low | High | ||
| (7.0) | (4.8) | (8.8) | (3.1) | (3.1) | (3.1) | (3.1) | (3.1) | (3.1) | (3.1) | (3.1) | ||
| Level 1 | Speed km/h | 1.5 | 2.4 | 3.2 | 4 | 4.8 | 5.6 | 6.4 | 5.5 | 4.8 | 4 | 3.6 |
| Indine | 0 | 0.5 | 1.3 | 1.5 | 1 | 0.5 | 0.5 | 0.5 | 1 | 1.5 | 0.5 | |
| Speed km/h | 2 | 3 | 4 | 4.8 | 5.6 | 6.4 | 7.9 | 6.4 | 5.6 | 4.5 | 4 | |
| Level 1 | Indine | 0 | 0.5 | 1.2 | 1.5 | 1 | 0.5 | 1 | 0.5 | 1 | 1.5 | 0.5 |
| Speed km/h | 2.4 | 3.6 | 4.8 | 5.6 | 6.4 | 7.2 | 8 | 7.2 | 9.4 | 5.5 | 4.8 | |
| Indine | 0 | 1 | 2 | 2 | 1 | 1 | 1 | 1 | 2 | 1 | 0.5 | |
| Speed km/h | 2.9 | 4.1 | 6.0 | 6.4 | 7.3 | 8 | 8.8 | 8 | 7.3 | 6.4 | 5.4 | |
| Level 1 | Indine | 0.5 | 1 | 2 | 2 | 1.5 | 1 | 1 | 1.5 | 2 | 1 | |
| Speed km/h | 3.2 | 4.8 | 6.4 | 7.2 | 8 | 8.8 | 9.6 | 8.8 | 8 | 7.2 | 6 | |
| Indine | 1 | 1.5 | 2.5 | 2.5 | 2 | 1.5 | 1.5 | 1.5 | 2 | 2.5 | 1.5 | |
| Level 1 | Speed km/h | 3.0 | 4.4 | 7.2 | 8 | 8.8 | 9.5 | 10.4 | 9.5 | 8.8 | 8 | 6.5 |
| Indine | 1 | 5 | 2.5 | 2.5 | 2 | 1.5 | 1.5 | 1 | 2 | 2.5 | 1.5 | |
| Speed km/h | 4 | 6 | 8.6 | 9 | 10.2 | 11.2 | 12.4 | 10.4 | 9.6 | 8.5 | 7.2 | |
| Level 1 | Indine | 1.5 | 2 | 3 | 3 | 2.5 | 2 | 2 | 2.5 | 3 | 2 | 1.5 |
| Speed km/h | 4.4 | 5.5 | 8.2 | 9.5 | 10.4 | 11.7 | 12.1 | 11.2 | 10.4 | 9.5 | 7.8 | |
| Indine | 1 | 1.2 | 3 | 3 | 2.5 | 2 | 2 | 2.5 | 3 | 2 | 1.2 | |
| Speed km/h | 4.8 | 7.2 | 9.6 | 10.4 | 11.2 | 12.1 | 12.8 | 12.1 | 11.2 | 10.4 | 8.4 | |
| Level 1 | Indine | 2 | 2.5 | 3.5 | 3.5 | 3 | 2.5 | 2.5 | 2.5 | 3 | 2.5 | 2 |
| Speed km/h | 5.2 | 7.8 | 10.4 | 11.2 | 12 | 12.8 | 13.6 | 12.5 | 12.1 | 11.2 | 9.9 | |
| Indine | 1 | 1.5 | 2.5 | 2.5 | 2 | 1.5 | 1.5 | 1.5 | 2 | 1.5 | 1 | |

USING YOUR MEDIA PLAYER
1) Connect the included AUDIO ADAPTOR CABLE to the AUDIO IN JACK on the left of the console and the headphone jack on your media player.
2) Use your media player buttons to adjust song settings.
3) Remove the AUDIO ADAPTOR CABLE when not in use.

ENERGY SAVER (STANDBY MODE)
This machine has a special feature called Energy Saver mode. This mode is NOT automatically activated. When Energy Saver mode is activated, the display will automatically enter standby mode (Energy Saver mode) after 15 minutes of inactivity. This feature saves energy by disabling most power to the machine until a key is pressed on the console. This feature can be turned on or off in the engineering menu.
To enter the engineering menu, press and hold the INCLINE ▲ key and SPEED ▼ key for 3-5 seconds. Use ▼ ▲ to navigate to SWITCH FUNCTION and press ENTER. Press ENTER to select Energy Saver mode, use ▼ ▲ to select ENERGY SAVE ON or OFF. Press and hold STOP for 3-5 seconds to exit SWITCH FUNCTION. Press and hold STOP again for 3-5 seconds to exit the engineering menu.
PASSPORT™ MEDIA PLAYER
The Passport player, featuring Virtual Active™ technology, is a high-definition experience that uses real destination footage and matching ambient sounds from stunning destinations around the world. The ultimate in workout entertainment, Passport lets you escape the confines of a regular workout routine while enjoying a dynamic experience.
A Passport player is available for purchase separately from your Horizon Fitness® retailer.
For more information, go to: www.passportplayer.com

text_image
13:47=SYNCING CONSOLE WITH PASSPORT
1) Use the arrow keys on the Passport remote to scroll to the setup icon and press select.
2) Follow the on-screen prompts to press (7) on the equipment console.
3) The message displayed on screen will notify you if the sync was a success or failure.

DEUTSCH
LAUFBANDBEDIENUNG
text_image
M K H A D O E P J B G F N PBEDIENUNG DER ADVENTURE 1-KONSOLE
text_image
H L P O N A R Q I J K K T### 10000000000000000000000000000000000000000000000000000000000000000000000000000000000000000 S S BF GCI M BBEDIENUNG DER ADVENTURE 3-KONSOLE
text_image
L H AN D E R H A N O K K S B M F Q SBEDIENUNG DER ADVENTURE 5-KONSOLE
text_image
HI NO K K T B G M TBEDIENUNG DER ADVENTURE 7-KONSOLE
ADVENTURE 3/5-DISPLAY

text_image
A E B 1324 87 39 F D 3 1 18 10 152 data for operation data used in the systemADVENTURE 7-DISPLAY

bar
| Category | Value | |---|---| | Heart rate (mmHg/day) | 136 | | Time calories (kcal/min) | 1800 | | Time calories (min/kcal) | 1324 | | Time calories (min/kcal) | 05 | | Time calories (min/kcal) | 128 | | Time calories (min/kcal) | 104 | | Time calories (min/kcal) | 479 | | Time calories (min/kcal) | 1800 | | Time calories (min/kcal) | 128 | | Time calories (min/kcal) | 104 | | Time calories (min/kcal) | 479 | | Time calories (min/kcal) | 1800 | | Time calories (min/kcal) | 128 | | Time calories (min/kcal) | 104 | | Time calories (min/kcal) | 479 |
ANZEIGE-FENSTER
text_image
MK H A D O E P J B G P N PADVENTURE 1 - FONCTIONNEMENT DE LA CONSOLE
text_image
H L P O N A R Q I J K K T### 10000000000000000000000000000000000000000000000000000000000000000000000000000000000000000 S M B F G C SADVENTURE 3 - FONCTIONNEMENT DE LA CONSOLE
text_image
L H ANC D E R H A N K B F Q S SADVENTURE 5 - FONCTIONNEMENT DE LA CONSOLE
text_image
HINO K K T B G M TADVENTURE 7 - FONCTIONNEMENT DE LA CONSOLE
text_image
A E B 1324 87 39 3 118 10 152 F D distance-based speed rateÉCRAN D'AFFICHAGE ADVENTURE 7
text_image
A C B F 136 188 1324 05 128 104 479 time calories inside distance speed E D
FENÊTRE D'AFFICHAGE
PROGRAMMES DISPONIBLES
CLASSIC (CLASSIQUE) : MANUAL (MANUEL), INTERVALS (INTERVALLES) (SPEED INTERVALS - INTERVALLES DE VITESSE ET PEAK INTERVALS - INTERVALLES DE POINTE), WEIGHT LOSS (PERTE DE POIDS).
text_image
M K H A D O E P J B G F N PADVENTURE 1: DE CONSOLE GEBRUIKEN
text_image
H L P O N A R Q I J K K T### 100000000000000000000000000000000000000000000000000000000000000000000000000000000000000000 Z B F G C F M E ZADVENTURE 3: DE CONSOLE GEBRUIKEN
text_image
HINO K K T B G M TADVENTURE 7: DE CONSOLE GEBRUIKEN
ADVENTURE 7: BEELDSCHERM
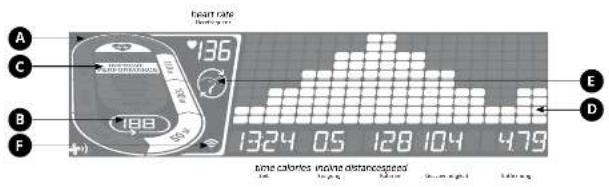
bar
| Time (minutes) | Heart Rate (per 100ml) | |---|---| | 0 | 1324 | | 5 | 136 | | 10 | 128 | | 15 | 104 | | 20 | 479 | The chart displays the heart rate values for a single glucose meter. The 'time calories' is shown below the bar chart.
BEELDSCHERM:
text_image
13:47 = 0.0000DE CONSOLE SYNCHRONISEREN MET PASSPORT
| CCTD | TIME: 2024 | TIME: |
| 10 | American Standard Time | (E) 201-04-2324 American |
| 12 | Case Tools Standard Time | (E) 201-04-0909 Caps, New York Islands |
| 48 | Wife Atlantic Standard Time | (E) 04-02-06 Mid-Atlantic |
| 27 | E. South America Standard Time | (E) 04-04-08C BC England |
| 54 | Salvian Standard Time | (E) 04-04-2322 British American, Germany |
| 53 | Greenland Standard Time | (E) 04-03-00 Greenland |
| 54 | Newfoundland Standard Time | (E) 04-04-2324 Newfoundland and Labrador |
| 55 | Atlantic Standard Time | (E) 04-04-01CC Arctic Time Canada |
| 56 | SA Precious Standard Time | (E) 04-04-2326 Canada, La Paz |
| 17 | Central Blue River Standard Time | (E) 04-04-2322 Mexico |
| 54 | Pacific SA Standard Time | (E) 04-04-0000 Scotland |
| 56 | SA Pacific Standard Time | (E) 04-04-0122 British, L.A., Chile |
| 24 | Eastern Standard Time | (E) 04-04-2322 East American India and Canada |
| 70 | US Eastern Standard Time | (E) 04-04-2322 India (East) |
| 15 | Central American Standard Time | (E) 04-04-0000 Central America |
| 23 | Central Standard Time | (E) 04-04-0000 Central USA and Canada |
| 23 | Central American National Standard | (E) 04-04-2322 England, Morocco City, Switzerland |
| 11 | Canaria Central Standard Time | (E) 04-04-2322 Southeastern Republic |
| 71 | LS Mountain Standard Time | (E) 04-04-2322 Australia |
| 53 | Mountain Standard Time (Asia) | (E) 04-04-2322 China, Japan, Mongolia |
| 34 | Stratian Standard Time | (E) 04-04-2322 Mauritius (Jahili and Canada) |
| 55 | Pacific Standard Time | (E) 04-04-0000 Pacific State USA and Canada, France |
| 82 | Arabic Standard Time | (E) 04-04-0000 Australia |
| 13 | Western Standard Time | (E) 04-04-0000 Western |
| 54 | Summe Standard Time | (E) 04-04-2322 Belarus and Sierra, Suriname |
| CME | TIME (A) | TIME | ||
| 15 | Green, Silver and Tin Time | 2007/12/24:00:00:00 | ||
| 16 | 8000 Second Tin | 2007/12/24:00:00:00 Tenth, Black, Black, White, Black | ||
| 17 | Aluminum Standard Tin | 2007/11/26:00:00:00, Black, Black, White, Black, White, Black | ||
| 18 | Central Aluminum Standard Tin | 2007/10/18:00:00:00, Black, Black, White, Black, Black, Black | ||
| 19 | Brown Ironed Tin | 2007/10/18:00:00:00, Black, Black, White, Black, Black | ||
| 20 | Central Ironed Sodium Tin | 2007/10/18:00:00:00, Black, Black, White, Black, Black, Black | ||
| 21 | M. Central Iron Standard Tin | 2007/10/18:00:00:00, Black, Black, Black, Black, Black, Black | ||
| 22 | Tin Standard Tin | 2007/10/18:00:00:00, Black, Black, Black, Black, Black, Black | ||
| 23 | Gold Standard Tin | 2007/10/18:00:00:00, Black, Black, Black, Black, Black, Black, Black | ||
| 24 | Sodium Iron and Tin | 2007/10/18:00:00:00, Black, Black, Black, Black, Black, Black, Black, Black | ||
| 25 | Lithium Standard Tin | 2007/10/18:00:00:00, Black, Black, Black, Black, Black, Black, Black, Black, Black | ||
| 26 | Sand Standard Tin | 2007/10/18:00:00:00, Black, Black, Black, Black, Black, Black, Black, Black | ||
| 27 | Orange Ironed Tin | 2007/10/18:00:00:00, Black, Black, Black, Black, Black, Black, Black, Black, Black | ||
| 28 | Yellow Ironed Tin | 2007/10/18:00:00:00, Black, Black, Black, Black, Black, Black, Black, Black, Black, Black | ||
| 29 | Ammonia Standard Tin | 2007/10/18:00:00:00, Black, Black, Black, Black, Black, Black, Black, Black, Black, Black, Black | ||
| 30 | Aspartate Iron and Tin | 2007/10/18:00:00:00, Black, Black, Black, Black, Black, Black, Black, Black, Black, Black, Black, Black, Black, Black, Black, Black, Black, Black, Black, Black, Black, Black, Black, Black, Black, Black, Black, Black, Black, Black, Black, Black, Black, Black, Black, Black, Black, Black, Black, Black, Black, Black, Black, Black, Black, Black, Black, Black, Black, Black, | ||
| 31 | European Iron and Tin | 2007/10/18:00:00:00, Black, Black, Black, Black, Black, Black, Black, Black, Black, Black, Black, Black, Black, Black, Black, Black, Black, Black, Black, Black, Black, Black, Black, Black, Black, Black, Black, Black, Black, Black, Black, Black, Black, Black, Black, Black, Black, Black | 2007/10/18:00:00:00, Black, Black, Black, Black, Black, Black, Black, Black, Black, Black, Black, Black, Black, Black, Black, Black, Black, Black, Black, Black, Black, Black, Black, Black, Black, Black, Black, Black, Black, Black, Black, Black, Black, Black, Black, Black, Black, Black, Black, | |
| 32 | Carbon Standard Tin | 2007/10/18:00:00:00, Black, Black, Black, Black, Black, Black, Black, Black, Black, Black, Black, Black, Black, Black, Black, Black, Black, Black, Black, Black, Black, Black, Black, Black, Black, Black, Black, Black, Black, Black, Black, Black, Black, Black, Black, Black, Black, Black, Black | 2007/10/18:00:00:00, Black,Black, Black, Black, Black, Black, Black, Black, Black, Black, Black, Black, Black, Black, Black, Black, Black, Black, Black, Black, Black, Black, Black, Black, Black, Black, Black, Black, Black, Black, Black, Black, Black, Black, Black, Black, Black, Black, Black, Black, Black, Black, Black, Black, Black, Black, Black, Black, Black, Black, Black,Black, Black, Black, Black, Black, Black, Black, Black, Black, Black, Black, Black, Black, Black, Black, Black, Black, Black, Black, Black, Black, Black, Black, Black, Black, Black, Black, Black, Black, Black, Black, Black, Black, Black, Black, Black, Black, Black, Black, Black, Black, Black, Black, Black, Black, Black, Black, Black,Black, Black,Black, Black, Black, Black, Black, Black, Black, Black, Black, Black, Black, Black, Black, Black, Black, Black, Black, Black, Black, Black, Black, Black, Black, Black, Black, Black, Black, Black, Black, Black, Black, Black, Black, Black, Black, Black, Black, Black, Black, Black, Black, Black, Black, Black, Black, Black, Black, Black, |
TIME ZONE LIST
| 0021. NO. 2022. 1974 | |
| 13 | Avei Standard Time (2021.15.28) Demand, Lazer, Jardan |
| 13.1 | Avei Standard Time (MEN(2021.03.28) Demand, Lazer, Jardan, Jardan, Jardan) |
| 13.2 | Mega Standard Time (2021.12.28) Standard |
| 13.3 | V. Central Standard Time (2021.20.28) Kandy, Kandy |
| 13.4 | Menderson Limited (2021.06.28) Kandy, Kandy |
| 13.5 | S. Leno Standard Time (2021.06.28) S. Leno Standard |
| 13.6 | Vestrian Standard Time (2021.03.28) Vestrian Standard |
| 13.7 | Avei Standard Time (MEN(1999.03.28) Meningk, Kandy, Kandy) |
| 13.8 | Menderson Limited Time (2021.03.28) Meningk, Kandy |
| 13.9 | China Standard Time (2021.03.28) Beijing, Beijing, Hong Kong SAR, Chongyi |
| 13.10 | Nort Asia East Standard Time (2021.03.28) Nort Asia East Standard |
| 13.11 | Bogoma Standard Time (MEN(1999.03.28) Bogota, Bogota, Bogota) |
| 13.12 | Australia Limited Time (2021.06.28) Australia |
| 13.13 | Taiwan Standard Time (2021.03.28) Taiwan |
| 13.14 | Tang Standard Time (MEN(1999.03.28) Tanaka, Tanaka, Tanaka) |
| 13.15 | Capea Limited Time (2021.03.28) Capea |
| 13.16 | Koohai Standard Time (2021.03.28) Kohai |
| 13.17 | Cai, Australia Standard Time (2021.03.28) Cai, Australia |
| 13.18 | A.S. Center Standard Time (2021.03.28) A.S. Center |
| 13.19 | E. Australia Standard Time (2021.03.28) E. Australia |
| 13.20 | A.S. London Standard Time (2021.03.28) A.S. London Standard, London, London |
| 13.21 | Majia Standard Time (2021.03.28) Majaia, Majaia |
| 13.22 | Tianana Standard Time (2021.03.28) Tianana |
| 13.23 | Vadapazak Standard Time (2021.03.28) Vadapazak |
| 13.24 | Central Bank Standard Time (2021.10.28) Central Bank Standard, Central Bank, Central Bank |
| CODE | ITEMS | ITEM |
| 50 | Kana Jazenda Standard Time | ISMT17-231 Auckland, Wellington |
| 51 | Fiji Standard Time | ISMT+6201(Fiji) Samba, Kandhaka, Marshall Islands |
| 65 | Tonga Standard Time | ISMT+18 301 Nusa/Saiya |
Adventure 1/3/5/7 Operation Guide Rev. 1.1 | © 2015 Johnson Health Tech Made in China
Adventure 1/3/5/7 Bedienungsanleitung Ver. 1.1 | © 2015 Johnson Health Tech Hergestellt in China