
Comfort R - Exercise bike Horizon Fitness - Free user manual and instructions
Find the device manual for free Comfort R Horizon Fitness in PDF.

User questions about Comfort R Horizon Fitness
0 question about this device. Answer the ones you know or ask your own.
Ask a new question about this device
Download the instructions for your Exercise bike in PDF format for free! Find your manual Comfort R - Horizon Fitness and take your electronic device back in hand. On this page are published all the documents necessary for the use of your device. Comfort R by Horizon Fitness.
USER MANUAL Comfort R Horizon Fitness
Read the BIKE GUIDE before using this OWNER'S MANUAL.
SAVE THESE INSTRUCTIONS
When using an exercise product, basic precautions should always be followed, including the following: Read all instructions before using this exercise bike. It is the responsibility of the owner to ensure that all users of this exercise bike are adequately informed of all warnings and precautions. If you have any questions after reading this owner's manual, contact Customer Tech Support at the number listed on the back panel.


WARNING
READ AND SAVE ALL INSTRUCTIONS BEFORE ASSEMBLING OR USING THIS EXERCISE BIKE. IT IS STRONGLY RECOMMENDED TO TAKE THE FOLLOWING SAFETY INSTRUCTIONS.
- CAUTION: If you experience chest pains, nausea, dizziness or shortness of breath, stop exercising immediately and consult your physician before continuing.
- Use this exercise bike for its intended purpose as described in this manual. Do not use attachments that have not been recommended by the manufacturer.
- Never operate the exercise bike if it is not working properly, or if it has been damaged. Contact Customer Tech Support on the authorized dealers for examination and repair.
-
Do not use the exercise bike without proper footwear. NEVER operate the exercise bike with bare feet.
-
Do not wear any clothing that might catch on any moving parts of this exercise bike.
-
Keep hands and feet clear at all times from moving parts to avoid injury. Never turn the pedal cranks by hand.
- Do not dismount the exercise bike until the pedals are at a complete STOP.
- Do not attempt to ride the exercise bike in a standing position at high RPMs until you have practiced at slower speeds.
- Do not insert any object, hands or feet into any openings, or expose hands, arms or feet to the drive mechanism or other potentially moving part of the exercise bike.
- Do not use any equipment that is damaged or has worn or broken parts. Use only replacement parts supplied by Customer Tech Support or the authorized dealers.
- Do not operate where aerosol (spray) products are being used or when oxygen is being administered.
- Close supervision is necessary when used near children, invalids or disabled people.
- When the exercise bike is in use, young children and pets should be kept at least 3 meters / 10 feet away.
- Ensure that adjustment levers (seat and handlebar fore-and-aft) are properly secured and do not interfere with range of motion during exercise.
- This product contains chemicals known to the State of California to cause cancer and birth defects or other reproductive harm.
ASSEMBLY


WARNING
There are several areas during the assembly process that special attention must be paid. It is very important to follow the assembly instructions correctly and to make sure all parts are firmly tightened. If the assembly instructions are not followed correctly, the exercise bike could have parts that are not tightened and will seem loose and may cause irritating noises. To prevent damage to the exercise bike, the assembly instructions must be reviewed and corrective actions should be taken.
Before proceeding, find your exercise bike's serial number and enter it in the space provided below. The serial number will be located on a white sticker with a bar code.
ENTER YOUR SERIAL NUMBER AND MODEL NAME IN THE BOX BELOW:
SERIAL NUMBER:
MODEL NAME: HORIZON
EXERCISE BIKE
SERIAL NUMBER LOCATION
» Refer to the SERIAL NUMBER and MODEL NAME when calling for service.
» Be sure to enter both the SERIAL NUMBER and MODEL NAME on your warranty card.


COMFORT R PRE ASSEMBLY
UNPACKING
Unpack the product where you will be using it. Place the bike carton on a level flat surface. It is recommended that you place a protective covering on your floor. Never open box when it is on its side.

IMPORTANT NOTES
- During each assembly step, ensure that ALL nuts and bolts are in place and partially threaded. It is recommended you complete the full assembly of your unit before completely tightening any ONE bolt.
- Several parts have been pre-lubricated to aid in assembly and usage. Please do not wipe this off. If you have difficulty, a light application of lithium bike grease is recommended.

NEED HELP?
If you have questions or if there are any missing parts, contact Customer Tech Support. Contact information is located on the back panel of this manual.
TOOLS INCLUDED:
13/15mm Flat Wrench
Phillips Screwdriver/Allen Wrench
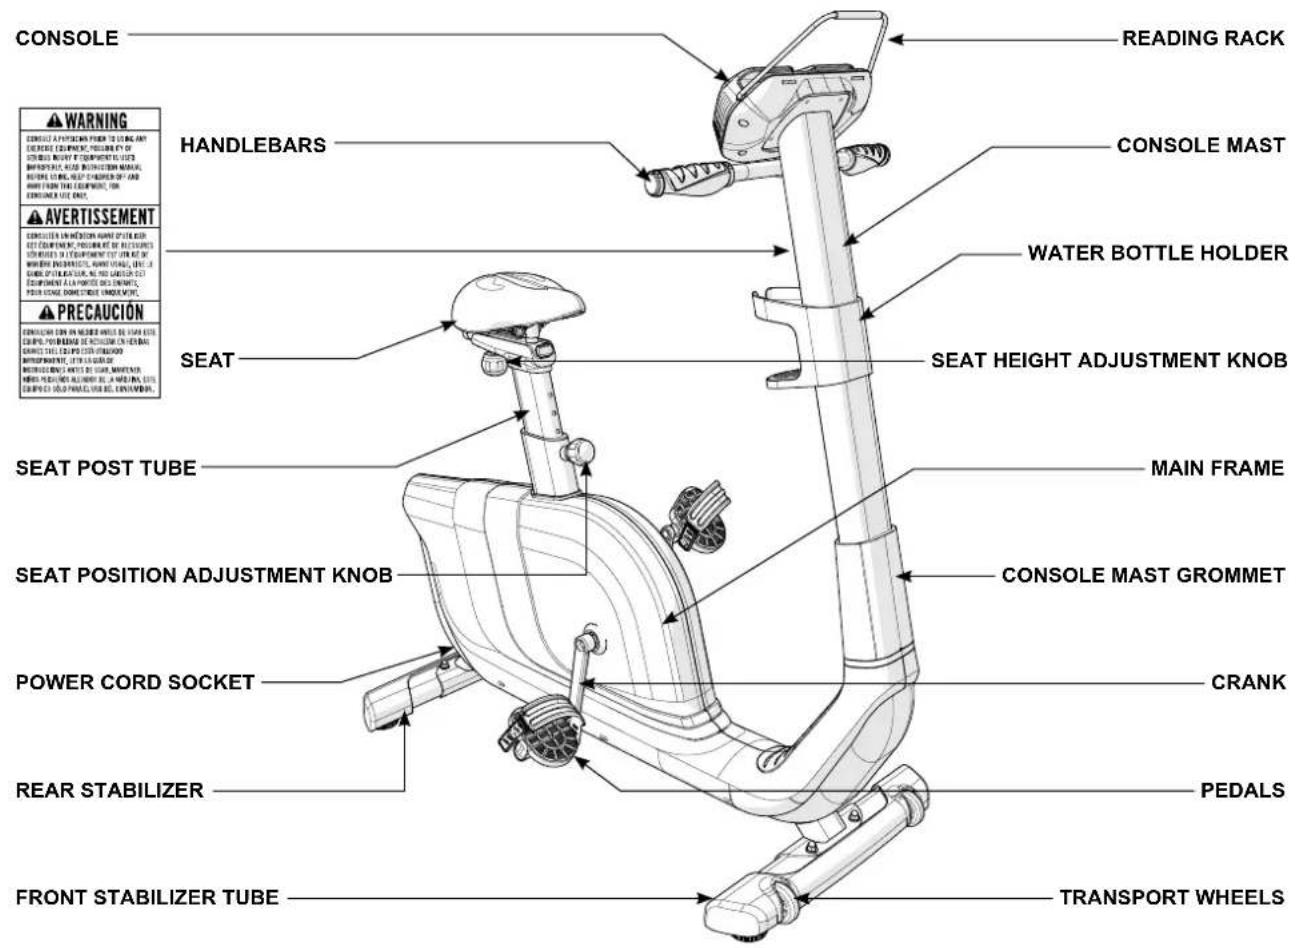
PARTS INCLUDED:
1 Main Frame
□ 1 Console
□1 Console Mast
□ 1 Console Mast Grommet
1 Water Bottle Holder
1 Front Stabilizer
1 Rear Stabilizer
1 Seat Base
1 Seat Back
1 Seat Frame
1 Seat Frame Cover
1 Pulse Grip Handlebars
2 Pedals with Straps
1 Audio Adapter Cable
1 Power Cord
1 Hardware Kit

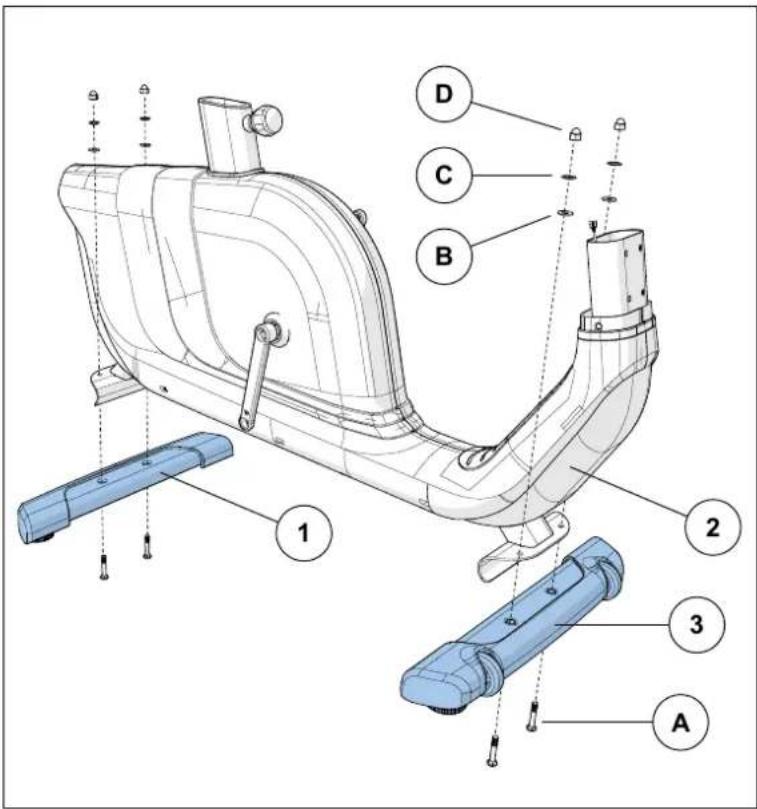
COMFORT R ASSEMBLY STEP 1

| HARDWARE FOR STEP 1 | |||
| PART TYPE DESCRIPTION QTY | |||
| A BOLT M8X56 4 | |||
| B FLAT WASHER Φ18X2.0T | 4 | ||
| C | SPRING WASHER | M8X2.0T | 4 |
| D | NUT | M8 | 4 |
A Open HARDWARE FOR STEP 1.
B Attach the REAR STABILIZER (1) to the MAIN FRAME (2) using 2 BOLTS (A), 2 FLAT WASHERS (B), 2 SPRING WASHERS (C) and 2 NUTS (D).
C Attach the FRONT STABILIZER (3) to the MAIN FRAME (2) using 2 BOLTS (A), 2 FLAT WASHERS (B), 2 SPRING WASHERS (C) and 2 NUTS (D).
COMFORT R ASSEMBLY STEP 2
| HARDWARE FOR STEP 2 | |||
| PART TYPE DESCRIPTION QTY | |||
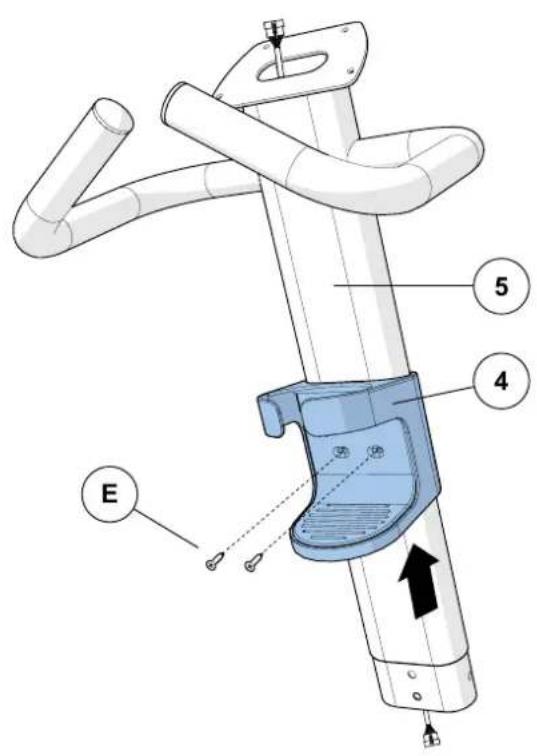
| E SCREW M4X12 2 | |||
A Open HARDWARE FOR STEP 2.
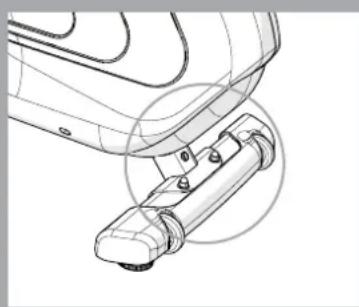
B Slide WATER BOTTLE HOLDER (4) up CONSOLE MAST (5) and align screw holes in WATER BOTTLE HOLDER (4) with holes in CONSOLE MAST (5).
C Attach the WATER BOTTLE HOLDER (4) using 2 SCREWS (E).

COMFORT R ASSEMBLY STEP 3

| HARDWARE FOR STEP 3 | |||
| PART TYPE DESCRIPTION QTY | |||
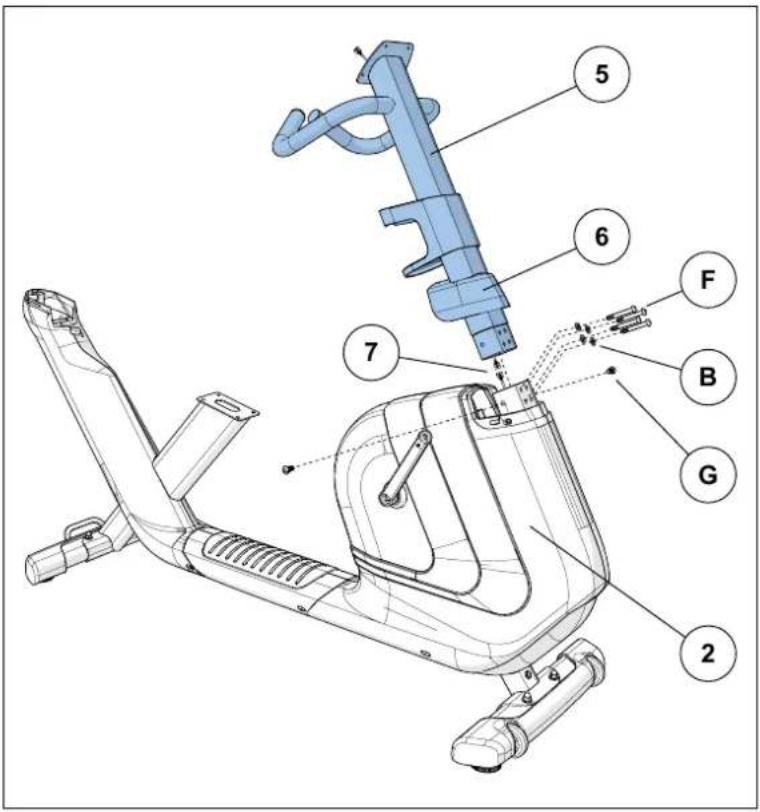
| F BOLT M8X60 4 | |||
| B FLAT WASHER Φ18X2.0T | 4 | ||
| G | BOLT | MBX18 | 2 |
A Open HARDWARE FOR STEP 3.
B Slide CONSOLE MAST GROMMET (6) from the bottom up the CONSOLE MAST (5).
C Attach CONSOLE CABLES (7) and carefully tuck all cables into MAIN FRAME (2). Slide CONSOLE MAST (5) into MAIN FRAME (2).
D Attach the CONSOLE MAST (5) using 4 BOLTS (F) and 4 FLAT WASHERS (B) from the front and 2 BOLTS (G) and from the sides.
E Slide CONSOLE MAST GROMMET (6) down over MAIN FRAME (2).
COMFORT R ASSEMBLY STEP 4
| HARDWARE FOR STEP 4 | |||
| PART TYPE DESCRIPTION QTY | |||
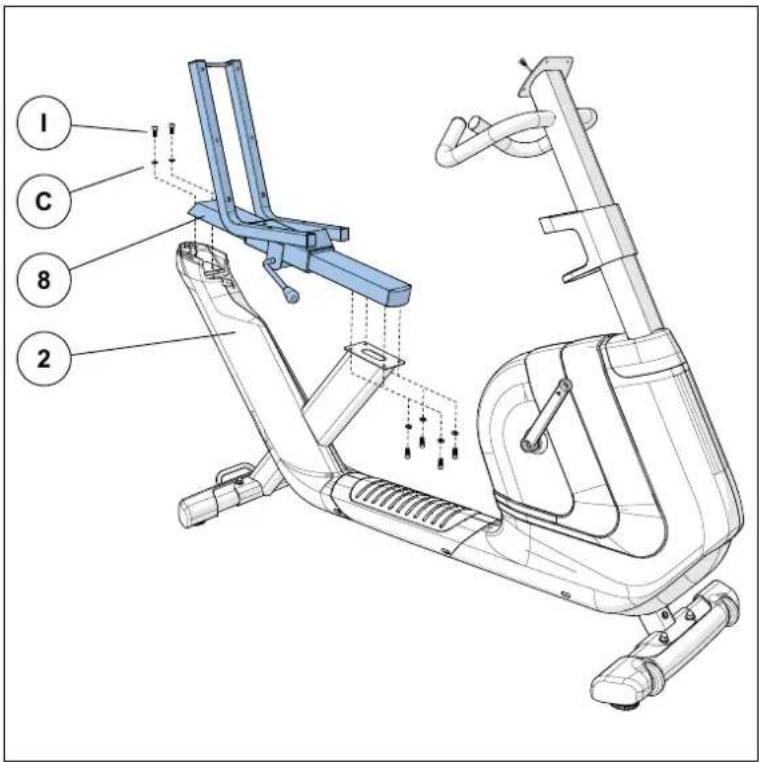
| I BOLT M8X18 6 | |||
| C SPRING WASHER M8X2.0T 6 | |||

A Open HARDWARE FOR STEP 4.
B Attach SEAT FRAME (8) to the MAIN FRAME (2) using 6 BOLTS (I) and 6 SPRING WASHERS (C) as shown.

COMFORT R ASSEMBLY STEP 5

| HARDWARE FOR STEP 5 | |||
| PART TYPE DESCRIPTION QTY | |||
| J BOLT M8X45 8 | |||
| B FLAT WASHER Φ18X2.0T | 8 | ||
A Open HARDWARE FOR STEP 5.
B Attach SEAT BASE (9) to SEAT FRAME (8) using 4 BOLTS (J) and 4 FLAT WASHERS (B).
C Attach SEAT BACK (10) to SEAT FRAME (8) using 4 BOLTS (J) and 4 FLAT WASHERS (B).
COMFORT R ASSEMBLY STEP 6
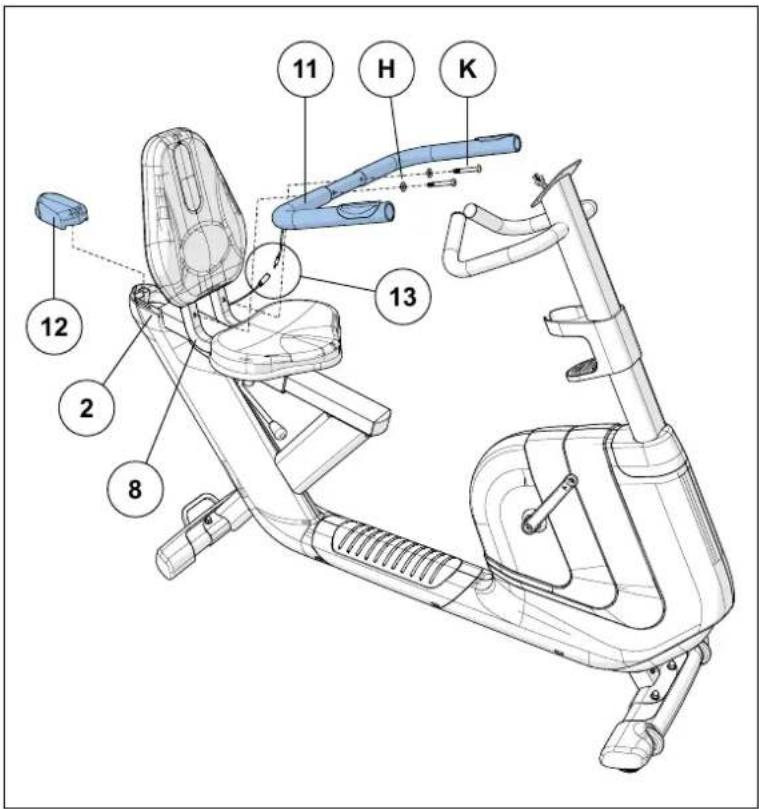
| HARDWARE FOR STEP 6 | |||
| PART TYPE DESCRIPTION QTY | |||
| K BOLT M10X65 2 | |||
| H ARC WASHER Φ20X2.0T 2 | |||

A Open HARDWARE FOR STEP 6.
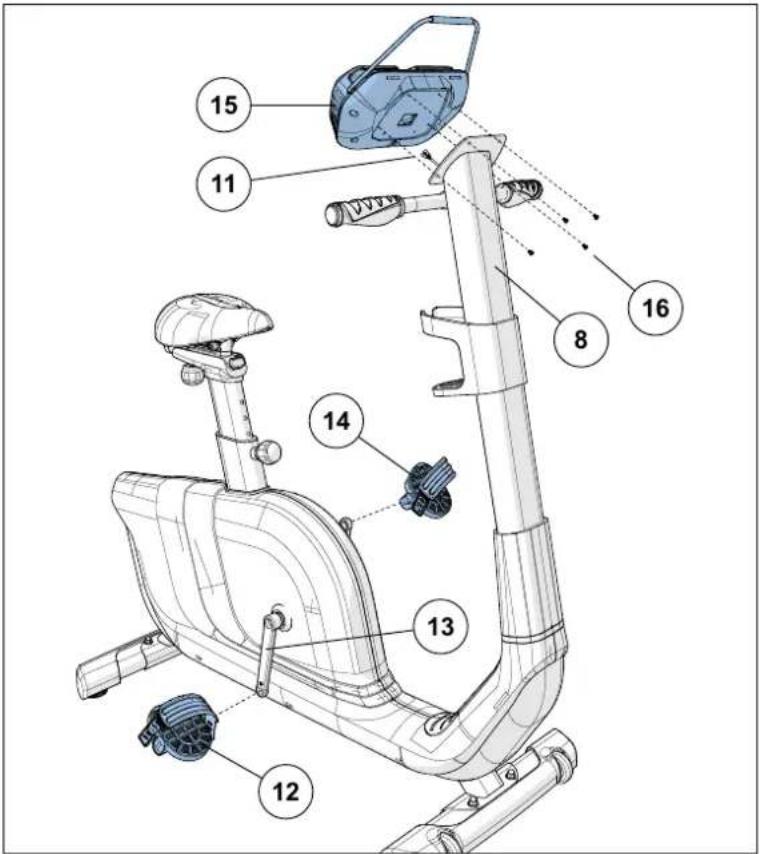
B Attach PULSE GRIP HANDLEBARS (11) to the SEAT FRAME (8) using 2 BOLTS (K) and 2 ARC WASHERS (H).
C Attach SEAT FRAME COVER (12) to MAIN FRAME (2) as shown.
D Attach HEART RATE WIRE (13) from PULSE GRIP HANDLEBARS (11) to wire from MAIN FRAME (2).
Note: Be sure to assemble handlebars with pulse grips facing up.

COMFORT R ASSEMBLY STEP 7
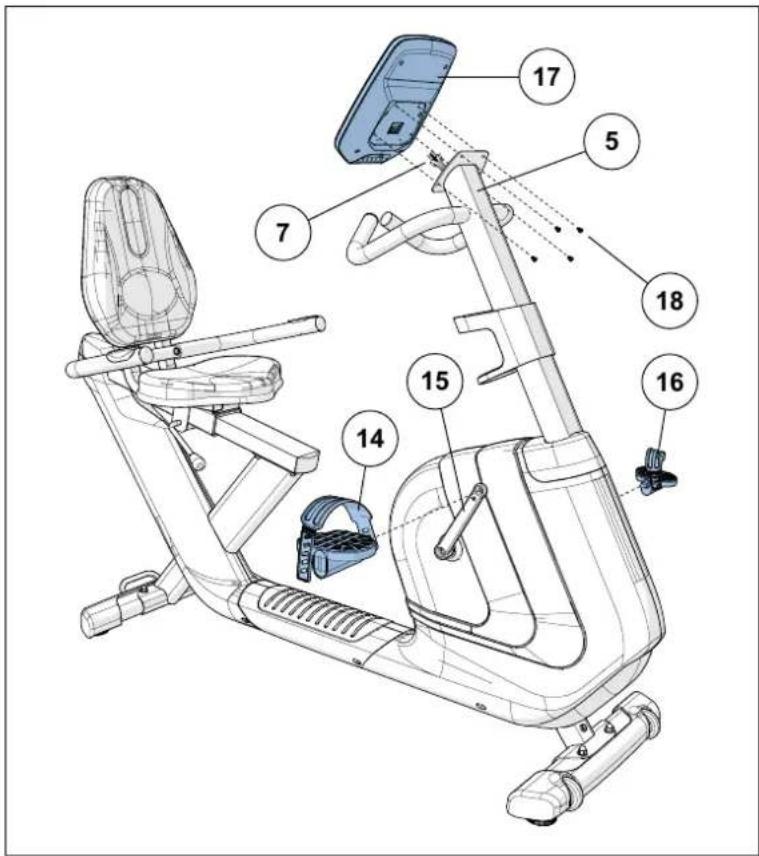
HARDWARE IS PRE-INSTALLED
A Attach the RIGHT PEDAL (14) to the RIGHT CRANK ARM (15), tightening it clockwise with the provided 13mm / 15mm flat wrench.
B Attach the LEFT PEDAL (16) onto the left crank arm, tightening it counter-clockwise with the provided 13mm / 15mm flat wrench. (NOTE: The left crank arm is reversed threaded so it is very important that it is tightened counter-clockwise. Tightening it the opposite way can damage the pedal or the crank arm or both.)
C Connect the CONSOLE CABLES (7) and carefully tuck into the CONSOLE MAST (5).
D Attach the CONSOLE (17) to the CONSOLE MAST (5) using 4 PRE-INSTALLED SCREWS (18).
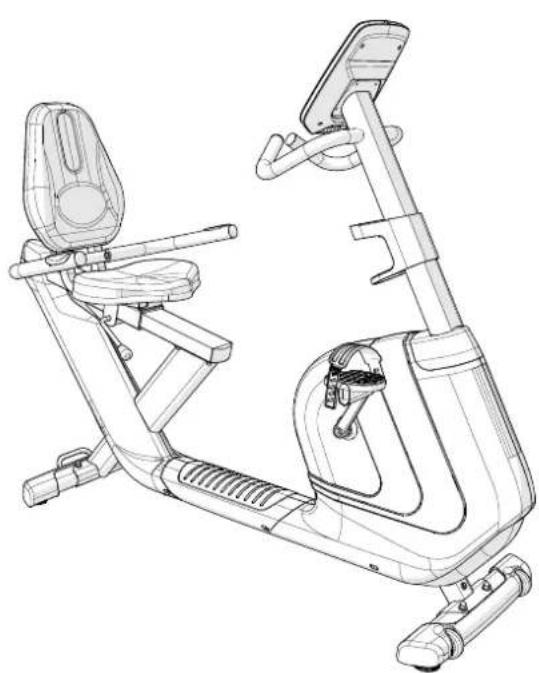
COMFORT R ASSEMBLY COMPLETE!
COMFORT R COMFORT U
Assembly on next page.


COMFORT U PRE ASSEMBLY
UNPACKING
Unpack the product where you will be using it. Place the bike carton on a level flat surface. It is recommended that you place a protective covering on your floor. Never open box when it is on its side.

IMPORTANT NOTES
- During each assembly step, ensure that ALL nuts and bolts are in place and partially threaded. It is recommended you complete the full assembly of your unit before completely tightening any ONE bolt.
- Several parts have been pre-lubricated to aid in assembly and usage. Please do not wipe this off. If you have difficulty, a light application of lithium bike grease is recommended.

NEED HELP?
If you have questions or if there are any missing parts, contact Customer Tech Support. Contact information is located on the back panel of this manual.
TOOLS INCLUDED:
13/15mm Flat Wrench
Phillips Screwdriver/Allen Wrench
PARTS INCLUDED:
1 Main Frame
□ 1 Console
□1 Console Mast
□ 1 Console Mast Grommet
1 Water Bottle Holder
1 Front Stabilizer
1 Rear Stabilizer
1 Seat
1 Seat Post Tube
2 Pedals with Straps
1 Audio Adapter Cable
1 Power Cord
1 Hardware Kit

COMFORT U ASSEMBLY STEP 1
| HARDWARE FOR STEP 1 | |||
| PART TYPE DESCRIPTION QTY | |||
| A BOLT M8X56 4 | |||
| B FLAT WASHER Φ20X2.0T | 4 | ||
| C | SPRING WASHER | M8X2.0T | 4 |
| D | NUT | M8 | 4 |
A Open HARDWARE FOR STEP 1.
B Attach the REAR STABILIZER (1) to the MAIN FRAME (2) using 2 BOLTS (A), 2 FLAT WASHERS (B), 2 SPRING WASHERS (C) and 2 NUTS (D).
C Attach the FRONT STABILIZER (3) to the MAIN FRAME (2) using 2 BOLTS (A), 2 FLAT WASHERS (B), 2 SPRING WASHERS (C) and 2 NUTS (D).
COMFORT U ASSEMBLY STEP 2
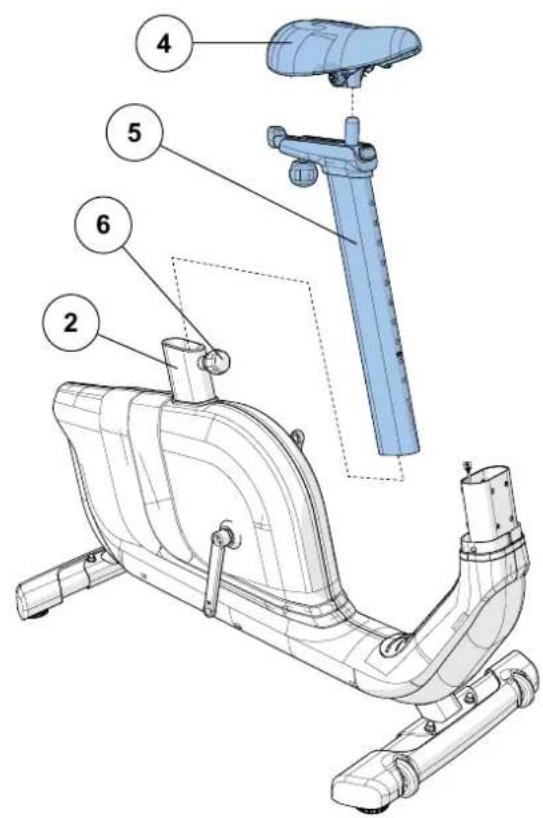
NO HARDWARE FOR THIS STEP
A Attach the SEAT (4) to the SEAT POST TUBE (5).
B Loosen the SEAT HEIGHT ADJUSTMENT KNOB (6) by turning it two half turns counter-clockwise.
C Then pull the SEAT HEIGHT ADJUSTMENT KNOB (6) outward while sliding the SEAT POST TUBE (5) into the MAIN FRAME (2).

COMFORT U ASSEMBLY STEP 3


| HARDWARE FOR STEP 3 | |||
| PART TYPE DESCRIPTION QTY | |||
| G SCREW M4X12 2 | |||
A Open HARDWARE FOR STEP 3.
B Slide WATER BOTTLE HOLDER (7) up CONSOLE MAST (8) and align screw holes in WATER BOTTLE HOLDER (7) with holes in CONSOLE MAST (8).
C Attach the WATER BOTTLE HOLDER (7) using 2 SCREWS (G).
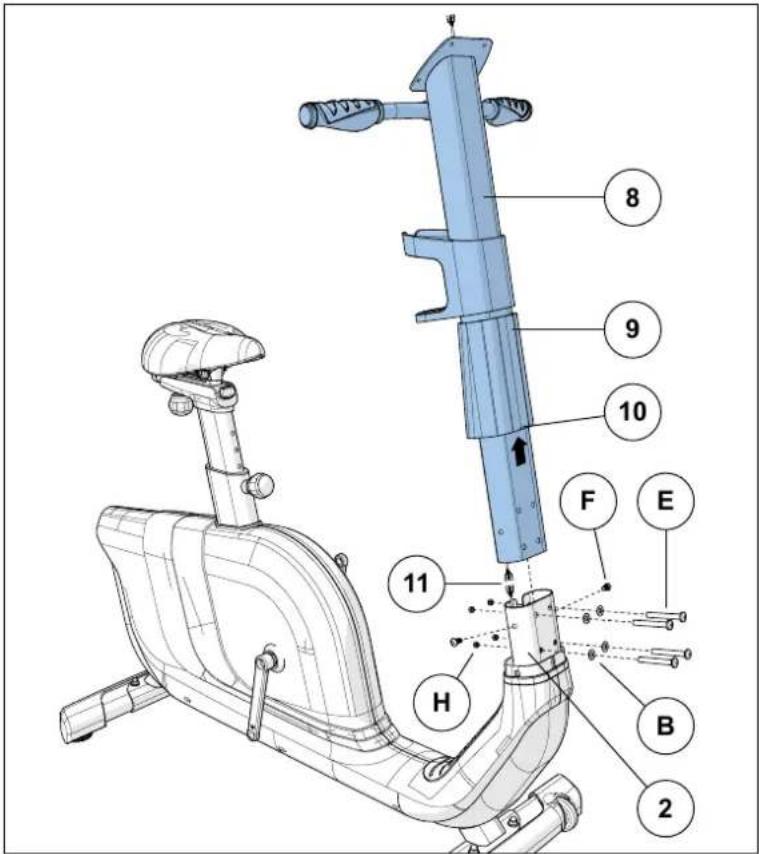
COMFORT U ASSEMBLY STEP 4
| HARDWARE FOR STEP 4 | |||
| PART TYPE DESCRIPTION QTY | |||
| E BOLT M8X60 4 | |||
| B FLAT WASHER Φ20X2.0T | 4 | ||
| F | BOLT | M8X15 | 2 |
| H | NUT | M8 | 4 |

A Open HARDWARE FOR STEP 4.
B Slide CONSOLE MAST GROMMET (9) from the bottom up the CONSOLE MAST (8) with the small POSITIONING NOTCH (10) facing forward.
C Attach CONSOLE CABLES (11) and carefully tuck all cables into MAIN FRAME (2). Slide CONSOLE MAST (8) into MAIN FRAME (2).
D Attach the CONSOLE MAST (8) using 4 BOLTS (E), 4 FLAT WASHERS (B) and 4 NUTS (H) from the front and 2 BOLTS (F) and from the sides.
E Slide CONSOLE MAST GROMMET (9) down over MAIN FRAME (2).
COMFORT U ASSEMBLY STEP 5

HARDWARE IS PRE-INSTALLED
A Open HARDWARE FOR STEP 5.
B Attach the RIGHT PEDAL (12) to the RIGHT CRANK ARM (13), tightening it clockwise with the provided 13mm / 15mm flat wrench.
C Attach the LEFT PEDAL (14) onto the left crank arm, tightening it counter-clockwise with the provided 13mm / 15mm flat wrench. (NOTE: The left crank arm is reversed threaded so it is very important that it is tightened counter-clockwise. Tightening it the opposite way can damage the pedal or the crank arm or both.)
D Connect the CONSOLE CABLE (11) and carefully tuck into the CONSOLE MAST (8).
E Attach the CONSOLE (15) to the CONSOLE MAST (8) using 4 PRE-INSTALLED SCREWS (16).
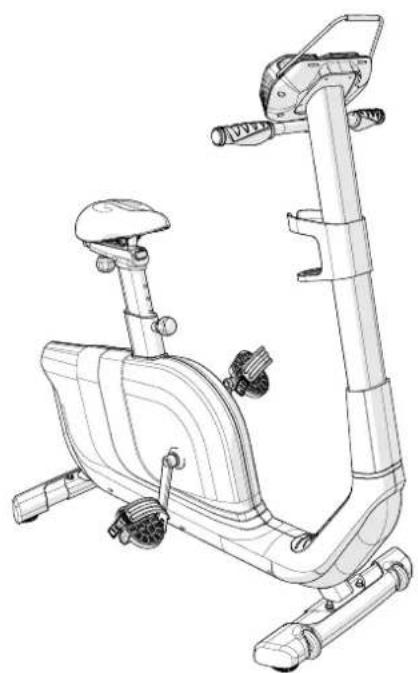
COMFORT U ASSEMBLY COMPLETE!
BIKE OPERATION

This section explains how to use your bike's console and programming.
The BASIC OPERATION section in the BIKE GUIDE has instructions for the following:
- LOCATION OF THE BIKE
- POWER/GROUNDING INSTRUCTIONS
- SEAT POSITIONING
MOVING THE BIKE
LEVELING THE BIKE - USING THE HEART RATE FUNCTION

Note: There is a thin protective sheet of clear plastic on the overlay of the console that should be removed before use.
A) LCD DISPLAY WINDOW: time, distance, calories, watts, RPM, speed, heart rate, Energy Saver.
B) START/STOP: used to start, stop, or pause your workout.
c) KEYS: used to cycle through programs, programming setup and to adjust resistance level during workout.
D) ENTER: used to confirm selection during program setup.
E) CHANGE DISPLAY: used to change display feedback during workout.
F) AUDIO IN JACK: plug your media player into the console using the included audio adaptor cable.
G) SPEAKERS: play music through speakers when connected to your media player.
H) READING RACK: holds reading material.


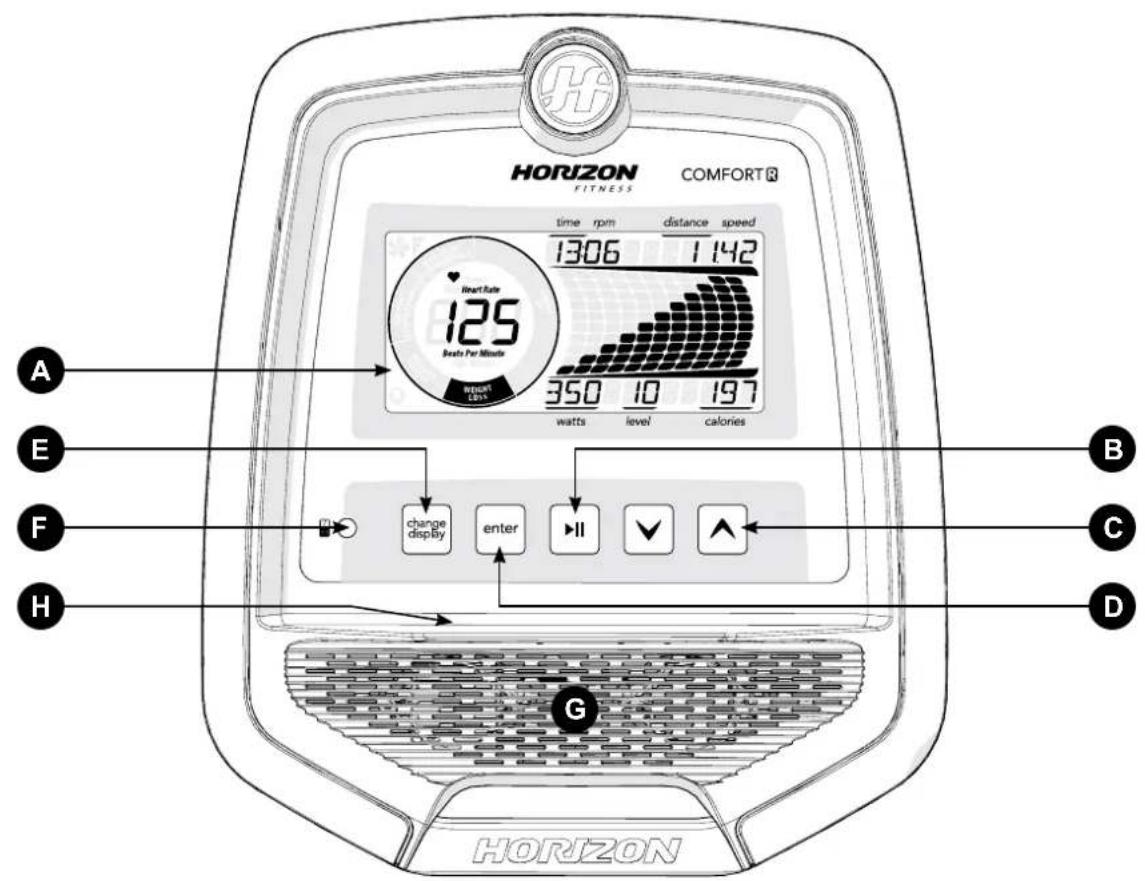
Note: There is a thin protective sheet of clear plastic on the overlay of the console that should be removed before use.
A) LCD DISPLAY WINDOW: time, distance, calories, watts, RPM, speed, heart rate, Energy Saver.
B) START/STOP: used to start, stop, or pause your workout.
c) KEYS: used to cycle through programs, programming setup and to adjust resistance level during workout.
D) ENTER: used to confirm selection during program setup.
E) CHANGE DISPLAY: used to change display feedback during workout.
F) THUMB PULSE: monitors heart rate.
G) AUDIO IN JACK: plug your media player into the console using the included audio adaptor cable.
H) SPEAKERS: play music through speakers when connected to your media player.
I) READING RACK: holds reading material.


COMFORTU DISPLAY
COMFORT R DISPLAY
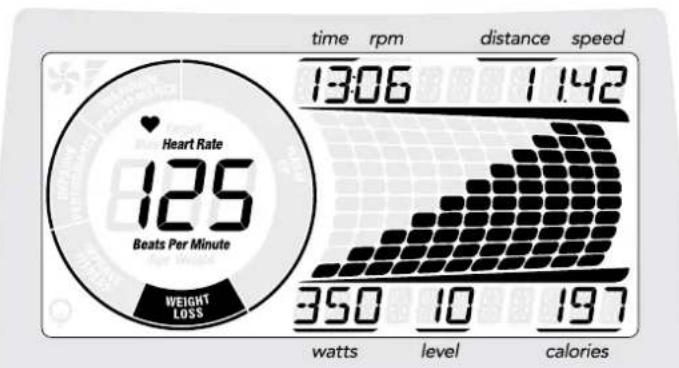
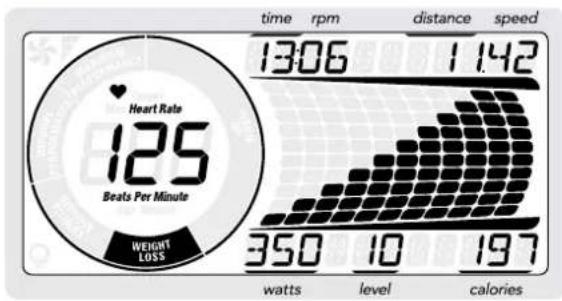
DISPLAY WINDOW
- TIME: Shown as minutes : seconds. View the time remaining or the time elapsed in your workout.
- RPM: Rotations Per Minute
- DISTANCE: Shown as miles. Indicates distance traveled or distance remaining during your workout.
- SPEED: Shown as MPH. Indicates how fast foot pads are moving.
WATTS: Displays current user power output.
LEVEL: Shows the current level of resistance. - CALORIES: Total calories burned during your workout.
-
HEART RATE: Shown as BPM (beats per minute). Used to monitor your heart rate.
-
COMFORT R: displayed when contact is made with both pulse grips.
-
COMFORT U: displayed when thumb is pressed to the thumb pulse monitor.
-
MAXIMUM HEART RATE: Shown at the beginning of your workout. Calculated by (220-age) x 0.85.
-
HEART RATE WHEEL: Displays what activity zone you are in during your workout.
-
WARM UP: 0-60% of maximum heart rate
- WEIGHT LOSS: 60-70% of maximum heart rate
- IMPROVE FITNESS: 70-80% of maximum heart rate
- IMPROVE PERFORMANCE: 80-90% of maximum heart rate
-
MAXIMUM PERFORMANCE: 90-100% of maximum heart rate
-
ENERGY SAVER: Indicates when the machine is in Energy Saver mode to conserve power consumption


GETTING STARTED
1) Check to make sure no objects are nearby that will hinder the movement of the exercise bike.
2) Plug in the power cord.
3) Select Guest, User 1 or User 2 using and press ENTER.
4) Set Weight using and press ENTER.
5) Set Age using and press ENTER.
6) You have the following options to start your workout:
A) QUICK START UP
Simply press to begin working out. Time, distance and calories will all count up from zero. The resistance level will default to level 1.
B) SELECT A PROGRAM
1) Select a PROGRAM using and press ENTER.
2) Set workout program information using Vsee program information for necessary settings) and press ENTER after each selection.
3) Press begin workout.
NOTE: You can adjust the resistance level during your workout.
When your workout is complete, the console will display "workout complete" and beep. Your workout information will stay displayed on the console for 30 seconds and then reset.
TO RESET THE CONSOLE
Press and hold for 3 seconds.
TO CLEAR CURRENT SELECTION
To clear the current program selection or screen, press and hold for 3 seconds.
PROGRAM INFORMATION
MANUAL: Adjust your resistance manually during your workout. User sets time and resistance using and ENTER.
INTERVALS: Promotes weight loss by increasing and decreasing the resistance, while keeping you in your fat burning zone. Time based program with 16 levels to choose from. User sets time and level using and ENTER.
GAME: A fun program that simulates a racing game where you avoid crashing into the walls. To steer the car up, you must pedal faster and to steer the car down, you reduce your pedal speed. The program will challenge you with random resistance changes. If you fall out of the RPM range you will crash into a wall. If you crash more than 10 times, the program will end. Select one of 3 levels using and ENTER.
WEIGHT LOSS: Promotes weight loss by raising and lowering the resistance level, while keeping you in your fat burning zone. Time based program with 16 levels to choose from. User sets time and level using and ENTER.
| INTERVALS | |||||||||||||||||||||
| Warm Up Prolong Segments - Repeat Cool down | |||||||||||||||||||||
| Time 4:00 Mins :30 :60 :60 :30 :30 :60 :60 :30 :30 :60 :4:00 Mins | |||||||||||||||||||||
| Segment | 123456789101112314151617181920 | ||||||||||||||||||||
| Level 1 1 | 223511551515513221 | ||||||||||||||||||||
| Level 2 1 | 2236226625226623221 | ||||||||||||||||||||
| Level 3 1 | 224733773377734221 | ||||||||||||||||||||
| Level 4 1 | 225844883448845221 | ||||||||||||||||||||
| Level 5 2 | 356955995959956532 | ||||||||||||||||||||
| Level 6 2 | 357106610161065101067532 | ||||||||||||||||||||
| Level 7 | 2358 | 11 | 7 | 11 | 7 | 11 | 7 | 11 | 7 | 11 | 7 | 7 | 11 | 11 | 7 | 8 | 5 | 3 | 2 | ||
| Level 8 2 | 35912888121888121289532 | ||||||||||||||||||||
| Level 9 3 | 4510139991391399139910543 | ||||||||||||||||||||
| Level 10 | 34 | 11 | 14 | 10 | 14 | 14 | 10 | 14 | 10 | 14 | 10 | 10 | 14 | 14 | 10 | 11 | 8 | 4 | 3 | ||
| Level 11 | 3610121511151515115151515151515151515151515151515151515151515151515151515151515151515151515151515151515151515151515151 | ||||||||||||||||||||
| Level 12 | 3610131612121616121612161612131063 | ||||||||||||||||||||
| Level 13 | 5913141713171713171713141395 | ||||||||||||||||||||
| Level 14 | 59131518141418181418141814151395 | ||||||||||||||||||||
| Level 15 | 5913161915151919151915151915161395 | ||||||||||||||||||||
| Level 16 | 591317201616202016201616202016171395 | ||||||||||||||||||||
| WEIGHT LOSS | ||||||||||||||||||||||||
| Warm Up Pro | gram Segments - Repeat Cool down | |||||||||||||||||||||||
| Time 4:00 Mins | Each segment lasts 60 seconds | 4:00 Mins | ||||||||||||||||||||||
| Segment | 1 | 2 | 3 | 4 | 5 | 6 | 7 | 8 | 9 | 10 | 11 | 12 | 13 | 14 | 15 | 16 | 17 | 18 | 19 | 20 | ||||
| Level 1 1 | 2 | 2 | 3 | 3 | 4 | 4 | 5 | 5 | 5 | 4 | 4 | 3 | 3 | 3 | 2 | 2 | 1 | |||||||
| Level 2 1 | 2 | 2 | 3 | 4 | 4 | 5 | 5 | 6 | 6 | 5 | 5 | 4 | 4 | 3 | 2 | 2 | 1 | |||||||
| Level 3 1 | 2 | 2 | 4 | 5 | 5 | 6 | 6 | 7 | 7 | 7 | 6 | 5 | 5 | 4 | 2 | 2 | 1 | |||||||
| Level 4 1 | 2 | 2 | 5 | 6 | 6 | 7 | 8 | 8 | 8 | 7 | 7 | 6 | 6 | 5 | 2 | 2 | 1 | |||||||
| Level 5 2 | 3 | 5 | 6 | 7 | 8 | 8 | 9 | 9 | 9 | 8 | 8 | 7 | 6 | 5 | 3 | 2 | ||||||||
| Level 6 2 | 3 | 5 | 7 | 8 | 8 | 9 | 10 | 10 | 10 | 9 | 9 | 8 | 8 | 7 | 5 | 3 | 2 | |||||||
| Level 7 | 2 | 3 | 5 | 8 | 8 | 9 | 9 | 9 | 10 | 10 | 10 | 11 | 11 | 11 | 11 | 11 | 10 | 10 | 9 | 9 | 8 | 5 | 3 | 2 |
| Level 8 | 2 | 3 | 5 | 9 | 9 | 10 | 10 | 10 | 11 | 11 | 11 | 12 | 12 | 12 | 12 | 12 | 11 | 11 | 10 | 10 | 9 | 5 | 3 | 2 |
| Level 9 3 | 4 | 5 | 10 | 11 | 11 | 12 | 1 | 2 | 13 | 13 | 13 | 12 | 12 | 11 | 11 | 10 | 5 | 4 | 3 | |||||
| Level 10 | 3 | 4 | 8 | 11 | 11 | 12 | 12 | 12 | 13 | 13 | 13 | 14 | 14 | 14 | 14 | 14 | 13 | 13 | 12 | 12 | 11 | 8 | 4 | 3 |
| Level 11 | 3 | 6 | 10 | 12 | 13 | 13 | 14 | 14 | 15 | 15 | 15 | 15 | 14 | 14 | 13 | 13 | 10 | 6 | 3 | |||||
| Level 12 | 3 | 6 | 10 | 13 | 14 | 14 | 15 | 15 | 16 | 16 | 16 | 16 | 15 | 15 | 14 | 14 | 13 | 10 | 6 | 3 | ||||
| Level 13 | 5 | 9 | 13 | 14 | 15 | 15 | 16 | 16 | 17 | 17 | 17 | 17 | 16 | 16 | 15 | 15 | 14 | 13 | 9 | 5 | ||||
| Level 14 | 5 | 9 | 13 | 15 | 16 | 16 | 17 | 17 | 18 | 18 | 18 | 17 | 17 | 17 | 16 | 16 | 15 | 13 | 9 | 5 | ||||
| Level 15 | 5 | 9 | 13 | 16 | 17 | 17 | 18 | 18 | 19 | 19 | 19 | 19 | 18 | 17 | 17 | 16 | 13 | 9 | 5 | |||||
| Level 16 | 5 | 9 | 13 | 17 | 18 | 18 | 19 | 19 | 20 | 20 | 20 | 19 | 19 | 18 | 18 | 17 | 13 | 9 | 5 | |||||

PROGRAM INFORMATION

ROLLING: Mimics the feeling of moving up and down hills by gradually increasing and decreasing the resistance. Time based program with 14 levels to choose from. User sets time and level using and ENTER.
CADENCE: The Cadence program is built to improve your "cadence comfort" or your comfort within a range of speed and resistance combinations. The program will vary the resistance and instruct you on how fast you should go during each segment. Time based program with 16 levels to choose from. User sets time and level using and ENTER.
H = Screen displays "High Speed" (30 seconds) M = Screen displays "Medium Speed" (45 seconds) L = Screen displays Low Speed" (90 seconds)
| ROLLING | ||||||||||||||||||||||||||||||||
| Warm Up Program | gram Segments - Repeat Cool down | |||||||||||||||||||||||||||||||
| Time 4:00 Mins Each segment lasts 30 seconds 4:00 Mins | ||||||||||||||||||||||||||||||||
| Segment 1 | 2 | 3 | 4 | 5 | 6 | 7 | 8 | 9 | 10 | 11 | 12 | 13 | 14 | 15 | 16 | 17 | 18 | |||||||||||||||
| Level 1 1 | 1 | 2 | 2 | 1 | 2 | 3 | 4 | 3 | 2 | 1 | 2 | 3 | 2 | 1 | 1 | 1 | ||||||||||||||||
| Level 2 1 | 2 | 2 | 3 | 2 | 3 | 4 | 5 | 4 | 3 | 2 | 1 | 2 | 3 | 2 | 1 | 1 | ||||||||||||||||
| Level 3 2 | 2 | 3 | 3 | 3 | 4 | 5 | 6 | 7 | 8 | 7 | 6 | 5 | 4 | 2 | 1 | 1 | ||||||||||||||||
| Level 4 2 | 3 | 3 | 4 | 4 | 5 | 6 | 7 | 8 | 9 | 8 | 7 | 6 | 5 | 3 | 1 | 1 | ||||||||||||||||
| Level 5 3 | 4 | 4 | 4 | 5 | 6 | 7 | 8 | 9 | 10 | 9 | 8 | 7 | 6 | 3 | 2 | 1 | ||||||||||||||||
| Level 6 3 | 5 | 4 | 5 | 6 | 7 | 8 | 9 | 10 | 10 | 10 | 9 | 8 | 7 | 4 | 3 | 2 | 1 | |||||||||||||||
| Level 7 4 | 5 | 5 | 5 | 7 | 7 | 8 | 8 | 9 | 9 | 10 | 10 | 9 | 8 | 4 | 3 | 2 | 1 | |||||||||||||||
| Level 8 4 | 5 | 5 | 5 | 8 | 8 | 9 | 9 | 10 | 10 | 11 | 11 | 10 | 9 | 4 | 3 | 2 | 1 | |||||||||||||||
| Level 9 4 | 5 | 5 | 5 | 9 | 9 | 10 | 10 | 11 | 11 | 12 | 12 | 11 | 10 | 5 | 4 | 3 | 1 | |||||||||||||||
| Level 10 4 | 5 | 6 | 6 | 10 | 10 | 11 | 11 | 12 | 12 | 13 | 13 | 12 | 11 | 6 | 5 | 4 | 1 | |||||||||||||||
| Level 11 4 | 5 | 7 | 7 | 11 | 11 | 12 | 13 | 13 | 14 | 14 | 13 | 12 | 6 | 5 | 4 | 1 | ||||||||||||||||
| Level 12 4 | 5 | 8 | 8 | 12 | 12 | 13 | 13 | 14 | 14 | 15 | 15 | 14 | 13 | 7 | 6 | 5 | 1 | |||||||||||||||
| Level 13 4 | 5 | 9 | 9 | 13 | 13 | 14 | 14 | 15 | 15 | 16 | 16 | 15 | 14 | 7 | 6 | 5 | 1 | |||||||||||||||
| Level 14 4 | 5 | 9 | 9 | 14 | 14 | 15 | 15 | 16 | 16 | 17 | 17 | 16 | 15 | 8 | 7 | 6 | 1 | |||||||||||||||
| CADENCE | ||||||||||||||||||||
| Warm Up | L | M | L | H | M | L | H | M | L | H | M | L | Cool Down | |||||||
| Time | 4:00 Mins | :90 | :45 | :90 | :30 | :45 | :90 | :30 | :45 | :90 | :30 | :45 | :90 | 4:00 Mins | ||||||
| Segment | 1 | 2 | 3 | 4 | 5 | 6 | 7 | 8 | 9 | 10 | 11 | 12 | 13 | 14 | 15 | 16 | 17 | 18 | 19 | 20 |
| Level 1 | 2 | 1 | 1 | 2 | 3 | 2 | 3 | 1 | 2 | 3 | 1 | 2 | 3 | 1 | 2 | 3 | 2 | 1 | 1 | 1 |
| Level 2 | 1 | 1 | 1 | 2 | 4 | 3 | 4 | 2 | 3 | 4 | 2 | 3 | 4 | 2 | 3 | 4 | 2 | 1 | 1 | 1 |
| Level 3 | 1 | 1 | 1 | 2 | 5 | 4 | 5 | 3 | 4 | 5 | 3 | 4 | 5 | 3 | 4 | 5 | 2 | 1 | 1 | 1 |
| Level 4 | 1 | 1 | 1 | 3 | 6 | 5 | 6 | 4 | 5 | 6 | 4 | 5 | 6 | 4 | 5 | 6 | 3 | 1 | 1 | 1 |
| Level 5 | 1 | 2 | 3 | 3 | 7 | 6 | 7 | 5 | 6 | 7 | 5 | 6 | 7 | 5 | 6 | 7 | 3 | 3 | 2 | 1 |
| Level 6 | 1 | 2 | 3 | 4 | 8 | 7 | 8 | 6 | 7 | 8 | 6 | 7 | 8 | 6 | 7 | 8 | 4 | 3 | 2 | 1 |
| Level 7 | 1 | 2 | 3 | 4 | 9 | 8 | 9 | 7 | 8 | 9 | 7 | 8 | 9 | 7 | 8 | 9 | 4 | 3 | 2 | 1 |
| Level 8 | 1 | 2 | 3 | 5 | 10 | 9 | 10 | 8 | 9 | 10 | 8 | 9 | 10 | 8 | 9 | 10 | 5 | 3 | 2 | 1 |
| Level 9 | 1 | 1 | 1 | 2 | 11 | 10 | 11 | 9 | 10 | 11 | 9 | 10 | 11 | 9 | 10 | 11 | 2 | 1 | 1 | 1 |
| Level 10 | 1 | 1 | 1 | 2 | 12 | 11 | 12 | 10 | 11 | 12 | 10 | 11 | 12 | 10 | 11 | 12 | 2 | 1 | 1 | 1 |
| Level 11 | 2 | 2 | 2 | 3 | 13 | 12 | 13 | 11 | 12 | 13 | 11 | 12 | 13 | 11 | 12 | 13 | 2 | 1 | 1 | 1 |
| Level 12 | 3 | 3 | 3 | 4 | 14 | 13 | 14 | 12 | 13 | 14 | 12 | 13 | 14 | 12 | 13 | 14 | 3 | 1 | 1 | 1 |
| Level 13 | 3 | 4 | 4 | 5 | 15 | 14 | 15 | 13 | 14 | 15 | 13 | 14 | 15 | 13 | 14 | 15 | 3 | 3 | 2 | 1 |
| Level 14 | 3 | 4 | 5 | 6 | 16 | 15 | 16 | 14 | 15 | 16 | 14 | 15 | 16 | 14 | 15 | 16 | 4 | 3 | 2 | 1 |
| Level 15 | 3 | 5 | 6 | 7 | 17 | 16 | 17 | 15 | 16 | 17 | 15 | 16 | 17 | 15 | 16 | 17 | 4 | 3 | 2 | 1 |
| Level 16 | 4 | 6 | 7 | 8 | 18 | 17 | 18 | 16 | 17 | 18 | 16 | 17 | 18 | 16 | 17 | 18 | 5 | 3 | 2 | 1 |
RANDOM: Provides even more workout variety by mixing up your resistance levels. Time based program with 14 levels to choose from. User sets time and level using and ENTER.
CONSTANT WATTS: User sets a watts level and tries to maintain that level throughout the workout. Resistance will adjust automatically to keep the user at the correct watts level. Time based program. User sets time and watts goal using × and ENTER.
| RANDOM | |||||||||||||||||||
| Warm Up Program | gram Segments - Repeat Cool down | ||||||||||||||||||
| Time 4:00 Mins Each segment lasts 60 seconds 4:00 Mins | |||||||||||||||||||
| Segment 1 | 2 3 | 4 5 | 6 7 8 | 9 10 | 11 12 | 13 | 14 15 | 16 | 17 18 | ||||||||||
| Level 1 1 | 1 2 | 2 1 3 | 5 2 4 | 7 2 | 3 6 | 1 1 1 | 1 1 | ||||||||||||
| Level 2 1 | 2 2 3 | 2 4 | 6 3 5 | 8 3 | 4 7 2 | 2 1 1 | 1 1 | ||||||||||||
| Level 3 2 | 2 3 3 | 3 5 | 7 4 6 | 9 4 | 5 8 3 | 2 1 1 | 1 1 | ||||||||||||
| Level 4 2 | 3 3 4 | 4 6 | 8 5 7 | 10 5 | 6 9 4 | 3 1 1 | 1 1 | ||||||||||||
| Level 5 3 | 4 4 4 | 5 7 | 9 6 8 | 11 6 | 7 10 | 5 3 | 3 2 1 | ||||||||||||
| Level 6 3 | 5 4 5 | 6 8 | 10 7 | 9 12 | 7 8 | 11 6 | 4 3 2 | 1 | |||||||||||
| Level 7 4 | 5 5 5 | 7 9 | 11 8 | 10 13 | 8 8 9 | 12 7 | 4 3 2 | 2 1 | |||||||||||
| Level 8 4 | 5 5 5 | 8 10 | 12 9 | 11 14 | 9 10 | 13 8 | 4 3 2 | 1 | |||||||||||
| Level 9 4 | 5 5 5 | 9 11 | 13 10 | 12 12 | 15 10 | 11 11 | 14 9 | 5 4 3 | 1 | ||||||||||
| Level 10 4 | 5 6 5 | 10 10 | 12 14 | 11 13 | 13 16 | 11 11 | 12 15 | 10 5 | 4 3 1 | ||||||||||
| Level 11 4 | 5 7 7 | 11 13 | 13 15 | 12 14 | 14 17 | 12 13 | 13 16 | 11 6 | 5 4 1 | ||||||||||
| Level 12 4 | 5 8 8 | 12 14 | 16 13 | 15 18 | 13 18 | 13 14 | 14 17 | 12 6 | 5 4 1 | ||||||||||
| Level 13 4 | 5 9 9 | 13 15 | 17 14 | 16 19 | 14 18 | 15 18 | 13 18 | 13 7 | 6 5 1 | ||||||||||
| Level 14 4 | 5 9 9 | 14 16 | 18 15 | 17 20 | 15 16 | 19 14 | 14 7 | 6 5 1 | |||||||||||

HEART RATE TRAINING INFORMATION
The first step in knowing the right intensity for your training is to find out your maximum heart rate (max HR = 220 - your age). The age-based method provides an average statistical prediction of your max HR and is a good method for the majority of people, especially
those new to heart rate training. The most precise and accurate way of determining your individual max HR is to have it clinically tested by a cardiologist or exercise physiologist through the use of a maximal stress test. If you are over the age of 40, overweight, have been sedentary for several years, or have a history of heart disease in your family, clinical testing is recommended. This chart gives examples of the heart rate range for a 30 year old exercising at 5 different heart rate zones. For example, a 30-year-old's max HR is 220 - 30 = 190 BPM and 90% max HR is 190 × 0.9 = 171 BPM.
| Target Heart Rate Zone | Workout Duration | Example THR Zone (age 30) | Your THR Zone | Recommended For |
| VERY HARD 90 – 100% | < 5 MIN | 171 – 190 BPM | Fit persons and for athletic training | |
| HARD 80 – 90% | 2 – 10 MIN | 152 – 171 BPM | Shorter workouts | |
| MODERATE 70 – 80% | 10 – 40 MIN | 133 – 152 BPM | Moderately long workouts | |
| LIGHT 60 – 70% | 40 – 80 MIN | 114 – 133 BPM | Longer and frequently repeated shorter exercises | |
| VERY LIGHT 50 – 60% | 20 – 40 MIN | 104 – 114 BPM | Weight management and active recovery |

PROGRAM INFORMATION
THR ZONE: Simulate the intensity of your favorite sport as the program resistance automatically adjusts to maintain a set Target Heart Rate range.
1) Select THR Zone program using and ENTER.
2) Select TIME using and ENTER.
3) The HEART RATE window will flash showing the default target heart rate of 80 beats per minute. Select your target heart rate (from heart rate training chart) using and ENTER.
4) Begin pedalling to start workout.
NOTES:
The dot matrix window displays your heart rate during exercise. The middle row represents your target heart rate (THR) and the other rows equal +/-2 heart beats. If you are working out beneath your THR, the LEDs below the middle row will illuminate. If you are over, the LEDs above the middle row will illuminate. Your current heart rate is represented by the flashing column and the window will refresh every 5 seconds.
- There is a 4-minute warm-up built into this program at level 1 resistance.
After 4 minutes, the resistance will automatically adjust to bring your heart rate within 5 beats of the target number you selected at the beginning of the program.
- If there is no heart rate detected, the unit will not change resistance levels up or down.
- If your heart rate is 25 beats over your target zone the program will shut down.
CUSTOM: Allows user to create own resistance-based workout for 15 different segments of workout. User sets time and resistance using and ENTER.
USING YOUR MEDIA PLAYER

1) Connect the included AUDIO ADAPTOR CABLE to the AUDIO IN JACK on the left of the console and the headphone jack on your media player.
2) Use your media player buttons to adjust song settings.
3) Remove the AUDIO ADAPTOR CABLE when not in use.


ENERGY SAYER (STANDBY MODE)
This machine has a special feature called Energy SaverTM mode. This mode is NOT automatically activated. When Energy Saver mode is activated, the display will automatically enter standby mode (Energy Saver mode) after 15 minutes of inactivity. This feature saves energy by disabling most power to the machine until a key is pressed on the console. This feature can be turned on or off in the engineering menu.
To enter the engineering menu, press and hold and for 3-5 seconds. Use to navigate through the menu to ENG 3. Press ENTER to select. Use to select ENRGY SVE ON or OFF. Press and hold STOP for 3-5 seconds to exit ENG 3. Press and hold STOP again for 3-5 seconds to exit the engineering menu.
LIMITED HOME-USE WARRANTY


WEIGHT CAPACITY
Comfort U = 300 lbs (136 kilograms)
Comfort R = 350 lbs (159 kilograms)
FRAME·LIFETIME
Manufacturer warrants the frame against defects in workmanship and materials for the lifetime of the original owner, so long as the device remains in the possession of the original owner. (The frame is defined as the welded metal base of the unit and does not include any parts that can be removed.)
ELECTRONICS & PARTS·1 YEAR
Manufacturer warrants the electronic components, finish and all original parts for a period of one year from the date of original purchase, so long as the device remains in the possession of the original owner.
LABOR·1 YEAR
Manufacturer shall cover the labor cost for the repair of the device for a period of one year from the date of the original purchase, so long as the device remains in the possession of the original owner.
EXCLUSIONS AND LIMITATIONS
Who IS covered:
- The original owner and is not transferable.
What IS covered: - Repair or replacement of a defective motor, electronic component, or defective part and is the sole remedy of the warranty.
What IS NOT covered: - Normal wear and tear, improper assembly or maintenance, or installation of parts or accessories not originally intended or compatible with the equipment as sold.
- Damage or failure due to accident, abuse, corrosion, discoloration of paint or plastic, neglect, theft, vandalism, fire, flood, wind, lightning, freezing, or other natural disasters of any kind, power reduction, fluctuation or failure from whatever cause, unusual atmospheric conditions, collision, introduction of foreign objects into the covered unit, or modifications that are unauthorized or not recommended by the Manufacturer.
- Incidental or consequential damages. The Manufacturer is not responsible or liable for indirect, special or consequential damages, economic loss, loss of property, or profits, loss of enjoyment or use, or other consequential damages of whatsoever nature in connection with the purchase, use, repair or maintenance of the equipment. The Manufacturer
does not provide monetary or other compensation for any such repairs or replacement parts costs, including but not limited to gym membership fees, work time lost, diagnostic visits, maintenance visits or transportation.
- Equipment used for commercial purposes or any use other than a single family or Household, unless endorsed by the Manufacturer for coverage.
- Equipment owned or operated outside the US and Canada.
- Delivery, assembly, installation, setup for original or replacement units or labor or other costs associated with removal or replacement of the covered unit.
- Any attempt to repair this equipment creates a risk of injury. The Manufacturer is not responsible or liable for any damage, loss or liability arising from any personal injury incurred during the course of, or as a result of any repair or attempted repair of your fitness equipment by other than an authorized service technician. All repairs attempted by you on your fitness equipment are undertaken AT YOUR OWN RISK and the Manufacturer shall have no liability for any injury to the person or property arising from such repairs.
- If you are out of the Manufacturer's warranty but have an extended warranty, refer to your extended warranty contract for contact information regarding requests for extended warranty service or repair.
SERVICE/RETURNS
- In-home service is available within 150 miles of the nearest authorized Service Provider (Mileage beyond 150 miles from an authorized service center is the responsibility of the consumer).
- All returns must be pre-authorized by the Manufacturer.
- Manufacturer's obligation under this warranty is limited to replacing or repairing, at the Manufacturer's option, the same or comparable model.
- Manufacturer may request defective components be returned to the Manufacturer upon completion of warranty service using a prepaid return shipping label. If you have been advised to return parts and did not receive a label, please contact Customer Tech Support.
- Replacement units, parts and electronic components reconditioned to as-new condition by the Manufacturer or its vendors may sometimes be supplied as warranty replacement and constitute fulfillment of warranty terms.
- This warranty gives you specific legal rights, and your rights may vary from state to state.

FRANÇAIS
PRECAUTIONS IMPORTANTES
INSTRUCTIONS A CONSERVER
Comfort R = 350 lbs (159 kilograms)
CADRE·A VIE
Comfort R = 350 lbs (159 kilograms)
BASTIDOR · DE POR VIDA
DO NOT RETURN TO THE RETAILER if you have any problems during assembly or if parts are missing.
For fast and friendly service, please contact one of our trained customer technicians via phone, email or our website.
We want to know if you have a problem and we want to have an opportunity to correct it for you.
NOTE: Please read the TROUBLESHOOTING section in the TREADMILL GUIDE before contacting Customer Tech Support. Additional product information is available on our website.
ATTENTION
SOUTIEN TECHNIQUE A LA CLIENTÉLE
comments@horizonfitness.com
www.horizonfitness.com
Horizon Fitness
1600 Landmark Drive,
Cottage Grove WI, 53527

See our troubleshooting and maintenance videos online at
www.youtube.com/HorizonFitness
Comfort R/Comfort U Rev.1.6
© 2020 Johnson Health Tech
Designed & Engineered in the U.S.A. Made in China